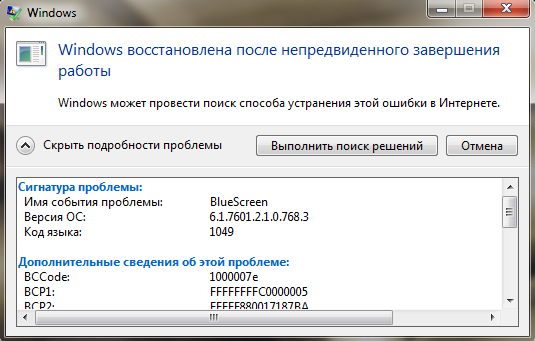
Как исправить BSoD с кодом 1000007e на Windows?
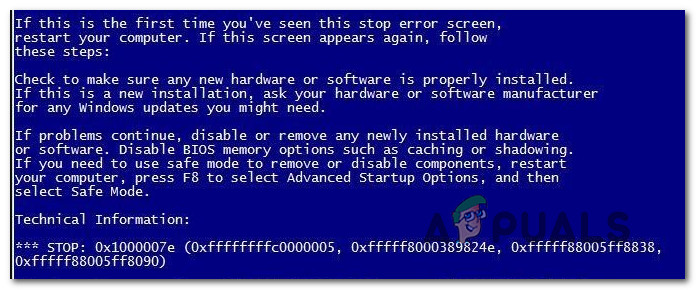
1000007e — код синего экрана смерти, которые внезапно может возникнуть на всех современных версиях ОС Windows, начиная от Windows 7 и заканчивая Windows 10. Однако наибольшее количество сообщений об этом BSoD исходит от пользователей «семерки» и «восьмерки». Увидеть код можно непосредственно после BSoD в системном сообщении, которое будет ждать вас по входу в Windows.
Что вызывает BSoD 1000007e?
Как правило, для появления этого синего экрана смерти выделяют четыре причины:
- некорректно перенесенные драйвера со старой версии Windows;
- работа антивирусного программного обеспечения;
- устаревшая версия BIOS материнской платы;
- повреждения системных файлов.
Понятное дело, BSoD 1000007e — это крайне неприятная проблема, появление которой может довольно сильно напугать неподготовленных пользователей. Тем не менее при помощи способов, расписанных ниже, вы сможете избавиться от нее в течение получаса или часа.
Способы решения BSoD 1000007e
Способ №1 Установка всех обновлений
Отсутствие определенных обновлений в Windows может вызвать набор самых разных проблем. В этот же список порой может входить и синий экран смерти, хоть и крайне редко. Мы рекомендуем попробовать вам установить для своей Windows все доступные обновления. Выполняется это следующим образом:
- нажмите правой кнопкой мыши на Пуск;
- кликните на пункт «Параметры»;
- перейдите в раздел «Обновление и безопасность»;
- пройдите во вкладку «Центр обновления Windows»;
- нажмите на кнопку «Проверить наличие обновлений»;
- следуйте инструкциям на экране.
Не бойтесь, если ваш компьютер начнет перезагружаться в процессе обновления системы — это вполне нормальное явление. Как только ваша Windows получит все актуальные обновления, протестируйте свой ПК на наличие BSoD 1000007e. Если он не будет появляться в течение длительного периода времени, то дело определенно заключалось в каком-то отсутствующем обновлении.
Способ №2 Удаление стороннего антивируса
У вас на компьютере установлен сторонний антивирус? Знайте, что именно он может стоять за появление синего экрана смерти с кодом 1000007e. Мы рекомендуем вам поступить следующим образом: удалите стороннее антивирусное ПО, перезагрузите компьютер и проверьте, перестанет ли проявляться BSoD. Удалить антивирус вы сможете следующим образом:
- нажмите Windows+R;
- пропишите в пустой строчке значение «appwiz.cpl» и нажмите Enter;
- оказавшись в «Программы и компоненты», найдите свой антивирус в списке установленных приложений;
- нажмите на него правой кнопкой мыши и выберите «Удалить»;
- следуйте инструкциям на экране и перезагрузите свой компьютер.
Протестируйте свой компьютер на наличие синего экрана смерти с кодом 1000007e. Как только вы удалить сторонний антивирус, системной будет задействован Защитник Windows. Попробуйте установить другой антивирус либо пользуйтесь услугами системной утилиты.
Способ №3 Обновление BIOS
В некоторых случаях синий экран смерти 1000007e может появляться на компьютерах с устаревшим BIOS для материнской платы. Если вы давненько не обновляли BIOS на своем ПК, то определенно попробуйте сделать это для решения проблемы.
К сожалению, процесс обновления BIOS отличается в зависимости от производителя материнской платы. Мы настоятельно советуем вам пройти на официальный ресурс вашего производителя и ознакомиться с инструкцией по обновлению BIOS.
Вот несколько примеров по обновлению BIOS на различных материнках:
- Dell;
- Acer;
- Lenovo;
- Asus.
Способ №4 Вернуть ПК в исходное состояние
Если ничего не вышло и вышеуказанные методы оказались абсолютно бессильны в вашей ситуации, то вы можете попробовать прибегнуть к такой процедуре, как возвращение компьютера к исходному состоянию. Проще говоря, переустановка операционной системы без потери установленных приложений, личных данных и настроек. Осуществить это можно следующим образом:
- нажмите правой кнопкой мыши на Пуск и выберите пункт «Параметры»;
- перейдите в раздел «Обновление и безопасность»;
- кликните на вкладку «Восстановление»;
- нажмите на кнопку «Начать» под разделом «Вернуть компьютер в исходное состояние»;
- на экране «Выбор действия» кликните на опцию «Сохранить мои файлы»;
- и наконец, нажмите на кнопку «Сброс» для начала возврата своего ПК к исходному состоянию.
Процесс возврата к исходному состоянию может занять довольно продолжительное время, плюс, ваш ПК по окончанию процедуры будет перезагружен. Синий экран смерти с кодом 1000007e после сброса определенно будет исправлен.
by Vlad Turiceanu
Passionate about technology, Windows, and everything that has a power button, he spent most of his time developing new skills and learning more about the tech world. Coming… read more
Updated on
- The 0x1000007e BSoD error is caused by a severely outdated Silverlight version, or by system file corruption.
- The first step to fix 0x1000007e on Windows 10 should be to install the pending updates, if any.
- An SFC scan will help you find any possible corrupted files that lead to bug check code 0x1000007e.
- Don’t forget that an all-in-one BSoD fixer can be the answer to many such blue screen errors.

Getting an error message immediately after starting your Windows 10 computer is not an uncommon occurrence.
The 0x1000007e BSoD error is caused by a severely outdated Silverlight version, system file corruption, or interference from a third-party service.
A hardware-related issue may also be the reason why this 0x1000007e error is shown, but you shouldn’t imagine the worst scenario yet.
Because of the multiple factors that cause this error, it’s likely that you may have to attempt more than one potential fix to suitably repair it.
With that said, we may only suggest you try the solutions below in the given order.
How can I fix error 0x1000007e on Windows?
1. Install pending updates

- Press Windows key + R keyboard hotkey to open up a Run dialog box.
- Type wuapp.exe inside the text box and press Enter to open up the Windows Update tab of the Settings app.
- Once you’re inside the Windows Update screen, click on Check for updates.
- After that, follow the next on-screen instructions to install every pending update.
- After each Windows update is installed, restart your computer and you should be good to go.
Windows 10 updates are supposed to be automatically downloaded when available and installed. Make sure you install every pending update that Windows has lined up for you.
Can’t install Windows updates? Just check out this guide to see how easy is to fix that.
2. Use a troubleshooting tool
Since the issue might be deeper than you thought and finding the cause might be difficult, a general troubleshooting BSoD tool can be very useful.
3. Use SFC /Scannow

- Click on Start.
- Then, you need to search for Command Prompt, right-click the top result, and select Run as administrator.
- Type the following command and then press Enter:
sfc /scannow - System File Checker will now verify the integrity of all protected operating system files on your computer.
- It might take quite a while to finish. Once you start this process, you must not interrupt it until the operation is finished.
- Restart your computer if sfc /scannow repaired any files.
System file corruption problems could occur as a result of an issue installing a driver, a system update, or application, or even while making any changes to the installation manually.
Windows 10’s System File Checker (SFC) scannow command can’t fix hardware issues.
But it’s a great place to start if you’re still experiencing the 0x1000007e error and suspect corrupted system files as the culprit.
In the unlikely case that the scannow command stops before the process finishes, we’ve also got an easy fix for you.
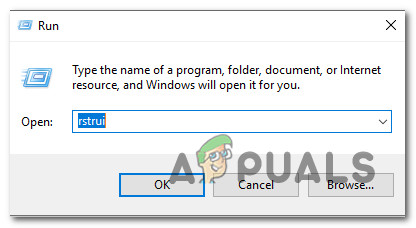
4. Use the System Restore utility

- Open up a Run dialog box by pressing Windows key + R.
- Inside the text box, type rstrui and press Enter to open up the System Restore wizard.
- Click Next at the initial prompt.
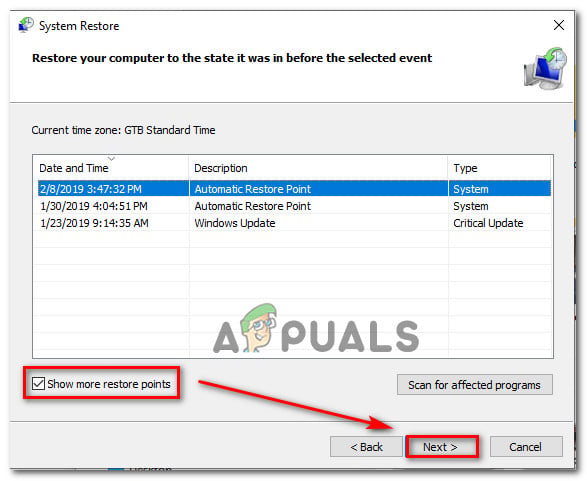
- Select the Restore point you wish to return to and click Next.
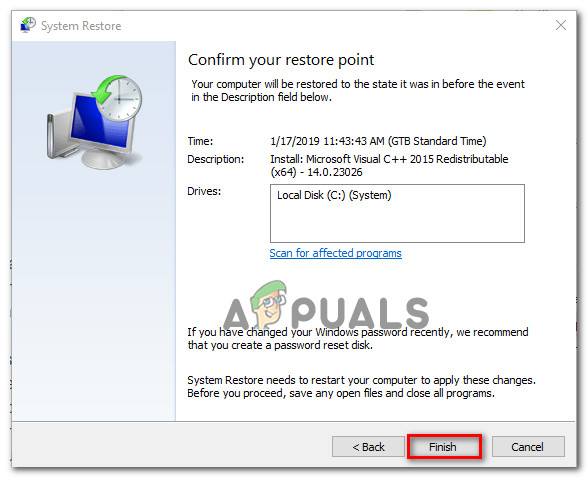
- Follow the instructions to complete the process.
- Lastly, your computer will restart and the new state will be enforced at the next system startup.
Many users reported that the 0x1000007e error was fixed after restoring their PC with the System Restore tool. You may try to do the same.
If System Restore is not working, there is no reason to panic. Just take a look at this useful guide and set things right once again.
Have you attempted to apply one or more of the solutions we have outlined below? Let us know which one worked for you in the comments area below.
![]()
Several Windows users have been seeing BSOD critical crashes with the error code 0x1000007e. Most affected users are reporting that for them, the issue seems to occur randomly with no apparent trigger. What’s even more annoying is the fact that they encounter the critical crash just minutes after they start their PC. As it turns out, the issue is not exclusive to a certain Windows version since it’s encountered on Windows 7, Windows 8.1 and Windows 10.
What’s causing the Error code 0x1000007e?
We investigated this particular error code by looking into various user reports and analyzing the various fixes that are recommended by other users that also encountered this issue. As it turns out, several different causes might trigger the 0x1000007e error. Here’s a list of culprits that might be responsible for the random BSODs:
- Silverlight version is outdated – As it turns out, this particular crash can occur due to a severely outdated Silverlight version. Fortunately, Microsoft has released a hotfix for the issue, that resolves the issue by installing the latest stable version. To take advantage of the fix, you’ll need to install every pending update since it’s included in one of the Cumulative updates.
- 3rd party AV conflict – According to various user reports, this problem can also arise due to a conflict between an overprotective antivirus suite and a Kernel process. In situations like this one, the easiest way to resolve the issue is to simply move away from the AV suite that’s causing the problem and revert to the default security suite (Windows Defender).
- System File Corruption – Another potential scenario in which this error code will occur is system file corruption. If certain Windows become affected by corruption, it might end up triggering general system instability which might trigger BSODs of this kind. In this case, you should be able to resolve the issue by running a couple of utilities capable of resolving OS corruption issues (DISM and SFC).
- 3rd Party Service interference – It’s also possible that some kind of startup service or process is interfering with an operating system component, which ends up crashing the system when certain circumstances are met. If this scenario is applicable, you can resolve the issue by achieving a clean boot state and identifying the process that is causing the problem.
- Underlying System File Corruption – In some rare cases, the corruption that ens up triggering this error code is so severe that it cannot be resolved conventionally. In situations like this one, the only viable fix is to reset every OS component or rever them to a healthy point in time. To do this, you can either use a viable system restore point or you can go for a repair install or clean install.
- Hardware-related issues – Several users have confirmed that this particular error code can also occur due to some hardware-issues that are contributing to the general instability of the system. In this case, the only viable fix is to test out the various components to find out the culprits or to take your PC directly to a certified technician.
If you’re currently struggling to find a way that will resolve the 0x1000007e error and allow you to use your computer normally without the annoying BSODs, this article will provide you with troubleshooting strategies. Down below, you’ll find a selection of repair strategies that have been confirmed to be effective by other affected users finding themselves in a similar situation.
For the best results, we advise you to follow the potential fixes below in the same order that we arranged them in (via efficiency and difficulty). Eventually, you will stumble upon a method that will be applicable regardless of the scenario in which you’re encountering the issue.
Let’s begin!
Method 1: Install every pending Windows Update
As it turns out, one particular reason that will cause BSOD crashes with the 0x1000007e error code is a scenario in which the latest Silverlight version is not installed on the affected machine. This is odd considering that Silverlight is on it’s way out as new tech is slowly replacing it, but it seems like Microsoft has already released an update that fixes an instability caused by an older version.
To take advantage of the fix, you’ll need to install every pending update that Windows has lined up for you (Critical and Non-Critical).
Several users that were also encountering this problem have reported that the issue was resolved after they installed every pending update and restarting their computer.
Here’s a quick guide on installing every pending update on your Windows computer:
Note: This guide will work regardless of the Windows version that you’re using.
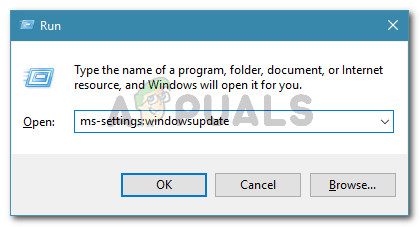
- Press Windows key + R to open up a Run dialog box. Next, type “ms-settings:windowsupdate” inside the text box and press Enter to open up the Windows Update tab of the Settings app.

Run dialog: ms-settings:windowsupdate Note: If you’re not using Windows 10, type “wuapp” instead of “ms-settings:windowsupdate”.
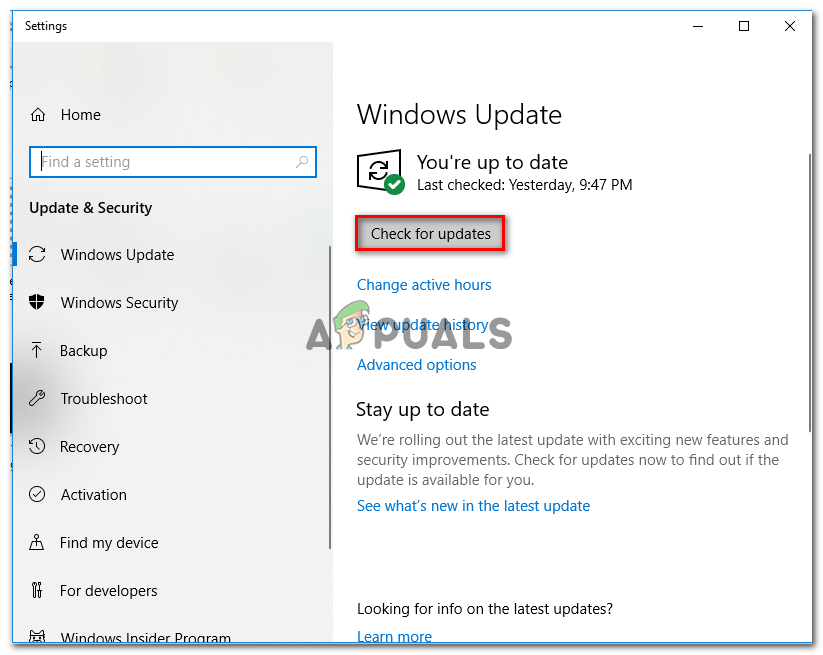
- Once you’re inside the Windows Update screen, move over to the right-hand pane and click on Check for updates, then follow the on-screen prompts to install every pending update.

Installing every pending Windows update Note: If during the procedure of installing the pending updates you are prompted to restart, do so, but make sure to return to this same screen at the next startup sequence to ensure that you install every update.
- After each Windows update is installed, restart your computer once again and see if the issue is resolved by looking out for a 0x1000007e BSOD once the next startup sequence is complete.
If the same critical error is still occurring, move down to the next method below.
Method 2: Uninstalling 3rd party security suite (if applicable)
As it turns out, the 0x1000007e error can also occur due to a conflict between a 3rd party security suite and a Kernel process. We have managed to identify several user reports blaming Comodo AV for this issue, but there might be other suites triggering the same behavior.
If this scenario is applicable and you’re using a 3rd party security suite, you should disable the real-time protection of your antivirus and see if the issue stops occurring. But to ensure that your 3rd party AV suite has no role in the apparition of the annoying BSODs, you’ll need to uninstall the security program and remove any remnant files.
But first, start by disabling the real-time protection – This procedure is different across the various 3rd party AV suites, but you are typically able to do so via the dedicated taskbar menu.

Leave the real-time protection disabled for a while and see if the issue is still occurring. If it is, try uninstalling the security program altogether and remove any remnant files that can still cause this problem. In case you decide to go this route, follow this article (here) for step by step instructions on uninstalling 3rd party security suites & removing all remnant files.
If this method wasn’t applicable or you’ve done this and the BSOD critical crash is still occurring, move down to the next method below.
Method 3: Resolving System File Corruption
In most documented cases, the 0x1000007e error occurs due to some kind of system file corruption that ends up crashing some critical component that in its turn triggers system instability. Some affected users that found themselves in a similar situation have reported that they finally managed to take care of the issue by running a series of utilities capable of fixing logical errors and system file corruption.
We recommend to avoid using 3rd party solutions and stick to the repair tools offered by Microsoft – DISM and SFC. Both DISM (Deployment Image Servicing and Management) and SFC (System File Checker) are equipped to deal with corrupted system files, but they go about this task differently.
DISM is a more modern tool that relies on the WU (Windows Update) component to replace corrupted instances with healthy copies, while SFC doesn’t need an Internet connection since it uses a locally stored archive to deal with corrupted system files.
IMPORTANT: We highly recommend that you run both utilities to make sure that you maximize your chances of fixing your system file problem.
Here’s a quick guide on running both scans to resolve the system file corruption and resolve the 0x1000007e error:
- Press Windows key + R to open up a Run dialog box. Then, type “cmd” inside the text box and press Ctrl + Shift + Enter to open up a Command Prompt with admin access. When you see the UAC (User Account Prompt), click Yes to grant administrative access.

Running Command Prompt - Once you manage to get inside the elevated Command Prompt, type the following command and press Enter to initiate an SFC scan:
sfc /scannow
Note: Once you start this process, DO NOT interrupt (by closing the CMD window or restarting your computer) it until the operation is finished. Doing this might produce additional logical errors that might cause further problems on your PC.
- Once the SFC scan is complete, close the elevated CMD window and restart your computer. During the next startup, wait until your OS is fully loaded, then follow step 1 again to open up another elevated CMD. After you’ve done this, type the following commands and press Enter after each command to initiate a DISM scan:
Dism.exe /online /cleanup-image /scanhealth
Dism.exe /online /cleanup-image /restorehealth
Note: Before you initiate the DISM scan, make sure you have a stable connection to the Internet, otherwise the utility won’t be able to download the fresh copies needed to replace the corruption. The first command (scanhealth) will scan for inconsistencies while the second (restorehealth) will fix any type of corruption that is found.
- Once the DISM scan is complete, restart your computer once again and see if the issue is resolved at the next system startup.

If you’re still encountering random BSOD crashes with the 0x1000007e error, move down to the next method below.
Method 4: Achieving a Clean Boot State
If you’re performed the steps appropriated to cleaning your system free of corruption and you’re still encountering the 0x1000007e error, some kind of 3rd party service or process is likely interfering with an OS component, which ends up crashing the system under certain circumstances.
Some affected users have blamed a 3rd party security suite, while others have singled a partitioning software for causing this issue. Since we can’t possibly cover every application that might trigger this 0x1000007e BSOD, the best course of action would be to configure your computer to start in a clean boot state.
This will prevent any 3rd party startup service or process from running, effectively preventing a BSOD crash caused by 3rd party interference. If the crash doesn’t occur while your system clean boots, it’s clear that some 3rd party program was previously causing the annoying BSODs.
Follow the instructions below to achieve a clean boot state and then identify the 3rd party program that was causing the 0x1000007e error:
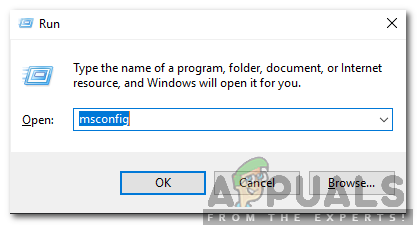
- Open up a Run dialog box by pressing Windows key + R. Then, type “msconfig” and press Enter to open up the System Configuration menu. Once you’re at the UAC (User Account Prompt), click Yes to grant administrative privileges.

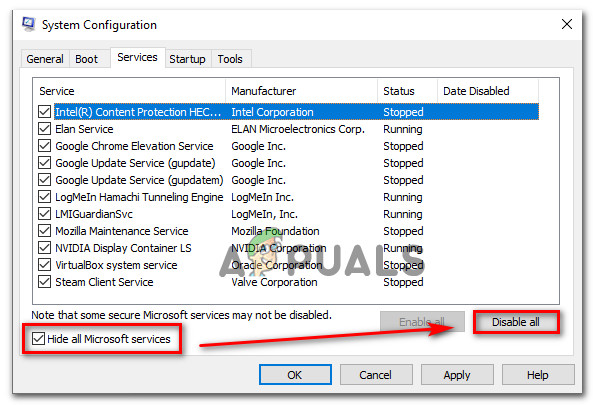
Typing msconfig in a Run box and pressing Enter - After you manage to get inside the System Configuration window, click on the Services tab from the top of the menu, then check the box associated with the “Hide all Microsoft Services” option. Once you’ve done this, all Windows services will be removed from the list, which will prevent you from mistakenly disabling a Windows service.

Disabling all non-Microsoft startup items - Once all Windows services are excluded from that list, click the Disable all button to effectively prevent any 3rd party services from being called into action at the next machine startup.
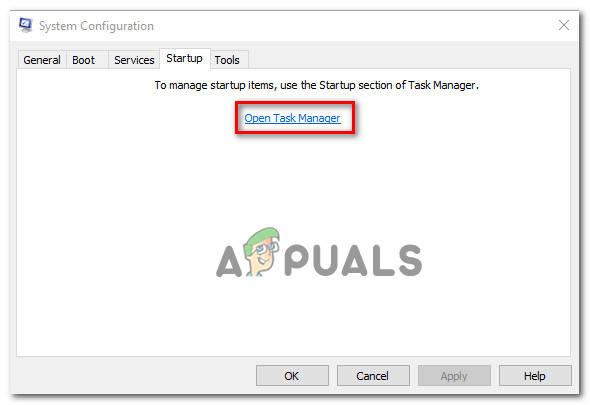
- After you’re done with this, select the Startup tab and click on Open Task Manager from the newly appeared menu.

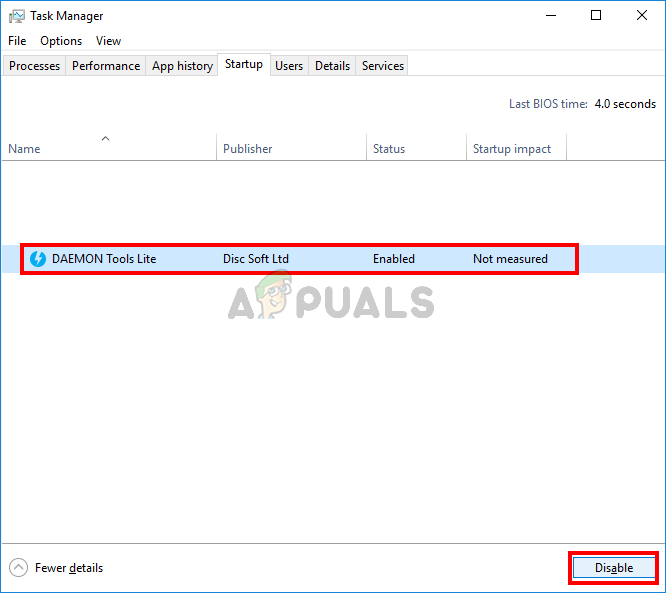
Opening the Startup items window via Task Manager - Once you’re inside the Startup tab of Task Manager, start to systematically select each startup service and then click on the Disable button at the bottom of the screen. This procedure will ensure that no startup service will get called at the next system startup.

Disabling Apps from Startup - Once you’re done with the step above, you have effectively disabled every service or process that might contribute to the 0x1000007e BSOD. All that’s left to do now is to take advantage of the clean boot state by restarting your computer.
- At the next startup, your computer will boot directly into a clean boot state, which will allow you to see if a 3rd party service or process was indeed causing the problem.
- If the crash no longer happens while in clean boot, reverse engineer the steps above and re-enable the previously disabled services one by one coupled with random restarts until you figure out which item is responsible for the crash. Once you manage to discover it, leave it disabled to avoid further issues of this kind.
If you followed the instructions above and you confirmed that the issue is not occurring due to a 3rd party service or process, move down to the next method below.
Method 5: Using System Restore
If none of the methods above have allowed you to get rid of the annoying 0x1000007e BSODs and the issue only started occurring recently, you might be able to resolve the issue promptly by utilizing the System Restore utility to restore your computer back to a healthy point when the circumstances that are know causing the problem didn’t exist.
The System Restore utility utilizes a snapshots to restore machines to the exact state it was in that previous point in time. By default, Windows creates new snapshots at every important event (app installation, major update, etc. so if you haven’t changed the default behavior, you should have plenty of snapshots to choose from.
But before you start using System Restore to restore your computer state to a previous point in time, keep in mind that all changes made after the snapshot was created will be lost. This means that any app installation, established user preferences and anything else enforced during that time will be reverted.
If you decide to try and fix the 0x1000007e error by doing a system restore, here’s a step-by-step guide through the whole thing:
- Open up a Run dialog box by pressing Windows key + R. Inside the text box, type “rstrui” and press Enter to open up the System Restore wizard.

Opening the System Restore wizard via Run box - Once you’re inside the System Restore wizard, click Next at the initial prompt to advance to the next menu.

Getting past the initial screen of System Restore - Next, proceed by selecting a restore point that is dated before the apparition of the annoying 0x1000007e error and click Next to advance to the final menu.

Restoring your system to a previous point in time Note: All changes you made after the snapshot was created will be lost if you go forward with the next step.
- To start the restoring process, click Finish, then click Yes at the confirmation prompt to start the restoring process.

Starting the System Restore process - After several seconds, your computer will restart and the new state will be enforced at the next system startup. Once the old state is enforced, see if the same 0x1000007e error is still occurring.

If you’re still experiencing random BSODs even after using System Restore, move down to the next method below.
Method 6: Performing a repair / clean install
If none of the methods below have allowed you to resolve the BSOD crashes pointing towards the 0x1000007e error, it’s clear that you’re system is suffering from an underlying problem that cannot be resolved conventionally. In this case, the only viable fix that will treat the issue in every scenario where the problem is occurring due to a software component is to reset every OS component.
Several Windows users that found themselves in a similar scenario have reported that they finally managed to resolve the issue either by going for a clean install or by performing an in-place repair (repair install).
A repair install (in-place repair) is a longer procedure, with the major advantage that it allows you to keep all your data including applications, games, user preferences, and personal media.
On the other hand, a clean install is simple and effective, but be prepared for a total data loss unless you don’t back up your data before initiating this procedure. All your personal files (personal media, applications, games, user preferences, etc.) will be lost after a clean install.
If you’ve performed one of the procedures above and you’re still having the same kind of BSOD crash, you can conclude that the issue is occurring due to a hardware component. In this case, the ideal way of resolving the issue is to take your PC to a certified technician.
Одна из частых проблем в Windows — system thread exception not handled. Пользователи могут получить синий экран смерти (BSoD) этого типа в любое время. Чаще всего он появляется при работе операционной системы, а после перезагрузки ПК все восстанавливается. Второй вариант – компьютер получает эту ошибку при запуске Windows и бесконечно перезагружается.
Что это за ошибка и почему возникает
BSoD с названием system thread exception not handled иногда сопровождается кодом ошибки 0x1000007e или 0x0000007e и возникает в Windows 7, 8, 10. Характеризуется следующими причинами возникновения:
- случайный сбой компьютера;
- повреждение важных системных файлов;
- неправильные настройки БИОС;
- ошибки оперативной памяти (ОЗУ);
- неисправность HDD или SSD, на котором установлена система;
- неверно установленные драйвера при подключении устройств.
Также на экране с ошибкой могут быть небольшие пояснения. Помимо самого кода появляется и название системного файла или драйвера, вызвавшего ошибку, например:
- nvlddmkm.sys – относится к драйверу видеоадаптера от NVIDIA.
- atikmdag.sys – компонент драйвера видеокарты от ATI/AMD Radeon.
- ntfs.sys – компонент HDD диска с файловой системой NTFS.
- etd.sys – компонент драйвера тачпада ноутбука.
Конечно, это не весь перечень проблемных файлов. Но для устранения проблемы в любых вариациях чаще всего используются одни и те же методы.
Проблемы с драйверами устройств
Итак, если пользователь уверен, что экран BSoD с ошибкой system thread exception not handled появляется из-за драйверов видеоадаптера или другого устройства, то от них необходимо избавиться. Конечно, просто так в систему не попадешь, когда компьютер постоянно перезагружается. В этом случае решить проблему поможет безопасный режим:
- Найдите установочный диск либо флэш-накопитель с ОС той версии, которая установлена на ПК.
- Загрузитесь с носителя и нажмите по опции «Восстановление системы».

- Выберите раздел «Поиск и устранение неисправностей».

- Посетите подраздел «Дополнительные параметры».

- Щелкните по опции «Командная строка».

- Вставьте команду — bcdedit /set {default}bootmenupolicy legacy – служит для запуска безопасного режима (вернуть все как было можно, вставив вместо слова legacy — standard).

- Закрываем CMD и перезапускаем компьютер.
- Загрузится окно безопасного режима, где выбираем самый первый пункт и жмём Enter.

- Сейчас Windows запустится без драйверов. Перейдите в диспетчер устройств (можно найти через поиск).
- Жмём правой кнопкой мышки по проблемному драйверу и выбираем «Удалить».


Настройки БИОСа
Иногда может помочь сброс настроек BIOS до заводских. Даже если в настройках ничего не изменилось, эта операция не помешает.
Для разных видов системных плат и ноутбуков процесс входа в BIOS отличается. Чаще всего это клавиши DEL, ESC, F8, F1 или F4. Ищите сведения в паспорте к системной плате или в интернете.
Чаще всего в разделе Exit или другом месте есть пункт Load Optimized Defaults, Load BIOS Setup Defaults, Load Fail-Safe Defaults или Load Setup Defaults. При помощи стрелок выбираем его и щелкаем клавишу Enter.
Чтобы изменения сохранились — выходим, выбрав пункт Save and Exit Setup.
Проверка системных файлов
Если проблема связана с повреждением системных файлов или файловой системы жёсткого диска, то исправить ошибку поможет утилита SFC:
- Открываем командую строку или PowerShell с повышенными правами.
- Пишем команду — sfc /scannow.


Появление ошибки на ноутбуке
В случае ноутбука можно попробовать способ отключения питания. В некоторых случаях это помогает:
- Отключите устройство с помощью кнопки питания.
- Отсоедините кабель зарядного устройства.
- Выньте аккумулятор и через пару минут вставьте.


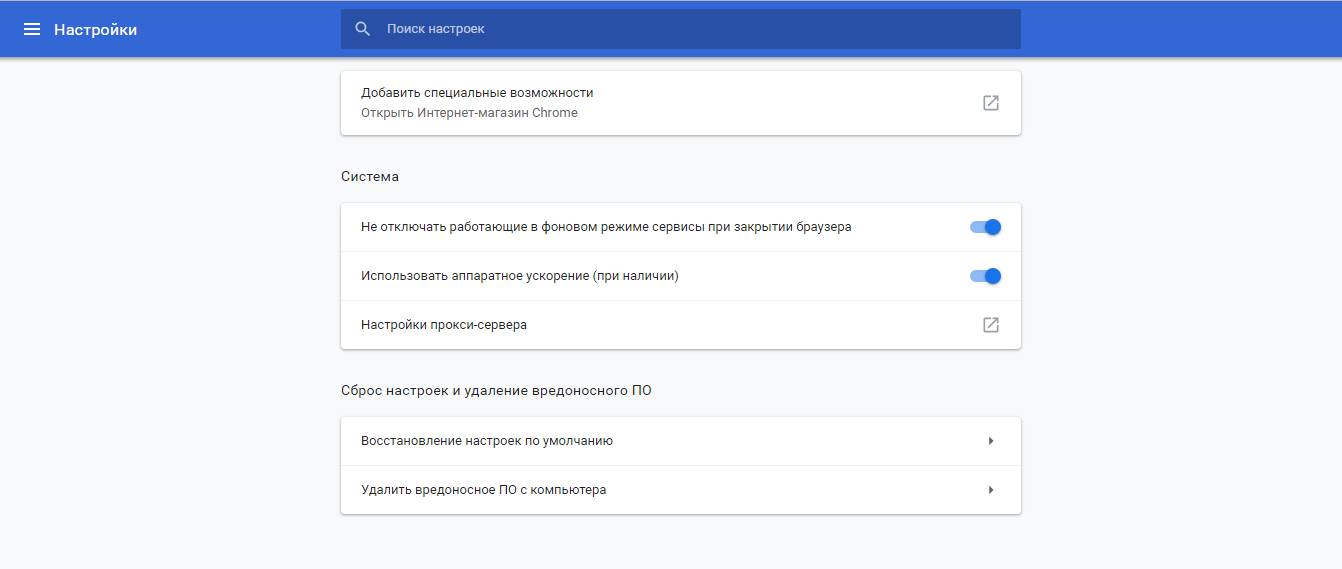
Отключение аппаратного ускорения в браузерах
Во время использования браузера с включенным аппаратным ускорением, чаще всего на Windows 10, так же может возникать данная проблема. Отключим эту функцию:
- В Google Chrome переходим в настройки (в остальных браузерах процедура идентична. Незначительно отличается интерфейс).
- Опускаемся вниз и жмем по пункту «Дополнительные».
- Находим в разделе «Система» функцию «Использовать аппаратное ускорение (при наличии)» и отключаем её.
- Перезаходим в браузер.

Проверка оперативной памяти на ошибки
Оперативная память – еще одна частая причина появления system thread exception not handled. Рассмотрим метод проверки памяти на ошибки:
- Выниманием модули ОЗУ, аккуратно протираем ластиком контакты, вставляем обратно.
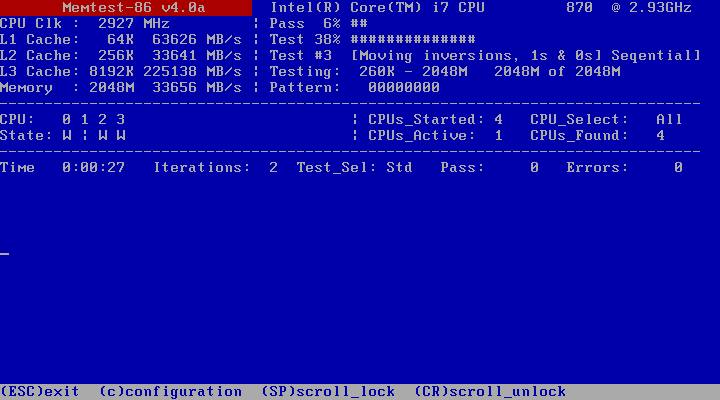
- Скачиваем утилиту memtest86+ и выполняем тестирование ОЗУ.

Для исправления этого типа ошибки необходимо сделать следующее:
- Сбросить BIOS до заводского состояния.
- Обновить БИОС или отключить в нем параметры кэширования или затенения памяти.
- Обновить/удалить драйвер через безопасный режим, как это было описано выше.
- Иногда требуется поменять проблемный компонент, например, видеокарту.
Summary: Getting a 0x1000007e error code with a BSOD (Blue Screen of Death) on your Windows system is certainly not a pleasant experience. However, you can fix it with easy-to-apply methods discussed in this blog. You can also take the help of dedicated data recovery software to recover data from a BSOD-affected PC.

Contents
- What is a Windows 10 Bugcheck?
- How do I fix the 0x1000007e bugcheck blue screen error?
- What is the cause of the 0x1000007e bugcheck error?
- Fix your PC in the blink of an eye!
- FAQ
It’s not unusual for your Windows 10/11 computer to start up and immediately display an error message. However, it also doesn’t happen so frequently. Therefore, something must be wrong with your system.
An outdated Microsoft Silverlight version, system file corruption, or interference from a third-party service can cause a 0x1000007e BSOD issue. A hardware problem could also cause the 0x1000007e error, but you shouldn’t assume the worst just yet.
You might need to try two or more potential fixes to adequately resolve this problem, given the variety of factors that can cause it.
So, without further ado, let’s dive into the article and resolve this problem for good.
What is a Windows 10 Bugcheck?
Microsoft Windows shuts down when it detects a circumstance that endangers secure system operation. A bug check is used to describe this situation.
The terms “system crash,” “kernel error,” “stop error,” and “BSOD” are also frequently used to describe it. This issue can be brought by a physical component, its driver, or associated software.
How do I fix the 0x1000007e bugcheck blue screen error?
1. Update Windows
The Windows operating system’s source code includes security flaws, errors, incompatibilities, and out-of-date software components. The most recent patches and updates for Windows correct bugs and vulnerabilities in the operating system and related software and occasionally bring new functionality. This sums up why you should run Windows Update frequently.
Updates for Windows 10 are designed to be downloaded and installed automatically when they become available. Install each pending update that Windows has prepared for you.
- A Run dialog box will appear if you press the Windows key and R on your keyboard.
- To open the Windows Update tab of the Settings app, enter wuapp.exe into the text box and press Enter. (Or Enter Settings and look for the Windows update tab.)

- Click Check for updates once you’re on the Windows Update screen.

- After that, install each pending update following the next set of on-screen instructions.
- Restart your computer after each Windows update has been installed.
It turns out that a seriously out-of-date Silverlight version may be to blame for this specific incident. You now have even another excuse to update Windows.
Fortunately, Microsoft has published a patch for the problem, which installs the most recent stable version to address it. Since the patch is part of one of the Cumulative updates, you must install every pending update to benefit from it.
2. Run SFC scan
Problems with installing a driver, a system update, an application, or even making manual installation adjustments could result in system file corruption.
The System File Checker (SFC) tool in Windows 10 cannot resolve hardware problems. But it’s an excellent place to start if you’re still getting the 0x1000007e issue and think that corrupted system files are to blame. It is also necessary to run DISM after this command, and we will shortly explain why.
- Select Start. After that, you must search for Command Prompt, right-click the first result, and choose Run as administrator.

- After entering the tool, type the following: sfc /scannow

- The System File Checker tool will check all protected operating system files on your computer for integrity.
- It can take a while to complete. You must not stop this process before it is complete once you’ve started it.
- Restart your computer.
3. Utilize DISM
DISM is another tool used to fix corrupted Windows files, including issues related to 0x1000007e errors. It is similar to SFC but with a few differences. You can use these two command-line utilities to detect and repair damaged or missing Windows system files.
Normally, you can only complete this process by running SFC instructions, but if SFC fails, you can try DISM commands to restore the system image. For SFC to function effectively, DISM finds and corrects faulty files in the Windows system image’s component store. That’s why it’s recommended to conduct an SFC scan again after DISM.
- Click Start, enter Command Prompt into the search box, right-click the first result, and choose Run as administrator.
- To run a more thorough DISM scan, type the following command: DISM /Online /Cleanup-Image /ScanHealth and hit Enter.

- If any problematic files are found, they will be repaired automatically.
4. Use the System Restore utility
Many people claimed that after using the System Restore utility to restore their PC, they had resolved the 0x1000007e error. You could attempt to follow suit.
- By hitting the Windows key + R, a Run dialog box will be displayed.
- Enter rstrui into the text field to launch the System Restore wizard.

- Upon seeing the first prompt, click Next.
- Select the Restore point you want to return to, and then click Next.
- To finish the procedure, adhere to the directions.
- The changed state will then be imposed at the subsequent system startup as soon as your computer restarts.
5. Recover your files and seek professional assistance
As a last option, you can restore your files from your hard drive and then have a specialist fix your computer. You can use Stellar Data Recovery to make bootable media and then try to recover your files without even starting your PC when the blue screen prevents you from accessing your information.
- Connect the USB drive to another operational PC. It would help if you had a 1GB USB.
- Launch Stellar Data Recovery Professional after downloading and installing it from the official website.
- In the main window of the Select What to Recover screen, select Waffle Menu.
- Choose Create Recovery Drive.
- Use the menu to select the USB drive you want the bootable media from the Create Recovery Drive dialog box.
- Next is to select Create Recovery Drive and OK.
- A new Activation window appears where you need to enter an activation key. After purchasing the product, enter the Key you received via email into the box and press the Activate button.
- Attach the mentioned USB media to your Windows computer that won’t boot.
- Turn on your computer, then rapidly press the F12 or Bios Key to view any connected bootable USB media.
- Select the bootable data recovery media using the arrow keys; then press Enter to boot the computer.
- You will see the Stellar Data Recovery Professional software interface once the computer has booted from USB media.
- From the Select What to Recover screen, select the files you wish to recover and press Next.

- Click Scan after selecting the desired drive.

- Click Recover to save the files that you have selected from the preview menu.

What is the cause of the 0x1000007e bugcheck error?
- Outdated Microsoft Silverlight version: It turns out that an out-of-date Silverlight version may cause this specific issue.
- Anti-Vitus conflicts: Conflict between a third-party antivirus program and a Kernel process, according to a number of user complaints, is another cause of this issue.
- System file corruption: System file corruption is another condition that could result in the occurrence of this error code. This form of BSOD may occur if specific Windows versions experience corruption, leading to widespread system instability.
- Interference from Third-Party Services: It’s also possible that a startup service or process interferes with an operating system component, which ultimately causes the system to crash when specific conditions are fulfilled.
- Hardware-related problems: Several users have confirmed that this specific error code can also happen due to hardware problems that add to the system’s overall instability.
Fix your PC in the blink of an eye!
There is no need to worry if one of the fixes does not work. Refer to our helpful instructions to get everything back on track. These fixes have been confirmed to work by people experiencing the 0x1000007e BSOD error but are now enjoying a problem-free PC.
If you are concerned about your data, Stellar can restore it and give you access to your valuable information again, but make sure to take backups first. You can use backups to restore lost data in minutes; therefore, having a thorough backup is essential.
FAQ
- Why does BSOD prevent me from accessing my computer?
If something critical fails, Windows will shut down the operation to prevent further harm and corruption and display a BSOD.
When a BSOD occurs, your computer will restart. This means that unless your computer resets, you will be unable to use it after a BSOD. Sometimes PCs are trapped in a loop of BSOD and rebooting.
- Why do I use Stellar Data Recovery Professional software to create bootable media?
Because your PC encounters a BSOD problem as soon as it boots up, you must recover your files without booting up Windows to avoid the BSOD. In this circumstance, the only way to retrieve your files is to create a bootable drive.
- Will Stellar Data Recovery Professional software allow me to preview my files before restoring them?
While scanning the storage media, the software provides a better view of the lost and deleted files, such as documents, audio, video, ZIP and RAR files, and so on. The software categorizes the scanned data beautifully in Tree View, File Type, and Deleted List formats for easy data sorting and verification before storing.
About The Author
Farhad Pashaei
As a technophile, Farhad has spent the last decade getting hands-on experience with a variety of electronic devices, including smartphones, accessories, laptops, wearables, printers, and so on. When he isn’t writing, you can bet he’s devouring information on products making their market foray, demonstrating his unquenchable thirst for technology.