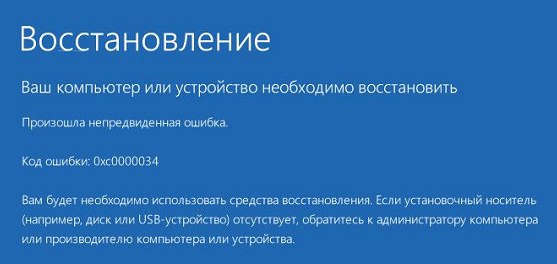
При работе с ОС Виндовс 10 (обычно при загрузке последней) пользователь может внезапно столкнуться с синим экраном смерти (BSoD). В сопровождающем BSoD сообщении указано, что система нуждается в исправлении, поскольку файлы BCD отсутствуют или повреждены, также приводится код ошибки — 0xc0000034. В данной статье я расскажу, в чём суть данной проблемы, и как её исправить.
Что это за ошибка 0xc0000034?
Ошибка с кодом 0xc0000034 является ошибкой загрузки Виндовс 10, также известной как «The Boot Configuration Data file is missing». Обычно перед появлением данной ошибки пользователь замечает более длительную, по сравнению с обычной, загрузку системы, внезапные замедления и торможения, спорадический «вылет» различных приложений, проблемы с Интернетом и прочие схожие неисправности.

Рассматриваемая ошибка обычно возникает во время загрузки Виндовс, после чего загрузка системы прекращается. При этом баг фиксируется не только на Виндовс 10, но и на более ранних операционных системах.
Причины ошибки 0xc0000034 могут быть следующими:
- Файлы, отвечающие за загрузки ОС отсутствуют, повреждены, или настроены неправильно. Ошибки, связанные с BCD (Boot Configuration Data – данные конфигурации загрузки) и ошибкой 34 наиболее часто вызваны проблемами лишь одного специфического BCD-файла;
- Плохие сектора на жёстком диске. Появление плохих (битых) секторов, на которых содержаться важные системные файлы, делает последние не читаемыми;
- Несовместимые с вашим ПК аппаратные или программные компоненты. Если вы недавно установили на компьютер какой-то новый софт или добавили новое устройство, то эти компоненты могут вызывать появление анализируемой в статье дисфункции;
- Некорректная работа операционной системы. Файлы Виндовс могут быть повреждены или отсутствовать по различным причинам (деятельность вирусных программ, ручное удаление их пользователем и др.).
Как исправить 0xc0000034 в Виндовс 10
Для решения проблемы с кодом 0xc0000034 существует несколько общепризнанных способов, ниже я последовательно их опишу. При этом вам обязательно понадобится флешка или диск с находящимися на них установочными файлами Виндовс 10 (могут даже пригодиться инсталляционные файлы Виндовс 8 и 7), без которых исправление рассматриваемой в статье проблемы будет невозможным. Полный список способов по устранению ошибки 0xc0000034 описан на Сделайкомп. Если описанные далее способы не помогут исправить проблему, тогда вам следует перейти на сайт Sdelaicomp.ru.
Способ №1. Используйте средство автоматического восстановления Виндовс
Для реализации данного способа необходимо перейти в БИОС вашего ПК, и выставить там очерёдность загрузки дисков таким образом, чтобы первой на загрузку стояла флешка (или диск), на которых имеются инсталяционные файлы вашей ОС.
Затем выполните следующее:
- Загрузитесь с данной флешки (диска), в начальном экран нажмите на «Далее» (Next);

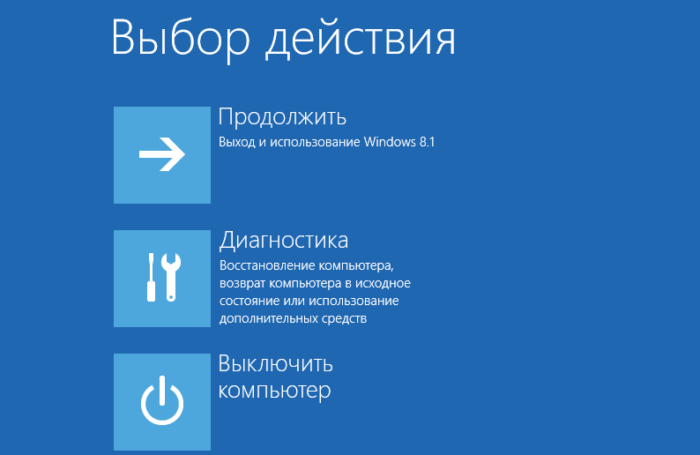
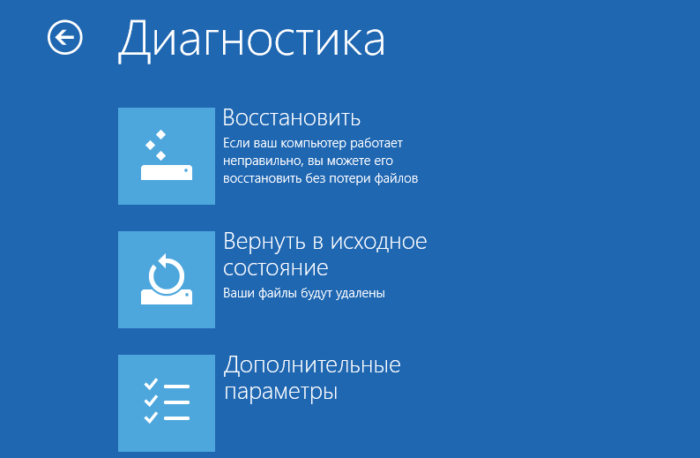
- Выберите «Диагностика» (Поиск и устранение неисправностей);
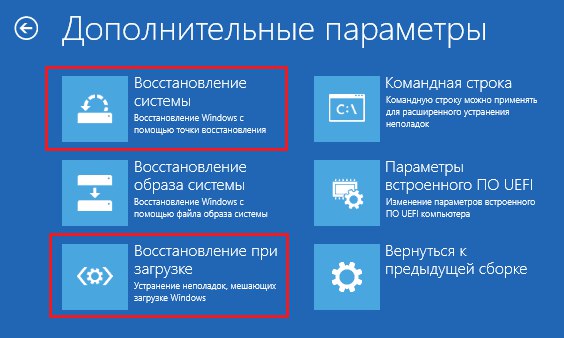
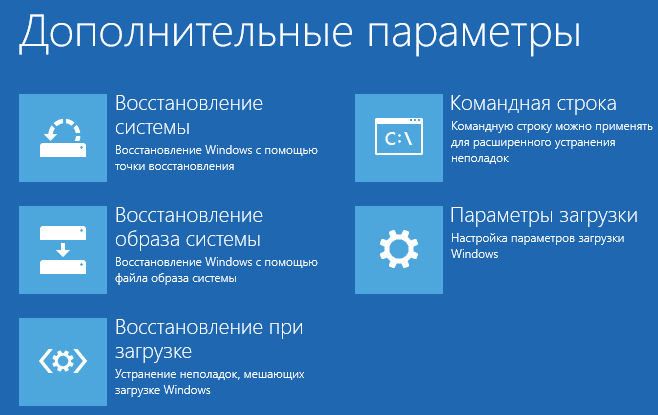
- Затем кликните на «Дополнительные параметры»;
- Потом на «Восстановление системы» (также можно попробовать «Восстановление при загрузке»).

Выберите вашу операционную систему из списка, после чего будет осуществлено поиск неисправностей на ней с их последующим устранением.
Если данный способ не помог, переходим к следующему.
Способ №2. Используем функционал команды bootrec
Загрузитесь с установочного диска или флешки, как рекомендовано выше. В начальном экране нажмите на Shift+F10 для запуска функционала командной строки.
В данной строке последовательно наберите следующие команды, не забывая нажимать на «Enter» после каждой из них:
Bootrec /fixmbr
Bootrec /fixboot
Bootrec /scanos
Bootrec /rebuildbcd
exit
Затем перезагрузите компьютер, ошибка 0xc0000034 после этого бывает устранена. Надеемся что наша статья помогла вам решить ваш вопрос. Оставайтесь с нами!
Синий экран смерти с сообщением об ошибке 0xc0000034 говорит о наличии серьезной проблемы с Windows 10 – у нее отсутствуют файлы конфигурации загрузки. Так может случиться в отдельных случаях после неудачного обновления операционной системы, в частности, из-за выключения компьютера в процессе установки обновлений в предзагрузочном режиме. Ошибка 0xc0000034 может быть и следствием экспериментов с различными программами, которые вносят правки в загрузочную запись Windows. К этой ошибке также могут привести вредоносные программы.

Часто пользователи в таком и подобных случаях прибегают к переустановке Windows 10. Но в самом сообщении на синем экране содержится подсказка, что проблема может быть решена не таким кардинальным способом, а более щадящим с использованием средств восстановления. Правда, что делать дальше, как только среда восстановления Windows будет загружена, синий экран смерти не сообщает. Чтобы решить проблему с синим экраном смерти и ошибкой 0xc0000034, необходимо восстановить способность Windows 10 загружаться. Рассмотрим ниже, как это делается .
Вход в среду восстановления и запуск командной строки
Теоретически в среду восстановления Windows 10 можно попасть, используя клавиши Shift+F8 в момент загрузки системы. Но из-за сокращенного времени запуска Windows 10 на практике сделать это будет непросто. Более надежный способ попасть в среду восстановления – это использование аварийного диска восстановления или установочного носителя Windows. Если таковых нет в наличии, любой из них можно создать с помощью другого компьютерного устройства. Диск восстановления создается внутри рабочих Windows 8.1 и 10, а установочную флешку или диск можно записать с помощью утилиты MediaCreationTool, скачиваемой с сайта Microsoft. Для создания установочного носителя не принципиальна версия Windows – 8.1 или 10, можно даже использовать старый завалявшийся диск установки Windows 7. Версия Windows не важна, поскольку все, что нам нужно будет от среды восстановления – это доступ к командной строке.
После загрузки с диска восстановления и выбора раскладки клавиатуры нужно выбрать пункт меню «Поиск и устранение неисправностей» (он также может именоваться «Диагностика»), затем перейти в раздел «Дополнительные параметры», откуда возможен запуск командной строки.

С установочным носителем Windows вызвать командную строку проще: в первом же окне процесса установки жмем клавиши Shift+F10.

Восстановление загрузчика
В окне командной строки переключаемся клавишами Shift+Alt на английский язык (поскольку русскоязычные дистрибутивы по умолчанию изначально предусматривают, соответственно, русскоязычную раскладку) и вводим команду:
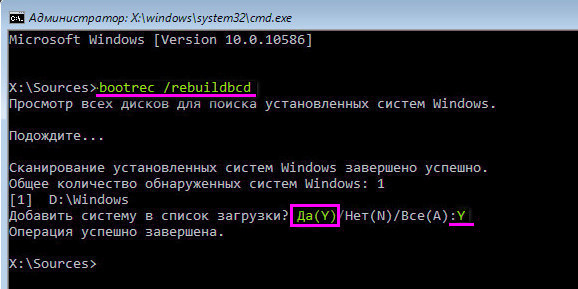
Ждем выполнения команды и, когда последует вопрос «Добавить систему в список загрузки?», отвечаем «Да» вводом клавиши «Y».

Команда «bootrec /rebuildbcd» является составляющей Bootrec.exe – утилиты для исправления ошибок загрузки Windows. При запуске утилиты с параметром «/rebuildbcd» выполняется поиск операционных систем, установленных на всех жестких дисках компьютера. По завершении поиска пользователю предлагается внести данные обо всех обнаруженных системах в конфигурацию загрузчика. Нажатие клавиши «Y» на запрос о добавлении найденных операционных систем перезаписывает загрузчик Windows 10. И операционная система сможет загружаться.
P.S. Еще один способ решить проблему: Как исправить ошибку «The boot configuration data file is missing some required information» при загрузке Windows.
Отличного Вам дня!
Исследуем очередную серьёзную ошибку в операционной системе Windows 10. На этот раз ее код – 0xc0000034 и это связано с файлами конфигурации загрузки, которых нет в наличии. Эта проблема может случиться по разным причинам, нов основном это неудачное обновление системы, а также принудительное прерывание обновления в процессе загрузки или установки.
Это еще не все. Существует множество программ, которые вносят изменения и в реестр, и в другие программы, для этого не предназначенные (для внесения изменения), поэтому от них тоже стоит избавиться. Ну и конечно же, вредоносные файлы, которые тоже являются причиной появления ошибки 0xc0000034.
Многие пользователи не замечают выданных им подсказок. Часто, синие экраны выдают их. В данном случае нам предлагают воспользоваться восстановлением системы, поэтому не нужно сразу бежать переустанавливать Windows. Итак, давайте уберем эту проблему с глаз долой. Загрузимся в режиме восстановления и восстановим загрузчик.
Как войти в режим восстановления?
Если вы не можете попасть в систему, то при загрузке компьютера нужно нажать клавиши Shift+F8, тогда вы попадёте в безопасный режим, но, иногда загрузка может происходит так быстро, что можно не успеть нажать нужные клавиши, тогда можно воспользоваться установочным диском или диском восстановления (подойдёт и флешка).
Вот статьи по созданию загрузочных флешек, советую с ними ознакомиться:
- Создать диск восстановления системы windows 10 | 8 | 8.1
- Как создать загрузочную флэшку Windows 10 с помощью программы WinSetupFromUSB
- Cоздание загрузочной флешки Windows 10 (Rufus и Windows USB/DVD Download Tool)
- Как сделать загрузочную флешку Windows 10 и 7?
Вообще, даже если у вас есть старый диск, начиная с Windows 7, то этого будет достаточно, потому что нам нужно попасть в командную строку, не более.
Итак, как только вы загрузились с диска у вас, появится окно установки и слева внизу должна быть кнопка «Восстановление системы». Когда вы попали в среду восстановления выберите пункт «Диагностика» или «Поиск и устранения неисправностей».
Далее перейдите в «Дополнительные параметры» и найдите там пункт «Командная строка».
Если возможно, то при нажатии клавиш Shift+F10 можно вызвать командную строку, это во много раз быстрее.
Теперь там нужно в командной строке переключиться на английский язык, для этого нажмите Shift+Alt и после этого вводите команду:
bootrec /rebuildbcd
Начнется небольшой анализ, по окончанию которого нам предлагают добавить систему в список загрузок и варианты ответа – Да и Нет и Всё, выбираем да, введя в окне Y.
Инструмент Bootrec как раз и создан для исправления вот таких ошибок, связанных с загрузкой Windows. Если у вас на компьютере больше одной операционной системе, то в командной строке проведите их поиск, введя команду bootrec /rebuildbc, а потом вы можете внести в список загрузки все ОС.
Другие статьи по восстановлению загрузчика:
- Проводим восстановление загрузчика Windows 7
- Как восстановить загрузчик в Windows 8
- Проводим восстановление загрузчика Windows 10
Если не помогло, читайте вот эту статью.
Надеюсь данная статья вам помогла. Отпишитесь в комментариях об успехах.
( 3 оценки, среднее 3.33 из 5 )
by Milan Stanojevic
Milan has been enthusiastic about technology ever since his childhood days, and this led him to take interest in all PC-related technologies. He’s a PC enthusiast and he… read more
Updated on

Most of us often encounter the annoying Blue screens of death problems on our different versions of Windows.
You will see that the screen will simply turn blue or the system will completely fail to boot.
What causes error 0xc0000034?
1. Bad sectors on Hard drive
All the critical system files will not be readable if you have bad sectors on your hard drive.
2. Corrupted Windows installation
You might have a corrupted installation of Windows as your OS crashed due to a malware or other reasons.
3. Missing boot files
Damaged BCD is a possible cause of the 0xc0000034 error. It occurs because your boot-related files are either corrupt, missing, misconfigured and damaged.
4. Compatibility Issues
Some of the users face the error because the recently changed hardware or software has compatibility issues with their PCs.
If you are a Windows 10 user you will see the following error message on your blue screen:
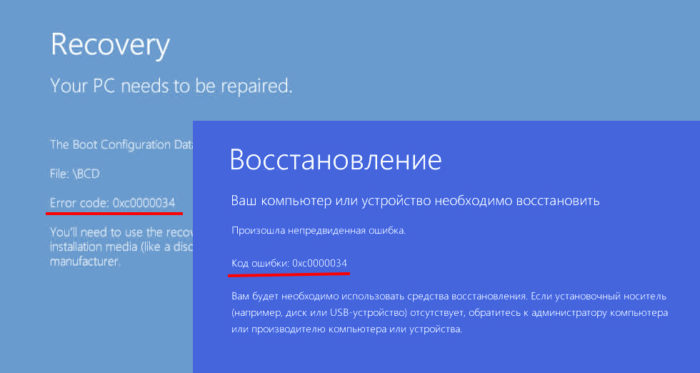
Recovery. Your PC needs to be repaired.
The Boot Configuration Data file is missing some required information.
File: \BCD
Error code: 0xc0000034
You’ll need to use the recovery tools on your installation media. If you don’t have any installation media (like a disc or USB device), contact your system administrator or PC manufacturer.
Press ESC for UEFI Firmware Settings.
How to get rid of Windows 10 error code 0xc0000034?
- Run Windows automatic repair
- Manually repair the error
- Refresh Your PC
1. Run Windows automatic repair

Windows provides an Automatic Repair tool that uses the Windows installation media (DVD, CD or USB drive) to fix the issue in a few steps. Here are some simple steps that you need to follow:
- Insert the Windows 10 DVD or USB stick and restart your system.
- Make sure to boot your system using the Windows installation media instead of your hard drive. You need to constantly press the specified key (F8 or F11 key depending upon your system) and choose the correct boot device.
- You will be navigated through the startup menu, select Next > Repair your computer.
- On the next screen select Troubleshoot and then click Automatic Repair.
- You will see a list of operating systems, select the one you currently have. A repairing process will start to check your Windows for problems and fix them.
- Wait patiently until the end of the process.
If the first solution fails to fix the error, try the next solution.
2. Manually repair the error

This method requires a Windows 10 setup bootable media, so you can fix the error by following these steps.
- First, plug in Windows 10 DVD or USB stick after starting your PC. The system will prompt you to select your keyboard and language settings.
- Select the Repair your computer option.
- On the next screen select Troubleshoot and then click Advanced Options.
- You will now see a Command Prompt option. Click on it.
- As soon as you see a Command Prompt window, enter the following commands and press Enter key after entering each of them.
- bootrec /fixMBR
- bootrec /fixBoot
- bootrec/scanos
- bootrec /rebuildBCD
- At this step add the installation to the boot list by typing A and pressing the Enter key.
- Finally, exit the setup by closing the Command Prompt window and click the Continue button.
- In the end, you will proceed to the Windows 10 home screen.
As you have finished the entire process the Windows 10 Error Code 0xc0000034 should be fixed and your system should boot normally. If the problem still persists try the next solution.
3. Refresh Your PC
When you are unable to repair your PC using any of the above-mentioned solutions you can use Windows Recovery Environment (WinRE) to perform Automatic repair.
Please follow the following steps to refresh your Windows 10 PC:
- At the first step, you have to Reboot your PC.
- Next, you need to hit the F8 or F11 key (depending upon your system) to open Advanced boot options.
- On the next screen select Troubleshoot and then Refresh your PC.
- Follow the instructions to complete the process.
How can I avoid the error in the future?
You have to care about the health of your Windows OS if you want to avoid this error in future. You should avoid downloading any suspicious programs that can be potentially harmful to your system. In case your system gets infected with any malware, scan your PC with antivirus software.
Most importantly, regularly updating your PC is the best solution to keep your system bug-free. Microsoft regularly releases updates including bugs and fixes to protect your PC. Following these simple steps can protect your PC from unnecessary damage and future issues.
RELATED ARTICLES YOU NEED TO CHECK OUT:
- How to reinstall Windows 10 apps on your PC
- Fix mbamswissarmy.sys boot errors using 3 easy solutions
- Fix: Stuck With Defaultuser0 User Account When Trying to Upgrade to Windows 10
![]()
Windows 7 Starter Windows 7 Home Basic Windows 7 Home Premium Windows 7 Enterprise Windows 7 Professional Windows 7 Ultimate Windows Server 2008 R2 Datacenter Windows Server 2008 R2 Enterprise Windows Server 2008 R2 for Itanium-Based Systems Windows Server 2008 R2 Service Pack 1 Windows Server 2008 R2 Standard More…Less
Symptoms
You install Service Pack 1 (SP1) on your computer with Windows 7 or Windows 2008 R2. After the service pack is installed, the computer may freeze or restart. If the computer restarts, you receive an error message that resembles the following on a black screen:
!! 0xc0000034 !! 142/53007 (_0000000000000000.cdf-ms)
Note If you restart the computer, you receive the same error message.
This issue can occur when a user attempts to install the Service Pack, does not restart the machine to complete the installation, installs other updates and then restarts the machine. This issue can also occur if the Service Pack is installed simultaneously with other updates when using WSUS.
During Service Pack installation, the servicing feature of Windows maintains lists of operations to be performed. Some are performed immediately; others can only be done once the system has restarted. One such list is the Primitive Operation Queue (POQ). The POQ operations that need to be performed during restart are stored in pending.xml. In the scenario showing failure, the system attempts to complete the POQ operations twice. The second attempt of the POQ fails (because it has already been done) and causes the error “0xc0000034”. Windows considers any failure at this stage of the install to be blocking and the servicing feature halts the machine from continuing.
If you are not an advanced user and are currently experiencing this error on a Windows 7-based computer, click the link below to view the recovery steps on the Microsoft website:
How to resolve «Error 0xc0000034» after installing Windows 7 Service Pack 1 (SP1)?
Preventative Steps
Resolution
To resolve this issue, follow the steps in the method below.
Delete the POQ entries from Pending.xml
This method is intended to resolve the issue by creating and running a .vbs script. After you successfully create and run the .vbs script, Windows 7 Service Pack 1 installation should complete successfully.
Notes
-
This .vbs script is only applicable for the 0xc0000034 error code, do not use this script for issues other than the 0xc0000034 error.
-
We recommend this method if you are an advanced user.
-
To use this method we recommend having access to a second computer and a removable media device such as a USB thumb drive.
Before getting started
Before getting started locate the following:
-
Locate a second computer with access to the internet. You will use the second computer to create a script (.vbs) file. To create the script (.vbs) file you will copy the text for the script from this knowledge base article.
-
Locate a removable media device such as a USB thumb drive. You will copy the script (.vbs) file that you create to the removable media device. You will then transfer the script (.vbs) file to the computer that is experiencing the issue.
Note If you do not have access to a second computer and a removable media device you can create the script (.vbs) file on the computer that is experiencing the issue. To do this you would go to System Recovery Options, open a command prompt, and then start Notepad from the command prompt. You would then manually create the script (.vbs) file by typing the text for the script from this knowledge base article. You would then save the script (.vbs) file to your local hard drive. You would then be able to run the script to complete the steps.
Part 1:Create the script (.vbs) file
To do this, follow these steps:
-
Locate a second computer with access to the internet.
-
Open Notepad.
-
Copy and paste the following text into Notepad.
Dim xmlDoc, node, nodeList, fileName, backupFileName, numberOfPOQNodes
Set xmlDoc = CreateObject(«Microsoft.XMLDOM»)
If Wscript.Arguments.Count = 0 Then
WScript.echo(«Error! No XML file specified.»)
Wscript.quit
End If
fileName = WScript.Arguments(0)
backupFileName = Left(fileName, InStrRev(fileName, «.») — 1) & «_backup.xml»
If Not xmlDoc.load(fileName) Then
WScript.echo(«Failure loading XML file » & fileName & «.»)
Wscript.quit
End If
xmlDoc.save(backupFileName)
Set nodeList = xmlDoc.documentElement.selectNodes(«POQ»)
numberOfPOQNodes = nodeList.Length
For Each node in nodeList
xmlDoc.documentElement.removeChild(node)
Next
xmlDoc.save(fileName)
Set xmlDoc = Nothing
WScript.echo(numberOfPOQNodes & » POQ nodes removed. Script completed.»)
-
Click File, and then click Save as.
-
Name the file Script.vbs and save the file to a removable media device such as a USB thumb drive.
Part 2: Run the script (.vbs) file
Note The following steps assume that you copied the script (.vbs) file to a USB thumb drive. If you used a different type of removable media device the steps may be slightly different.
To do this, follow these steps:
-
Restart your computer and start pressing the F8 key on your keyboard. You have to press F8 before the Windows logo appears. If the Windows logo appears, you have to try again by waiting until the Windows logon prompt appears and then shutting down and restarting your computer.
Note: On a computer that is configured to boot to multiple operating systems, you can press the F8 key when the Boot Menu appears. -
Use the arrow keys to select Repair your Computer in the Advanced Boot Options area, and then press Enter. If you are prompted, select the Windows 7 installation to be repaired, and then click Next.
-
Select the language and a keyboard input method, and then click Next.
-
Select a user name, type your password, and then click OK.
-
Under System Recovery Options, make a note of the Windows 7 drive letter listed on the line below Choose a recovery tool.
For example, you may see something similar to the following.
Operating system: Windows 7 on (C:) <VolumeName>
Note In this example, the drive letter for Windows 7 would be C.
-
Under System Recovery Options, click Command Prompt.
-
Insert the removable media with the script (.vbs) file that you previously created into the PC.
-
At the command prompt, navigate to the drive, and the directory, that contains the script (.vbs) file that you previously created.
For example, if you previously saved the script.vbs file that you created to the root of a USB thumb drive, and the drive letter associated with the USB thumb drive is the “E” drive, you would simply type the following at the command prompt, and then press Enter.
E:
Note If you are not sure which drive contains the removable media you can use Diskpart to display a list of drives. To run Diskpart, follow these steps.
-
Type Diskpart, and then press Enter.
-
Type List volume, and then press Enter.
-
Make a note of the drive that contains the removable media with the script (.vbs) file that you previously created. Assuming you used a USB thumb drive, the drive type will be listed as “Removable”.
-
To exit Diskpart type Exit, and then press Enter.
-
-
At the command prompt, type the following command and press Enter:
Cscript Script.vbs <Windows _7_drive_letter>:\Windows\winsxs\pending.xml.
Where, <Windows _7_drive_letter> is the drive letter that the Windows 7 operating system is installed on.
This will run the script in the Script.vbs file. After the script completes, you may see a message similar to following.
2 POQ nodes removed. Script Completed
-
To exit the command prompt type Exit, and then press Enter.
-
Restart your computer. Service Pack 1 installation should now complete successfully.
Need more help?
Want more options?
Explore subscription benefits, browse training courses, learn how to secure your device, and more.
Communities help you ask and answer questions, give feedback, and hear from experts with rich knowledge.