Синий экран смерти 0x0000010E указывает, что диспетчер видеопамяти в состоянии, из которого не способен восстановиться.
Причина
Данный BSoD обычно вызывается видеодрайвером, который ведет себя ненадлежащим образом.
Решение
Обновите операционную систему. Если после этого ошибка еще продолжает появляться, то необходимо установить последнею версию драйверов. Скачать их можно на официальном сайте производителя Вашего видеоадаптера.
Также рекомендую ознакомиться со статьей “Общие рекомендации по устранению BSoD”.
Reader Interactions
You might have come across the BSOD error where the system gets crashed up with a message for restarting your computer. Today, we will deal with one such common issue VIDEO_MEMORY_MANAGEMENT_INTERNAL along with a bug check value of 0x0000010E. When there is an intensive problem in the system, a blue-colored prompt shows up on the screen. To slow down the consequences of these damages, the PC restarts itself randomly which leads to the ceasing of many operations.
The aforementioned stop code is an interpretation of the infinite spinning of a thread in a device. The malfunctioning of the graphics card or its driver is the main reason for the appearance of this Blue Screen of Death. Moreover, the absence of system resources, as well as the presence of outdated drivers, are also responsible for this issue. Furthermore, less disk space, issues of memory, and bad sector in the hard disk, also lead to the BSOD error.
Here is how to fix VIDEO_MEMORY_MANAGEMENT_INTERNAL in Windows 10 –
1] Update the corrupted Drivers with Device Manager
Whenever you are going to face a BSOD error then the main reason behind this is the use of obsolete and faulty device drivers. Thus, you must follow a series of systematic steps to update them with the help of Device Manager. Moreover, as we already mentioned earlier faulty drivers are one of the main causes of VIDEO_MEMORY_MANAGEMENT_INTERNAL. Follow the steps as discussed below to check and resolve any such situations –
- Right-click on the Start button and select Device Manager located on the upper part of the list.
- Search for the devices having exclamation mark beside them
- As soon as you get it, just double click on them.
- Right-click on each of them and choose the Update driver option to start the process.
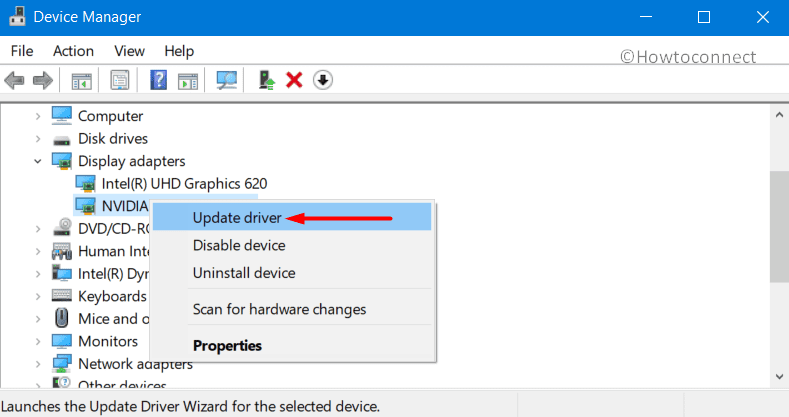
- Your computer will display two options; select Search automatically for drivers.
- Restart your computer to make the changes effective.
2] Repair Windows System Files Using SFC Tool
The corrupted and missing system resources are one of the possible reasons behind the occurrence of VIDEO_MEMORY_MANAGEMENT_INTERNAL error. System File Checker utility can be a much helpful way to recover and correct the corrupted DLL files. The tool is executed in an Elevated Command Prompt which automatically attempts to resolve the problems. Follow the guidelines to access the utility –
- Access the Taskbar Search by pressing Win + Q keys.
- Type cmd in the vacant text area. Once you get the Command Prompt in the result, go to the right side and choose Run as administrator.
- When UAC asks for permission, select Yes.
- You will get a black window, type
sfc / scannowand press the Enter key. - The utility will detect and fix the issues all by itself.
- As the process may take a while, don’t close the system and wait until the scan gets over.
- Reboot the device and upon startup, check for the error and the stop code.
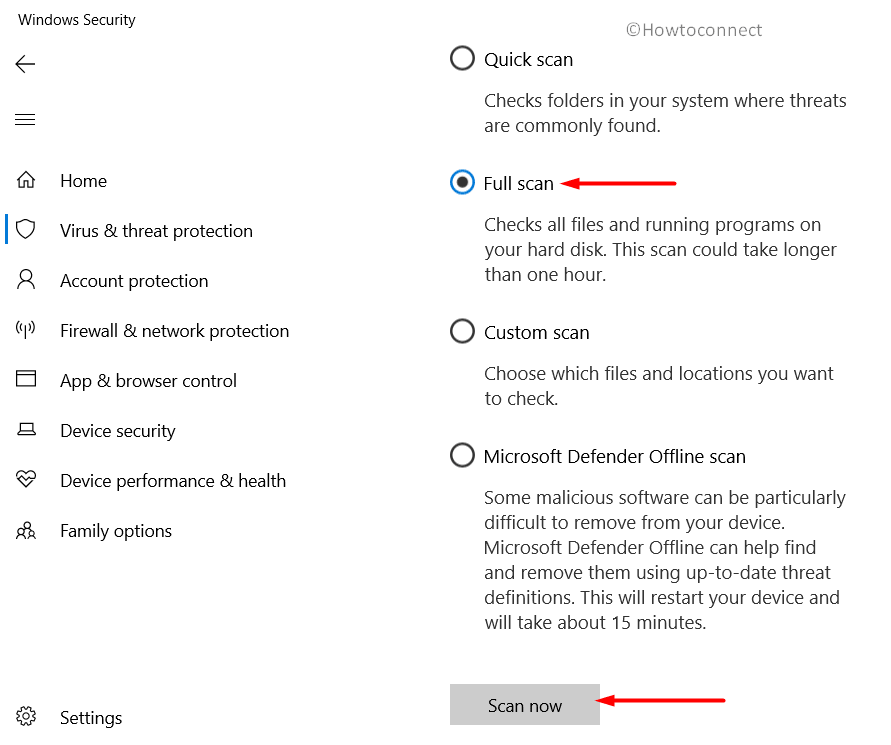
3] Use Window Security to scan full PC
Malware and Viruses are some of the worst enemies in this tech developing world. We are not at all secure as they are present everywhere on the Internet. Whenever you are clicking on some suspicious link or going on a malicious site, they enter into the computer. The slowdown of the PC deteriorates the system resources and loses DLL files, resulting in the initiation of VIDEO_MEMORY_MANAGEMENT_INTERNAL error. Windows Security is one of the well-known security software provided by Microsoft. This application is very much handy in dealing with a virus and to get rid of them. Follow the process as listed below –
- Click the Windows Security system tray icon to quickly access the app.
- Go to Virus & threat protection category.
- Click Scan options link on the right pane.
- Choose the Full Scan option and hit the Scan now button to initiate the scanning process. This may take hours of time as every corner of the system will be scanned.
- Once it reports you about the scan, take necessary action and immediately get rid of the threats.
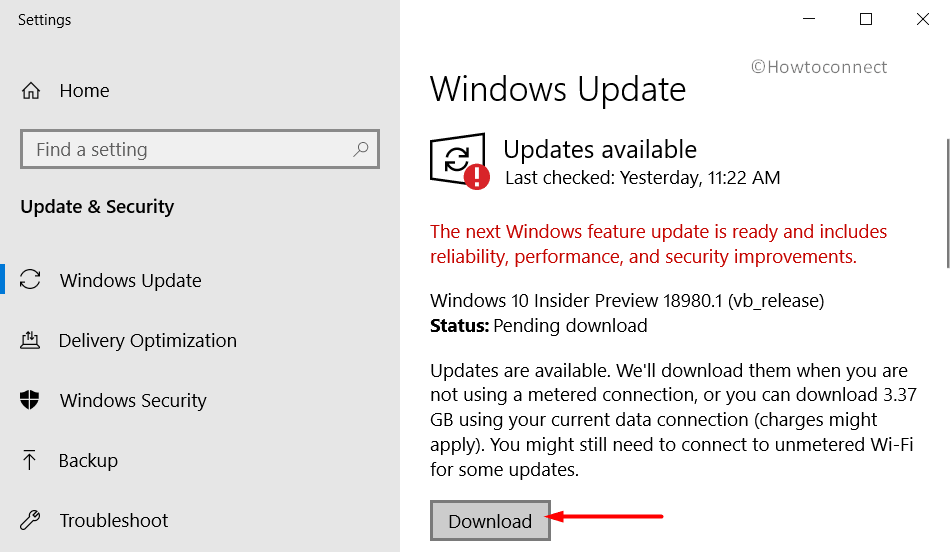
4] Get all possible Windows Updates
There is a much higher chance for an outdated Operating System to get harmed by issues like BSOD error. All cumulative update released by Microsoft regularly consists of fixes of problems and bugs. Downloading and installing them will make the system strong and much more secure from the VIDEO_MEMORY_MANAGEMENT_INTERNAL issue. This is possible through the Windows Settings app and is automatic. Just disable Metered Connection if you are using a mobile hotspot. Our recommendation is to use high-speed internet to decrease the consumption of time. Once ready, go through the steps as stated below –
- Press the Win logo and I key to launch the Settings program.
- Choose the Update and Security icon.
- Move to the right of Windows Update on the following result.
- Click on Check for updates button.
- The system will initiate the process of exploring updates for your OS.
- As soon as the searching process will get over, all the updates will be displayed on the screen.
- Click the Download button and then follow the installation guidelines to finish the process.
5] Use Deployment Image Servicing and Management (DISM) tool
The corruption of Windows Image files is one of the reasons which results in a VIDEO_MEMORY_MANAGEMENT_INTERNAL error. Thus, it is important that we should solve this problem and to defend it, we have the DISM tool. This application can only be executed in an Elevated Command Prompt so go through the steps as stated below –
- Invoke the taskbar by pressing the Windows and S key together.
- Write cmd.exe in the vacant space.
- As soon as the result flashes up right-click on it and choose Run as administrator from the context menu.
- Click on the Yes option if the UAC prompt up.
- Write the given code and press Enter key –
DISM.exe / Online / Cleanup-image / Restorehealth
Note – Generally the process gets stuck at 20 percent. If you are experiencing the same thing, you need not take stress about it as it’s a normal process.
- After the scan gets over, restart the system and see for the error.
6] Run Blue Screen Troubleshooter to fix VIDEO_MEMORY_MANAGEMENT_INTERNAL
Windows 10 is featured with the Blue Screen Troubleshooter which is an inbuilt software to solve any BSOD error on the computer. This application can easily catch a problem linked with VIDEO_MEMORY_MANAGEMENT_INTERNAL and can fix it as well. Follow the steps as given below to use this tool –
- Right-click on the Start menu and choose Settings.
- Click the Update and Security section from the consecutive page.
- Choose Troubleshoot from the left side and switch to the corresponding right.
- Use your mouse to scroll and find the Blue Screen option.
- As soon as you get that just select Run the troubleshooter from the extended area.
Running the tool properly will help you to fix Windows 10 BSOD error code VIDEO_MEMORY_MANAGEMENT_INTERNAL automatically.
7] Boot the OS of your system to safe mode
To defend and tackle issues related to Windows 10, one of the best and simple way is Booting in Safe Mode. Basically, this is the special Startup technique where Windows get loaded up with only the basic root applications. If your issue is getting generated from some advanced settings or any other additional apps, VIDEO_MEMORY_MANAGEMENT_INTERNAL BSOD may get disappeared while booting into the Safe Mode. Go through the guidelines below to utilize the tool –
- Open up Windows Settings by pressing Win and I key together.
- Select Update and Security.
- Choose Recovery and go to the right side.
- Select the Restart now button present below the Advanced startup area.
- The Windows will restart itself and will ask you to choose the next step. From the Startup Screen select Troubleshoot.
- Choose Advanced Options in the Troubleshoot menu and subsequently on Startup Settings.
- During this phase, you will be informed that your machine can be restarted using additional settings i.e. Enable Safe Mode. Select Restart.
- Select “Enable Safe Mode” by choosing F4.
The operating system will get initiated with default services and apps. If the error appears again then it will be very sure that either a problem in the Hardware or a third party application is the real culprit.
8] Remove the Faulty Windows update files
Microsoft rolls out cumulative updates for Windows quite frequently which consists generally of bug fixes and updated features. The team wants its users to get these updates downloaded into their computers using the Settings application. There are very fewer chances of facing trouble in the midway of the installation process but if the process terminates abnormally then one can have a VIDEO_MEMORY_MANAGEMENT_INTERNAL BSOD issue in the system. Files that will be creating problem needs to be eliminated as soon as possible. Go through the steps to do so –
- Go to the Action Center and click All Settings.
- Choose the Update and Security section.
- Windows Update page will open up.
- Click the link of View update history from the adjacent right.
- Select Uninstall updates.
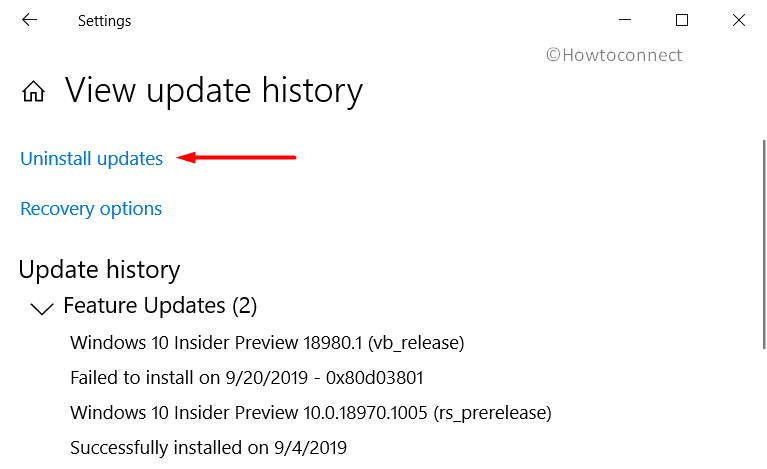
- Right-click the recently installed update and choose Uninstall. Go through the directions on the screen to remove the update files.
9] Reconnect the External Hardware Devices
It is seen that most often the VIDEO_MEMORY_MANAGEMENT_INTERNAL occurs after connecting an additional hard drive with the computer. In such a case, one needs to remove it and then connect it again. Go through the guidelines as provided below –
- Remove all the plugged-in accessories from the computer and then Restart Windows 10 PC.
- When the OS has loaded itself successfully, connect the external devices to the computer and then check for the error VIDEO_MEMORY_MANAGEMENT_INTERNAL.
- After this, get the updated drivers for that specific hardware from the manufacturer website and then install them.
10] Uninstall the program that causes VIDEO_MEMORY_MANAGEMENT_INTERNAL issue
In some cases having different applications that carry out the same task creates some conflicts which lead to VIDEO_MEMORY_MANAGEMENT_INTERNAL in the computer. This makes crashes in the framework prompting a failing PC. You can defend your system from this by uninstalling some extra applications. Follow the steps to do it –
- Press the Windows key and select the cog icon to access Settings.
- Choose the category specified as Apps.
- Move to the right pane on the following page and search for the program that might lead to VIDEO_MEMORY_MANAGEMENT_INTERNAL or the one that you have installed recently.
- When you get it, select and click the Uninstall option from the extended pane.
- Click on the Uninstall option from a small pop-up window to confirm the process.
11] Get rid of 3rd party antivirus software to solve VIDEO_MEMORY_MANAGEMENT_INTERNAL
Earlier, we used to suggest several 3rd party antivirus software to secure the PC from bugs. Using such tools often creates a mess in the operating system which might further lead to VIDEO_MEMORY_MANAGEMENT_INTERNAL. Thus, it is better to uninstall these programs if you are using them by going through the steps below –
- Right-click on the Start icon and choose Run.
- Write appwiz.cpl in the vacant space and choose OK.
- Search for the 3rd party anti-malware application on the Programs and Features from the list provided.
- Select on the Uninstall button from the top menu.
- Follow the app’s instructions to remove it from the PC.
- Reboot the device to completely get rid of all elements of the antivirus software.
12] Run CHKDSK utility to fix VIDEO_MEMORY_MANAGEMENT_INTERNAL
Due to long term use, bad sectors are generated in a Hard Disk that eventually results in VIDEO_MEMORY_MANAGEMENT_INTERNAL. You can tackle this problem using an appropriate command in Elevated Command Prompt. Go through the guidelines as stated below –
- Click on Start and type cmd.exe.
- When the results show an option for Command Prompt, right-click on it.
- Choose Run as administrator from the context menu.
- Select the Yes button if the UAC is displayed on the screen.
- Write the command in the following format –
chkdsk [Drive:] [parameters] - Using the above syntax, the system will show you only the status of the disk but will not solve any existing issues.
- Thus, we need to write the command in the following way – /f /r /x
“f” will make the utility to settle the found issues from the volume.
“r” will search for poor sectors in the Hard Disk.
“x” will dismount the whole volume before beginning the process.
Thus, the command will look like – chkdsk C: /f /r /x
Important – Here the OS is installed in C: drive. If you have used other drivers to carry out the same job then replace C: with D:, E: etc.
13] Use Disk Cleanup utility to clear all junk from your PC
With the execution of every task, junk files are created continuously inside the computer and get stored in the disk storage. These data are useless for the system, thus it is important to delete them. Additionally, they keep on piling up into the PC and with time they take up a large space in the drive. Hence, Hard disk works in low space which affects its performance and results in a VIDEO_MEMORY_MANAGEMENT_INTERNAL. However, we can delete these using the tool named as Disk Cleanup. Check the instructions as shown below –
- Press the Windows key from the keyboard and type in cleanmgr.
- Select the Disk Cleanup desktop app from the results.
- You will get a wizard that will pop up asking for a preferable drive.
- Select C: from the dropdown menu and press Enter key
- The Disk Cleanup utility will get initiated by figuring out the amount of space it can recover in the C: drive and appear in a window.
- Click on the Cleanup system files button present at the bottom of the window.
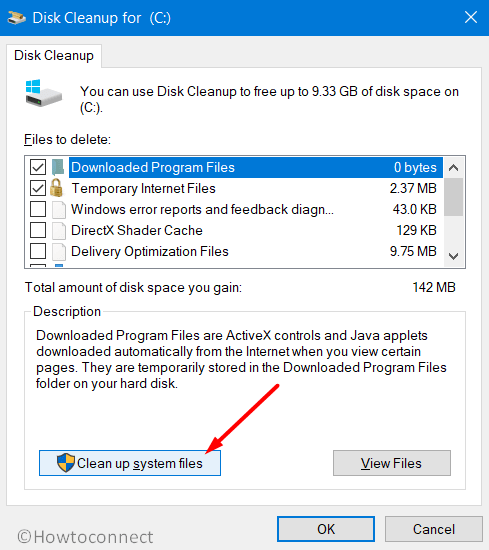
- A pop up will appear again on the screen asking to select the drive.
- Select C: from the dropdown menu and press Enter key from the keyboard.
- When the Disk Cleanup for (C:) comes into the display, check all boxes except Downloads
- Click on OK to initiate the cleanup process in the system.
14] Resolve the issue linked with RAM
A defective, unreliable, and wrong allocation of RAM (Random Access Memory) may result in the VIDEO_MEMORY_MANAGEMENT_INTERNAL issue in Windows 10. Thus, a perfect solution is mandatory to rectify these problems. Scanning the RAM issues is a bit complex but the Memory Diagnostic tool works excellently to resolve the problematic sectors. Go through the steps as discussed below-
- The very first thing that you need to ensure is that you close and save all the on-progress applications in your system.
- Press the Windows and S key simultaneously to enable the Taskbar Search to appear on the screen.
- Write Windows Memory Diagnostic in the allowed field and choose it from the list as prompted.
- Choose Restart now and check for problems (recommended) from the wizard.
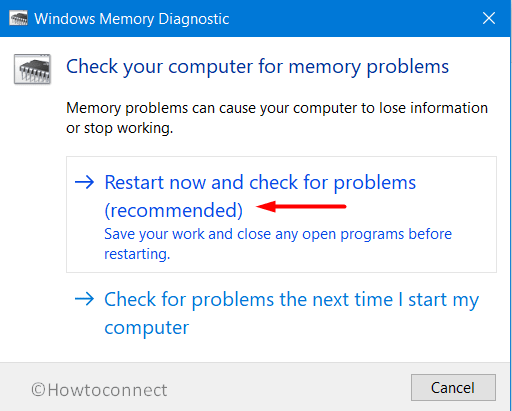
- As soon as the system will start, it will scan all the memory troubles.
- When the process will reach 100 percent, Windows will automatically restart itself.
- Once it will get started again, you will be seeing a list in the notification area of the taskbar.
15] Utilize Previous System Restore Point
Whenever some changes take place inside the computer, the Windows Registry files are also affected. If something goes wrong while uninstalling or installing a registry file then it may cause VIDEO_MEMORY_MANAGEMENT_INTERNAL. One of the best ways to get rid of this issue is to revert all these changes and this can only be possible using System Restore.
- Invoke the Run dialog box by pressing Win and R keys simultaneously from the keyboard.
- Write ‘rstrui’ and press Enter key.
- This will open up System Restore wizard on the screen.
- Select the Next option to make the system reveal the Restore points.
- Click the Show more restore points option to see further of time and date.
- Choose the first row showing the latest point you have created on the device.
- Select the Next option.
- At last, select Finish to start the complete restoration procedure.
16] Disabling of Auto Restart feature
In the case of BSOD error, the shutdown of the system is a common experience by many users. But if this process is taking place for a majority of the time then you need to note that your computer has gone into some critical issues like VIDEO_MEMORY_MANAGEMENT_INTERNAL. If you are facing this issue too often then keep reading below to stop it.
- To get the taskbar search bar press Windows and S key in one go.
- Write Control in the search bar and then press Enter.
- Change its view to either large or small icon, search for System applet and then click on it.
- Choose Advanced System Settings from the left column.
- Go to the Advanced tab as soon as a wizard comes up on the screen.
- Under Startup and Recovery section click Settings.
- Unmark the box of Automatically restart from System failure.
- Select the OK button to get ahead.
<
17] Carry out a complete installation to fix VIDEO_MEMORY_MANAGEMENT_INTERNAL
Hopefully, you will solve the VIDEO_MEMORY_MANAGEMENT_INTERNAL using the above techniques. In case you are not able to solve it, you can just go for a clean installation of Windows 10. This method is going to make your system get rid of all kinds of bugs and error and thus there will be no further issues.
We recommend you to save all your important files and data at a safer place as Backup. Since this resolution requires professional skills, you might need someone to guide you.
Methods:
1] Update the corrupted Drivers with Device Manager
2] Repair Windows System Files Using SFC Tool
3] Use Window Security to scan full PC
4] Get all possible Windows Updates
5] Use Deployment Image Servicing and Management (DISM) tool
6] Run Blue Screen Troubleshooter
7] Boot the OS of your system to safe mode
8] Remove the Faulty Windows update files
9] Reconnect the External Hardware Devices
10] Uninstall the program that causes issue
11] Get rid of 3rd party antivirus software
12] Run CHKDSK utility
13] Use Disk Cleanup utility to clear all junk from your PC
14] Resolve the issue linked with RAM
15] Utilize Previous System Restore Point
16] Disabling of Auto Restart feature
17] Carry out a complete installation
That’s all!!
Repair any Windows problems such as Blue/Black Screen, DLL, Exe, application, Regisrty error and quickly recover system from issues using Reimage.
You might have come across the BSOD error where the system gets crashed up with a message for restarting your computer. Today, we will deal with one such common issue VIDEO_MEMORY_MANAGEMENT_INTERNAL along with a bug check value of 0x0000010E. When there is an intensive problem in the system, a blue-colored prompt shows up on the screen. To slow down the consequences of these damages, the PC restarts itself randomly which leads to the ceasing of many operations.
The aforementioned stop code is an interpretation of the infinite spinning of a thread in a device. The malfunctioning of the graphics card or its driver is the main reason for the appearance of this Blue Screen of Death. Moreover, the absence of system resources, as well as the presence of outdated drivers, are also responsible for this issue. Furthermore, less disk space, issues of memory, and bad sector in the hard disk, also lead to the BSOD error.
Here is how to fix VIDEO_MEMORY_MANAGEMENT_INTERNAL in Windows 10 –
1] Update the corrupted Drivers with Device Manager
Whenever you are going to face a BSOD error then the main reason behind this is the use of obsolete and faulty device drivers. Thus, you must follow a series of systematic steps to update them with the help of Device Manager. Moreover, as we already mentioned earlier faulty drivers are one of the main causes of VIDEO_MEMORY_MANAGEMENT_INTERNAL. Follow the steps as discussed below to check and resolve any such situations –
- Right-click on the Start button and select Device Manager located on the upper part of the list.
- Search for the devices having exclamation mark beside them
- As soon as you get it, just double click on them.
- Right-click on each of them and choose the Update driver option to start the process.
- Your computer will display two options; select Search automatically for drivers.
- Restart your computer to make the changes effective.
2] Repair Windows System Files Using SFC Tool
The corrupted and missing system resources are one of the possible reasons behind the occurrence of VIDEO_MEMORY_MANAGEMENT_INTERNAL error. System File Checker utility can be a much helpful way to recover and correct the corrupted DLL files. The tool is executed in an Elevated Command Prompt which automatically attempts to resolve the problems. Follow the guidelines to access the utility –
- Access the Taskbar Search by pressing Win + Q keys.
- Type cmd in the vacant text area. Once you get the Command Prompt in the result, go to the right side and choose Run as administrator.
- When UAC asks for permission, select Yes.
- You will get a black window, type
sfc / scannowand press the Enter key. - The utility will detect and fix the issues all by itself.
- As the process may take a while, don’t close the system and wait until the scan gets over.
- Reboot the device and upon startup, check for the error and the stop code.
3] Use Window Security to scan full PC
Malware and Viruses are some of the worst enemies in this tech developing world. We are not at all secure as they are present everywhere on the Internet. Whenever you are clicking on some suspicious link or going on a malicious site, they enter into the computer. The slowdown of the PC deteriorates the system resources and loses DLL files, resulting in the initiation of VIDEO_MEMORY_MANAGEMENT_INTERNAL error. Windows Security is one of the well-known security software provided by Microsoft. This application is very much handy in dealing with a virus and to get rid of them. Follow the process as listed below –
- Click the Windows Security system tray icon to quickly access the app.
- Go to Virus & threat protection category.
- Click Scan options link on the right pane.
- Choose the Full Scan option and hit the Scan now button to initiate the scanning process. This may take hours of time as every corner of the system will be scanned.
- Once it reports you about the scan, take necessary action and immediately get rid of the threats.
4] Get all possible Windows Updates
There is a much higher chance for an outdated Operating System to get harmed by issues like BSOD error. All cumulative update released by Microsoft regularly consists of fixes of problems and bugs. Downloading and installing them will make the system strong and much more secure from the VIDEO_MEMORY_MANAGEMENT_INTERNAL issue. This is possible through the Windows Settings app and is automatic. Just disable Metered Connection if you are using a mobile hotspot. Our recommendation is to use high-speed internet to decrease the consumption of time. Once ready, go through the steps as stated below –
- Press the Win logo and I key to launch the Settings program.
- Choose the Update and Security icon.
- Move to the right of Windows Update on the following result.
- Click on Check for updates button.
- The system will initiate the process of exploring updates for your OS.
- As soon as the searching process will get over, all the updates will be displayed on the screen.
- Click the Download button and then follow the installation guidelines to finish the process.
5] Use Deployment Image Servicing and Management (DISM) tool
The corruption of Windows Image files is one of the reasons which results in a VIDEO_MEMORY_MANAGEMENT_INTERNAL error. Thus, it is important that we should solve this problem and to defend it, we have the DISM tool. This application can only be executed in an Elevated Command Prompt so go through the steps as stated below –
- Invoke the taskbar by pressing the Windows and S key together.
- Write cmd.exe in the vacant space.
- As soon as the result flashes up right-click on it and choose Run as administrator from the context menu.
- Click on the Yes option if the UAC prompt up.
- Write the given code and press Enter key –
DISM.exe / Online / Cleanup-image / Restorehealth
Note – Generally the process gets stuck at 20 percent. If you are experiencing the same thing, you need not take stress about it as it’s a normal process.
- After the scan gets over, restart the system and see for the error.
6] Run Blue Screen Troubleshooter to fix VIDEO_MEMORY_MANAGEMENT_INTERNAL
Windows 10 is featured with the Blue Screen Troubleshooter which is an inbuilt software to solve any BSOD error on the computer. This application can easily catch a problem linked with VIDEO_MEMORY_MANAGEMENT_INTERNAL and can fix it as well. Follow the steps as given below to use this tool –
- Right-click on the Start menu and choose Settings.
- Click the Update and Security section from the consecutive page.
- Choose Troubleshoot from the left side and switch to the corresponding right.
- Use your mouse to scroll and find the Blue Screen option.
- As soon as you get that just select Run the troubleshooter from the extended area.
Running the tool properly will help you to fix Windows 10 BSOD error code VIDEO_MEMORY_MANAGEMENT_INTERNAL automatically.
7] Boot the OS of your system to safe mode
To defend and tackle issues related to Windows 10, one of the best and simple way is Booting in Safe Mode. Basically, this is the special Startup technique where Windows get loaded up with only the basic root applications. If your issue is getting generated from some advanced settings or any other additional apps, VIDEO_MEMORY_MANAGEMENT_INTERNAL BSOD may get disappeared while booting into the Safe Mode. Go through the guidelines below to utilize the tool –
- Open up Windows Settings by pressing Win and I key together.
- Select Update and Security.
- Choose Recovery and go to the right side.
- Select the Restart now button present below the Advanced startup area.
- The Windows will restart itself and will ask you to choose the next step. From the Startup Screen select Troubleshoot.
- Choose Advanced Options in the Troubleshoot menu and subsequently on Startup Settings.
- During this phase, you will be informed that your machine can be restarted using additional settings i.e. Enable Safe Mode. Select Restart.
- Select “Enable Safe Mode” by choosing F4.
The operating system will get initiated with default services and apps. If the error appears again then it will be very sure that either a problem in the Hardware or a third party application is the real culprit.
8] Remove the Faulty Windows update files
Microsoft rolls out cumulative updates for Windows quite frequently which consists generally of bug fixes and updated features. The team wants its users to get these updates downloaded into their computers using the Settings application. There are very fewer chances of facing trouble in the midway of the installation process but if the process terminates abnormally then one can have a VIDEO_MEMORY_MANAGEMENT_INTERNAL BSOD issue in the system. Files that will be creating problem needs to be eliminated as soon as possible. Go through the steps to do so –
- Go to the Action Center and click All Settings.
- Choose the Update and Security section.
- Windows Update page will open up.
- Click the link of View update history from the adjacent right.
- Select Uninstall updates.
- Right-click the recently installed update and choose Uninstall. Go through the directions on the screen to remove the update files.
9] Reconnect the External Hardware Devices
It is seen that most often the VIDEO_MEMORY_MANAGEMENT_INTERNAL occurs after connecting an additional hard drive with the computer. In such a case, one needs to remove it and then connect it again. Go through the guidelines as provided below –
- Remove all the plugged-in accessories from the computer and then Restart Windows 10 PC.
- When the OS has loaded itself successfully, connect the external devices to the computer and then check for the error VIDEO_MEMORY_MANAGEMENT_INTERNAL.
- After this, get the updated drivers for that specific hardware from the manufacturer website and then install them.
10] Uninstall the program that causes VIDEO_MEMORY_MANAGEMENT_INTERNAL issue
In some cases having different applications that carry out the same task creates some conflicts which lead to VIDEO_MEMORY_MANAGEMENT_INTERNAL in the computer. This makes crashes in the framework prompting a failing PC. You can defend your system from this by uninstalling some extra applications. Follow the steps to do it –
- Press the Windows key and select the cog icon to access Settings.
- Choose the category specified as Apps.
- Move to the right pane on the following page and search for the program that might lead to VIDEO_MEMORY_MANAGEMENT_INTERNAL or the one that you have installed recently.
- When you get it, select and click the Uninstall option from the extended pane.
- Click on the Uninstall option from a small pop-up window to confirm the process.
11] Get rid of 3rd party antivirus software to solve VIDEO_MEMORY_MANAGEMENT_INTERNAL
Earlier, we used to suggest several 3rd party antivirus software to secure the PC from bugs. Using such tools often creates a mess in the operating system which might further lead to VIDEO_MEMORY_MANAGEMENT_INTERNAL. Thus, it is better to uninstall these programs if you are using them by going through the steps below –
- Right-click on the Start icon and choose Run.
- Write appwiz.cpl in the vacant space and choose OK.
- Search for the 3rd party anti-malware application on the Programs and Features from the list provided.
- Select on the Uninstall button from the top menu.
- Follow the app’s instructions to remove it from the PC.
- Reboot the device to completely get rid of all elements of the antivirus software.
12] Run CHKDSK utility to fix VIDEO_MEMORY_MANAGEMENT_INTERNAL
Due to long term use, bad sectors are generated in a Hard Disk that eventually results in VIDEO_MEMORY_MANAGEMENT_INTERNAL. You can tackle this problem using an appropriate command in Elevated Command Prompt. Go through the guidelines as stated below –
- Click on Start and type cmd.exe.
- When the results show an option for Command Prompt, right-click on it.
- Choose Run as administrator from the context menu.
- Select the Yes button if the UAC is displayed on the screen.
- Write the command in the following format –
chkdsk [Drive:] [parameters] - Using the above syntax, the system will show you only the status of the disk but will not solve any existing issues.
- Thus, we need to write the command in the following way – /f /r /x
“f” will make the utility to settle the found issues from the volume.
“r” will search for poor sectors in the Hard Disk.
“x” will dismount the whole volume before beginning the process.
Thus, the command will look like – chkdsk C: /f /r /x
Important – Here the OS is installed in C: drive. If you have used other drivers to carry out the same job then replace C: with D:, E: etc.
13] Use Disk Cleanup utility to clear all junk from your PC
With the execution of every task, junk files are created continuously inside the computer and get stored in the disk storage. These data are useless for the system, thus it is important to delete them. Additionally, they keep on piling up into the PC and with time they take up a large space in the drive. Hence, Hard disk works in low space which affects its performance and results in a VIDEO_MEMORY_MANAGEMENT_INTERNAL. However, we can delete these using the tool named as Disk Cleanup. Check the instructions as shown below –
- Press the Windows key from the keyboard and type in cleanmgr.
- Select the Disk Cleanup desktop app from the results.
- You will get a wizard that will pop up asking for a preferable drive.
- Select C: from the dropdown menu and press Enter key
- The Disk Cleanup utility will get initiated by figuring out the amount of space it can recover in the C: drive and appear in a window.
- Click on the Cleanup system files button present at the bottom of the window.
- A pop up will appear again on the screen asking to select the drive.
- Select C: from the dropdown menu and press Enter key from the keyboard.
- When the Disk Cleanup for (C:) comes into the display, check all boxes except Downloads
- Click on OK to initiate the cleanup process in the system.
14] Resolve the issue linked with RAM
A defective, unreliable, and wrong allocation of RAM (Random Access Memory) may result in the VIDEO_MEMORY_MANAGEMENT_INTERNAL issue in Windows 10. Thus, a perfect solution is mandatory to rectify these problems. Scanning the RAM issues is a bit complex but the Memory Diagnostic tool works excellently to resolve the problematic sectors. Go through the steps as discussed below-
- The very first thing that you need to ensure is that you close and save all the on-progress applications in your system.
- Press the Windows and S key simultaneously to enable the Taskbar Search to appear on the screen.
- Write Windows Memory Diagnostic in the allowed field and choose it from the list as prompted.
- Choose Restart now and check for problems (recommended) from the wizard.
- As soon as the system will start, it will scan all the memory troubles.
- When the process will reach 100 percent, Windows will automatically restart itself.
- Once it will get started again, you will be seeing a list in the notification area of the taskbar.
15] Utilize Previous System Restore Point
Whenever some changes take place inside the computer, the Windows Registry files are also affected. If something goes wrong while uninstalling or installing a registry file then it may cause VIDEO_MEMORY_MANAGEMENT_INTERNAL. One of the best ways to get rid of this issue is to revert all these changes and this can only be possible using System Restore.
- Invoke the Run dialog box by pressing Win and R keys simultaneously from the keyboard.
- Write ‘rstrui’ and press Enter key.
- This will open up System Restore wizard on the screen.
- Select the Next option to make the system reveal the Restore points.
- Click the Show more restore points option to see further of time and date.
- Choose the first row showing the latest point you have created on the device.
- Select the Next option.
- At last, select Finish to start the complete restoration procedure.
16] Disabling of Auto Restart feature
In the case of BSOD error, the shutdown of the system is a common experience by many users. But if this process is taking place for a majority of the time then you need to note that your computer has gone into some critical issues like VIDEO_MEMORY_MANAGEMENT_INTERNAL. If you are facing this issue too often then keep reading below to stop it.
- To get the taskbar search bar press Windows and S key in one go.
- Write Control in the search bar and then press Enter.
- Change its view to either large or small icon, search for System applet and then click on it.
- Choose Advanced System Settings from the left column.
- Go to the Advanced tab as soon as a wizard comes up on the screen.
- Under Startup and Recovery section click Settings.
- Unmark the box of Automatically restart from System failure.
- Select the OK button to get ahead.
<
17] Carry out a complete installation to fix VIDEO_MEMORY_MANAGEMENT_INTERNAL
Hopefully, you will solve the VIDEO_MEMORY_MANAGEMENT_INTERNAL using the above techniques. In case you are not able to solve it, you can just go for a clean installation of Windows 10. This method is going to make your system get rid of all kinds of bugs and error and thus there will be no further issues.
We recommend you to save all your important files and data at a safer place as Backup. Since this resolution requires professional skills, you might need someone to guide you.
Methods:
1] Update the corrupted Drivers with Device Manager
2] Repair Windows System Files Using SFC Tool
3] Use Window Security to scan full PC
4] Get all possible Windows Updates
5] Use Deployment Image Servicing and Management (DISM) tool
6] Run Blue Screen Troubleshooter
7] Boot the OS of your system to safe mode
8] Remove the Faulty Windows update files
9] Reconnect the External Hardware Devices
10] Uninstall the program that causes issue
11] Get rid of 3rd party antivirus software
12] Run CHKDSK utility
13] Use Disk Cleanup utility to clear all junk from your PC
14] Resolve the issue linked with RAM
15] Utilize Previous System Restore Point
16] Disabling of Auto Restart feature
17] Carry out a complete installation
That’s all!!
Repair any Windows problems such as Blue/Black Screen, DLL, Exe, application, Regisrty error and quickly recover system from issues using Reimage.
/Knowledgebase /0x0000010E (VIDEO MEMORY MANAGEMENT INTERNAL) – Fix for Windows
Get the fix to the 0x0000010E: VIDEO MEMORY MANAGEMENT INTERNAL boot error message affecting Windows Vista, Windows 7, Windows 8, Windows 8.1, Windows 10 and Windows Server 2008.
About the “0x0000010E” error
The following information on this error has been compiled by NeoSmart Technologies, based on the information gathered and reported by our global network of engineers, developers, and technicians or partner organizations.
Description and Symptoms
The error messages, alerts, warnings, and symptoms below are tied to this error.
Symptom 1: 0x0000010E error screen on startup
The main cause for this error to appear is a corrupt video driver or a driver that is incompatible with your current Windows version.

A problem has been detected and Windows has been shut down to prevent damage
to your computer.

VIDEO_MEMORY_MANAGEMENT_INTERNAL

If this is the first time you’ve seen this Stop error screen,
restart your computer. If this screen appears again, follow
these steps:

Check to make sure any new hardware or software is properly installed.
If this is a new installation, ask your hardware or software manufacturer
for any Windows updates you might need.

If problems continue, disable or remove any newly installed hardware
or software. Disable BIOS memory options such as caching or shadowing.
If you need to use Safe Mode to remove or disable components, restart
your computer, press F8 to select Advanced Startup Options, and then
select Safe Mode.

Technical Information:

*** STOP: 0x0000010E (0x00000000, 0x00000000, 0x00000000, 0x00000000)

Collecting data for crash dump ...
Initializing disk for crash dump ...
Beginning dump for physical memory.
Dumping physical memory to disk: 100
Physical memory dump complete.
Contact your system admin or technical support group for further assistance.
Causes of this Error
This error has been known to occur as a result of one or more of the following:
Cause 1: Corrupt or outdated device drivers
Sometimes the device drivers may become misconfigured, corrupt or outdated. That may also happen after a Windows update or a Windows downgrade from a newer system to an older one.
Fixing “0x0000010E” on Windows
Windows Setup CD/DVD Required!
Some of the solutions below require the use of the Microsoft Windows setup CD or DVD. If your PC did not come with a Windows installation disc or if you no longer have your Windows setup media, you can use Easy Recovery Essentials for Windows instead. EasyRE will automatically find and fix many problems, and can also be used to solve this problem with the directions below.
Fix #1: Update drivers
To check if the error is caused by a faulty drive, run an automatic driver update or manually update the drivers to the latest available versions.
To manually update a driver, follow these steps:
- Click Start
- Type in
devmgmt.mscin the search box - Click devmgmt from results list
- Right-click on the driver
- To update the driver, select Update Driver Software.
- To disable the driver, select Disable.
- To uninstall the driver, select Uninstall.
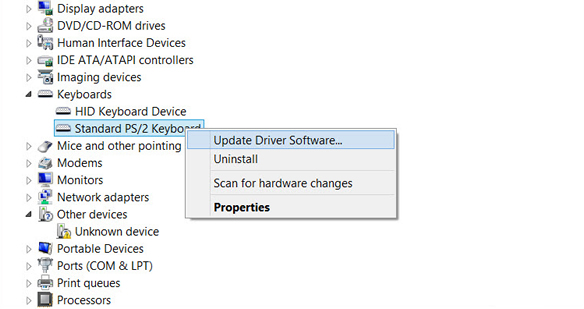
Device Manager screen
To run an automatic driver update, follow these steps:
- Click Start
- Go to Devices and Printers
- Right-click on your computer
- Select Device Installation Settings
- Select Yes, do this automatically
- Click Save Changes
- Follow the necessary steps to continue the process

Device installation screen
Fix #2: Install Hotfix
Microsoft made the following Hotfix available that can fix the 0x0000010E error at the https://support.microsoft.com/en-us/kb/953026 link.
The supported versions of Windows are:
- Windows Vista
- Windows Server 2008
Fix #3: Reinstall Windows
If Fix #1 doesn’t fix the error, reinstall Windows.
Reinstalling Windows will delete your personal files. Use Easy Recovery Essentials to backup your files before you proceed.
To reinstall Windows, follow these steps:
- Insert the installation DVD
- Restart the computer
- Press any key to boot from the CD when prompted to do so
- At the Install Windows window, select a language, time and keyboard method
- Click Next
- Click Install Now

Windows Vista Repair Your Computer Menu
- Follow the instructions to continue

More Information
Support Links
- Easy Recovery Essentials for Windows – our repair and recovery disk.
It’s an easy-to-use and automated diagnostics disk. It’s available for Windows 8, Windows 7 and Windows Vista. It’s also available for Windows XP and Windows Server.
Read more at Windows Recovery Disks.
- The NeoSmart Support Forums, member-to-member technical support and troubleshooting.
- Get a discounted price on replacement setup and installation discs: Windows 8, Windows 10.
Applicable Systems
This Windows-related knowledgebase article applies to the following operating systems:
- Windows 8 (all editions)
- Windows 8.1 (all editions)
- Windows 10 (all editions)
Propose an edit
Related Articles
-
Fatal: INT18: Boot failure fix
-
BootGuard 2TB Data Protection
-
Setup was unable to create a new system partition: Fix for Windows
-
IRQL NOT LESS OR EQUAL – Fix for Windows 10, 11, XP, Vista, 7, 8
-
KERNEL SECURITY CHECK ERROR – Fix for Windows XP, Vista, 7, 8, 8.1, 10
-
0x00000109 – Fix for Windows Vista, 7, 8, 10
01.09.2018
Просмотров: 5031
| Цифровое название ошибки | 0x0000010E |
| Название BSoD | VIDEO_MEMORY_MANAGEMENT_INTERNAL |
| Причина появления | Сбой драйвера |
| Операционные системы | Windows 2000, XP, 7, 8, 10 |
Синий экран смерти VIDEO_MEMORY_MANAGEMENT_INTERNAL с цифровым кодом 0x0000010E указывает на то, что диспетчер видеопамяти находится в состоянии, из которого не способен восстановиться. Возникает такой BSoD по причине повреждения, отсутствия или несовместимости видеодрайвера с операционной системой. Также не исключена сама поломка видеокарты.
Способы решения ошибки 0x0000010E
/Knowledgebase /0x0000010E (VIDEO MEMORY MANAGEMENT INTERNAL) – Fix for Windows
Get the fix to the 0x0000010E: VIDEO MEMORY MANAGEMENT INTERNAL boot error message affecting Windows Vista, Windows 7, Windows 8, Windows 8.1, Windows 10 and Windows Server 2008.
About the “0x0000010E” error
The following information on this error has been compiled by NeoSmart Technologies, based on the information gathered and reported by our global network of engineers, developers, and technicians or partner organizations.
Description and Symptoms
The error messages, alerts, warnings, and symptoms below are tied to this error.
Symptom 1: 0x0000010E error screen on startup
The main cause for this error to appear is a corrupt video driver or a driver that is incompatible with your current Windows version.
A problem has been detected and Windows has been shut down to prevent damage
to your computer.

VIDEO_MEMORY_MANAGEMENT_INTERNAL

If this is the first time you’ve seen this Stop error screen,
restart your computer. If this screen appears again, follow
these steps:

Check to make sure any new hardware or software is properly installed.
If this is a new installation, ask your hardware or software manufacturer
for any Windows updates you might need.

If problems continue, disable or remove any newly installed hardware
or software. Disable BIOS memory options such as caching or shadowing.
If you need to use Safe Mode to remove or disable components, restart
your computer, press F8 to select Advanced Startup Options, and then
select Safe Mode.

Technical Information:

*** STOP: 0x0000010E (0x00000000, 0x00000000, 0x00000000, 0x00000000)

Collecting data for crash dump ...
Initializing disk for crash dump ...
Beginning dump for physical memory.
Dumping physical memory to disk: 100
Physical memory dump complete.
Contact your system admin or technical support group for further assistance.
Causes of this Error
This error has been known to occur as a result of one or more of the following:
Cause 1: Corrupt or outdated device drivers
Sometimes the device drivers may become misconfigured, corrupt or outdated. That may also happen after a Windows update or a Windows downgrade from a newer system to an older one.
Fixing “0x0000010E” on Windows
Windows Setup CD/DVD Required!
Some of the solutions below require the use of the Microsoft Windows setup CD or DVD. If your PC did not come with a Windows installation disc or if you no longer have your Windows setup media, you can use Easy Recovery Essentials for Windows instead. EasyRE will automatically find and fix many problems, and can also be used to solve this problem with the directions below.
Fix #1: Update drivers
To check if the error is caused by a faulty drive, run an automatic driver update or manually update the drivers to the latest available versions.
To manually update a driver, follow these steps:
- Click Start
- Type in
devmgmt.mscin the search box - Click devmgmt from results list
- Right-click on the driver
- To update the driver, select Update Driver Software.
- To disable the driver, select Disable.
- To uninstall the driver, select Uninstall.
Device Manager screen
To run an automatic driver update, follow these steps:
- Click Start
- Go to Devices and Printers
- Right-click on your computer
- Select Device Installation Settings
- Select Yes, do this automatically
- Click Save Changes
- Follow the necessary steps to continue the process
Device installation screen
Fix #2: Install Hotfix
Microsoft made the following Hotfix available that can fix the 0x0000010E error at the https://support.microsoft.com/en-us/kb/953026 link.
The supported versions of Windows are:
- Windows Vista
- Windows Server 2008
Fix #3: Reinstall Windows
If Fix #1 doesn’t fix the error, reinstall Windows.
Reinstalling Windows will delete your personal files. Use Easy Recovery Essentials to backup your files before you proceed.
To reinstall Windows, follow these steps:
- Insert the installation DVD
- Restart the computer
- Press any key to boot from the CD when prompted to do so
- At the Install Windows window, select a language, time and keyboard method
- Click Next
- Click Install Now
Windows Vista Repair Your Computer Menu
- Follow the instructions to continue
More Information
Support Links
- Easy Recovery Essentials for Windows – our repair and recovery disk.
It’s an easy-to-use and automated diagnostics disk. It’s available for Windows 8, Windows 7 and Windows Vista. It’s also available for Windows XP and Windows Server.
Read more at Windows Recovery Disks.
- The NeoSmart Support Forums, member-to-member technical support and troubleshooting.
- Get a discounted price on replacement setup and installation discs: Windows 8, Windows 10.
Applicable Systems
This Windows-related knowledgebase article applies to the following operating systems:
- Windows 8 (all editions)
- Windows 8.1 (all editions)
- Windows 10 (all editions)
Propose an edit
Related Articles
-
Fatal: INT18: Boot failure fix
-
BootGuard 2TB Data Protection
-
Setup was unable to create a new system partition: Fix for Windows
-
IRQL NOT LESS OR EQUAL – Fix for Windows 10, 11, XP, Vista, 7, 8
-
KERNEL SECURITY CHECK ERROR – Fix for Windows XP, Vista, 7, 8, 8.1, 10
-
0x00000109 – Fix for Windows Vista, 7, 8, 10