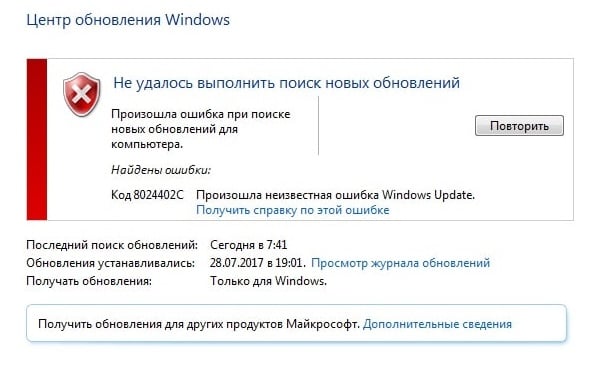
When you launch Windows Update, it makes an effort to connect to the internet to update your PC, and this problem can show up: 0x8024402c. How to fix the error? Here is the quick navigation.
| Workable Solutions | Step-by-step Troubleshooting |
|---|---|
| Fix 1. Enable Automatic Network | In the first method, we shall enable automatic network detection settings via Windows Settings…Full steps |
| Fix 2. Disable Windows Firewall | By temporarily disabling Windows Defender Firewall, check whether the error code 0x8024402c…Full steps |
| Fix 3. Delete Distribution | In this method, you should delete software distribution to eliminate the error…Full steps |
| Fix 4. Restart to Clean the Boot | We will perform a Clean Boot via System Configuration to eliminate the error…Full steps |
| More Fixes | The other 2 fixes are available here for you to fix Windows update error 0x8024402c…Full steps |
What Is Windows Error Code 0x8024402c
This occurs when the PC cannot correctly connect to the Windows Update Server, which then confuses the system and ultimately causes it to crash and display the blue screen of death. An incorrect network setting, LAN setting, or update setting that does not comply with the update requirements could cause this issue. By approving the Automatically detected connection settings, it can be stopped.
The connection between the PC and the Windows Updates servers may break down if the firewall or proxy settings are misconfigured, another possible reason for this issue. Given below are more causes on why the Windows update error 0x8024402c occurs:
- ⏳Pending updates
- ⚙️Incorrect time setting on your PC
- 📃Damaged files
- 🚮Junk files that contain active threats
- 🧱Incorrect firewall configuration preventing critical computer updates
So, these are the possible causes of the error 0x8024402c Windows 10 or 11 error. Now, let us move on to the solutions to solve the error.
There are several methods to fix the Windows 11/10 error 0x8024402c. Check out the solutions below for the error code and a detailed video.
- 00: 22 — Disable Proxy Settings
- 00: 57 — Reset Proxy
- 01: 46 — Install Windows Updates
- 02: 18 — Automatically detect LAN Settings
So, I hope this video helped you understand more about Windows 11/10 error 0x8024402c. Now, let us move on to the detailed solutions for this error.
- Fix 1. Enabling Automatic Network Detection Settings
- Fix 2. Temporarily Disable Windows Defender Firewall
- Fix 3. Delete Software Distribution
- Fix 4. Restart to Access Clean Boot
- Fix 5. Removing the Invalid Characters in the Proxy Exception List
- Fix 6. Changing the DNS Servers
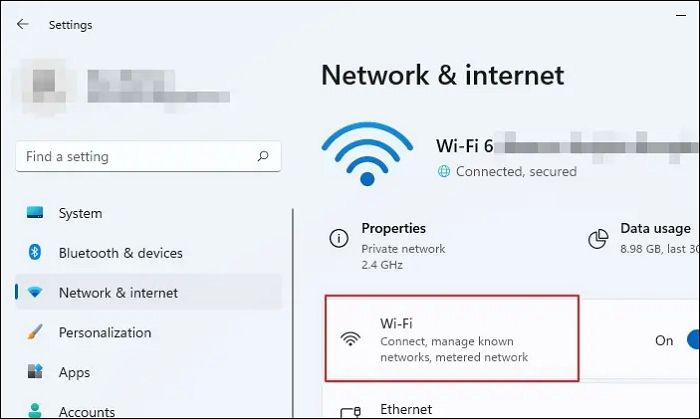
Fix 1. Enabling Automatic Network Detection Settings
In the first method, we shall allow automatic network detection settings via Windows Settings. Here is how to go about it:
Step 1. Press the Windows key + I to open Settings.
Step 2. Choose Network & Internet from the left pane.
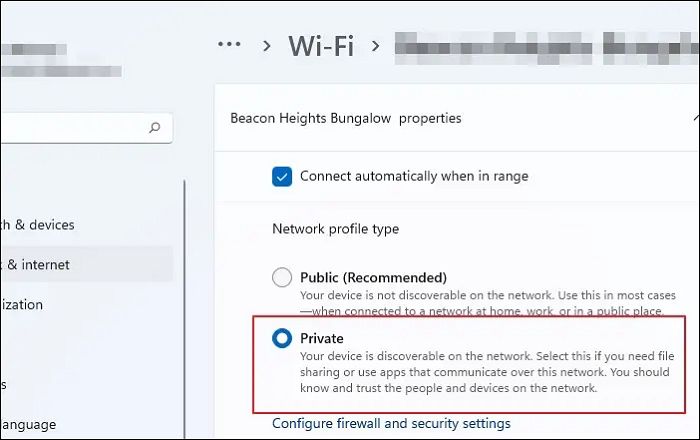
Step 3. Click on Wi-Fi. Next, click on the Wi-Fi properties you are connected to.
Step 4. Under the Network profile type, click the «radio» button next to the Private option to enable automatic network detection. This will make your PC discoverable and may help eliminate the Windows error code 0x8024402c.
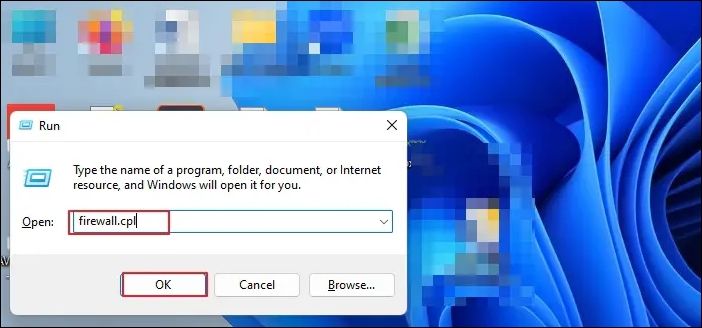
Fix 2. Temporarily Disable Windows Defender Firewall
By temporarily disabling Windows Defender Firewall, check whether the error code 0x8024402c gets eliminated. This is how you go about it:
Step 1. Type firewall.cpl into the Windows search bar and press Enter.
Step 2. On the left side of the windows, click the «Turn Windows Defender Firewall» on or off option.
Step 3. Under Private Network Settings, click the «radio» button next to Turn off «Windows Defender Firewall». Do the same for Public Network Settings and click «OK» to save the changes.
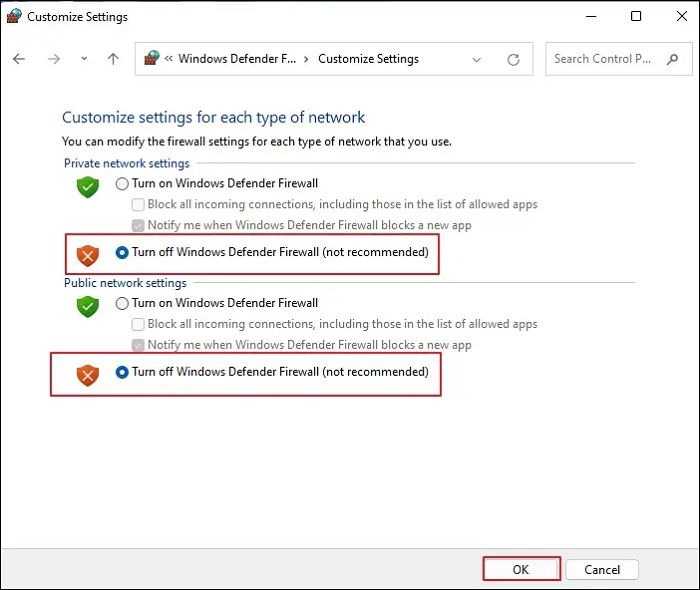
You should now check the Windows updates and see whether the issue is fixed.
Fix 3. Delete Software Distribution
In this method, you should delete software distribution to eliminate the error. This is how you go about it:
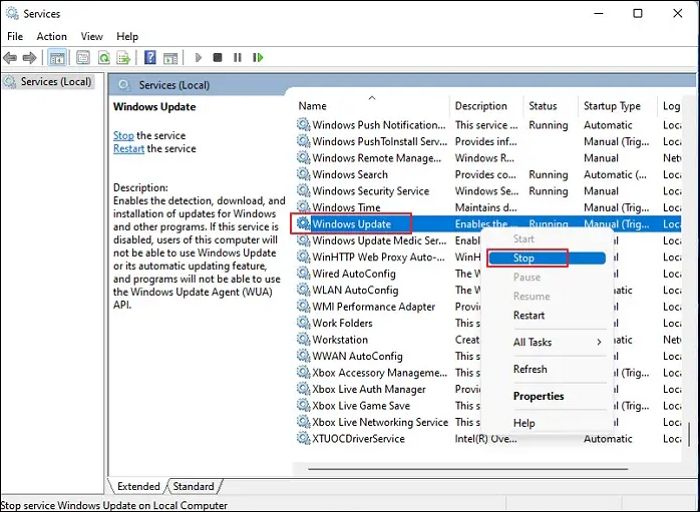
Step 1. Type Services into the Windows search bar, right-click on the result and choose the Run as administrator option.
Step 2. In the Services window, please scroll down and locate the Windows Update option, right-click on it, and choose the «Stop» option from the context menu.
Step 3. After it stops, click on File Explorer and choose Local Disk (C:).
Step 4. Click on the «Windows folder». Next, please scroll down and locate the SoftwareDistribution folder, right-click on it, and choose the Delete option from the context menu.
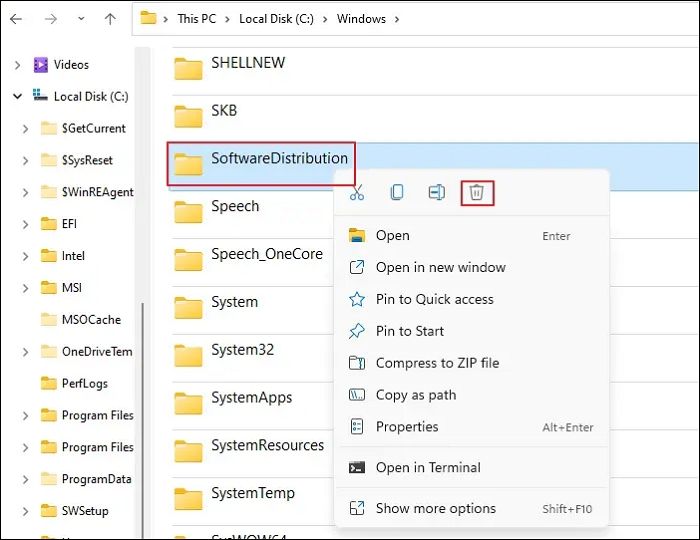
After removing the contents from the SoftwareDistribution folder, check whether the Windows 11/10 error 0x8024402c disappears.
Fix 4. Restart to Access Clean Boot
We will perform a Clean Boot via System Configuration to eliminate the error. Let us see how to go about it:
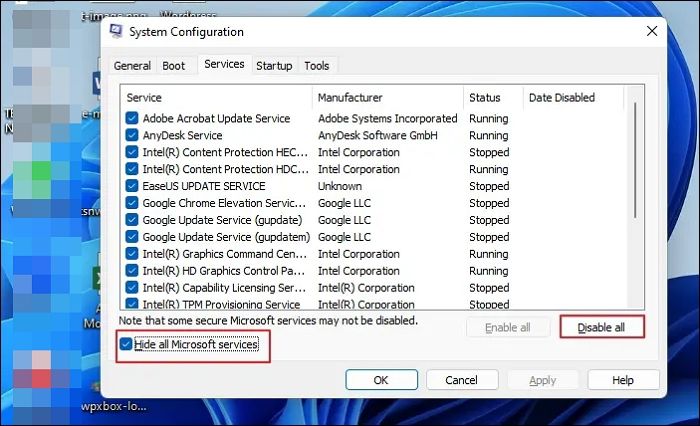
Step 1. Press Windows key + R to open the Run dialogue box. Type msconfig into the text box and press OK. This will open the System Configuration window.
Step 2. Click the «Services» tab and the check box next to «Hide all Microsoft services» to enable it. Next, click the «Disable al»l button and «Apply».
Step 3. Click on the Startup tab and click on «Open Task Manager». Next, please find all the application that has the Enabled status, right-click on them, and choose the Disabled option.
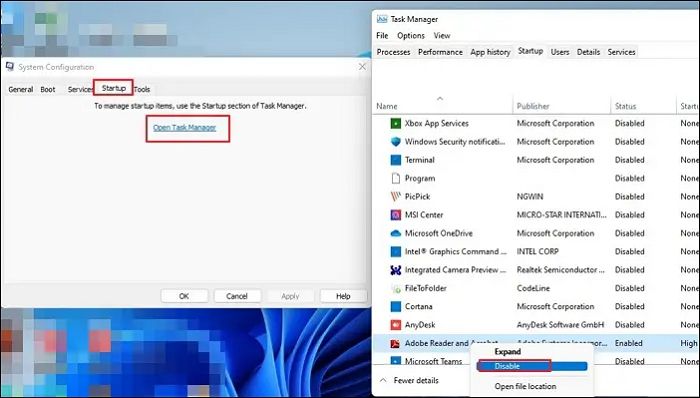
Step 4. Close the window and click OK. Click the Restart button to apply the changes in the System Configuration prompt.
Fix 5. Removing the Invalid Characters in the Proxy Exception List
In the proxy exception list, remove all the invalid characters. This is how you go about it:
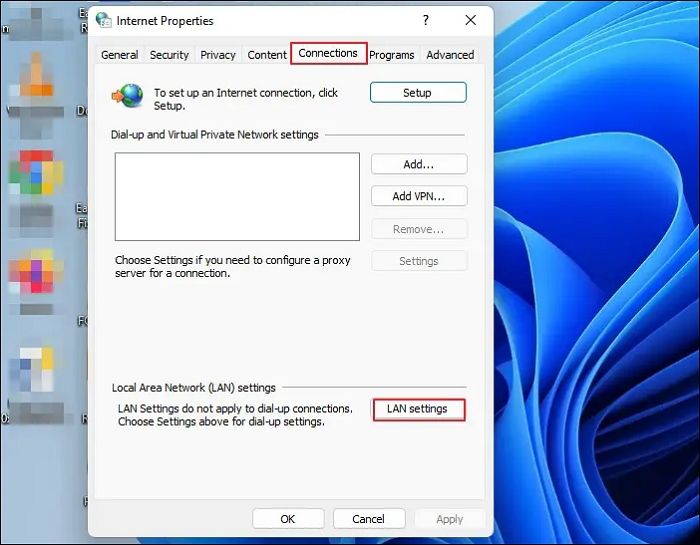
Step 1. Type internet options into the Windows search bar and click on the result to open the Internet Properties window.
Step 2. Click on the «Connections» tab and the LAN settings button.
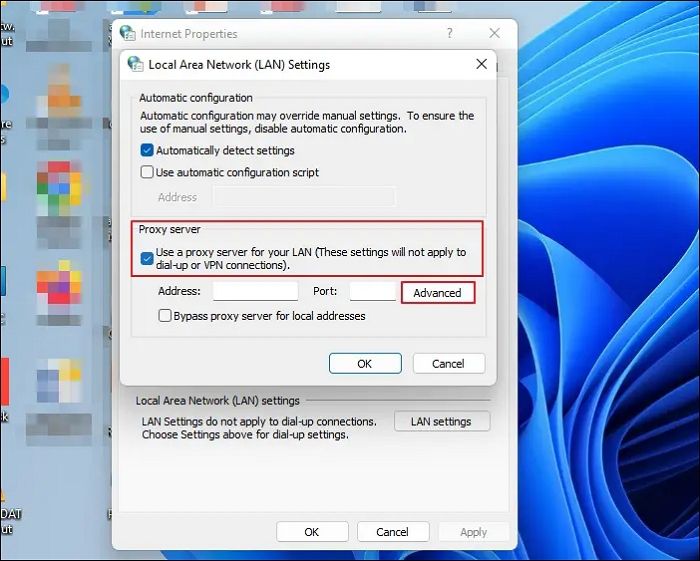
Step 3. In the next window, click on the radio button next to Use a proxy server for your LAN and click on the Advanced button to open Proxy Settings.
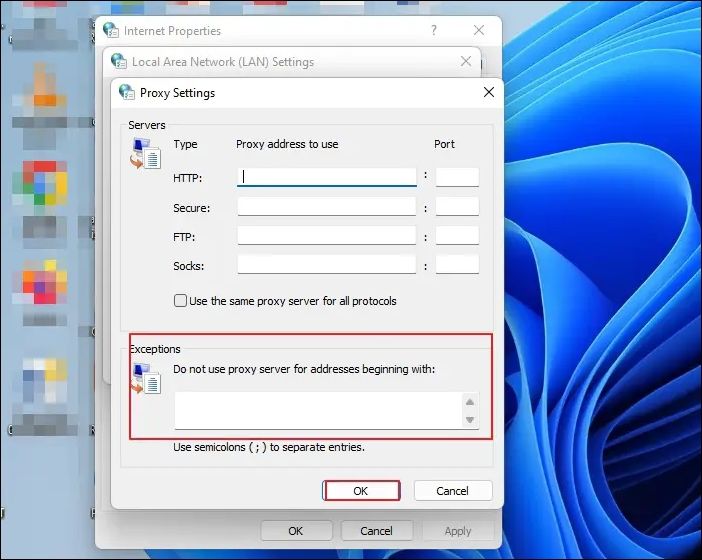
Step 4. Delete everything in the Do not use a proxy server for addresses beginning with the field, press OK in the prompt window, and OK again to close the LAN settings window.
The next step is to clear the proxy cache. Here is how to go about it:
Step 1. Right-click on the Windows logo and click on Windows Terminal (Admin).
Step 2. Press Enter after typing each command line one by one:
netsh winhttp reset proxy net stop wuauserv net start wuauserv
The error code 0x8024402c should be resolved after it is finished.
Fix 6. Changing the DNS Servers
In this method, change DNS servers to fix the 0x8024402c error. Let us see how to go about it:
Step 1. Press the Windows key + R to open the Run command box and type ncpa.cpl into the text box and press Enter to open the Wi-Fi-Status window.
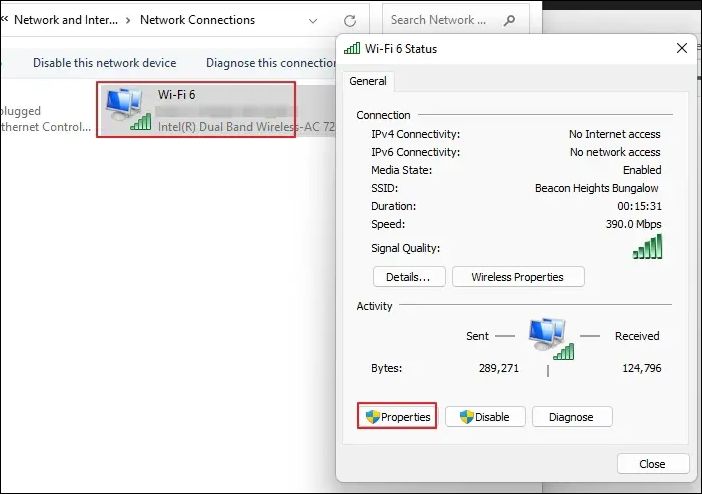
Step 2. Click on the Properties button. Next, locate the Internet Protocol Version 4 option and double-click on t to open its properties.
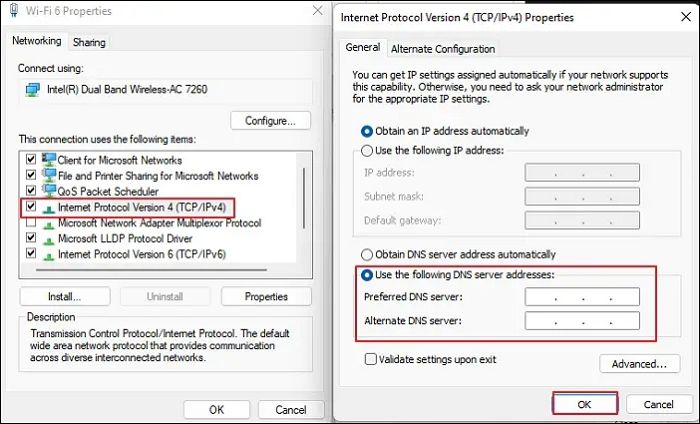
Step 3. Click on the radio button next to Use the following DNS server addresses and type in the following addresses:
- Preferred DNS server: 8.8.8.8
- Alternate DNS server: 8.8.4.4
Step 4. Click OK to update the changes and check whether the Windows error code 0x8024402c has disappeared.
Windows users have proved the efficacy of these fixes. If one of the methods helps fix the Windows update error 0x8024402c, share it on Facebook, Twitter, Instagram, and other social media platforms!
How to Recover Data When Fixing Error 0x8024402c
Windows users may lose data after fixing error code 0x8024402c. So, to recover deleted files from Windows 11/10/8/7, I recommend using EaseUS Data Recovery Wizard. It was created to aid in the recovery of data lost as a result of a file system malfunction, system crashes, and unintended file deletion. Even novice users can recover files quickly because of the software’s user-friendly interface.
EaseUS Data Recovery Wizard
- It can recover lost photos, videos, music files, documents, and other files with simple clicks.
- This software recovers data from external hard drives, SSD, USB flash drive, and pen drive.
- It makes restoring a partition’s data simple, even if it has been completely lost or the system cannot recognize it.
Download it now and follow the guide below to restore data from your PC quickly.
Note: To guarantee a high data recovery chance, install EaseUS data recovery software on another disk instead of the original disk where you lost files.
Step 1. Launch EaseUS Data Recovery Wizard on your Windows 11, Windows 10, Windows 8, or Windows 7 computer. Select the disk partition or storage location where you lost data and click «Scan».

Step 2. This recovery software will start scanning the disk to find all lost and deleted files. When the scan process completes, click «Filter» > «Type» to specify lost file types.

Step 3. Preview and restore lost Windows files. You can double-click to preview the scanned files. Then, select the target data and click the «Recover» button to save them to another safe spot in the PC or an external storage device.

Conclusion
The abovementioned techniques can resolve the Windows Update error code 0x8024402c.
You can also consider setting up a time sync between your PC and the internet, then restarting Windows Updates. When updates stop working due to malware, you can run security software. You should also be aware that Windows Updates is a compassionate application; if it has problems, the system will be adversely affected and may start to run slowly or improperly. So, follow the solutions given in this article carefully for a smooth and successful completion of the Windows update without any errors.
Also, note that after fixing the error code 0x8024402c, you may lose some data on your PC. So, download and use the data recovery tool EaseUS Data Recovery Wizard to save all your lost files. So that is it! I hope this article helped you resolve the error code issue!
Windows Update Error Code 0x8024402c FAQs
Do you have more questions on the Windows update error code 0x8024402c? Check out the frequently asked questions and their answers given below:
1. What does 0x8024401c mean?
You might encounter various issues when connecting to Microsoft’s Windows Update servers. It usually happens when you attempt to install updates, but the proxy, firewall, or other network settings are incorrect. 0x8024402C is one of these error codes. The error code is displayed on the screen when a user checks for updates.
2. How do I get rid of the error-checking drive?
On your Windows PC. Right-click on the Windows logo and choose Windows Terminal (Admin). Click Yes on User Account Control prompt and type chkdsk into the Windows Terminal window. Press Enter. CHKDSK will scan for drive errors and let you know if it finds any issues that need repair. Remember that it will not fix the errors without a command.
3. What does the Windows Update client fail to detect with error 0x8024402c?
An incorrect network setting, LAN setting, or update setting that does not comply with the update requirements could cause this issue. By approving the Automatically detected connection settings, it can be stopped.
4. What is error 0x8024402c for feature installation?
Not sure what this is feature installation. Kindly send me a message about it.
Table of Contents
- Symptom
- Understanding the Issue
- Resolution
- Workaround
Symptom
Consider a scenario where roaming users have workstations configured to use a WSUS via Domain Policy. When they are traveling and are without access to the corporate network, they receive the error message below when they try to force a Windows Update:

Understanding the Issue
After receiving this error, if you open the %systemroot%\WindowsUpdate.Log you will notice the following pattern:
————————————————————————————————————————————-
2011-08-23 14:12:30:347 748 2140 AU AU setting next detection timeout to 2011-08-24 00:12:30
2011-08-23 14:12:30:348 748 2140 AU Setting AU scheduled install time to 2011-08-24 08:00:00
2011-08-23 14:12:30:349 748 2140 AU Successfully wrote event for AU health state:0
2011-08-23 14:12:30:350 748 2140 AU Successfully wrote event for AU health state:0
2011-08-23 14:12:35:379 748 23f4 Report CWERReporter finishing event handling. (00000000)
2011-08-23 14:13:30:321 748 1280 AU Triggering AU detection through DetectNow API
2011-08-23 14:13:30:321 748 1280 AU Triggering Online detection (interactive)
2011-08-23 14:13:30:322 748 508 AU #############
2011-08-23 14:13:30:322 748 508 AU ## START ## AU: Search for updates
2011-08-23 14:13:30:322 748 508 AU #########
2011-08-23 14:13:30:324 748 508 AU <<## SUBMITTED ## AU: Search for updates [CallId = {AEC5F2B6-8D4A-4646-A25D-8CFDE73E0C5F}]
2011-08-23 14:13:30:327 748 23f4 Agent *************
2011-08-23 14:13:30:327 748 23f4 Agent ** START ** Agent: Finding updates [CallerId = AutomaticUpdates]
2011-08-23 14:13:30:327 748 23f4 Agent *********
2011-08-23 14:13:30:327 748 23f4 Agent * Online = Yes; Ignore download priority = No
2011-08-23 14:13:30:327 748 23f4 Agent * Criteria = «IsInstalled=0 and DeploymentAction=’Installation’ or IsPresent=1 and DeploymentAction=’Uninstallation’ or IsInstalled=1 and DeploymentAction=’Installation’ and RebootRequired=1 or IsInstalled=0 and DeploymentAction=’Uninstallation’
and RebootRequired=1»
2011-08-23 14:13:30:327 748 23f4 Agent * ServiceID = {3DA21691-E39D-4DA6-8A4B-B43877BCB1B7} Managed
2011-08-23 14:13:30:327 748 23f4 Agent * Search Scope = {Machine}
2011-08-23 14:13:30:328 748 23f4 Setup Checking for agent SelfUpdate
2011-08-23 14:13:30:328 748 23f4 Setup Client version: Core: 7.5.7601.17514 Aux: 7.5.7601.17514
2011-08-23 14:13:30:329 748 23f4 Misc Validating signature for C:\Windows\SoftwareDistribution\SelfUpdate\wuident.cab:
2011-08-23 14:13:30:343 748 23f4 Misc Microsoft signed: Yes
2011-08-23 14:13:30:370 748 23f4 Misc WARNING: Send failed with hr = 80072ee7.
2011-08-23 14:13:30:370 748 23f4 Misc WARNING: SendRequest failed with hr = 80072ee7. Proxy List used: <(null)> Bypass List used : <(null)> Auth Schemes used : <>
2011-08-23 14:13:30:370 748 23f4 Misc WARNING: WinHttp: SendRequestUsingProxy failed for <http://wsussrv.contoso.com:80/selfupdate/wuident.cab>.
error 0x8024402c
2011-08-23 14:13:30:370 748 23f4 Misc WARNING: WinHttp: SendRequestToServerForFileInformation MakeRequest failed. error 0x8024402c
2011-08-23 14:13:30:370 748 23f4 Misc WARNING: WinHttp: SendRequestToServerForFileInformation failed with 0x8024402c
2011-08-23 14:13:30:370 748 23f4 Misc WARNING: WinHttp: ShouldFileBeDownloaded failed with 0x8024402c
2011-08-23 14:13:30:389 748 23f4 Misc WARNING: Send failed with hr = 80072ee7.
————————————————————————————————————————————-
Notice that it tries to contact the WSUS Server (WSUSSRV.contoso.com) on port 80, which it is an internal server. Since the client workstation doesn’t have access to this server during that time the request fails.
Such behavior is expected since the domain policy overwrites the local policy. Therefore, it will always try to use the server that it was specified in the domain policy.
Resolution
Make sure to have corporate access from the corporate workstation while forcing update detection.
Workaround
If you have administrative access to this workstation and you must check for updates during that specific time, change the registry key UseWUServer to 0 (zero). For more information about this registry key, review this article:
http://technet.microsoft.com/en-us/library/cc784946(WS.10).aspx
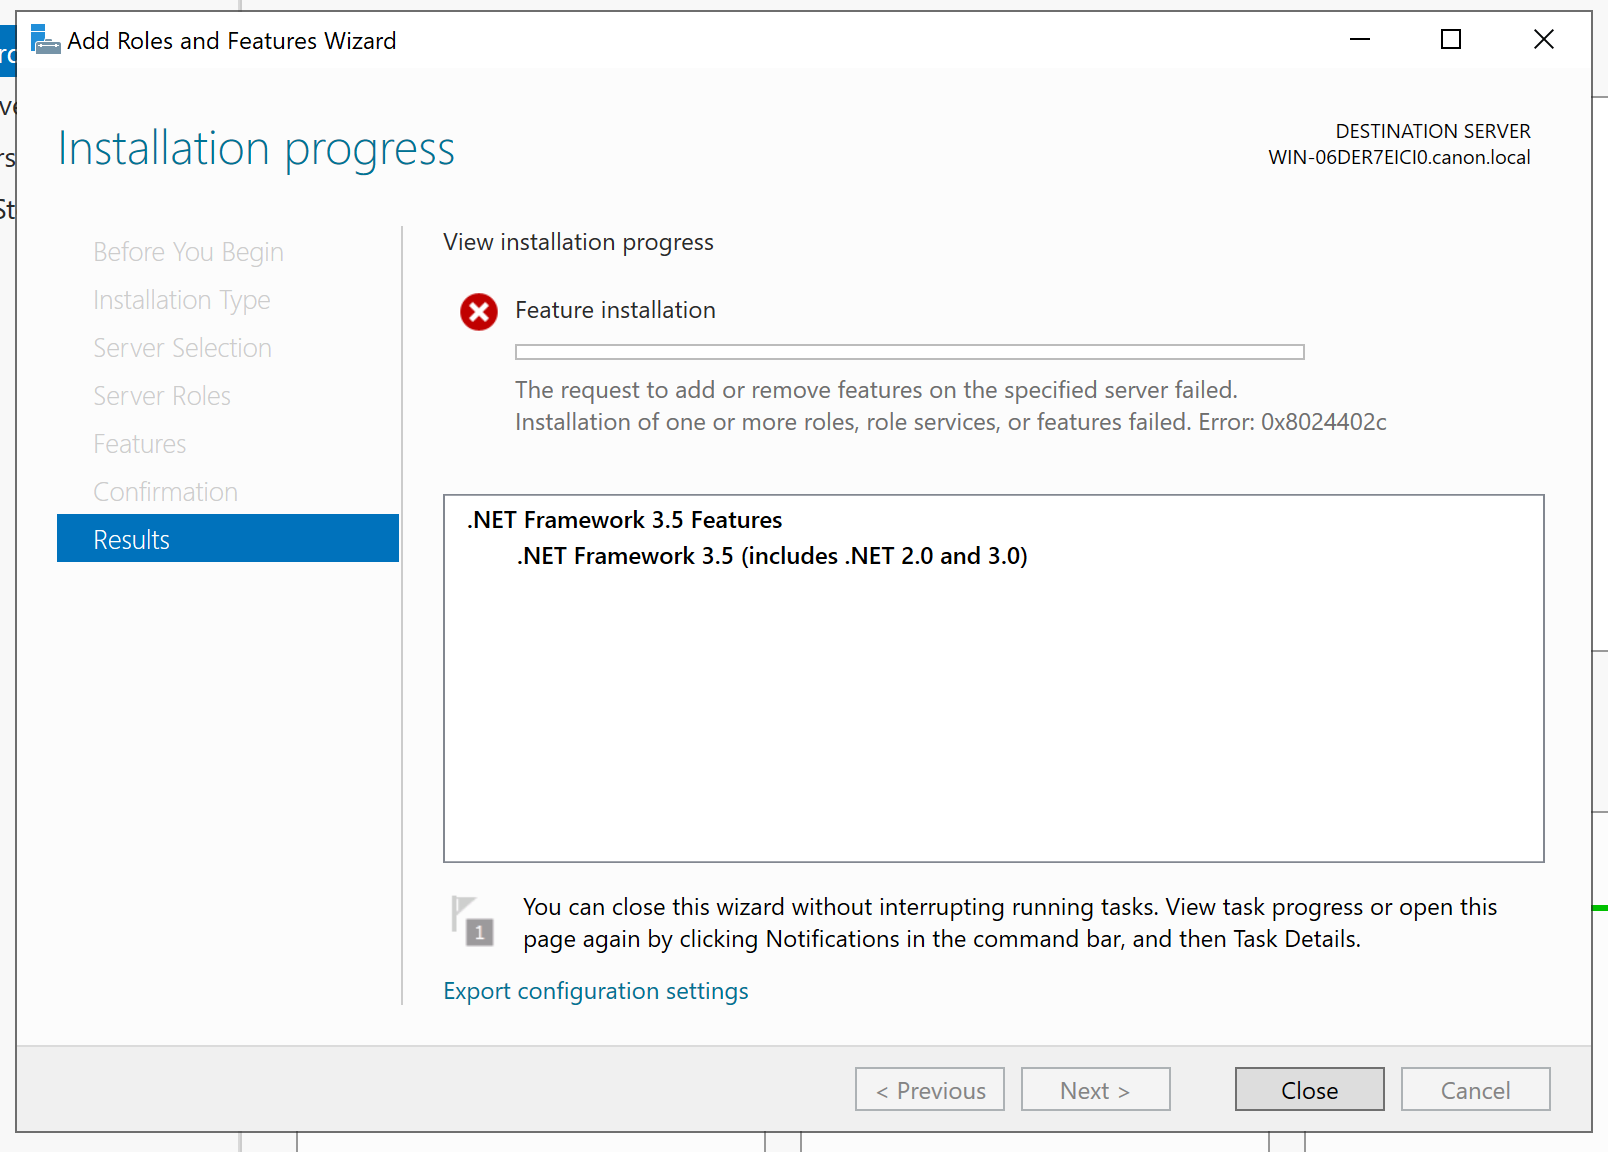
Return Error Code 0x8024402c prompt when installing .NET Framework 3.5 feature on Windows 10 or Windows Server 2019 although installation media disc inserted.
The request to add or remove features on the specified server failed. Installation of one or more roles, role services, or features failed. Error: 0x8024402c
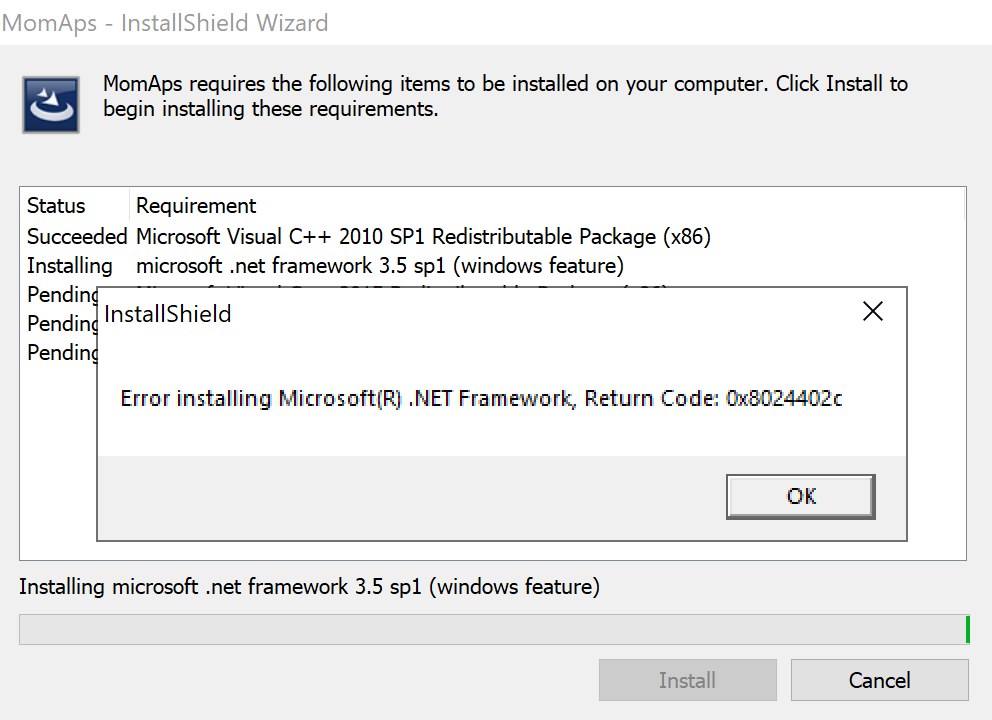
Error installation Microsoft(R) .NET Framework, Return Code: 0x8024402c
Resolution step as below:
Step 1: Open Notepad.
Step 2: Copy and paste the following into it:
@echo off

Title .NET Framework 3.5 Offline Installer

for %%I in (D E F G H I J K L M N O P Q R S T U V W X Y Z) do if exist "%%I:\\sources\install.wim" set setupdrv=%%I

if defined setupdrv (

echo Found drive %setupdrv%

echo Installing .NET Framework 3.5...

Dism /online /enable-feature /featurename:NetFX3 /All /Source:%setupdrv%:\sources\sxs /LimitAccess

echo.

echo .NET Framework 3.5 should be installed

echo.

) else (

echo No installation media found!

echo Insert DVD or USB flash drive and run this file once again.

echo.

)

pause
Step 3: Save it as framefx.cmd
Step 4: Insert Windows 10 / Windows Server 2019 installation media ISO.
Step 5: Right-click framefx.cmd
Step 6: Click Run as administrator.
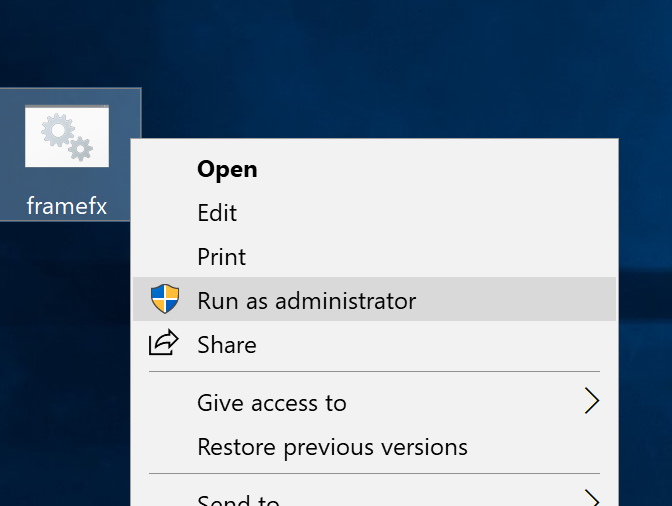
Run as administrator
Step 7: The file will install .NET Framework 3.5 automatically after finding the drive letter of your Windows 10 installation media.

.NET Framework 3.5 Offline Installer
If the installation media are not found then insert Windows 10 / Windows Server 2019 USB or DVD drive and run as administrator again. If there is an issue in regards to your installation media, download the Windows 10 / Windows Server 2019 ISO file from Microsoft Evaluation Center then double-click to mount it.
Reference: Microsoft Community > Error Code 0x8024402c windows 10 when installing .net framework 3.5
Ошибка 0x8024402c делает неисполнимым установку апдейтов ОС. Это вызвано следующими факторами:
- задействование прокси сервера;
- блокирование соединения антивирусом или файрволом.
Способы решения ошибки 0x8024402c
Решается проблема следующими способами:
- Отключение приложений, которые блокирую сетевые подключения. Предпочтительней всего сделать неактивными или удалить на время обновления антивирус и файрвол (брандмауэр).
- Отключение прокси. Запустите Internet Explorer и следуйте по пути: «Свойства браузера» => «Подключения» => «Настройка сети». Убедитесь, что стоит галочка в строке «Использовать прокси…». Переходьте в раздел «Дополнительно» и проверьте, что во всех строках там нет каких-либо значений. Подтверждаем действием нажатием Ок в двух открытых окнах. Перегружаем ПК и ошибка 0x8024402c исчезнет.
Windows update errors are one of the worst errors to experience because Windows constantly forces you to install and download new updates but when you finally decide to install them, some error pops up and prevents you from doing so. One such errors is definitely the 8024402c error which is common amongst Windows 7 and Windows 10 users.
There are quite a few different solutions to the problem and you can sometimes even blame your Internet provider as their address is sometimes not allowing your PC to connect to Microsoft’s servers. Anyway, follow the methods below in order to solve your problem.
Solution 1: Change Your DNS Address
If your Internet provider is really causing these problems, you may find other solutions quite unhelpful because they can’t fix the fact that your current DNS address is simply incompatible with Microsoft servers. Luckily, changing the DNS address is quite an easy process if you follow the instructions below carefully. You can reverse the process quite easily if something goes wrong.
- Open the Run dialog box by pressing the Windows logo key + R key together. Then type “ncpa.cpl” in it and click OK.
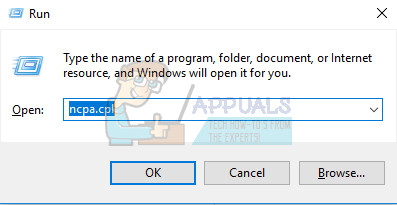
- Now that the Internet Connection window is open, double-click on your active Network Adapter.
- Then click Properties and double-click on Internet Protocol Version 4 (TCP/IPv4).
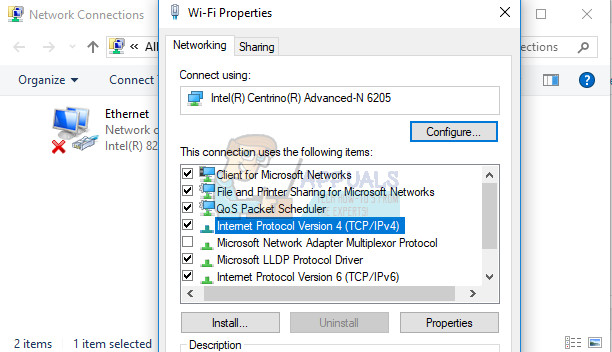
- Locate Use the following DNS server addresses option.
- Set Preferred DNS server to be 8.8.8.8
- Set Alternate DNS server to be 8.8.4.4
Note: That’s Google’s public DNS server addresses.
- Now try to install Windows Updates again and check to see if the same error code still appears.
Solution 2: Update Your HDD and SSD Drives
Some users shared their experience regarding the same error code and they said that updating their HDD or SDD drivers helped them solve many problems on their computer, including this specific Windows Update error code. We recommend you do the same, especially if you have recently added a new storage device to your computer.
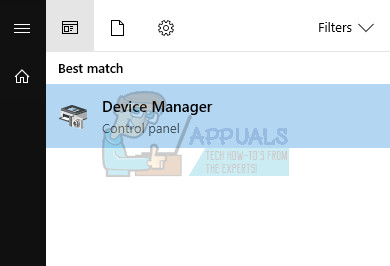
- Select the Start button, type Device Manager, and select it from the list of results.
- Expand one of the categories to find the name of your device, then right-click (or tap and hold) it, and select Update Driver. For storage devices, expand the Disk drives category, right-click on the device you want to update and choose the Update option from the context menu.
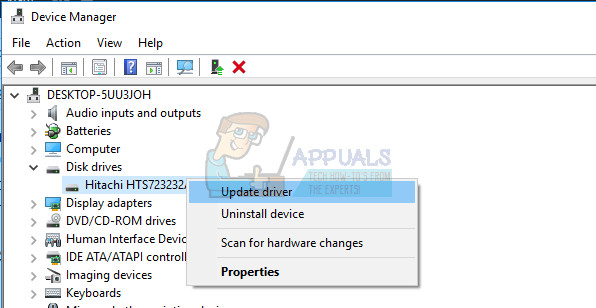
- Select Search automatically for updated driver software.
- If Windows doesn’t find a new driver, you can try looking for one on the device manufacturer’s website and follow their instructions.
Note: If you are using Windows 10, the latest drivers are often installed alongside other Windows updates so make sure you keep your computer up to date. Windows Update is run automatically on Windows 10 but you can check by following the instructions below for a new update.
- Use the Windows Key + I key combination in order to open Settings on your Windows PC. Alternatively, you can search for “Settings” by using the search bar located at the taskbar.

- Locate and open the “Update & security” section in the Settings app.
- Stay in the Windows Update tab and click on the Check for updates button under the Update status in order to check whether there is a new version of Windows available.
- If there is one, Windows should proceed with the download process automatically.
Solution 3: Disable IPV6 on Your PC
This Windows Update error sometimes occurs if you have enabled IPv6 and you don’t have a local gateway that is needed to connect. There are several users who were able to solve the problem this way whereas it didn’t work for others. Your safest bet is to try and see if it’s working yourself.
- Open the Run dialog box by pressing the Windows logo key + R key together. Then type “ncpa.cpl” in it and click OK.
- Now that the Internet Connection window is open, double-click on your active Network Adapter.
- Then click Properties and locate the Internet Protocol Version 6 entry on the list. Disable the checkbox next to this entry and click OK. Restart your computer in order to confirm the changes and check to see if the error appears again.
Solution 4: Command Prompt Tweak
This solution can be quite helpful as it can be performed easily and it can solve the problem by resetting the proxy settings on your computer which may have gone corrupt since the last time you ran the update. Follow the instructions below in order to solve the problem.
- Use the Windows Key + X key combination in order to open the menu where you should select the Command Prompt (Admin) option. Alternatively, you can right-click on the Start menu for the same effect or you can simply search for Command Prompt, right-click on it and select Run as administrator.
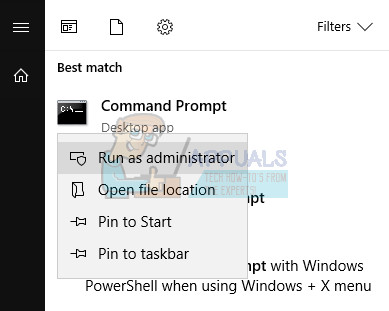
- Type in the commands presented below and make sure you press Enter after each one in order to run it properly.
netsh
winhttp
reset proxy
- Return to Windows Update and check to see if the problem still appears on your PC.
Solution 5: Reset Windows Update Components
This method is somewhat advanced and it takes a while to accomplish it. However, users have reported that, even when the other methods failed, resetting the components was still able to fix their issue.
Before proceeding with this solution, it’s recommended that you close all of your running programs and it’s advisable to create a backup of your registry just in case something goes terribly wrong while you edit it.
- Let’s proceed with the solution by killing the following services which are the core services related to Windows Update: Background Intelligent Transfer, Windows Update, and Cryptographic Services. Disabling them before we start is crucial if you want the remainder of the steps to perform smoothly.
- Search for “Command Prompt”, right-click on it, and select the “Run as administrator” option. Copy and paste the following commands and make sure you click Enter after each one.
net stop bits
net stop wuauserv
net stop appidsvc
net stop cryptsvc
- After this, you will have to delete some files which should be deleted if you want to continue with resetting the update components. This is also done via Command Prompt with administrative privileges.
Del “%ALLUSERSPROFILE%\Application Data\Microsoft\Network\Downloader\qmgr*.dat”
- The following step can be skipped if this is not a last resort. This step is considered to be the aggressive approach but it will definitely reset your updating process from its very core. So we can recommend that you try this out. It has been suggested by a lot of people on online forums.
- Change the name of the SoftwareDistribution and catroot2 folders. In order to do this, at an administrative command prompt, copy and paste the following commands and click Enter after copying each one.
Ren %systemroot%\SoftwareDistribution SoftwareDistribution.bak
Ren %systemroot%\system32\catroot2 catroot2.bak
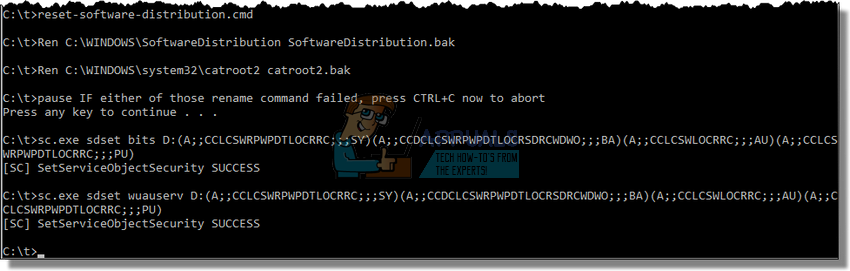
- The following commands will help us reset the BITS (Background Intelligence Transfer Service) and the wuauserv (Windows Update Service) to their default security descriptors. Make sure you don’t modify the commands below so it’s for the best if you simply copy them.
exe sdset bits D:(A;;CCLCSWRPWPDTLOCRRC;;;SY)(A;;CCDCLCSWRPWPDTLOCRSDRCWDWO;;;BA)(A;;CCLCSWLOCRRC;;;AU)(A;;CCLCSWRPWPDTLOCRRC;;;PU)
exe sdset wuauserv D:(A;;CCLCSWRPWPDTLOCRRC;;;SY)(A;;CCDCLCSWRPWPDTLOCRSDRCWDWO;;;BA)(A;;CCLCSWLOCRRC;;;AU)(A;;CCLCSWRPWPDTLOCRRC;;;PU)
- Let’s navigate back to the System32 folder in order to proceed with the solution at hand.
cd /d %windir%\system32
- Since we have completely reset the BITS service, we will need to reregister all of the files necessary for the service to run and operate smoothly. However, each of the files requires a new command in order to make it reregister itself so the process may end up being lengthier than what you are used to. Copy the commands one by one and make sure you don’t leave out any of them. Here is a list of files that need to be reregistered along with the corresponding commands next to them.
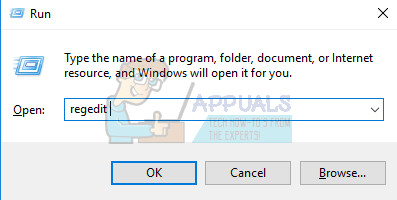
- Some files may have been left behind after these processes so we are going to look for them in this step. Open the Registry Editor by typing “regedit” in either the search bar or the Run dialog box. Navigate to the following key in Registry Editor:
HKEY_LOCAL_MACHINE\COMPONENTS
- Click on the Components key and check the right side of the window for the following keys. Delete them all if you locate any of them.
PendingXmlIdentifier
NextQueueEntryIndex
AdvancedInstallersNeedResolving

- The next thing we are going to do is reset Winsock by copying and pasting the following command back into the administrative Command Prompt:
netsh winsock reset
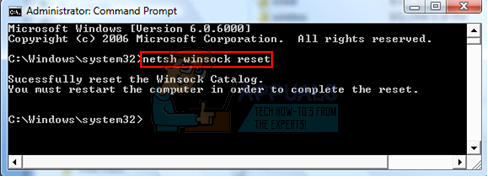
- If you are running Windows 7, 8, 8.1, or 10, at a command prompt, copy the following command, and tap the Enter key:
netsh winhttp reset proxy
- If all of the steps above have gone through painlessly, you can now restart the services you killed in the very first step by using the commands below.
net start bits
net start wuauserv
net start appidsvc
net start cryptsvc
- Restart your computer after following through with all of the steps which are listed.
Solution 6: Edit Certain Settings in Internet Explorer
Internet Explorer is usually the first place where you should look if you encounter certain errors regarding Windows Update and your Internet Connection overall. These settings are quite easy to adjust so make sure that this solution is your first step in approaching the problem.
- Open Internet Explorer and click on the Gear icon located in the top right corner.
- From the menu which opens, click on Internet options.

- Navigate to the Connections tab and click on LAN Settings.
- Mark the checkbox next to Automatically Detect Settings and make sure the Proxy servers are blank unless you actively use one, which is not recommended while updating Windows.
- Make sure you apply the changes you made and restart your computer before you check to see if the update error still appears.
Solution 7: Turn off UAC until Your Update Your Computer
UAC is designed to keep you safe but it appears that there is a bug that causes this error to occur if UAC is turned on. It’s recommended that you keep it on at all times but you can disable UAC for a while until the update is installed but make sure you re-enable it as soon as possible.
- Open Control Panel by searching for it in the Start menu.
- Switch the View by option in Control Panel to Large Icons and locate the User Accounts option.
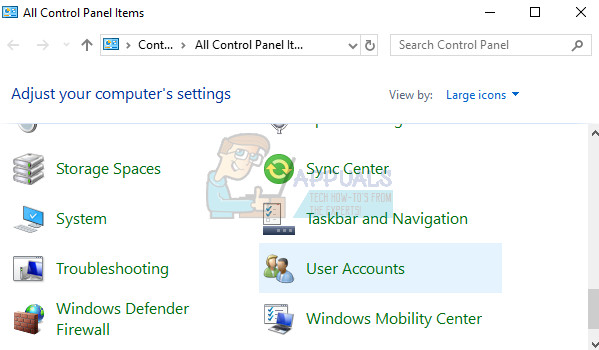
- Open it and click on “Change User Account Control Settings”.
- You will notice that there are several different options you can choose on the slider. If your slider is set at the top level, you will definitely receive more of these pop-up messages than usual. Also, the error messages similar to the one you are experiencing right now are usually caused by User Account Control.
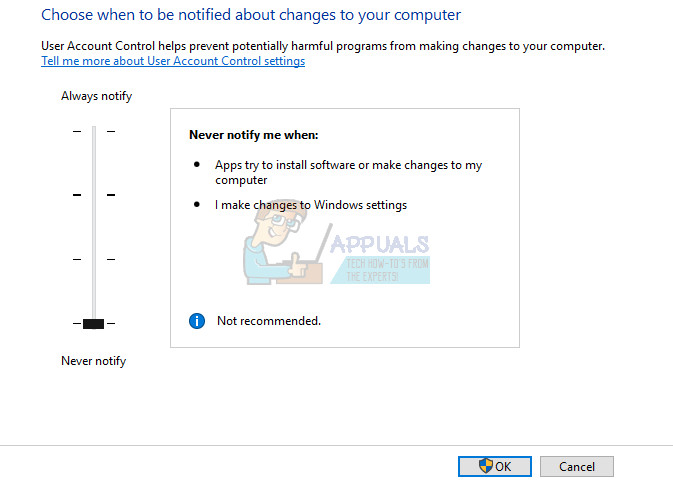
- We recommend you turn it off for now as the update should probably install successfully. This may have helped solve your current problem but you should definitely leave it on as it serves to protect your PC.
Solution 8: A Simple Registry Hotfix
This process requires editing your registry which can be quite helpful but also dangerous. Before proceeding with this solution, it’s recommended that you close all of your running programs and it’s advisable to create a backup of your registry just in case something goes terribly wrong while you edit it.
- Open Run dialog box by pressing Windows logo key + R key together. Then type regedit in it and click OK. Click Yes when prompted by User Account Control.
- In the Registry Editor window, head to HKEY_LOCAL_MACHINE >> SOFTWARE >> Policies >> Microsoft >> Windows >> WindowsUpdate >> AU
- On the right pane of AU key, double-click on UseWUServer, change its value data into 0, and click OK.
Note: If you can’t find WindowsUpdate, you should create one. Follow the steps below.
- Right-click on the Windows folder, then choose New > Key and name the new key WindowsUpdate.
- Right-click on the WindowsUpdate folder, then choose New >> Key and name the new key AU.
- Right-click on the right pane of AU key, choose New >> DWORD (32-bit) Value. Name the new value UseWUServer. Set its value to 0.
- Now try to install Windows Updates now.
Solution 9: Install the Latest Version of .NET Framework
Having the latest version of this tool is a must if you want the updating process to proceed smoothly.
Navigate to this link and click the red download button in order to download the latest version of the Microsoft .NET Framework. After the download has finished, locate the file you downloaded and run it. Note that you will need to have constant access to the Internet.
- After installing the latest version, it’s time to check its integrity. On your keyboard, use the Windows Key + R key combination to open the Run dialog box.
- Type in Control Panel and click OK in order to open it.

- Click the Uninstall a Program option and click Turn Windows features on or off. Make sure you locate the .NET Framework 4.6.1 entry and make sure it’s enabled.
- If the checkbox next to .NET Framework 4.6.1 is not enabled, enable it by clicking the box. Click OK to close the Windows Feature window and reboot the computer.
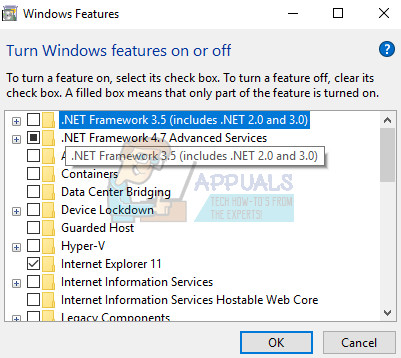
- If .Net Framework 4.6.1 is already enabled, you can repair .Net Framework by clearing the box and rebooting the computer. After the computer has restarted, re-enable .Net Framework and restart the computer again.
Note: If you are using a version of Windows other than Windows 10, the latest version may be different which you should also install.

Kevin Arrows
Kevin Arrows is a highly experienced and knowledgeable technology specialist with over a decade of industry experience. He holds a Microsoft Certified Technology Specialist (MCTS) certification and has a deep passion for staying up-to-date on the latest tech developments. Kevin has written extensively on a wide range of tech-related topics, showcasing his expertise and knowledge in areas such as software development, cybersecurity, and cloud computing. His contributions to the tech field have been widely recognized and respected by his peers, and he is highly regarded for his ability to explain complex technical concepts in a clear and concise manner.