Если вы столкнулись с ошибкой 0x80072f8f 0x20000 при создании загрузочной флешки Windows 10 через официальную утилиту Media Creation Tool, то вероятнее всего у вас установлена Windows 7 либо Windows 8.
Она возникает из-за того что данные версии Windows уже не поддерживаются и необходимо создать загрузочную флешку другим способом.
В данной инструкции мы подробно распишем что необходимо делать в таком случае.
Для создания загрузочной флешки необходимо будет скачать дистрибутив Windows 10:
Версия x32 – https://cdn.keyslab.ru/windows/10/ProAndHome/Win10_22H2_Russian_x32.iso
Версия x64 – https://cdn.keyslab.ru/windows/10/ProAndHome/Win10_22H2_Russian_x64.iso
А так-же программа для того чтобы записать этот образ на флешку мы сделаем это на примере одной из самых популярных программ Rufus – https://github.com/pbatard/rufus/releases/download/v3.22/rufus-3.22.exe
После того как скачается образ запускаем программу, в пункте «Устройство» необходимо выбрать флешку размером от 8ГБ (рекомендуем 16). Обратите внимание что она будет форматироваться, поэтому сохраните все важные файлы. Так-же не рекомендуем использовать внешний жесткий диск, так как часто возникают ошибки при установке с них.

Далее в разделе «Метод загрузки» нажимаем «Выбрать» и находим скачанный образ. Все остальные пункты оставляем по умолчанию.
На данном этапе вы можете выбрать дополнительные параметры установки системы, которые упростят процесс установки, выбирайте их на ваше усмотрение.
Здесь программа сообщает нам о том, что флешка будет форматирована.
Теперь дожидаемся окончания создания, в конце статус изменится на «ГОТОВ». После этого можно закрывать программу.
Теперь вы можете приступить к установке новой системы, мы подробно расписали весь процесс в нашей другой инструкции, вам необходимо будет пропустить пункт про создание загрузочного накопителя, он у вас уже есть — https://keyslab.ru/articles/kak-ustanovit-windows-10-s-fleshki/
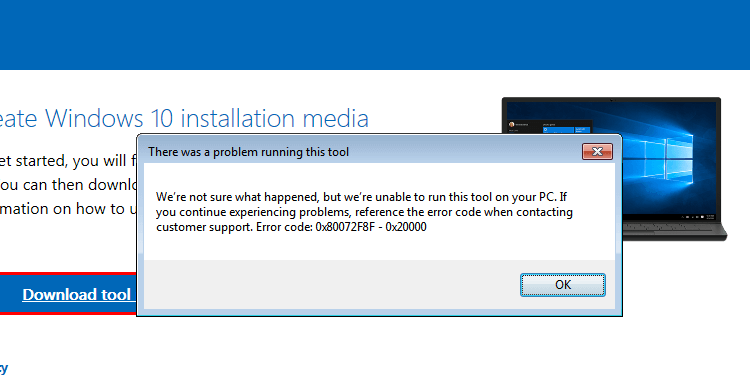
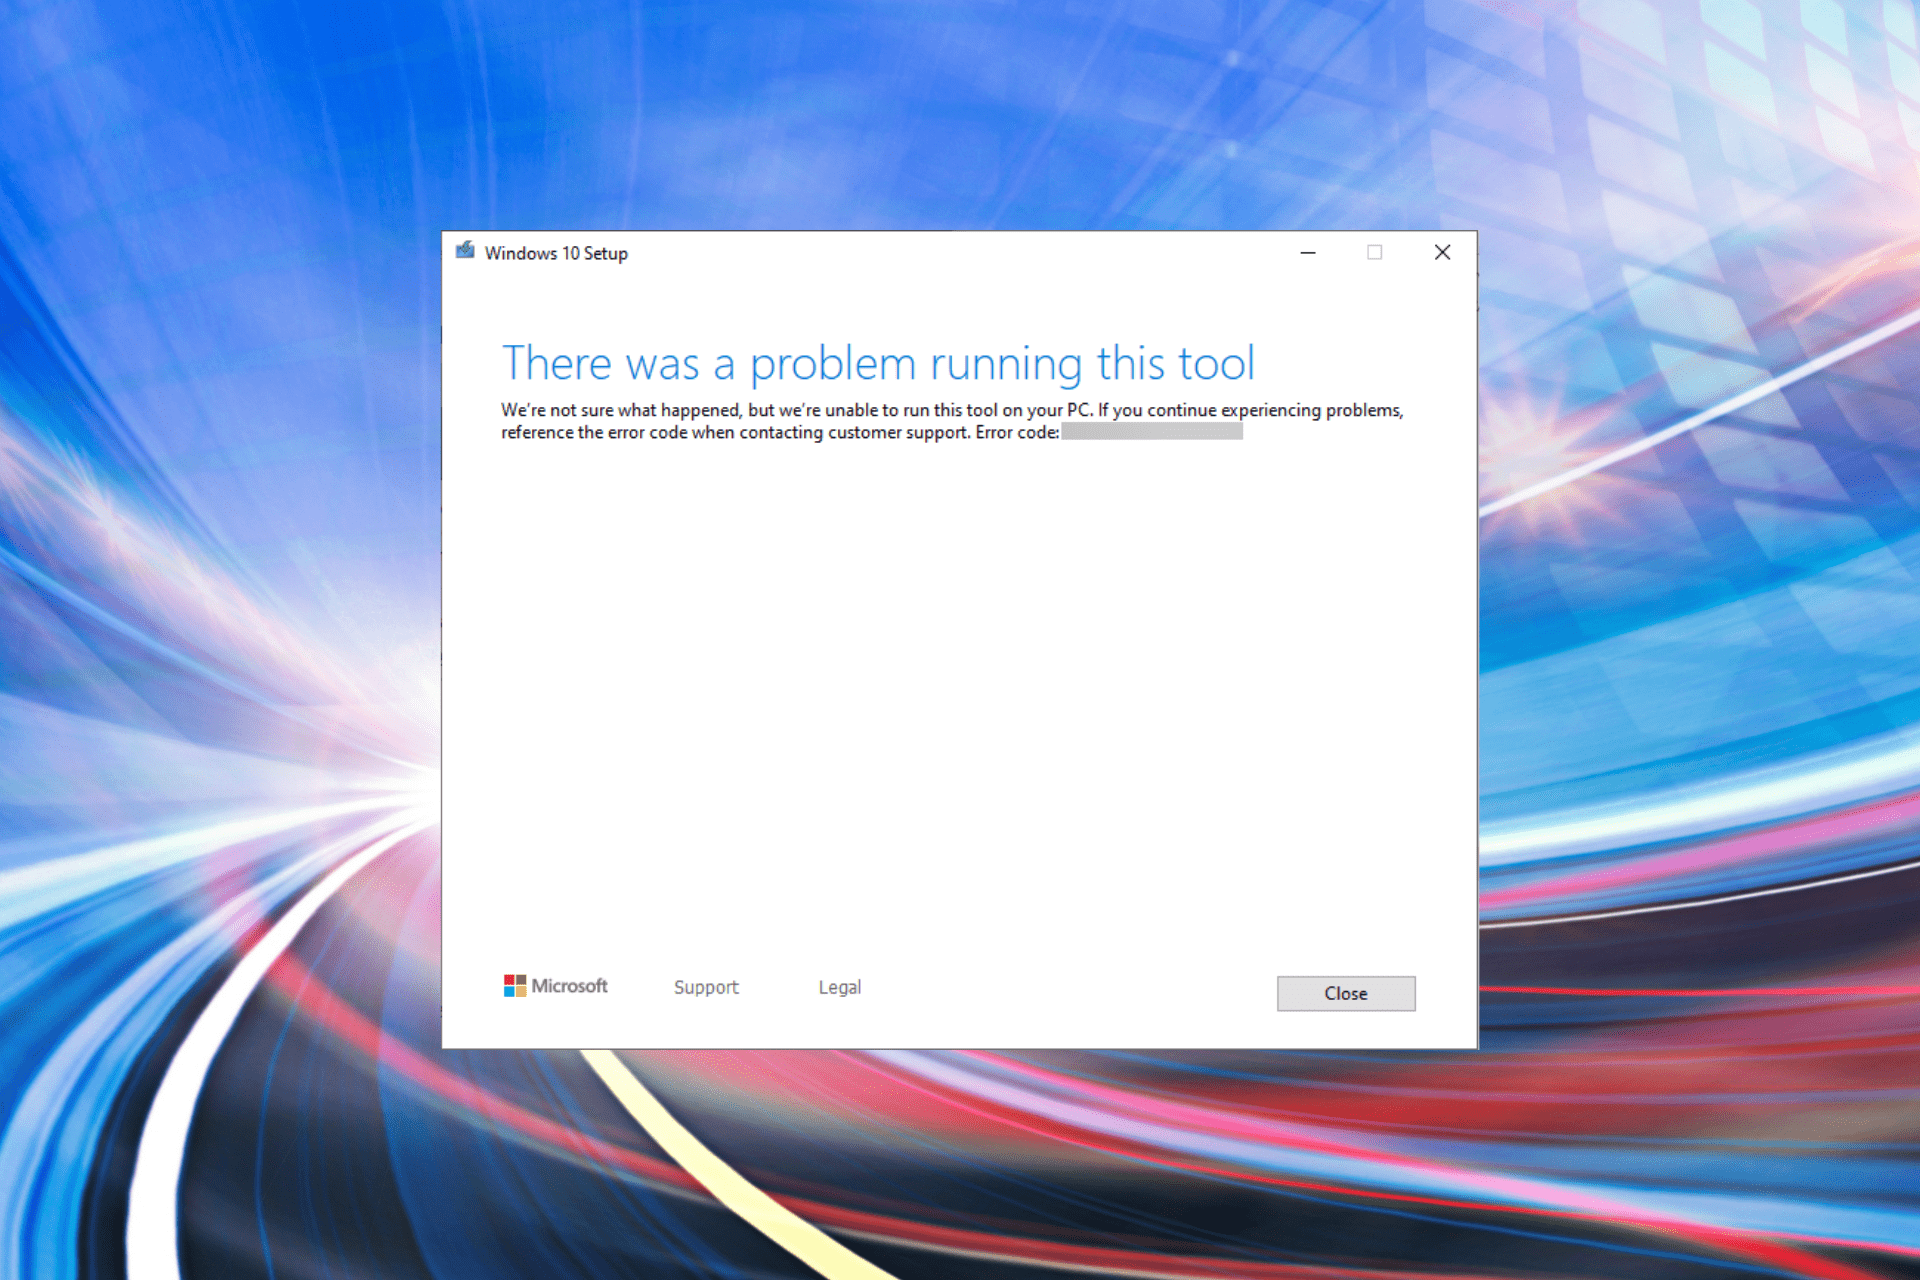
When you attempt to upgrade to Windows 10 from a Windows 7/8 computer using Microsoft’s Media Creation Tool, the error 0x80072F8F - 0x20000 may appear. The full error message verbatim is below:
There was a problem running this tool

We're not sure what happened, but we're unable to run this tool on your PC. If you continue experiencing problems, reference the error code when contacting customer support. Error code: 0x80072F8F - 0x20000
Let’s see how to fix this error on Windows 7 and Windows 8.
Important: Information in this article (and the registry fix) is for Windows 7 SP1 and Windows 8 systems only. They don’t apply to Windows 8.1 and higher!
Cause
The error 0x80072F8F - 0x20000 happens because the Media Creation Tool uses the TLS 1.2 Protocol, but the protocol is disabled by default on Windows 7 and Windows 8 computers. By default, only SSL3 and TLS1 are enabled in Windows 7 and Windows 8. On Windows 8.1 and Windows 10, SSL3, TLS1.0, TLS1.1, and TLS1.2 are enabled by default.
To resolve the Media Creation Tool Error 0x80072F8F – 0x20000 error on Windows 7 and Windows 8 computers, enable the TLS 1.1 and TLS 1.2 protocols. Follow these steps to do so:
Method 1: Enable TLS 1.1 and TLS 1.2 via the registry (Windows 7 & 

- Make sure your system is fully updated.
- Open Notepad.
- Copy the following lines into Notepad.
Windows Registry Editor Version 5.00

[HKEY_LOCAL_MACHINE\SOFTWARE\Microsoft\Windows\CurrentVersion\Internet Settings\WinHttp]
"DefaultSecureProtocols"=dword:00000a00

[HKEY_LOCAL_MACHINE\SOFTWARE\Wow6432Node\Microsoft\Windows\CurrentVersion\Internet Settings\WinHttp]
"DefaultSecureProtocols"=dword:00000a00

[HKEY_LOCAL_MACHINE\SYSTEM\CurrentControlSet\Control\SecurityProviders\SCHANNEL\Protocols\TLS 1.1\Client]
"DisabledByDefault"=dword:00000000
"Enabled"=dword:00000001

[HKEY_LOCAL_MACHINE\SYSTEM\CurrentControlSet\Control\SecurityProviders\SCHANNEL\Protocols\TLS 1.2\Client]
"DisabledByDefault"=dword:00000000
"Enabled"=dword:00000001
- Save the file with a .reg extension — e.g.,
enable_tls.reg - Double-click the
enable_tls.regfile to apply the settings into the registry. Click Yes when asked for confirmation. - Download the KB3140245 package (TLS 1.1/1.2 enablement update) from Microsoft and install it.
- Restart Windows.
- Download registry files: If you wish to download premade registry file(s), download enable-tls.zip. Unzip and run the enclosed file enable_tls.reg. To reverse/undo the setting to Windows 7/8 defaults, run the
undo.regregistry file.
(Credits to Markus for the fix.)
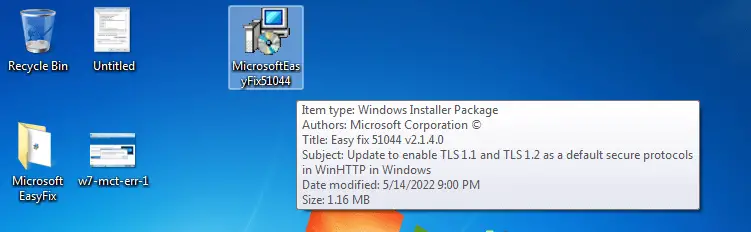
Method 2: Easy Fix (for Windows 7)
The above registry fix was created incorporating the suggestions in the Microsoft article titled Update to enable TLS 1.1 and TLS 1.2 as default secure protocols in WinHTTP
The article talks about the Microsoft Update with will enable TLS 1.1 and TLS 1.2 support via KB3140245 package. Here are the instructions:
- Download the KB3140245 package. Don’t run it yet.
- Download the “Easy Fix” executable via the above link (direct download) and run it. The fix will create the
DefaultSecureProtocolsregistry value which is a prerequisite for the Microsoft update. - Now run the KB3140245 .msi package you downloaded in Step 1.
This automatically enables TLS 1.1 and TLS 1.2 on the computer.
Re-run the Media Creation Tool now. It should work now!
Editor’s note
Note that the Easy Fix sets the “DefaultSecureProtocols” registry value only; it doesn’t write to the SCHANNEL registry location. But the manual registry fix in “Method 1” above does both! So, if you’ve explicitly disabled the TLS 1.1 and TLS 1.2 protocols via the SCHANNEL registry modification (e.g., by using the nisudf.reg registry fix to resolve a game/server connectivity issue), then the “Easy Fix” tool won’t help. You need to use “Method 1” in that case.
One small request: If you liked this post, please share this?
One «tiny» share from you would seriously help a lot with the growth of this blog.
Some great suggestions:
- Pin it!
- Share it to your favorite blog + Facebook, Reddit
- Tweet it!
So thank you so much for your support. It won’t take more than 10 seconds of your time. The share buttons are right below. 
Ramesh Srinivasan is passionate about Microsoft technologies and he has been a consecutive ten-time recipient of the Microsoft Most Valuable Professional award in the Windows Shell/Desktop Experience category, from 2003 to 2012. He loves to troubleshoot and write about Windows.
Ramesh founded Winhelponline.com in 2005.
A lot of Windows users are not able to upgrade their Windows Operating System using the Media Creation Tool. When the run the application, the following error pops up.
There was a problem running this tool
We’re not sure what happened, but we’re unable to run this tool on your PC. If you continue experiencing problems, reference the error code when contacting customer support, Error code: 0x80072F8F – 0x20000
In this post, we will be talking about the 0x80072F8F – 0x20000 Windows Upgrade error and see what you can do to resolve it.

What does Error Code 0x80072f8f 0x20000 mean?
Error Code 0x80072f8f 0x20000 is a Media Creation Tool error and it appears when a user tries to run the tool to upgrade their OS. It happens because of various reasons, it can be a glitch that can be resolved by restarting the system, or the tool requires administrative privileges or needs to be unblocked.
You may also face the error code in question if TLS or Transport Layer Security protocol is disabled. It is a security protocol and is used to designate encrypted connections to send data into the applications over the network.
There are various other reasons such as misconfigured registry, corrupted temporary files, etc. Let us go to the troubleshooting guide to resolve this issue.
If you are facing Fix 0x80072F8F – 0x20000 Windows Upgrade error, try the following solutions.
- Run the Media Creation Tool as an administrator
- Unblock Media Creation Tool
- Move Media Creation Tool to the Desktop and try
- Delete Software Distribution Folder
- Edit Registry
- Enable TLS
- Troubleshoot in Clean Boot
Let us talk about them in detail.
1] Run the Media Creation Tool as an administrator
Let us start by running the Media Creation Tool as an administrator. Just right-click on the tool and then select Run as administrator. You will see a UAC box asking you to confirm your action, so, click on Ok. Now, you can just use the tool normally and upgrade.
2] Unblock Media Creation Tool
Some users were able to resolve the issue by just unblocking the Media Creation Tool. So, you should try to do the same and see if it works for you. Follow the prescribed steps to unblock Media Creation Tool.
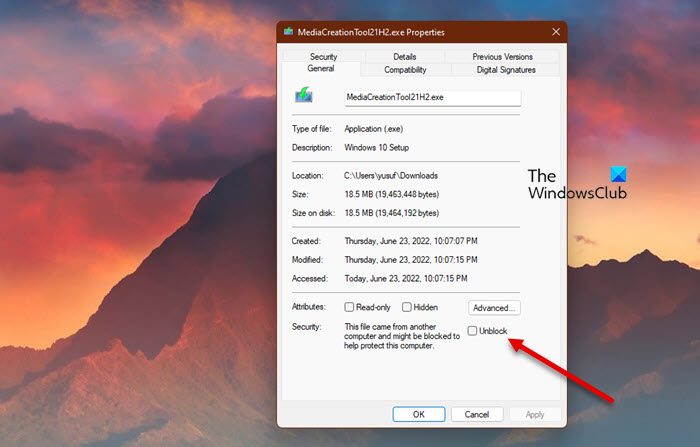
- Right-click on the Media Creation Tool and select Properties.
- Make sure you are on the General tab and tick Unblock.
- Click Apply > Ok.
Now, try running the tool and see if that helps.
3] Move Media Creation Tool to the Desktop and try
For some users, the solution was as simple as moving the downloaded Media Creation Tool to the Desktop. You can also try this, as it won’t take much of your time. Just right-click on the Media Creation Tool and select Copy, go to your Desktop, and hit Ctrl + V to paste the file. Or, drag the tool from your File Explorer to the Desktop in the right panel. This will do the job for you.
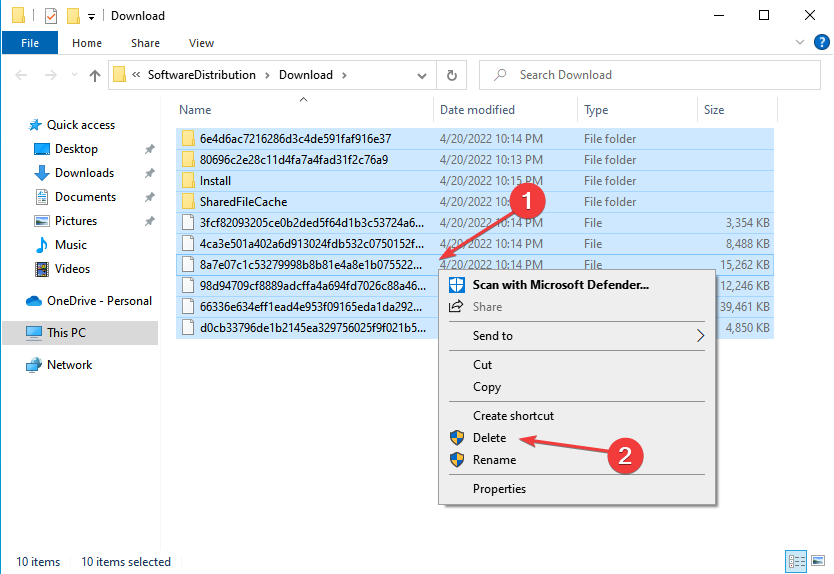
4] Delete Software Distribution Folder

The Software Distribution Folder contains temporary files that can interfere with the process and cause the error code in question. We are going to clear the content of that folder and see if that works.
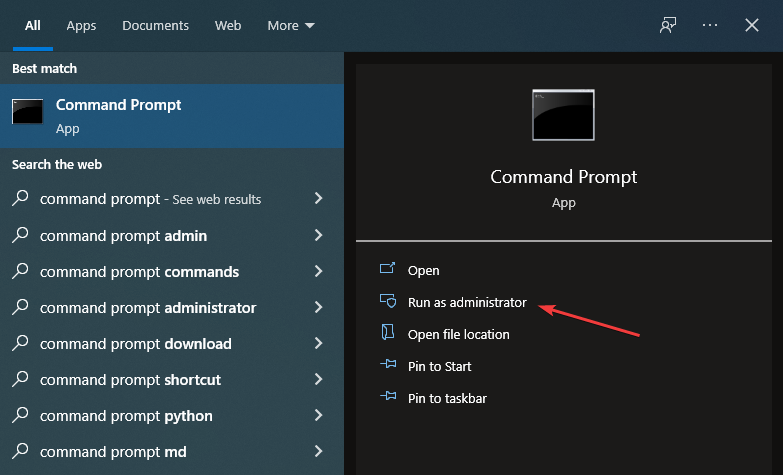
First of all, open Command Prompt as an administrator and run the following command.
net stop wuauserv
net stop bits
Now browse to the C:\Windows\SoftwareDistribution\Download folder and delete all the files and folders inside. You can hit Ctrl + A to select all the content and then Ctrl + D to delete them.
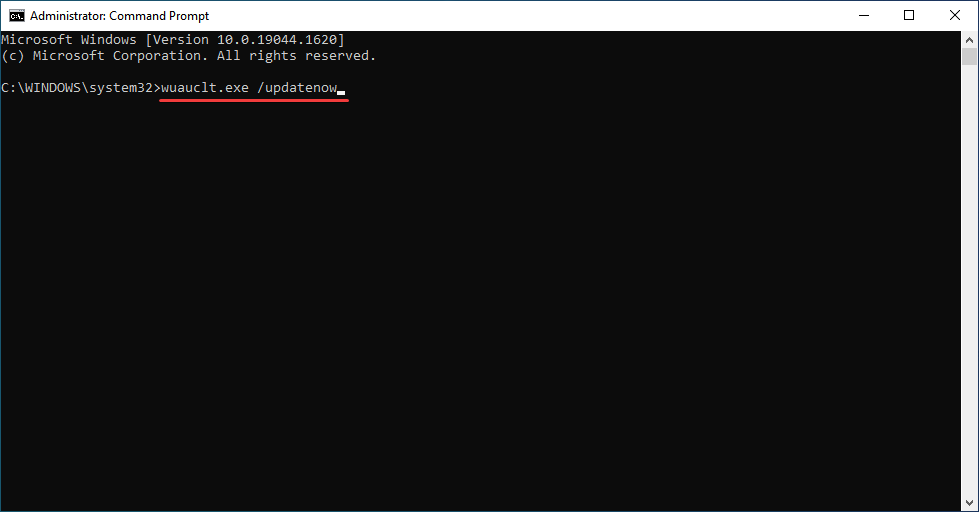
Now in the Command Prompt windows, type the following commands one at a time, and hit Enter:
net start wuauserv
net start bits
Finally, execute the following command.
wuauclt.exe /updatenow
Now, you can restart your computer and run the Media Creation Tool. Hopefully, it will work this time.
5] Edit Registry
If flushing out the Software Distribution folder didn’t work, let us edit registries and see if that helps. For some users, the issue was caused by misconfigured Registry Editor and was easily solved by the following steps.
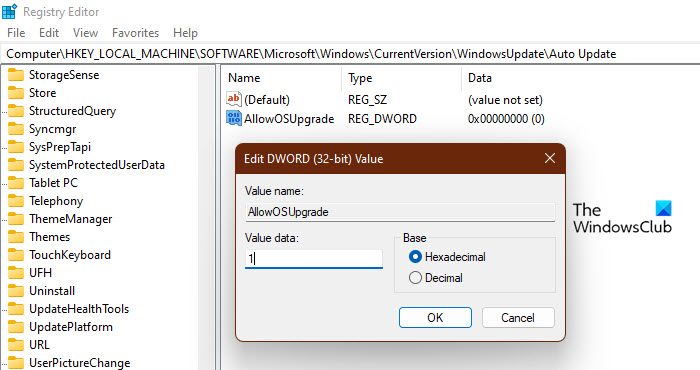
Open Registry Editor by searching it out of the Start Menu.
Navigate to the following location.
Computer\HKEY_LOCAL_MACHINE\SOFTWARE\Microsoft\Windows\CurrentVersion\WindowsUpdate\Auto Update
Right-click on the empty space, and select New > DWORD (32-bit) Value.
Name it AllowOSUpgrade and set the Value data to 1.
Save the changes by clicking Ok.
Finally, restart your computer and try running Media Creation Tool. Hopefully, this time, you will be able to upgrade.
6] Enable TLS
TLS or Transport Layer Security is protocol and it is necessary to run the tool. If the protocol is disabled, you may see the error code in question when trying to upgrade your OS with Media Creation Tool. So, let’s enable it and see if that helps.
Before moving forward, you should make a backup of your Registry if something goes wrong. Once registries are backed up, open Notepad and paste the following content.
Windows Registry Editor Version 5.00

[HKEY_LOCAL_MACHINE\SOFTWARE\Microsoft\Windows\CurrentVersion\Internet Settings\WinHttp]
"DefaultSecureProtocols"=dword:00000a00

[HKEY_LOCAL_MACHINE\SOFTWARE\Wow6432Node\Microsoft\Windows\CurrentVersion\Internet Settings\WinHttp]
"DefaultSecureProtocols"=dword:00000a00

[HKEY_LOCAL_MACHINE\SYSTEM\CurrentControlSet\Control\SecurityProviders\SCHANNEL\Protocols\TLS 1.1\Client]
"DisabledByDefault"=dword:00000000
"Enabled"=dword:00000001

[HKEY_LOCAL_MACHINE\SYSTEM\CurrentControlSet\Control\SecurityProviders\SCHANNEL\Protocols\TLS 1.2\Client]
"DisabledByDefault"=dword:00000000
"Enabled"=dword:00000001
Now, save the file with any name, but make sure to add .reg as the extension. It is better to save the file on the desktop and with an easy-to-remember name for easy access.
Finally, double-click on the file from the Desktop, and the registry will be added.
The only thing left now is to restart your computer and use the Media Creation tool.
6] Troubleshoot in Clean Boot
If nothing works, then we are going to perform Clean Boot. It will allow you to stop all other processes and just run this one. So, perform Clean Boot and manually enable processes. Once you know which app is the cause, you can easily remove it and resolve your problem.
Hopefully, now, you are able to use the Media Creation Tool to upgrade your PC.
Similar: Fix 0x80072F8F Windows Update, Activation and Microsoft Store Error
How do I fix error 0x80072f8f?
You can fix the Media Creation error code 0x80072f8f using the solutions mentioned here. But there are some other errors 0x80072f8f. You can check our guide on how to resolve the 0x80072F8F errors for Windows Update, Activation, and Microsoft Store. We have solutions that will fix your error easily.
Also Read: Windows Media Creation Tool not working.
Contents
- What Causes the Windows Media Creation Tool Error Code 0x80072f8f – 0x20000?
- How to Fix Error Code 0x80072f8f 0x20000 on Windows 10/11 or Windows 7
- Enable TLS 1.1 and TLS 1.2
- Delete the Software Distribution Folder
- Perform a Clean Boot
- Use the Windows ISO File
- Conclusion

Microsoft offers different ways to upgrade your Windows OS to the latest version. Since the introduction of Windows 11, users have been making the move to the new OS in numbers.
That said, some Windows 7 users are still making the switch to Windows 10 after Microsoft ended support for the former.
You can upgrade through the Windows Update client, the Windows Update assistant or by using the Windows ISO file.
However, one of the common ways to upgrade Windows, especially from Windows 7 to 10, is using the Media Creation tool.
Related: How to get and use Windows 10 Media Creation Tool
But users have been complaining about seeing error code 0x80072f8f-0x20000 when trying to use the tool.
The common cause of the error code, especially in Windows 7, is the lack of support for TLS 1.1 and TLS 1.2.
In other cases, the error could be showing up because of the software distribution folder or application conflicts.
How to Fix Error Code 0x80072f8f 0x20000 on Windows 10/11 or Windows 7
While the issue mostly occurs on Windows 7, you may also experience it on Windows 10 when upgrading to 11.
Follow the guides below to get rid of the problem for good.
Enable TLS 1.1 and TLS 1.2
We are putting this solution at the top because it helped many users get rid of the error.
The Media Creation Tool communicates with servers that use TLS (Transport Layer Security) 1.1 and TLS 1.2. That’s because the tool has to download the setup files required for the upgrade from Microsoft’s servers.
But as it turns out, these security protocols might be disabled by default on your current Windows version.
So, the error code 0x80072f8f 20000 could be showing up because your PC can’t properly communicate with Microsoft’s servers.
Thankfully, you can enable TLS 1.1 and TLS 1.2 by making changes to the system registry.
Important: Before you begin, note that the system registry is a sensitive part of your operating system and applying the wrong changes could cause permanent damage. So, make sure you follow the steps in this guide carefully.
You can create a backup of the entire registry to be on the safe side. Here’s how to back up the entire registry:
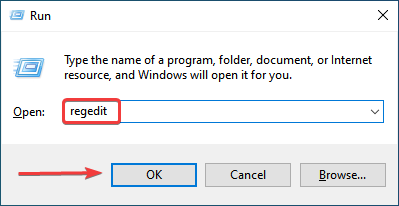
- Click on the Start button.
- Go to the search box and type “regedit.exe.”
- You can also open the Run dialog box (Win + R), type “regedit.exe,” and hit the Enter key.
- After the Registry Editor opens, click on File in the top-left corner and select Export.

- When the Export Registry File dialog window shows up, choose a location to save the backup, enter a name for the backup file in the File Name box, and select All under Export Range.
- Click on the Save button.
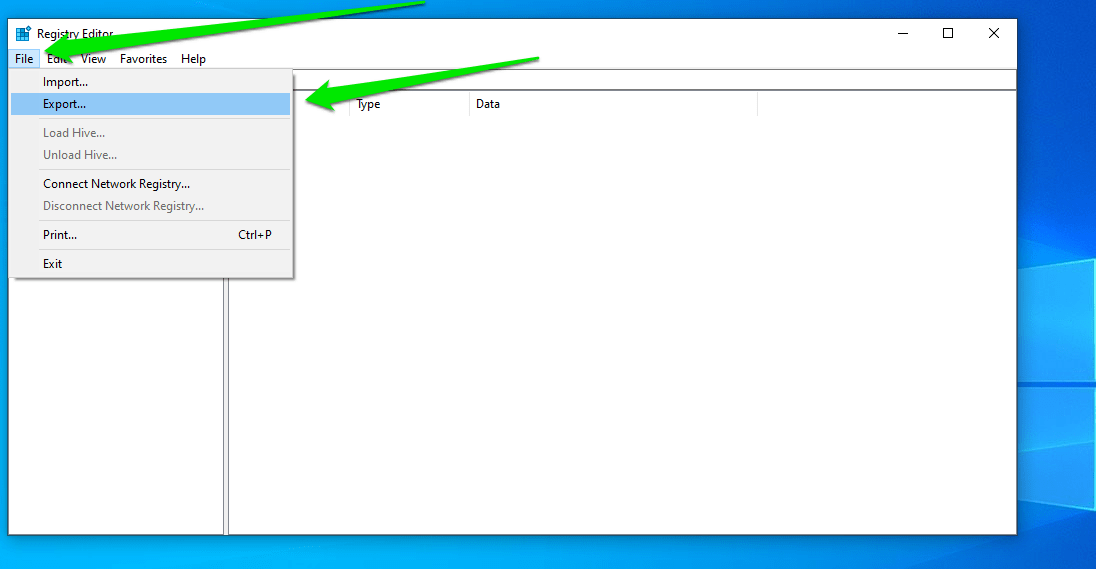
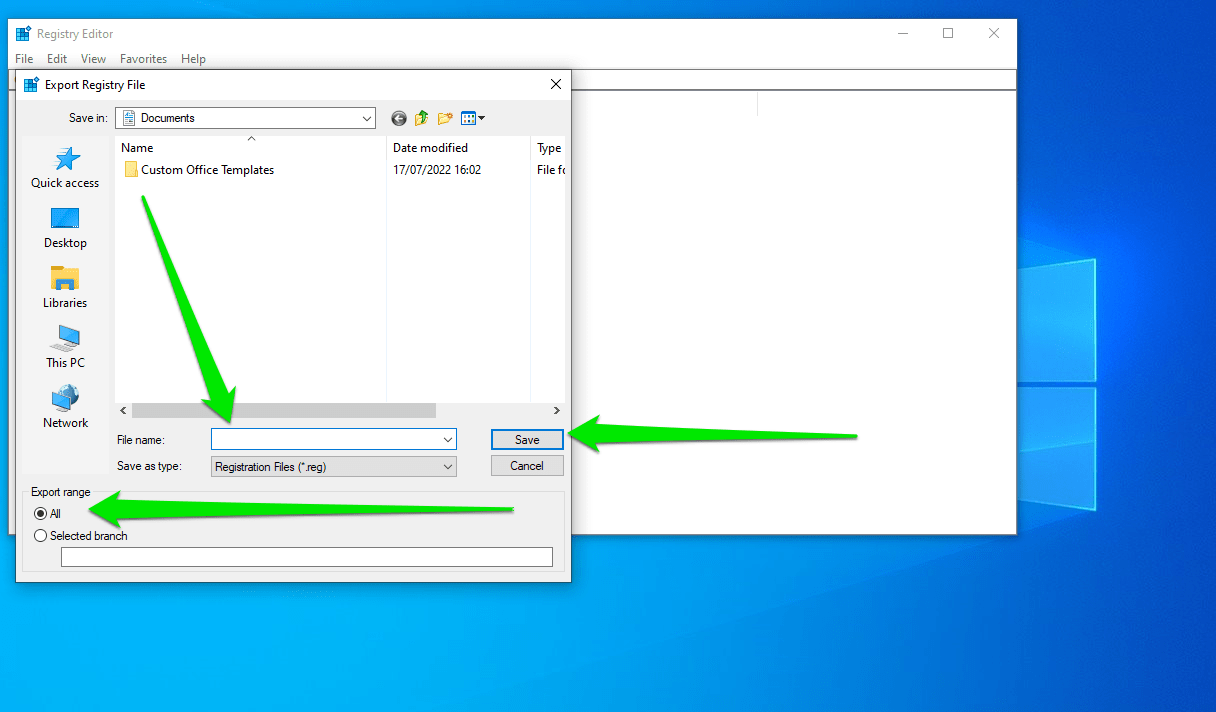
That’s how to backup the registry. Now, follow these steps to enable TLS 1.1 and TLS 1.2:
- Open the Registry Editor.
- To enable TLS 1.1, head to this registry location and follow the subsequent steps:
HKEY_LOCAL_MACHINE\SYSTEM\CurrentControlSet\Control\SecurityProviders\SCHANNEL\Protocols\TLS 1.1\Client
Now, go to the right side of the window and create the DisabledByDefault DWORD. To do that, right-click the empty field and select New > DWORD (32-bit) Value. Change the name of the new DWORD to DisabledByDefault.
Next, double-click the DWORD and set its value to 0.
3. Go to this registry location and follow the subsequent steps to enable TLS 1.2:
HKEY_LOCAL_MACHINE\SYSTEM\CurrentControlSet\Control\SecurityProviders\SCHANNEL\Protocols\TLS 1.2\Client
Note: If the tree ends at Protocols, create the TLS 1.2 and Client keys under the Protocols key.
Create the DisabledByDefault DWORD and set its value to 0.
4. Restart your computer and run the Media Creation Tool again.
Delete the Software Distribution Folder
The software distribution folder is used by the Windows Update client to temporarily store files required for Windows updates. These files are stored when an update is pending for installation or download.
Sometimes, the file in the folder causes conflicts and prevents the client from completing an update.
Since the Media Creation Tool has to download setup files required for upgrading Windows, the issue might be related to the software distribution folder. That’s because Windows may want to install pending updates before moving forward with the upgrade.
As such, deleting the folder may fix the problem.
Follow these steps:
- Open your file explorer and go to C:\Windows\SoftwareDistribution\Download.
- Select every file and sub folder in the folder and delete them.
- Next, launch the Command Prompt and enter the following command: wuauclt.exe /updatenow
- Hit the Enter key and try running the setup again.
Perform a Clean Boot
Windows error code 0x80072f8f – 0x20000 may also be appearing due to application conflicts. Some programs and services that launch during startup may be responsible for triggering the error when you run the Media Creation Tool.
You can resolve the problem by disabling those applications and running only minimal programs at Windows startup. This process is called a clean boot.
Follow these steps:
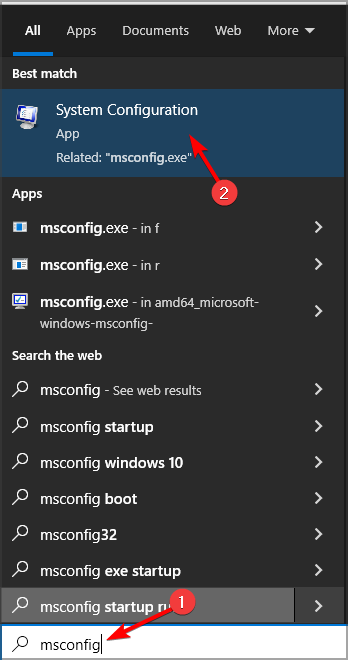
- Open the Start menu and search for “msconfig.”
- Click System Configuration in the search results.
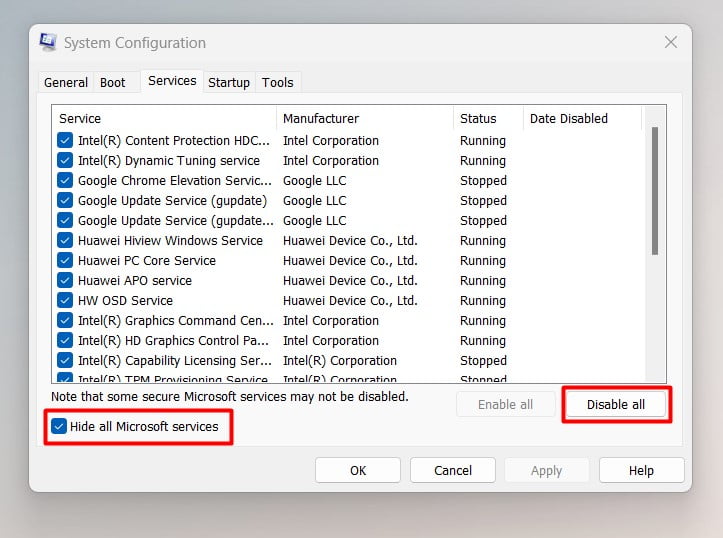
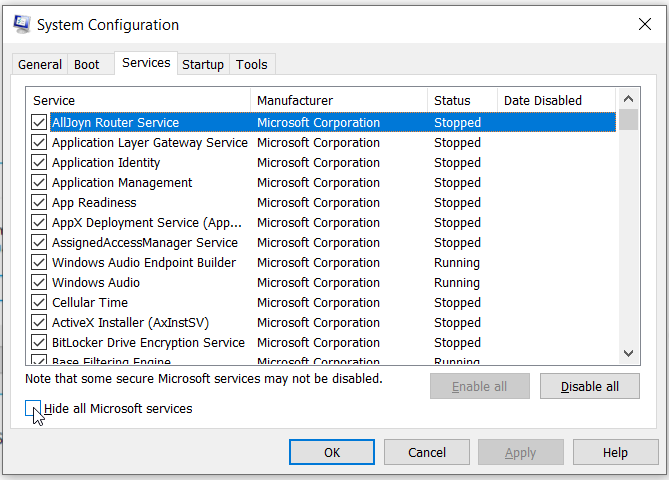
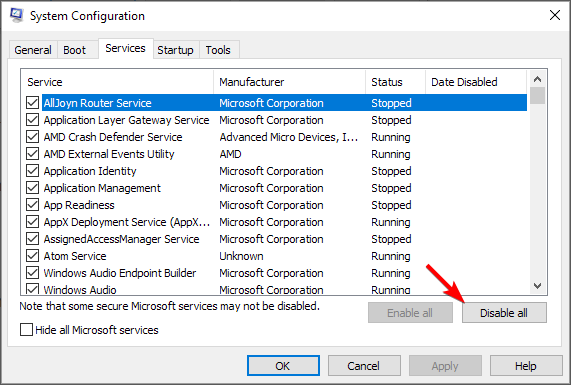
- Once the System Configuration dialog window appears, head to the Services tab.
- Check the “Hide all Microsoft services” box and click on the Disable All button.

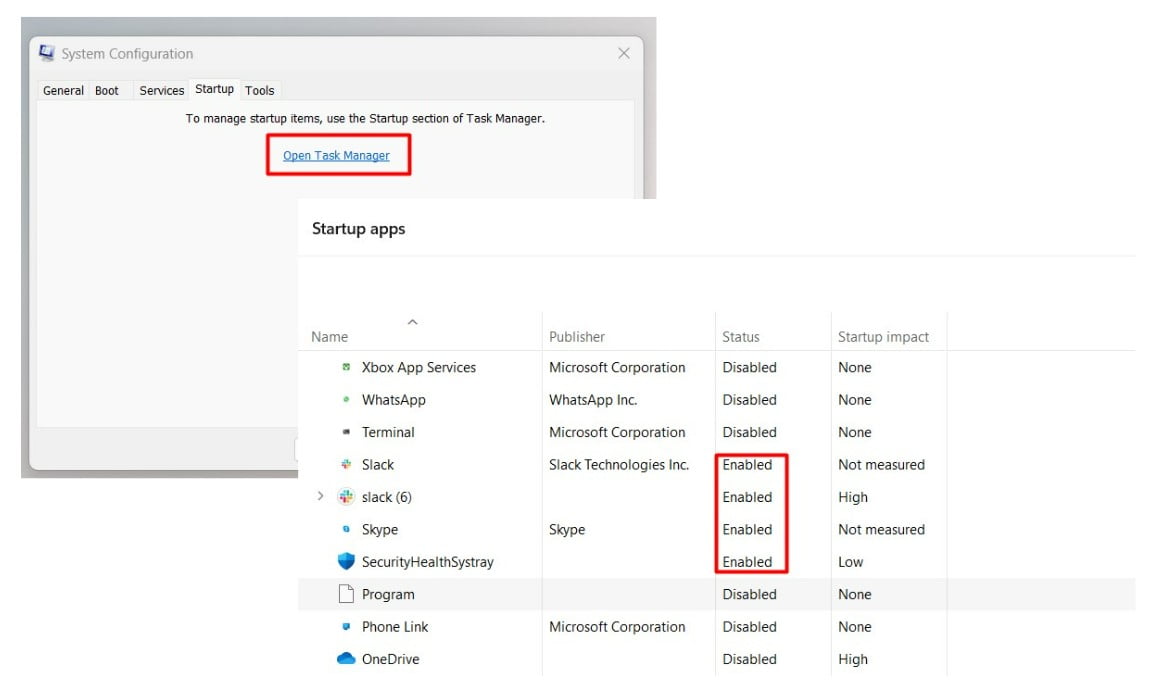
- Next, switch to the Startup tab and select Open Task Manager.
- Once the Startup tab of the Task Manager opens, select each enabled program and click on Disable.

- Return to the System Configuration dialog and click on the OK button.
- Restart your computer and try upgrading your operating system.
Related: How to perform a clean boot in Windows 10?
Use the Windows ISO File
As we mentioned earlier, the Media Creation Tool has to download the setup file to upgrade your PC. But for some reason, it keeps showing error code 0x80072f8f – 0x20000.
If none of the methods above helped you fix the problem, another alternative is to download the Windows setup file yourself and run the upgrade.
You should also consider downloading the ISO (Windows setup) to your mobile device and transfer it to your computer. This way, the process won’t be botched by the error.
So, follow these steps:
1. On your mobile browser, go to the Microsoft download page and download the ISO for Windows 10. A simple Google search will take you to the page.
Note that you need at least 6 GB of free storage on your mobile device and computer.
2. After downloading the ISO file, transfer it to your computer and extract it using a program such as WinZip or 7zip. Some Windows versions can mount the ISO file as a virtual DVD.
3. Next, open the extracted – or mounted – folder and double-click on the Setup file.
4. Follow the subsequent instructions to complete the upgrade.
You can choose to keep your files and applications during the upgrade or remove everything.
If you still see an error after choosing to keep your files and programs, consider the “Remove everything” option. But before you do that, backup your important files to an external drive.
Conclusion
With the error code 0x80072f8f – 0x20000 Windows 10/11 or Windows 7 fails to upgrade and you may be left with the option of installing Windows from scratch.
However, the guides above will help you get rid of the error for good.
You can also use a PC repair tool to find and fix errors that may be triggering the problem. The tool also helps you prevent issues from occurring in the future.
Make sure you have admin rights or try other quick solutions ✅
by Kazim Ali Alvi
Kazim has always been fond of technology, be it scrolling through the settings on his iPhone, Android device, or Windows. And at times, unscrewing the device to take… read more
Updated on
- Error code 0x80072f8f — 0x20000 tends to pop up while upgrading your OS.
- By all means, conflicting applications or the absence of admin privileges can trigger it.
- Try to run the Media Creation Tool with administrative rights and see how it goes.
XINSTALL BY CLICKING THE DOWNLOAD FILE
To fix Windows PC system issues, you will need a dedicated tool
SPONSORED
Fortect is a tool that does not simply clean up your PC, but has a repository with several millions of Windows System files stored in their initial version. When your PC encounters a problem, Fortect will fix it for you, by replacing bad files with fresh versions. To fix your current PC issue, here are the steps you need to take:
- Download Fortect and install it on your PC.
- Start the tool’s scanning process to look for corrupt files that are the source of your problem
- Right-click on Start Repair so the tool could start the fixing algorythm
- Fortect has been downloaded by 0 readers this month, rated 4.4 on TrustPilot
Upgrading your Windows computer should be a straightforward process, but sometimes an error code like “0x80072f8f – 0x20000” can pop up and make things confusing. This error might happen because of simple things like your computer’s clock being set to the wrong time, or more complex issues like conflicts with other programs on your computer.
Don’t worry, though! This guide is here to help you understand what’s causing the error and how to fix it. Whether you’re using Windows 10 or Windows 7, the solutions provided here are easy to follow and will get you back on track with your Windows upgrade.
🔵What causes error code 0x80072f8f – 0x20000?
There are multiple causes for this error, with these being the most common ones:
- TLS 1.2 turned off – It happens because the Media Creation Tool uses a specific security protocol called TLS 1.2, but this protocol is turned off by default on Windows 7,8 and Windows 10 computers. In simpler terms, the tool is trying to use a security feature that’s not enabled on your computer, causing the error.
- Lack of privileges – Certain tools require administrative privileges, and to use them you need to make apps run as admin.
- App conflicts – Third-party applications can sometimes come into conflict with Media Creation Tool and cause this problem. If that’s the case, you need to find and uninstall those programs.
- Corrupted cache files – Sometimes installation cache can get corrupted. If that happens, deleting the SoftwareDistribution directory might help.
If you have these problems and you’re getting an error message when trying to run Media Creation Tool stating that There was a problem running this tool, check the tested fixes below.
How do I fix error code 0x80072f8f – 0x20000?
- 🔵What causes error code 0x80072f8f — 0x20000?
- How do I fix error code 0x80072f8f — 0x20000?
- 1. Run the Media Creation tool as an administrator ✅
- 2. Enable TLS 1.2 using the Registry
- Step 1: Open the Registry Editor
- Step 2: Navigate to the TLS 1.2 Key
- Step 3: Create Client and Server Keys
- Step 4: Configure Client and Server Keys
- Step 5: Close the Registry Editor and Restart
- 3. Perform a Clean Boot
- 4. Check your date and time
- 5. Clear the software distribution folder
- 6. Modify the registry
- 7. Uninstall antivirus or other conflicting apps
1. Run the Media Creation tool as an administrator ✅
1. Locate and navigate to the folder where the Media Creation Tool is stored.
2. Right-click on it to open the context menu.
3. Select Run as administrator from the context menu.

4. Click Yes in the UAC (User Account Control) prompt.
5. Check if the issue persists.
If you are not running the Media Creation tool with administrative privileges, there’s a chance that you are encountering the error code 0x80072f8f – 0x20000 because of that.
Therefore, manually running it as an admin is likely to fix the issue.
If this method doesn’t work in Windows 10, head to the next one.
2. Enable TLS 1.2 using the Registry
Enabling Transport Layer Security (TLS) 1.2 in Windows 7,8 and 10 is essential for secure network communication. This guide, requiring administrative access, will lead you through the process using the Windows Registry Editor. Care must be taken, as incorrect changes to the registry can cause system issues.

NOTE
The steps provided for enabling TLS 1.2 using the Registry Editor are generally applicable to Windows 7 and 8 as well. The process of navigating the registry and creating the necessary keys and values is consistent across different versions of Windows, including Windows 7.
Step 1: Open the Registry Editor
- Press the
Windows Key + Ron your keyboard to open the Run dialog box. - Type
regeditand pressEnter. - If prompted by User Account Control, click
Yesto allow the Registry Editor to make changes to your device.
Step 2: Navigate to the TLS 1.2 Key
- In the Registry Editor, navigate to the following path:
HKEY_LOCAL_MACHINE\SYSTEM\CurrentControlSet\Control\SecurityProviders\SCHANNEL\Protocols - Right-click on the
Protocolsfolder, selectNew, and thenKey. - Name the new key
TLS 1.2.
Step 3: Create Client and Server Keys
- Right-click on the
TLS1.2key, selectNew, and thenKey. - Name this new key
Client. - Repeat the process to create another key under
TLS 1.2and name itServer.
Step 4: Configure Client and Server Keys
- Select the
Clientkey, right-click in the right pane, selectNew, and thenDWORD (32-bit) Value. - Name the new DWORD
DisabledByDefault. - Double-click
DisabledByDefaultand set its value to0. - Right-click in the right pane again, select
New, and thenDWORD (32-bit) Value. - Name this new DWORD
Enabled. - Double-click
Enabledand set its value to1. - Repeat these steps for the
Serverkey.
Step 5: Close the Registry Editor and Restart
- Close the Registry Editor.
- Restart your computer to apply the changes.
Enabling TLS 1.2 in Windows 10 through the Registry Editor is a straightforward process that will help you get rid of 0x80072f8f – 0x20000 Media Creation Tool Error. If this does not solve your issue, please continue with the following fixing method.
3. Perform a Clean Boot
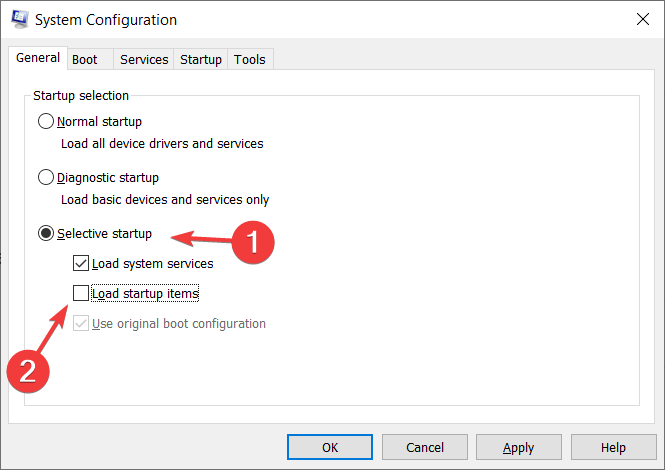
- Type MSConfig in the Start search and select System Configuration.

- In the General tab, select Selective Startup.
- Check Load System Services.

- Click the Services tab and choose to Hide All Microsoft Services.

- Select Disable All.

- Click Apply and OK and restart the computer.
If the problem does not appear with a clean boot, you may now try to locate the culprit program or service.
The simplest method to handle this is using a third-party specialized removal application to remove stubborn apps while in Clean Boot mode.
Otherwise, you could also utilize an automatic PC repair method that is capable of cleaning the Windows OS and thus restoring your system files.
Fortect is the ideal software designed to detect various system issues and repair them quickly with its patented technology. This way, you can get rid of such Media Creation errors.

Fortect
Stay away from Windows OS errors using this full repairing tool capable of fixing media creation issues.
4. Check your date and time
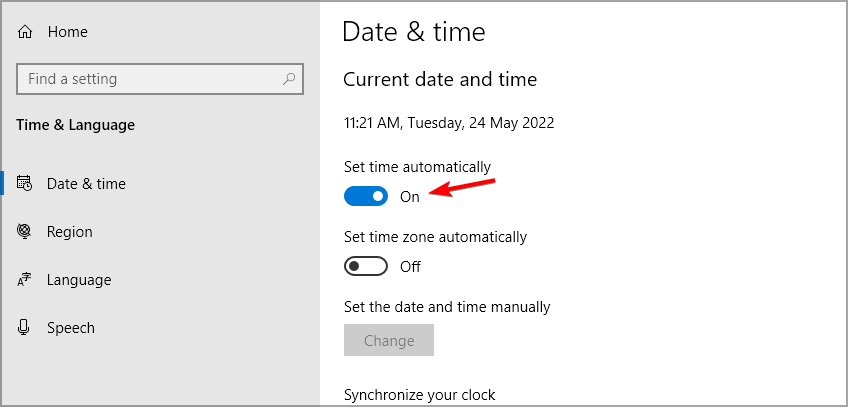
- Right-click the clock in the bottom right. Choose Adjust date/time.

- Disable Set time automatically.


- Wait for a few moments and then enable it again.

- Media Creation Tool: Access denied on Windows 10/11 ISO to USB
- Windows Media Creation Tool Not enough space error [SOLVED]
- How to Change the Hyper-V Display Resolution [Windows 11 Guide]
- Fix: No Internet, Secured Error on Windows 11
5. Clear the software distribution folder
- Press Windows + R to launch the Run command.
- Paste the following path in the text field, and either click OK or hit Enter to launch the Software Distribution folder.
C:\Windows\SoftwareDistribution\Download
- Press Ctrl + A to select all the files.
- Then, right-click on them, and select Delete from the context menu. Alternatively, you can pick them up and hit the Delete key.

- Once done, press Windows + S to launch the Search menu, enter Command Prompt in the text field, and then click on Run as administrator at the right.

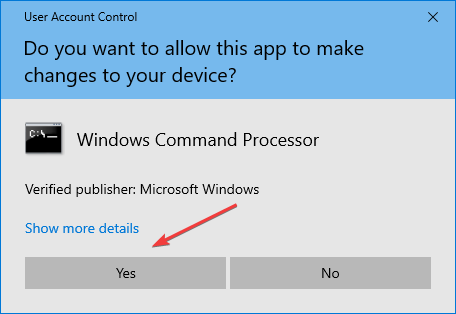
- Click Yes in the UAC prompt that appears.

- Paste the following command and hit Enter:
wuauclt.exe /updatenow

After following these steps, restart the computer for the changes to effect, and check if the error code 0x80072f8f – 0x20000 is fixed.
Nite than cleaning up the software distribution folder can also help with Media Creation Tool’s refusal to update your PC.
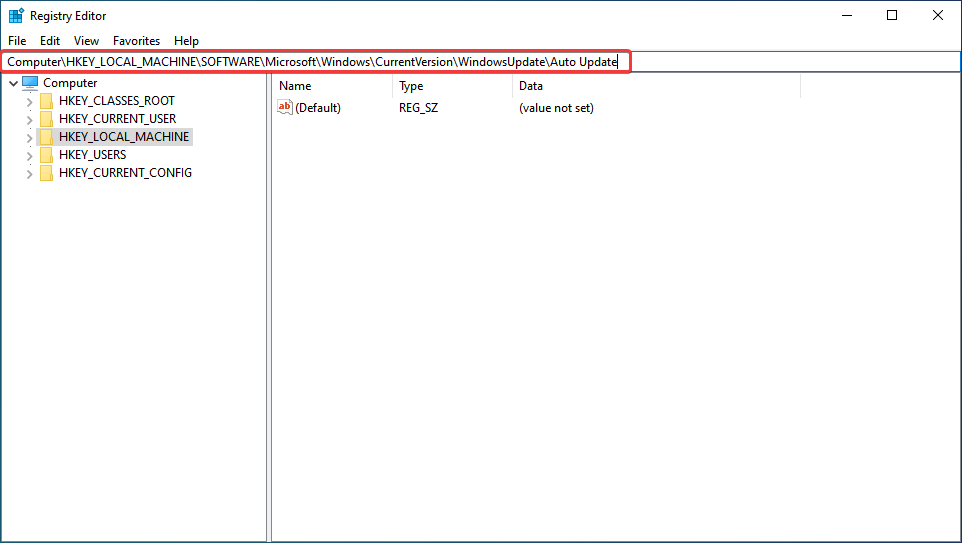
6. Modify the registry
- Press Windows + R to launch the Run command dialog box, type Regedit in the text field, and click on OK to launch the Registry Editor.
- Click Yes in the UAC prompt that pops up.
- Paste the following path in the address bar at the top, and hit Enter:
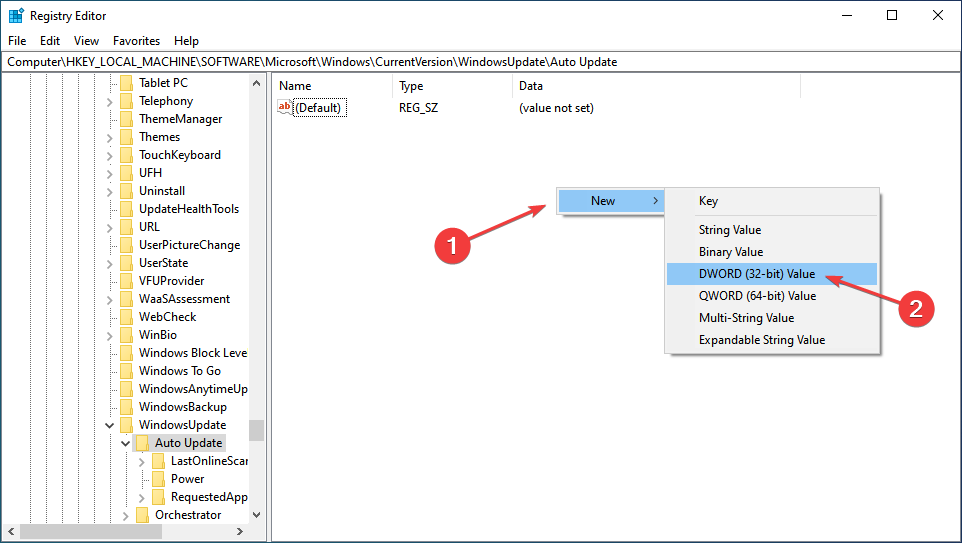
Computer\HKEY_LOCAL_MACHINE\SOFTWARE\Microsoft\Windows\CurrentVersion\WindowsUpdate\Auto Update
- Now, right-click on the empty portion on the right, hover the cursor over New, select DWORD (32-bit) Value from the context menu, and name it AllowOSUpgrade.
- Double-click on the key you just created to change its value.
- Finally, enter 1 under Value data and click on OK at the bottom to save the changes.


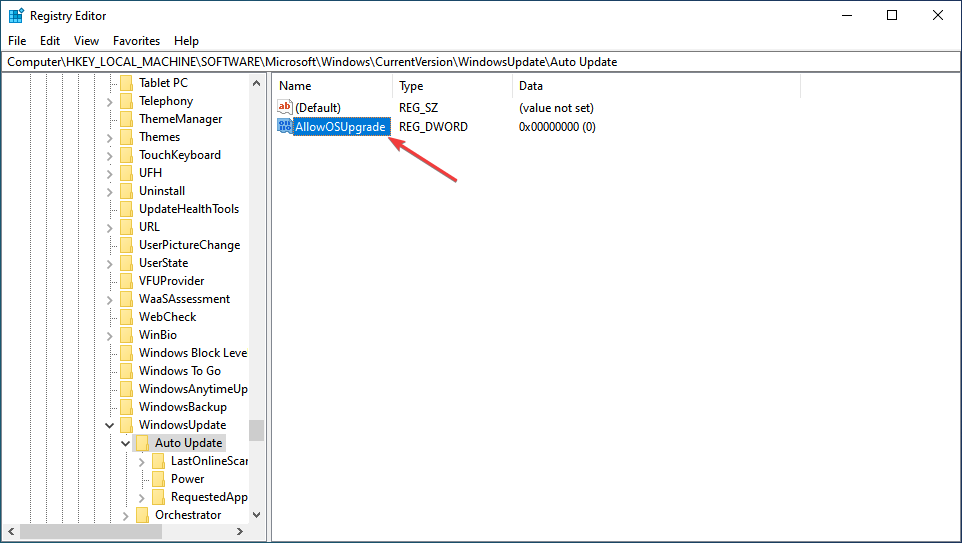
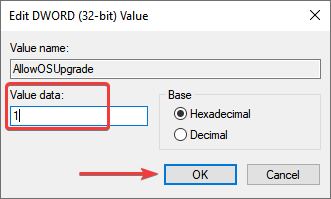
This registry fix has helped many users eliminate the error code 0x80072f8f – 0x20000, so try it in Windows 10. In all likelihood, the error should be fixed after this.
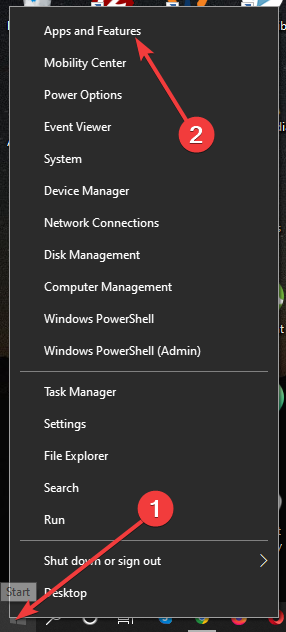
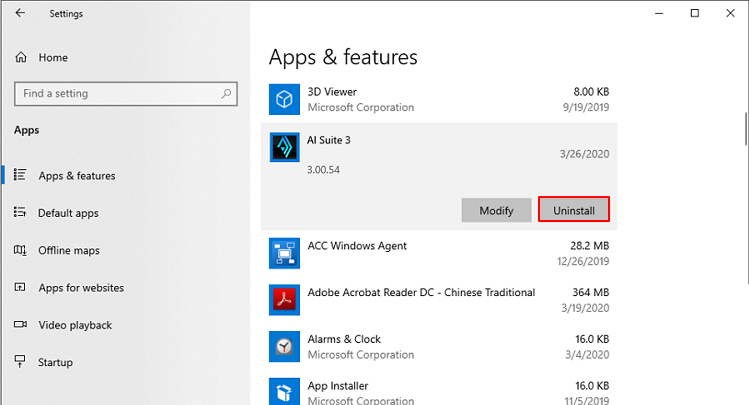
7. Uninstall antivirus or other conflicting apps
- Press the Windows key + X and select Apps and Features from the menu.

- Then, select your antivirus software and click on Uninstall.

- Follow the instructions on the screen to remove it.
- After removing the software, try to perform the upgrade again.
If you remove your antivirus, you can take a look at these best and most reliable antiviruses for Windows.
Error code 0x80072f8f – 0x20000 is a common issue and it can lead to Windows installation fails, so it’s important that you fix it.
Please tell us which fix worked and the iteration of Windows on which you were facing the problem in the comments section below.
![]()