На чтение 2 мин Просмотров 11.7к. Опубликовано
Обновление для системы безопасности Windows, выпущенное в октябре, вызвало широко распространенные проблемы с Windows 10 и Windows 11. И многие пользователи стали получать ошибку 0x0000007c при печати или добавлении сетевого принтера. В этой статье я расскажу как исправить данную ошибку печати.
Корпорация Майкрософт часто выпускает пакеты безопасности для диспетчера очереди печати, после того, как начиная с июня были раскрыты уязвимости Windows, известные как «PrintNightmare».
Однако эти исправления безопасности привели к массовым проблемам с сетевой печатью Windows, в результате чего крупные и мелкие организации, а так же обычные пользователи сталкиваются с ошибками и не могут печатать на своих принтерах.
В октябре 2021 года, Microsoft выпустила обязательное накопительное обновление KB5006670 с обновлениями безопасности для двух уязвимостей (CVE-2021-36970 и CVE-2021-41332). Эти исправления вызвали широкий спектр проблем с сетевой печатью и пользователи Windows начали получать ошибки 0x00000709 и 0x0000007c.
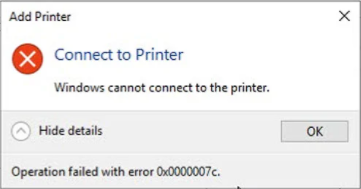
Если при печати или добавлении сетевого принтера, вы получили ошибку «Windows не может подключиться к принтеру. Операция завершилась с ошибкой 0x0000007c», скачайте файл исправления реестра, согласно версии вашей операционной системы и запустите его.
Скачать исправление реестра для Windows 10 2004, 20H2, 21H1 и 21H2 или внести изменения вручную можно в ветке:
Windows Registry Editor Version 5.00
[HKEY_LOCAL_MACHINE\SYSTEM\CurrentControlSet\Policies\Microsoft\FeatureManagement\Overrides]
«713073804»=dword:00000000
Скачать исправление реестра для Windows Windows 10 1909 или внести изменения вручную можно в ветке:
Windows Registry Editor Version 5.00
[HKEY_LOCAL_MACHINE\SYSTEM\CurrentControlSet\Policies\Microsoft\FeatureManagement\Overrides]
«1921033356»=dword:00000000
Скачать исправление реестра для Windows 10 1809 и Windows Server 2019 или внести изменения вручную можно в ветке:
Windows Registry Editor Version 5.00
[HKEY_LOCAL_MACHINE\SYSTEM\CurrentControlSet\Policies\Microsoft\FeatureManagement\Overrides]
«3598754956»=dword:00000000
Ожидается, что исправления этой ошибки будет выпущено в декабре 2021 года и должно исправить проблемы с печатью.
Если вы не можете дождаться декабря, когда проблемы с принтером будут устранены, вы можете использовать приведенные выше значения реестра для исправления ошибок прямо сейчас.
После внесения изменений в реестр, не забудьте перезагрузиться!

Администратор
«Админы делятся на тех, кто не делает бэкапы, и тех, кто уже делает». Народная мудрость.
Ошибка с кодом 0x0000007c является новой неполадкой, которая появляется при попытке подключиться к принтеру по сети. При попытке установить связь высвечивается сообщение со сбоем. Иногда дополнительно просят установить драйвер для средства печати. С этой ошибкой столкнулось очень много пользователей, о чем свидетельствуют десятки страниц с обсуждением проблемы на различных форумах. При чем поломка не привязана к конкретной модели принтера или версии Windows 10. Вот все, что нам удалось разузнать о данной ошибке, а также все известные способы исправления, подтвержденные другими пользователями.
Совет! Ошибка 0x000006e4 похожа на 0x0000007c, поэтому стоит попробовать способы из нашего соответствующего руководства — вот ссылка.
Почему появляется ошибка 0x0000007c?
Ключевая причина проблемы подключения компьютера к принтеру заключается в проблемном октябрьском обновлении Windows 10. После его установки и начала появляться ошибка. Мы можем сделать вывод, что это не единственная причина, так как сбой возникает только у определенной группы людей. Иными словами, сюда наслаиваются какие-то настройки системы, но выяснять это с нашей стороны не имеет большого смысла. Единственное, что дополнительно нужно отметить – в Microsoft подтвердили осведомленность о данной неисправности и пообещали его исправить в одном из декабрьских обновлений.
Как исправить ошибку 0x0000007c?
Сегодня есть 3 эффективных исправления, которые уже помогают пользователям. Это скорее временные решения до момента, когда Microsoft выпустит полноценный патч. Как показывает опыт, обещания не всегда выполняют, а еще реже –вовремя.
Что следует попробовать:
- Изменить ключи в реестре. Это решение посоветовали в технической поддержке и оно имеет наибольшие шансы на успех.
- Удалить проблемное обновление. Изменения откатятся и проблема может уйти сама собой.
- Особым способом переустановить принтер. Как минимум несколько пользователей отписали, что у них это срабатывает.
Вносим исправления в реестр
Эффективность способа подтверждена в системах: Windows 10 2004, 20H2, 21H1, 21H2, 1909, 1809, Server 2019. Суть способа в том, что отключить ту проверку безопасности, которая и вызывает проблемы при подключении к принтеру. В результате несколько снижается степень безопасности, но многие годы обходились без данной функции и еще немного можно потерпеть. Во время следующего обновления, когда внесут исправление, придется вручную включить опцию.
Что нужно сделать:
- Открываем редактор реестра с помощью слова regedit (его нужно ввести в строку «Выполнить»).
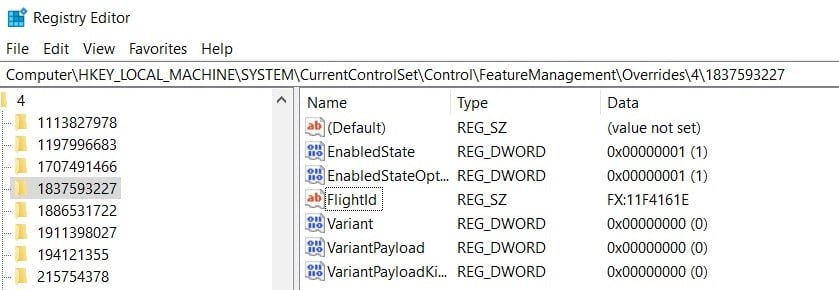
- Идем по пути HKEY_LOCAL_MACHINE \ SYSTEM \ CurrentControlSet \ Policies \ Microsoft \ FeatureManagement \ Overrides.
- Вместо значения 713073804 вставляем 00000000. Здесь могут изначально стоять и другие значения: 3598754956, 1921033356 и другие.
Удаляем проблемное обновление
На сегодняшний день чаще всего ошибку 0x0000007c вызывает обновление KB5006670 для Windows 10 или KB5006674 для Windows 11. Их удаление может сработать.
Как удалить накопительное обновление:
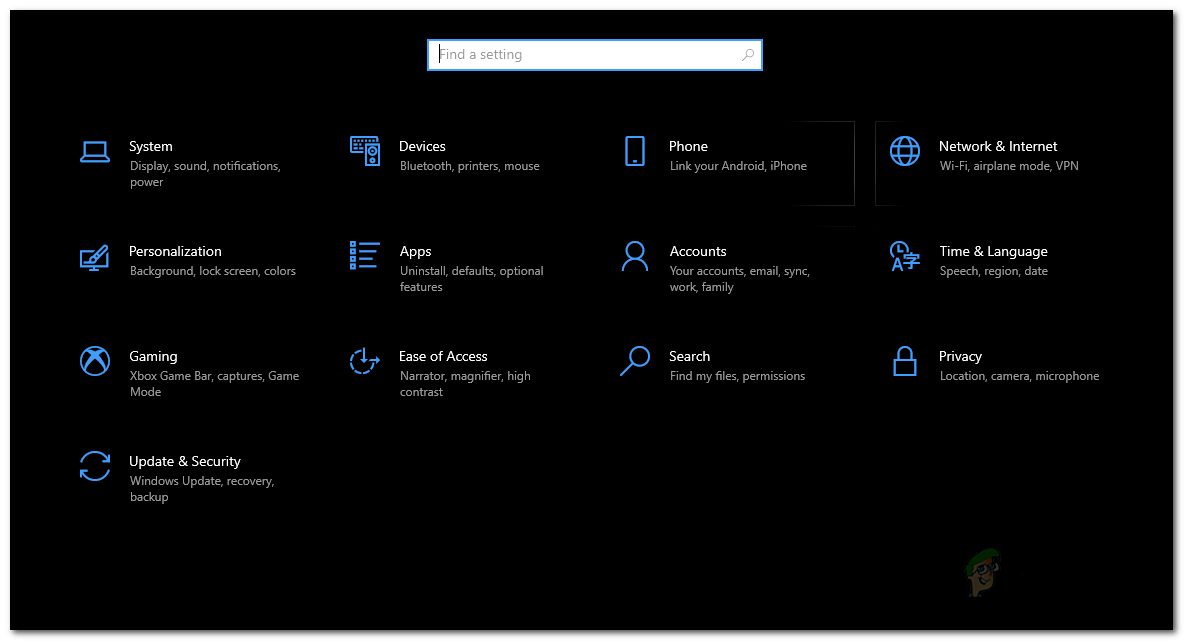
- Нажимаем комбинацию Win + I и переходим в «Обновление и безопасность» или «Центр обновления Windows» (в Windows 11).
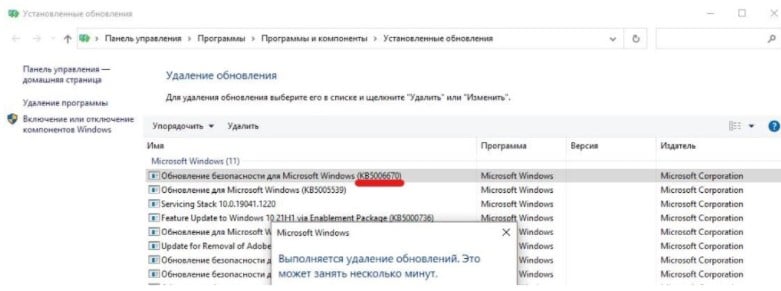
- Жмем по кнопке «История обновлений», затем – «Удалить обновления».
- Из списка выделяем проблемное обновление и удаляем его.
Важно! Чтобы исправление сработало, дополнительно нужно выключить автоматическое обновление. В противном случае оно будет переустановлено без вашего ведома и проблема сохранится.
Переподключаем принтер
Последнее решение, которое много пользователей похвалили. Возможно, вы уже пробовали удалить и заново подключить устройство, но в стандартном исполнении процедура не работает. Просто следуйте инструкции ниже.
Руководство по переподключению принтера:
- Переходим по пути C:\Windows\System32\spool\drivers\x64\3, вырезаем все содержимое последней папки и переносим его на рабочий стол.
- Открываем раздел «Службы» (проще всего вставить в поиск файл services.msc и открыть его.
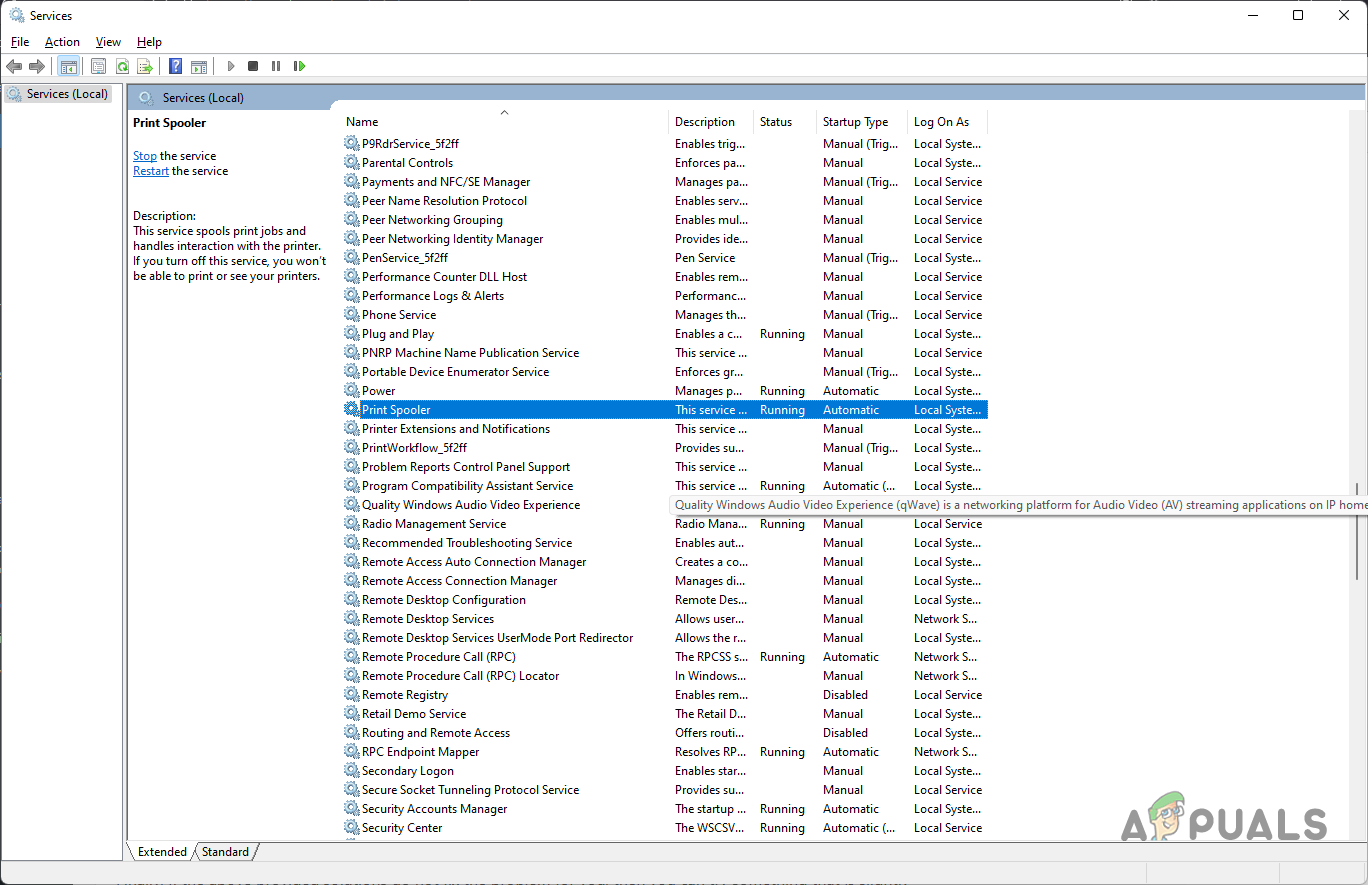
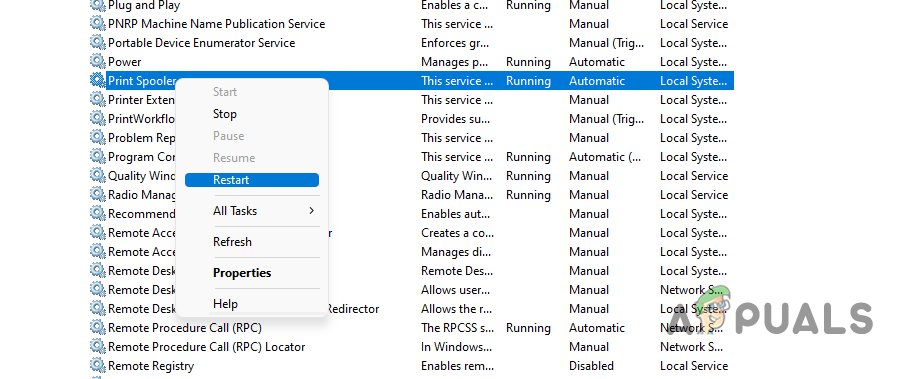
- Перезагружаем «Диспетчер печати» (останавливаем процесс и запускаем его заново).
- Скачиваем из интернета файл драйверов без автоустановки, просто в виде inf-файла.
- Удаляем принтер и вручную добавляем его стандартным образом, только во время его установки нужно указать путь к inf-файлу драйвера.

Есть и другие способы, не подтвердившие свою эффективность в борьбе с ошибкой 0x0000007c, которые мы пока не можем рекомендовать нашим читателям. Мы больше надеемся на ваш опыт. Пожалуйста, напишите в комментариях, удалось ли вам исправить данную проблему и как именно.
While trying to print a document or install a printer, users have been getting the error code 0x0000007c that states the system cannot connect to the printer. As it turns out, this issue has been reportedly caused by an update that was released by Microsoft as part of their security updates. The issue was recognized by Microsoft and they have released a fix for this problem. However, the sad part is, that the so-called fix seems to not fix the problem for everyone and thus the issue remains for most of the users. In this article, we are going to show you how to resolve the error message in question so without further ado, let us get started.

As it turns out, even though security patches are essential for your computer, especially in a work environment, it doesn’t really bode well when it breaks some functionality. You can go about solving this issue by simply uninstalling the update that has uprooted it in the first place. However, that may not work unless you stop Windows updates for a certain period of time until a permanent fix has been released. In addition to that, there are other workarounds as well that have been reported by different users who were facing the same issue. We will be mentioning all of them so you can choose and see which one works for you best. With that said, let us get started.
Uninstall Problematic Security Update
As we have mentioned already, one way you can resolve the problem in question is to simply uninstall the security update that has caused the error code in the first place. The security patch in question is the update KB5006670. Uninstalling Windows updates is pretty simple and when you stumble upon issues that have been caused by Windows updates, you can easily rectify them by uninstalling them from your system.
However, in order for that to work properly, you will also need to stop Windows updates for the time period. This is because in case you do not, Windows will automatically download and install the same updates on your system again which can end up causing the issue. Thus, stopping updates is important in this method. To uninstall a specific Windows update, follow the instructions that have been given down below:
- First of all, press the Windows key + I buttons on your keyboard which will bring up the Windows Settings window.
- Then, on the Windows Settings window, navigate to Windows Updates.

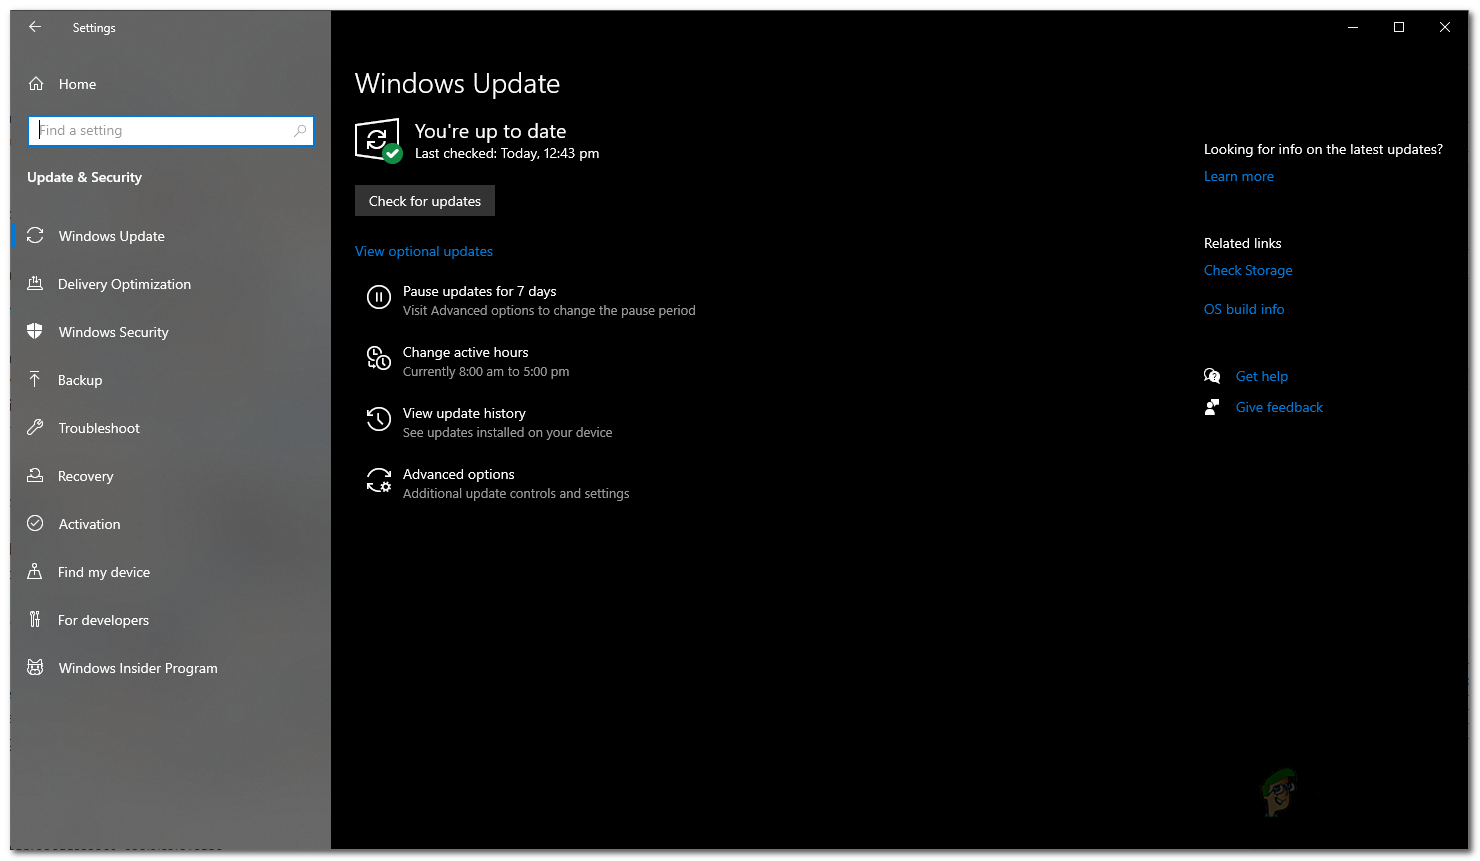
Windows Settings - On the Windows Updates screen, click on the View Update history option provided.

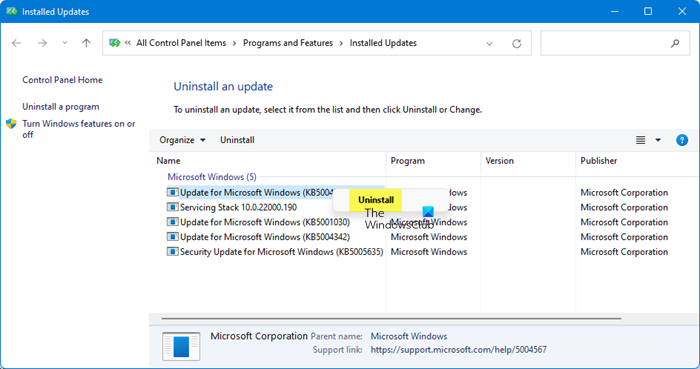
Windows Update Settings - After that, on the new page, under the Update history text, click on the Uninstall updates option.
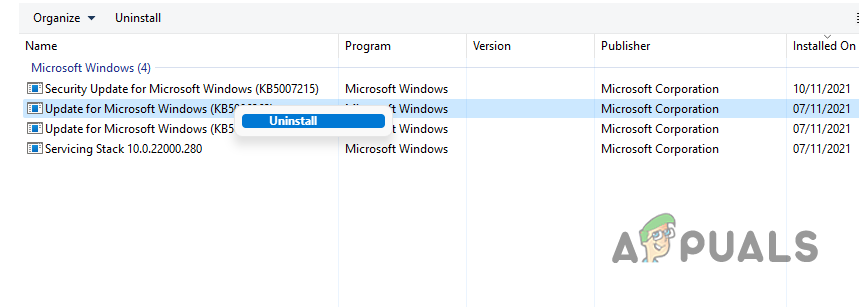
- This will bring up a Control Panel window.
- From the list of updates that have been installed on your system, look for the KB5006670 update.
- Double click on it to uninstall it from your system.

Uninstalling Windows Update - Once you have done that, go back to the Windows Updates menu on the Windows Settings app.
- There, click on the Pause updates for 7 days option.
Windows Update Settings - Finally, once you are through that, go ahead and restart your system.
- Once you boot up, go ahead and see if the problem still persists.
Reinstall Printer
As it turns out, another way that you can solve the error message in question is to reinstall the printer by following a few simple steps. If you try to reinstall the printer directly, it will not work as you will have to clear the drivers folder on your computer first and then proceed with installing the drivers again. The exact location may vary slightly depending on the architecture of your system but do not worry as we will be mentioning both down below. In addition to that, you will be opening up with the Windows Services window by running a MSC file and then restarting a service. With that said, follow the instructions given down below to systematically reinstall the printer:
- To start off, open up the File Explorer window.
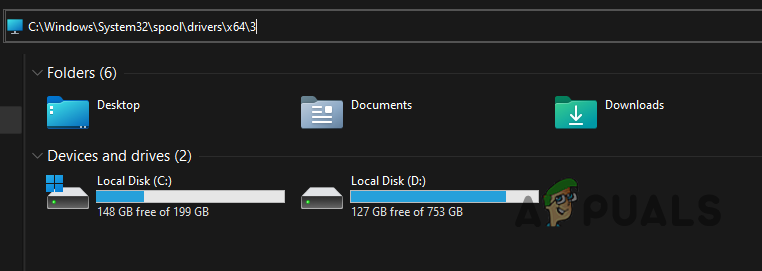
- After that, navigate to one of the following locations depending on the architecture of your system by copy-pasting the address given down below in the address bar of the File Explorer:
64-bit OS: C:\Windows\System32\spool\drivers\x64\3

32-bit OS: C:\Windows\System32\spool\drivers\W32X86\3

Navigating to Printer Driver Folder - Once you are there, cut all the contents of the folder and paste it on your desktop.
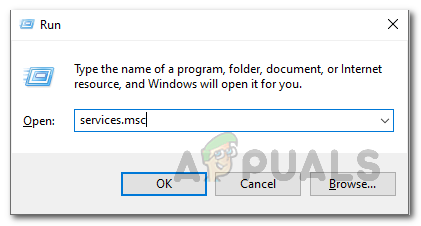
- After doing that, open up the Run dialog box by pressing Windows key + R.
- In the Run dialog box, type in services.msc and then hit the Enter key. This will open up the Windows Services window.

Opening up Windows Services - From the list of services, look for the Print Spooler service.

Print Spooler Service - Right-click on the service and from the drop-down menu, click the Restart button.

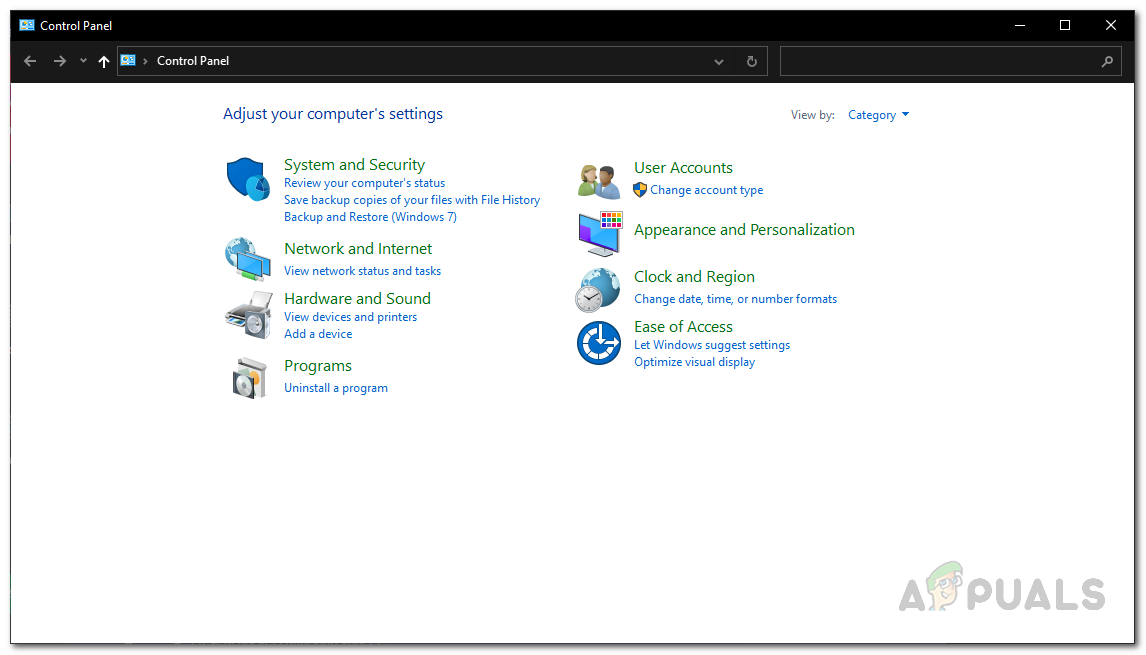
Restarting Print Spooler Service - Once you have done that, go ahead open up the Control Panel by searching for it in the Start Menu.
- On the Control Panel window, make your way to the Uninstall a program option.

Control Panel - There, uninstall the printer from the list of software by double-clicking it.
- Once you have done that, go ahead and manually add the printer and then install the required manually as well by downloading them from the manufacturer’s website.
- After doing all of this, the printer should now work properly and the error message should be gone.
Cancel Driver Installation Midway
Finally, if the above-provided solutions do not fix the problem for you, then you can try something that is slightly weird but has reportedly fixed the issue for a user. To do this, first of all, you will need to download the drivers for your printer from the manufacturer’s website. Once you have the drivers, run the installation and then when you are prompted to connect to the printer via the printer cable, choose to connect to the remote printer. Once you do this, and the printer connects successfully, go ahead and cancel the installation. After doing this, see if the problem still appears for you.

Kamil Anwar
Kamil is a certified MCITP, CCNA (W), CCNA (S) and a former British Computer Society Member with over 9 years of experience Configuring, Deploying and Managing Switches, Firewalls and Domain Controllers also an old-school still active on FreeNode.
09.05.2019
Просмотров: 11418
Синий экран смерти 0x0000007C: BUGCODE_NDIS_DRIVER возникает на старых серверных сборках Microsoft Windows Server и указывает на то, что возникли проблемы с низкоуровневым сетевым драйвером NDIS, который обеспечивает связь с железом. Такая неполадка может возникнуть и на Windows 2000 и Windows XP, только код ошибки будет 0x000000D2 (BUGCODE_ID_DRIVER). По умолчанию такой драйвер расположен по адресу C:\Windows\System32\drivers. Ему соответствуют файл ndis.sys, который нужно заменить, восстановить или обновить, чтобы исправить ошибку 0x0000007C.
ВАЖНО! Ошибка 0x0000007C появляется и на компьютерах с Windows 7, 8 и 10.
Читайте также: Нет доступа к целевой папке и вам необходимо разрешение на выполнение этой операции
Способы решения ошибки 0x0000007C: BUGCODE_NDIS_DRIVER
Зачастую виновником проблемы 0x0000007C: BUGCODE_NDIS_DRIVER становится сетевая карта Intel, а также неправильно установленные к ней драйвера. Поэтому для решения BSOD стоит изначально попробовать манипуляции с программным обеспечением.
ВАЖНО! Все действия мы будет выполнять на Windows 7. Вы повторяете все те же шаги на своей сборке. Возможны некоторые отличия в адресах к определенной функции.
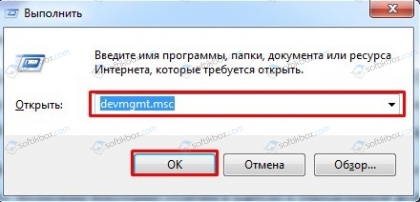
- Нажимаем «Win+R» и вводим «devmgmt.msc».
- Откроется Диспетчер устройств. Здесь нужно найти ветку «Сетевые адаптеры» и развернуть её. Смотрим, чтобы не было обозначения с желтым восклицательным знаком. Оно указывает на повреждение драйвера.
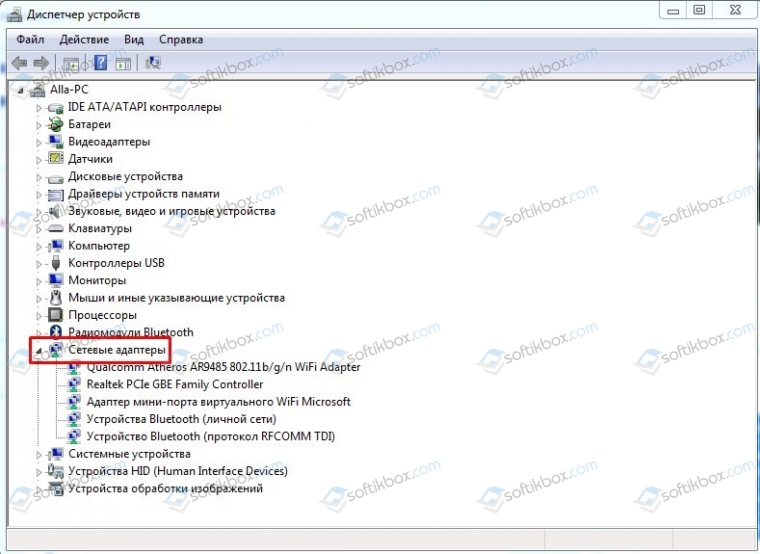
- Находим сетевой модуль и нажимаем на нем правой кнопкой мыши. Выбираем «Свойства».
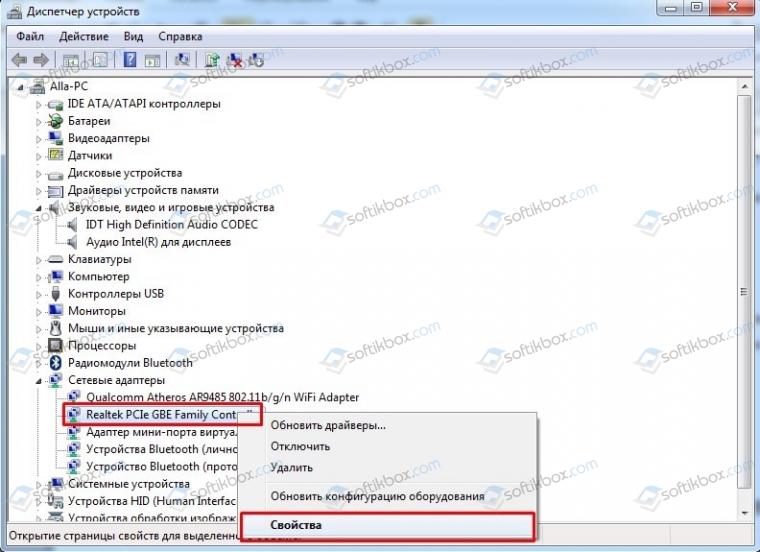
- Откроется небольшое окно. Переходим во вкладку «Драйвер» и выбираем «Обновить» или «Откатить». Выбираем действие в зависимости от того, что последнее вы выполняли: если устанавливали софт или обновляли ОС, то выбираем «Откат», а если давно не обновляли Windows – то «Обновление».

- После отката или обновления драйверов нужно перезагрузить систему.
ВАЖНО! Если вы будете обновлять драйвера к сетевой карте, то их нужно скачать ТОЛЬКО с официального сайта производителя оборудования или материнской платы. Не скачивайте программное обеспечение со сторонних сайтов.
В старших сборках Windows решить синий экран смерти можно путем обновления драйвера к беспроводному адаптеру. Поэтому стоит обновить ПО и для данного компонента, если ошибка не исчезла. Если же неполадка появилась на Windows 10, то обновить в первую очередь стоит саму операционную систему, так как устаревшие компоненты могут конфликтовать с ОС.
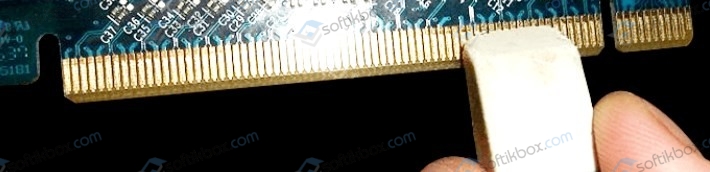
Также на некоторых форумах отмечено, что синий экран смерти BUGCODE NDIS DRIVER возникает по причине неправильной работы видеокарты. Нужно отключить устройство. Попробовать запустить ПК без графического видеоускорителя, а затем, если все в порядке, обновить ПО, а также почистить контакты видеокарты. Возможно, возникли неполадки с графикой.
Для полной уверенности нужно протестировать ОЗУ и жесткий диск на предмет ошибок, так как ошибка 0x0000007C: BUGCODE NDIS DRIVER указывает на то, что драйвер имеет доступ ко многим компонентам системной сборки и проблема может крыться в любой другой детали.
Если же ошибку не получается исправить, рекомендуем проверить ПК на вирусы, а затем, если вредоносные объекты не обнаружены, переустановить Windows.
На чтение 2 мин Просмотров 10.7к. Опубликовано 13.11.2021
Обновление для системы безопасности Windows, выпущенное в октябре, вызвало широко распространенные проблемы с Windows 10 и Windows 11. И многие пользователи стали получать ошибку 0x0000007c при печати или добавлении сетевого принтера. В этой статье я расскажу как исправить данную ошибку печати.
Корпорация Майкрософт часто выпускает пакеты безопасности для диспетчера очереди печати, после того, как начиная с июня были раскрыты уязвимости Windows, известные как «PrintNightmare».
Однако эти исправления безопасности привели к массовым проблемам с сетевой печатью Windows, в результате чего крупные и мелкие организации, а так же обычные пользователи сталкиваются с ошибками и не могут печатать на своих принтерах.
В октябре 2021 года, Microsoft выпустила обязательное накопительное обновление KB5006670 с обновлениями безопасности для двух уязвимостей (CVE-2021-36970 и CVE-2021-41332). Эти исправления вызвали широкий спектр проблем с сетевой печатью и пользователи Windows начали получать ошибки 0x00000709 и 0x0000007c.
Если при печати или добавлении сетевого принтера, вы получили ошибку «Windows не может подключиться к принтеру. Операция завершилась с ошибкой 0x0000007c», скачайте файл исправления реестра, согласно версии вашей операционной системы и запустите его.
Скачать исправление реестра для Windows 10 2004, 20H2, 21H1 и 21H2 или внести изменения вручную можно в ветке:
Windows Registry Editor Version 5.00
[HKEY_LOCAL_MACHINESYSTEMCurrentControlSetPoliciesMicrosoftFeatureManagementOverrides]
«713073804»=dword:00000000
Скачать исправление реестра для Windows Windows 10 1909 или внести изменения вручную можно в ветке:
Windows Registry Editor Version 5.00
[HKEY_LOCAL_MACHINESYSTEMCurrentControlSetPoliciesMicrosoftFeatureManagementOverrides]
«1921033356»=dword:00000000
Скачать исправление реестра для Windows 10 1809 и Windows Server 2019 или внести изменения вручную можно в ветке:
Windows Registry Editor Version 5.00
[HKEY_LOCAL_MACHINESYSTEMCurrentControlSetPoliciesMicrosoftFeatureManagementOverrides]
«3598754956»=dword:00000000
Ожидается, что исправления этой ошибки будет выпущено в декабре 2021 года и должно исправить проблемы с печатью.
Если вы не можете дождаться декабря, когда проблемы с принтером будут устранены, вы можете использовать приведенные выше значения реестра для исправления ошибок прямо сейчас.
После внесения изменений в реестр, не забудьте перезагрузиться!
Администратор
«Админы делятся на тех, кто не делает бэкапы, и тех, кто уже делает». Народная мудрость.
09.05.2019
Просмотров: 11209
Синий экран смерти 0x0000007C: BUGCODE_NDIS_DRIVER возникает на старых серверных сборках Microsoft Windows Server и указывает на то, что возникли проблемы с низкоуровневым сетевым драйвером NDIS, который обеспечивает связь с железом. Такая неполадка может возникнуть и на Windows 2000 и Windows XP, только код ошибки будет 0x000000D2 (BUGCODE_ID_DRIVER). По умолчанию такой драйвер расположен по адресу C:WindowsSystem32drivers. Ему соответствуют файл ndis.sys, который нужно заменить, восстановить или обновить, чтобы исправить ошибку 0x0000007C.
ВАЖНО! Ошибка 0x0000007C появляется и на компьютерах с Windows 7, 8 и 10.
Читайте также: Нет доступа к целевой папке и вам необходимо разрешение на выполнение этой операции
Способы решения ошибки 0x0000007C: BUGCODE_NDIS_DRIVER
Зачастую виновником проблемы 0x0000007C: BUGCODE_NDIS_DRIVER становится сетевая карта Intel, а также неправильно установленные к ней драйвера. Поэтому для решения BSOD стоит изначально попробовать манипуляции с программным обеспечением.
ВАЖНО! Все действия мы будет выполнять на Windows 7. Вы повторяете все те же шаги на своей сборке. Возможны некоторые отличия в адресах к определенной функции.
- Нажимаем «Win+R» и вводим «devmgmt.msc».
- Откроется Диспетчер устройств. Здесь нужно найти ветку «Сетевые адаптеры» и развернуть её. Смотрим, чтобы не было обозначения с желтым восклицательным знаком. Оно указывает на повреждение драйвера.
- Находим сетевой модуль и нажимаем на нем правой кнопкой мыши. Выбираем «Свойства».
- Откроется небольшое окно. Переходим во вкладку «Драйвер» и выбираем «Обновить» или «Откатить». Выбираем действие в зависимости от того, что последнее вы выполняли: если устанавливали софт или обновляли ОС, то выбираем «Откат», а если давно не обновляли Windows – то «Обновление».
- После отката или обновления драйверов нужно перезагрузить систему.
ВАЖНО! Если вы будете обновлять драйвера к сетевой карте, то их нужно скачать ТОЛЬКО с официального сайта производителя оборудования или материнской платы. Не скачивайте программное обеспечение со сторонних сайтов.
В старших сборках Windows решить синий экран смерти можно путем обновления драйвера к беспроводному адаптеру. Поэтому стоит обновить ПО и для данного компонента, если ошибка не исчезла. Если же неполадка появилась на Windows 10, то обновить в первую очередь стоит саму операционную систему, так как устаревшие компоненты могут конфликтовать с ОС.
Также на некоторых форумах отмечено, что синий экран смерти BUGCODE NDIS DRIVER возникает по причине неправильной работы видеокарты. Нужно отключить устройство. Попробовать запустить ПК без графического видеоускорителя, а затем, если все в порядке, обновить ПО, а также почистить контакты видеокарты. Возможно, возникли неполадки с графикой.
Для полной уверенности нужно протестировать ОЗУ и жесткий диск на предмет ошибок, так как ошибка 0x0000007C: BUGCODE NDIS DRIVER указывает на то, что драйвер имеет доступ ко многим компонентам системной сборки и проблема может крыться в любой другой детали.
Если же ошибку не получается исправить, рекомендуем проверить ПК на вирусы, а затем, если вредоносные объекты не обнаружены, переустановить Windows.
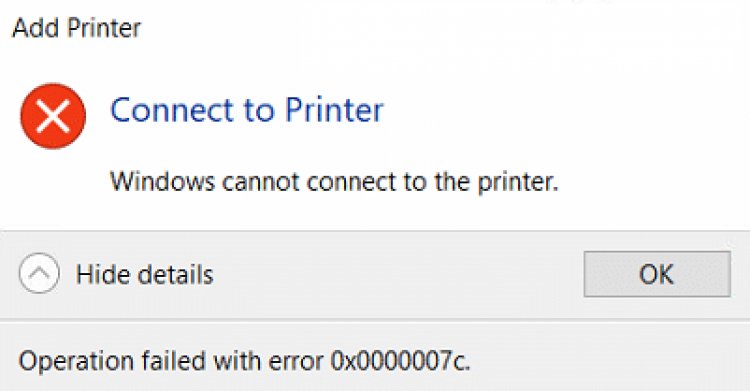
Some Windows 11 and Windows 10 users are unable to use the Printer. In this post, we will show you how to fix Windows cannot connect to the printer, Error Code 0x0000007c or 0x000006e4 on your Windows computer.

Why am I seeing Windows cannot connect to the printer Error 0x0000007c or 0x000006e4?
You may see error codes 0x0000007c or 0x000006e4 when trying to print a document. There are multiple variables that can cause this issue, such as buggy updates, outdated or corrupted Printer Driver, and more. More often than not, this error is seen in Windows Update KB5006670 for Windows 10 and KB5006674 for Windows 11. The issue can also occur if the Network Printer name or path is wrong. Other than that, the issue can be caused by a glitch in the Printer Spooler service. That you can fix by restarting the service itself. In the error is thrown up when trying to connect a Network Printer, ensure that the name/path is correct.
We have tried accumulating all the potential causes and their respective solutions to resolve this issue.
If you experiencing Windows cannot connect to the printer Error 0x0000007c or 0x000006e4, then you can use these solutions to resolve the issue.
- Uninstall Buggy Updates
- Use Printer Troubleshooter
- Restart Printer Spooler
- Remove and add Printer
- Reinstall Printer Drivers
Let us talk about them in detail.
1] Uninstall Buggy Updates
The most common reason for this issue is buggy updates. Usually, this update is KB5006670 for Windows 10 and KB5006674 for Windows 11. So, we have to remove them and check if the issue persists.
Before doing that, it is recommended to stop automatic updates in Windows 11/10. This way you won’t end up reinstalling the update that you are going to delete.
To remove cumulative updates in Windows 11, follow the given steps.
- Open Settings by Win + I.
- Click Windows Update.
- Then click Update History > Uninstall updates.
- Look for KB5006674.
- Right-click on them and select Uninstall.
To remove cumulative updates in Windows 10, follow the given steps.
- Open Settings by Win + I.
- Click Updates & Security.
- Then click Windows Update > View update history > Uninstall Updates
- Look for KB5006670.
- Right-click on them and select Uninstall.
After doing that, you need to restart your computer and try printing, hopefully, the issue will be resolved.
2] Use Printer Troubleshooter
If the issue is not because of a buggy update, then we have to opt for a general solution. So, run Printer Troubleshooter and check if the issue persists. To do that, open Command Prompt as an administrator and execute the following command.
msdt.exe /id PrinterDiagnostic
Now, wait for the process to complete and hopefully, the issue will be resolved for you.
Similar error: Windows couldn’t connect to the Printer.
3] Restart Printer Spooler
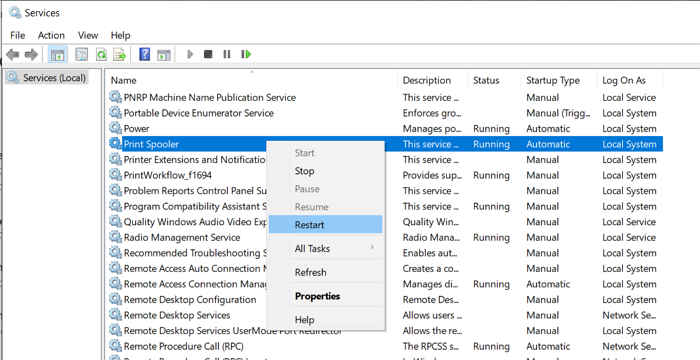
If the issue persists, then the issue can be because of a glitch in Printer Spooler service. So, we have to restart the Service, but first, clear out all its content.
So, open File Explorer from the Taskbar, and navigate to the following location.

For 64-bit OS
C:WindowsSystem32spooldriversx643
For 32-bit OS
C:WindowsSystem32spooldriversW32X863
Now, cut paste its content, somewhere else, as a backup.
Open Services from the Start Menu. Look for Printer Spooler, right-click on it and select Restart.
After restarting, check if the issue is resolved. If the issue persists, then move to the next solution.
Similar error: Windows cannot connect to the printer, Errors 0x00000002,0x0000007a, 0x00004005, 0x00000057, 0x00000006.
4] Remove and add Printer
The issue can be because of a glitch that can be easily resolved by removing and re-adding the Printer to resolve the issue. So, go to Control Panel, remove and then add the Printer, and hopefully, your issue will be resolved.
5] Reinstall Printer Driver
Sometimes, the issue occurs because of corrupted Printer Drivers. The easiest way to resolve the issue is by reinstalling Printer Drivers.
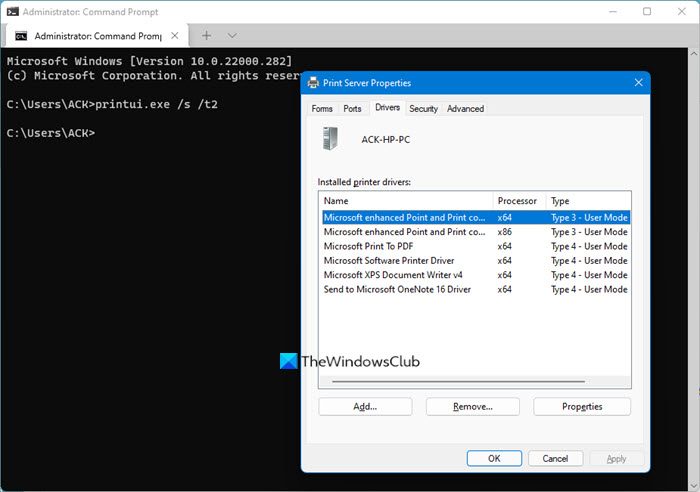
Open Terminal and run this command:
printui.exe /s /t2
You will see the list of installed printer drivers. Find the printer driver you want to reinstall and remove it by clicking Remove.
If you know your Printer driver then do the following:
- Open Device Manager from the Start Menu or by Win + X > Device Manager.
- Expand Printer queues.
- Right-click on your Printer Driver and select Uninstall device.
- After the uninstallation, right-click on Printer queues and click Scan for hardware changes.
Wait for the process to complete and hopefully, the issue will be resolved.
Read: How to change Printer Port in Windows the easy way.
How do I get my Wireless Printer to connect with my laptop?
To connect a Wireless Printer to your Laptop, follow the given steps.
- Turn on your Printer
- Search out “Printer and Scanner” from the Start Menu.
- Click Add a printer or scanner.
- Then follow the given steps to connect to your Printer
That’s it!
Also Check:
- Fix Network Printer errors – Windows cannot connect to the printer
- Fix 0x000003e3 Printer error in Windows.
While trying to print a document or install a printer, users have been getting the error code 0x0000007c that states the system cannot connect to the printer. As it turns out, this issue has been reportedly caused by an update that was released by Microsoft as part of their security updates. The issue was recognized by Microsoft and they have released a fix for this problem. However, the sad part is, that the so-called fix seems to not fix the problem for everyone and thus the issue remains for most of the users. In this article, we are going to show you how to resolve the error message in question so without further ado, let us get started.

As it turns out, even though security patches are essential for your computer, especially in a work environment, it doesn’t really bode well when it breaks some functionality. You can go about solving this issue by simply uninstalling the update that has uprooted it in the first place. However, that may not work unless you stop Windows updates for a certain period of time until a permanent fix has been released. In addition to that, there are other workarounds as well that have been reported by different users who were facing the same issue. We will be mentioning all of them so you can choose and see which one works for you best. With that said, let us get started.
Uninstall Problematic Security Update
As we have mentioned already, one way you can resolve the problem in question is to simply uninstall the security update that has caused the error code in the first place. The security patch in question is the update KB5006670. Uninstalling Windows updates is pretty simple and when you stumble upon issues that have been caused by Windows updates, you can easily rectify them by uninstalling them from your system.
However, in order for that to work properly, you will also need to stop Windows updates for the time period. This is because in case you do not, Windows will automatically download and install the same updates on your system again which can end up causing the issue. Thus, stopping updates is important in this method. To uninstall a specific Windows update, follow the instructions that have been given down below:
- First of all, press the Windows key + I buttons on your keyboard which will bring up the Windows Settings window.
- Then, on the Windows Settings window, navigate to Windows Updates.
Windows Settings - On the Windows Updates screen, click on the View Update history option provided.
Windows Update Settings - After that, on the new page, under the Update history text, click on the Uninstall updates option.
- This will bring up a Control Panel window.
- From the list of updates that have been installed on your system, look for the KB5006670 update.
- Double click on it to uninstall it from your system.
Uninstalling Windows Update - Once you have done that, go back to the Windows Updates menu on the Windows Settings app.
- There, click on the Pause updates for 7 days option.
Windows Update Settings - Finally, once you are through that, go ahead and restart your system.
- Once you boot up, go ahead and see if the problem still persists.


Reinstall Printer
As it turns out, another way that you can solve the error message in question is to reinstall the printer by following a few simple steps. If you try to reinstall the printer directly, it will not work as you will have to clear the drivers folder on your computer first and then proceed with installing the drivers again. The exact location may vary slightly depending on the architecture of your system but do not worry as we will be mentioning both down below. In addition to that, you will be opening up with the Windows Services window by running a MSC file and then restarting a service. With that said, follow the instructions given down below to systematically reinstall the printer:
- To start off, open up the File Explorer window.
- After that, navigate to one of the following locations depending on the architecture of your system by copy-pasting the address given down below in the address bar of the File Explorer:
64-bit OS: C:WindowsSystem32spooldriversx643

32-bit OS: C:WindowsSystem32spooldriversW32X863
Navigating to Printer Driver Folder - Once you are there, cut all the contents of the folder and paste it on your desktop.
- After doing that, open up the Run dialog box by pressing Windows key + R.
- In the Run dialog box, type in services.msc and then hit the Enter key. This will open up the Windows Services window.
Opening up Windows Services - From the list of services, look for the Print Spooler service.
Print Spooler Service - Right-click on the service and from the drop-down menu, click the Restart button.
Restarting Print Spooler Service - Once you have done that, go ahead open up the Control Panel by searching for it in the Start Menu.
- On the Control Panel window, make your way to the Uninstall a program option.
Control Panel - There, uninstall the printer from the list of software by double-clicking it.
- Once you have done that, go ahead and manually add the printer and then install the required manually as well by downloading them from the manufacturer’s website.
- After doing all of this, the printer should now work properly and the error message should be gone.


Cancel Driver Installation Midway
Finally, if the above-provided solutions do not fix the problem for you, then you can try something that is slightly weird but has reportedly fixed the issue for a user. To do this, first of all, you will need to download the drivers for your printer from the manufacturer’s website. Once you have the drivers, run the installation and then when you are prompted to connect to the printer via the printer cable, choose to connect to the remote printer. Once you do this, and the printer connects successfully, go ahead and cancel the installation. After doing this, see if the problem still appears for you.

Kamil Anwar
Kamil is a certified MCITP, CCNA (W), CCNA (S) and a former British Computer Society Member with over 9 years of experience Configuring, Deploying and Managing Switches, Firewalls and Domain Controllers also an old-school still active on FreeNode.
В этой статье мы попытаемся решить ошибку 0x0000007c, с которой сталкиваются пользователи Windows, когда хотят распечатать или пытаются подключить принтер, подключившись по сети. Если вы столкнулись с такой ошибкой, вы можете решить проблему, выполнив следующие шаги.
Что такое ошибка сетевой печати Windows 0x0000007c?
С этой ошибкой сталкиваются многие пользователи с новым обновлением безопасности Windows, препятствующим сетевому подключению. Эта проблема может возникнуть у пользователей с ошибками 0x00000709 и 0x0000007c. Если вы столкнулись с такой проблемой, вы можете решить проблему, выполнив следующие шаги.
Как исправить ошибку сетевой печати Windows 0x0000007c?
Чтобы решить эту ошибку, мы можем решить проблему, отредактировав различные блоки кода в реестре. Конечно, одним только реестром мы не сможем решить проблему. Для этого мы попытаемся решить ее, поговорив о нескольких предложениях.
1-) Редактировать реестр
Вы можете решить эту проблему, добавив следующие строки кода в свой реестр.
Значение реестра для добавления для версий Windows 10 2004, 20H2, 21H1 и 21H2.
Редактор реестра Windows версии 5.00 [HKEY_LOCAL_MACHINESYSTEMCurrentControlSetPoliciesMicrosoftFeatureManagementOverrides] «713073804»=dword:00000000
Значение реестра для добавления для Windows 10 версии 1909
Редактор реестра Windows версии 5.00 [HKEY_LOCAL_MACHINESYSTEMCurrentControlSetPoliciesMicrosoftFeatureManagementOverrides] «1921033356»=dword:00000000
Значение реестра для добавления для Windows 10 1809 и Windows Server 2019
Редактор реестра Windows версии 5.00 [HKEY_LOCAL_MACHINESYSTEMCurrentControlSetPoliciesMicrosoftFeatureManagementOverrides] «3598754956»=dword:00000000
Если вы не знаете, как сохранить реестр, который мы оставили выше, вы можете сохранить его, выполнив приведенные ниже процедуры.
- Щелкните правой кнопкой мыши на экране рабочего стола и нажмите «Создать».
- Мы создаем наш новый текстовый документ, выбрав опцию «Текстовый документ» из перечисленных опций.
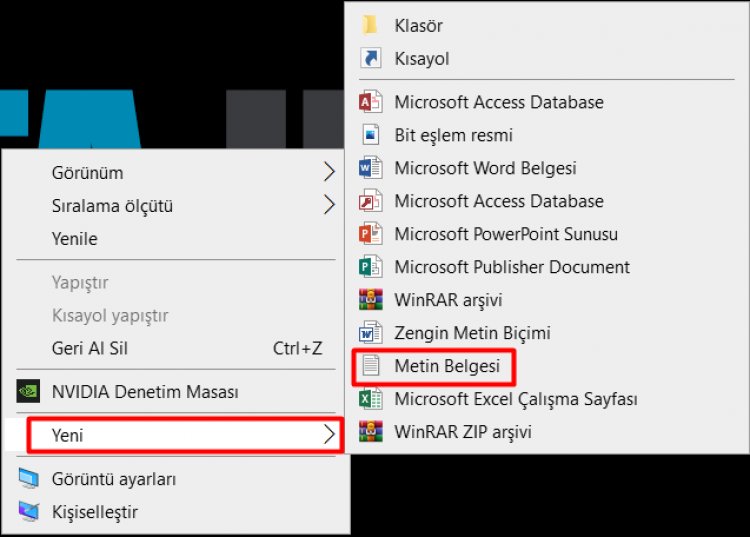
- Открываем созданный нами новый текстовый документ и вставляем в него код реестра, соответствующий вашей соответствующей версии.
- После этого процесса мы сохраняем вашу транзакцию и меняем имя расширения с «.txt» на «.reg».
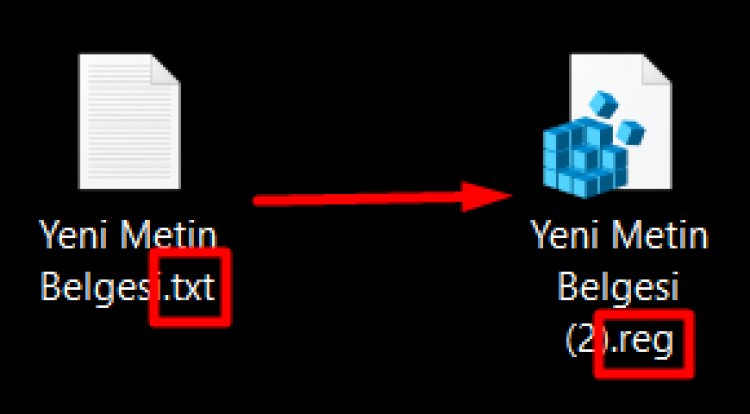
После внесения изменений дважды щелкните наш файл «.reg» и скажите «Да» на появившееся предупреждение. После завершения процесса перезагрузите компьютер и проверьте, сохраняется ли проблема. Если проблема не устранена, давайте перейдем к другому предложению.
2-) Удалите обновление безопасности
Обновление безопасности Windows вызывает проблемы с сетевыми принтерами. Для этого мы можем решить проблему, удалив код обновления «KB5006670».
- Откройте меню настроек, нажав клавишу «Windows Key + I».
- Откройте экран поиска, набрав «Проверить наличие обновлений».
- На открывшемся экране нажмите на опцию «Просмотреть историю обновлений».
- После этого проверьте, установлен ли на вашем компьютере код обновления «KB5006670». Если они установлены на вашем компьютере, удалите их и приостановите обновления на 7 дней.