Время на прочтение
7 мин
Количество просмотров 27K
Привет, Хабр!
Ваш интерес к новой книге «Секреты Python Pro» убедил нас, что рассказ о необычностях Python заслуживает продолжения. Сегодня предлагаем почитать небольшой туториал о создании кастомных (в тексте — собственных) классах исключений. У автора получилось интересно, сложно не согласиться с ним в том, что важнейшим достоинством исключения является полнота и ясность выдаваемого сообщения об ошибке. Часть кода из оригинала — в виде картинок.
Добро пожаловать под кат.
Создание собственных классов ошибок
В Python предусмотрена возможность создавать собственные классы исключений. Создавая такие классы, можно разнообразить дизайн классов в приложении. Собственный класс ошибок мог бы логировать ошибки, инспектировать объект. Это мы определяем, что делает класс исключений, хотя, обычно собственный класс едва ли сможет больше, чем просто отобразить сообщение.
Естественно, важен и сам тип ошибки, и мы часто создаем собственные типы ошибок, чтобы обозначить конкретную ситуацию, которая обычно не покрывается на уровне языка Python. Таким образом, пользователи класса, встретив такую ошибку, будут в точности знать, что происходит.
Эта статья состоит из двух частей. Сначала мы определим класс исключений сам по себе. Затем продемонстрируем, как можно интегрировать собственные классы исключений в наши программы на Python и покажем, как таким образом повысить удобство работы с теми классами, что мы проектируем.
Собственный класс исключений MyCustomError
При выдаче исключения требуются методы __init__() и __str__().
При выдаче исключения мы уже создаем экземпляр исключения и в то же время выводим его на экран. Давайте детально разберем наш собственный класс исключений, показанный ниже.

В вышеприведенном классе MyCustomError есть два волшебных метода, __init__ и __str__, автоматически вызываемых в процессе обработки исключений. Метод Init вызывается при создании экземпляра, а метод str – при выводе экземпляра на экран. Следовательно, при выдаче исключения два этих метода обычно вызываются сразу друг за другом. Оператор вызова исключения в Python переводит программу в состояние ошибки.
В списке аргументов метода __init__ есть *args. Компонент *args – это особый режим сопоставления с шаблоном, используемый в функциях и методах. Он позволяет передавать множественные аргументы, а переданные аргументы хранит в виде кортежа, но при этом позволяет вообще не передавать аргументов.
В нашем случае можно сказать, что, если конструктору MyCustomError были переданы какие-либо аргументы, то мы берем первый переданный аргумент и присваиваем его атрибуту message в объекте. Если ни одного аргумента передано не было, то атрибуту message будет присвоено значение None.
В первом примере исключение MyCustomError вызывается без каких-либо аргументов, поэтому атрибуту message этого объекта присваивается значение None. Будет вызван метод str, который выведет на экран сообщение ‘MyCustomError message has been raised’.

Исключение MyCustomError выдается без каких-либо аргументов (скобки пусты). Иными словами, такая конструкция объекта выглядит нестандартно. Но это просто синтаксическая поддержка, оказываемая в Python при выдаче исключения.
Во втором примере MyCustomError передается со строковым аргументом ‘We have a problem’. Он устанавливается в качестве атрибута message у объекта и выводится на экран в виде сообщения об ошибке, когда выдается исключение.

Код для класса исключения MyCustomError находится здесь.
class MyCustomError(Exception):
    def __init__(self, *args):
        if args:
            self.message = args[0]
        else:
            self.message = None

    def __str__(self):
        print('calling str')
        if self.message:
            return 'MyCustomError, {0} '.format(self.message)
        else:
            return 'MyCustomError has been raised'


# выдача MyCustomError

raise MyCustomError('We have a problem')
Класс CustomIntFloatDic
Создаем собственный словарь, в качестве значений которого могут использоваться только целые числа и числа с плавающей точкой.
Пойдем дальше и продемонстрируем, как с легкостью и пользой внедрять классы ошибок в наши собственные программы. Для начала предложу слегка надуманный пример. В этом вымышленном примере я создам собственный словарь, который может принимать в качестве значений только целые числа или числа с плавающей точкой.
Если пользователь попытается задать в качестве значения в этом словаре любой другой тип данных, то будет выдано исключение. Это исключение сообщит пользователю полезную информацию о том, как следует использовать данный словарь. В нашем случае это сообщение прямо информирует пользователя, что в качестве значений в данном словаре могут задаваться только целые числа или числа с плавающей точкой.
Создавая собственный словарь, нужно учитывать, что в нем есть два места, где в словарь могут добавляться значения. Во-первых, это может происходить в методе init при создании объекта (на данном этапе объекту уже могут быть присвоены ключи и значения), а во-вторых — при установке ключей и значений прямо в словаре. В обоих этих местах требуется написать код, гарантирующий, что значение может относиться только к типу int или float.
Для начала определю класс CustomIntFloatDict, наследующий от встроенного класса dict. dict передается в списке аргументов, которые заключены в скобки и следуют за именем класса CustomIntFloatDict.
Если создан экземпляр класса CustomIntFloatDict, причем, параметрам ключа и значения не передано никаких аргументов, то они будут установлены в None. Выражение if интерпретируется так: если или ключ равен None, или значение равно None, то с объектом будет вызван метод get_dict(), который вернет атрибут empty_dict; такой атрибут у объекта указывает на пустой список. Помните, что атрибуты класса доступны у всех экземпляров класса.

Назначение этого класса — позволить пользователю передать список или кортеж с ключами и значениями внутри. Если пользователь вводит список или кортеж в поисках ключей и значений, то два эти перебираемых множества будут сцеплены при помощи функции zip языка Python. Подцепленная переменная, указывающая на объект zip, поддается перебору, а кортежи поддаются распаковке. Перебирая кортежи, я проверяю, является ли val экземпляром класса int или float. Если val не относится ни к одному из этих классов, я выдаю собственное исключение IntFloatValueError и передаю ему val в качестве аргумента.
Класс исключений IntFloatValueError
При выдаче исключения IntFloatValueError мы создаем экземпляр класса IntFloatValueError и одновременно выводим его на экран. Это означает, что будут вызваны волшебные методы init и str.
Значение, спровоцировавшее выдаваемое исключение, устанавливается в качестве атрибута value, сопровождающего класс IntFloatValueError. При вызове волшебного метода str пользователь получает сообщение об ошибке, информирующее, что значение init в CustomIntFloatDict является невалидным. Пользователь знает, что делать для исправления этой ошибки.
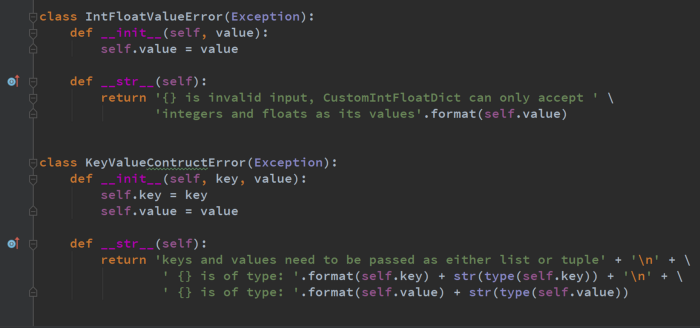
Классы исключений IntFloatValueError и KeyValueConstructError

Если ни одно исключение не выдано, то есть, все val из сцепленного объекта относятся к типам int или float, то они будут установлены при помощи __setitem__(), и за нас все сделает метод из родительского класса dict, как показано ниже.

Класс KeyValueConstructError
Что произойдет, если пользователь введет тип, не являющийся списком или кортежем с ключами и значениями?
Опять же, этот пример немного искусственный, но с его помощью удобно показать, как можно использовать собственные классы исключений.
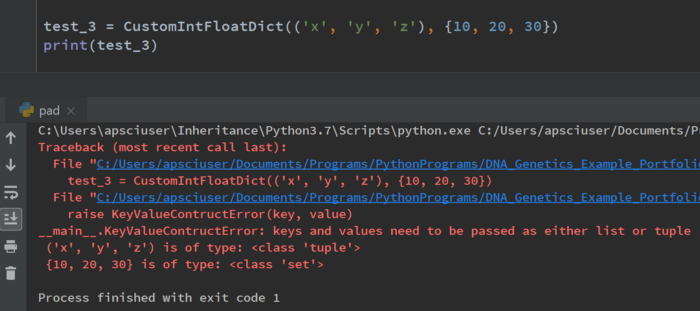
Если пользователь не укажет ключи и значения как список или кортеж, то будет выдано исключение KeyValueConstructError. Цель этого исключения – проинформировать пользователя, что для записи ключей и значений в объект CustomIntFloatDict, список или кортеж должен быть указан в конструкторе init класса CustomIntFloatDict.
В вышеприведенном примере, в качестве второго аргумента конструктору init было передано множество, и из-за этого было выдано исключение KeyValueConstructError. Польза выведенного сообщения об ошибке в том, что отображаемое сообщение об ошибке информирует пользователя: вносимые ключи и значения должны сообщаться в качестве либо списка, либо кортежа.
Опять же, когда выдано исключение, создается экземпляр KeyValueConstructError, и при этом ключ и значения передаются в качестве аргументов конструктору KeyValueConstructError. Они устанавливаются в качестве значений атрибутов key и value у KeyValueConstructError и используются в методе __str__ для генерации информативного сообщения об ошибке при выводе сообщения на экран.
Далее я даже включаю типы данных, присущие объектам, добавленным к конструктору init – делаю это для большей ясности.
Установка ключа и значения в CustomIntFloatDict
CustomIntFloatDict наследует от dict. Это означает, что он будет функционировать в точности как словарь, везде за исключением тех мест, которые мы выберем для точечного изменения его поведения.
__setitem__ — это волшебный метод, вызываемый при установке ключа и значения в словаре. В нашей реализации setitem мы проверяем, чтобы значение относилось к типу int или float, и только после успешной проверки оно может быть установлено в словаре. Если проверка не пройдена, то можно еще раз воспользоваться классом исключения IntFloatValueError. Здесь можно убедиться, что, попытавшись задать строку ‘bad_value’ в качестве значения в словаре test_4, мы получим исключение.

Весь код к этому руководству показан ниже и выложен на Github.
# Создаем словарь, значениями которого могут служить только числа типов int и float

class IntFloatValueError(Exception):
    def __init__(self, value):
        self.value = value

    def __str__(self):
        return '{} is invalid input, CustomIntFloatDict can only accept ' \
               'integers and floats as its values'.format(self.value)


class KeyValueContructError(Exception):
    def __init__(self, key, value):
        self.key = key
        self.value = value

    def __str__(self):
        return 'keys and values need to be passed as either list or tuple' + '\n' + \
                ' {} is of type: '.format(self.key) + str(type(self.key)) + '\n' + \
                ' {} is of type: '.format(self.value) + str(type(self.value))


class CustomIntFloatDict(dict):

    empty_dict = {}

    def __init__(self, key=None, value=None):

        if key is None or value is None:
            self.get_dict()

        elif not isinstance(key, (tuple, list,)) or not isinstance(value, (tuple, list)):
            raise KeyValueContructError(key, value)
        else:
            zipped = zip(key, value)
            for k, val in zipped:
                if not isinstance(val, (int, float)):
                    raise IntFloatValueError(val)
                dict.__setitem__(self, k, val)

    def get_dict(self):
        return self.empty_dict

    def __setitem__(self, key, value):
        if not isinstance(value, (int, float)):
            raise IntFloatValueError(value)
        return dict.__setitem__(self, key, value)


# тестирование

# test_1 = CustomIntFloatDict()
# print(test_1)
# test_2 = CustomIntFloatDict({'a', 'b'}, [1, 2])
# print(test_2)
# test_3 = CustomIntFloatDict(('x', 'y', 'z'), (10, 'twenty', 30))
# print(test_3)
# test_4 = CustomIntFloatDict(('x', 'y', 'z'), (10, 20, 30))
# print(test_4)
# test_4['r'] = 1.3
# print(test_4)
# test_4['key'] = 'bad_value'
Заключение
Если создавать собственные исключения, то работать с классом становится гораздо удобнее. В классе исключения должны быть волшебные методы init и str, автоматически вызываемые в процессе обработки исключений. Только от вас зависит, что именно будет делать ваш собственный класс исключений. Среди показанных методов – такие, что отвечают за инспектирование объекта и вывод на экран информативного сообщения об ошибке.
Как бы то ни было, классы исключений значительно упрощают обработку всех возникающих ошибок!
«What is the proper way to declare custom exceptions in modern Python?»
This is fine unless your exception is really a type of a more specific exception:
class MyException(Exception):
    pass
Or better (maybe perfect), instead of pass give a docstring:
class MyException(Exception):
    """Raise for my specific kind of exception"""
Subclassing Exception Subclasses
From the docs
ExceptionAll built-in, non-system-exiting exceptions are derived from this class.
All user-defined exceptions should also be derived from this
class.
That means that if your exception is a type of a more specific exception, subclass that exception instead of the generic Exception (and the result will be that you still derive from Exception as the docs recommend). Also, you can at least provide a docstring (and not be forced to use the pass keyword):
class MyAppValueError(ValueError):
    '''Raise when my specific value is wrong'''
Set attributes you create yourself with a custom __init__. Avoid passing a dict as a positional argument, future users of your code will thank you. If you use the deprecated message attribute, assigning it yourself will avoid a DeprecationWarning:
class MyAppValueError(ValueError):
    '''Raise when a specific subset of values in context of app is wrong'''
    def __init__(self, message, foo, *args):
        self.message = message # without this you may get DeprecationWarning
        # Special attribute you desire with your Error,
        # perhaps the value that caused the error?:
        self.foo = foo
        # allow users initialize misc. arguments as any other builtin Error
        super(MyAppValueError, self).__init__(message, foo, *args)
There’s really no need to write your own __str__ or __repr__. The built-in ones are very nice, and your cooperative inheritance ensures that you use them.
Critique of the top answer
Maybe I missed the question, but why not:
class MyException(Exception):
    pass
Again, the problem with the above is that in order to catch it, you’ll either have to name it specifically (importing it if created elsewhere) or catch Exception, (but you’re probably not prepared to handle all types of Exceptions, and you should only catch exceptions you are prepared to handle). Similar criticism to the below, but additionally that’s not the way to initialize via super, and you’ll get a DeprecationWarning if you access the message attribute:
Edit: to override something (or pass extra args), do this:
class ValidationError(Exception):
    def __init__(self, message, errors):

        # Call the base class constructor with the parameters it needs
        super(ValidationError, self).__init__(message)

        # Now for your custom code...
        self.errors = errors
That way you could pass dict of error messages to the second param, and get to it later with e.errors
It also requires exactly two arguments to be passed in (aside from the self.) No more, no less. That’s an interesting constraint that future users may not appreciate.
To be direct — it violates Liskov substitutability.
I’ll demonstrate both errors:
>>> ValidationError('foo', 'bar', 'baz').message

Traceback (most recent call last):
  File "<pyshell#10>", line 1, in <module>
    ValidationError('foo', 'bar', 'baz').message
TypeError: __init__() takes exactly 3 arguments (4 given)

>>> ValidationError('foo', 'bar').message
__main__:1: DeprecationWarning: BaseException.message has been deprecated as of Python 2.6
'foo'
Compared to:
>>> MyAppValueError('foo', 'FOO', 'bar').message
'foo'
An Exception is raised whenever there is an error encountered, and it signifies that something went wrong with the program. By default, there are many exceptions that the language defines for us, such as TypeError when the wrong type is passed. In this article, we shall look at how we can create our own Custom Exceptions in Python.
But before we take a look at how custom exceptions are implemented, let us find out how we could raise different types of exceptions in Python.
Raise Exceptions
Python allows the programmer to raise an Exception manually using the raise keyword.
Format: raise ExceptionName
The below function raises different exceptions depending on the input passed to the function.
def exception_raiser(string):
    if isinstance(string, int):
        raise ValueError
    elif isinstance(string, str):
        raise IndexError
    else:
        raise TypeError
Output:
>>> exception_raiser(123)
Traceback (most recent call last):
  File "<stdin>", line 1, in <module>
  File "<stdin>", line 3, in exception_raiser
ValueError
>>> exception_raiser('abc')
Traceback (most recent call last):
  File "<stdin>", line 1, in <module>
  File "<stdin>", line 5, in exception_raiser
IndexError
>>> exception_raiser([123, 456])
Traceback (most recent call last):
  File "<stdin>", line 1, in <module>
  File "<stdin>", line 7, in exception_raiser
TypeError
As you can observe, different types of Exceptions are raised based on the input, at the programmer’s choice. This allows for good flexibility of Error Handling as well, since we can actively predict why an Exception can be raised.
Defining Custom Exceptions
Similarly, Python also allows us to define our own custom Exceptions. We are in complete control of what this Exception can do, and when it can be raised, using the raise keyword. Let us look at how we can define and implement some custom Exceptions.
1. Create a Custom Exception Class
We can create a custom Exception class to define the new Exception. Again, the idea behind using a Class is because Python treats everything as a Class. So it doesn’t seem that outlandish that an Exception can be a class as well!
All Exceptions inherit the parent Exception Class, which we shall also inherit when creating our class.
We shall create a Class called MyException, which raises an Exception only if the input passed to it is a list and the number of elements in the list is odd.
class MyException(Exception):
	pass

def list_check(lst):
    if len(lst) % 2 != 0:
        raise MyException

# MyException will not be raised
list_check([1, 2, 3, 4])

# MyException will be raised
list_check([1, 3, 5])
Output:
root@AskPython:~# python3 exceptions.py
Traceback (most recent call last):
  File "exceptions.py", line 12, in <module>
    list_check([1, 3, 5])
  File "exceptions.py", line 6, in list_check
    raise MyException
__main__.MyException
2. Add a custom Message and Error
We can add our own error messages and print them to the console for our Custom Exception. This involves passing two other parameters in our MyException class, the message and error parameters.
Let us modify our original code to account for a custom Message and Error for our Exception.
class MyException(Exception):
    def __init__(self, message, errors):
        # Call Exception.__init__(message)
        # to use the same Message header as the parent class
        super().__init__(message)
        self.errors = errors
        # Display the errors
        print('Printing Errors:')
        print(errors)

def list_check(lst):
    if len(lst) % 2 != 0:
        raise MyException('Custom Message', 'Custom Error')

# MyException will not be raised
list_check([1, 2, 3, 4])

# MyException will be raised
list_check([1, 3, 5])
Output:
Printing Errors:
Custom Error
Traceback (most recent call last):
  File "exceptions.py", line 17, in <module>
    list_check([1, 3, 5])
  File "exceptions.py", line 11, in list_check
    raise MyException('Custom Message', 'Custom Error')
__main__.MyException: Custom Message
We have thus successfully implemented our own Custom Exceptions, including adding custom error messages for debugging purposes! This can be very useful if you are building a Library/API and another programmer wants to know what exactly went wrong when the custom Exception is raised.
Conclusion
In this article, we learned how to raise Exceptions using the raise keyword, and also build our own Exceptions using a Class and add error messages to our Exception.
References
- JournalDev article on Custom Exceptions
- Exception Handling in Python
Summary: in this tutorial, you’ll learn how to define Python custom exception classes.
Introduction to the Python custom exception
To create a custom exception class, you define a class that inherits from the built-in Exception class or one of its subclasses such as ValueError class:
The following example defines a CustomException class that inherits from the Exception class:
class CustomException(Exception):
    """ my custom exception class """Code language: Python (python)
Note that the CustomException class has a docstring that behaves like a statement. Therefore, you don’t need to add the pass statement to make the syntax valid.
To raise the CustomException, you use the raise statement. For example, the following uses the raise statement to raise the CustomException:
class CustomException(Exception):
    """ my custom exception class """


try:
    raise CustomException('This is my custom exception')
except CustomException as ex:
    print(ex)Code language: Python (python)
Output:
This is my custom exceptionCode language: Python (python)Like standard exception classes, custom exceptions are also classes. Hence, you can add functionality to the custom exception classes like:
- Adding attributes and properties.
- Adding methods e.g., log the exception, format the output, etc.
- Overriding the
__str__and__repr__methods - And doing anything else that you can do with regular classes.
In practice, you’ll want to keep the custom exceptions organized by creating a custom exception hierarchy. The custom exception hierarchy allows you to catch exceptions at multiple levels, like the standard exception classes.
Suppose you need to develop a program that converts a temperature from Fahrenheit to Celsius.
The minimum and maximum values of a temperature in Fahrenheit are 32 and 212. If users enter a value that is not in this range, you want to raise a custom exception e.g., FahrenheitError.
Define the FahrenheitError custom exception class
The following defines the FahrenheitError exception class:
class FahrenheitError(Exception):
    min_f = 32
    max_f = 212

    def __init__(self, f, *args):
        super().__init__(args)
        self.f = f

    def __str__(self):
        return f'The {self.f} is not in a valid range {self.min_f, self.max_f}'Code language: Python (python)
How it works.
- First, define the FahrenheitError class that inherits from the
Exceptionclass. - Second, add two class attributes
min_fandmax_fthat represent the minimum and maximum Fahrenheit values. - Third, define the
__init__method that accepts a Fahrenheit value (f) and a number of position arguments (*args). In the__init__method, call the__init__method of the base class. Also, assign thefargument to thefinstance attribute. - Finally, override the
__str__method to return a custom string representation of the class instance.
Define the fahrenheit_to_celsius function
The following defines the fahrenheit_to_celsius function that accepts a temperature in Fahrenheit and returns a temperature in Celcius:
def fahrenheit_to_celsius(f: float) -> float:
    if f < FahrenheitError.min_f or f > FahrenheitError.max_f:
        raise FahrenheitError(f)

    return (f - 32) * 5 / 9Code language: Python (python)
The fahrenheit_to_celsius function raises the FahrenheitError excpetion if the input temperature is not in the valid range. Otherwise, it converts the temperature from Fahrenheit to Celcius.
Create the main program
The following main program uses the fahrenheit_to_celsius function and the FahrenheitError custom exception class:
if __name__ == '__main__':
    f = input('Enter a temperature in Fahrenheit:')
    try:
        f = float(f)
    except ValueError as ex:
        print(ex)
    else:
        try:
            c = fahrenheit_to_celsius(float(f))
        except FahrenheitError as ex:
            print(ex)
        else:
            print(f'{f} Fahrenheit = {c:.4f} Celsius')Code language: Python (python)
How it works.
First, prompt users for a temperature in Fahrenheit.
f = input('Enter a temperature in Fahrenheit:')Code language: Python (python)Second, convert the input value into a float. If the float() cannot convert the input value, the program will raise a ValueError exception. In this case, it displays the error message from the ValueError exception:
try:
    f = float(f)
    # ...
except ValueError as ex:
    print(ex)Code language: Python (python)
Third, convert the temperature to Celsius by calling the fahrenheit_to_celsius function and print the error message if the input value is not a valid Fahrenheit value:
try:
    c = fahrenheit_to_celsius(float(f))
except FahrenheitError as ex:
    print(ex)
else:
    print(f'{f} Fahrenheit = {c:.4f} Celsius')Code language: Python (python)
Put it all together
class FahrenheitError(Exception):
    min_f = 32
    max_f = 212

    def __init__(self, f, *args):
        super().__init__(args)
        self.f = f

    def __str__(self):
        return f'The {self.f} is not in a valid range {self.min_f, self.max_f}'


def fahrenheit_to_celsius(f: float) -> float:
    if f < FahrenheitError.min_f or f > FahrenheitError.max_f:
        raise FahrenheitError(f)

    return (f - 32) * 5 / 9


if __name__ == '__main__':
    f = input('Enter a temperature in Fahrenheit:')
    try:
        f = float(f)
    except ValueError as ex:
        print(ex)
    else:
        try:
            c = fahrenheit_to_celsius(float(f))
        except FahrenheitError as ex:
            print(ex)
        else:
            print(f'{f} Fahrenheit = {c:.4f} Celsius')Code language: Python (python)
Summary
- Subclass the
Exceptionclass or one of its subclasses to define a custom exception class. - Create a exception class hierarchy to make the exception classes more organized and catch exceptions at multiple levels.
Did you find this tutorial helpful ?
- Create a Custom Exception Class in Python
- Execute Exception-Handling Using the
try...exceptBlock in Python

This tutorial will demonstrate you can create custom exception classes in Python. Here, we’ll show how you can properly perform exception handling, define custom exception classes, and override existing built-in exceptions.
Exceptions are a type of event that occurs whenever something within a program doesn’t go as intended or disrupts the flow of the intended use-case of the program. Without exception handling, the program will cease to execute entirely, and the exception would have to either be fixed or handled.
Create a Custom Exception Class in Python
Creating an Exception Class in Python is done the same way as a regular class. The main difference is you have to include the Python’s base Exception class to inform the compiler that the class you’re making is an exception class.
Let’s test this method out to create an exception class called DemoException and use the placeholder control flow keyword pass inside as a placeholder.
class DemoException(Exception):
    pass
Execute Exception-Raising Using the Keyword raise in Python
To test the DemoException class and see what it displays when it’s actually triggered, perform exception raising. Exception-raising is synonymous with exception-throwing in other programming languages.
Using the keyword raise, trigger an exception using the given exception class and outputs an exception message.
class DemoException(Exception):
    pass

raise DemoException
Output:
Traceback (most recent call last):
  File "/Users/demo/python/demo_exception.py", line 4, in <module>
    raise DemoException
__main__.DemoException
A standard exception will look like in the terminal if no custom exception message has been declared.
Declare a Custom Exception Message in Python
To declare a custom exception message for DemoException, override the __init__() method of the exception class and include the message that should be outputted for the exception in the parameters, along with the mandatory self-referential parameter self.
For example, let’s override the __init__() method and create a custom message for the DemoException class:
class DemoException(Exception):
    def __init__(self, message):
        super().__init__(message)
Take note that for the message to be integrated into your exception successfully, call the base Exception class, __init__() method, and include the message as an argument.
Let’s call the exception class again using the raise keyword, and now, passing a custom message with it:
class DemoException(Exception):
    def __init__(self, message):
        super().__init__(message)

message = "Exception Triggered! Something went wrong."
raise DemoException(message)
The output should look like this:
Traceback (most recent call last):
  File "/Users/demo/python/helloworld.py", line 6, in <module>
    raise DemoException(message)
__main__.DemoException: Exception Triggered! Something went wrong.
We’ve now successfully created and triggered an exception class with a custom error message.
For actual situations that may trigger an exception, how do we handle and raise these exceptions? You can solve this problem neatly by implementing exception-handling using the try...except block.
Execute Exception-Handling Using the try...except Block in Python
The try...except block is much like the try-catch block in other languages like Java.
The try...except block has 2 main blocks and 2 optional blocks:
try(required) — The main block responsible for encapsulating the code block where the exception might be triggered. Thetryblock halts the whole process within it whenever an exception is triggered.except(required) — The block program proceeds whenever a specified exception is triggered. This block typically contains a descriptive error message for the caller or just a simpleprint()statement. There may be more than oneexceptblock in a singletryblock, each one catching different exceptions.else(optional) — This optional block is where the program will proceed if thetryblock did not trigger any exceptions.finally(optional) — This optional block runs once everything from the previous 3 blocks has been performed regardless if an exception is triggered or not.
Let’s use the previous example using the DemoException class to try a simple try...except block.
First, wrap the raise keyword in a function and put it inside the try...except block.
The function that we’ll create for this example is a function that accepts a number and throws an exception if it sends 0. If it sends any other number, then the code will proceed as intended. Check the example below:
class DemoException(Exception):
    def __init__(self, message):
        super().__init__(message)


message = "Exception Triggered! Something went wrong."

def triggerException(num):
    if (num == 0):
        raise DemoException(message)
    else:
        print(num)


try:
    triggerException(0)
    print("Code has successfully been executed.")
except DemoException:
    print("Error: Number should not be 0.")
Since the triggerException() passed 0 as an argument, the code should trigger DemoException. Here we should expect the raise keyword message to be overridden with whatever is inside the except block as the output.
Notice that the print() line after the triggerException() function call was not outputted. It’s because the function raised an exception; therefore, it immediately halted all the processes within the try block and proceeded directly to the except block.
Output:
Error: Number should not be 0.
Now, let’s try passing a valid number like 20, for example.
try:
    triggerException(20)
    print("Code has successfully been executed.")
except DemoException:
    print("Error: Number should not be 0.")
Output:
20
Code has successfully been executed.
Let’s try chaining the except blocks and create another exception. Let’s call the new exception NumberFormatException, which triggers if the given input is not a number. For this exception class, let’s declare the message inside the class.
class NumberFormatException(Exception, value):
    message = f'{value} is not a number'
    def __init__(self):
        super().__init__(message)
Now, modify the code above to handle the new exception class NumberFormatException:
class DemoException(Exception):
    def __init__(self, message):
        super().__init__(message)

class NumberFormatException(Exception):
    def __init__(self, message, value):
        message = f'{value} is not a number'
        super().__init__(message)

message = "Exception occured."

def triggerException(num):
    if (not num.isdigit()):
        raise NumberFormatException(message, num)
    elif (num == 0):
        raise DemoException(message)
    else:
        print(num)

num = "sample string"
try:
    triggerException(num)
    print("Code has successfully been executed.")
except DemoException:
    print("Error: Number should not be 0.")
except NumberFormatException:
    print(num+" is not a number.")
In this code, the value of num that was passed to triggerException() is a string 'sample string' so the NumberFormatException should be triggered.
Output:
sample string is not a number.
In summary, creating custom exceptions in Python is as simple as creating a new class, but with the Exception class as an extra argument in the class definition. The raise keyword is used to trigger exceptions given the Exception Class. The try...except blocks are used to wrap one or more exceptions within a code block and modify what the code does when handling that exception and not just shutting down the program entirely.