Ошибка 0x80072f8f 0x20000 появляется при двух распространенных ситуациях. Первая из них – при обновлении с Windows 7 до более свежей версии или просто при установке Windows 10. Вторая частая ситуация заключается в появлении ошибки при запуске Media Creation Tool. Причины появления, как и особенности проявления в каждой них, будут разными. Но есть и хорошая новость, она заключается в том, что есть довольно четкое представление об ошибке и эффективное решение к каждой вариации проблемы.

Почему появляется ошибка 0x80072f8f 0x20000?
Нам придется разделять две ситуации появления ошибки. Хотя они и имеют идентичный код, но во всем остальном сильно отличаются. Основная причина сбой с кодом 0x80072f8f 0x20000 при установке Windows 10 – отсутствие поддержки протоколов безопасности TLS. В Windows 7 Service Pack 1 по умолчанию включена поддержка только TLS 1.0. Сейчас же сервера Microsoft более не поддерживают столь устаревший стандарт. Требуется версия TLS 1.1 и TLS 1.2, которые по умолчанию отключены в старой операционной системе Windows 7. Их включение должно исправить проблему.
Если ошибка появляется при обновлении Windows, в основном через официальную утилиту Media Creation Tool, то проблема в некорректных файлах обновления. Видимо, система пыталась загрузить файлы для апдейта, но они оказались поврежденными. Нужно принудительно удалить их.
Как исправить ошибку 0x80072f8f 0x20000 при установке Windows 10?
Как мы и писали, нам нужно заставить Windows 7 работать с TLS 1.1 и TLS 1.2. Это вполне реально сделать, если подкорректировать реестр операционной системы. Можно запустить Windows в безопасном режиме и сделать необходимые изменения. Это можно сделать вручную, но есть и более быстрый способ – запустить файл. Нам нужен один из файлов Microsoft, вот ссылка. Скачиваем его, запускаем и через пару секунд исправления должны быть внесены. Можно перезагружать ПК и снова пытаться установить Windows 10.
Что нужно сделать вручную:
- Нажимаем комбинацию Win + R, вводим regedit и нажимаем Enter.
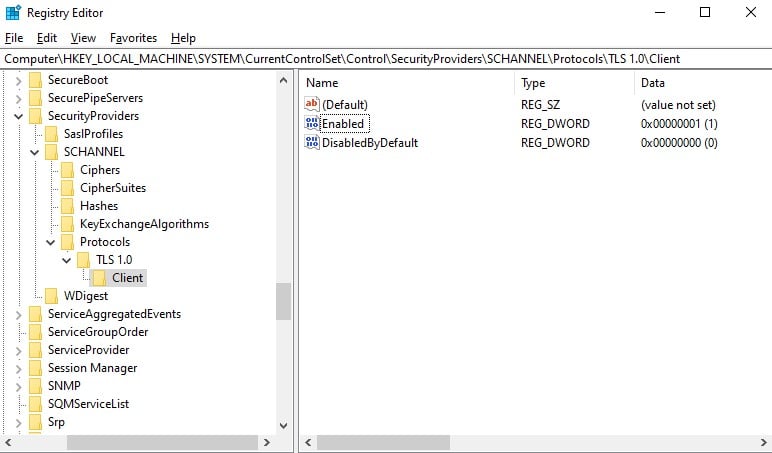
- Идем по пути HKEY_LOCAL_MACHINE\SYSTEM\CurrentControlSet\Control\SecurityProviders\SCHANNEL\Protocols\TLS 1.1\Client.
- Изменяем значение параметра DisabledByDefault на 0 (если его нет, то просто создаем его).
- Переходим в ветку HKEY_LOCAL_MACHINE\SYSTEM\CurrentControlSet\Control\SecurityProviders\SCHANNEL\Protocols\TLS 1.2\Client.
- Тоже создаем или изменяем существующий параметр DisabledByDefault в значение 0.
Важно! Есть еще один интересный способ – запустить установку через ISO. Для этого нужно войти на сайт Microsoft с клиентом Windows и скачать его. Обязательно следует использовать для этого телефон. Затем передаем файл на ПК и запускаем его. У многих такое решение сработало.
Как исправить ошибку при обновлении через Media Creation Tool?
Для решения проблемы нужно зачистить файлы в одной из важных директорий, а также запустить обновление другим способом.
Пошаговая инструкция:
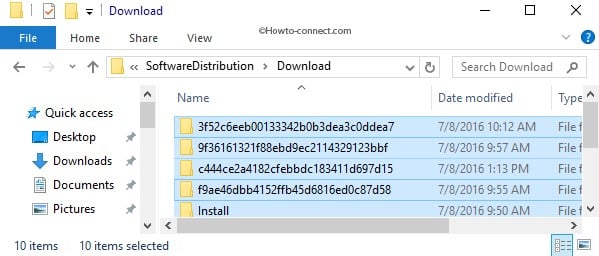
- Переходим по пути C:\Windows\SoftwareDistribution\Download.
- Удаляем все файлы, которые хранятся в этой папке.
- Кликаем правой кнопкой мыши по Пуску и выбираем «Командная строка (администратор).
- Вводим команду wuauclt.exe /updatenow.
Теперь вы знаете, что делать, если появляется ошибка 0x80072f8f 0x20000 при разных обстоятельствах. Включение поддержки TLS 1.1 и новее поможет успешно завершить установку операционной системы, а очистка файлов и обновление через консоль избавит от неполадки при апдейте Windows.
Будем рады увидеть ваши комментарии в отношении данной ошибки. Давайте вместе сделаем статью максимально полной.
A lot of Windows users are not able to upgrade their Windows Operating System using the Media Creation Tool. When the run the application, the following error pops up.
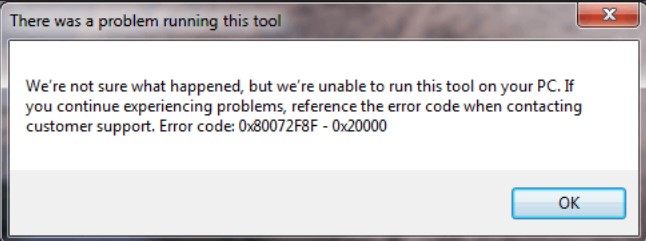
There was a problem running this tool
We’re not sure what happened, but we’re unable to run this tool on your PC. If you continue experiencing problems, reference the error code when contacting customer support, Error code: 0x80072F8F – 0x20000
In this post, we will be talking about the 0x80072F8F – 0x20000 Windows Upgrade error and see what you can do to resolve it.

What does Error Code 0x80072f8f 0x20000 mean?
Error Code 0x80072f8f 0x20000 is a Media Creation Tool error and it appears when a user tries to run the tool to upgrade their OS. It happens because of various reasons, it can be a glitch that can be resolved by restarting the system, or the tool requires administrative privileges or needs to be unblocked.
You may also face the error code in question if TLS or Transport Layer Security protocol is disabled. It is a security protocol and is used to designate encrypted connections to send data into the applications over the network.
There are various other reasons such as misconfigured registry, corrupted temporary files, etc. Let us go to the troubleshooting guide to resolve this issue.
If you are facing Fix 0x80072F8F – 0x20000 Windows Upgrade error, try the following solutions.
- Run the Media Creation Tool as an administrator
- Unblock Media Creation Tool
- Move Media Creation Tool to the Desktop and try
- Delete Software Distribution Folder
- Edit Registry
- Enable TLS
- Troubleshoot in Clean Boot
Let us talk about them in detail.
1] Run the Media Creation Tool as an administrator
Let us start by running the Media Creation Tool as an administrator. Just right-click on the tool and then select Run as administrator. You will see a UAC box asking you to confirm your action, so, click on Ok. Now, you can just use the tool normally and upgrade.
2] Unblock Media Creation Tool
Some users were able to resolve the issue by just unblocking the Media Creation Tool. So, you should try to do the same and see if it works for you. Follow the prescribed steps to unblock Media Creation Tool.
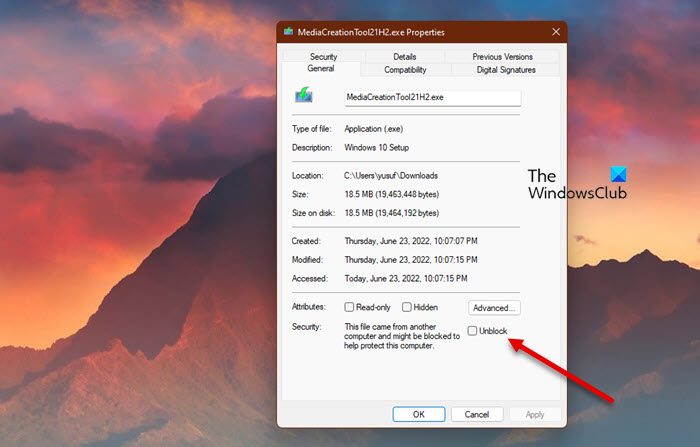
- Right-click on the Media Creation Tool and select Properties.
- Make sure you are on the General tab and tick Unblock.
- Click Apply > Ok.
Now, try running the tool and see if that helps.
3] Move Media Creation Tool to the Desktop and try
For some users, the solution was as simple as moving the downloaded Media Creation Tool to the Desktop. You can also try this, as it won’t take much of your time. Just right-click on the Media Creation Tool and select Copy, go to your Desktop, and hit Ctrl + V to paste the file. Or, drag the tool from your File Explorer to the Desktop in the right panel. This will do the job for you.
4] Delete Software Distribution Folder

The Software Distribution Folder contains temporary files that can interfere with the process and cause the error code in question. We are going to clear the content of that folder and see if that works.
First of all, open Command Prompt as an administrator and run the following command.
net stop wuauserv
net stop bits
Now browse to the C:\Windows\SoftwareDistribution\Download folder and delete all the files and folders inside. You can hit Ctrl + A to select all the content and then Ctrl + D to delete them.
Now in the Command Prompt windows, type the following commands one at a time, and hit Enter:
net start wuauserv
net start bits
Finally, execute the following command.
wuauclt.exe /updatenow
Now, you can restart your computer and run the Media Creation Tool. Hopefully, it will work this time.
5] Edit Registry
If flushing out the Software Distribution folder didn’t work, let us edit registries and see if that helps. For some users, the issue was caused by misconfigured Registry Editor and was easily solved by the following steps.
Open Registry Editor by searching it out of the Start Menu.
Navigate to the following location.
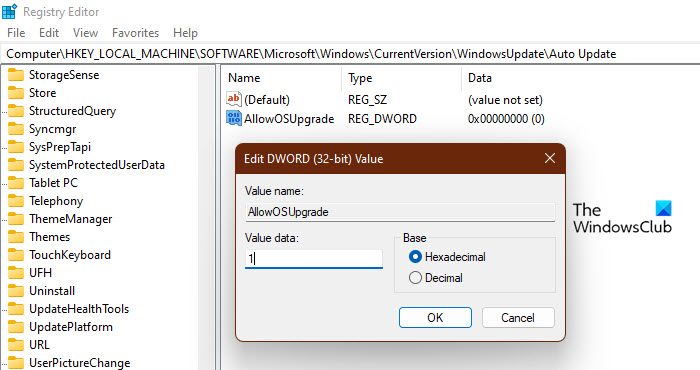
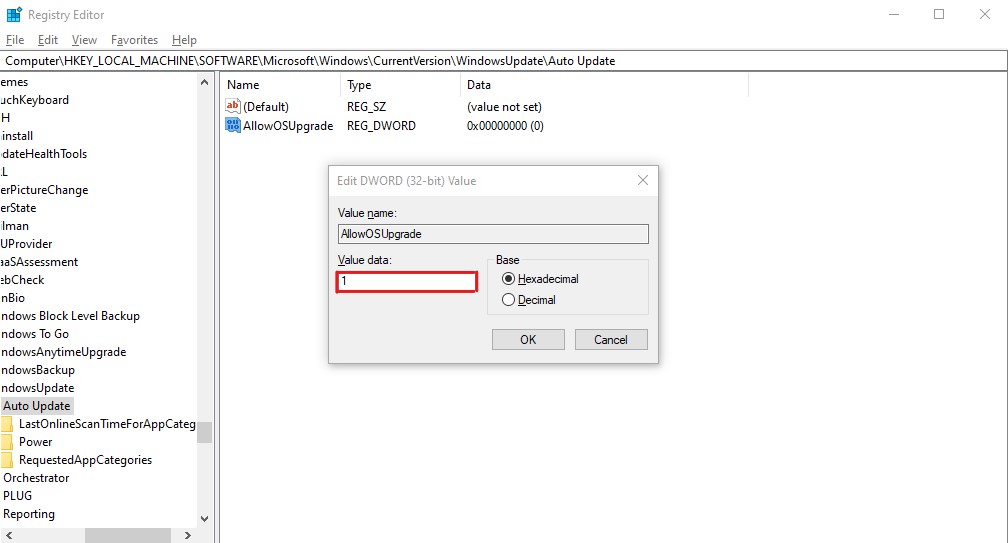
Computer\HKEY_LOCAL_MACHINE\SOFTWARE\Microsoft\Windows\CurrentVersion\WindowsUpdate\Auto Update
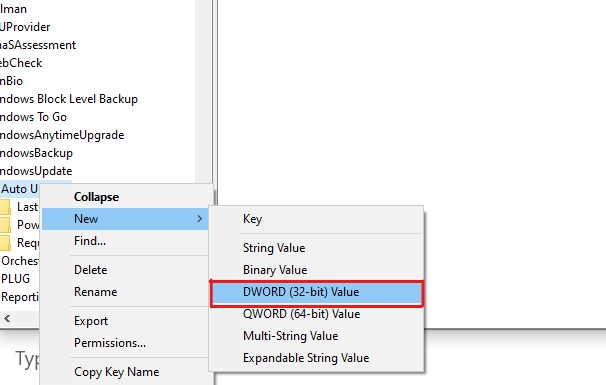
Right-click on the empty space, and select New > DWORD (32-bit) Value.
Name it AllowOSUpgrade and set the Value data to 1.
Save the changes by clicking Ok.
Finally, restart your computer and try running Media Creation Tool. Hopefully, this time, you will be able to upgrade.
6] Enable TLS
TLS or Transport Layer Security is protocol and it is necessary to run the tool. If the protocol is disabled, you may see the error code in question when trying to upgrade your OS with Media Creation Tool. So, let’s enable it and see if that helps.
Before moving forward, you should make a backup of your Registry if something goes wrong. Once registries are backed up, open Notepad and paste the following content.
Windows Registry Editor Version 5.00

[HKEY_LOCAL_MACHINE\SOFTWARE\Microsoft\Windows\CurrentVersion\Internet Settings\WinHttp]
"DefaultSecureProtocols"=dword:00000a00

[HKEY_LOCAL_MACHINE\SOFTWARE\Wow6432Node\Microsoft\Windows\CurrentVersion\Internet Settings\WinHttp]
"DefaultSecureProtocols"=dword:00000a00

[HKEY_LOCAL_MACHINE\SYSTEM\CurrentControlSet\Control\SecurityProviders\SCHANNEL\Protocols\TLS 1.1\Client]
"DisabledByDefault"=dword:00000000
"Enabled"=dword:00000001

[HKEY_LOCAL_MACHINE\SYSTEM\CurrentControlSet\Control\SecurityProviders\SCHANNEL\Protocols\TLS 1.2\Client]
"DisabledByDefault"=dword:00000000
"Enabled"=dword:00000001
Now, save the file with any name, but make sure to add .reg as the extension. It is better to save the file on the desktop and with an easy-to-remember name for easy access.
Finally, double-click on the file from the Desktop, and the registry will be added.
The only thing left now is to restart your computer and use the Media Creation tool.
6] Troubleshoot in Clean Boot
If nothing works, then we are going to perform Clean Boot. It will allow you to stop all other processes and just run this one. So, perform Clean Boot and manually enable processes. Once you know which app is the cause, you can easily remove it and resolve your problem.
Hopefully, now, you are able to use the Media Creation Tool to upgrade your PC.
Similar: Fix 0x80072F8F Windows Update, Activation and Microsoft Store Error
How do I fix error 0x80072f8f?
You can fix the Media Creation error code 0x80072f8f using the solutions mentioned here. But there are some other errors 0x80072f8f. You can check our guide on how to resolve the 0x80072F8F errors for Windows Update, Activation, and Microsoft Store. We have solutions that will fix your error easily.
Also Read: Windows Media Creation Tool not working.
Если вы столкнулись с ошибкой 0x80072f8f 0x20000 при создании загрузочной флешки Windows 10 через официальную утилиту Media Creation Tool, то вероятнее всего у вас установлена Windows 7 либо Windows 8.
Она возникает из-за того что данные версии Windows уже не поддерживаются и необходимо создать загрузочную флешку другим способом.
В данной инструкции мы подробно распишем что необходимо делать в таком случае.
Для создания загрузочной флешки необходимо будет скачать дистрибутив Windows 10:
Версия x32 – https://cdn.keyslab.ru/windows/10/ProAndHome/Win10_22H2_Russian_x32.iso
Версия x64 – https://cdn.keyslab.ru/windows/10/ProAndHome/Win10_22H2_Russian_x64.iso
А так-же программа для того чтобы записать этот образ на флешку мы сделаем это на примере одной из самых популярных программ Rufus – https://github.com/pbatard/rufus/releases/download/v3.22/rufus-3.22.exe
После того как скачается образ запускаем программу, в пункте «Устройство» необходимо выбрать флешку размером от 8ГБ (рекомендуем 16). Обратите внимание что она будет форматироваться, поэтому сохраните все важные файлы. Так-же не рекомендуем использовать внешний жесткий диск, так как часто возникают ошибки при установке с них.

Далее в разделе «Метод загрузки» нажимаем «Выбрать» и находим скачанный образ. Все остальные пункты оставляем по умолчанию.
На данном этапе вы можете выбрать дополнительные параметры установки системы, которые упростят процесс установки, выбирайте их на ваше усмотрение.
Здесь программа сообщает нам о том, что флешка будет форматирована.
Теперь дожидаемся окончания создания, в конце статус изменится на «ГОТОВ». После этого можно закрывать программу.
Теперь вы можете приступить к установке новой системы, мы подробно расписали весь процесс в нашей другой инструкции, вам необходимо будет пропустить пункт про создание загрузочного накопителя, он у вас уже есть — https://keyslab.ru/articles/kak-ustanovit-windows-10-s-fleshki/
Contents
- What Causes the Windows Media Creation Tool Error Code 0x80072f8f – 0x20000?
- How to Fix Error Code 0x80072f8f 0x20000 on Windows 10/11 or Windows 7
- Enable TLS 1.1 and TLS 1.2
- Delete the Software Distribution Folder
- Perform a Clean Boot
- Use the Windows ISO File
- Conclusion

Microsoft offers different ways to upgrade your Windows OS to the latest version. Since the introduction of Windows 11, users have been making the move to the new OS in numbers.
That said, some Windows 7 users are still making the switch to Windows 10 after Microsoft ended support for the former.
You can upgrade through the Windows Update client, the Windows Update assistant or by using the Windows ISO file.
However, one of the common ways to upgrade Windows, especially from Windows 7 to 10, is using the Media Creation tool.
Related: How to get and use Windows 10 Media Creation Tool
But users have been complaining about seeing error code 0x80072f8f-0x20000 when trying to use the tool.
The common cause of the error code, especially in Windows 7, is the lack of support for TLS 1.1 and TLS 1.2.
In other cases, the error could be showing up because of the software distribution folder or application conflicts.
How to Fix Error Code 0x80072f8f 0x20000 on Windows 10/11 or Windows 7
While the issue mostly occurs on Windows 7, you may also experience it on Windows 10 when upgrading to 11.
Follow the guides below to get rid of the problem for good.
Enable TLS 1.1 and TLS 1.2
We are putting this solution at the top because it helped many users get rid of the error.
The Media Creation Tool communicates with servers that use TLS (Transport Layer Security) 1.1 and TLS 1.2. That’s because the tool has to download the setup files required for the upgrade from Microsoft’s servers.
But as it turns out, these security protocols might be disabled by default on your current Windows version.
So, the error code 0x80072f8f 20000 could be showing up because your PC can’t properly communicate with Microsoft’s servers.
Thankfully, you can enable TLS 1.1 and TLS 1.2 by making changes to the system registry.
Important: Before you begin, note that the system registry is a sensitive part of your operating system and applying the wrong changes could cause permanent damage. So, make sure you follow the steps in this guide carefully.
You can create a backup of the entire registry to be on the safe side. Here’s how to back up the entire registry:
- Click on the Start button.
- Go to the search box and type “regedit.exe.”
- You can also open the Run dialog box (Win + R), type “regedit.exe,” and hit the Enter key.
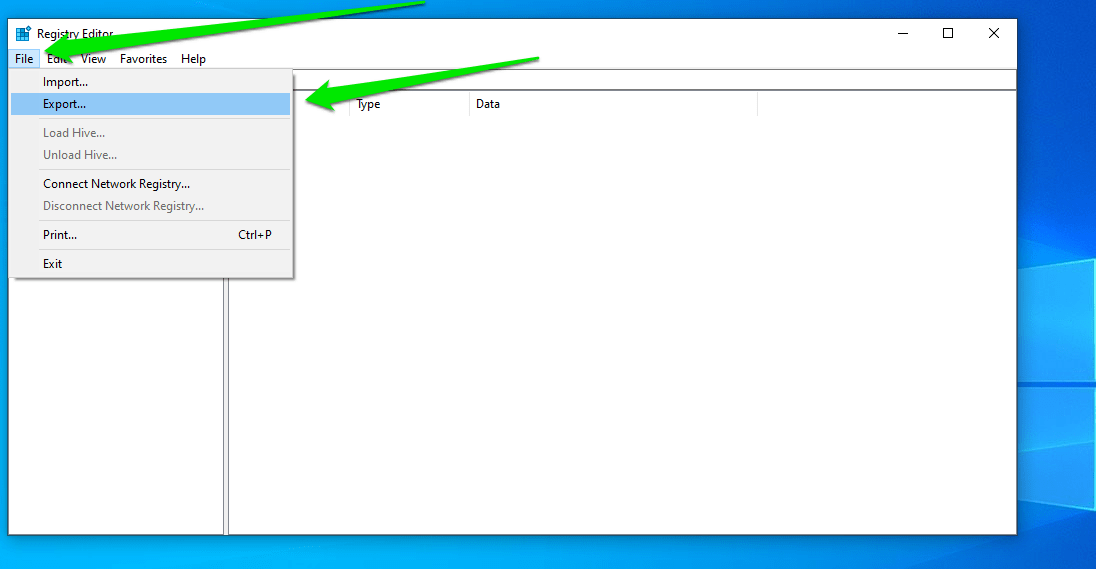
- After the Registry Editor opens, click on File in the top-left corner and select Export.

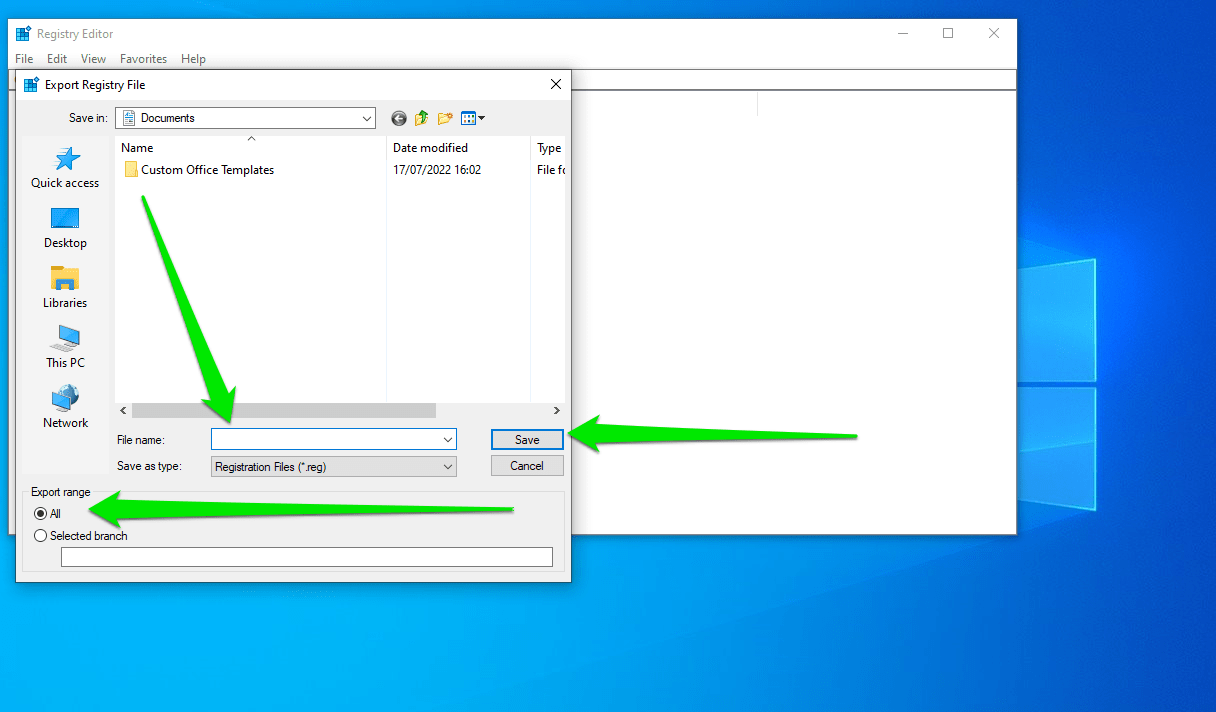
- When the Export Registry File dialog window shows up, choose a location to save the backup, enter a name for the backup file in the File Name box, and select All under Export Range.
- Click on the Save button.
That’s how to backup the registry. Now, follow these steps to enable TLS 1.1 and TLS 1.2:
- Open the Registry Editor.
- To enable TLS 1.1, head to this registry location and follow the subsequent steps:
HKEY_LOCAL_MACHINE\SYSTEM\CurrentControlSet\Control\SecurityProviders\SCHANNEL\Protocols\TLS 1.1\Client
Now, go to the right side of the window and create the DisabledByDefault DWORD. To do that, right-click the empty field and select New > DWORD (32-bit) Value. Change the name of the new DWORD to DisabledByDefault.
Next, double-click the DWORD and set its value to 0.
3. Go to this registry location and follow the subsequent steps to enable TLS 1.2:
HKEY_LOCAL_MACHINE\SYSTEM\CurrentControlSet\Control\SecurityProviders\SCHANNEL\Protocols\TLS 1.2\Client
Note: If the tree ends at Protocols, create the TLS 1.2 and Client keys under the Protocols key.
Create the DisabledByDefault DWORD and set its value to 0.
4. Restart your computer and run the Media Creation Tool again.
Delete the Software Distribution Folder
The software distribution folder is used by the Windows Update client to temporarily store files required for Windows updates. These files are stored when an update is pending for installation or download.
Sometimes, the file in the folder causes conflicts and prevents the client from completing an update.
Since the Media Creation Tool has to download setup files required for upgrading Windows, the issue might be related to the software distribution folder. That’s because Windows may want to install pending updates before moving forward with the upgrade.
As such, deleting the folder may fix the problem.
Follow these steps:
- Open your file explorer and go to C:\Windows\SoftwareDistribution\Download.
- Select every file and sub folder in the folder and delete them.
- Next, launch the Command Prompt and enter the following command: wuauclt.exe /updatenow
- Hit the Enter key and try running the setup again.
Perform a Clean Boot
Windows error code 0x80072f8f – 0x20000 may also be appearing due to application conflicts. Some programs and services that launch during startup may be responsible for triggering the error when you run the Media Creation Tool.
You can resolve the problem by disabling those applications and running only minimal programs at Windows startup. This process is called a clean boot.
Follow these steps:
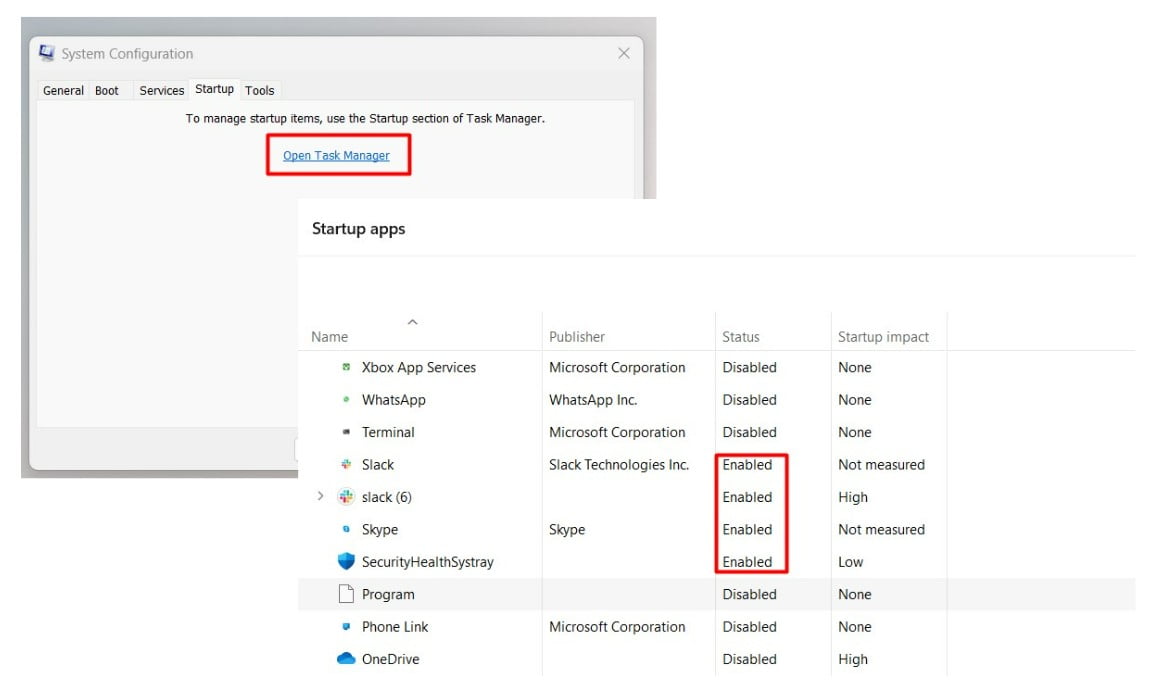
- Open the Start menu and search for “msconfig.”
- Click System Configuration in the search results.
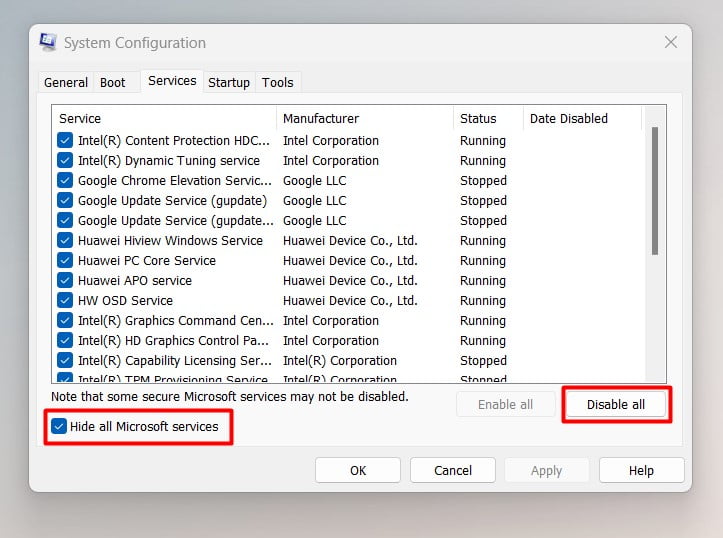
- Once the System Configuration dialog window appears, head to the Services tab.
- Check the “Hide all Microsoft services” box and click on the Disable All button.

- Next, switch to the Startup tab and select Open Task Manager.
- Once the Startup tab of the Task Manager opens, select each enabled program and click on Disable.

- Return to the System Configuration dialog and click on the OK button.
- Restart your computer and try upgrading your operating system.
Related: How to perform a clean boot in Windows 10?
Use the Windows ISO File
As we mentioned earlier, the Media Creation Tool has to download the setup file to upgrade your PC. But for some reason, it keeps showing error code 0x80072f8f – 0x20000.
If none of the methods above helped you fix the problem, another alternative is to download the Windows setup file yourself and run the upgrade.
You should also consider downloading the ISO (Windows setup) to your mobile device and transfer it to your computer. This way, the process won’t be botched by the error.
So, follow these steps:
1. On your mobile browser, go to the Microsoft download page and download the ISO for Windows 10. A simple Google search will take you to the page.
Note that you need at least 6 GB of free storage on your mobile device and computer.
2. After downloading the ISO file, transfer it to your computer and extract it using a program such as WinZip or 7zip. Some Windows versions can mount the ISO file as a virtual DVD.
3. Next, open the extracted – or mounted – folder and double-click on the Setup file.
4. Follow the subsequent instructions to complete the upgrade.
You can choose to keep your files and applications during the upgrade or remove everything.
If you still see an error after choosing to keep your files and programs, consider the “Remove everything” option. But before you do that, backup your important files to an external drive.
Conclusion
With the error code 0x80072f8f – 0x20000 Windows 10/11 or Windows 7 fails to upgrade and you may be left with the option of installing Windows from scratch.
However, the guides above will help you get rid of the error for good.
You can also use a PC repair tool to find and fix errors that may be triggering the problem. The tool also helps you prevent issues from occurring in the future.

Are you also dealing with Microsoft Media Creation Tool’s error code 0x80072F8F 0x20000 and looking for a guide to help you fix it? If yes, you have stumbled upon the right webpage. 👍
Error code 0x80072F8F 0x20000 is a very common error code that people see when they try to upgrade their Windows OS using Media Creation Tool. This error code can be frustrating as it prevents you from upgrading your OS.
The worst part here, however, is that there is no official information from Microsoft that clearly explains why this error code triggers. Thankfully, there are some workarounds that you can follow to fix the error in no time.
This article covers detailed information about what this Media Creation Tool error code 0x80072F8F 0x20000 means, why it occurs, and most importantly, how to fix it.
So, without any further ado, let’s get started.
What is Error Code 0x80072F8F 0x20000, and why does it occur?
Even though there is no official statement about this error code 0x80072F8F 0x20000 and why it occurs, it is believed that this error gets triggered when the server that Microsoft Media Creation Tool tries to communicate with no longer supports the old TLS 1.0 security protocol for communication.
However, it is just speculation based on the troubleshooting solutions that have worked for a majority of users that were dealing with the same error.
Besides that, the other possible causes that could trigger this error code 0x80072F8F 0x20000 on Media Creation Tool are:
- Corrupted Cache or Temporary Files – The process of downloading and executing installation files creates some cache and temporary files on your computer. Even though these files are important, if corrupted, they could interfere with Microsoft Media Creation Tool and trigger this error.
- Conflict between Third-Party Apps – Sometimes, third-party apps installed on your computer may cause conflict with the Microsoft Media Creation Tool, and as a result, you will encounter this error.
- Lack of Admin Privileges – Since Microsoft Media Creation Tool makes system-level changes, it needs admin privileges. If you are currently running your machine as a guest user or not providing this tool admin access, it could be the reason you are facing this error code 0x80072F8F 0x20000.
- Incompatible System Requirements – To upgrade your Windows OS, your device must meet minimum system requirements to properly install the OS. If your current system specification isn’t compatible with the Windows OS version you want to upgrade to, you may encounter this error.
- Lack of Essential Services – Most of the time, errors like error code 0x80072F8F 0x20000 can occur due to the lack of essential services that are required for programs like Microsoft Media Creation Tool to function properly.
- Poor Internet Connection – Many people have reported that they were facing this error because of an unstable internet connection. This may not be the case for everyone, but if your internet connection isn’t stable, it would be a great idea to restart the OS upgrade process once your internet connection gets stable and starts delivering decent speed.
Now that you know the possible reasons that could’ve triggered this error, let’s discuss some of the best workarounds you can apply to fix it.
Ways to Fix Error Code 0x80072F8F 0x20000
As stated above, Microsoft has no official clarification about what triggers this error. Therefore, our workarounds are based on solutions that have worked for other Windows users with the same error.
As I mentioned, the Microsoft Media Creation Tool helps you update your Windows OS and thus makes system-level changes. Therefore, it requires Admin privileges and rights, and the lack of Admin access can be a possible reason you are facing this error.
This error may trigger because the user account that you are currently using doesn’t have administrative rights. In such a scenario, running the Microsoft Media Creation Tool as an Administrator may fix the error.
To run Media Creation Tool as an administrator, you need to follow these simple steps –
- First, navigate to the folder where you have stored the Microsoft Media Creation Tool file.
- Locate the Media Creation Tool file and right-click on it.
- From the context menu, select the Run as administrator option.
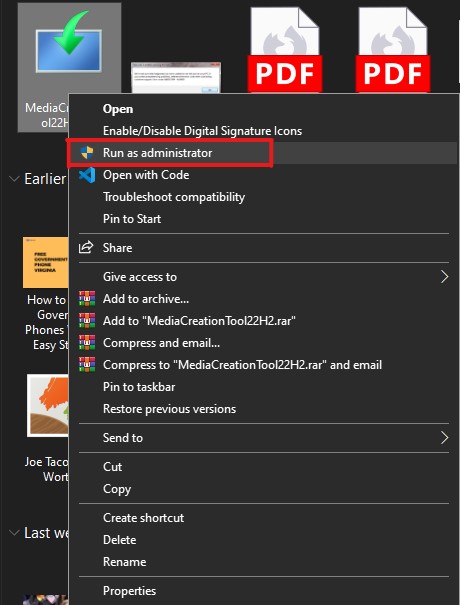
- A UAC prompt will appear on your screen, asking you to confirm your decision. Simply select the Yes button to confirm.
That’s it. This is how you can give Microsoft Media Creation Tool administrative rights.
Now, check if the issue has been resolved. If it isn’t, try following the next workaround.
Enable TLS 1.1 and TLS 1.2
This is one of the most widely observed reasons people encounter this error code 0x80072F8F 0x20000. This could be because your computer might have a dated TLS version enabled.
TLS allows you to establish secure and encrypted connections over the internet. Most outdated Windows computers only have TLS 1.0 and SSL3 enabled.
Microsoft, on the other hand, uses upgraded TLS 1.1 and TLS 1.2 security protocols for its servers.
This incompatibility of TLS versions can be the reason that every time your computer tries to establish a connection with a Microsoft server, the connection fails and shows the error code 0x80072F8F 0x20000.
To fix this error, you must enable TLS 1.1 and TLS 1.2.
There are two ways you can do that.
- Enable from Internet Settings using the GUI.
- Make changes in the registry.
We have covered both of these methods below.
Enable TLS 1.1, TLS 1.2, and TLS 1.3 using GUI
To enable all these TLS versions using GUI, you need to follow these simple steps –
- First of all, launch the Run window. For this, press the Win+R buttons on your keyboard.
- Type
inetcpl.cpland hit enter. This will launch the Internet Properties window for you.
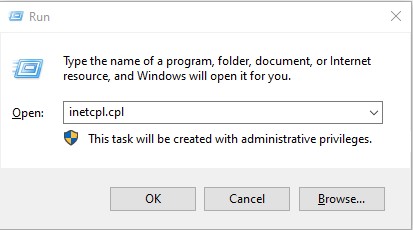
- Go to the Advanced Tab.
- Scroll down on the list of Settings and select TLS 1.1, TLS 1.2, and TLS 1.3.
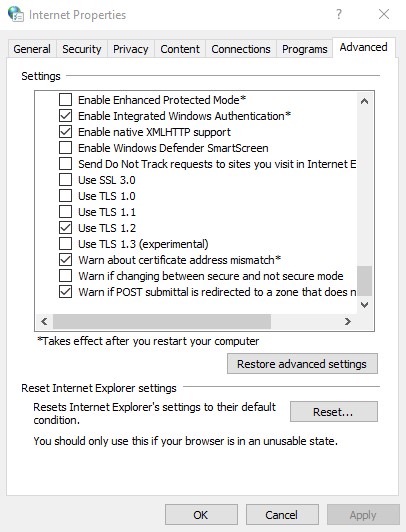
- Click on the OK button to save all the changes that you made.
- Now, click on the Apply button to apply all the changes.
- Restart your computer.
After that, rerun the Media Creation Tool to see if it has resolved the error.
If you can’t see TLS 1.1 and TLS 1.2 on the list, you can only enable these versions by making changes in the registry file.
Enable TLS 1.1 and TLS 1.2 by making changes in Registry
Disclaimer – Before proceeding further, let me clearly warn you that this method makes changes in the registry, which may become risky if something goes wrong. I strongly recommend creating a backup of the current registry.
Follow these simple steps to create a backup of the current registry –
- First of all, launch the Run command. For this, you need to press the Win+R key on your keyboard.
- In the comment box, type
regeditand hit Enter key. This will open the Registry Editor.

- Now, click on the File tab, and click on the Export option from the drop-down menu.
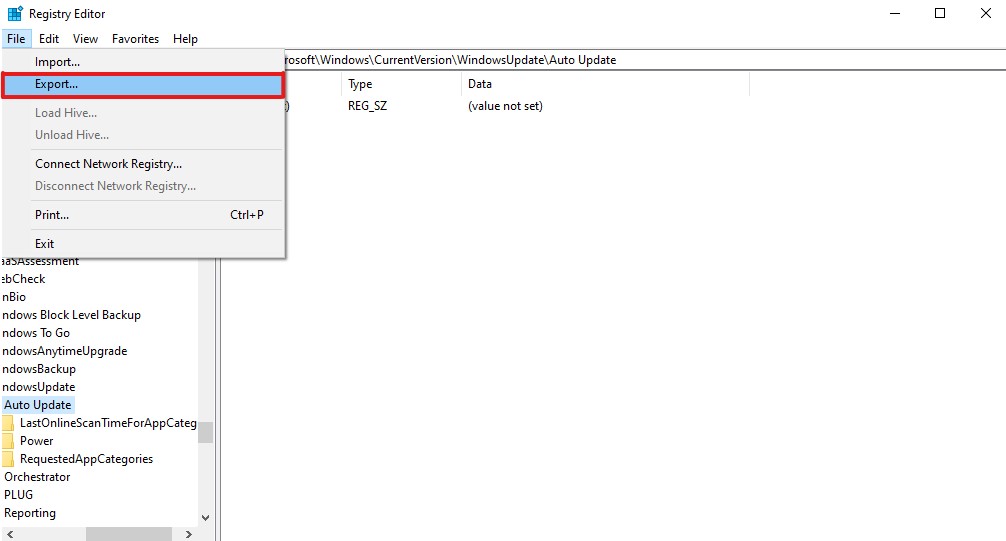
- Export the Registry file and save it to any of the folders of your choice.
That’s it. You have successfully created a backup of your registry.
Now, follow these steps to make changes in the Windows registry settings –
- First of all, launch Notepad.
- Now, copy this code and paste it into Notepad –
Windows Registry Editor Version 5.00

[HKEY_LOCAL_MACHINE\SOFTWARE\Microsoft\Windows\CurrentVersion\Internet Settings\WinHttp]

"DefaultSecureProtocols"=dword:00000a00

[HKEY_LOCAL_MACHINE\SOFTWARE\Wow6432Node\Microsoft\Windows\CurrentVersion\Internet Settings\WinHttp]

"DefaultSecureProtocols"=dword:00000a00

[HKEY_LOCAL_MACHINE\SYSTEM\CurrentControlSet\Control\SecurityProviders\SCHANNEL\Protocols\TLS 1.1\Client]

"DisabledByDefault"=dword:00000000

"Enabled"=dword:00000001

[HKEY_LOCAL_MACHINE\SYSTEM\CurrentControlSet\Control\SecurityProviders\SCHANNEL\Protocols\TLS 1.2\Client]

"DisabledByDefault"=dword:00000000
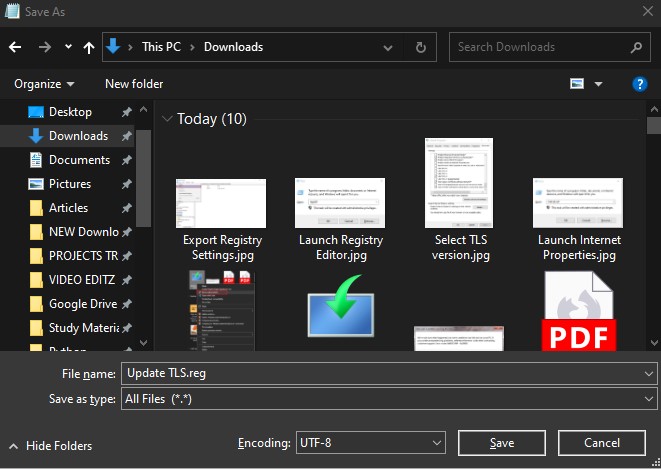
"Enabled"=dword:00000001- Now, save this file with a .reg extension. You can do that by typing the
update TLS.regin the File name box and selecting All files from the Save as type list.
- Now, locate this file on your Windows machine.
- Double-click on it to execute the file and apply registry settings.
- If the UAC prompt appears, click on the Yes option.
- Once the file is executed properly, restart your computer.
Once your computer reboots, it will have TLS 1.1 and TLS 1.2 enabled.
Now, launch the Media Creation Tool to check if the error code 0x80072F8F 0x20000 has been fixed. If not, try the following workaround.
Make sure your computer meets the Minimum System Requirements
If you are still facing this error, it could be because of your system’s configuration.
This error may occur if your computer specification doesn’t meet the minimum system requirements to run the Windows OS you want to upgrade.
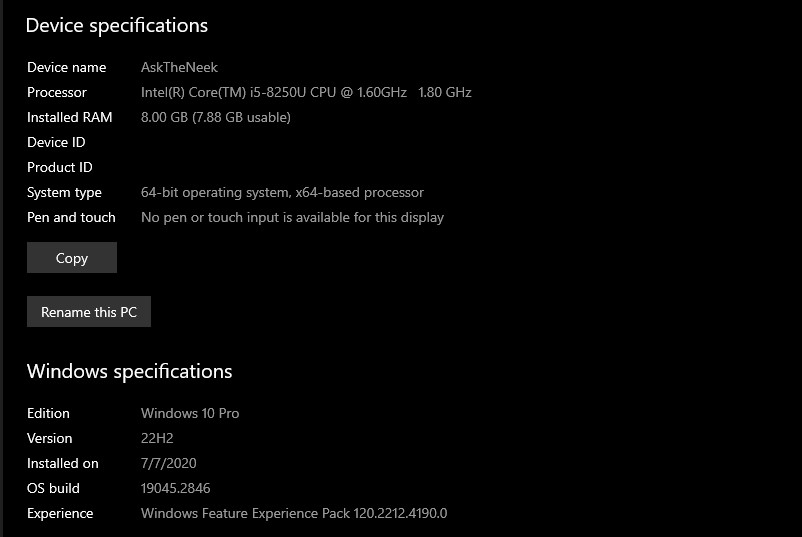
If you are not sure if this is the reason, simply cross-check your system’s configuration with the below-shared requirements of Windows 10 and 11.
To upgrade to Windows 10, the minimum system requirements are as follows –
- Processor – 1 GHz or faster processor
- RAM – 1 GB for 32-bit and 2 GB for 64-bit OS
- Hard Disk – 16 GB for 32-bit or 20 GB for 64-bit OS
- Graphics card – Compatible with DirectX 9 or later with WDDM 1.0 driver
The minimum system requirements for Windows 11 are –
- Processor – 1 GHz or faster processor with a minimum of 2 cores
- RAM – 4 GB or higher
- Hard Disk – 64 GB or higher
- Graphics card – Compatible with DirectX 12 or later with WDDM 2.0 driver
Restart Windows Services
If your machine meets the minimum system requirements, yet you are facing this error, there are chances that some Windows services might be the culprit.
In this scenario, you can follow the below-shared workaround to restart Windows services to see if it fixes this error for you –
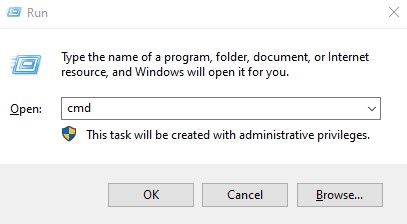
- First of all, launch the Command Prompt as an administrator. You can do that by pressing Win+R, typing
cmdinto the box, and then hitting CTRL+Shift+Enter simultaneously.
- After that, type these commands shared below one by one and hit Enter after each command. These commands will stop all Windows services, including Windows Update, Background Intelligent Transfer Services, Application Identity, and Cryptographic Services.
net stop bitsnet stop wuauservnet stop appidsvcnet stop cryptsvc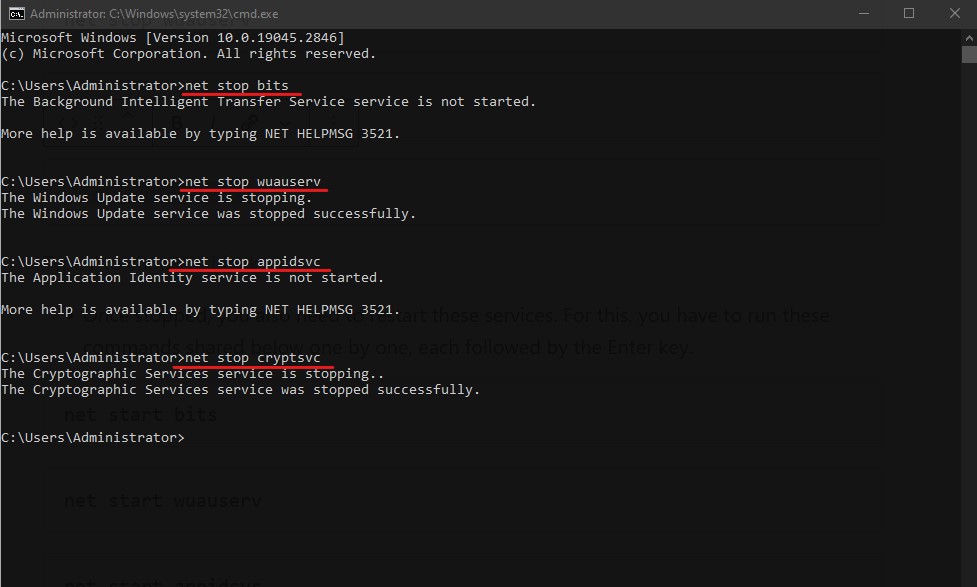
- Once stopped, you also need to restart these services. For this, you have to run these commands shared below one by one, each followed by the Enter key.
net start bitsnet start wuauservnet start appidsvcnet start cryptsvc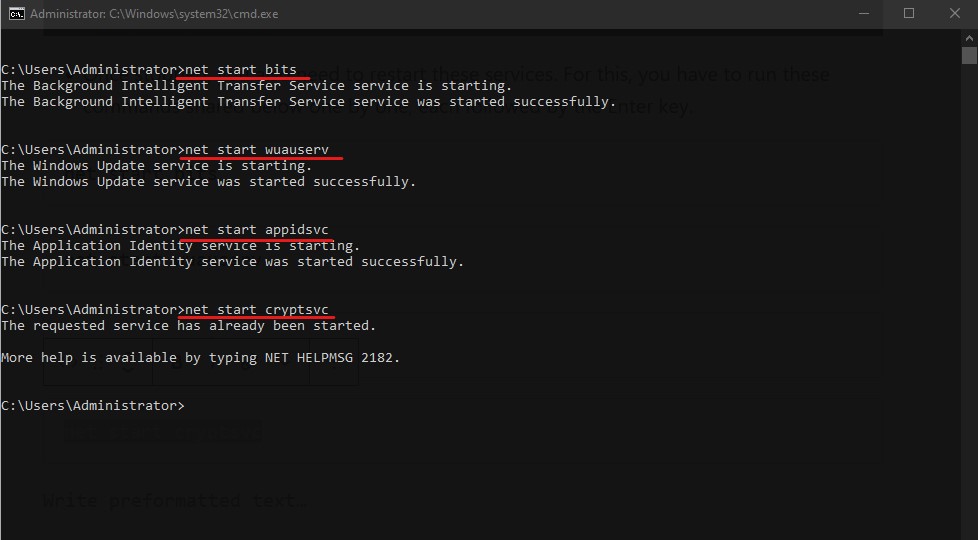
- Once all the commands have been executed, type
exitin the Command Prompt and hit enter.
Run the Media Creation Tool again with administrative access to see if restarting Windows services has fixed the error.
Allow OS Upgrade from Windows Registry
Disclaimer – Making any changes in the registry can be fatal. Therefore, I’d recommend you create a backup file of the current registry to avoid any risk. Besides that, I’ll also recommend following the steps very carefully.
Another possible reason you are dealing with error code 0x80072F8F 0x20000 could be that your computer’s Windows policy isn’t allowing you to upgrade the OS. In such a scenario, you can make changes in the Windows registry to allow your OS to be upgraded.
Here is how you can do that:
- First of all, launch the Run dialog box. You can do that by simply pressing the Win+R key.
- Now, type
regeditand hit Enter.
- Directly paste the following path into the navigation bar and hit enter.
Computer\HKEY_LOCAL_MACHINE\SOFTWARE\Microsoft\Windows\CurrentVersion\WindowsUpdate\Auto Update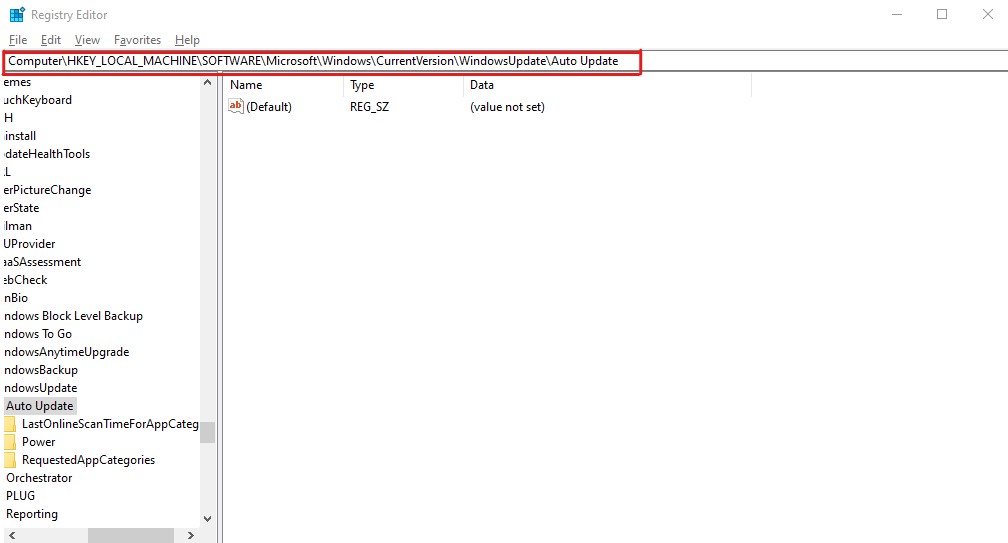
- You have to right-click on the Auto Update, select New, create a DWORD file, and name it AllowOSUpgrade.
- Double-click on this recently created file, set its Value Data to 1, and click the OK button.
- Restart your computer.
That’s it. The changes have been applied, and now all you have to do is run the Media Creation Tool to check whether the error has been fixed.
Clear SoftwareDistribution Folder
As already explained, sometimes, error code 0x80072F8F 0x20000 may get triggered because of corrupted caches and temporary files. If the workarounds mentioned above haven’t worked for you, you can try clearing files from the SoftwareDistribution folder.
Why this folder specifically? Well, that is because whenever you try to install a Windows update, all the temporary files required for the installation get stored within a sub-folder of this SoftwareDistribution folder.
Here, you can clear the SoftwareDistribution folder on your PC and fix the error code 0x80072F8F 0x20000.
- First of all, launch the Command Prompt. You can do that by pressing Win+R, typing
cmdinto the box, and then hitting CTRL+Shift+Enter.
- Now, you have to stop Windows Update and Background Intelligent Transfer Services. For this, you can type the following commands one by one, each followed by Enter key –
Net Stop wuauservNet Stop bits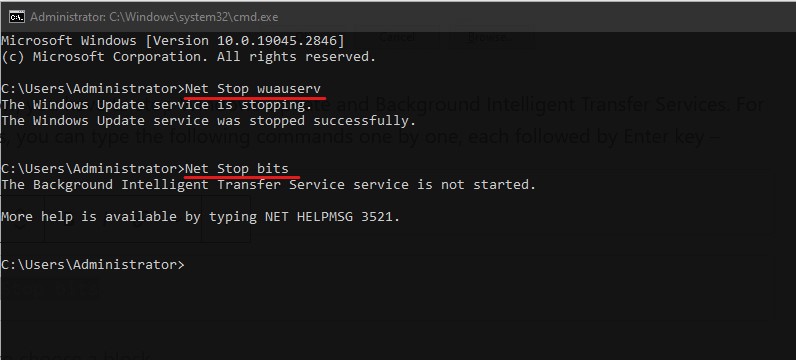
Don’t close the Command Prompt, as we’ll have to restart these services again.
- Launch the Windows File Explorer. You can do that simply by pressing the Win+E key.
- Enter the below-shared path in the address bar and hit Enter.
C:\Windows\SoftwareDistribution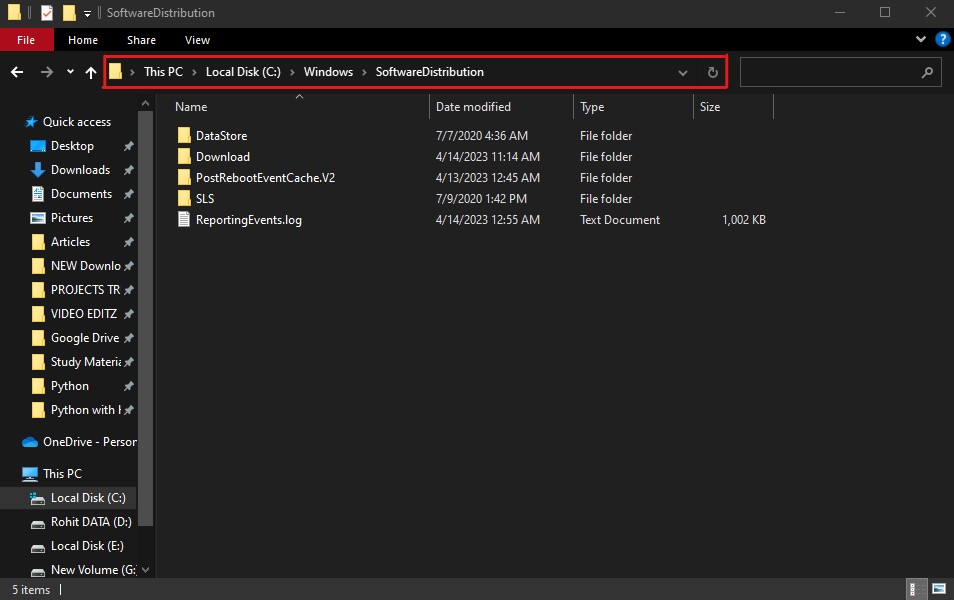
- Select all the files inside this folder and delete them. You can do that simply by pressing the CTRL+A and then the Del key. If asked for Administrative Permissions, select the Continue option.

- Get back to Command Prompt to restart the services that we stopped earlier. For this, just type below shared commands one by one, each followed by the Enter key –
Net Start wuauservNet Start bits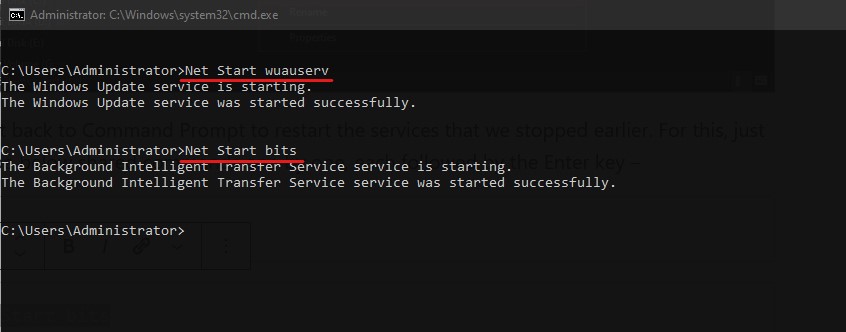
Now, restart your computer and rerun the Media Creation Tool to see if the issue persists.
Perform a Clean Boot
Sometimes, apps in the background that have been running for quite a long temporarily block or create conflict with some services that are essential for the Media Creation Tool.
If that’s the case with you, you can perform a clean boot to temporarily close these unnecessary apps so they don’t affect the Media Creation Tool.
To perform a clean boot on Windows, you need to follow these simple steps –
- First of all, launch the Run window. You can do that by pressing the Win+R keys.
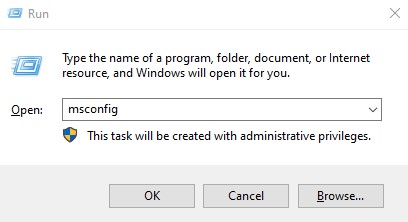
- Type
msconfigand hit Enter. It will take you to the System Configuration app.
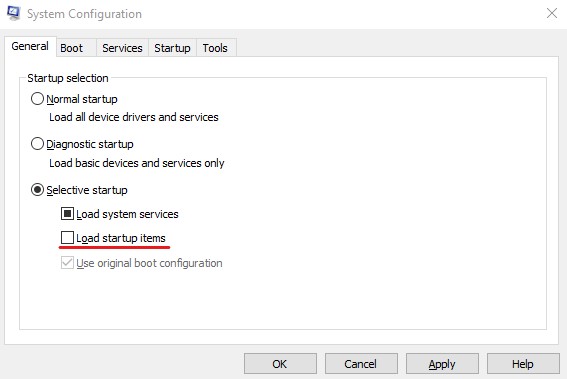
- In the General tab, you have to select the Selective Startup option. Make sure to uncheck the Load startup items option.
- After this, click the Services tab and check the Hide all Microsoft Services option.
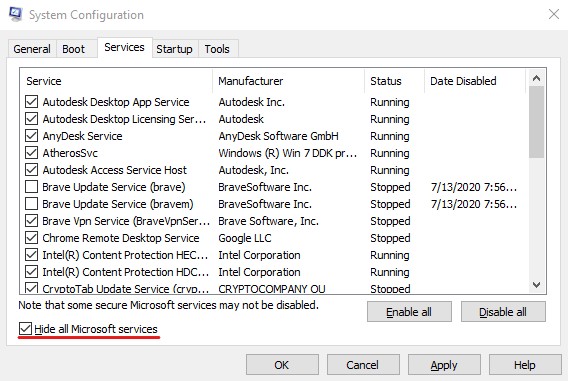
- Now, click on the Disable All button.
- Click on the Apply button and then the OK button to save all the changes you made.
After that, restart your PC and rerun the Microsoft Media Creation Tool to see if the error has been fixed.
Make sure your internet is good and stable
Since the Media Creation Tool downloads system files, it requires a stable internet connection.
If the connection is disruptive or unstable, it may result in the form of error code 0x80072F8F 0x20000. Therefore, ensure your internet connection is stable and delivers a decent speed.
Free Up Disk Space
Microsoft Media Creation Tool, by default, uses your C Drive to download and store installation files. Therefore, if your C Drive doesn’t have sufficient space to download the system files, you may face this error.
In such a scenario, consider freeing up some space on your C Drive so that all the OS upgrade-related files can be downloaded and executed properly without any issues.
There you have it – a detailed article covering how to fix error code 0x80072F8F 0x20000 on Windows 10/11.
Since there isn’t any official statement from Microsoft that explains why this error occurs, it is difficult to suggest a solution that may work for everyone. Therefore, you have to go for the hit-and-try method.
To make things easier for you, I have compiled a list of workarounds that have worked for other users. I hope this will help you troubleshoot this error.
Also, check some of the registry hacks to help improve your Windows 11 experience.