Search code, repositories, users, issues, pull requests…
Provide feedback
Saved searches
Use saved searches to filter your results more quickly
Sign up
microsoft-sql-server:t-sql-script-samples:how-to-check-and-repair-ms-sql-server-database
Как проверить и восстановить базу данных SQL Server
1. На всякий случай делаем резервную копию базы данных
2. Выполняем проверку базы данных
Use MyDataBase
GO
DBCC CHECKDB
GO
Если в процессе проверки обнаружены ошибки переходим к п.3, если нет ошибок — к п.4
3. Переводим базу данных в однопользовательский режим и запускаем процедуру исправления ошибок
Use MyDataBase
GO
ALTER DATABASE MyDataBase SET SINGLE_USER
GO
DBCC CHECKDB('MyDataBase', REPAIR_REBUILD)
GO
Возможно скрипт придётся выполнять несколько раз до тех пор пока ошибки не исчезнут.
4. Возвращаем базу данных в многопользовательский режим
ALTER DATABASE MyDataBase SET MULTI_USER
GO
Дополнительная информация:
MSDN Library — DBCC CHECKDB (Transact-SQL)
Table of Contents
- SQL Server Database Integrity Check Best Practices Worth Considering
- 1. Run DBCC CHECKDB with subset commands
- 2. Offload logical consistency checks where possible
- 3. Run DBCC CHECKDB with other execution options
- 4. Restore backup on another server and run DBCC CHECKDB
- 5. Determine whether you should run DBCC CHEKCDB before or after backup
- End Note
- References
As SQL database administrators, running consistency checks against a database is crucial to ensure that the database is free from corruption. However, how you should run DBCC CHECKDB to perform integrity checks is often overlooked,
especially in an environment with several SQL Server instances and databases on each server. There are some best practices you need to follow to run database integrity checks optimally.
In this article, we will be discussing the SQL Server database integrity check best practices you should know.
SQL Server Database Integrity Check Best Practices Worth Considering
Here are some of the SQL Server database integrity check best practices you should be following, but not limited to:
1. Run DBCC CHECKDB with subset commands
Running DBCC CHECKDB command to perform database consistency checks can be a resource-intensive process and may take a long time to complete. Performing the integrity check on all the databases across multiple server instances
may not finish on time. Meaning, the process may exceed the maintenance window limit. In such a case, you need to do a full run of DBCC CHECKDB using the following subset commands:
- CHECKALLOC – It checks the disk space allocation structures consistency for a database.
- CHECKTABLE – It checks the integrity of all the pages and structures that make up the table or indexed view.
- CHECKCATALOG – The database must be online to check catalog consistency within a SQL database.
Executing DBCC CHECKDB with these options will help you perform integrity checks in phases.
2. Offload logical consistency checks where possible
A full run of integrity checks on a large database can take a long time to complete than earlier versions. Such behavior occurs due to the following reasons:
- By default, DBCC CHECKDB spends the majority of the time performing logical consistency checks on the data. So, the more data you have, the more time it will take to produce results.
- Complexity of some of the underlying database structures.
- New integrity checks have been introduced with new features.
To work around this, focus your efforts on checking the integrity of a page’s physical structure using the PHYSICAL_ONLY option. This check doesn’t find any logical issues; however, it can identify common hardware failures, torn
pages, and checksum failures that can corrupt a user’s data. Also, running DBCC CHECKDB using WITH PHYSICAL_ONLY check on the primary database can skip CPU-intensive checks.
3. Run DBCC CHECKDB with other execution options
Consider using other checks when running DBCC CHECKDB on large databases, such as:
- NO_INFOMSGS: Sometimes, running DBCC CHECKDB produces irrelevant output. You may see thousands of red lines with informational messages that
might not be of any use. Use the NO_INFOMSGS option to suppress informational messages.
DBCC CHECKDB(Database_Name) with NO_INFOMSGS;
- DATA_PURITY: By default, DBCC CHECKDB performs column-value integrity checks. However, when upgrading databases, you will need to use the DATA_PURITY check for checking the data integrity in a table column.
The syntax is as follows:
DBCC CHECKDB(Database_Name) with DATA_PURITY;
- EXTENDED_LOGICAL_CHECKS:
Run this check with DBCC CHECKDB when running missing critical databases. It performs logical checks on indexed views, spatial indexes, or XML indexes. Here’s the syntax:
DBCC CHECKDB(Database_Name) with EXTENDED_LOGICAL_CHECKS;
Note: Executing “DBCC CHECKDB with EXTENDED_LOGICAL_CHECKS” on a table in SQL Server 2016 with a “filtered nonclustered index (NCI) over a clustered columnstore index (CCI)” may fail. It may also lead
to SQL error 5297. This is a SQL bug. Refer to this link
for more information.
- TABLOCK: Run CHECKDB using the TABLOCK option when the database snapshot creation is failing. This option uses locks rather than database snapshots.
4. Restore backup on another server and run DBCC CHECKDB
Restore backup of your production database on another system (or a test server). After restoring the database, perform a full CHECKDB on it. Doing so helps offload the burden of running database integrity checks from the production system. It also helps validate backups. However, there are a couple of downsides to this practice. If your production database is 1 TB or more, you’ll need the same amount of space on the separate system. Another drawback is that if consistency errors are found, you might not know whether the production database is corrupt or there’s an issue with the test server.
5. Determine whether you should run DBCC CHEKCDB before or after backup
As long as you are running database integrity checks regularly, it doesn’t really matter when you should run DBCC CHECKDB. But, knowing whether you should run backup before or after executing the CHECKDB command can determine if
the backup is good or not.
Essentially, if performing consistency checks using DBCC CHECKDB fails, your subsequent backup might also fail. But, you would be less certain whether you have a good or bad backup if you decided to run backup before executing
the CHECKDB command; there’s a possibility that corruption occurred between the times running backup and then CHECKDB.
Note: If you can’t do a full run of DBCC CHECKDB in a maintenance window, execute backups
WITH CHECKSUM.
End Note
Following the best practices discussed in this post can help you run database integrity checks optimally. However, if you still find your database inconsistent, you may consider using third-party
SQL recovery tool to regain access to your database without downtime. Stellar Repair for MS SQL is an efficient and reliable tool you can use to restore the database and its data without any inconsistency.
References
-
DBCC CHECKDB (Transact-SQL)
-
How often should I run DBCC
CHECKDB?
Posted By: Mar. 12, 2020

How to check and repair MySQL Databases
You will need know how to check and repair MySQL databases or tables when you troubleshoot your website as they may have become corrupt. The mysqlcheck command is a maintenance tool that can be used to check, repair, analyze and optimize multiple tables from the command line. One of the best features of using mysqlcheck is that you don’t need to stop the MySQL service to perform the database maintenance.
In this tutorial, we will show you how to check/repair MySQL databases and tables.
Note : It is recommended to take a backup of your databases before performing a database repair operation.
Basic Syntax of mysqlcheck
A basic syntax of mysqlcheck is shown below:
mysqlcheck [OPTION] DATABASENAME TABLENAME -u root -p
A brief explanation of each option that you can use with mysqlcheck as shown below:
-c : Used to check a table for errors
-C : Used to check a tables that are changed after last week.
-a : Used to analyze tables.
-A : Used to check all databases.
-g : Used to check tables for version-dependent changes.
-B, –databases : Used to specify multiple databases.
-F : Used to check tables that are not closed properly.
–fix-db-names : Used to fix the database name.
–fix-table-names : Used to fix the table name.
–e : Used to perform an extended check.
-r : Used to repair corrupt table.
Check a Specific Table in a MySQL Database
In some cases, you need to check a specific table in a specific database. In that case, you can use the following syntax:
mysqlcheck -c databasename tablename -u root -p
For example, checks authors table in books database by running the following command:
mysqlcheck -c books authors -u root -p
You should get the following output:
books.authors OK

Check All Tables in a MySQL Database
If you want to check all the tables in a specific database use the following syntax:
mysqlcheck -c databasename -u root -p
For example, check all tables in books database by running the following command:
mysqlcheck -c books -u root -p
You should get the following output:
 Enter password:
 books.accountant                                   OK
 books.authors                                      OK
 books.writer                                       OK

Check and Optimize All Tables and All MySQL Databases
You can check all tables and all databases using the following command:
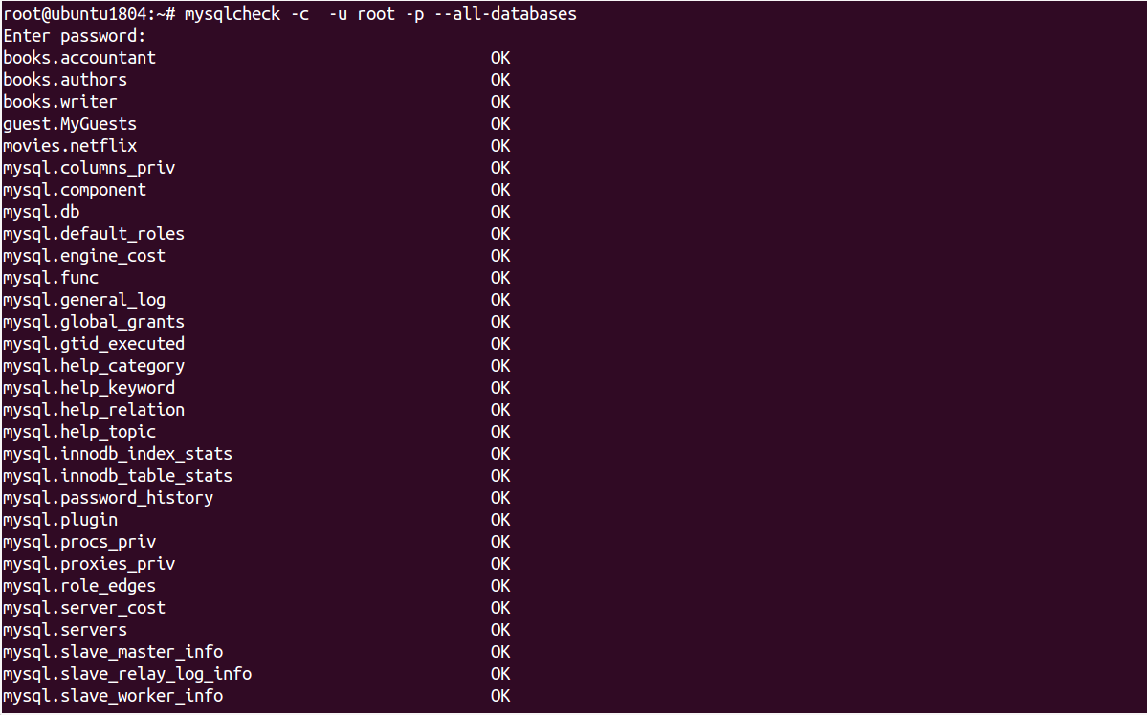
mysqlcheck -c -u root -p --all-databases
Output:
 Enter password:
 books.accountant                                   OK
 books.authors                                      OK
 books.writer                                       OK
 guest.MyGuests                                     OK
 movies.netflix                                     OK
 mysql.columns_priv                                 OK
 mysql.component                                    OK
 mysql.db                                           OK
 mysql.default_roles                                OK
 mysql.engine_cost                                  OK
 mysql.func                                         OK
 mysql.general_log                                  OK
 mysql.global_grants                                OK
 mysql.gtid_executed                                OK
 mysql.help_category                                OK
 mysql.help_keyword                                 OK
 mysql.help_relation                                OK
 mysql.help_topic                                   OK
 mysql.innodb_index_stats                           OK
 mysql.innodb_table_stats                           OK
 mysql.password_history                             OK
 mysql.plugin                                       OK
 mysql.procs_priv                                   OK
 mysql.proxies_priv                                 OK
 mysql.role_edges                                   OK
 mysql.server_cost                                  OK
 mysql.servers                                      OK
 mysql.slave_master_info                            OK
 mysql.slave_relay_log_info                         OK
 mysql.slave_worker_info                            OK
You can optimize all tables and all databases using the following command:
mysqlcheck -o root -p --all-databases
Output:
 Enter password:
 books.accountant
 note     : Table does not support optimize, doing recreate + analyze instead
 status   : OK
 books.authors
 note     : Table does not support optimize, doing recreate + analyze instead
 status   : OK
 books.writer
 note     : Table does not support optimize, doing recreate + analyze instead
 status   : OK
 guest.MyGuests
 note     : Table does not support optimize, doing recreate + analyze instead
 status   : OK
 movies.netflix
 note     : Table does not support optimize, doing recreate + analyze instead
 status   : OK
 mysql.columns_priv
 note     : Table does not support optimize, doing recreate + analyze instead
 status   : OK
 mysql.component
 note     : Table does not support optimize, doing recreate + analyze instead
 status   : OK
 mysql.db
 note     : Table does not support optimize, doing recreate + analyze instead
 status   : OK
 mysql.default_roles
 note     : Table does not support optimize, doing recreate + analyze instead
 status   : OK
 mysql.engine_cost
 note     : Table does not support optimize, doing recreate + analyze instead
 status   : OK
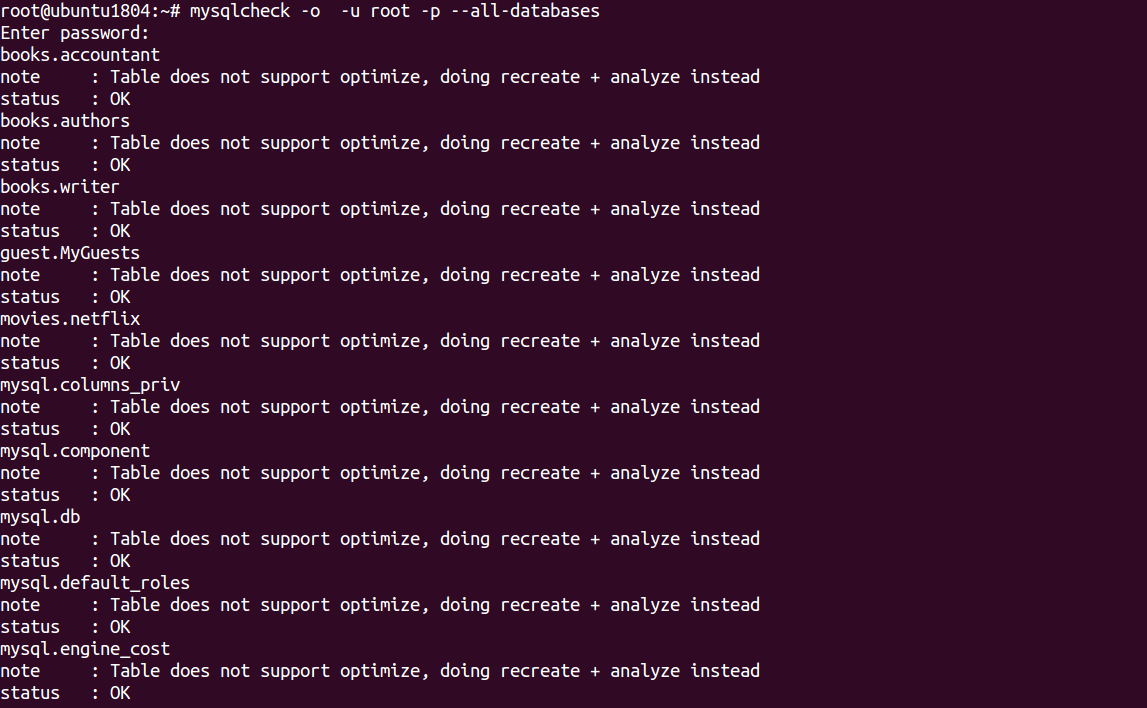
In the above output, you should see “Table does not support optimize” which means the InnoDB table that doesn’t support this option.
Repair MySQL Databases
To repair accountant tables in books database run the following command:
mysqlcheck -r books accountant -u root -p
Output:
 mysqlcheck -r books accountant -u root -p
 Enter password:
 books.accountant                                   OK

To repair all tables in both books and movies database run the following command:
mysqlcheck -r --databases books movies -u root -p
Output:
 Enter password:
 books.accountant                                   OK
 books.authors                                      OK
 books.writer                                       OK
 movies.netflix                                     OK

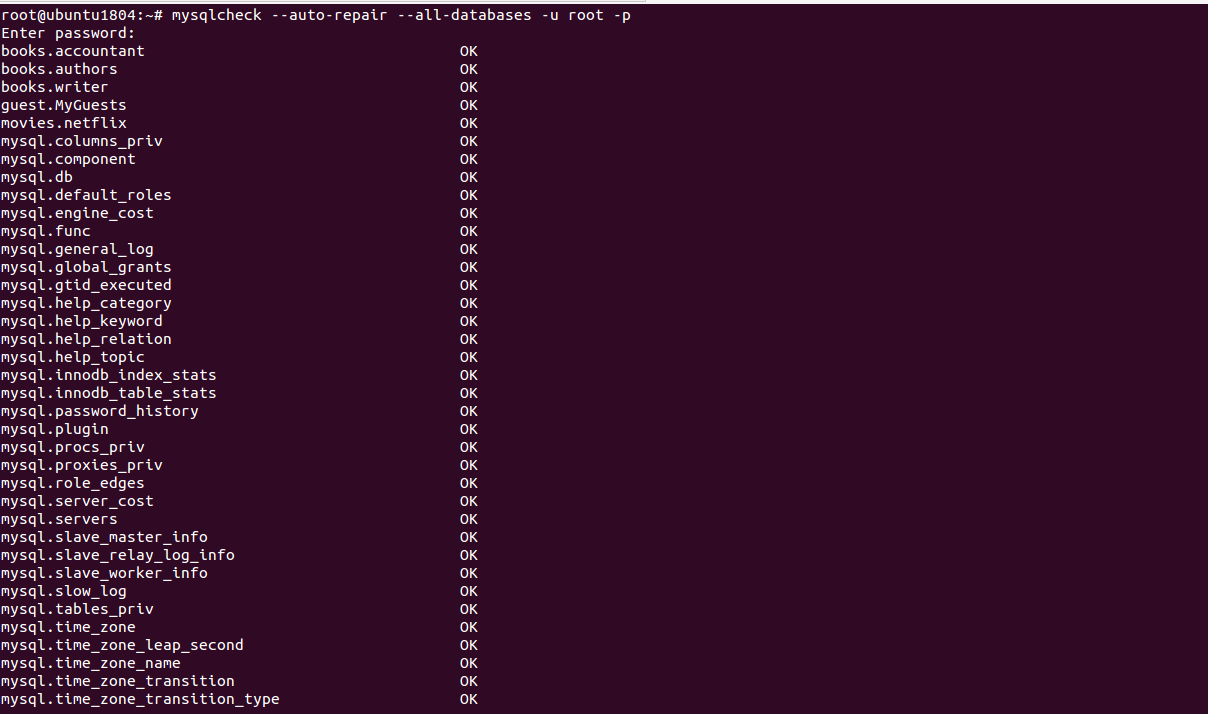
To check and repair all tables in all databases run the following command:
mysqlcheck --auto-repair --all-databases -u root -p
Output:
 Enter password:
 books.accountant                                   OK
 books.authors                                      OK
 books.writer                                       OK
 guest.MyGuests                                     OK
 movies.netflix                                     OK
 mysql.columns_priv                                 OK
 mysql.component                                    OK
 mysql.db                                           OK
 mysql.default_roles                                OK
 mysql.engine_cost                                  OK
 mysql.func                                         OK
 mysql.general_log                                  OK
 mysql.global_grants                                OK
 mysql.gtid_executed                                OK
 mysql.help_category                                OK
 mysql.help_keyword                                 OK
 mysql.help_relation                                OK
 mysql.help_topic                                   OK
 mysql.innodb_index_stats                           OK
 mysql.innodb_table_stats                           OK
 mysql.password_history                             OK
 mysql.plugin                                       OK
 mysql.procs_priv                                   OK
 mysql.proxies_priv                                 OK
 mysql.role_edges                                   OK
 mysql.server_cost                                  OK
 mysql.servers                                      OK
 mysql.slave_master_info                            OK
 mysql.slave_relay_log_info                         OK
 mysql.slave_worker_info                            OK
 mysql.slow_log                                     OK
 mysql.tables_priv                                  OK
 mysql.time_zone                                    OK
 mysql.time_zone_leap_second                        OK
 mysql.time_zone_name                               OK
 mysql.time_zone_transition                         OK
 mysql.time_zone_transition_type                    OK
Important note: InnoDB storage engine does not support repair. So you will need to change MySQL storage engine from InnoDB to MyISAM.
Check, Repair and Optimize MySQL Database with PHPMyAdmin
You can also check, repair and optimize tables and databases using the PHPMyAdmin web interface.
You can follow the below steps to check, repair and optimize tables and databases:
1- Open the phpMyAdmin tool through a web browser as shown below:
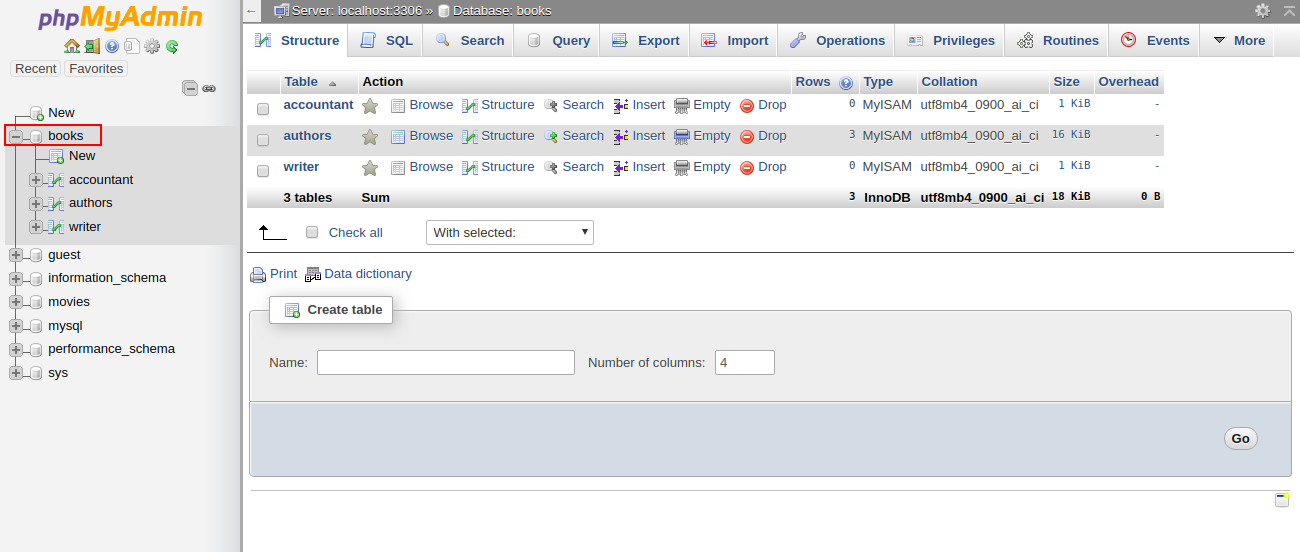
2- Select the affected database in the left pane. You should see all the tables in the right pane in the following screen:
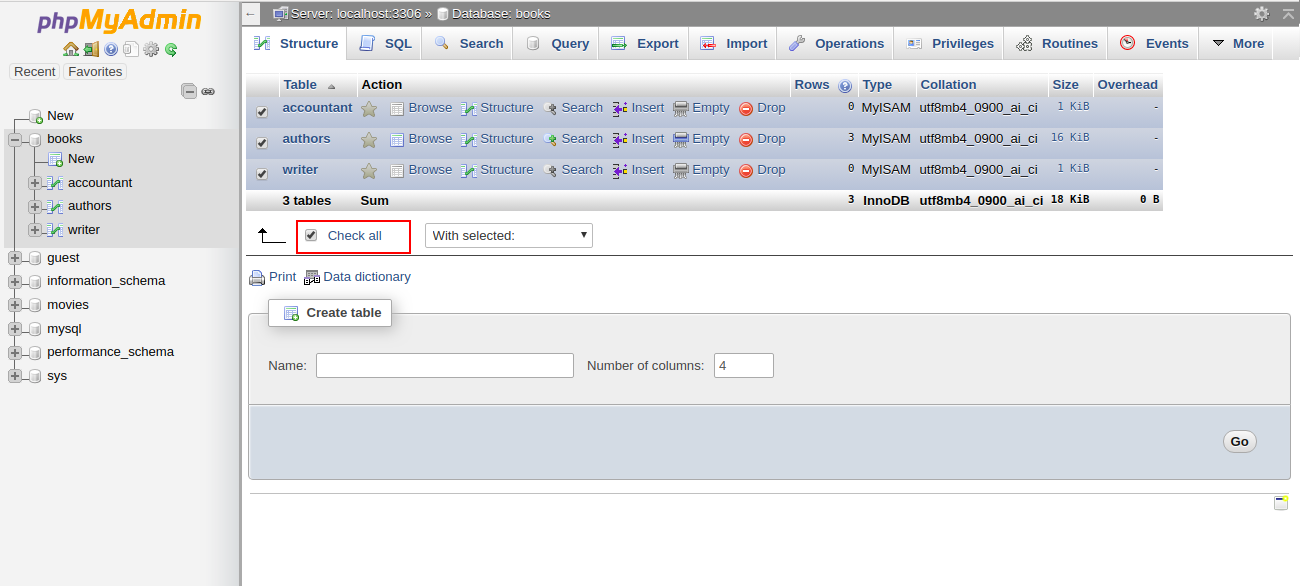
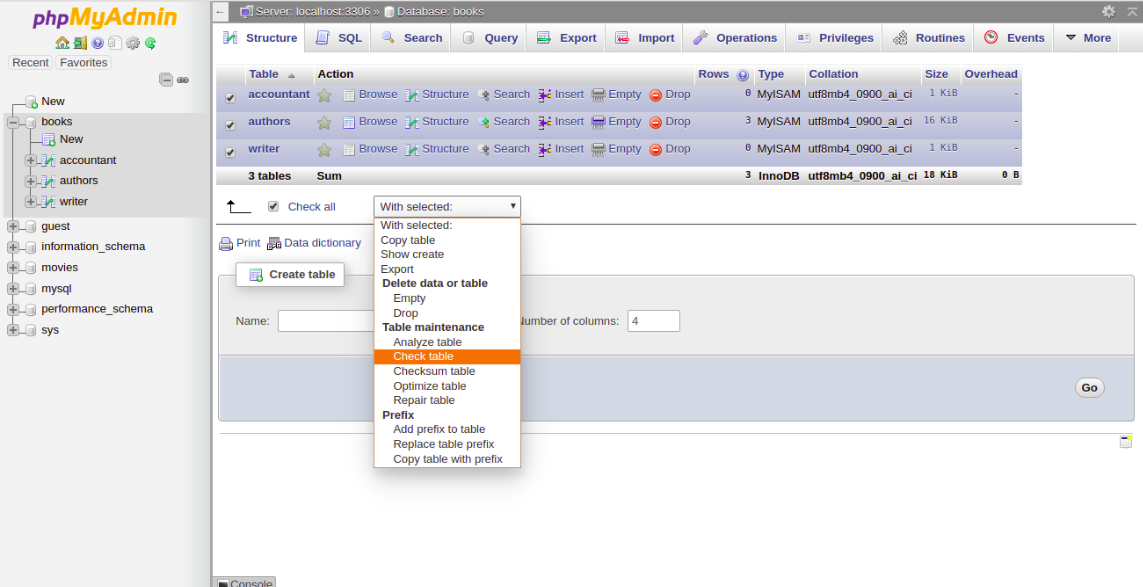
3- Click Check All to select all the tables. At the bottom of the window, choose Check Table from the menu. You should see a summary of the tables in the following screen:
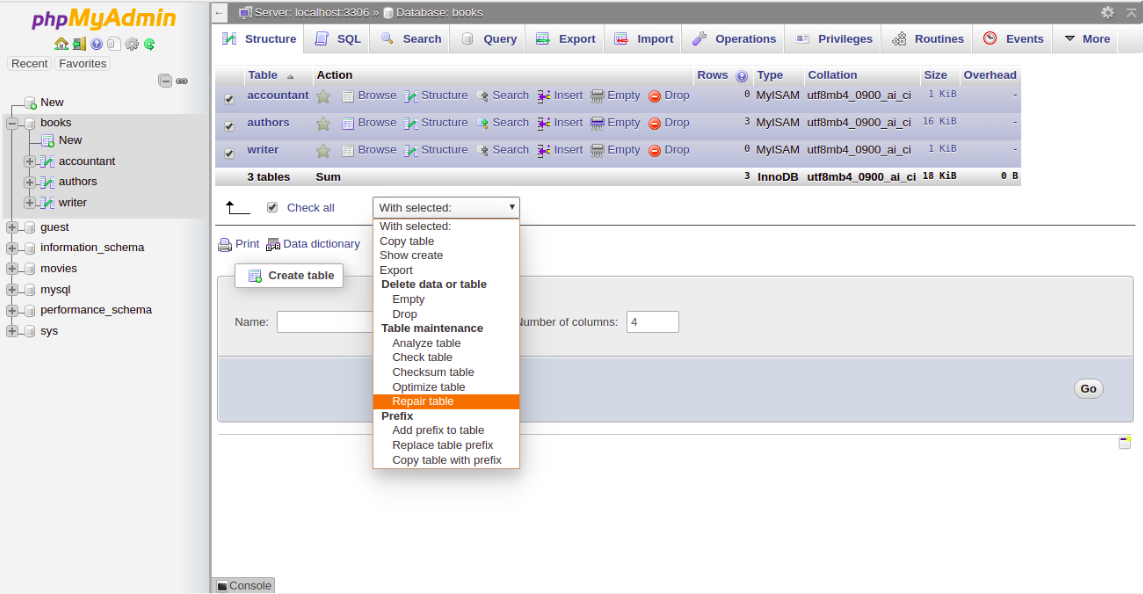
4- To repair the table, Check All to select all the tables and choose Repair Table from the menu. You should see the following page:
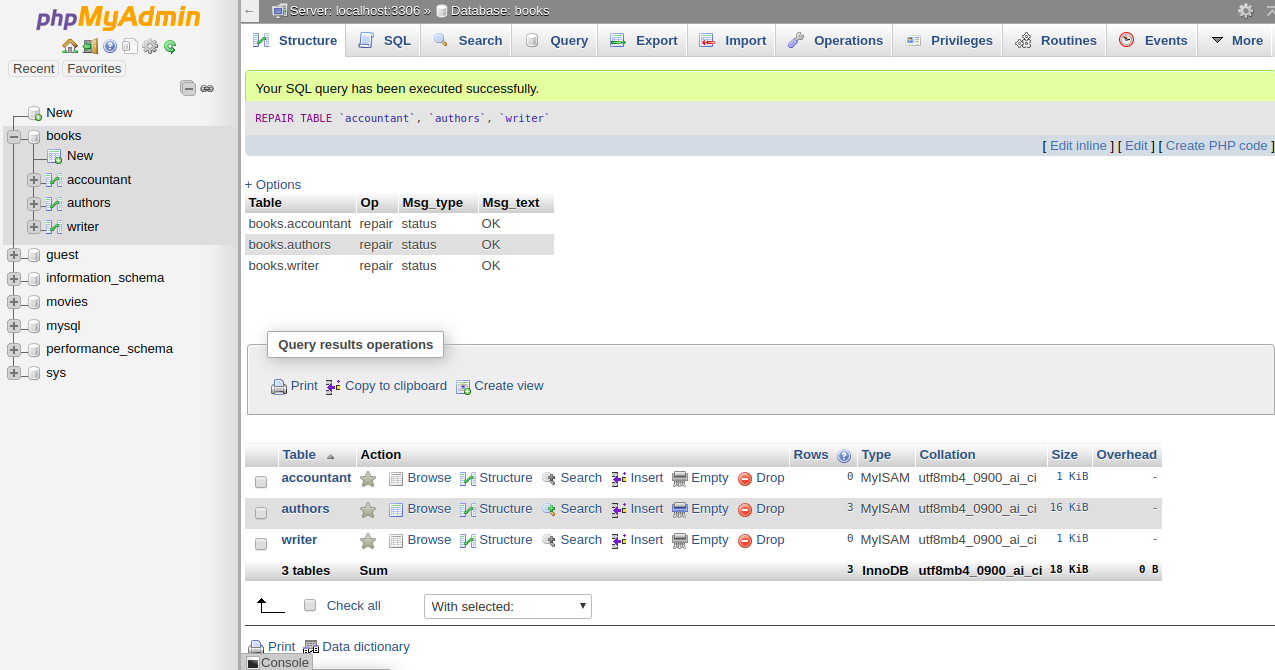
Then you should get a confirmation that the command been executed successfully:
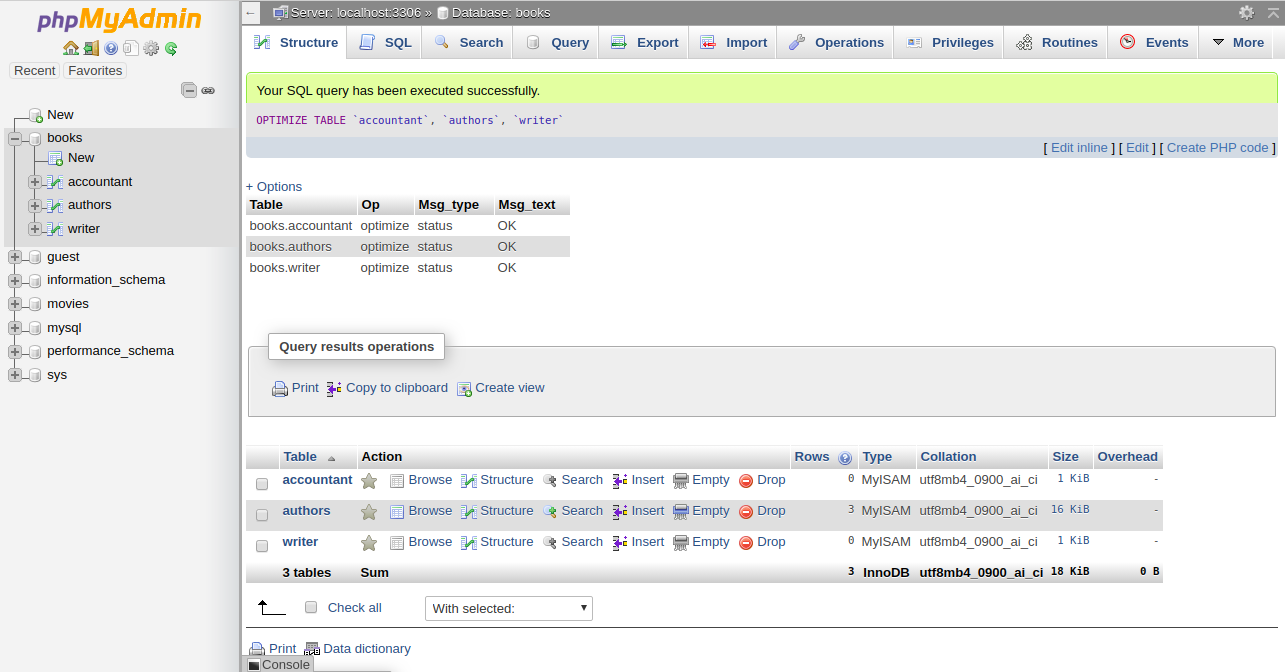
5- To optimize the table, Check All to select all the tables and choose Optimize Table from the menu. You should see the following page:

Then you should get a confirmation that the command been executed successfully:
Conclusion
In the above tutorial, we learned how to check and repair MySQL table using mysqlcheck command-line tool. We also learned how to check, repair and optimize database tables using the PHPMyAdmin web interface. I hope you can now easily fix your corrupted tables using this tool.
Summary: Database Console Command (DBCC) CHECKDB is used to identify errors in the SQL Server database. The DBCC CHECKDB comes with three repair options to fix database-related errors. This article outlines how to use DBCC CHECKDB command to repair SQL database. Also, it will discuss about a specialized MS SQL repair software you can use when DBCC CHECKDB fails to repair the database.

Contents
- How to Use DBCC CHECKDB Command?
- Steps to Use DBCC CHECKDB for Repairing SQL Database
- What To Do When DBCC CHECKDB Fails?
- Conclusion
DBCC CHECKDB is used to check the physical and logical integrity of database objects, index relationships, and other structural checks. The failure of any of these checks will report consistency errors as part of the database console command.
The best method to repair errors in the database, reported by DBCC CHECKDB, is to run the last known good backup as recommended by Microsoft. However, if the backup is not available or is corrupted, you can try accessing the database in Emergency state.
The Emergency state allows accessing a database marked as suspect. It also allows running DBCC CHECKDB repair options to resolve database corruption. Once the database becomes accessible, repair it using the minimum level of repair option.
Note: Repair operations exclude any constraints applied to or between tables. So, if any of the table has one or more constraints, you must run DBCC CHECKCONSTRAINTS following a repair operation.
How to Use DBCC CHECKDB Command?
Before using DBCC CHECKDB, let’s look at its syntax.
Syntax:
DBCC CHECKDB
[ ( db_name | db_id | 0
[ , NOINDEX
| , { REPAIR_ALLOW_DATA_LOSS | REPAIR_FAST | REPAIR_REBUILD } ]
) ]
[ WITH
{
[ ALL_ERRORMSGS ]
[ , EXTENDED_LOGICAL_CHECKS ]
[ , NO_INFOMSGS ]
[ , TABLOCK ]
[ , ESTIMATEONLY ]
[ , { PHYSICAL_ONLY | DATA_PURITY } ]
[ , MAXDOP = number_of_processors ]
}
]
]
There are a few options you can use to perform database consistency checks using DBCC CHECKDB. These options are as follows:
- database_name | database_id | 0: Specifies the name or ID of the database against which you need to run integrity checks. If the ‘database_name’ or ‘id’ is not specified and ‘0’ is specified, the current database will be used by default.
- NOINDEX: This argument performs only logical checks to reduce the total execution time. Also, it does not include non-clustered indexes in the checks.
- REPAIR_ALLOW_DATA_LOSS | REPAIR_FAST | REPAIR_REBUILD: To repair a database, you need to run the DBCC CHECKDB command with any of these repair options:
- REPAIR_ALLOW_DATA_LOSS: Use this repair option as a last resort to repair a SQL database, as it can lead to data loss.
- REPAIR_FAST: This repair option does not perform any repair actions. It helps maintain syntax for backward compatibility.
- REPAIR_REBUILD: The REPAIR_REBUILD option helps repair the database without any data loss. It can be used to repair missing rows in nonclustered indexes and for rebuilding an index.
- ALL_ERRORMSGS: This argument displays all the error messages for each object.
- EXTENDED_LOGICAL_CHECKS: Starting with SQL Server 2016, additional logical checks are not performed on filtered indexes and views. To perform the additional checks, you must use the EXTENDED_LOGICAL_CHECKS option.
- NO_INFOMSGS: DBCC output displays informational messages that are not related to the consistency errors. Running DBCC CHECKDB with NO_INFOMSGS can turn off the informational messages.
- TABLOCK: Uses locks rather than internal database snapshot to perform consistency checks on a database.
- ESTIMATEONLY: Specifies the estimated space required by the ‘tempdb’ database for executing the CHECKDB command.
- PHYSICAL_ONLY: It limits consistency checks on the physical structure of the database page, reducing run-time for DBCC CHECKDB on large databases.
- DATA_PURITY: It helps check a database for invalid or out-of-range column values.
Prerequisites to Run DBCC CHECKDB
You must ensure that your system meets the following prerequisites before you run DBCC CHECKDB to perform consistency checks on a database or repair it.
- SQL Server Management Studio (SSMS) must be installed on your machine.
- The user must have Administrator privileges.
Steps to Use DBCC CHECKDB for Repairing SQL Database
Open SSMS and follow these steps to repair SQL database by using DBCC CHECKDB:
Note: In below-mentioned steps, we will be using database_name as Dbtesting. Make sure to replace DBtesting with the name of your database.
Step 1: Set Database to Emergency Mode
Change the database status to EMERGENCY mode, which provides a read-only access to the administrator. To put the database in EMERGENCY mode, run the following query in SSMS:
ALTER DATABASE [Dbtesting] SET EMERGENCY

Step 2: Check for Corruption Errors
Once the administrator is able to access the database, execute the following DBCC CHECKDB command to analyze corruption errors in the database:
DBCC CHECKDB (Dbtesting)

If DBCC CHECKDB detects any errors in the database, it will recommend appropriate repair options to fix the issue.
Step 3: Set SQL Server Database to SINGLE_USER Mode
Before using the DBCC CHECKDB repair options, put the corrupt database in SINGLE_USER mode to prevent other users from modifying the data during the repair process. To set SQL database mode to SINGLE_USER, follow these methods:
Method 1: Using Graphical User Interface (GUI)
Open SSMS and perform these steps to set the database to SINGLE_USER mode:
- Right-click the database you want to repair, and then click Properties.

- In the Database Properties window, click Options.

- Click the Restrict Access dropdown box under the State tab, select SINGLE_USER option, and then click OK.

Method 2: Using Transact-SQL (T-SQL) Commands
You can also set the database to SINGLE_USER mode, by running the following T-SQL query in SSMS:
ALTER DATABASE Dbtesting SET SINGLE_USER

Step 4: Repair the Database
Once you have changed the database mode to SINGLE_USER, run DBCC CHECKDB with the REPAIR_ALLOW_DATA_LOSS repair option to repair SQL server database.
DBCC CHECKDB (N ’Dbtesting’, REPAIR_ALLOW_DATA_LOSS) WITH ALL_ERRORMSGS, NO_INFOMSGS;
GO

Note: While the REPAIR_ALLOW_DATA_LOSS repair option helps in repairing all reported errors in the SQL server database, it is not the best option for repairing database corruption. This repair option causes data loss. In fact, Microsoft recommends using the REPAIR_ALLOW_DATA_LOSS option as a last resort when you cannot restore a database from the backup. If you do not have a backup and cannot risk losing data, use a specialized MS SQL repair software to repair the database without any loss in database integrity.
Step 5: Set Database Back to MULTI_USER Mode
After successfully repairing the database, set the database to MULTI_USER mode by executing the following command:
ALTER DATABASE Dbtesting SET MULTI_USER

What To Do When DBCC CHECKDB Fails?
Running the DBCC CHECKDB REPAIR_ALLOW_DATA_LOSS command might require deleting some database pages, resulting in loss of data. Also, DBCC CHECKDB commands might fail and return an error when dealing with severely corrupt SQL database files.
In such a case, use a specialized MS SQL repair software, such as Stellar Repair for MS SQL. The software repairs severely corrupt MS SQL database and restores all its components, while maintaining database integrity. The SQL recovery software helps reinstate access to the database with minimal manual efforts and time.
Key Features:
- Repairs both MDF and NDF database files
- Recovers all database components, including tables, keys, indexes, stored procedures, etc.
- Allows recovery of deleted records
- Recovers SQL tables with PAGE and ROW compression
- Supports selective recovery of database objects
- Previews recoverable database objects
To know the complete working process of the software, watch the video
Conclusion
A corrupt database could lead to unnecessary downtime and data loss. To overcome database-related errors, restore the database from the most recent backup. If current database backup does not exist or if the backup itself is corrupt, you can use DBCC CHECKDB ‘REPAIR_ALLOW_DATA_LOSS’ repair option to fix the database. But, this repair option involves risk of data loss. Also, DBCC CHECKDB might fail to fix the issue.
Use Stellar Repair for SQL software to repair MS SQL database and recover all its components with precision, maintaining database structure and integrity of database objects.
About The Author
Priyanka Chauhan
Priyanka is a technology expert working for key technology domains that revolve around Data Recovery and related software’s. She got expertise on related subjects like SQL Database, Access Database, QuickBooks, and Microsoft Excel. Loves to write on different technology and data recovery subjects on regular basis. Technology freak who always found exploring neo-tech subjects, when not writing, research is something that keeps her going in life.