To find the crash files, you can run Console app which will display all the system messages. If any specific application crashed, look in User Reports. If it’s system crash, check in System Reports. Once you have found the crash file, you can Reveal in Finder (usually located in ~/Library/Logs/DiagnosticReports).
If the crash resulted in reboot, in All Messages look line stating its Shutdown Cause and check the following list of Shutdown Causes for further information.
Alternatively you can also check the log files in /var/log (such as system.log), or in real-time by log stream.
You can also check where dumps are generated by monitoring system.log file, e.g.
tail -f /var/log/system.log | grep crash # Hit Control-C to stop.
To scan for the previous crash files, run:
grep crash /var/log/system.log
To generate the actual core dump files (in /cores), see: How to generate core dumps in macOS?
To make sure your macOS is healthy, perform the following tests:
- Use coconutBattery app to check your current battery health.
- Run Apple Hardware Test.
If your system reboots often, you can also try to:
- Make sure you didn’t modify your
boot-args(check bynvram boot-args). - Reset the System Management Controller (SMC).
- Reset NVRAM.

Увы, большинство компьютерных болезней не проходят просто так. Если проблема трудноразрешима, первое, что вы должны сделать, — это определить ее источник. Для этого нет легких путей, но цели можно достичь системным подходом.
Благодаря многолетнему опыту было обнаружено, что оптимальный способ — задать ряд вопросов, которые помогут получить нужную информацию и сузить список возможных причин:
Появилось ли сообщение об ошибке?
Это раздражает, но компьютерные сообщения об ошибках часто оказываются невразумительными и малополезными для того, чтобы можно было решить вопрос сразу. Однако коды ошибок и текст сообщений могут указать направление, в котором надо двигаться: либо это поиск в онлайновых базах данных, либо передача информации специалисту технической поддержки. Поэтому всегда необходимо записывать весь текст сообщения об ошибке, когда оно появляется. Если приложение предлагает отправить разработавшей его компании сообщение об ошибке, обязательно прочтите его (даже если вы не собираетесь его отправлять).
Нет ли сообщений об ошибках в «Консоли»?
Если ошибка произошла в фоновом режиме, предупреждающее сообщение не появится. Однако весьма вероятно, что Mac сделал запись об ошибке в сообщении «Консоли» (Console).
Чтобы проверить это, откройте Finder и выберите «Программы» (Applications) => «Утилиты» (Utilities) => «Консоль» (Console). Следует проверить также журнал «Консоли» (выберите «Файл» (File) О «Открыть журнал консоли» (Open Console Log)) и системный журнал (выберите «Файл» (File) => «Открыть» (Open System Log). Иногда трудно понять сразу, на что именно надо обратить внимание в окне «Консоли».
Для начала поищите в колонке «Отправитель» (Sender) название программы, которая, по вашим предположениям, может быть источником проблемы. Обращайте внимание только на те сообщения, которые записаны примерно в то же время, когда произошла неполадка. И хотя любое сообщение из тех, которые вы увидите, скорее всего, окажется слишком сложным, чтобы вы могли его расшифровать, оно будет понятно специалисту техподдержки. Можно также искать решение проблемы в Google.
Изменяли ли вы недавно какие-либо настройки программ?
Если да, попробуйте вернуть старые настройки и посмотрите, не приведет ли это к исправлению неполадки. Если попытка окажется неудачной, проверьте сайт разработчика: нет ли там исправлений для этой программы. Можно также попробовать удалить программу и установить ее вновь.
Устанавливали ли вы недавно новую программу?
Если вы подозреваете, что нестабильность системы вызвана новой программой, перезагрузите Mac и попробуйте поработать, не пользуясь ею. (Если программа применяет объекты, которые автоматически запускаются при загрузке компьютера, убедитесь, что вы деактивировали их) Если все наладилось, то, вероятно, причиной сбоя была эта новая программа.
Попробуйте пользоваться ею, когда ни одна другая программа не запущена. Необходимо также посмотреть в файле README этой программы (если он есть) описание стандартных проблем и способов их устранения. Хорошо бы проверить, совместима ли версия программы с версией OS X, установленной на компьютере. (Например, некоторые более старые версии программ плохо работают в новых версиях Mac OS X, таких как Lion или Snow Leopard.)
Далее, можно попробовать переустановить программу. Аналогично, если вы недавно устанавливали на какую-то программу обновление, попробуйте это обновление удалить.
Устанавливали ли вы недавно новое устройство?
Если недавно было установлено новое устройство или обновлен драйвер уже имеющегося устройства, это может быть причиной проблемы. Попробуйте прибегнуть к обычным методам поиска неполадок оборудования.
Устанавливали ли вы недавно какие-либо обновления?
Иногда обновления, предназначенные для устранения одной неисправности, вызывают появление других. Отменить установку обновления программы невозможно, поэтому единственным выходом является восстановление компьютера Mac и возврат к предыдущему состоянию.
Изменяли ли вы недавно какие-либо из системных настроек?
Если трудности начались после того, как вы изменили конфигурацию компьютера, попробуйте вернуть все в первоначальное состояние. Даже такие кажущиеся невинными действия, как включение экранной заставки, могут вызвать неполадки в работе, поэтому не отбрасывайте какие-либо предположения с ходу.
|
← Основные шаги по устранению неполадок программ в Mac OS |
Общие методы устранения неисправностей в работе программ → |
|---|
Новые статьи:
- —
- —
- —
- —
- —
Предыдущие статьи:
- —
- —
- —
- —
- —

Ваш Mac ведет системные журналы, которые могут помочь диагностировать и устранять проблемы с macOS и установленными вами приложениями. Эти журналы хранятся в виде текстовых файлов журналов на системном диске вашего Mac, и в macOS также есть приложение для их просмотра.
Просмотр системных журналов в консольном приложении
Чтобы просмотреть системные журналы Mac, запустите приложение Console. Вы можете запустить его с поиском Spotlight, нажав Command + Пробел, набрав «Консоль» и затем нажав Enter. Вы также можете найти его в Finder> Applications> Utilities> Console.
Консольное приложение, также известное как Console.app, похоже на
Средство просмотра событий Windows
для Mac.

По умолчанию вы увидите список сообщений консоли с текущего Mac. Вы можете нажать «Ошибки и сбои» на панели инструментов, чтобы видеть только сообщения об ошибках, если хотите. Вы также можете использовать поле поиска для поиска сообщения об ошибке, которое вы хотите увидеть.

Дополнительные журналы доступны в разделе «Отчеты». Чтобы просмотреть журналы сбоев и зависаний приложений, щелкните «Системные отчеты» для системных приложений или «Пользовательские отчеты» для пользовательских приложений. Вы увидите множество журналов с расширениями файлов, такими как .crash, .diag и .spin. Щелкните их, чтобы просмотреть на панели «Информация».
Если вам нужна дополнительная информация о причинах сбоя приложения в вашей системе, вы можете найти ее здесь. Эта информация может потребоваться разработчику приложения, чтобы исправить сбой, который происходит и на вашем Mac.

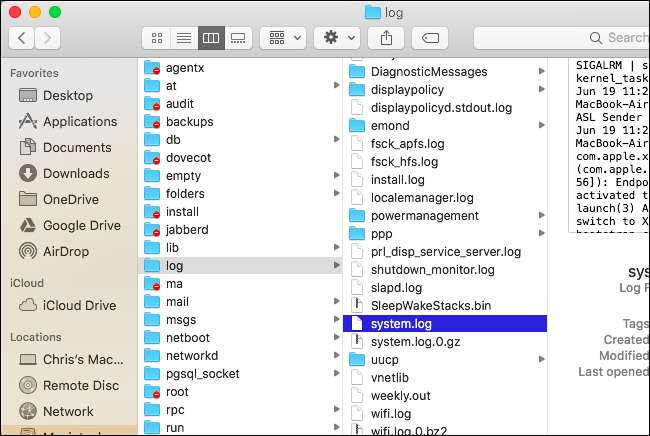
Чтобы просмотреть файл системного журнала, щелкните «system.log». Чтобы просмотреть различные журналы приложений, просмотрите другие папки здесь. «~ Library / Logs» — это папка журнала приложений вашей текущей учетной записи Mac, «/ Library / Logs» — это общесистемная папка журнала приложений, а «/ var / log» обычно содержит журналы для низкоуровневых системных служб. . Панель поиска работает и для фильтрации этих файлов журналов.
Чтобы просмотреть журналы другой учетной записи пользователя Mac, расположенные в разделах «Отчеты пользователей» или «~ / Библиотека / Журналы», вам необходимо войти в систему как этот пользователь и затем открыть приложение консоли.

Вы можете скопировать данные из системных журналов в текстовый файл, если вам нужно экспортировать их, чтобы поделиться ими с кем-то еще для устранения неполадок. Сначала нажмите «Правка»> «Выбрать все», чтобы выбрать все сообщения на текущем экране. Затем нажмите Правка> Копировать, чтобы скопировать их в буфер обмена.
Затем откройте приложение TextEdit, например, нажав Command + Пробел, набрав «TextEdit» и нажав «Enter». Создайте новый документ и затем выберите «Правка»> «Вставить», чтобы вставить сообщения в текстовый файл. Щелкните Файл> Сохранить, чтобы впоследствии сохранить текстовый файл.

Найти файлы журнала на диске
Эти журналы представляют собой текстовые файлы, которые вы также можете найти на локальном диске вашего Mac. Это означает, что вы можете просматривать их в Finder или через Терминал, открывать их в других приложениях, использовать с ними инструменты командной строки и создавать резервные копии файлов.
Чтобы найти эти файлы журнала, ищите в следующих местах:
-
Папка системного журнала
: / var / журнал -
Системный журнал
: /вар/лог/систем.лог -
Данные Mac Analytics
: /вар/лог/ДиагностикМессагес -
Журналы системных приложений
: / Библиотека / Журналы -
Системные отчеты
: / Библиотека / Журналы / DiagnosticReports -
Журналы приложений пользователей
: ~ / Library / Logs (другими словами, / Users / NAME / Library / Logs) -
Пользовательские отчеты
: ~ / Library / Logs / DiagnosticReports (другими словами, / Users / NAME / Library / Logs / DiagnosticReports)
Если вам когда-нибудь понадобится вспомнить, где найти одну из этих папок, вы можете открыть приложение Console (в /Applications/Utilities/Console.app), Ctrl + щелчок или щелчок правой кнопкой мыши по одному из журналов или папок на боковой панели и выберите «Показать в Finder», чтобы просмотреть его местоположение на диске.

How To Clear System Storage On Mac
Console On Mac
Login With An Active Directory User To A Mac OS X System
How To Access ICloud From A Mac
How To Use Activity Monitor On Your Mac
How To Find Your Logs Mac OS X
Find Saved Passwords In Safari On A Mac
How To Delete ‘Other’ Files From Any Mac
How To Access Apple ICloud On Mac Or PC
As an IT admin, you’ve almost certainly had to check some form of log when investigating a problem. Logs tell the story of what’s happening on a system, so they can be enormously helpful in both troubleshooting issues and in learning why the system is behaving the way that it is.
In this guide, we’ll cover some of the basics of Apple’s unified logging system, go over how to read the logs using the log command, and provide some practical examples of how to filter log messages to find the ones that are most important to you.
What is Unified Logging?
When unified logging was first introduced at WWDC 2016, it was a pretty radical and bold change. Until then, most—if not all—logs on Apple platforms were recorded using standard Unix logging systems, usually writing to flat files on disk.
But as Apple’s platforms became more and more complex over the years, the volume of logs they generated increased as well. When Apple introduced unified logging, it dubbed it “logging for the future.” It set out to create a common logging system for all of its platforms with the following goals:
- Provide a single efficient logging mechanism for both user and kernel mode.
- Maximize information collection with minimum observer effect. (In other words, collect as much data as possible while compromising performance as little as possible. Among other things, that meant compressing log data and providing robust ways to manage log message lifecycles.)
- Keep as much logging on as much of the time as possible.
- Design privacy into the system.
Many admins might still think of looking for log messages in the common Unix flat files in /var/log/. And it’s true, there are still some flat log files written there; for example, /var/log/install.log contains useful information about the macOS installation process and is easy to parse with command-line tools.
But such flat log files often don’t provide the whole story, and messages logged to them are usually recorded in the unified logging system as well. For a complete picture of what’s happening on a system, you should use the log command to explore the unified log.
(While we won’t cover it in this guide specifically, it’s worth mentioning that the Console application (in the /Applications/Utilities folder) can also be useful for examining logs if you prefer a graphical interface; however, the log command is much more flexible and useful in practice. Apple Configurator 2 from the Mac App Store is also useful for streaming the live system log of a connected iOS device, which can be useful for troubleshooting issues as they happen on iOS; Xcode can also be used for that purpose.)
The log Command
The log command is built into macOS at /usr/bin/log. For full details on how to use it, type man log in Terminal to read the man(ual) page for the command. (Press q to exit.) In this section, we’ll cover the basics to get you started.
Let’s say you want to see all of the “default” logs on your system for the last minute (excluding extra informational or debug-level messages). To do that, you can run the command:
sudo log show --last 1m
You’ll likely be surprised at the sheer number of messages that appear on your screen just from the last minute. That’s because of Apple’s stated goal of doing as much logging as much of the time as possible. As we’ll explain shortly, you can filter messages, but for now let’s look at some of the common options for the log command.
In the above example, we used log show. What this does is straightforward: it’s simply showing the logs on the system. We time-limited the list by using --last 1m (with m standing for «minute»). You can pass different time modifiers into the --last option: --last 1h (the last hour) or --last 1d (the last day), for example. With the --start and --end options plus specific timestamps—in the formats YYYY-MM-DD, YYYY-MM-DD HH:MM:SS, or YYYY-MM-DD HH:MM:SSZZZZZ—you can very narrowly filter the list of messages based on timestamp.
The log show command shows the logs of the Mac on which you’re running it. You can also combine show with the --archive option for passing in the path to a system log archive generated using the command log collect. The collect option is useful for collecting logs from any system—your own or another—for analysis later; they can be stored, moved around, and analyzed at any point in time.
The sysdiagnose tool, which runs automatically when you file feedback with Apple, even automatically generates a system log archive for Apple engineers to analyze (named system_logs.logarchive in the root of the sysdiagnose folder). You can view more details on the collect option in the man page for log.
To see how these building blocks can fit together, consider this example for collecting all of the default level logs on your system for the last 20 minutes:
sudo log collect --output ~/Desktop/SystemLogs.logarchive --last 20m
This will place a log archive file on your desktop named SystemLogs.logarchive. To view the logs from the archive, you could run:
sudo log show --archive ~/Desktop/SystemLogs.logarchive
While log show is useful for looking back in time, log stream displays logs in real-time. This can be useful for observing logs while an issue is happening or while you’re performing an action on the system and you simply want to watch and learn what’s happening.
For example, to see all of the default logs on your system as they’re happening, use the command:
sudo log stream(To end the stream, press Ctrl+C.) Streaming all logs in real-time is not very useful in practice, due to the sheer volume of messages that are generated. Paring down the logs, either when looking back in time with log show (including with archives) or in real-time using log stream can be accomplished using predicate filtering.
Predicate Filtering
Apple’s goal to have as much logging on as much of the time as possible is great for admins, because more logging often means more insight that can be used to solve problems or to learn. But it can also make it difficult to find the signal in all the noise. This is where predicate filtering becomes enormously useful.
Apple has a full guide to predicate filtering on its website, and the topic is covered in the man page for the log command as well. But here’s an example to help get you started:
sudo log stream --debug --predicate 'subsystem=="com.apple.sharing" and category=="AirDrop"'
First, note that we’re streaming the logs (log stream) and that we’ve also passed in the --debug option to include more detailed debug logging in the output.
Next, note the --predicate option. This tells the log command that we want to filter the log messages; what we include between the next set of single quotes becomes the filter. In this example, we’re looking for logs generated by the com.apple.sharing subsystem that also match the AirDrop category. This relatively short predicate filter is a great one to keep in your toolbox for looking at AirDrop logs.
Apple defines subsystems as “a major functional area” of an app—or, in this case, the operating system. A category is defined as something that “segregates specific areas within a subsystem”. When you’re first starting out filtering logs, it can be difficult to know what criteria to specify in a predicate filter. For example, how did we know that AirDrop uses that particular subsystem and category?
Software vendors can help; they can provide you with the appropriate filters to look for logs generated by their product(s). For example, the Kandji Agent on macOS generates its logs with a subsystem of io.kandji.KandjiAgent and various categories.
One other way to identify common subsystems and categories is simply to look at the output from log stream and log show. Consider a log entry like this:
mdmclient: [com.apple.ManagedClient:OSUpdate] Mapped status SU: [phase: downloading; progress: 0] to MDM: [ProductKey: MSU_UPDATE_21E258_patch_12.3.1; Status: Downloading; IsDownloaded: 0; DownloadPercentComplete: 0]
In this case, com.apple.ManagedClient is the subsystem, OSUpdate is the category, and mdmclient is the process. (Filtering by process is another useful option in predicate filtering.)
The actual log message (eventMessage) is really useful, too. Based on the example above, if you wanted to filter for just logs that came from the mdmclient process, were logged with the com.apple.ManagedClient subsystem with the OSUpdate category, and contained the string MSU_UPDATE_21E258_patch_12.3.1 in the messages, you could use the following filter:
process=="mdmclient" and subsystem=="com.apple.ManagedClient" and category=="OSUpdate" and eventMessage contains "MSU_UPDATE_21E258_patch_12.3.1"
Using this predicate would output logs showing the status of a software update to macOS 12.3.1 initiated by an MDM solution. Note that we used contains; other options for string comparison include: beginswith, endswith, and matches, among others. String comparisons with predicate filters are case and accent (diacritic) sensitive by default.
A few useful processes, subsystems, and categories for Apple admins are listed below. This is by no means a fully inclusive list; note also that Apple may at its discretion change these at any time.
| Description | Filter parameters |
| AirDrop | subsystem: com.apple.sharingcategory: AirDrop |
| Apple Push Notification Service (APNs) | process: apsdsubsystem: com.apple.apsd |
| Apple Watch unlock | subsystem: com.apple.sharingcategory: AutoUnlock |
| Content caching | subsystem: com.apple.AssetCache |
| Gatekeeper | process: syspolicydsubsystem: com.apple.syspolicy.exec |
| macOS Installer and Software Update | process: softwareupdatedsubsystems: com.apple.mac.install, com.apple.SoftwareUpdate, com.apple.SoftwareUpdateMacController, com.apple.mobileassetd |
| MDM | process: mdmclientsubsystem: com.apple.ManagedClient |
| Mobile Activation (Activation Lock, DEP Enrollment, etc.) | process: mobileactivationdsubsystem: com.apple.MobileActivation |
| Networking | subsystem: com.apple.networkcategories: connection, boringssl |
| OCSP (Certificate validity) | subsystem: com.apple.securitydcategory: ocsp |
| Open Directory | process: opendirectorydsubsystems: com.apple.opendirectoryd, com.apple.AccountPolicy |
| User login | process: loginwindowsubsystem: com.apple.login |
| XProtect | subsystem: com.apple.xprotect |
Private Data
When reviewing logs, you may see entries that contain the string <private>, sometimes accompanied by a unique identifier (or UUID). When you see this, something on the system has tried to log data that could potentially identify a user, the network, or another piece of dynamic information that could be considered private in some way. By default, these types of entries are masked by the unified logging system; this ties back to Apple’s goal of making privacy a core pillar of unified logging.
Take this example from Open Directory. This log indicates a successful authentication event, such as when successfully unlocking a preference pane in System Preferences:
opendirectoryd: (PlistFile) [com.apple.opendirectoryd:auth] Authentication succeeded for <private> (1B0820C7-05D9-4DEA-BF67-370FAB16E41C): ODNoError
By default, the user name of the user is masked as <private>. Sometimes when troubleshooting, however, it can be useful to expose data typically marked as private. You can do this with a configuration profile, optionally delivered by an MDM solution, either for specific subsystems or for the system as a whole. (See the Enable_Private_Data profile examples on the Kandji support GitHub repository.)
Here is the same log entry, but with private data logging enabled for the com.apple.opendirectoryd subsystem, using the Open Directory private data profile:
opendirectoryd: (PlistFile) [com.apple.opendirectoryd:auth] Authentication succeeded for ladmin (1B0820C7-05D9-4DEA-BF67-370FAB16E41C): ODNoError
Note that this time the username ladmin was logged.
We recommend enabling private data logging only for specific subsystems, and only when absolutely necessary. To resume hiding private data, simply remove the configuration profile.
With the log command and predicate filtering, the possibilities for viewing, streaming, collecting, and filtering your logs to find the information you need are vast.
The commands above are just the start of what the log command can do to tell the story of what’s happening on a system. Once you spend some time viewing and reviewing logs, you can start to identify common “rhythms” or patterns, which then make it easier to spot anomalies. The more you learn about them, the more useful logs become for both troubleshooting and for discovering how and why things happen on a system—and that makes the log command an essential tool for any Apple admin.
About Kandji
The Kandji team is constantly working on solutions to help you deliver great experiences to your users. With powerful and time-saving features such as zero-touch deployment, one-click compliance templates, and plenty more, Kandji has everything you need to manage your Apple fleet in the modern workplace.

See Kandji in Action
Experience Apple device management and security that actually gives you back your time.
Request Access
Contact Us
See Kandji in Action
Experience Apple device management and security that actually gives you back your time.
Start Free Trial
Contact Us