![]()
Загрузить PDF
![]()
Загрузить PDF
Данная статья объясняет, как создать фейковое сообщение об ошибке (VBScript) в Windows, используя только Блокнот.
-

1
Запустите Блокнот (NotePad). Нажмите сочетание клавиш [WIN-R] (Windows key + R) и введите «notepad.exe».
-
2
Скопируйте и вставьте следующий код: x=msgbox(«Здесь ваше сообщение», 4+16, «Здесь ваше название»). Другой код для ответов «да» или «нет» таков: onclick=msgbox («Здесь ваше сообщение»,20,»Здесь ваше название»).
-
3
Поменяйте надписи «Здесь ваше сообщение» и «Здесь ваше название» на текст по своему усмотрению. Кроме того, измените «4+16» на другую комбинацию, как показано в разделе «Советы» (это изменит тип сообщения об ошибке и кнопки).
-
4
Щелкните по вкладке «Файл» (File) и кликните «Сохранить» (Save). Укажите название вашего сообщения об ошибке и добавьте в конце расширение «.vbs».
-
5
Откройте VBS файл, и появится фейковое сообщение об ошибке!
Реклама


Советы
-
-
- 0 – только кнопка «OK»
- Кнопки (Первое число):
-
Реклама
Об этой статье
Эту страницу просматривали 62 328 раз.
Была ли эта статья полезной?
![]()
Download Article
![]()
Download Article
Do you want to create a custom Windows error message? Whether you’re an application developer or someone who wants to prank their coworker, knowing how to create a custom error message is an essential ability. To learn how to create a custom Windows error message, follow this guide.
-
1
Open the Notepad app.
- Press the ⊞ Win+R keys simultaneously.
- Type notepad into the Run dialog.
- Hit ↵ Enter or click OK.
-
2
Copy and paste the following code into Notepad:
- x=msgbox(«Your Message Here», Button+Icon, «Your Title Here»)
Advertisement
-
3
Customize the button(s) of your error message. Replace Button in the code you pasted into Notepad with one of the following:
- 0 — OK
- 1 — OK and Cancel
- 2 — Abort, Retry and Ignore
- 3 — Yes, No and Cancel
- 4 — Yes and No
- 5 — Retry and Cancel
-
4
Customize the icon of your error message. Replace Icon in the code that you pasted into Notepad with one of the following:
- 0 = No Icon
- 16 = Critical Icon (a.k.a. «X» icon)
- 32 = Question Icon (a.k.a. «?» icon)
- 48 = Warning Icon (a.k.a. «!» icon)
- 64 = Info Icon (a.k.a. «i» icon)
-
5
Customize the title of your error message. Replace Your Title Here in the code you pasted into Notepad with what you want the title of the error message to be.
-
6
Customize the contents of your error message. Replace Your Message Here in the code you pasted into Notepad with what you want the error message to say.
-
7
Open the Save As window. Press Ctrl+S on your keyboard.
-
8
Expand the combo box next to Save as type and select All Files.
-
9
Type a name for your file followed by a period and vbs.
-
10
Choose a location to save the file to.
-
11
Save the file. Click Save.
-
12
Display the error message. Double-click the file that was created.


Advertisement
Create a sequence of error messages. Messages will display one at a time, and closing a message will display the following one.
-
1
Open the Notepad app.
- Press the ⊞ Win+R keys simultaneously.
- Type notepad into the Run dialog.
- Hit ↵ Enter or click OK.
-
2
Copy and paste the following code into Notepad:
- x=msgbox(«Your Message Here», Button+Icon, «Your Title Here»)
-
3
Customize the button(s) of your error message. Replace Button in the code you pasted into Notepad with one of the following:
- 0 — OK
- 1 — OK and Cancel
- 2 — Abort, Retry and Ignore
- 3 — Yes, No and Cancel
- 4 — Yes and No
- 5 — Retry and Cancel
-
4
Customize the icon of your error message. Replace Icon in the code that you pasted into Notepad with one of the following:
- 0 — No Icon
- 16 — Critical Icon (a.k.a. «X» icon)
- 32 — Question Icon (a.k.a. «?» icon)
- 48 — Warning Icon (a.k.a. «!» icon)
- 64 — Info Icon (a.k.a. «i» icon)
-
5
Customize the title of your error message. Replace Your Title Here in the code you pasted into Notepad with what you want the title of the error message to be.
-
6
Customize the contents of your error message. Replace Your Message Here in the code you pasted into Notepad with what you want the error message to say.
-
7
Switch to a subsequent line position.
-
8
Create another error message (if desired). Repeat these steps, starting from Step 3.
- This error message will display after the previously created one has been closed.
-
9
Open the Save As window. Press Ctrl+S on your keyboard.
-
10
Expand the combo box next to Save as type and select All Files.
-
11
Type a name for your file followed by a period and vbs.
-
12
Choose a location to save the file to.
-
13
Save the file. Click Save.
-
14
Display the error message. Double-click the file that was created.


Advertisement
Add New Question
-
Question
Is there a way to make a custom icon for the error?

No, you can try using different numbers, but most likely a real error will pop up.
-
Question
How do I make it do actions to my computer?
You can’t do that. It’s a fake error, meaning it won’t do anything to your computer.
-
Question
How do I create an input text box in the message?
Do this: InputVariableName=InputBox(«Prompt»,»Title»,»Value which is optional»)
See more answers
Ask a Question
200 characters left
Include your email address to get a message when this question is answered.
Submit
Advertisement
Video
Thanks for submitting a tip for review!
About This Article
Thanks to all authors for creating a page that has been read 572,331 times.
Did this article help you?
Do you want to create an error message on Windows ?
Whether you are a developer or want to prank a friend (or a family member), Knowing how to create an error message is essential.
There are several programs and languages for creating error messages under Windows and the simplest among them is VBScript.
Follow this tutorial to create your own custom error messages.
Create error message Windows
Here is what the result of this tutorial looks like, it is also possible to display multiple error messages using a single file .vbs
1. Create a «.vbs» file
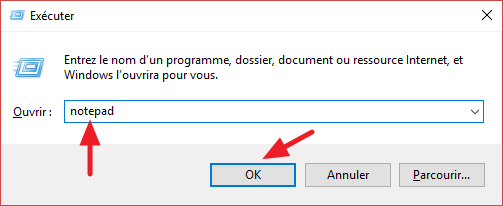
Open Execute (![]() Win+R) then type
Win+R) then type notepad to open the Notepad editor.
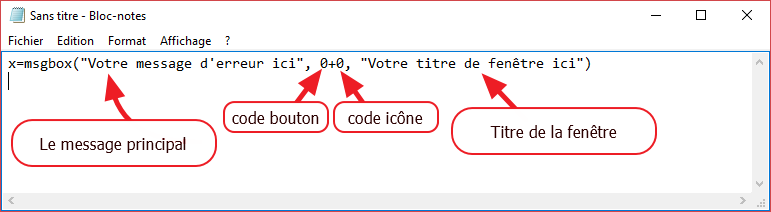
Put the following code on Notepad:
x=msgbox("Votre message d'erreur ici", CODE_BOUTON+CODE_ICONE, "Votre titre de fenêtre ici")
As you can see in the image below, the code is simple to understand, it consists of four elements: Main Message, Button Code + Icon Code and Window Title
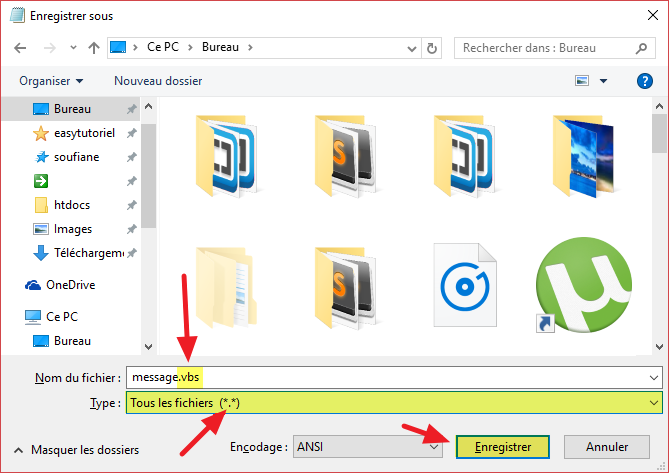
type Ctrl+S or go to «File«>»Save«then save the file under the name of message.vbs.
To launch the error message, simply double-click and you’re done!
Now let’s move on to personalizing your message.
2. Customize the error message
Customize the window buttons:
In order to change the appearance or type of the button appearing on the error message window replace CODE_BOUTON in the code above by the code corresponding to the button:
- 0 => OK
- 1 => OK et Annuler
- 2 => Abandonner, Réessayer et Ignorer
- 3 => Oui, Non etAnnuler
- 4 => Oui et Non
- 5 => Réessayer et Annuler
Customize the error icon:
To change the error icon displayed on the left of the window you can try one of these codes:
- 0 => Without icon
- 16 => critic error icon (or the symbol «X»)
- 32 => Question icon (or the symbol «?»)
- 48 => Alert or attention icon (or the «!» icon)
- 64 => Information icon (or the symbol «i» icon)
Skip the line in the message:
To skip the line, just add the code vbCrLf with the symbol & to link the two strings.
Here is an example of using vbCrLf:
x=msgbox("Premiere ligne" & vbCrLf & "Deuxieme ligne", 1+64, "Titre")
3. Add multiple messages
Maintenance as you know how to create a personalized message on Windows, you only have to add several lines if you want to display several of them.
Each message will be displayed in the order of the lines, when you click on one of the buttons in the window.
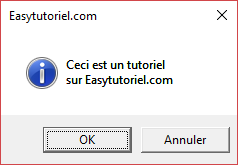
Here is a small example:
x=msgbox("Ceci est un tutoriel" & vbCrLf & "sur Easytutoriel.com", 1+64, "Easytutoriel.com")
x=msgbox("Créer ses propres messages d'erreur !", 3+16, "Attention !")
Here is the result :
4. Process responses with If
You can process responses using If and End If like this (thanks to the comment on this article):
x = MsgBox("Viendrez-vous à la fête de demain ?",4+32+0,"Fête")

If x = 6 Then
y = MsgBox("Super ! Dans ce cas téléphonez-moi pour m'avertir de votre présence !")
End If

If x = 7 Then
z = MsgBox("Tant pis...")
End If
Et voila 
Thank you for reading dear reader and if you have any questions I will always be here to help. 
To the next tutorial!
Share this article :
Introduction: How to Make Fake Windows Error
1st April is near so I though to publish this. I used to make these when I was about 10. It wont use any softwares and it doesn’t need any programming skills. So, let’s get started
Step 1: Making It
To get started, open notepad and copy in the following code:
x=msgbox(«message»,4+16,»title»)
You can use your own message and title of the error
After copying this, save it as a ‘vbs’ file
When you open the vbs file, you will get an error message.
Step 2: Modifying the Error
There are many type of errors.
Some have only ‘OK’ button, some have ‘Yes’ and ‘No’ buttons
You can make any type of error you want.
To change the type of error, you can modify the numbers of the code(which were ‘4+16’ in the last step)
Here is a list of the feature of the first number (no. before the ‘+’ sign):
0- ok button only
1-ok and cancel
2-abort retry and ignore
3- yes,no and cancel
4- yes and no
5- retry and cancel
Here is a list of the feature of the second number (no. after the ‘+’ sign):
16-critical message
32-question message
48-warning message
64-info message
Step 3: Examples
Here are some examples
Step 4: Masking the Error/Preparing the Error for a Prank
To mask the error as an app or a game, simply copy the vbs file some where (except the desktop) and make a shortcut of the file on the desktop. Then change the name to…….let’s say FIFA 10 and use a similar icon. When someone opens the game, they will get an error saying that they are a big douchebag :-p
Vote if you liked it 
![]()
Для семьи и детей
Японские товары, косметика из Японии, подгузники Мериес
» 2015 » Июнь » 13 » Как создать фейковое сообщение об ошибке в Windows
Как создать фейковое сообщение об ошибке в WindowsДанная статья объясняет, как создать фейковое сообщение об ошибке (VBScript) в Windows, используя только Блокнот. Шаги
Советы
|
Категория: Вопросы и ответы | | Рейтинг: 0.0/0 |
 1 Запустите Блокнот (NotePad). Нажмите сочетание клавиш [WIN-R] (Windows key + R) и введите «notepad.exe».
 2 Скопируйте и вставьте следующий код: x=msgbox(«Здесь ваше сообщение», 4+16, «Здесь ваше название»). Другой код для ответов «да» или «нет» таков: onclick=msgbox («Здесь ваше сообщение»,20,»Здесь ваше название»).
 3 Поменяйте надписи «Здесь ваше сообщение» и «Здесь ваше название» на текст по своему усмотрению. Кроме того, измените «4+16» на другую комбинацию, как показано в разделе «Советы» (это изменит тип сообщения об ошибке и кнопки).
 5 Откройте VBS файл, и появится фейковое сообщение об ошибке!