If you have been getting the “Internal Exception java.io.ioexception” error while trying to connect to a Minecraft server, you have come to the right place. In this article, we have gathered and listed all the solutions and fixes that you can implement to completely fix this issue. Therefore, make sure to follow the steps listed below carefully and stop only when a solution works for you.
Before You Start:
The initial troubleshooting steps towards resolving this error include simply restarting your computer and Minecraft both. Close the game and then shut down your PC as well as you do normally. After a while “Restart” your machine and then again launch the game. Hopefully, this simple “Restart” trick will get you out of the problem easily. If you do not succeed in it, then try implementing some advanced solutions listed below.
How to fix internal exception java.io.ioexception operation timed out error:
Solution 1: Power Cycle Your Router
Simply unplug the “Power Cable” from your router and let it turn OFF completely. Leave it unplugged for a few minutes and then plug it back in and “Restart” your router. This will potentially fix any internet issues, now start playing the game again and see if the error occurs again or not.
Solution 2: Enable Java Native Sandbox
Enabling the Java Native Sandbox will let you start all of the Java applications including Minecraft in a restricted environment which will bypass any sort of issues you might be encountering prior to enabling this option. In order to enable it, proceed with the below-mentioned steps:
- Press the “Window + R” keys together to open up the Run prompt, here type “Control Panel” in the dialog box, and hit the “Enter” button.
Open Control panel - In the Control Panel window proceed to click on the “Java” option.
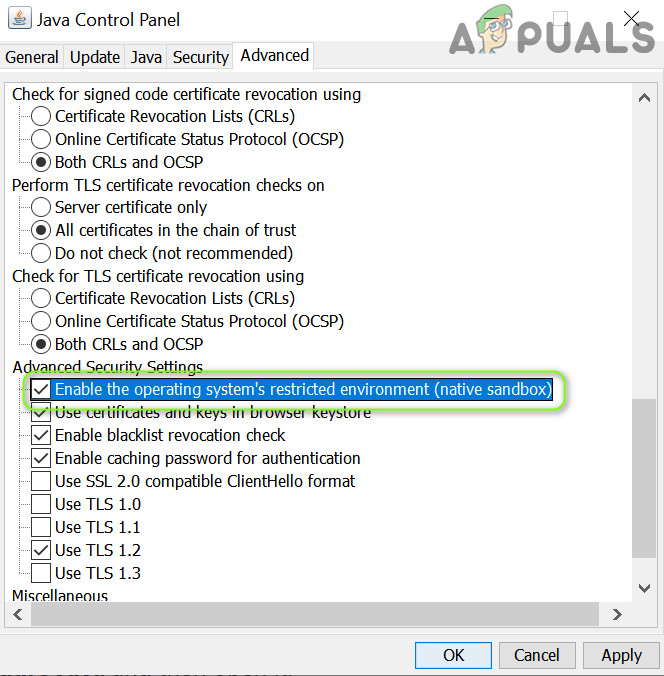
- The Java Control Panel will appear up now, here proceed to the “Advanced” tab from the top and scroll down to locate the option of “Advanced Security Settings” and click on it.
- Now locate the option of “Enable the Operating Systems Restricted Environment (Native Sandbox)” and make sure it is check marked. Next, hit the “Apply” button and click “OK”.
Enable the system’s restricted environment - Finally, “Restart” your computer to let the changes have their effect and then see if the internal exception java.io.ioexception Minecraft realms error got resolved.
Solution 3: Switch DNS To Google DNS
- In the search bar near the Start menu type in “Control Panel” and hit the “Enter” key.
Open Control panel - In the pop-up window click on “Network & Internet > Network & Sharing Center > Change Adapter Settings” options respectively.
- In the following window right-click on the specific network connection you want to configure for “Google Public DNS” and select “Properties” from the context menu.
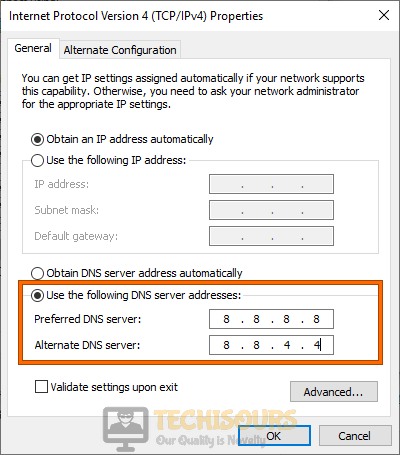
- After moving on to the next window, double-click on “Internet Protocol Version 4 (TCP/IPv4)” and next select the option of “Use the Following DNS Server Addresses”.
Use the following DNS server addresses - Now enter “8.8.8.8” and “8.8.4.4” in the Preferred DNS Server and Alternate DNS Server boxes respectively.
- After entering the above Google Public DNS Addresses (IPv4) “Restart” your PC and see if the error got removed.
Solution 4: Update the Minecraft Launcher
This error might occur if the Minecraft launcher of your system is outdated which in turn can cause several compatibility issues between the server and the launcher. In order to remove this you need to update the Minecraft launcher to the latest version available, to do so follow the steps below:
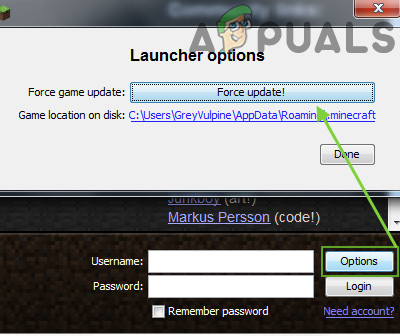
- On your system open Minecraft Launcher and in front of the Username click on “Options”.
- Then click on the “Force Update” button and select “Done”.
Clicking on Force Update Option - Once updated, relaunch the Minecraft launcher and see if the internal exception java.io.ioexception error persists or not.
Solution 5: Flush the DNS Cache
If the DNS cache of your system gets corrupted it may also lead to the occurrence of this error, in such a case you need to try clearing out the DNS cache of your system. Follow the steps below in order to do so
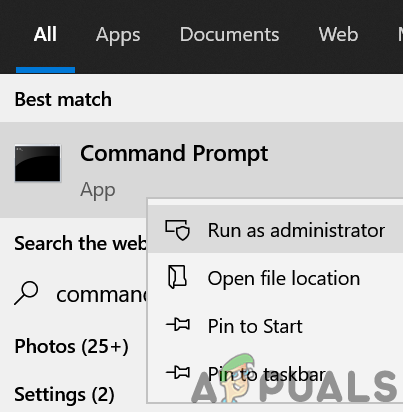
- In the search bar near the Start menu type in “Command Prompt” and from the pop-up results right-click on it to select the “Run As Administrator” option.
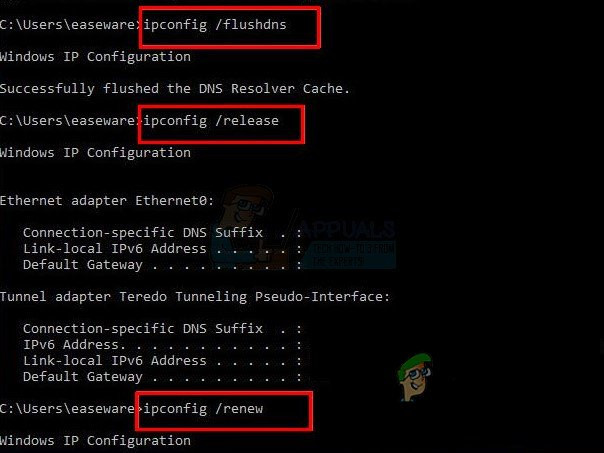
Run command Prompt - In the Command Prompt window execute the following commands one by one:
ipconfig / flushdns

ipconfig / release

ipconfig / renew
- Once done close the Command Prompt window and see if the error exists or not.
Solution 6: Disable Server Resource Pack
Although using the resource pack the player can customize a lot many settings including music, textures, models, etc but it can also cause hindrance in the client-server communication thus giving rise to this error. Therefore, try disabling this option and then see if it resolves the problem. Proceed as below:
- Open your PC and launch “Minecraft Launcher”.
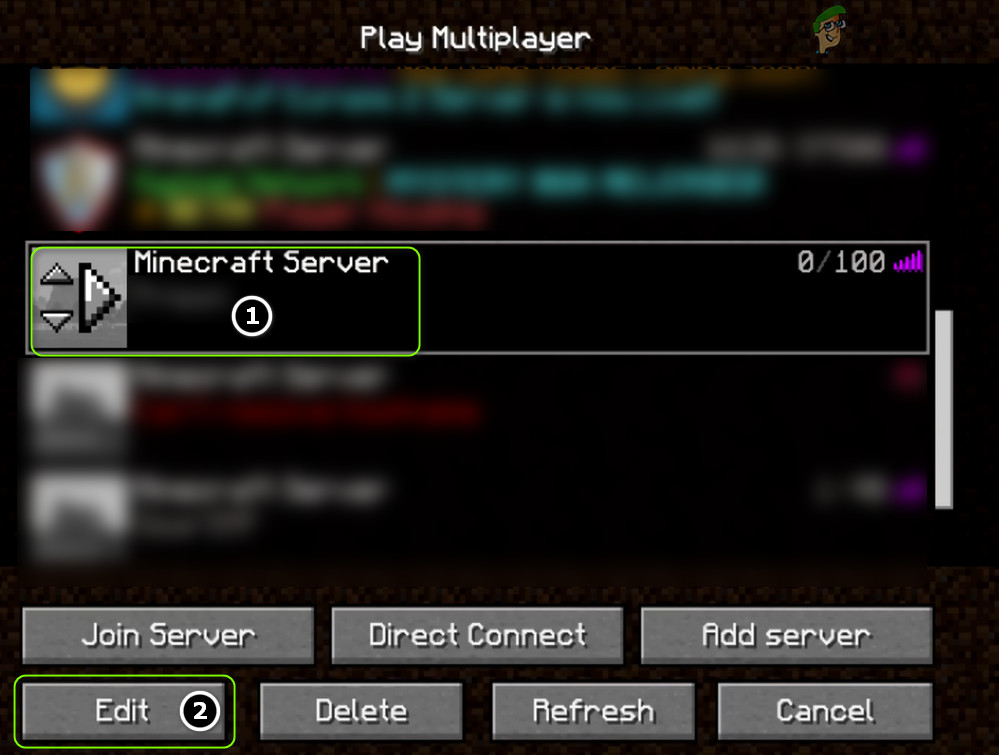
- Then select “MultiPlayer”, next click on the “Problematic Server” and after that hit the “Edit” button.
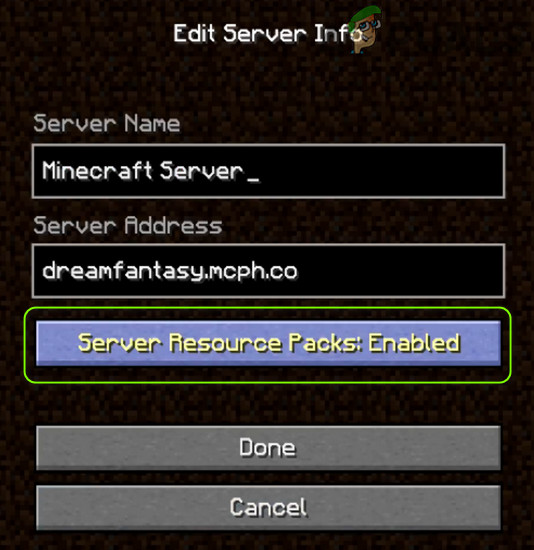
- Further click on the “Server Resource Packs” option in order to set them to “Disabled”. Then click on “Done” and check if the error gets rectified now.
Choose Server Resource Packs Option
Solution 7: Remove Any Conflicting Application
If your PC encounters any such application which is causing hindrance to the proper functioning of Minecraft this error may also appear. In such a case try uninstalling the conflicting app from your system. Initially, you may Clean Boot your PC in order to check out the problematic application and then proceed to uninstall it. In this particular case many users reported that Hamachi VPN was the one out there causing all of the trouble so here we will show you how to uninstall it:
- In the search bar near the Start menu type in “Settings” and press the “Enter” button.
- From the Settings window, locate the “Apps” option and click to select it.
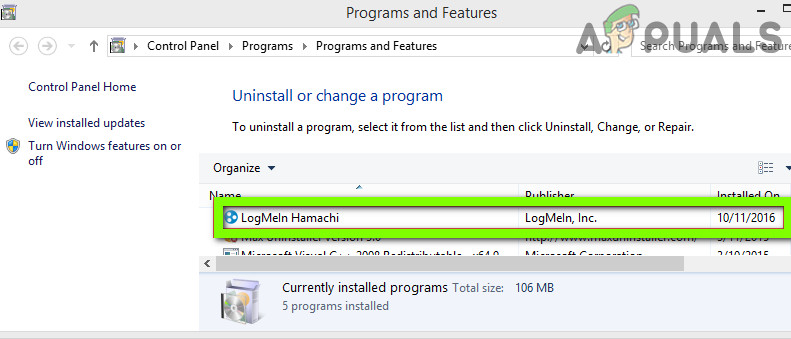
- In the Apps & Features window find “LogMeIn Hamachi” and click to expand it.
- Next press the “Uninstall” button and follow the on-screen instructions to uninstall the app completely.
Uninstall Hamachi VPN - Afterwards “Restart” your PC and see if the problem got settled.
Solution 8: Reinstall Minecraft And Java
The problem can also arise due to the corrupt installation of Minecraft, in which case reinstallation of it will be the only solution. In order to repair/reinstall Minecraft proceed with the steps below:
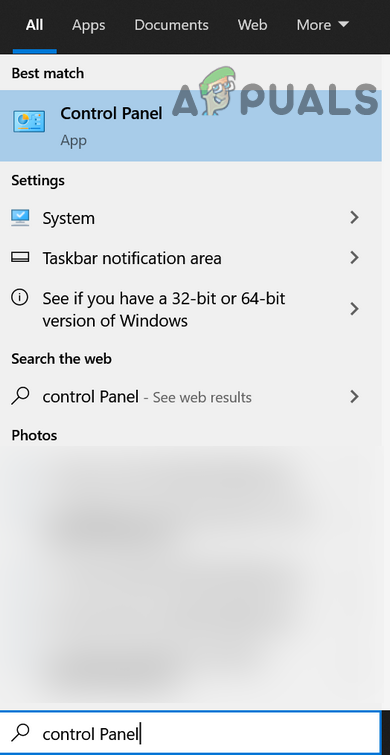
- In the search bar near the Start menu type in “Control Panel” and press “Enter”.
Open Control Panel - Now click on the “Programs > Programs and Features” option respectively.
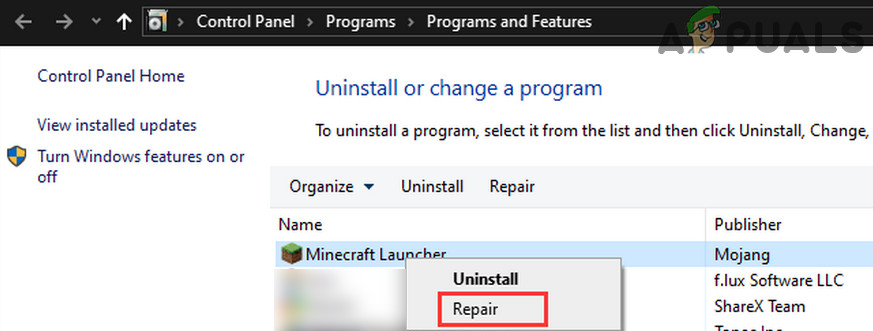
- In the following window go through the list of programs to find “Minecraft” and click on it.
- Then select “Repair” and follow the on-screen instructions to repair Minecraft.
Repair Minecraft Launcher - Restart your PC now and see if the error got removed and if the problem persists then try uninstalling both i.e. “Minecraft” and “Java”.
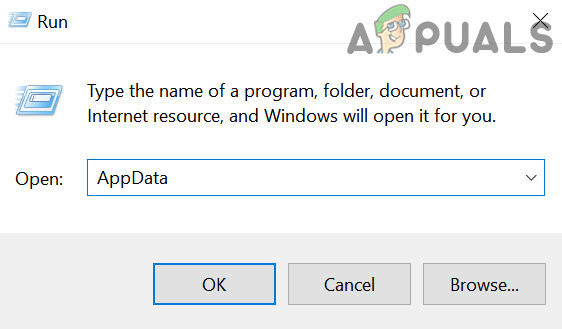
- Then Restart your PC finally and upon restart press the “Window + R” keys together to open up the Run prompt.
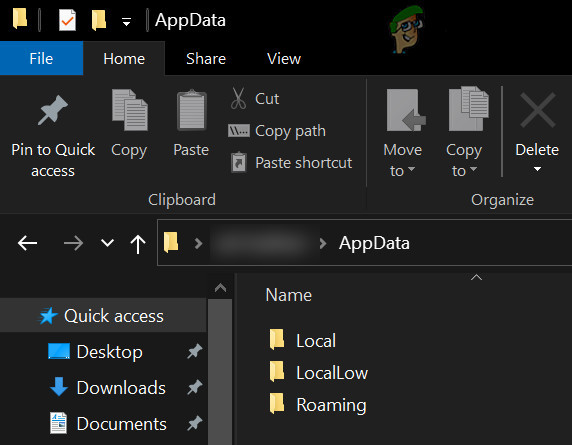
- Here enter “AppData” in the dialog box and in the pop-up window open each of the folders i.e. “Local”, “LocalLow” and “Roaming” and delete all of the Minecraft folders in them one by one.
- Once completed download the latest available version of both Java and Minecraft.
- Then install Java as an “Administrator” and afterward “Reboot” your PC.
- Upon Reboot again install Minecraft as an “Administrator” and later Restart your computer.
- Finally, proceed to see if the internal exception java.io.ioexception connection reset by peer Minecraft error got settled now.
Solution 9: Reduce the Render Distance In Minecraft
Decreasing the render distance in Minecraft might also help solve this error because if Minecraft isn’t able to render all of the video blocks due to some sort of network connection issues this error might pop up and in such a case cutting down the render distance can help fix problems. Follow the below-mentioned procedure in order to do so:
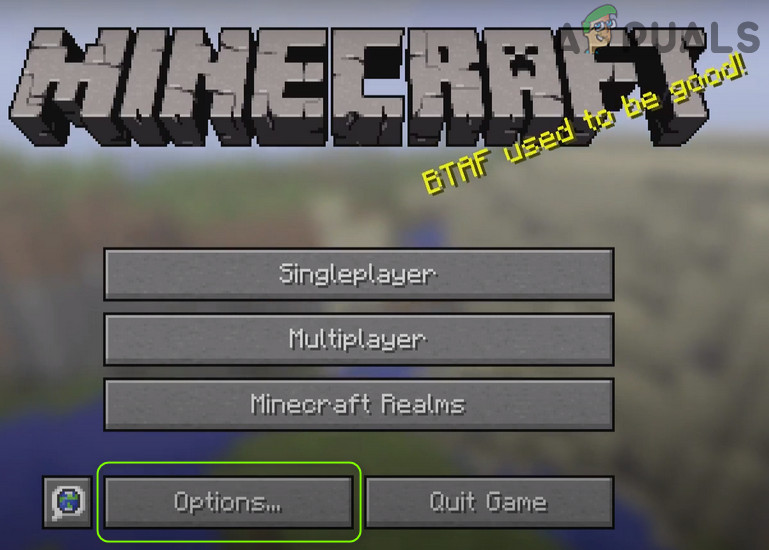
- Launch Minecraft on your desktop PC and open the “Options” window.
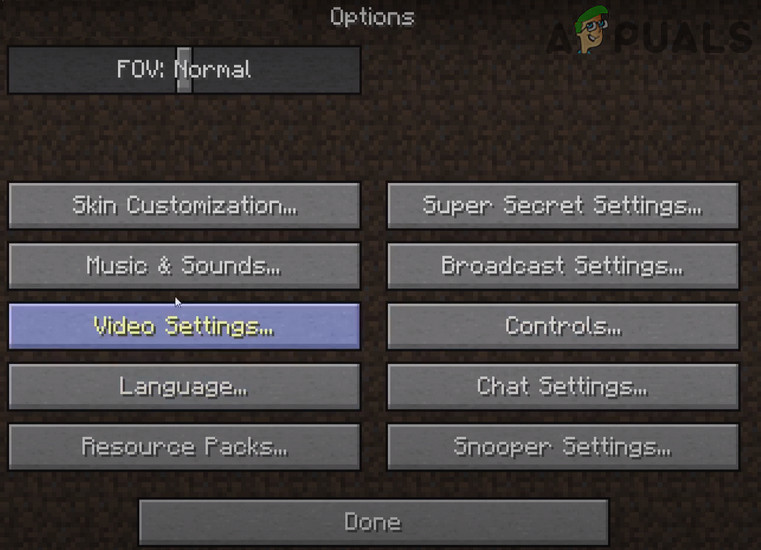
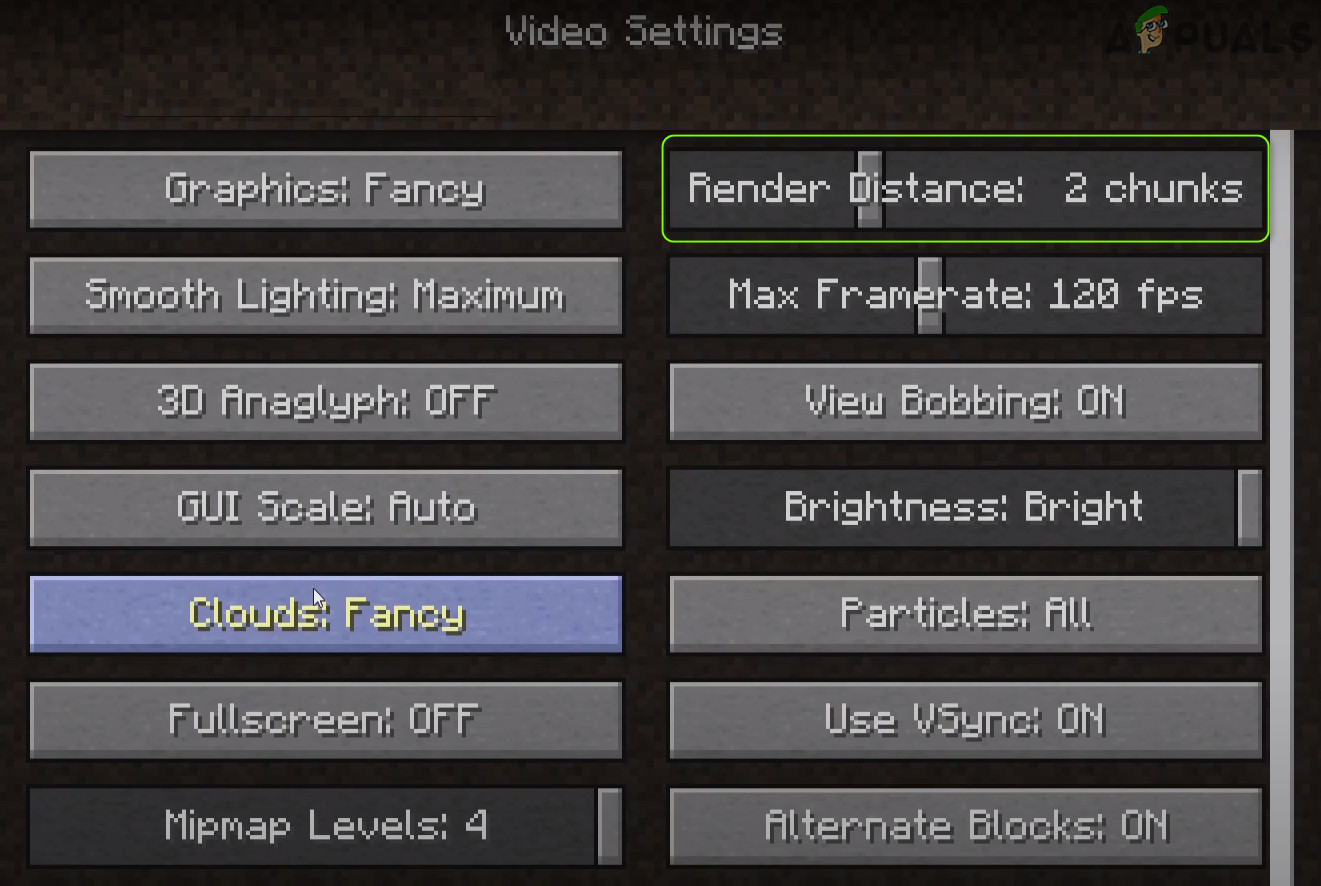
- Then select “Video Settings” from the menu and slide the “Render Distance” to the lowest possible value.
Decrease Render Distance - If it helps you remove the error then you can also increase the render distance to your desired value afterwards.
Solution 10: Update Java To Latest Version
- In the search bar near the Start menu type in “Control Panel” and press the “Enter” button.
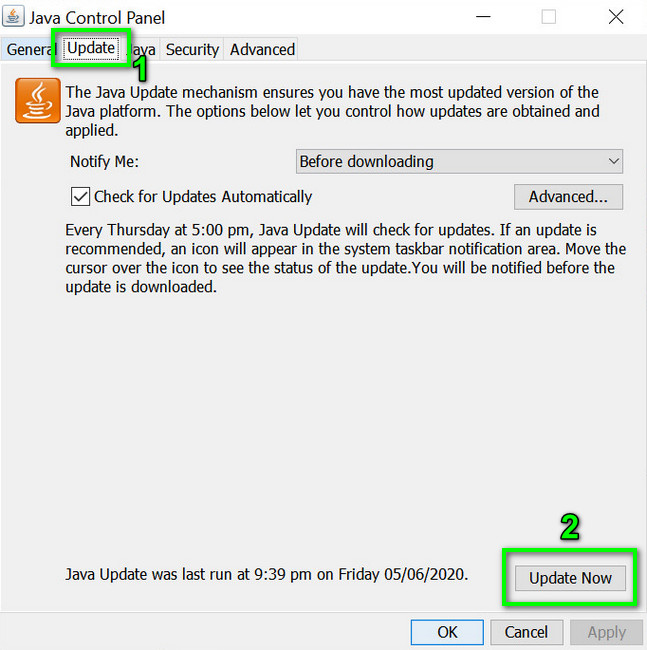
- Look for the “Java” in the control panel window and click on it. Afterwards, proceed to the “Update” tab and click on the “Update Now” button.
Update Java - If an update is available “Apply” it and then see if the error gets resolved.
Solution 11: Edit the Java Path
- Press the “Window + R” keys simultaneously to open up the Run dialogue box.
- Here type in the following command in the dialogue box and press the “Enter” button:
\Program Files (x86)\
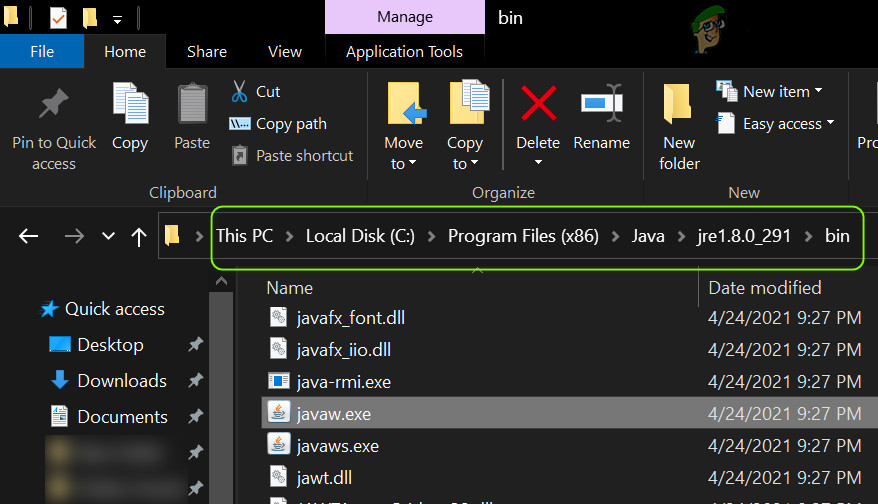
- In the pop-up Program Files window move to the “Java” folder and then head towards the latest version of Java installation folder.
- Next, open up the “Bin” folder and copy its address from the address bar.
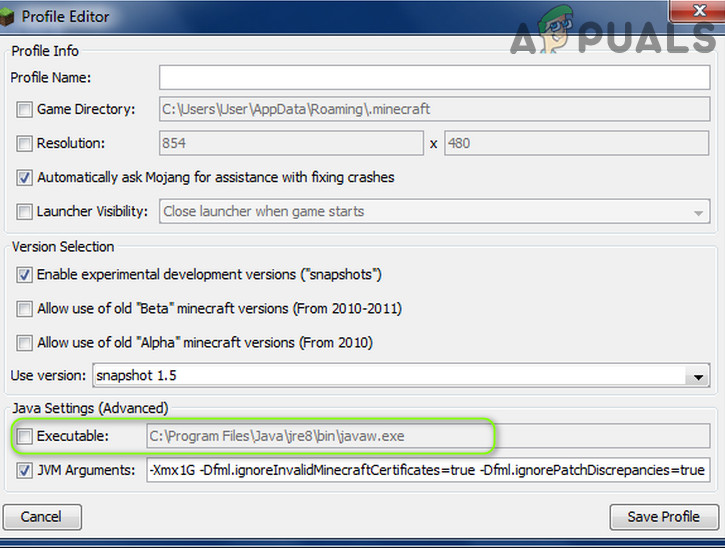
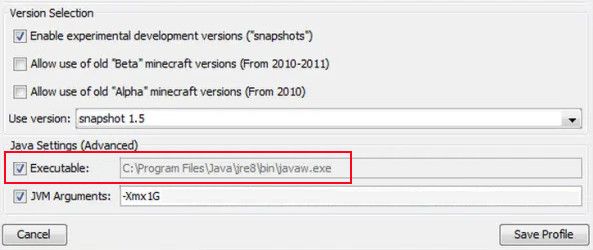
- Now launch Minecraft and select the “Edit Profile” option.
- Then checkmark the option of “Executable” under Java Settings (Advanced) and afterwards paste that copied address in the dialogue box in front of it. The path should somewhat look like this:
C:\ Program Files (x86)\ Java\ jrel.8.0_291\bin\javaw.exe
- Lastly, apply the changes made and then see if the error persists or not.
Solution 12: Disable Firewall Temporarily
Sometimes this error may also occur if Windows Defender Firewall blocks access to a resource pack essential for the operation of Minecraft. In this scenario, the first thing you need to do is disable the Firewall temporarily. If it works you can skip a couple of next solutions otherwise move on to trying them as well in order to resolve the Firewall related issues. Proceed with the steps mentioned below to disable Windows Firewall temporarily on your system:
- Press the “Window + R” keys together to open up the Run prompt, here type “Control Panel” in the dialogue box, and hit the “Enter” button.
Open Control panel - Then alter the selection of View By located on the top-right of the screen to “Large Icons” and next select the “Windows Defender Firewall” option.
- In the following window select the “Turn Windows Defender Firewall On Or Off” option from the left menu.
Clicking on the “Turn Windows Defender Firewall On or OFF” option - Next in the Customize Settings window checkmark the box in front of “Turn Off Windows Defender Firewall” for both Private and Public Network Settings.
- Lastly hit the “OK” button, close the window and then check if the error got removed. If not, then move on to try the next solutions indexed below.
Solution 13: Tweak Java Platform SE Settings In Firewall
- Press the “Window + R” keys together to open up the Run prompt, here type “Control Panel” in the dialogue box, and hit the “Enter” button.
Open Control panel - Then alter the selection of View By located on the top-right of the screen to “Large Icons” and next select “Windows Defender Firewall”.
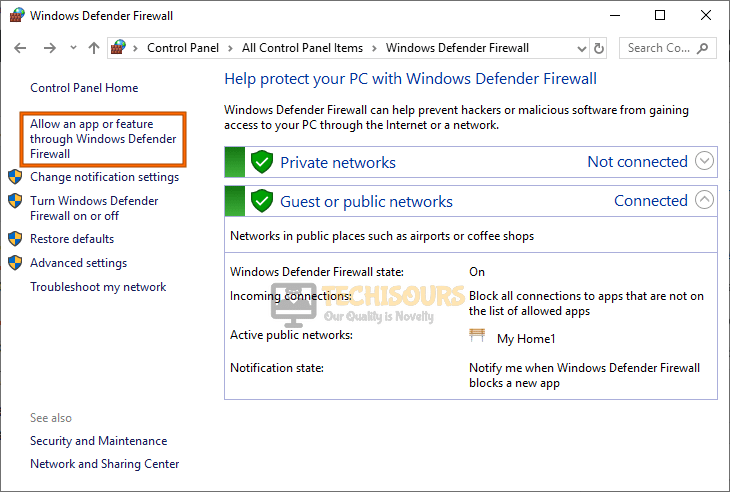
- In the pop-up window select “Allow An App Or Feature Through Windows Defender Firewall” from the menu at the left.
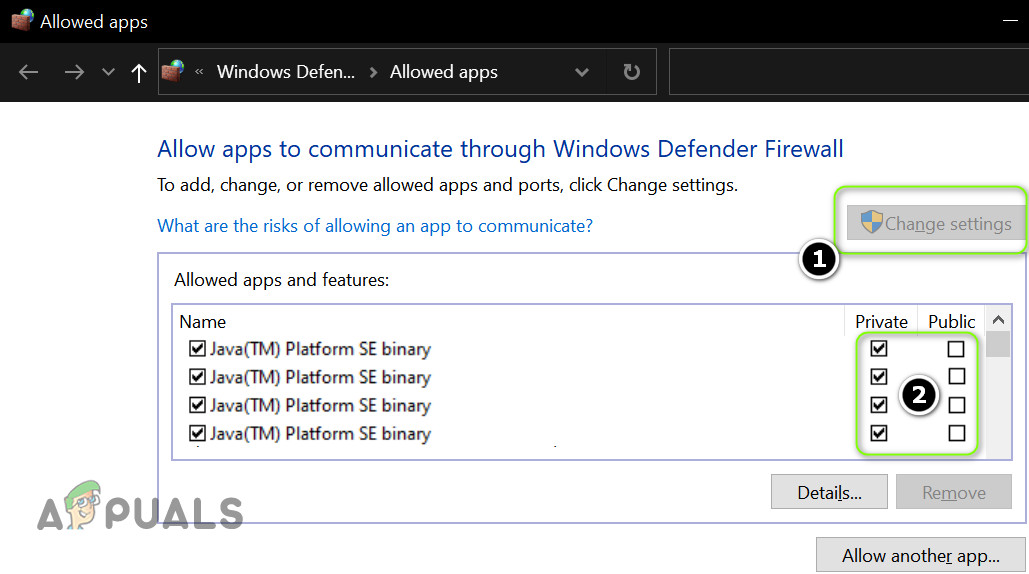
Allow an app or feature through Windows Defender Firewall - In the following window click on “Change Settings” and from the list of apps and features locate “Java ™ Platform SE Binary”. If you are unable to find it from the list click on “Allow Another App” at the bottom and then enter the “Installation Directory” of Java (usually it’s the Java directory of Program Files and Program Files (x86) folders), now double-click on “Java.exe”.
- In the next step, you need to uncheck the box of “Public” and checkmark the option of “Private” for all the Java ™ SE-related binary processes.
- Next, click on Java ™ SE Binary and hit the “Details” button. Afterwards, open the “Network Type” and tick mark the option of “Private”.
- Apply all the changes made and “Restart” your PC.
- Finally, check to see if the internal exception java.io.ioexception operation timed out problem got resolved.
Solution 14: Bypass Minecraft Through Firewall
- In the search bar near the Start menu type in “Windows Defender Firewall With Advanced Security” and press the “Enter” button.
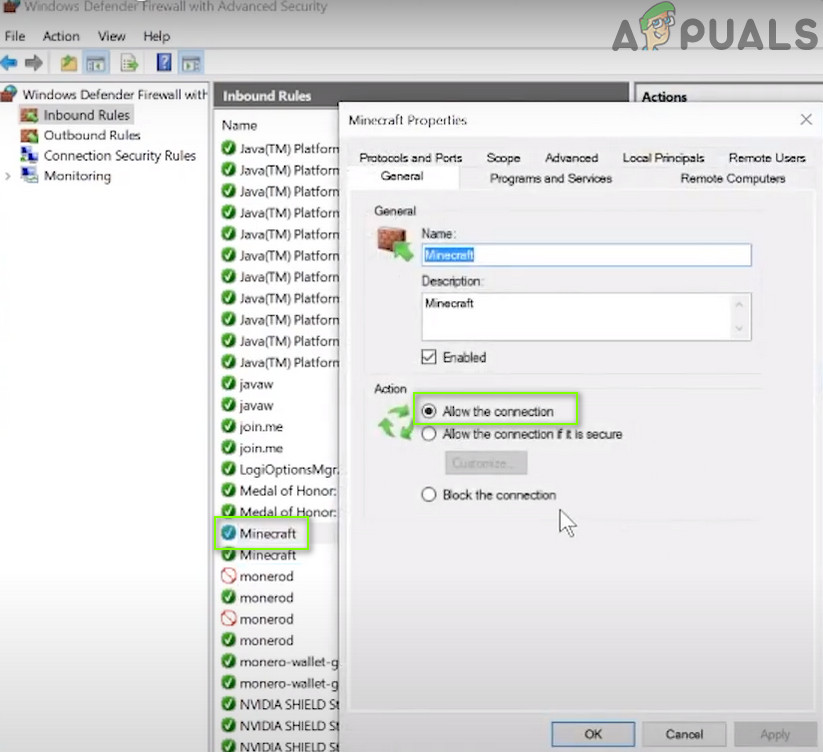
Typing Windows Defender Firewall With Advanced Security - Now select the option of “Inbound Rules” and “Outbound Rules” respectively, here find “Minecraft” from the list, double-click on it, and in the Services Properties window check to see if “Block the Connection” isn’t enabled for Minecraft.
- Again select Inbound Rules and select “New Rule” under Actions from the left.
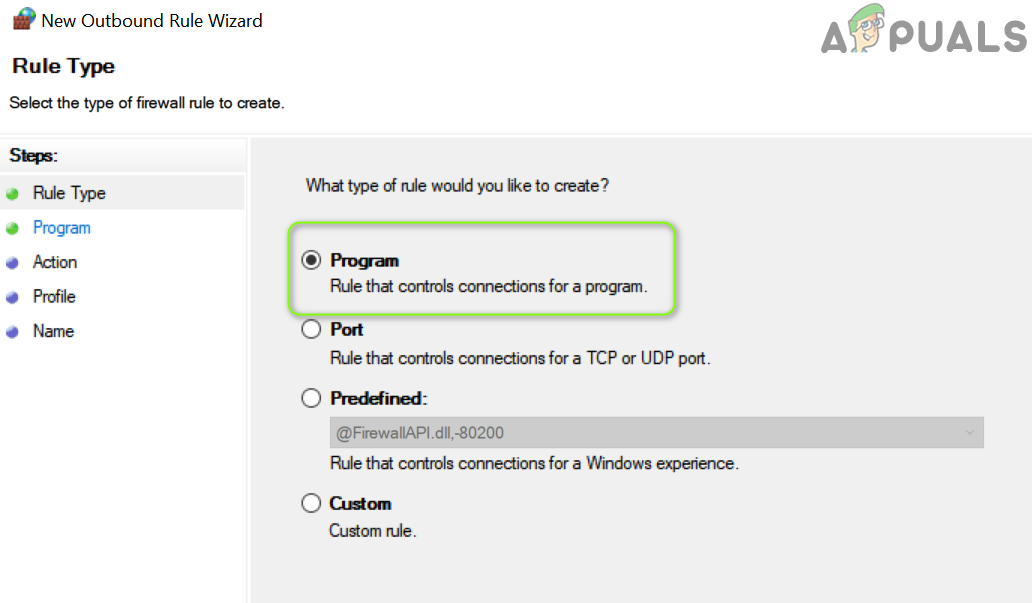
Clicking on the “New Rule” option - In the New Inbound Rule Wizard select “Program” and hit the “Next” button.
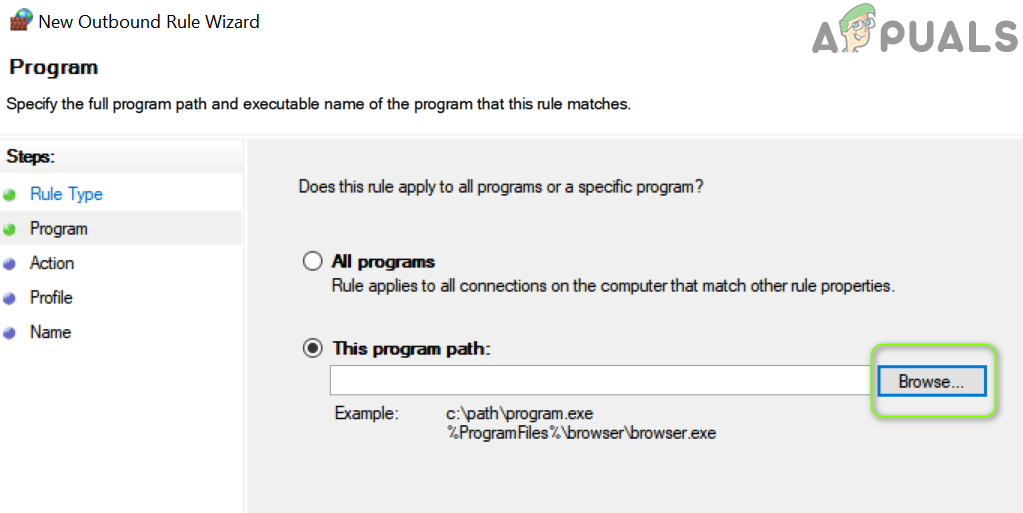
- Now click on “Browse” and proceed to the “Installation Directory” of Minecraft.
- Here select “Minecraft.exe” and click on the “Allow the Connection” button.
- Click on “Next” and choose all three profiles i.e. “Public”, “Private”, and “Domain”.
- Next set the “Name” of the rule and click on the “Finish” button.
- Now repeat the steps “3 to 8” for “Outbound Rules” as well and afterwards “Restart” your PC.
Solution 15: Disable NAT Acceleration In Your Router
- On your PC open up the “Web Browser” and launch your “Router’s Control Page”.
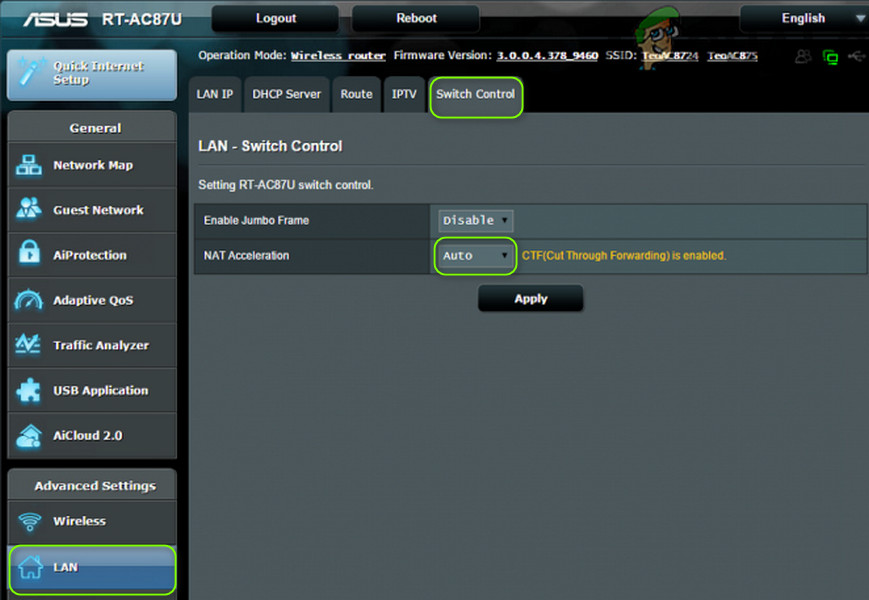
- Then select “LAN” from the left menu and proceed to the “Switch Control” tab.
- Here disable “Hardware Acceleration” and if it does not show up you can look for it with different names such as “CTF (Cut Through Forwarding)” and “FA (Flow Accelerator)”.
- Apply the changes made, close the window and see if the problem got solved.
Solution 16: Try Using An Alternate Network
You can also try using another network to see if that helps, for this, you first need to disconnect from the current network and then reconnect to a new network. You can opt from among the various choices such as “Ethernet”, “LAN”, “Mobile Hotspot” etc. If all of these do not work then you can also consider using a “VPN” instead.
Solution 17: Run A Traceroute
If the above methods didn’t help you much you can try running a traceroute on your system which will help you troubleshoot the cause of the error. It works by tracking your connection straight through your system to Aternos (a remote server) and displays output in the form of useful information depicting the errors in that particular connection. This troubleshooting data will later help you identify the root cause of the problem thus making the error resolution easier.
Solution 18: Use A Different Launcher
There is a greater possibility that the game launcher you are using is a pretty old version of Java even if you have had installed the latest version of Java on your PC. Therefore this error might pop up due to the Java bug itself and not because of Minecraft. In this case, you need to use some different launchers whether it be a “.jar Minecraft launcher” or you forcibly configure the game launcher to use the latest version of Java installed on your system. For the latter option go to your Java settings and in the game launcher options alter the password of the older version of Java to the new version available with you.
WorkAround:
If none of the above-indexed solutions works for you then you can try implementing some of the other remedies listed below:
- Check to see if “Parental Controls” are not the ones blocking the Minecraft access.
- Try allowing the Minecraft connection through “Router’s Firewall”.
- Try allocating more “RAM” for Minecraft as it may also be helpful in solving the error.
- Perform a “Factory Reset” of your system, also try getting your system checked for any sort of “Hardware Error”.
- Also, verify if the “Ports” are forwarded properly in the system/router Firewall as needed for Minecraft.
- Check up with the server admin to either delete your “Player Data” or check for any “Server-Side” issues.
- Check if this fixes the internal exception java.io.ioexception issue on your computer.
Hopefully, by following the list of detailed fixes mentioned above you’d get through the error easily but in case you have any more queries regarding it feel free to reach us out here.
The Minecraft launcher may show the ‘Internal Exception Java.IO.IOException’ issue if the Minecraft installation is corrupt or outdated. Moreover, the corrupt DNS cache of the system or improper configuration of Java may also cause the issue at hand.
The issue arises when the user tries to join or connect a server but encounters the following message:
“Connection Lost Internal Exception: java.io.IOException: An existing connection was forcibly closed by the remote host”
Before proceeding with the solutions to stop internal exceptions in Java IO IOException, check if trying another network cable (if using an ethernet connection) resolves the issue. If you have a long username (7+ characters), then check if reducing it to (7 or fewer characters) solves the issue. Also, check if your internet speed meets the minimum speed requirements of Minecraft. Moreover, make sure to log out/disconnect the Minechat (if using) and then close it. Additionally, check if launching the Minecraft launcher (or server) as an administrator resolves the issue.
Solution 1: Update the Minecraft Launcher to the Latest Build
You may encounter the internal exception issue if the Minecraft launcher of your system is outdated as it can create incompatibility between the launcher & server. In this context, updating the Minecraft launcher to the latest release may solve the problem. But before moving on, check if you have more than one account configured with the Minecraft launcher, if so, then remove all the other accounts but one.
- Open the Minecraft launcher & near the username, click on the Options.
- Then click on the Force Update button & apply the launcher update.
Force Update the Minecraft Launcher - Once updated, relaunch the Minecraft launcher and check if it is clear of the IOexception error.
- If not, check if using another launcher resolves the issue.
Solution 2: Clear the DNS Cache of Your System
The Java.io error may emerge if the DNS cache of your system is corrupt as it may lead to the system’s ability to resolve the domain name. In this context, flushing the DNS cache (which will force the system to re-fetch the combinations) may solve the problem.
- Click Windows, type: Command Prompt, and right-click on the result of Command Prompt. Then choose Run as Administrator.
Open Command Prompt as Administrator - Now execute the following one by one:
ipconfig /flushdns

ipconfig /release

ipconfig /renew
Flush the DNS Cache - Then exit the Command Prompt and check if the Java exception issue is resolved.
If the issue persists, then check if changing DNS server (e.g., Google DNS) resolves the internal exception issue.
Solution 3: Disable Server’s Resource Pack
Resource packs allow the players to do a lot of customization (like textures, music, models, splash tests, etc.) but this customization may hinder the client/server communication and thus cause the IOexception issue. In this scenario, disabling the server’s resource pack may solve the problem.
- Open the Minecraft launcher and select Multiplayer.
- Then select the problematic server and click on Edit.
Edit the Minecraft Server Properties - Now click on Server Resource Packs to set it to Disabled (if enabled) and click on Done.
Disable Server Resource Packs in Minecraft - Then check if the launcher is clear of the Java.io issue.
Solution 4: Uninstall the Conflicting Applications
You may encounter the Java.io issue if an application on your system is hindering the operation of Minecraft. In this scenario, removing the conflicting application may solve the problem. You can clean boot your PC to find out the problematic application. For illustration, we will discuss the process for the Hamachi VPN (reported by the users to cause the issue).
- Right-click Windows & open Apps and Features.
- Now click on LogMeIn Hamachi to expand it & then click on Uninstall.
Uninstall Hamachi - Then follow the prompts to remove Hamachi & reboot your PC.
- Upon reboot, check if the IOexception issue is resolved.
Solution 5: Decrease the Render Distance in the Minecraft Settings
The internal exception issue may arise if Minecraft could not render all the video blocks at once (due to the poor internet speed). In this context, decreasing the Render Distance in the Minecraft settings to the lowest possible may solve the problem.
- Open the Minecraft Launcher & open its Options (it will be also a good idea to lower the Render Distance in the server settings, if possible).
Open the Minecraft Options - Now select Video Settings & slide the Render Distance to the lowest possible (e.g., to 2).
Open Video Settings of Minecraft - Then check if the Java.io issue is resolved. If so, then you may increase the Render Distance by one till you reach your desired Render Distance.
Set Render Distance to 2 Chunks in Minecraft
Solution 6: Edit the Java Settings
The Java.io error may arise if the Java installation of your system is not properly configured. In this context, editing the Java settings (like enabling the Native Sandbox) may solve the problem. But before proceeding, make sure you have only one Java installation.
Update Java to the Latest Build
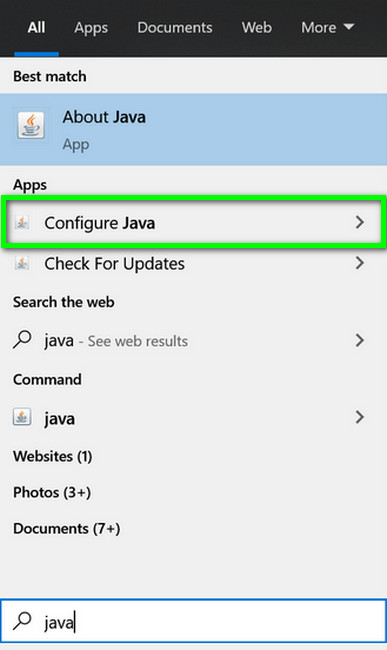
- Click Windows, type: Configure Java & then open it.
Open Configure Java - Now steer to the Update tab & click on the Update Now button.
Click Update Java in the Update Tab - If an update is available, apply the Java update & check if the internal exception issue is resolved.
Enable Native Sandbox
- Click Windows, type: Configure Java & open it.
- Now steer to the Advanced tab & checkmark Enable the Operating System’s Restricted Environment (Native Sandbox).
Enable the Operating System’s Restricted Environment (Native Sandbox) - Then apply your changes & reboot your PC.
- Upon reboot, check if the Minecraft IOexception issue is resolved.
Edit the Java Path in the Launcher Settings
- Right-click Windows & open Run.
- Now navigate to the following path:
\Program Files (x86)\
Open Program Files (x86) From Run - Then open the Java folder & steer to the latest version of the Java installation (e.g., the jre1.8.0_291 folder).
- Now open the Bin folder & copy the address from the address bar.
Copy the Java Path - Then open the Minecraft Launcher & select Edit Profile.
- Now, under Java Settings (Advanced), checkmark the option of Executable.
- Then paste the address (copied at step 4) up to Bin, so the path should be something like below:
C:\Program Files (x86)\Java\jre1.8.0_291\bin\javaw.exe
Edit the Java Path in the Minecraft Profile Editor - Now apply your changes & check if the internal exception issue is resolved.
If the issue persists, then check if reinstalling Java sorts out the IOexception issue.
Solution 7: Repair / Reinstall the Minecraft
The Java.io issue may arise if the Minecraft installation is corrupt. In this context, repairing or reinstalling it may solve the problem.
- Click Windows, type: Control Panel, & launch it.
Open Control Panel - Now open Uninstall a Program & select Minecraft.
Repair the Minecraft Launcher - Then click on Repair & follow the prompts to repair Minecraft.
- Now reboot your PC & check if the IOexception issue is resolved.
- If not, uninstall Minecraft & Java (make sure to back up the essentials).
- Now reboot your PC & upon reboot, right-click Windows & select Run.
- Then navigate to the following path (copy-paste the address):
AppData
Open AppData Through the Run Box - Now open each directory (Local, LocalLow, & Roaming) one by one & delete the Minecraft folders in them.
Delete the Minecraft Directories in the AppData Folders - Then download the latest versions of Java & Minecraft.
- Then install Java as administrator & reboot your PC.
- Upon reboot, install Minecraft as administrator & check if the internal exception issue is resolved.
Solution 8: Edit the Network-Related Settings
Minecraft may show the internal exception issue if the network settings of your system are not properly configured (or your ISP is blocking access to a resource essential for the operation of Minecraft). In this case, editing the network settings (or trying another network/VPN) may solve the problem.
Try Another Network or a VPN
- Disconnect your system from the current network & connect to another network e.g., the hotspot of your phone to check if the IOexception issue is resolved. You can also check by using a VPN. Also, it will be a good idea to switch between the Wi-Fi and ethernet connection.
- If the issue persists, directly connect the system to the internet without the router to rule out if its configuration causing the issue.
Disable NAT Acceleration in the Router’s Settings
- Launch a web browser & navigate to the Router’s control page.
- Now select LAN (in the left pane) & disable Hardware Acceleration in the Switch Control tab. If the Hardware Acceleration (the Asus branded router feature) is not shown, look for it with different names like CTF (Cut-Through Forwarding) & FA (Flow Accelerator).
Disable NAT Acceleration - Then apply your changes & check if the internal exception issue is resolved.
Solution 9: Edit the Firewall Settings
You may encounter the internal exception issue if the Firewall of your system is blocking access to a resource essential for the operation of Minecraft. In this context, editing the Firewall settings (like allowing Java (TM) Platform SE Binary in the Firewall settings) may solve the problem. Before proceeding, it will be a good idea to check if temporarily disabling the firewall of your system resolves the issue. For illustration, we will go through the process for the Windows Defender Firewall.
Warning: Advance at your own risk as editing the firewall’s settings is a skillful task & if done wrong, you may expose your system/data to threats.
Set Java (TM) Platform SE to Private in the Firewall Settings
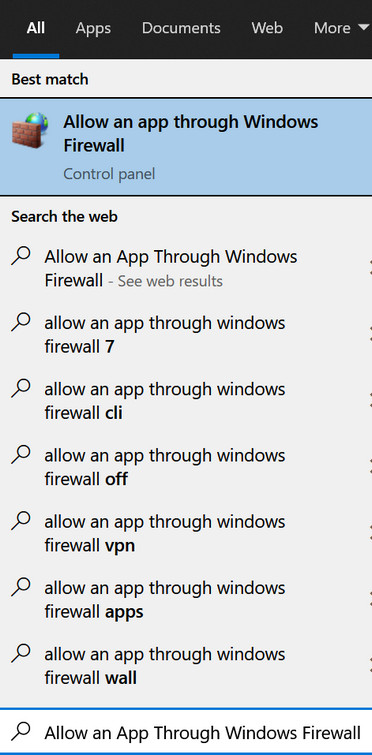
- Click Windows, type: Allow an App Through Windows Firewall, & open it.
Open Allow an App Through Windows Firewall - Now click on Change Settings & in the list of Apps, find Java (TM) Platform SE Binary. If it is not present, click on Allow Another App & steer to the installation directory of Java (usually, the Java directory of Program Files and Program Files (X86) folders) and double-click on Javaw.exe.
Set Java (TM) Platform SE Binary to Private - Then uncheck the option of Public and checkmark the option of Private for all the Java (TM) Platform SE Binary processes.
- Now select Java (TM) Platform SE Binary & click on Details.
- Then open Network Type and checkmark Private.
- Now apply your changes & reboot your PC.
- Upon reboot, check if the IOexception issue is resolved.
Allow the Minecraft Through the Firewall
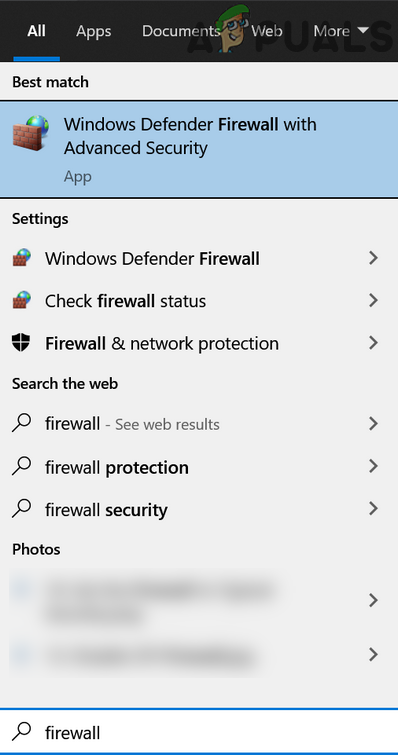
- Click Windows, type: Firewall, & open Windows Defender Firewall.
Open Windows Defender Firewall - Now make sure no Inbound and Outbound rules related to Minecraft are set to Block the Connection.
Allow the Minecraft Connection Through the Windows Defender Firewall - Then select Inbound Rules & click on New Rule.
Create a New Inbound Rule - Now select Program & click on Next.
Select Program in New Rule Window - Then click on Browse & steer to the installation directory of Minecraft.
Open Browse and Steer to The Installation Directory of Minecraft - Now double-click on Minecraft.exe & select Allow the Connection.
- Then click on Next & select all the three profiles (i.e., Public, Private, & Domain).
- Now name the rule & click on Finish.
- Then repeat the same for the Outbound Rule & reboot your PC.
- Upon reboot, check if the Java.io issue is resolved.
If the issue persists, check if allowing the Minecraft connections through the router’s Firewall (if any) resolves the issue (especially, if it is using some autoblocking feature). If that did not do the trick, check if the parental controls are not restricting the Minecraft access. Also, it will be a good idea to ensure that the ports are properly forwarded in the system/router firewall as required by Minecraft.
If the issue persists, check if allocating more RAM to Minecraft solves the problem. If that did not do the trick, you may contact the server’s admins to delete your player data or check for a server-side problem. If the issue did not resolve so far, you may have to perform a factory reset of your PC & if that did not do the trick, get your system (especially, hard disk and network/Wi-Fi card) checked for a hardware error.
What are IO Exceptions (java.io.IOException) and what causes them?
What methods/tools can be used to determine the cause so that you stop the exception from causing premature termination? What does this mean, and what can I do to fix this exception?
asked Sep 6, 2018 at 1:03
3
Java IOExceptions are Input/Output exceptions (I/O), and they occur whenever an input or output operation is failed or interpreted. For example, if you are trying to read in a file that does not exist, Java would throw an I/O exception.
When writing code that might throw an I/O exception, try writing the code in a try-catch block. You can read more about them here: https://docs.oracle.com/javase/tutorial/essential/exceptions/catch.html
Your catch block should look something like this:
try {
    //do something
}catch(FileNotFoundException ex){
    System.err.print("ERROR: File containing _______ information not found:\n");
    ex.printStackTrace();
    System.exit(1);
}
answered Sep 6, 2018 at 1:14
Here you go https://docs.oracle.com/javase/7/docs/api/java/io/IOException.html
IOException is thrown when an error occurred during an input-output operation. That can be reading/writing to a file, a stream (of any type), a network connection, connection with a queue, a database etc, pretty much anything that has to do with data transfer from your software to an external medium.
In order to fix it, you would want to see the stack trace of your exception or at least the message, to see exactly where the exception is thrown and why.
try {
    methodThrowingIOException();
} catch (IOException e) {
    System.out.println(e.getMessage()); //if you're using a logger, you can use that instead to print.
    //e.printStackTrace(); //or print the full stack.
}
The error message that will be printed will likely show you what the issue is. If you add the error message here, I’ll be able to give you more info on how to fix that specific IOException. Without that, no one can really give you a complete answer.
answered Sep 6, 2018 at 1:16
StefStef
2,6232 gold badges18 silver badges29 bronze badges
It is a very generic exception that a lot IO operation can cause. A best way is to read the Stack Trace. To continue the execution you can use the try-catch block to bypass the exception, but as you mention you should investigate into the cause.
To print the stack trace:
try {
    // IO operation that could cause an exception
} catch (Exception ex) {
    ex.printStackTrace();
}
answered Sep 6, 2018 at 1:08
mckuokmckuok
7446 silver badges11 bronze badges
IOException is usually a case in which the user inputs improper data into the program. This could be data types that the program can’t handle or the name of a file that doesn’t exist. When this happens, an exception (IOException) occurs telling the compiler that invalid input or invalid output has occurred.
Like others have said, you can use a try-catch statement to stop a premature termination.
try {
 // Body of code
} catch (IOException e) {
 e.printStackTrace();
}
answered Sep 6, 2018 at 1:18
Minecraft is a beloved sandbox video game by Mojang Studios. Children and adults alike enjoy building their own worlds in this 3D game.
However, many players have recently received a stressful error message: Internal Exception: java.io.ioexception. When you get the notification “an existing connection was forcibly closed by the remote host Minecraft,” you won’t be able to continue playing.
So what exactly does the java.io.ioexception error mean? The main reason you received this error is an internet connection error. There are several possible causes of connection failure, such as firewall blocking, router and issues, or outdated Minecraft or Java.
While fixing the internal exception error in Minecraft might seem too technical, the problem can easily be resolved with the help of our step-by-step guide. If a standard power cycle or re-installing Minecraft or Java doesn’t work, set up your DNS, IP address, and server settings.
In this article, we’ll begin by giving you an introduction to this common error. From there, go through our list of tried-and-tested troubleshooting solutions.
When you receive “Minecraft Internal Exception: java.io.ioexception an existing connection was forcibly closed,” this means that there was a problem with your internet connection. This network issue likely prevented your device from connecting with the Minecraft server.
Getting this error can be very frustrating because you won’t be able to continue playing.
On top of that, it’s difficult to find the main cause of the problem. Any disruption in your network can cause a Minecraft server error.
This means that you’ll have to try multiple solutions to try and fix the error.
What causes the error?
As mentioned, there are many possible reasons why you received the connection error. It’s hard to pinpoint the exact point where the connection failed, but these are some of the most common causes:
- Firewall permissions blocked access to the Minecraft server
- Incorrect DNS, IP address, or router settings
- Incompatible or outdated Minecraft and Java softwares
How to fix Minecraft internal exception java.io.ioexception
As mentioned, the Minecraft internal exception error is a bit complicated because there are many possible causes of the glitch.
To help you out, we provided 11 solutions on how to fix the java.io.ioexception issue.
Before proceeding, make sure that you have a stable internet connection. Try not to use mobile data or a mobile hotspot as these are much more unstable compared to a WiFi network.
Make sure to try which solution works for you, and don’t skip any steps.
However, if none of these work, you may need to contact your internet service provider (ISP).
Check your Internet Connection
Before trying anything complicated, make sure that your internet connection is stable.
Unreliable internet connection using mobile data or mobile hotspot can prevent your PC from connecting to the Minecraft server. Standard multiplayer mode will use 40MB of data per hour.
Open an internet speed checker, and check if your bandwidth is up to par. The host computer should have at least 1.5 Mbps bandwidth.
The appropriate bandwidth speed will depend on how many other gamers you’re playing with in Multiplayer mode. Ideally, though, bandwidth should be at least 100Mb an hour per user.
Powercycle your system
The first thing you should try is restarting your PC, internet connection, and Minecraft.
For many users, simply doing a full power cycle fixes the issue. This is because it restarts the services and closes all failed processes.
- Close Minecraft and shutdown your PC. Remove your PC from the power source.
- Unplug the router from the power source while it is still running, then switch it off. Disconnect the ethernet cable from the power source.
- Leave your router and PC unplugged for five minutes.
- Reconnect the ethernet cable and switch on your router and PC. Connect your PC to the internet network.
- Launch Minecraft and see if the issue persists.
If this doesn’t work, try connecting to the internet using a different device, such as your smartphone. If you can’t connect to the network, the problem might be with your ISP.
Call your ISP so they can find the issue with your network setup.
Update Minecraft
This is another effective solution that fixes the Minecraft internal exception error for most users. Updating Minecraft will do two things: it will remove the glitch in the installed program, and it will match your client application to the Minecraft server you’re connecting to.
If your current Minecraft version doesn’t match your server, you will likely encounter some sort of connection error.
- Open the Minecraft launcher and double-click the Minecraft app. Log in with your email address and password if necessary.
- Look for the Download button beside Play in the main menu. The Download option will appear if a new Minecraft version update is available.
- Click Play. The update will start to download –– wait for the green progress bar to finish downloading. You can now start playing.
Here’s another way to update Minecraft:
- Open the Minecraft launcher and double-click the Minecraft app.
- On the Login page, click on Options.
- From the list, click Manage game & add-ons > Updates.
- Click the update you want to download. You can now start playing.
If there’s a problem with updating Minecraft, you need to uninstall the game, then reinstall it again.
Uninstall and Reinstall Minecraft
You need to re-download Minecraft if the available update in your area fails. Here’s how to uninstall and reinstall the latest version of Minecraft:
Reinstall Minecraft on Windows:
- Press Win+R on your keyboard and type %appdata%. Press enter and select the Roaming folder.
- Open the .minecraft folder and locate saves. Copy and paste the saves folder to a secure location. You will need this folder to restore your Minecraft progress.
- Return to the Roaming folder and delete the .minecraft folder. This will uninstall the game.
- Visit the Minecraft website and log in with your Mojang account if necessary. Download the latest Minecraft Windows version available in your region.
- Launch the Minecraft installer and follow the on-screen instructions. After installing and loading, close Minecraft.
- Open the .minecraft folder and drag the saves folder to this location. This will restore your Minecraft gameplay.
Reinstall Minecraft on macOS:
- Open the Finder Window and click Go on the Toolbar. Click Go to Folder and type ~/Library/Application Support/minecraft. Press Enter.
- Copy and paste the saves folder to a secure location. You will need this folder to restore your Minecraft progress.
- Select all the other folders in the Minecraft folder and drag them to the Trash. Empty the Trash folder.
- Visit the Minecraft website and log in with your Mojang account if necessary. Download the latest Minecraft macOS version available in your region.
- Launch the Minecraft installer and follow the on-screen instructions. After installing and loading, close Minecraft.
- Open the .minecraft folder and drag the saves folder to this location. Click Replace to overwrite to restore your Minecraft gameplay.
Reinstalling Minecraft is also a recommended fix for jna-4.4.0.jar Error (the File Contents Differ From What Was Expected).
Update/Fix Java
For Minecraft to work, your Java software should be up to date.
- Press Win + S on your keyboard, then type Configure Java. Click OK.
- Navigate tot he Update tab, then click Update Now.
There are some cases when updating Java doesn’t work. You’ll need to reinstall Java:
- Type Control Panel on the Windows Search Bar then launch the program.
- Click on Uninstall a Program, then look for Java.
- Download the latest version of Java, and install it onto your PC.
- Restart your computer, then launch Minecraft. Check if the problem persists.
Reset the Server
If you receive a connection error and restarting your PC or internet connection doesn’t work, you may need to reset the Minecraft Server.
If you’re using someone else’s server, the only way to configure the server is to request the owner to reset it. If you own the server, you can use programs like Shockbyte, CraftyControl, or Multicraft.
- Log into your server’s Control Panel, and select the server you want to reset. Make sure to stop the server from running to prevent creating or modifying files.
- Navigate to the Server Type dropdown menu and select the action you want to take after the restart.
- Navigate to the Setup tab of your control panel choose Reset or Delete All server files. Enter your password when prompted.
- Click Apply or Done to confirm the changes.
- Start the Server, then launch Minecraft. Check if the error still persists.
Flush DNS and Renew IP address
If your DNS or IP address is corrupted, you can flush DNS and renew your IP address.
- Launch Command Prompt from the Start menu.
- Type these commands:
ipconfig /flushdns
ipconfig /release
ipconfig /renew
- Restart your computer, than launch Minecraft. Check to see if the error persists.
Change Router DNS to Google DNS servers
In cases where it’s difficult to get a stable internet connection, your ISP may have temporary issues that prevent your computer from connecting with the server. To fix this issue, you need to adjust your DNS settings in your router control panel.
- Access your router settings –– enter your login and password when prompted.
- Navigate to the DNS tab then type the following under Primary DNS server and Secondary DNS server. These settings will automatically connect to Google’s more reliable DNS servers.
Primary DNS Server: 8.8.8.8
Secondary DNS Server: 8.8.4.4
- Apply the changes, then restart your internet connection. Launch Minecraft and see if the problem persists.
While this strategy may not work all the time, connecting to Google DNS servers usually works better than the settings given by your ISP.
Disable Server’s Resource Pack
Resource Packs allow users to add more personality into their gameplay. You can customize textures, music, and other skins onto Minecraft.
However, if you have Resource Pack enabled, there are times when you will be blocked from the server. In this case, you need to adjust Resource Pack permissions:
- Launch Minecraft then navigate to Multiplayer.
- Click Problematic Server, then Edit.
- Locate Server Resource Packs, then click Disable.
- Save the changes and check if the error persists.
Turn off Firewall Permissions
Another common reason why Minecraft players get the connection error is because their PC fails to connect to the server because of Windows Firewall permissions:
- Click the Windows search bar and look for Windows Security.
- Open Firewall & Network protection, then click on the network and Firewall protection option on the menu.
- Select the network that you’re connected to, and toggle off Windows firewall protection on your device.
- Apply the changes, then restart your computer. Launch Minecraft and check if the problem persists.
Enable Java Native Sandbox
Java Native Sandbox allows users to access Java applications in a restricted environment. This means that you can play Minecraft while bypassing connection issues to the server.
- Type Control Panel on the Windows Search Bar then launch the program.
- Look for the header labeled ‘Programs.’
- In the next section, look for the Java icon. A small pop-up notification labeled ‘Java Control Panel’ will appear. In the same window, navigate to Advanced > Advanced Security Settings.
- Select the option Enable the operating system’s restricted environment (native sandbox), then apply and click OK.
- Restart your computer then launch Minecraft. Check if the problem persists. If it does, try disabling Native Sandbox then enabling it again.
Conclusion
The Minecraft Internal Exception Java.io.ioexception is caused by failed connections between your PC and the Minecraft server. This error is more complicated compared to other Minecraft connection errors because there are a lot of possible causes of the issue.
Before troubleshooting your PC, the first thing that you should do is check that you have stable internet connection. After confirming a strong connection, you can try powercycling your router and PC, updating or reinstalling Minecraft.
If these don’t work, try to fix your internet connection by changing your DNS, router settings, or IP address. You can also try turning off Firewall permissions and disabling server resource pack.
Other gamers solved the issue by enabling Java Native Sandbox.
If these solutions don’t work for you, try contacting your ISP.
При запуске игр мы часто сталкиваемся с различными ошибками и сбоями, которые заставляют переключить нашу вовлеченность с игрового мира в процесс поиска способов их решения. Более того, некоторые из них не просто решить. В частности, к таким ошибкам при запуске Minecraft относится и «
Простые решения
В общем она может появиться по ряду причин и некоторые из них можно исправить простыми способами. Поэтому прежде чем перейти к более продвинутым решениям выполните следующие шаги.
Во-первых, попробуйте исправить ошибку Java.Io.Ioexception обычным перезапуском Minecraft. В противном случае перезапустите компьютер и роутер. Также нужно проверить состояние внешнего сервера Minecraft. Если эти методы не сработали, перейдите к следующим шагам.
Варианты запуска
Ошибка внутреннего исключения «internal exception java.io.ioexception удаленный хост принудительно разорвал существующее подключение» в основном происходит из-за проблем с Java. Даже если игра работает, сбой может произойти из-за проблем этой среды выполнения. Иногда программа запуска использует старую версию java, хотя в системе установлен последний ее выпуск.
В этом случае нужно заставить загрузчик Minecraft использовать последнюю версию программной среды. Для этого нужно перейти в параметры запуска и в профиле переключить путь с устаревшей версии на новую.
Отключение межсетевого экрана
Межсетевые экраны, включая брандмауэр Windows, могут сбросить подключение с внешним сервером Minecraft на этапе запуска игры. Чтобы узнать, не причастен ли он к этому событию, попробуйте отключить эту функцию безопасности.
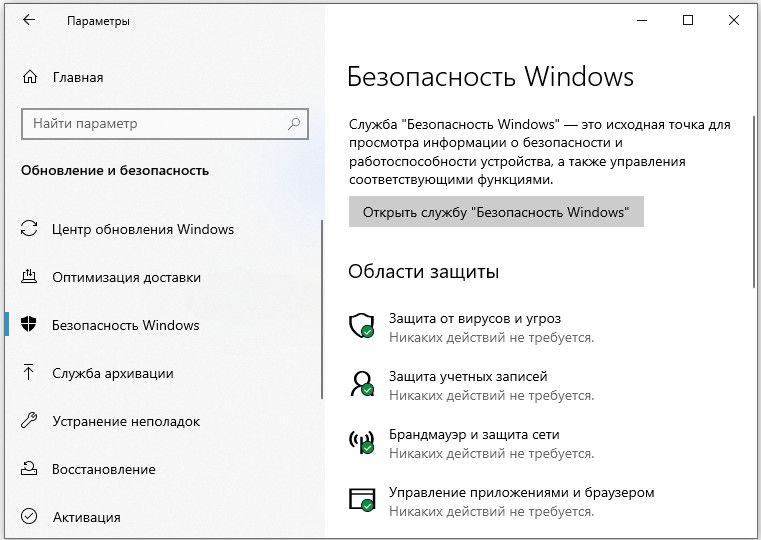
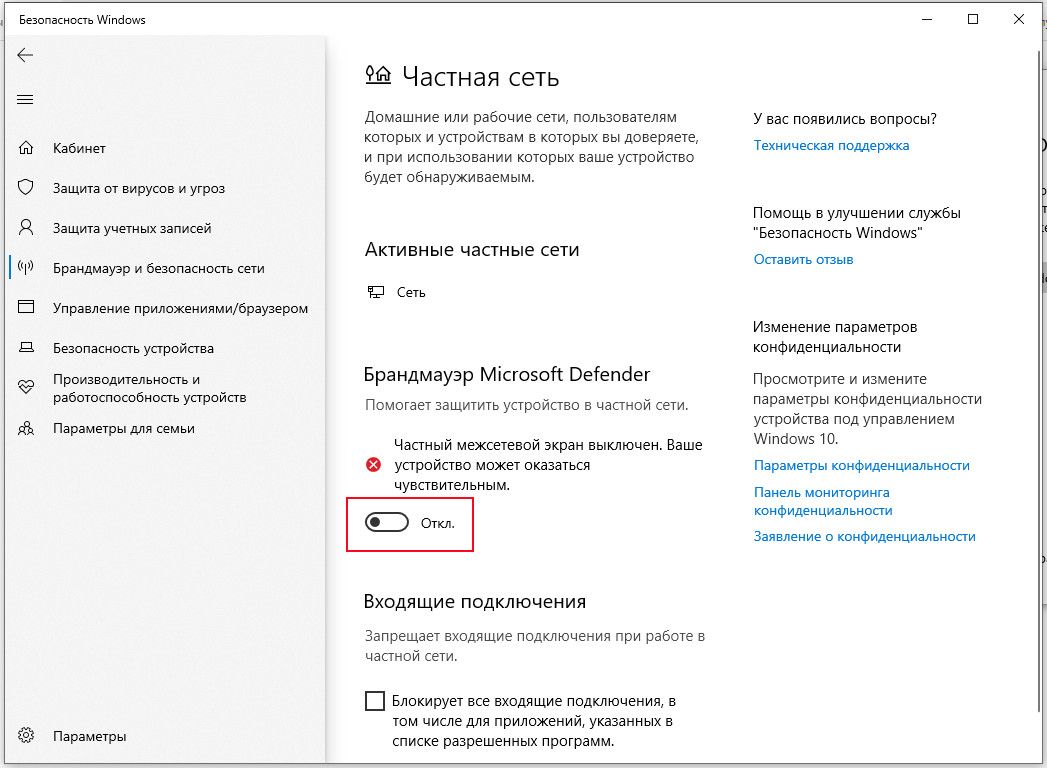
Откройте параметры Windows нажатием на Win + I и перейдите в раздел Обновление и безопасность. На вкладке Безопасность Windows выберите раздел Брандмауэр и защита сети.
Для активной частной сети переместите переключатель в положение «Отключено». После этого попробуйте запустить игру.
Установка разрешений в брандмауэре Windows
Если продолжаете сталкиваться с ошибкой внутреннего исключения java.io.ioexception, попробуйте добавить среду в список разрешений брандмауэра.
С помощью поискового запроса перейдите в брандмауэр. На панели слева перейдите на вкладку «Разрешение взаимодействия с приложением или компонентом в брандмауэре Windows». Затем щелкните на кнопку изменения параметров.
Найдите в списке файлы Java Platform SE и разрешите им доступ по частной сети.
После перезагрузки компьютера проблема должна быть решена.
Уменьшение глубины прорисовки
С ошибкой внутреннего исключения можно столкнуться, когда Minecraft не сможет отобразить всю картинку в целом из-за низкой скорости Интернета. В этом случае уменьшите глубину прорисовки в настройках до минимально допустимого.
В настройках Майнкрафт в разделе «Настройки графики» переместите ползунок прорисовки до минимального, например, до 2-х позиций.
Если ошибка исчезла, увеличьте этот показатель на единицу, пока не достигните оптимального значения.


