")
Ошибка, которая появляется за пределами границ Riot Games, — это критическая системная ошибка. Так что если у вас возникла эта проблема, не волнуйтесь, потому что здесь вы узнаете, как исправить «Произошла критическая ошибка, и процесс должен быть завершен» Valorant!
Причина критической ошибки в Valorant
Эта критическая системная ошибка может появиться в основном при попытке запустить или поиграть в Valorant в середине игры. В этом случае виноваты ни Riot Games, ни игра Valorant. Критическая системная ошибка означает, что ваш компьютер или, точнее, ваша операционная система Windows столкнулась с ошибкой и закрыла Valorant, чтобы спасти ваш компьютер от любого вреда.
Существует ряд проблем, которые могли привести к возникновению критической ошибки во время игры в Valorant. Но беспокоиться не о чем, так как далее мы рассмотрим все проблемы вместе с решениями, чтобы вы могли исправить эту критическую системную ошибку Valorant и продолжить игру с лучшими скинами ножей!
КАК ИСПРАВИТЬ КРИТИЧЕСКУЮ СИСТЕМНУЮ ОШИБКУ В VALORANT
ОБНОВИТЕ СВОЙ ПК С ОС WINDOWS
Первое решение, которое вы можете попробовать для устранения критической системной ошибки Valorant, — установить последние обновления на ваш ПК с Windows. Microsoft продолжает выпускать обновления безопасности и благополучия для пользователей Windows PC. Поэтому если критическая ошибка возникла из-за вашей ОС Windows, обновление может исправить ее. Вот как можно обновить ПК с Windows:
- Нажмите клавиши Windows Key+I, чтобы открыть Настройки ПК
- Выберите Обновление и безопасность, который находится последним
- Нажмите на Проверить наличие обновлений
- Если есть доступные обновления Windows, нажмите на Установить
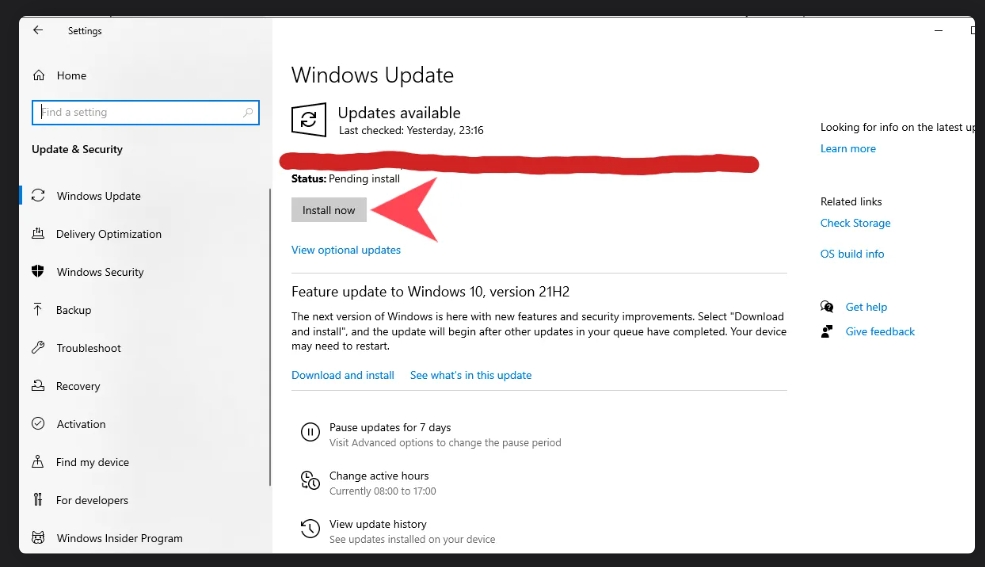
Выполните все необходимые действия, обновите ПК Windows, и, скорее всего, вам также придется перезагрузить ПК. Теперь попробуйте снова поиграть в Valorant с лучшим скином Вандала и посмотрите, появится ли критическая ошибка снова. Если она появилась, следуйте приведенным ниже решениям, чтобы узнать, сможете ли вы исправить эту ошибку.
ОБНОВИТЕ ДРАЙВЕРЫ ВИДЕОКАРТЫ
Второе решение, которое вы можете попробовать для исправления критической системной ошибки Valorant, — установить последние обновления драйверов видеокарты. Вам следует часто обновлять драйверы вашей графической карты, так как они исправляют и обеспечивают меньшее количество сбоев в игре. Вот как вы можете традиционно обновить свои графические драйверы:
- На вкладке Поиск найдите Панель управления и выберите первый вариант.
- Нажмите на Оборудование и звук и выберите Диспетчер устройств
- Найдите опцию «Адаптеры дисплея» и дважды щелкните по ней.
- Щелкните правой кнопкой мыши на вашей видеокарте и нажмите на Обновить драйвер
- Выберите Автоматический поиск драйверов и выполните все необходимые действия.
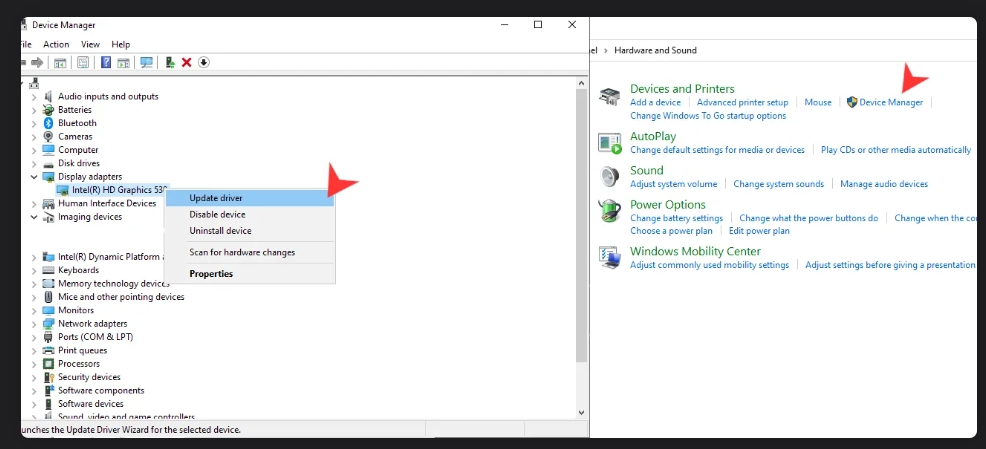
Существует также вероятность того, что ваш компьютер не найдет нужного обновления драйверов видеокарты, поэтому вам, возможно, придется обновлять драйверы вручную. В зависимости от того, какую видеокарту вы используете, будь то видеокарта AMD или NVIDIA, вот где вы можете скачать нужные драйверы:
- AMD Graphics Card Drivers Update — https://www.amd.com/en/support
- NVIDIA Graphics Card Drivers Update — https://www.nvidia.com/Download/index.aspx
- Intel Graphics Card Drivers Update — https://www.intel.com/content/www/us/en/support/products/80939/graphics.html
Вы можете попробовать загрузить нужные обновления драйверов из уважаемых приложений для видеокарты, таких как AMD Radeon Software. После обновления драйверов видеокарты вы сможете свободно войти в Valorant с лучшими скинами Phantom! Хотя если критическая ошибка появится снова, то проблема может быть более серьезной.
ЗАПУСТИТЕ VALORANT ОТ ИМЕНИ АДМИНИСТРАТОРА
Следующее решение для устранения этой критической системной ошибки — запустить Valorant от имени администратора. Не предоставление Valorant специальных привилегий на ПК может быть причиной возникновения критической ошибки. Вот как вы можете открыть Valorant от имени администратора:
- Найдите папку установки Valorant
- Перейдите по следующему пути к папке: Riot Games -> VALORANT -> live -> ShooterGame -> Binaries -> Win64
- Найдите файл «VALORANT-Win64-Shipping».
- Щелкните по нему правой кнопкой мыши и выберите Свойства
- Выберите вкладку Совместимость
- Установите флажок Запускать эту программу от имени администратора на вкладке Совместимость
- Нажмите на Применить, затем OK
- Valorant Critical System Error Fix Run Valorant As Administrator
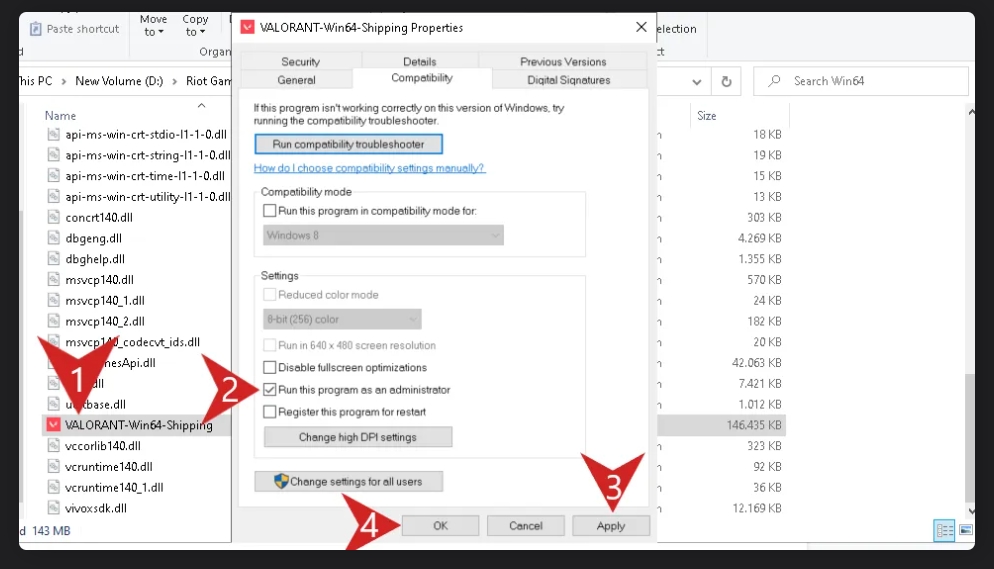
Попробуйте открыть Valorant сейчас и посмотрите, не возникнет ли критическая системная ошибка снова. Если нет, то вы можете играть с Вандалом или Фантомом! Хотя если вы снова столкнетесь с проблемой в игре, у вас еще есть множество решений, которые вы можете попробовать.
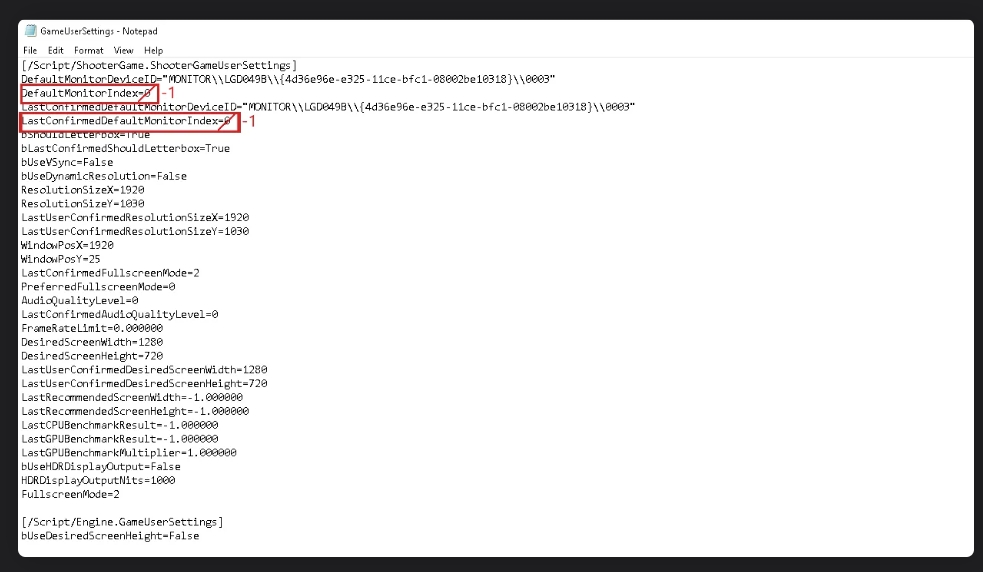
ИЗМЕНИТЬ НАСТРОЙКИ ФАЙЛА ЗАПУСКА VALORANT
Хотя это более сложное решение, вы можете исправить критическую ошибку Valorant, если измените настройки запуска игры в его файлах. Они диктуют, как Valorant открывается с самого начала, поэтому вот как вы можете изменить настройки запуска игры для Valorant:
- Нажмите клавиши Windows Key + R, чтобы открыть диалоговое окно «Выполнить».
- Введите «%AppData%» и нажмите на Enter в диалоговом окне «Выполнить».
- Вернитесь на 1 папку назад и откройте папку Local
- Откройте папку VALORANT и в правом верхнем углу найдите файл GameUserSettings.ini
- Дважды щелкните по файлу GameUserSettings.ini и откройте его с помощью Блокнота
- Измените значения «DefaultMonitorIndex» и «LastConfirmedDefaultMonitorIndex» в .ini файле с 0 на -1
- Сохраните и закройте файл
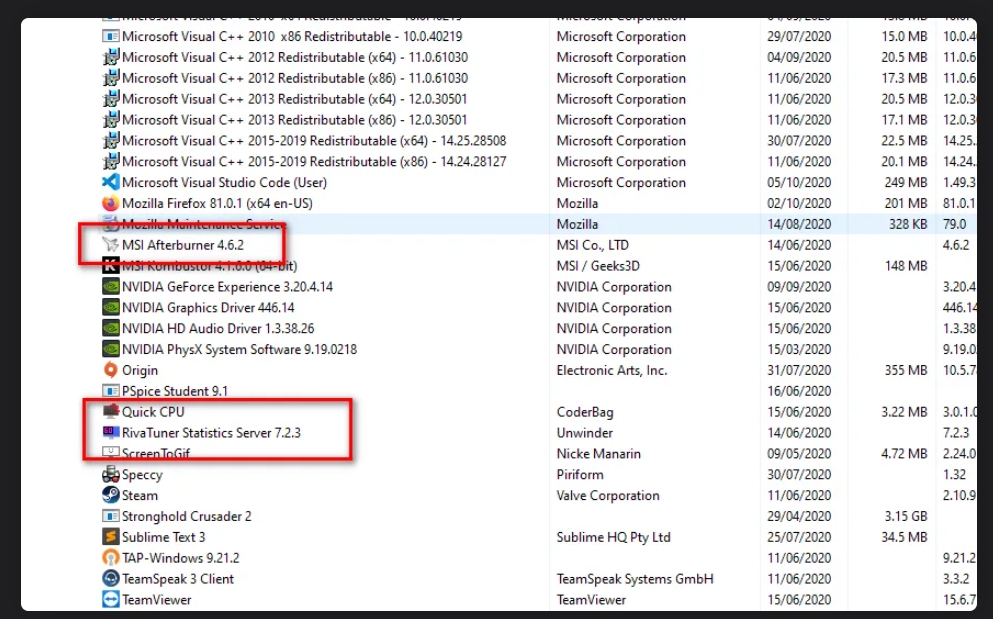
УДАЛИТЬ ПРИЛОЖЕНИЯ ДЛЯ РАЗГОНА
Valorant не воспринимает разгон ПК как нечто хорошее. И из-за разогнанного процессора вы можете получить критическую системную ошибку в Valorant. В этом случае вам придется отменить разгон и удалить приложения, такие как MSI Afterburner, которые выполняют разгон.
Чтобы удалить эти приложения для разгона, введите «Добавить или удалить программы» в строке поиска ниже и откройте первый вариант. Найдите приложения, которые делают разгон вашего GPU, например MSI Afterburner, выберите их и удалите MSI Afterburner и любые другие приложения для разгона, например RivaTuner.
Valorant Critical System Error Fix Overclocking Apps Uninstall MSI Afterburner
Отключите другие функции, которые могут удерживать разогнанный процессор на вашем ПК. Попробуйте открыть и начать играть в Valorant с лучшими агентами, чтобы посмотреть, появится ли у вас сообщение о критической ошибке. Если да, то у вас еще остались некоторые решения, которые вы можете попробовать.
ИЗМЕНИТЬ ТИП ЗАПУСКА СЛУЖБЫ VGC
Античитерская система Valorant’s Riot Vanguard временами работает не лучшим образом. Задачи Valorant и Vanguard могли перехватить ваш ПК, вызвав появление критической системной ошибки. Вам придется изменить тип запуска службы Riot Vanguard VGC, чтобы попытаться исправить эту ошибку, и вот как это сделать:
- Откройте диалоговое окно «Выполнить», нажав клавиши Windows + R.
- Введите «services.msc» и нажмите Enter, чтобы открыть окно Службы
- Найдите службу «vgc».
- Когда вы найдете ее, щелкните правой кнопкой мыши и выберите Свойства
- Измените параметр Тип запуска на Автоматический
- Нажмите на Пуск, Применить, а затем OK
- Valorant Critical System Error Fix VGC Service
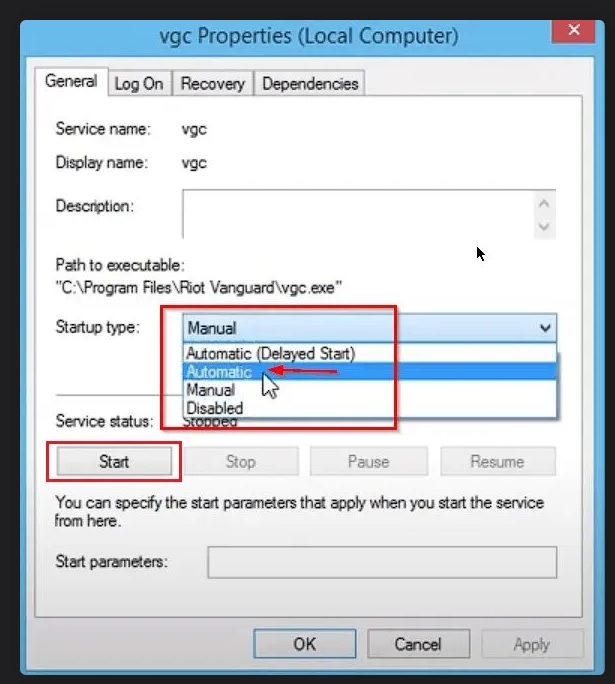
Теперь служба VGC из античита должна работать правильно. Если вы все еще получаете сообщение о критической системной ошибке, последнее решение, которое вы можете попробовать, это.
ВОСПОЛЬЗОВАТЬСЯ СИСТЕМОЙ ВОССТАНОВЛЕНИЯ VALORANT
Некоторые игроки предпочитают полностью удалить и переустановить Valorant, но они не знают, что в игре есть система ремонта. Вот как вы можете использовать систему ремонта Valorant, чтобы исправить эту критическую системную ошибку:
- Перейдите на официальный сайт Riot Games Valorant.
- Войдите в систему и снова скачайте игру
- Откройте установочный файл Valorant и нажмите на опцию Дополнительно
- Найдите и выберите точное место и папку, в которую вы скачали Valorant
- Нажмите на кнопку Установить, и Valorant попытается восстановить все поврежденные файлы.
- Valorant Исправление критических системных ошибок Восстановление системы
Подождите немного, пока игра сделает свое волшебство, и перезагрузите ПК. Попробуйте снова поиграть в игру и посмотрите, сохраняется ли ошибка. Если да, то вам следует
СВЯЗАТЬСЯ СО СЛУЖБОЙ ПОДДЕРЖКИ RIOT GAMES
Служба поддержки Riot существует для того, чтобы помочь каждому игроку Valorant справиться с любой ошибкой или игровой проблемой, с которой он может столкнуться. Они могут попросить вас предоставить конкретные файлы и дать конкретные решения для устранения этой критической системной ошибки. Вы можете связаться со службой поддержки Riot, отправив тикет здесь.
Видео
Are you seeing the critical error on your WordPress site?
WordPress may sometimes show an error message saying, ‘There has been a critical error on this website. Please check your site admin email inbox for instructions.’ It will also include a link to the WordPress debugging guide.
In this guide, we will show you how to fix the critical error in WordPress. We will also talk about what causes this error and how to avoid it.

What Is the Critical Error in WordPress?
The critical error in WordPress is an error that stops WordPress from loading all the scripts it needs to work correctly.
Previously, this WordPress error resulted in a white screen of death or a fatal error message on the screen. Most beginners didn’t find it very helpful and struggled to resolve the issue on their own.
Since WordPress 5.2, users will now see a generic error message: ‘There has been a critical error on this website. Please check your site admin email inbox for instructions’ with a link to the WordPress debugging guide.

It will also send an email message to your WordPress site’s admin email address.
This email includes more details about the plugin or theme causing the error and a link to access your WordPress dashboard in recovery mode.

Another variant of this error will only show that your website is facing a critical error. It will not instruct you to check your email address.
This can happen because WordPress wasn’t able to load the files it needed to make the recovery mode available or to send the email.

What Causes the Critical Error in WordPress?
The critical error in WordPress is generally caused by a malfunctioning plugin, script, or code that prevents WordPress from functioning correctly.
Due to the malfunctioning code, WordPress is unable to load the files it needs.
If you recently copied and pasted code snippets from a tutorial to your website, they might trigger a critical error.
All top WordPress plugins are thoroughly tested, so they are less likely to cause a critical error. However, a conflict with another WordPress plugin or some custom code may trigger the error.
Let’s look at how to fix the critical error in WordPress and get your website back.
Fixing the Critical Error in WordPress (2 Methods)
The critical error message itself is not very useful for finding and fixing the issue’s cause. Luckily, WordPress also sends an email to the admin email address of your website.
Many WordPress websites are not configured to send emails using SMTP. Due to this reason, they may not get an email despite WordPress telling them that it has sent an email.
Similarly, some WordPress sites may only see the critical error message without instructions to check the email. That’s because WordPress wasn’t able to load files it needed to send an email or make recovery mode available.
If you are among those users, don’t worry. We will show you how to fix the critical error even without the email.
On the other hand, if you received the WordPress technical issue email notification, then we will show you how to make sense of it and use it to bring your website back.
Simply click the links below to skip straight to the section you need:
- Fixing the Critical Error With WordPress Debugging Email
- Fixing the Critical Error in WordPress Manually (Without Email)
Fixing the Critical Error With WordPress Debugging Email
First, you need to visit the inbox for your website’s WordPress administration email address.
Are you unsure which email address you used as the admin email? It is the email address you provided when installing WordPress.
If your site is on Bluehost or you used a WordPress auto-installer, your admin email address will likely be the same one you used for your WordPress hosting account.
You will see an email in your inbox with the subject line, ‘Your Site is Experiencing a Technical Issue.’ Inside it, you will find more helpful information about what caused the critical error on your WordPress website.
For instance, the following screenshot shows that the critical error was caused by the WordPress theme on our test site.

The email also includes a unique link that will allow you to log in to your WordPress website in recovery mode to investigate and fix the issue.
At the bottom of the email, you will see even more detailed information about the error, including the specific file and code that triggered it.
In the example below, some code on line 614 of our theme’s functions.php file is responsible for triggering the error.

Here is another example showing an error caused by a malfunctioning WordPress plugin.
As you can see, the message highlights the plugin name and the line of code causing the error.

Now, you just need to click on the link to WordPress recovery mode, which will take you to your WordPress admin area.
You will be asked to log in to continue.

Once you are logged in, you will see a notification telling you about the critical error, what caused it, and a link to where you can go to fix it.
For instance, in the following screenshot, WordPress is notifying us about the critical error caused by the plugin with a link to the Plugins page.

If you click the link, it will show you the problem plugin. It will also show you exactly which line of code caused the error.
You can go ahead and deactivate the plugin for now by clicking on ‘Deactivate’.

Then you can simply look for an alternative WordPress plugin or see if you can get support from the plugin developers.
Similarly, you will see a link to the Themes page if the problem lies with your theme. At the bottom of the page, it will say which theme is causing the issue.

You can change your WordPress theme. Alternatively, you can delete the broken one and reinstall a fresh copy of it from the official source to see if that resolves the issue.
Once you have addressed the issue, click on the ‘Exit Recovery Mode’ button at the top.

In most cases, your WordPress website would now start working normally.
However, if you still see the critical error in WordPress, you can try the troubleshooting steps in the next section.
Fixing the Critical Error in WordPress Manually (Without Email)
If you didn’t receive the WordPress critical issue notification email, then this method will teach you how to troubleshoot and fix the critical error in WordPress.
If the error was caused by a recent action you took, then you can undo that action to fix the issue.
For example, if you installed a new plugin and activating it caused the critical error, then you just need to deactivate it (we will show you how to do that in the first step below).
On the other hand, if you are unsure what caused the error, you can simply follow these steps.
1. Deactivate All WordPress Plugins
The easiest way to disable a faulty WordPress plugin is by deactivating it. However, due to the critical error, you won’t have access to the admin area or know which plugin to deactivate.
To address this, we will deactivate all WordPress plugins. Don’t worry, you can easily reactivate them once you get access to your WordPress admin area.
Simply connect to your WordPress website using an FTP client or the File Manager app in your web hosting control panel.
Once connected, you need to navigate to the wp-content folder.

Inside the wp-content folder, you will see a folder called ‘plugins’. You need to right-click on it and then select the ‘Rename’ option.
Next, change the ‘plugins’ folder name to anything you like. In our example, we will call it ‘plugins.deactivated’.
WordPress looks for the plugins folder to load the activated plugins on your website. When it cannot find the plugins folder, it simply cannot activate them and automatically sets them as deactivated.
You can now visit your website to see if the critical error message has disappeared.
Important: Don’t forget to rename the ‘plugins’ folder if the critical error issue has been resolved. WordPress will then recognize the folder, and you can reactivate the plugins one by one from the WordPress dashboard to identify which one caused the critical error.
For more details, see our tutorial on how to deactivate all WordPress plugins.
2. Switch to a Default Theme
The next step in troubleshooting the critical error is switching your WordPress theme to a default one. This will fix the critical error issue if some code in your current WordPress theme is causing the problem.
Simply go to the WordPress.org theme directory and download a fresh copy of a default theme like Twenty Twenty-Two or Twenty Twenty-Three.

Next, you need to unzip the theme file to your computer.
This will create a folder with the theme name on your computer.

Now, you need to connect to your WordPress site using an FTP client or the File Manager app in your hosting control panel.
Once you have connected, navigate to the /wp-content/themes folder, and you will see a list of all the themes installed on your website.

Go ahead and download all of these folders to your computer as a backup.
After that, you need to delete all the theme folders from your website.

Your WordPress site now doesn’t have a theme installed.
To fix this, upload the default theme folder you downloaded earlier.

Once this process has finished, you can try visiting your website.
If your WordPress theme caused the critical error, then the error message should have disappeared, and you will be able to access your website.
3. Reinstall WordPress
A corrupt WordPress core file or malware could also trigger a critical error in WordPress. The easiest way to fix this is by reinstalling WordPress.
Simply go to WordPress.org and download a fresh copy of WordPress to your computer.
After downloading the file, you need to unzip it to your computer. This will create a folder called ‘wordpress’, which contains all the files you need for the reinstall.

Next, connect to your WordPress site using an FTP client or the File Manager app in your hosting control panel.
Once connected, navigate to the root folder of your website. This is the folder that contains the wp-admin, wp-content, wp-includes, and wp-admin folders.

Now select the files inside the ‘wordpress’ folder on your computer and upload them to your website.
Your FTP client will ask if you want to overwrite these files or skip them. You need to select ‘Overwrite’ and check the box next to ‘Always use this action’.

Then, simply click on the ‘OK’ button to continue. Your FTP client will now replace your core WordPress files with fresh copies from your computer.
Once it has finished, you can try visiting your website to see if this resolves the error.
If the critical error was caused by a corrupt WordPress core file or malware, then the error message should disappear now.
4. Turn On Debugging in WordPress
WordPress comes with a built-in debugging system that allows you to catch errors, log them, and troubleshoot issues.
To turn it on, you need to edit the wp-config.php file. Just locate the following line:
define( 'WP_DEBUG', false );
Now, go ahead and replace this line with the following code:
define( 'WP_DEBUG', true );
define( 'WP_DEBUG_DISPLAY', true );
define( 'WP_DEBUG_LOG', true );
define( 'SCRIPT_DEBUG', true );
If you visit your WordPress website now, it will show you debugging information and the critical error message.

Debug mode not only shows errors but warnings and notices too. This helps you find out what is causing the problem so that you can fix it.
5. Increase PHP Memory Limit
Your web hosting server is like any other computer. It needs memory to efficiently run multiple applications at the same time.
If your server doesn’t have enough resources to run PHP, then it may crash or become unresponsive. This could trigger a critical error in WordPress.
To fix this, you can increase the PHP memory limit by telling your hosting server to use more memory for PHP.
You can do that by entering the following line into your wp-config.php file.
define( 'WP_MEMORY_LIMIT', '512M' );
Don’t forget to save and upload your changes to the server.
For more details, you can see our tutorial on how to increase PHP memory limit in WordPress.
Now, you can try visiting your website to see if this has resolved the critical error.
6. Upgrade Your PHP Version
WordPress requires PHP version 7.4 or greater. If your WordPress hosting server uses an older version of PHP, it may not work well and cause a critical error.
If you have access to the WordPress recovery mode, you can see which PHP version your site is using by visiting the Tools » Site Health page and switching to the Info tab.

From here, scroll down to the Server section and click to expand it.
There, you will see the PHP version installed on your hosting server.

If it is lower than 7.4, then you need to update the PHP version.
Most good WordPress hosting companies allow you to easily do that from your hosting account control panel. For details, please see our article on how to update your PHP version on popular WordPress hosting platforms.
We hope this article helped you troubleshoot and fix the critical error in WordPress. You may also want to see our guide on how to get a free SSL certificate for your WordPress site or our expert comparison of the best business phone services for small businesses.
If you liked this article, then please subscribe to our YouTube Channel for WordPress video tutorials. You can also find us on Twitter and Facebook.
Disclosure: Our content is reader-supported. This means if you click on some of our links, then we may earn a commission. See how WPBeginner is funded, why it matters, and how you can support us. Here’s our editorial process.
Editorial Staff at WPBeginner is a team of WordPress experts led by Syed Balkhi with over 16 years of experience in WordPress, Web Hosting, eCommerce, SEO, and Marketing. Started in 2009, WPBeginner is now the largest free WordPress resource site in the industry and is often referred to as the Wikipedia for WordPress.
Some PC gamers are reporting the issue whereby when you start or while playing exclusively Riot Games like VALORANT, War or Warships or League of Legends on Windows 11 or Windows 10 computer, the game crashes with the error prompt indicating A critical error has occurred and the process must be terminated. This post provides the most suitable solutions to this issue.

What is a critical system error?
A critical error is a serious computer error that forces the program to stop and it becomes impossible for the running program, operating system or software to continue working normally. This error might cause the computer to reboot or freeze.
When this system error is triggered on your gaming computer, a an error prompt with the following full message is displayed:
A critical error has occurred end the process must be terminated.
Would you like to create a crash dump to aid the developers in troubleshooting this issue? This may take up to 5 minutes.
NOTE: The process may appaer unresponsive during this time.
What is a Windows crash dump?
A system crash (also known as a “bug check” or a “Stop error”) occurs when Windows can’t run correctly. The dump file that is produced from this event is called a system crash dump. They can hog gigabytes of hard drive storage. Windows only automatically delete crash dump files when HDD space is limited. However, users can also erase crash dumps with cleanup utilities.
Investigations reveal the following are the most common culprit of this error;
- Overclocked CPU or GPU
- MSI Afterburner and Rivatuner
- Game Launch Settings
- Outdated Display Drivers
- Insufficient Permissions
Read: Valorant Crashing Mid Game or on Startup
If you are getting the A critical error has occurred and the process must be terminated when you start or while playing any Riot games like VALORANT, War or Warships or League of Legends on your Windows 11/10 system, you can try our recommended fixes below in no particular order to resolve the issue and get back to playing your favorite game on your rig.
- Run the game with admin privilege
- Change game settings
- Remove the Config and Logs Folders
- Update graphics adapter driver
- Revert overclocking (if applicable)
- Reinstall the game
- Update BIOS
Let’s see the description of the listed solutions.
1] Run the game with admin privilege

Some affected PC gamers reported that every other thing being equal, they were able to resolve the A critical error has occurred and the process must be terminated issue on their Windows 11/10 gaming system by simply running the game as an administrator but make sure the VGC service is started and set as Automatic Startup Type prior to the task.
2] Change game settings
The issue in highlight can also be resolve by altering the game launch settings stored in the GameSettings.ini file in the Valorant or League of Legends directory as the case may be. Essentially, the file stores your basic configuration that is to be used whenever you launch the game on your PC.
To change game launch settings, do the following:
- Press Windows key + R to invoke the Run dialog.
- In the Run dialog box, type environment variable below and hit Enter.
%appdata%
- In the File Explorer window that opens, click the up facing arrow to go back a step.
- Now, double-click the Local folder.
- Next, navigate to ShooterGame > Saved > Config > WindowsClient directory.
- Next, open up the GameUserSettings.ini file with any Text Editor.
- In the open file, change the value of DefaultMonitorIndex from 0 to -1.
- After that, change the LastConfirmedMonitorIndex value from 0 to -1.
- Save the changes and close the file.
See if the issue is resolved when you launch or while playing the game. Otherwise, try the next solution.
Read: Fix RADS Error on League of Legends on Windows PC
3] Remove the Config and Logs Folders
Another viable solution to this Riot Games-specific issue you are currently facing is deleting the Config and Logs folders within the LoL or Valorant folder. To perform this task, do the following:
- Press Windows key + E to open File Explorer.
- Navigate to the default directory path below:
C:\Program Files\Riot Games
- At the location, open the game folder and delete the mentioned folders.
- Exit File Explorer.
4] Update graphics adapter driver

Depending on the GPU in use AMD or NVIDIA, this solution simply requires you to make use of the AMD Radeon software or the GeForce Experience app installed for NVIDIA graphic cards and update your graphics adapter driver on your Windows 11/10 gaming rig.
Read: Fix Valorant Graphics Driver Crashed error on Windows PC
5] Revert overclocking (if applicable)
This solution requires you stop overclocking your CPU or GPU. So, if you have overclocked your PC, you can simply reverse the change depending on the overclocking software in use like MSI Afterburner and Rivatuner. Generally, launch the software and look for the option to stop the overclocking or simply uninstall the software altogether. Once done, restart your computer and see if the issue is resolved. Otherwise, proceed with the next solution.
6] Reinstall the game
If youre still encountering the error, this possible solution simply requires you to download and then run the Hextech Repair Tool. Once you download and install the tool, run the tool with administrative privileges, then follow the on-screen instructions to repair/reinstall the LoL game. Alternatively, you ca use a third-party software uninstaller to uninstall the game, and then proceed to the official Riot Games website and redownload and install the latest version of the game. Afterwards, check if the problem persists. If so, proceed with the next solution.
7] Update BIOS

At this point, if the issue you’re currently facing is still unresolved on your Windows 11/10 gaming device, then you can try updating the BIOS and firmware on your system.
Using tools from OEMs is the easiest way to do so. All OEM manufacturers have utilities that help you easily update, BIOS, firmware, and drivers. Search for yours and download it from the official site only. This is the safest way to update the BIOS.
- If you own a Dell laptop you can head over to Dell.com, or you could use Dell Update Utility.
- ASUS users can download the MyASUS BIOS update utility from the Microsoft Store.
- ACER users can go here. Enter your Serial Number/SNID or search for your product by Model, select BIOS/Firmware, and click the Download link for the file you want to download.
- Lenovo users can use the Lenovo System Update Tool.
- HP users can use the bundled HP Support Assistant.
Hope this helps!
Why does my computer say critical process died?
The critical process died issue is basically caused when a critical component of Windows detects that data has been modified when it should not have been. This element could be a bad driver, a memory error, etc. Most of the time, this error occurs all of a sudden when users are working on their PCs.


Участник, Альфа-тестер, Коллекционер
3 999 публикаций
5 148 боёв
Участник, Альфа-тестер, Коллекционер
3 999 публикаций
5 148 боёв

Старший альфа-тестер
16 977 публикаций
5 174 боя
Старший альфа-тестер
16 977 публикаций
5 174 боя

Участник
54 публикации
18 024 боя

![]()
Участник, Коллекционер
2 604 публикации
50 165 боёв

Участник
71 публикация
8 805 боёв
Старший альфа-тестер
16 977 публикаций
5 174 боя
Участник
1 309 публикаций
Участник
1 459 публикаций
26 641 бой
Старший альфа-тестер
16 977 публикаций
5 174 боя
Участник, Коллекционер
3 130 публикаций
4 723 боя
Старший альфа-тестер
16 977 публикаций
5 174 боя
Эта тема закрыта для публикации новых ответов.
Перейти к контенту

A critical error has been occurred в игре World of Warships. Как исправить?
Игра World of Warships считается довольно хорошо сбалансированной и оптимизированной в плане корректности своей работы. Но даже в ней некоторые пользователи сталкиваются с проблемами запуска. Одна из наиболее распространенных таких ошибок – A critical error has occurred. Появляется она, как правило, в момент нажатия на кнопку “Играть”, хотя не исключены случаи ее появления прямо во время игры.
В данной статье мы приведем несколько рабочих решений, которые помогут исправить эту проблему.
Некорректный файл preferences.xml
Первое, с чего стоит начать решать ситуацию с появляющейся ошибкой Critical Error Occurred это удаление файла preferences.xml из папки с игрой.
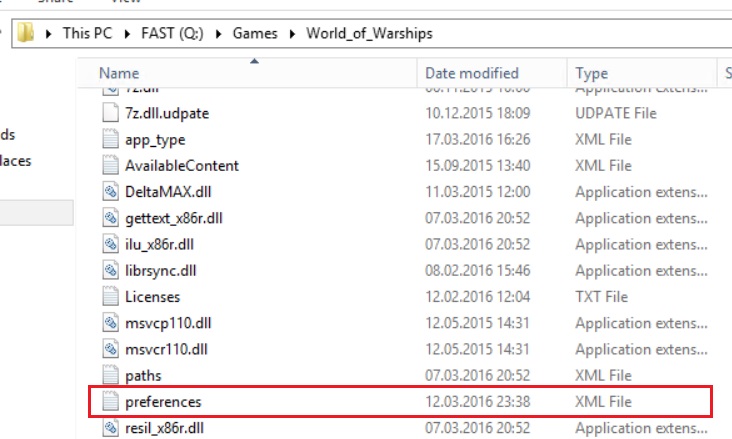
Файл файл preferences.xml
Дело в том, что этот файл содержит в себе некоторые параметры, влияющие на работу Critical Error Occurred. Удалив его и запустив игру, Вы сбросите все параметры этого файла на заводские.
Отключение масштабирования изображения
Если действия, описанные выше, не дали результата, то далее попробуйте деактивировать масштабирование изображения (оптимизацию во весь экран) в свойствах исполняемого файла WorldofWarships.
Для этого переходим в папку с игрой и находим в ней файл WorldofWarships.exe. Это тот файл на который ссылается ярлык на рабочем столе для запуска игры.
Жмем по нему правой кнопкой мыши и выбираем “Свойства”.
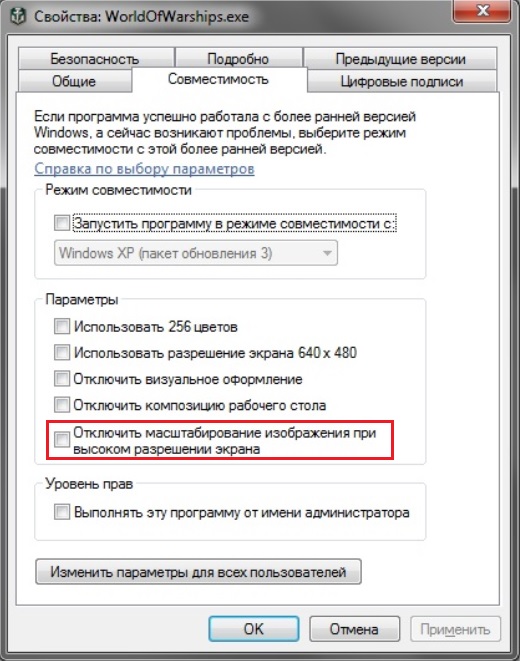
Отключение масштабирования
Далее переходим на вкладку “Совместимость” и находим пункт “Отключить оптимизацию во весь экран” или “Отключить оптимизацию полноэкранного режима” или “Отключить масштабирование изображения при высоком разрешении экрана”. В зависимости от версии Windows этот пункт может иметь разные названия.
Применяем и пробуем запускать.
Обновление драйвера видеокарты
Если ничего выше не помогло, то однозначно стоит попробовать обновить драйвера для своей видеокарты. Несмотря на то, что данный совет достаточно банален и распространен не стоит им пренебрегать. Очень много случаев, когда именно обновленные драйвера видеокарты помогали избавиться от ошибки Critical Error Occurred не только в игре World of Warships, но и в других популярных играх.
Лучшая благодарность автору — репост к себе на страничку:
- Why this happens
- How this happens
- How to resolve this issue
- AT YOUR OWN RISK — Alternative Solutions
Why this happens
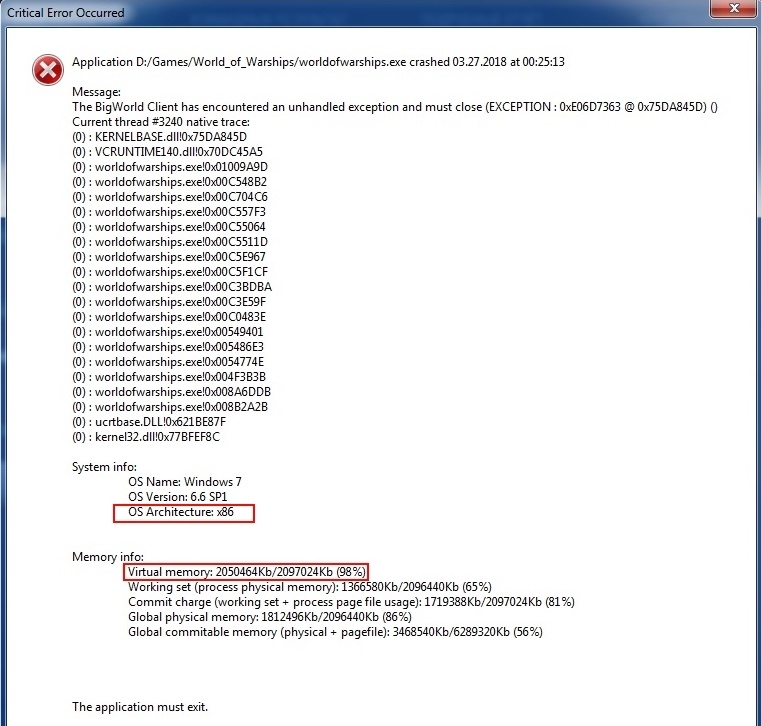
World of Warships uses quite a bit of your Volatile memory, commonly called RAM.
- x86 OS (Windows XP 32bit, Windows Vista 32bit, Windows 7 32bit), have a maximum allowed virtual address space for an application of 2 GB RAM.
- x64 OS have a maximum allowed virtual address space for an application of 4 GB RAM.
- Computers with a low amount of RAM available may face issues to run the game reliably.
- With Update 0.8.1 32-Bit OS are no longer supported and can not run World of Warships!
- More details are available in a dedicated article.
How this happens
- You start the game and it loads from your Hard Drive to your RAM.
- You play a few battles and your RAM starts filling up.
- Your Computer runs out of free RAM space and the game crashes.
- About: Windows and Memory limits
- An error looking like the image below appears.

How to resolve this issue
- Should your computer have installed a x86 / 32 bits OS installed, you will need an OS upgrade to x64
- Refer to an IT Specialist before upgrading your OS.
- Verify your computer meets the minimum requirements. See amount of RAM required.
- Run the game in safe mode, with no mods.
AT YOUR OWN RISK — Alternative Solutions
Increasing the virtual address space for the process on Windows 7, 8, 8.1, 10 x86
- Run command line with administrator privileges:
- Open Start menu and type cmd
- Right click on the appeared cmd icon
- Choose «Run as administrator».
- Enter the following command in command line window:
- bcdedit /set increaseuserva 3072
- Reboot your computer.
Verify increase of virtual address space
- Run command line with administrator privileges:
- Open Start menu and type cmd,
- Right click on the appeared cmd icon
- Choose «Run as administrator».
- Enter the following command in command line window:
- bcdedit /enum | find «increaseuserva»
- If optimization flag exists you will be provided the following output:
- increaseuserva 3072
Rollback increase of virtual address space
- Run command line with administrator privileges:
- Open Start menu and type cmd,
- Right click on the appeared cmd icon
- Choose «Run as administrator».
- Enter the following command in command line window:
- bcdedit /deletevalue increaseuserva
- Reboot computer
On 2/15/2020 at 6:17 PM, SnipeySnipes said:
Always nice when someone can use the search function. However, is there any more information you can give us as to the error like logs or screenshots? Shy of that, check out my troubleshooting guide. In this case, I would focus on Parts 1, 5, 7*, 10,13 and 14.
https://warshipnews.blog/2018/06/11/world-of-warships-and-win-10-troubleshooting-guide/
*-As noted in previous posts, delete the preferences.xml file usually found in C:GamesWorld_of_Warships. Also, if you have extensions hidden (which is default) you will NOT see the .xml so the file will just be called Preferences. If you are more comfortable knowing that the file is preferences.xml you can enable file extensions in Windows 10 by going to View on the file explorer and check the File name extensions box.
I’ve started getting this error as well. Uninstalled and reinstalled. Deleted preferences. Renamed preferences. Nothing seems to work.
It seems to happen in the Login phase. It gets past Game Loading, and hangs at the Login screen. If you try to restart, it crashes completely. At one point, it crashed the computer entirely.
I am not having connection issues with the internet in general. However, I have been disconnected from the game much more often since 10.0 came out. But multiple machines on the router work just fine, and this computer has no connection issues aside from WOWS. I’m usually on a wire, not on a WiFi connection. When I am on WiFi it’s a 5G connection.
The drive is actually new and there’s hardly anything on it yet.
BIOS were updated not too long ago, so I doubt it’s anything on that level. I doubt there’s a driver issue, but I’ll look into that again if it keeps up.
I don’t run any mods to the game.
The only thing I haven’t done is removed the battery from the laptop to try a cold reset.
Am I missing anything?