Вы можете столкнуться с проблемой «connection refused no further information» при попытке присоединиться к серверу Minecraft. Эта проблема — одна из наиболее распространенных проблем в Minecraft. Как только вы столкнетесь с ней, используйте описанные в этой статье методы для устранения ошибки.
Способ 1: Выполните перезагрузку

Простой перезапуск может помочь вам решить множество мелких сбоев и ошибок. Поэтому, если вы не знаете, как исправить ошибку «connection refused no further information» в Minecraft, вы можете попробовать перезагрузить компьютер, чтобы посмотреть, была ли проблема именно в этом. Кроме того, вам также следует перезагрузить маршрутизатор, чтобы улучшить подключение к Интернету и избежать возможных проблем с сетью.
Способ 2: Разрешите Minecraft в брандмауэре
Файрволл Windows может распознать процесс подключения к серверу как угрозу и заблокировать процесс. Это тоже может вызывать данную проблему. Чтобы избежать этого, рекомендуется добавить Minecraft в качестве исключения в брандмауэр.
Способ 3: Удалите конфликтующие программы
Если у вас установлены программы, у которых возникает конфликт с Minecraft, то, скорее всего, появится сообщение об ошибке. В этом случае вы можете попытаться избавиться от проблемы, удалив весь неподходящий софт. После удаления перезагрузите компьютер, чтобы проверить, устранена ли ошибка.
Способ 4: Добавьте IP-адрес и порт перед подключением к серверу
Чтобы устранить проблему «connection refused no further information», вы должны проверить и добавить правильный IP-адрес и порт для Minecraft.
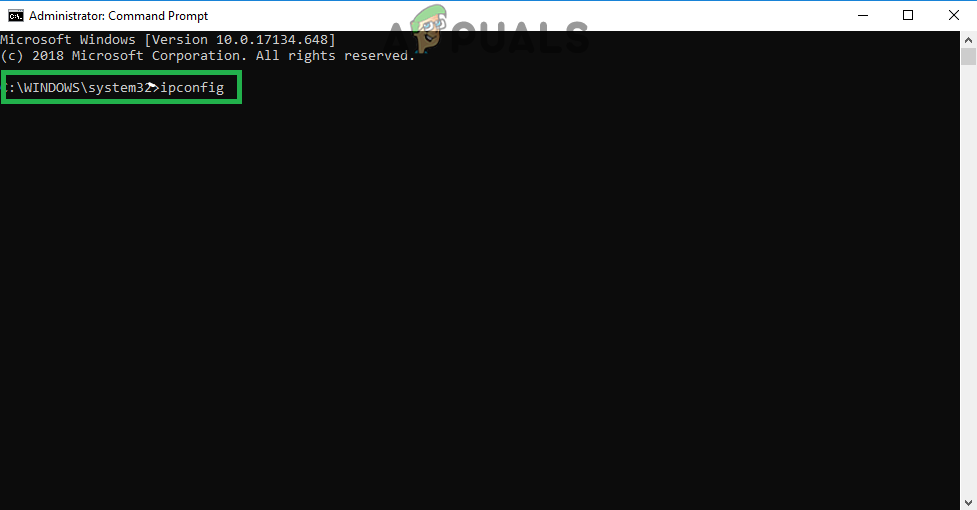
Шаг 1: Запустите командную строку от имени администратора. Затем введите ipconfig и нажмите Enter, чтобы просмотреть конфигурацию IP. Вам нужно записать свой IPv4-адрес.
Шаг 2: Нажмите Windows+E, чтобы открыть проводник, а затем перейдите в папку Minecraft Server.
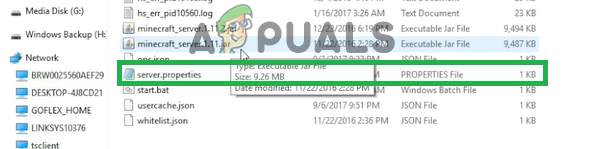
Шаг 3: Откройте текстовый документ Server.properties, чтобы узнать порт сервера.
Шаг 4: После этого откройте Minecraft и перейдите в «Play Multiplayer».
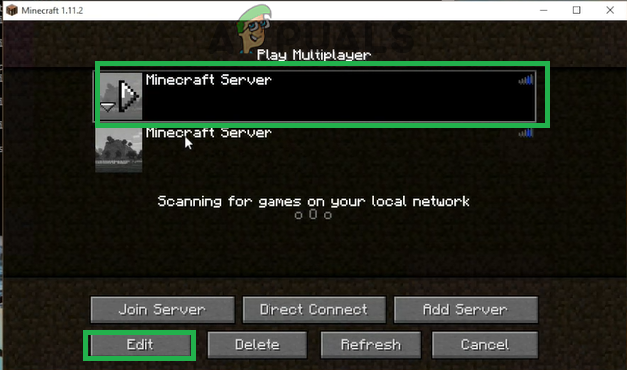
Шаг 5: Выберите сервер Minecraft, к которому вы хотите присоединиться, и нажмите «Изменить».
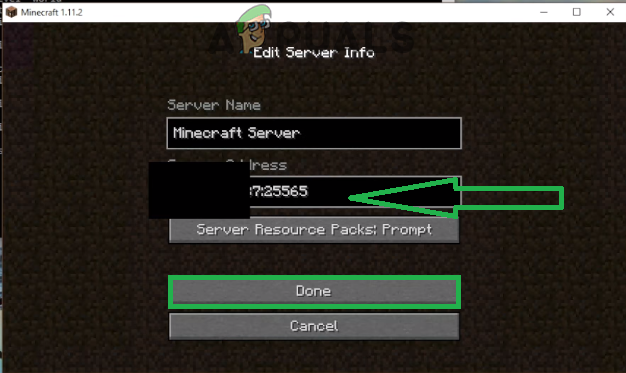
Шаг 6: В следующем окне убедитесь, что адрес сервера совпадает с адресом IPv4 и портом сервера, которые вы записали ранее.
Шаг 7: Наконец, нажмите «Готово», а затем «Обновить», чтобы применить изменения.
Способ 5: Обновите Java
Minecraft использует java для правильной работы. Если java в вашей системе устарела, вы можете столкнуться с этой проблемой. Таким образом, необходимо обновить Java, чтобы решить ошибку. Для этого перейдите в папку Java в проводнике Windows и дважды щелкните «Проверить наличие обновлений» внутри этой папки. Затем нажмите «Обновить сейчас» на вкладке «Обновление» во всплывающем окне.
Введение
Minecraft — популярная песочница, разработанная Mojang Studios. Она предоставляет возможность играть в виртуальном мире, где игроки могут строить различные конструкции и исследовать миры вместе с другими игроками. Hamachi — это виртуальная частная сеть (VPN), которая позволяет игрокам создавать локальные сетевые соединения для мультиплеерной игры.
Причины возникновения ошибки «connection refused no further information»
Ошибка «connection refused no further information» при попытке игры в Minecraft через Hamachi может возникнуть из-за нескольких причин:
- Неправильная настройка сети Hamachi: Если настройки сети Hamachi некорректны или несоответствуют требуемым параметрам для игры в Minecraft, возникает ошибка «connection refused no further information».
- Фаервол или антивирусная программа блокирует соединение: Фаерволы или антивирусные программы могут блокировать входящее соединение Hamachi, что приводит к ошибке «connection refused no further information».
- Несовместимость версий Minecraft и Hamachi: Если используемые версии Minecraft и Hamachi несовместимы, это может вызвать ошибку соединения.
Способы исправления ошибки «connection refused no further information»
Вот несколько способов решить проблему ошибки «connection refused no further information» при попытке игры в Minecraft через Hamachi:
1. Проверьте правильность настроек сети Hamachi
Убедитесь, что настройки сети Hamachi верны и соответствуют требованиям для игры в Minecraft. В основном, это включает в себя следующие проверки:
- Убедитесь, что все игроки находятся в одной и той же сети Hamachi и имеют одинаковый IP-адрес Hamachi.
- Проверьте, что IP-адреса Hamachi не конфликтуют с другими устройствами в сети.
- Убедитесь, что Hamachi разрешен в настройках брандмауэра и антивирусной программы.
2. Проверьте фаерволы и антивирусные программы
Проверьте, не блокируют ли фаерволы или антивирусные программы входящее соединение Hamachi. Если они блокируют доступ, добавьте Hamachi в исключения или разрешите входящие соединения. Некоторые программы могут иметь функцию «Режим игры» или «Игровой профиль», которая автоматически регулирует настройки безопасности во время игры.
3. Обновите Minecraft и Hamachi до последних версий
Убедитесь, что у вас установлены последние версии Minecraft и Hamachi. Проверьте наличие обновлений для обоих программ и установите их, если таковые имеются. Более новые версии могут включать исправления ошибок и улучшенные свойства сетевых соединений.
4. Попробуйте альтернативные методы для игры в Minecraft по локальной сети
Если все вышеперечисленные способы не помогли, можно попробовать играть в Minecraft по локальной сети, используя другие методы. Например, можно использовать порты и IP-адреса, вместо Hamachi, для настройки соединения. Дополнительные инструкции и руководства можно найти в официальных форумах Minecraft или на сайте Mojang Studios.
Заключение
Ошибка «connection refused no further information» в Minecraft при использовании Hamachi может быть вызвана неправильной настройкой сети Hamachi, блокировкой фаерволом или антивирусной программой соединения или несовместимостью версий программ. Рекомендуется проверить и исправить настройки сети Hamachi, проверить блокировки фаервола и антивирусной программы, обновить Minecraft и Hamachi и попробовать альтернативные методы для игры по локальной сети.
Вот бывает же такое: приходишь домой, запускаешь Minecraft и думаешь «ух, сейчас как поиграю!», а поиграть не получается. Ошибку Java.net.ConnectException Connection timed out: no further information Minecraft выдает пользователям довольно часто. В статье разберемся, что она означает и как можно быстро ее решить.

При подключении к серверу в игре может возникнуть ошибка Java.net.ConnectException Connection timed out: no further information. Если переводить досконально, то на экране вы видите предупреждение: «Сетевой сбой Java.Net. Время соединения истекло: нет дальнейшей информации». Чаще всего появляется ошибка во время подключения к Minecraft, но столкнуться с ней можно и в других продуктах на движке Java.

По сути, ошибка означает, что программа не смогла подключиться к серверу в указанное время (connection timed out). А перед тем как разбираться, что с этим делать, стоит узнать причину ее возникновения.
Причины появления
У ошибки Java.net.ConnectException Connection timed out: no further information есть несколько причин:
- Нестабильное соединение с лагами и перебоями;
- Низкая скорость интернета;
- На компьютере стоит старая версия Java;
- Вы пытаетесь запустить устаревшую версию Minecraft;
- Проблемы с работой сервера (техработы, сервер недоступен и так далее);
- Брандмауэр Windows или антивирус заблокировали подключение;
- Проблемы с работой роутера.

Как убрать ошибку
Перед тем как браться за устранение ошибки, проверьте работоспособность нужного сервера. Сделать это достаточно просто. Перейдите на любой онлайн-ресурс для проверки (например, этот) и введите IP-адрес сервера в первую строку. Если все в порядке, вы увидите информацию о самом сервере и количестве игроков.

Также стоит проверить не закончилась ли у вас подписка на платный сервер (если вы играете на нем) и не нужно ли ее возобновить. После этого можно переходить к различным решениям проблемы.
Перезагрузка
Пойдем по порядку от самого простого к самому сложному. Прежде всего, попробуйте перезагрузить ПК. Да, это тоже может помочь. Бывает, что из-за долгой работы ваше устройство начинает лагать. Отсюда могут появиться различные баги и ошибки.

Если перезагрузка ПК не сработала, переподключитесь к интернету или Wi-Fi, либо перезагрузите роутер. Вдруг проблема на стороне провайдера и вы тут не причем.
Обновление Java
Идем дальше. Перезагрузки не спасли. Что можно сделать? Поставить на компьютер последнюю версию движка Java. Иногда проблема бывает в том, что версия игры конфликтует с устаревшей программой. Чтобы это сделать, откройте Панель управления, потом меню «Программы и компоненты», отыщите в списке Java и нажмите на нее. В окне настроек движка нажмите Update и обновите программу по инструкции.

Кстати, обновить Java нужно не только у вас, но и у друга, с которым вы собираетесь играть на одном сервере.
Если не помогло и это, пора вносить игру в исключения брандмауэра и антивируса.
Обновление Minecraft
Тоже простой вариант решения проблемы. Скачайте новую версию игры из магазина. Также напомните другу, чтобы он тоже обновил Minecraft. Важно, чтобы у вас совпадали не только версии Java, но и самой игры.

Подключению к серверам также могут мешать моды и модпаки. Чтобы проверить это, перенесите все установленные моды в отдельную папку в другой директории или на другом диске. После этого запускайте игру и снова пробуйте подключиться.
Исключения
Начнем с брандмауэра. Снова откройте Панель управления и перейдите в раздел «Система и Безопасность». Внутри вы увидите надпись «Брандмауэр Windows», на которую нужно кликнуть. После этого откроются настройки брандмауэра, где вверху слева можно найти раздел «Разрешения взаимодействия».
После нажатия на надпись откроется еще одно окно. В разделе для внешнего подключения программ отыщите все, что запускается через Java, и измените их параметры. Выставьте галочки для разрешения подключения и закрывайте окно. Не забудьте после этого перезагрузиться.

Если не помогло, есть еще один вариант. В окне брандмауэра откройте раздел «Дополнительные параметры». После этого перейдите в «Правила для входящих подключений», нажмите «Создать правило» и выберите пункт «Для порта». Потом нажмите «Все локальные порты» и жмите кнопку «Далее», пока не дойдете до последнего пункта. Задайте имя для нового правила и нажмите «Готово».
С антивирусом все проще. В зависимости от вашего антивируса открывайте раздел «Безопасность» и ищите раздел «Исключения». После этого нажмите «Добавить» и укажите путь к папке, куда установлен Minecraft. Сохраните все и перезагрузите компьютер.
Смена сервера
Попытайтесь подключиться к другому серверу. Возможно, вся проблема в том, что именно с конкретным сервером неполадки. Если подключение будет успешным, значит, стоит подождать, пока все починят. Нужный сервер заработает рано или поздно.

Еще один вариант решения проблемы — создайте сервер на другом устройстве. Возможно, ошибка вылезает из-за того, что ПК перестал нормально выдерживать нагрузку и придется создавать новый сервер.
IP
Еще один вариант — сменить статический IP-адрес. Если вы использовали измененный айпи, стоит попробовать подключаться через официальный, который вам предоставляет провайдер.

Можно также попробовать сбросить Winsock. Открывайте Пуск и запускайте «Командную строку» от имени администратора. По очереди вводите вот эти команды в строку, нажимая Enter после каждой:
- ipconfig /release
- ipconfig /all
- ipconfig /flushdns
- ipconfig /renew
- netsh int ip set dns
- netsh winsock reset
Перезагрузите ПК, чтобы изменения вступили в силу. Попробуйте подключиться к серверу снова.
Еще одной причиной проблем с IP может стать VPN. Рекомендуем его отключить и попробовать присоединиться к серверу заново. А если вы играете без VPN, то наоборот, его установка может решить все ваши проблемы.
DNS
Нет, речь пойдет не о том, чтобы вы пошли и купили себе новый компьютер в магазине. Еще один вариант решения проблемы — работа с DNS-сервером. Это самый сложный метод, поэтому мы оставили его напоследок.
Важно! Прибегать к нему нужно только в самую последнюю очередь и только если уверены в том, что знаете, как работает ваша сеть. В ином случае НЕ НУЖНО этого делать.

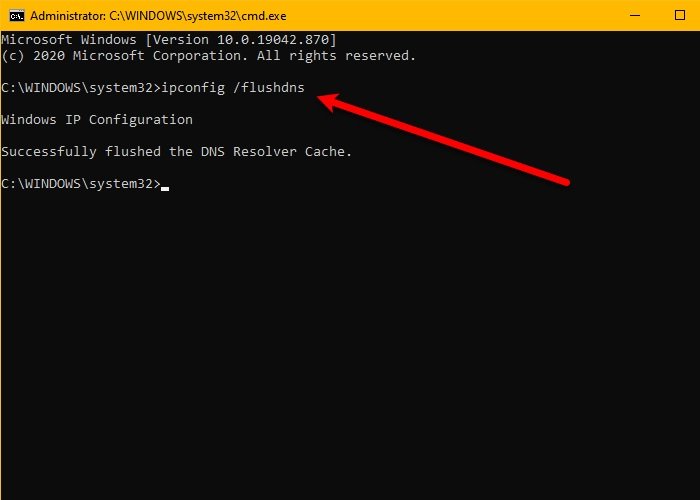
Прежде всего, сделайте очистку кэша DNS. Вызовите командную строку (в случае в Windows 10 можно использовать PowerShell) любым удобным для вас способом. Введите команду:
ipconfig /flushdns
И нажмите Enter.
После этого убедитесь, что порт 25565 свободен, чтобы подключение работало нормально. Откройте командную строку или PowerShell и введите команду:
ipconfig /all
После чего нажмите Enter. После этого пролистайте вниз и найдите раздел Network adapter. Скопируйте и сохраните где-нибудь на компьютере следующие данные:
- Default Gateway — Основной шлюз;
- Subnet Mask — Маска подсети;
- MAC Address — Физический адрес;
- DNS.

Нажмите Win + R и откройте диалоговое окно. Введите в нем ncpa.cpl и нажмите ОК, чтобы открыть сетевые подключения. Щелкните правой кнопкой по активному подключению и откройте «Свойства». Отыщите строку IP версии 4 (TCP/IPv4) и откройте его свойства. Выберите параметр «Использовать следующие адреса DNS-серверов» и введите следующее:
- Предпочитаемый DNS сервер: 8.8.8.8
- Альтернативный DNS сервер: 8.8.4.4.
После этого нажмите «Использовать следующий IP-адрес» и в разделе «Основной шлюз» введите данные из Default Gateway, которые вы сохранили раньше. Последнюю цифру стоит заменить другим числом. IP адрес и маску подсети тоже нужно взять из данных, которые мы получили из командной строки.

Откройте браузер и введите номер шлюза по умолчанию в вашу адресную строку. Нажмите Enter. Введите имя пользователя и пароль от вашей сети и нажмите войти. Отыщите параметр «Включить ручное назначение» и включите его.
В текстовые поля введите свой MAC и IP-адреса. После этого выберите «Добавить». Теперь найдите область перенаправления портов. В разделе «Начало и конец» укажите диапазон открытых портов или используйте отдельные порты для внутреннего и внешнего трафика.
Переадресовывайте только порт 25565 для сервера Minecraft и убедитесь, что он выбран как для TCP, так и для UDP. Введите ваш IP-адрес, созданный ранее, и включите его, если этот параметр доступен. Подтвердите изменения и перезагрузите роутер и компьютер.

Мы разобрали все варианты исправления ошибки. Теперь вам остается только попробовать их и понять, помогло ли это вам или нет. И не забудьте почитать другие статьи по Майнкрафту на нашем сайте.
Заглавное фото: pxfuel.com
The “io.netty.channel.abstractchannel$annotatedconnectexception: Connection refused: no further information” error is a common frustration experienced by Minecraft players. This error message typically appears when you’re trying to connect to a Minecraft server but encounter difficulties during the connection process.
What Does the Error Message Mean?
The error message io.netty.channel.abstractchannel$annotatedconnectexception essentially signifies that there was a problem with establishing a network connection between your Minecraft client and the server you’re trying to join. The specific causes can vary, ranging from issues within your own network setup to problems with the server you’re attempting to connect to.
The error message might initially appear to be a jumble of technical terms and symbols. However, breaking down its components and understanding its structure can provide valuable insights into the nature of the error and its implications.
Namespace (“io.netty.channel.AbstractChannel”): The first part of the error message, “io.netty.channel.AbstractChannel,” refers to a specific class in the Netty framework. Netty is an open-source networking framework that allows developers to build robust and performant network applications. The “AbstractChannel” class is a foundational element within Netty, responsible for managing network communication channels.
Exception Type (“AnnotatedConnectException”): The second part of the error message, “AnnotatedConnectException,” specifies the type of exception that has occurred. In this case, it indicates an exception related to connecting to a network resource, such as a server or service. The term “Annotated” implies that additional contextual information might be attached to this exception.
Common Scenarios That Trigger the Error
After receiving numerous reports from multiple users we investigated the issue and devised a set of solutions that solved the problem for most of the users. Also, we looked into the reasons due to which the error is triggered and listed them below. For that:
- Server Unavailability: If the server you’re trying to connect to is offline or experiencing maintenance, you’re likely to encounter this error. Servers periodically go down for updates, maintenance, or other reasons, and during these times, you might see the “io.netty.channel.abstractchannel$annotatedconnectexception” error.
- IP issue: In some cases, the problem is caused due to the wrong IP address or the port listed while trying to connect to a server. The IP address along with the correct port is used to forward your connection to the server and connection is established once the server approves. Unless you are using a static IP address, that is quite rare, the IP address assigned to you by the ISP changes from time to time, and multiple users might be allocated the same IP address. Therefore, the IP address needs to be edited from time to time.
- Firewall: Also it is possible that the Windows Firewall that you are using might be blocking your connection to the server. Both the Java files and the game directory is to be added to the exclusion list of the Windows Firewall in order for the game to connect to the server properly.
- Outdated Java: Minecraft requires the Java software to be updated to the latest version in order for it to work properly. If the Java is outdated on your device and the launcher has been updated to the latest version it might cause conflicts with certain elements of the game and prevent proper connection to the server.
- Incompatible Software: There is a list of software that is not compatible with Minecraft and causes issues if they are installed on the computer on which you are trying to connect to the server. Minecraft has an official list of software that is not compatible with the game and causes conflicts.
Now that you have a basic understanding of the nature of the issue we will move on towards the solutions. It is recommended that you try these solutions in the specific order in which they are provided to ensure that no conflicts occur.
Fix 1. Power-Cycle your Network
Whenever the internet router is reset the IP address that is provided by the ISP is changed unless you are using a static IP address. Therefore, in this step, we will be reinitializing the internet settings and the DNS cache by completely power cycling the Internet Router. For that:
- Disconnect the power from the internet router.

Disconnecting Power cord - Wait for 5 minutes and reconnect the power.
- When internet access is granted try to connect to the server and check to see if the issue persists.

Fix 2. Reset your Network Configurations
Your Windows Network configurations can also be a culprit here, as it’s possible that your Network settings are configured incorrectly. For resetting network configurations, follow the steps below:-
- Search for the Command Prompt in the Windows Search bar then click “run as administrator”.

Running Command Prompt - Once the Command Prompt window is opened, type the following commands one by one:-
ipconfig /flushdns
ipconfig /release
ipconfig /renew
netsh winsock reset
netsh int ip reset
- Restart your computer and check to see if the issue persists.

Fix 3. Add Exception in Firewall
It is possible that the Windows Firewall that you are using might be blocking your connection to the server. Therefore, in this step, we will be adding an exception in the Firewall for some executables in the Minecraft folder that need internet access. For that:
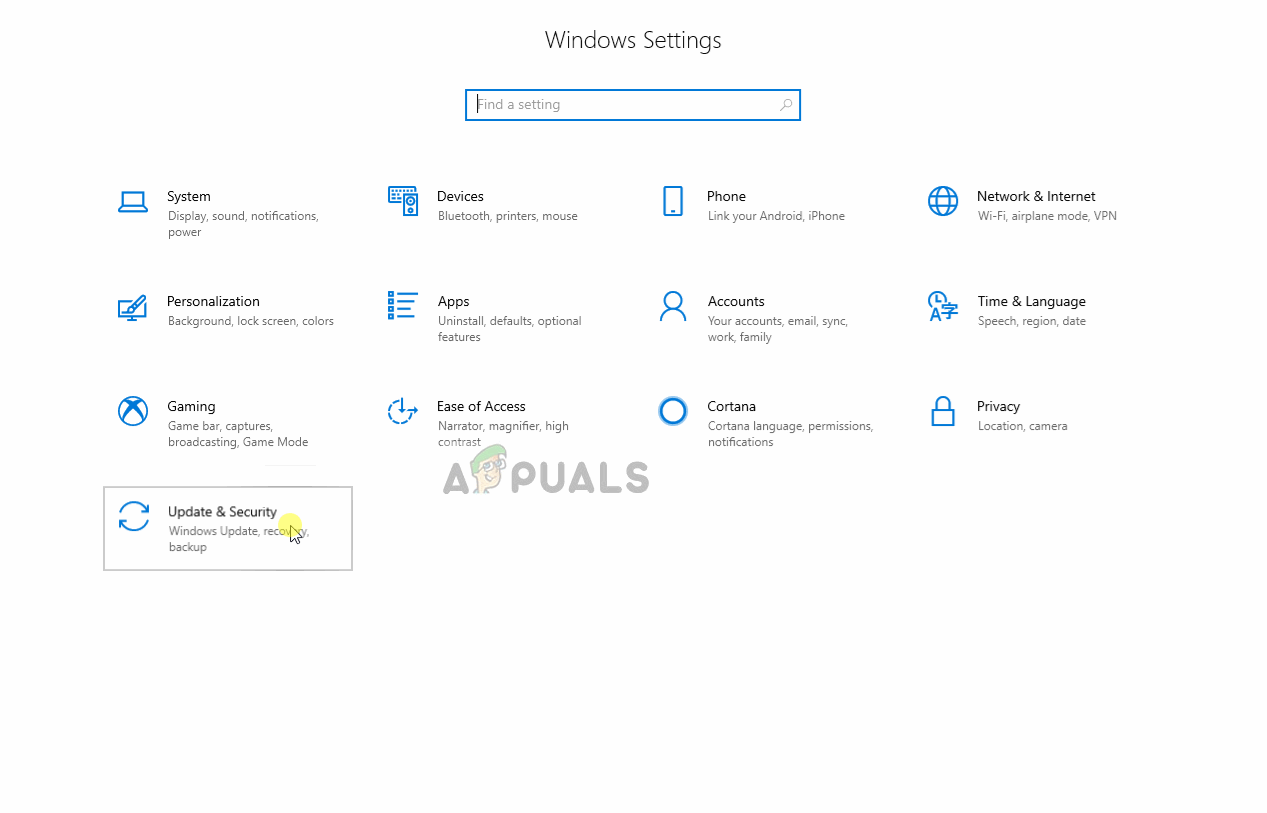
- Click on the start menu and select the Settings icon.
- In the Settings, click on the “Updates & Security” option.
- Select the “Windows Security” from the left pane and select the “Firewall & Network Protection” option.
- Scroll down and select the “Allow an App through Firewall” option.
- Click on “Change Settings” and select “Yes” on the warning prompt.
- Select the “Allow another app” from the options and click on “Browse“
- Navigate to the game installation directory and select the game and the launcher executable.
- Now repeat the above process again and this time navigate to the directory where you have the Minecraft servers installed.
- Open the “Maxwell” folder and then the “MinecraftServer” folder.
- Now allow both the Java executables located inside the folder in the same way.
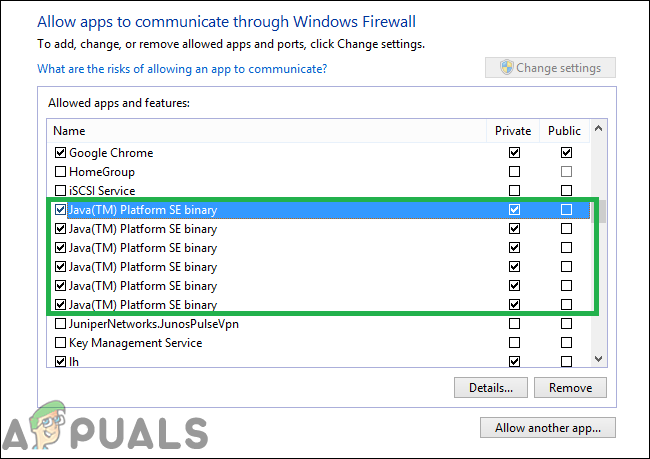
- Now repeat the process again and instead of clicking “Allow another app” after selecting the “change” option simply scroll down the list of apps available and allow all the “Java Platform SE Binary” options through both the “Private” and “Public” networks.

The applications that need to be allowed through the firewall - Open the Minecraft launcher, try to connect to the server, and check to see if the issue persists.

Allowing an application through the firewall
Fix 4. Add the IP address and Port Before Connecting
If the IP address that you are using is not a static one, it will change every couple of days or whenever the Internet Connection is reset. Therefore, in this step, we are going to be checking the IP address and the correct port for the game and add it to the Minecraft Launcher. For that:
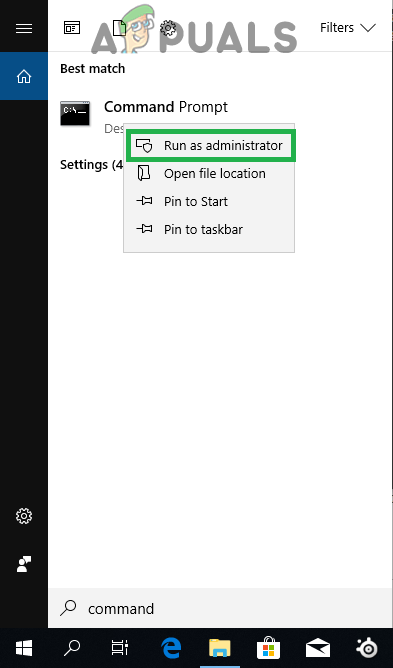
- Click on the search bar on the Windows toolbar and type in “Command Prompt“.
- Right–click on the icon and select “Run as Administrator“.

Right-clicking on the Command Prompt icon and selecting Run as Administrator - Type in “ipconfig” and note down the “IPV4 Address“.

Typing in ipconfig in the command prompt - Also, Navigate to the “Minecraft Servers folder>Maxwell (some random numbers)> MinecraftServer” and open the “Server Properties” text document.

Opening the “Server Properties” text document and noting down the server port - Note down the “Server Port” listed there. In our case it was “25565” it should be similar in most cases however in some it is not.
- Now open up Minecraft and navigate to the “Play Multiplayer” option.
- Select the server which you want to join by clicking on it and select “Edit” from the below options.

Clicking on the server and selecting “Edit” - The server name can be according to your preference but the “Address” needs to be the IPV4 address that we noted and the port number for example “XXX.XXX.X.X:25565” the “25565” is the port number and it may vary.

Editing the Server Address and clicking on Done - Click on “Done“, click on “Refresh” and check to see if the issue persists.
Note: There are some applications that are generally incompatible with certain elements of Minecraft and cause issues with it. The list of applications is available here. If these are installed on the computer on which the server is running from or on your computer you will continue to face issues with the game.
Fix 5. Check for Port Filtering
We came across numerous instances where users were accidentally filtering ports. Even though the port forwarding was working alright, the filtering automatically nullifies it and you will not be able to connect to Minecraft servers.
Here, what you can do is check your router’s and your local machine’s network configurations and make sure that port filtering isn’t turned on and if it is, the correct ports are being filtered.
Fix 6. Check ISP Network Access
If none of the above methods work, you should check your ISP’s network access. ISPs sometimes block network access to specific domains and don’t allow you to go through. Contact your ISP and verify that internet access isn’t indeed blocked.
Furthermore, you can also change your internet connection to your smartphone’s 3G and see how that works out for you. If it does, it probably means that your ISP is blocking you and you need to change your network.
If Minecraft is working with the Mobile Data it means that your ISP is blocking the connection. If that’s the case please contact your ISP to get your issue resolved.

Kevin Arrows
Kevin Arrows is a highly experienced and knowledgeable technology specialist with over a decade of industry experience. He holds a Microsoft Certified Technology Specialist (MCTS) certification and has a deep passion for staying up-to-date on the latest tech developments. Kevin has written extensively on a wide range of tech-related topics, showcasing his expertise and knowledge in areas such as software development, cybersecurity, and cloud computing. His contributions to the tech field have been widely recognized and respected by his peers, and he is highly regarded for his ability to explain complex technical concepts in a clear and concise manner.
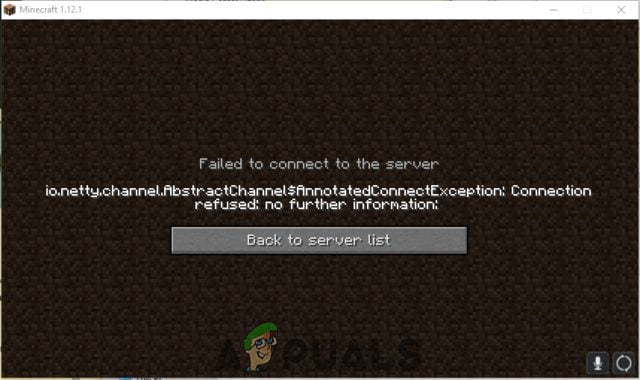
Some Minecraft users are not able to join a server. The issue is not limited to a particular server but is experienced across the board. The following is the exact error message that the victims are seeing.
Failed to connect to the server
io.netty.channel.AbstractChannel$AnnotatedConnectException: Connection refused: no further information:

Now, let us see what you need to do to resolve Connection refused: no further information on Minecraft.
Why does it say Connection refused No further information?
The error code in question means that Minecraft is not able to create a connection to the server. The problem can occur because of various things. Usually, the reason is network glitches. Your network protocols or the network devices can have some issues that we are oblivious of, but the good news is, that they can be resolved. Other than that, there are some other reasons such as a firewall blocking Minecraft. So, you should go to the troubleshooting guide and resolve the issue.
Failed to connect to the server, Connection refused, No further information Minecraft error
If you are seeing Connection refused: no further information on Minecraft, try the following solutions to resolve the issue.
- Restart your computer and network devices
- Allow Minecraft Server through Firewall
- Reset Network Protocols
- Disable Mods
- Check Port Filtering
- Update Java
Let us talk about them in detail.
1] Restart your computer and network devices
First up, we need to try and restart all the devices that are responsible for handling your network. So, go ahead and restart your computer first. If that doesn’t help, go ahead and restart the router and if possible, your modem. Follow the prescribed steps to restart your router.
- Turn off your Router and remove all the cables.
- Wait for 30 seconds.
- Plug your router back and restart it.
Now, check if the issue persists.
Related: Failed to connect to the server, Not Authenticated with Minecraft.net
2] Allow Minecraft Server through your Firewall
Your antivirus can block you from accessing your server. Usually, it’s the server that’s blocked, but it’s a good option to add the Minecraft launcher to the exception as well. So, if you have a third-party antivirus, just whitelist the app, Windows Defender users can allow the app through the firewall.
Related: Could not Connect, Outdated Server error in Minecraft
3] Reset Network Protocols
The issue can be a result of a glitch in your network protocols. To reset the protocols, we are going to run some commands, so, open Command Prompt as an administrator and run the following commands.
ipconfig /flushdns
ipconfig /release
ipconfig /renew
netsh winsock reset
netsh int ip reset
After running the commands, close cmd and try connecting to the Minecraft server.
Related: Minecraft unable to connect to world
4] Disable Mods
You may also see the error code in question because of a corrupted mod. Since we are not sure which one is the culprit here, you should disable all of them at once and then try enabling them one by one. If you see the error code after disabling a particular mod, removing it will resolve the issue for you.
5] Check Port Filtering
You need to check whether you are accidentally filtering ports. Port filtering will revert back the Port Forwarding and stop you from connecting to the server. So, disable Port Filtering and then try connecting to the server. Hopefully, this will do the job for you.
6] Update Java
Java is crucial for Minecraft, we are pretty sure you are well aware of this. You need to make sure that Java is up-to-date. So, go ahead and update the Java Runtime Environment. Then, check if the issue persists.
Hopefully, you can resolve the issue with these solutions.
Also Read: Minecraft keeps crashing or freezing
What does IO Netty channel AbstractChannel AnnotatedConnectException Connection refused No further information?
The error code basically means that the connection is not established between your Minecraft client and the server you were trying to connect to. This issue, more often than not, is nothing but a network issue. You should try and execute the solutions mentioned here and see if it works.
That’s it!
Read Next: OH NO, Something went wrong Minecraft error.