Windows 7 Enterprise Windows 7 Home Basic Windows 7 Home Premium Windows 7 Professional Windows 7 Starter Windows 7 Ultimate More…Less
Symptoms
When you install Windows 7 Service Pack 1 (SP1), you may receive the following error message:
Error 0x8024200D
Cause
This issue can occur if Windows 7 Service Pack 1 (SP1) was downloaded by Windows Update but has not yet been installed, or if the installation has become corrupt. For more information about this service pack, click the following article number to view the article in the Microsoft Knowledge Base:
976932 Information about Service Pack 1 for Windows 7 and for Windows Server 2008 R2
Resolution
To have us fix this problem for you, go to the «Fix it for me» section. If you prefer to fix this problem yourself, go to the «Let me fix it myself» section.
Fix it for me
To fix this problem automatically, click the Fix it button or link. Then click Run in the File Download dialog box, and follow the steps in the Fix it wizard.
Notes
-
This wizard may be in English only. However, the automatic fix also works for other language versions of Windows.
-
If you are not on the computer that has the problem, you should save the Fix it solution to a flash drive or a CD and then run it on the computer that has the problem.
Uninstall Windows 7 Service Pack 1
To resolve this issue, uninstall Service Pack 1 by using the DISM command. To do this, follow these steps for your version of Windows 7.
For the 32-bit version of Windows 7
-
Click Start, and then type cmd in the Search box.
-
Right-click cmd.exe, and then click Run as administrator.
-
Type the following command, and then press Enter:
dism.exe /online /remove-package /packagename:Package_for_KB976932~31bf3856ad364e35~x86~~6.1.1.17514
-
After the removal is complete, type exit, and then press Enter.
-
Restart the computer.
For the 64-bit version of Windows 7
-
Click Start, and then type cmd in the Search box.
-
Right-click cmd.exe, and then click Run as administrator.
-
Type the following command, and then press Enter:
dism.exe /online /remove-package /packagename:Package_for_KB976932~31bf3856ad364e35~amd64~~6.1.1.17514
-
After the removal is complete, type exit, and then press Enter.
-
Restart the computer.
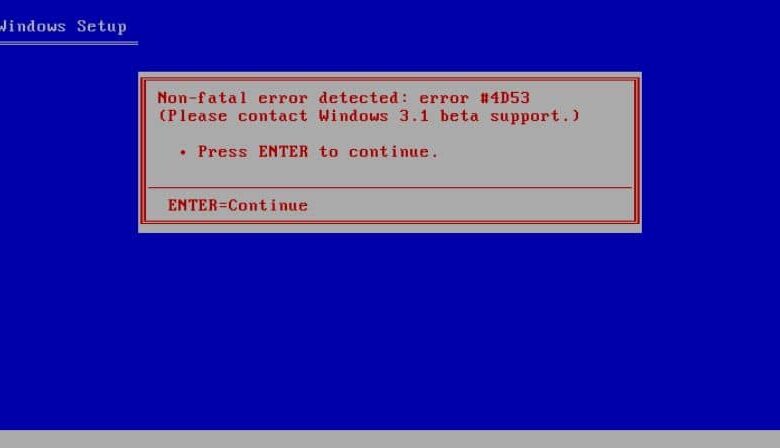
Determine whether you installed the Beta version of Windows 7 SP1
If you installed the Beta version of Windows 7 SP1, you need to uninstall the Beta version and then install the released version of Service Pack 1. To Uninstall the Beta version, follow these steps for your version of Windows 7.
Note If you uninstalled the Beta version of Windows 7 SP1 and you continue to receive the error, you may have remnants of the Beta version on your PC. These steps will also clean any remnants of the Beta version from your PC.
For the 32-bit version of Windows 7
-
Click Start, and then type cmd in the Search box
-
Right-click cmd.exe, and then click Run as administrator.
-
Type the following command, and then press Enter:
dism.exe /online /remove-package /packagename:Package_for_KB976932~31bf3856ad364e35~x86~~6.1.1.17105
-
After the removal is complete, type exit, and then press Enter.
-
Restart the computer.
For the 64-bit version of Windows 7
-
Click Start, and then type cmd in the Search box.
-
Right-click cmd.exe, and then click Run as administrator.
-
Type the following command, and then press Enter:
dism.exe /online /remove-package /packagename:Package_for_KB976932~31bf3856ad364e35~amd64~~6.1.1.17105
-
After the removal is complete, type exit, and then press Enter.
-
Restart the computer.
More Information
When you install Windows 7 or Windows Server 2008 R2 SP1 you may also receive error 0x800f081f.
When you check the CBS log(C:\Windows\Logs\CBS\cbs.log), you will find the errors like below:
2011-03-03 21:38:06, Error CBS Exec: Failed to pre-stage package: Package_for_KB976933~31bf3856ad364e35~amd64~cs-CZ~6.1.7601.17514, file: TsUsbGD.sys, source: \\?\C:\Windows\Servicing\Packages\amd64_tsgenericusbdriver.inf_31bf3856ad364e35_6.1.7601.17514_none_9872c8452ac8f816\TsUsbGD.sys, sandbox: (null) [HRESULT = 0x800f081f — CBS_E_SOURCE_MISSING]
2011-03-03 21:38:06, Info CBS Failed to gather all required files. [HRESULT = 0x800f081f — CBS_E_SOURCE_MISSING]
You can use the following methods to resolve the issue:
-
Run System Update Readiness Tool (KB947821). It should resolve the error in most of cases
-
If the System Update Readiness Tool does not resolve the issue, it may be that you have a pre-release version of the RSAT tools installed on the system.
To resolve this issue, do the following:
-
Uninstall the pre-release RSAT tools
-
Reboot the system
-
Install the release version of the RSAT tools (http://www.microsoft.com/download/en/details.aspx?FamilyID=7d2f6ad7-656b-4313-a005-4e344e43997d&displaylang=en)
-
Reinstall Windows 7 SP1
-
Need more help?
Want more options?
Explore subscription benefits, browse training courses, learn how to secure your device, and more.
Communities help you ask and answer questions, give feedback, and hear from experts with rich knowledge.
-
Home
-
News
- How to Repair Windows Update Error 8024200d on Your PC
By Alin |
Last Updated
Some users reported that they encountered the error code 8024200d when trying to install some Windows updates like KB2930275, KB2925418, KB2929961, or KB2929733. How to fix this issue? This post of MiniTool Partition Wizard will give you the answers.
I have been unsuccessful in installing Windows updates KB2925418, KB2929961, KB2930275, and KB2929733. All fail with error 8024200d.
—from Microsoft Community
The Windows update error 8024200d (WU_E_UH_NEEDANOTHERDOWNLOAD) most commonly appears on Windows 7, but it can also occur on other versions of Windows. It indicates that the Windows Update handler can’t install the update because the update downloaded is invalid and damaged.
What Causes the Error Code 8024200d
The Windows update error may occur for various reasons. Here, we summarize some possible causes, such as:
- Corrupted system files
- Corrupted Windows Distribution folder
- Problematic installation of programs
- Virus or malware attacks
You can try the methods below to fix the error code 8024200d.
Way 1. Disable Third-Party Security Software
Some antivirus programs or firewall settings may interfere with Windows updates and cause the error code 8024200d3. To fix this issue, you can temporarily disable your security software and try to install the update again.
Way 2. Run the Windows Update Troubleshooter
You can follow the steps below to run the Windows Update troubleshooter to diagnose and fix common problems with Windows updates.
Step 1. Go to Settings > Update & Security > Troubleshoot > Additional troubleshooters.
Step 2. Then click Windows Update and select Run the troubleshooter.
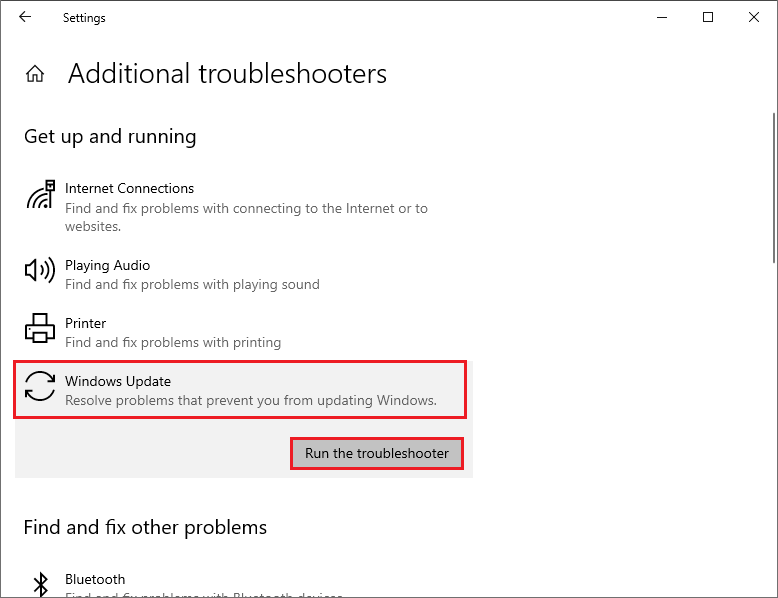
Step 3. In the pop-up window, follow the on-screen wizard to complete troubleshooting. Once done, restart your system and view if the error disappears.
Way 3. Run SFC and DISM
To get rid of the Windows update error 8024200d, you can run SFC and DISM to repair corrupted system files.
Step 1. Press Win + R to open the Run dialog box. Then type cmd and press Ctrl + Shift + Enter to run Command Prompt as administrator.
Step 2. Type sfc /scannow and press Enter to run SFC. Once the process ends up, reboot your computer.
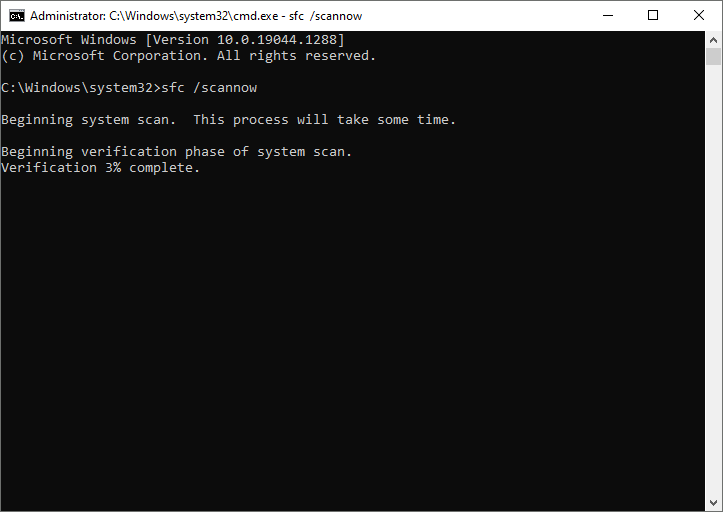
Step 3. If the issue still exists, run Command Prompt as administrator again, type the following commands, and press Enter after each one to run DISM.
DISM /Online /Cleanup-Image /CheckHealth
DISM /Online /Cleanup-Image /ScanHealth
DISM /Online /Cleanup-Image /RestoreHealth
Way 4. Reset the Windows Update Components
Another possible cause of the Windows update error 8024200d is that the services that handle the update and download process are not working properly. You can try to restart this service with this guide: How to Reset Windows Update Components in Windows 11/10?
Way 5. Clear and Expand the System Partition If Necessary
You can check if your system partition has enough free space to install the update. The system partition is usually labeled as C: in File Explorer. If it is almost full, the error code 8024200d may happen. You can use MiniTool Partition Wizard – a professional partition manager to resize your system partition and allocate more space to it.
Click the following button to download and install MiniTool Partition Wizard and then follow this guide: How to Make Windows System Partition Bigger? Solutions Are Here.
MiniTool Partition Wizard FreeClick to Download100%Clean & Safe
Way 6. Manually Download and Install the Update
If none of the above methods works, you can try manually downloading and installing the latest Windows updates by using Media Creation Tool or from Microsoft Update Catalog. You can follow this guide: [Tutorial] How to Download & Install Windows 10 Updates Manually.
In addition to the above methods, you can try installing the update in Clean Boot mode or uninstalling recently installed software to fix the error code 8024200d.
Conclusion
Is this post helpful to you? Do you have any suggestions or other nice methods to fix the Windows update error 8024200d? You can feel free to share them with us in the following comment part.
About The Author
Position: Columnist
Alin is a new member of MiniTool. Her articles are mainly about disk & partition management, data recovery, and hard disk issues. She is enthusiastic about acquiring computer knowledge and helping users to solve problems with computers. To provide more useful and professional solutions, she will keep learning and know more computer knowledge.
In order to maintain a secure and stable Windows system, it’s essential to download and install the latest updates through the Windows Update Center – either automatically or manually. Going without these updates will mean known errors and identified security vulnerabilities will continue to exist on your system, unnecessarily exposing you to system issues and security risks. Although not self-inflicted, errors like 0x8024200d are just as critical because they prevent the update process and the problem can even persist after restarting the computer.
We show you what this update error is all about and which possible solutions are the most promising.
Contents
- What is the 0x8024200d Error All About?
- The Best Solutions for the Windows Error “0x8024200d”
- Solution 1: Deactivate Third-Party Security Software (Temporarily)
- Solution 2: Use the Windows Update Troubleshooter
- Solution 3: Temporarily Delete Windows Installation Files
- Solution 4: Restart the Update and Download Service
- Solution 5: Check System Files for Errors
- Solution 6: Clear and Expand the System Partition if Necessary
- Solution 7: Manually Download and Install the Windows Update
What is the 0x8024200d Error All About?
The Windows error code “0x8024200d” relates to an installation problem with a system update. In this instance, it’s possible that the update process is completely blocked or that only part of the available update is affected by the issue. Besides the code “0x8024200d”, Windows often also displays the message “WU_E_UH_NEEDANOTHERDOWNLOAD”, which suggests that the error won’t be fixed by simply repeating the update process. The update handler can’t work with the existing installation files. This can be due to a wide range of reasons. This includes erroneous data, update components that are defective or haven’t yet started, or a lack of storage space. Moreover, malware and third-party applications like antivirus programs or tuning tools can be responsible for a blocked update.
Error 0x8024200d occurs both on the current version Windows 10 as well as on older editions like Windows 7 or Windows Vista.
The Best Solutions for the Windows Error “0x8024200d”
Since the Windows update error can be due to a range of causes, there are also various solutions available. However, the general problem is that you don’t receive any information whatsoever from Windows about where you should look for the error. So, you have no choice other than to work through the list of possible causes, one after another to fix the 0x8024200d error.
Before you get started, you should at least try to resolve the issue by restarting the computer: The probability is very low, but there’s still a chance that the problematic update will run afterwards – for instance, because the download server simply couldn’t be reached before or because Windows itself wasn’t working properly.
If the Windows update continues to display the error code “0x8024200d” after you reboot the computer, you’ll need to look for the cause of the problem yourself. The solutions presented below have proven to be helpful.
Solution 1: Deactivate Third-Party Security Software (Temporarily)
If the 0x8024200d error is preventing the installation of a new Windows update, you should first take a look at your security software before you implement any changes to system files, services or settings. For example, if you’ve installed additional security programs against malware on your system besides Windows Defender and Windows Firewall, there’s a chance that they’re blocking the operating system’s update process. You can easily check whether this is the case by temporarily deactivating the corresponding applications and then trying the update again.
To display this video, third-party cookies are required. You can access and change your cookie settings here.
If you were able to identify an antivirus software, a malware scanner or a similar program as the cause of the problem, you have three different options:
- Contact the manufacturer of the software and report this issue.
- Uninstall the problematic application and replace it with a similar alternative.
- Deactivate the security software whenever you receive error messages like “0x8024200d” when updating Windows (not recommended if Windows Defender and Firewall are also disabled).
Solution 2: Use the Windows Update Troubleshooter
Windows errors that start with the code “0x8024” can often be resolved using the Windows Update Troubleshooter. This is integrated as standard in Windows 10, as well as older versions like Windows 8, however, it can also be downloaded from the Microsoft Support Forum. It’s particularly advisable to download the troubleshooter if you haven’t been able to update Windows for a long time – and are therefore less likely to have the up-to-date version of the troubleshooter. Once it has been downloaded, launch the downloaded .diagcab file simply by double clicking, select “Windows Update” and click on “Next” to start the automatic troubleshooter.

For the integrated troubleshooter in Windows 10, the following steps are necessary:
- Open the Start menu (Windows symbol) and open the Settings (cog symbol).
- Click on “Update and Security”.
- Switch to the “Troubleshooter” tab.
- Click on the “Windows Update” entry and then on “Run troubleshooter”.
Solution 3: Temporarily Delete Windows Installation Files
Another option for fixing the 0x8024200d error is to delete the automatically cached system files for the Windows update. It’s possible that they include defective files or incomplete patches that prevent the update to the operating system.
Note
You need administrator rights to delete system files!
Windows provides the “Disk Cleanup” tool for this purpose; it can be started using the “Run” dialog. You can open it either via the button with the same name in the Start menu or using the key combination [Windows key] + [R]. As soon as you’ve opened the window, enter the following:
Confirm your entry with “OK” and Windows will open the Disk Cleanup tool. Now select the drive Windows is saved on – usually C: – and click on “OK” again. Next, you can press the button “Clear system files”. After a quick check, Windows will display a list of files that may be deleted, where you can select the following entries (provided they are listed):
- Windows Update Cleanup
- Downloaded Program Files
- Temporary Internet Files
- Temporary Files
- System Error Small Memory Dump Files
- Temporary Windows Installation Files
- Temporary Windows Setup Files

Click on “OK” one last time and then on “Delete files” to start the cleanup. After the tool has finished the process, you should then restart the system before trying to run the update again.
Solution 4: Restart the Update and Download Service
In order for the Windows Update Center to establish contact with Microsoft servers and download and install provided updates, it uses the Windows Update (WU) service as well as the Background Intelligent Transfer Service (BITS), among others. The former supports the entire update process, while the latter serves as a download manager and provides optimal utilization of bandwidth and the resumption of interrupted downloads. If these two services aren’t working properly or can’t even be started, the “0x8024200d” update problem can arise at any time.
Tip
The maximum bandwidth provided for new updates can be limited in the advanced settings of the Windows update (under “Transfer Optimization”). Use this option if the automatic Windows update regularly takes up too much of your capacity.
In this case, the solution involves ending these services, deleting the content of the directory Windows\SoftwareDistribution\Download and subsequently restarting both services. Begin by performing the following steps to stop the services:
- Open the “Run” dialog via the Start menu or using the key combination [Windows key] + [R].
- Enter “services.msc”.
- Press “OK” to open the Services Manager.
- Search for the entries “Windows Update” and “Background Intelligent Transfer Service” and press the “End the service” button for each of them.
Keep the Services Manager window open while deleting the content of the Update Download Directory. You can also open this via the “Run” dialog by entering the complete pathway there:
C:\Windows\SoftwareDistribution\DownloadDelete all files and folders contained in this directory without deleting the download folder itself, and then restart the system.
Note
If you’ve chosen another installation location for your Windows system, you’ll need to change the drive letter accordingly.
Now restart the two update services by clicking on “Start the service” for both entries:

Solution 5: Check System Files for Errors
If installing new updates produces the error code “0x8024200d”, this can also be due to damaged or missing system files. To check whether this is the case, you can use the System File Checker (SFC) integrated as standard. The tool can be launched via command line, provided you have administrator rights. It examines all protected system files, and also attempts to resolve any discovered issues. If the fix is unsuccessful, you’ll at least receive a detailed report in the CBS.log file found in the directory Windows\Logs\CBS.
To start the SFC, you need to run the command prompt as an administrator – otherwise the command won’t work even with the corresponding rights. You can start the command prompt as administrator by following these steps:
- Open the Windows search function.
- Enter the term “cmd”.
- Right-click on the displayed entry “Command Prompt”.
- Select the menu item “Run as administrator”.

Now enter the following command into the command line:
Press the [Enter] key to confirm the command and then wait until the system check has been fully completed. It can take a few minutes. Leave the command prompt window open during this time.
Solution 6: Clear and Expand the System Partition if Necessary
One possible cause for the 0x8024200d error is that the hard drive or partition that Windows is installed in does not have sufficient free space. You should first try to clear up any unnecessary files from the Windows drive if you haven’t already done so as part of Solution 3 (see above).
If there still isn’t enough storage space after cleaning up the disk, the alternative solution is to expand the size of the system partition. Windows offers an integrated tool called “Disk Management” for this purpose. It can be opened as follows and used to expand the partition:
- Open the Windows Start menu and click on the entry “Computer Management” under “Windows Management Programs”.
- Under the “Disk” section, look for “Disk Management” and select it to obtain a list of existing partitions.
- Right-click on the system partition and then select the item “Expand volume”.

Note
If the option “Expand volume” is grayed out, the storage space after the partition to be expanded is not available as it is used by the following partition. In this case, you’ll need to move the storage piece by piece by reducing the volume of the following partitions consecutively. Here it is advisable to use a third-party program such as Paragon Hard Disk Manager.
Solution 7: Manually Download and Install the Windows Update
If the 0x8024200d error can’t be resolved with the above solutions, you can try to download and install the problematic update yourself – without the Windows Update Center. All you need to do this is the update ID (starting with the letters “KB”) as well as the online database operated by Microsoft, the Microsoft Update Catalog.
Tip
The update ID can be found in the Update Center: Display the update history and note the updates’ KB number which caused the 0x8024200d error, shown in brackets.
You can open the online catalog at any time using the browser of your choice. Simply click on the above link or type the URL “catalog.update.microsoft.com” into the address bar. Next, enter the ID into the catalog’s search bar and click “Search”:

Following a successful search, the web catalog lists the available versions of the searched update. Select the suitable version for your system – Windows (desktop) or Windows Server – and the underlying architecture – ARM64, x64 or x84. Afterwards, click on “Download” in the respective line and then on the link provided in order to start the download. If you’re unsure about what system architecture you have, you can find out using the command prompt. Simply enter the command “systeminfo” and look for the value in the “System Type” line:

After you’ve downloaded the respective update file (.msu), start the installation by double-clicking. Then follow the instructions given by the assistant to update your system properly, thereby also fixing the 0x8024200d issue.
Click here for important legal disclaimers.
Related articles
 Kunst BilderShutterstock
How to Fix Windows Error 0x80004005
The big problem with many Windows error messages is that users hardly ever understand them. For instance, messages with the code “0x80004005” indicate an “unspecified” error. Since these kinds of errors can occur in all sorts of scenarios, we present a range of solution strategies that can prove helpful.
How to Fix Windows Error 0x80004005
 RDVectorShutterstock
How to fix parameter error 0x80070057
Windows systems use error messages to inform their users that a system function could not be executed properly. The major problem is the fact that most messages only contain error codes such as “0x80070057”, which are of little help to many users. For example, the code provided here represents a parameter error – but how do you fix it?
How to fix parameter error 0x80070057
 iunewindShutterstock
0x80070bc2: How to Resolve the Windows Update Error
Microsoft regularly provides its users with the latest features and security improvements via the Update Center. What’s more, the update packages also remove known errors and issues. But the update process doesn’t always work without a hitch: For instance, error 0x80070bc2 occurs when an update fails to install. We reveal how you can fix this problem.
0x80070bc2: How to Resolve the Windows Update Error
 Titima OngkantongShutterstock
0xc0000005: The Best Ways to Solve the Windows Error
Windows errors are assigned various codes and their meaning is often unclear to many users. For instance, the text displayed for error code “0xc0000005” says that a program launch or an access attempt has failed. But why the issue occurred or how it can be fixed is left unexplained. We reveal what’s behind the “0xc0000005” error and how you can resolve it.
0xc0000005: The Best Ways to Solve the Windows Error

How to fix a Windows update that is stuck
Updating Windows regularly is important to improve the stability and security of the operating system. From time to time, however, an update may get stuck during download or installation. The problem can be fixed fairly easily and usually without much effort. Read on to find out common solutions to fix a stuck Windows update.
How to fix a Windows update that is stuck

- Remove From My Forums
-
Вопрос
-
Часто возникает код ошибки 8024200D при этом обновления устанавливаются( или делают вид)но, не применяются
Ответы
-
-
Предложено в качестве ответа
Anton Sashev Ivanov
17 августа 2018 г. 7:34 -
Помечено в качестве ответа
Anton Sashev Ivanov
4 сентября 2018 г. 6:58
-
Предложено в качестве ответа
Все ответы
-
Добрый день! Очень частая проблема, особенно в Windows 7. Я бы вам посоветовал установить нужный KB и проверить средством устранения неполадок, вот пример решения ошибки 8024200D.
А вообще уже пора переходить на Windows 10, там такого не наблюдал. -
-
Предложено в качестве ответа
Anton Sashev Ivanov
17 августа 2018 г. 7:34 -
Помечено в качестве ответа
Anton Sashev Ivanov
4 сентября 2018 г. 6:58
-
Предложено в качестве ответа
Прочтите следующее руководство, в котором вы узнаете чтобы исправить код ошибки обновления 8024200D в Windows 10, 8, 7 . Неисправность «8024200D», а также ошибка 0x800765e в Центре обновления Windows являются наиболее распространенными, но, к счастью, существует несколько способов их решения.
В большинстве случаев эта ошибка вызвана неудачным обновлением Windows. Фактически, это обычно относится к проблеме с файлами, возникающей при их повреждении. La повреждение файла может быть вызвано различными причинами, причиной может быть сбой подключения к Интернету, но также могут происходить сбои.
В других случаях проблемы с жестким диском также могут привести к повреждению файлов. В любом случае, в большинстве случаев ошибка «8024200D» может быть устранена без серьезных проблем, так же легко, как и с другими ошибками, такими как Ошибка Центра обновления Windows 0xd0000034 и многие другие.
Как исправить код ошибки обновления 8024200D в Windows 10, 8, 7
Существует несколько методов решения проблемы обновления «8024200D» в Windows. Тогда мы покажем вам самый простой и самый простой которым часто удается найти решение этой неприятной проблемы.
Перезагрузите компьютер
Это может показаться глупым решением, но часто ошибка «8024200D» исправляется с помощью простой перезапуск компьютера . Когда вы это сделаете, компьютер попытается установить файлы, загруженные из Центра обновления Windows, и в большинстве случаев, если есть поврежденный файл, он будет удален.

После его устранения по умолчанию Windows снова начнет его загрузку, а после загрузки при следующем перезапуске обычно устанавливается правильно.
Освободите место для установки обновлений
Одна из причин повреждения файлов: что не хватает места для загрузки обновлений. В связи с этим мы рекомендуем вам освободить значительный объем места, чтобы избежать этой проблемы.
Поэтому проверьте, осталось ли мало места на системном жестком диске, и если да, сделайте все необходимое, чтобы освободить место для обновления.
Используйте средство устранения неполадок Центра обновления Windows
Еще один способ устранения проблем при обновлении Windows — использовать инструмент, предназначенный для этой цели. Для этого нужно зайти в настройки системы и запустить программу. Просто начните и найдите опцию «Конфигурация» / «Конфигурация вашего ПК» .
Теперь найдите параметр «Обновление и безопасность», который вы можете найти в разделе «Устранение неполадок». Найдите опцию «Центр обновления Windows». Система начнет сканировать компьютер на наличие проблем с обновлениями Windows.

Подождите, пока процесс завершится, и Windows сообщит вам, что делать дальше. В большинстве случаев вам не нужно много делать, и простой перезагрузки будет достаточно, чтобы исправить ошибку «8024200D».
Использование PowerShell
Так же, как PowerShell хорош для исправить код ошибки 0x80072ee7 , мы также можем использовать его для правильный ошибки установки Мизес в курсе. Это очень простой процесс, вам просто нужно нажать кнопку Windows + X . Когда вы это сделаете, при запуске Windows появится контекстное меню, просто выберите опцию «Windows PowerShell (администратор)».
Когда вы сделаете это, откроется вкладка PowerShell Admin, введите здесь следующий код «DISM.exe / Online / Cleanup-image / Restorehealth» и нажмите клавишу «Enter». Система начнет сканирование и восстановление, дождитесь окончания.
Наконец, вам нужно написать следующий код в консоли «sfc / scannow» и снова нажать клавишу «Enter». Во многих случаях это решение обычно эффективно для решения проблемы обновления «8024200D».
Используйте антивирус
Хотя антивирус Defender для Windows поставляется по умолчанию с операционной системой, чтобы быть очень хорошим, иногда он может скрывать некоторые вредоносные файлы. По этой причине рекомендуется установить бесплатный антивирус на Windows если у вас постоянно возникают подобные проблемы.