Java is a commonly used programming language, and numerous clients depend on it for different applications. However, when trying to update Java, you may encounter Java update error 1603. This error demonstrates that the establishment of the new Java update has failed.
This error can arise because previous versions of Java exist on your system. Thus, uninstalling them might be helpful. Checking the system requirements can help you detect where your system could be improved. Also, disabling the antivirus software can help to fix Java update error 1603.
While this can disappoint, there are a few arrangements that you can attempt to fix the blunder. Previously mentioned was a portion of the routes through which you can fix the error. In this article, we will provide a total aid on the most proficient method to fix Java update error 1603.
Table of Contents
- 1 How To Fix Java Update Error 1603
- 1.1 Uninstall previous versions of Java
- 1.2 Check for system requirements
- 1.3 Disable antivirus software
- 1.4 Check the Windows Installer Service
- 1.5 Use the Java offline installer
- 2 Other Ways To Fix Java Update Error 1603
- 2.1 Java Uninstall Error Code 1603
- 2.2 Java Error 1603 Fix
- 2.3 Java Install Error 1603:
- 3 Java Error Code 1603
- 3.1 Java Won’t Install on Windows 10
- 4 FAQs
- 4.1 What causes Java error 1603 during installation or uninstallation?
- 4.2 Can I fix Java update error 1603, or must I contact specialized help?
- 4.3 Do I need to uninstall previous versions of Java before installing a new update?
- 4.4 Can antivirus software cause Java error 1603?
- 4.5 How do I check if the Windows Installer Service runs correctly?
- 5 Conclusion
These are the following ways how you can fix Java update error 1603:
Uninstall previous versions of Java
Before installing the new Java update, remove any previous versions you may have installed essentially. These old versions can cause conflicts and prevent the new version from installing correctly.
Follow these steps to uninstall previous versions of Java:
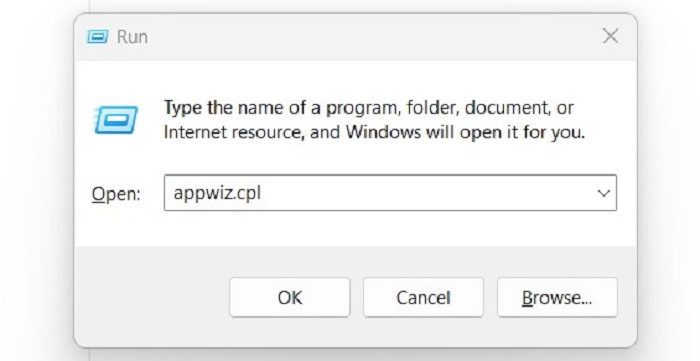
- Open the Run dialog box by pressing the Windows key + R. Type “appwiz.cpl” and press Enter. It will open the Programs and Features window.

- Locate all the previous versions of Java installed on your system. Select each one and click the Uninstall button.

Follow the prompts to uninstall each version. Once all previous versions of Java have been uninstalled, restart your computer.
If you want to restart your computer, check this out for easy ways.
Check for system requirements
Follow the following steps to check your system requirements:
- Guarantee that your PC meets the minimum system requirements for the new Java update.
- If your PC doesn’t meet the necessities, you might experience errors during the establishment process.
- You can take a look at the framework prerequisites on the Java website.
Disable antivirus software
Antivirus programming can sometimes slow the establishment of new software, including Java updates. To fix error 1603, try disabling your antivirus software temporarily.
Disable antivirus software:
In the system tray, right-click on the antivirus icon. Select Disable or Pause Protection. Choose the amount of time you want to disable the software.![]()
Attempt to install the Java update again. Once the installation is complete, re-enable your antivirus software.
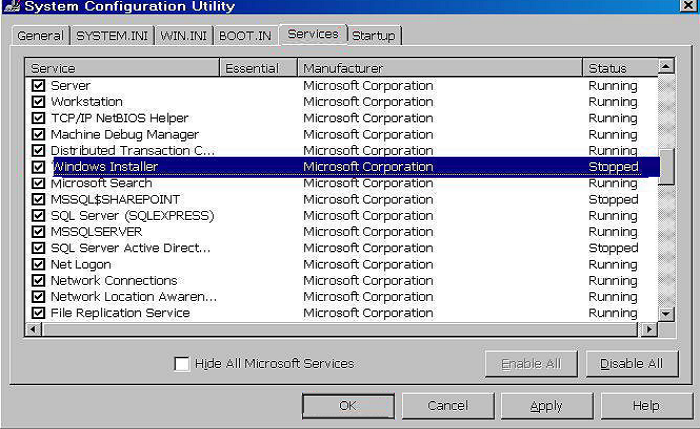
Check the Windows Installer Service
The Windows Installer Service is crucial for installing new software on your computer. If this service is not running correctly, it can cause error 1603.
To look at the Windows Installer Service, follow these steps:
Open the Run dialog box by Pressing the Windows key + R. Type “services.msc” and press Enter. This will open the Services window.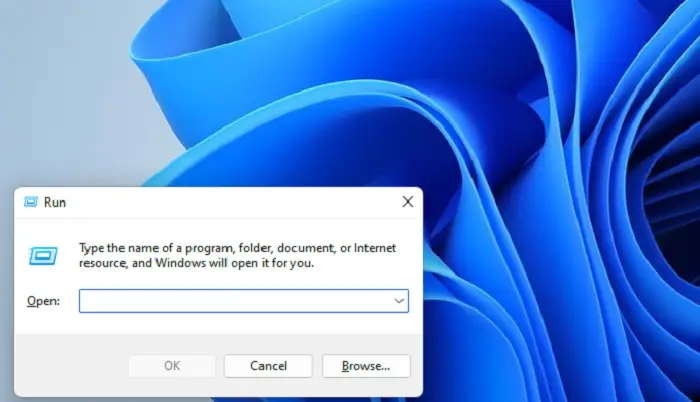
Find the Windows Installer service. Check that the service is running and set to Automatic. On the off chance that the assistance isn’t running, right-click on it and select Start.
Use the Java offline installer
If you have tried the previous solutions and are still encountering Java update error 1603, try using the Java offline installer. The offline installer can install Java without an internet connection and may resolve any issues with the online installer.
Follow these steps to use the Java offline installer:
Download the Java offline installer from the Java website. Save the file to your computer.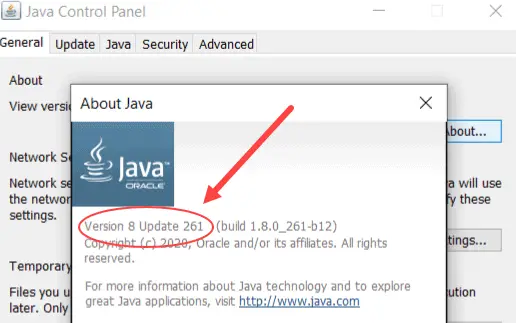
Close all running programs. Run the offline installer and follow the prompts to install Java. Once the installation is done, restart your computer.
See Also: A Fatal JavaScript Error Occurred [Fixed] | 4 Unique Ways
Other Ways To Fix Java Update Error 1603
In case the solutions mentioned above prove to be unsuccessful, you can try the following solutions to fix Java update error 1603-
Java Uninstall Error Code 1603
If you encounter error code 1603 while trying to uninstall Java from your computer, there are a few solutions you can try: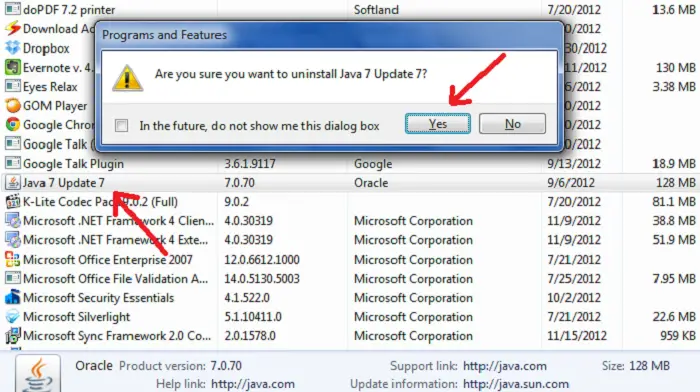
- Use the Java uninstall tool: Oracle provides an uninstall tool you can download from the Java website. Run this tool to remove all traces of Java from your system.
- Use a third-party uninstaller: Many uninstallers can remove stubborn programs like Java. These programs can help remove any leftover files and registry entries that may be causing the error.
- Check for conflicting software: Other programs installed on your system may conflict with Java and prevent it from uninstalling correctly. Check for any programs that may be causing conflicts and temporarily disable or uninstall them before attempting to uninstall Java.
Java Error 1603 Fix
If you encounter error 1603 while trying to install Java, follow these solutions to fix the error:
- Check for system requirements: Ensure your computer meets the new Java update’s minimum requirements. If your computer does not meet the requirements, you may encounter errors during installation.

- Check the Windows Installer Service: The Windows Installer Service is crucial for installing new software on your computer. Ensure that the service is running correctly and set to automatic.
Java Install Error 1603:
If you encounter error 1603 while trying to install Java, try the following solutions:
- Use the Java offline installer: The offline installer can install Java without an internet connection and may resolve any issues with the online installer.

- Temporarily disable antivirus software: Antivirus software can sometimes interfere with the installation of Java. Temporarily disable your antivirus software and attempt to install Java again.

Java Error Code 1603
Error code 1603 is a generic Windows installation error that can occur during the installation or uninstallation of the software.
If you encounter error code 1603 while installing or uninstalling Java, try the abovementioned solutions, such as removing any previous versions of Java, disabling antivirus software, and checking system requirements.
Java Won’t Install on Windows 10
If Java doesn’t install on Windows 10, follow these solutions:
- Use the Java offline installer: The offline installer can install Java without an internet connection and may resolve any issues with the online installer.
- Temporarily disable antivirus software: Antivirus software can sometimes interfere with the installation of Java. Temporarily disable your antivirus software and attempt to install Java again.

- Check for system requirements: Ensure your computer meets the new Java update’s minimum requirements. If your computer does not meet the requirements, you may encounter errors during installation.
- Check the Windows Installer Service: Ensure that the Windows Installer Service is running correctly and set to automatic.
- Use the Java uninstall tool: If Java is already installed on your system, use the Java uninstall tool to remove all traces of Java before attempting to install the new version.
See Also: 7 Best Online JavaScript Validator Tools In 2023
FAQs
What causes Java error 1603 during installation or uninstallation?
There can be several reasons for this error, including conflicts with previous versions of Java, antivirus software interfering with the installation process, insufficient system requirements, or issues with the Windows Installer Service.
Can I fix Java update error 1603, or must I contact specialized help?
You can fix the blunder by following the arrangements referenced in this article.
Do I need to uninstall previous versions of Java before installing a new update?
It is recommended to uninstall all previous versions of Java from your system before installing a new update. Previous versions of Java can cause conflicts during installation and may result in errors like 1603.
Can antivirus software cause Java error 1603?
Yes, antivirus software can sometimes interfere with the installation of Java and cause error 1603. To fix this, you can temporarily disable your antivirus software and attempt to install Java again.
How do I check if the Windows Installer Service runs correctly?
To check if the Windows Installer Service is running, go to the Start menu and type services.msc in the search box. This will open the Services window. Scroll down to find the Windows Installer Service and check if its status is Running, Its startup type is set to Automatic.
Conclusion
Java update error 1603 can be frustrating but can be fixed with the abovementioned solutions. It is essential to follow each step carefully and ensure your computer meets the minimum system requirements for the new Java update. Check this out, if you want to know about Liferay Portal in Java
You can resolve this error and continue using Java for all your programming needs with patience and effort.
Aloukik Rathore is a Delhi-based entrepreneur, musician, writer, and tech nerd. He has been blogging for about 7 years now.
Java is a computer language with few implementation stumbling blocks. As a result, it is a popular choice among developers. On the other hand, users must have it installed on their Mac, Windows, or another operating system. Use programs that are built on it.
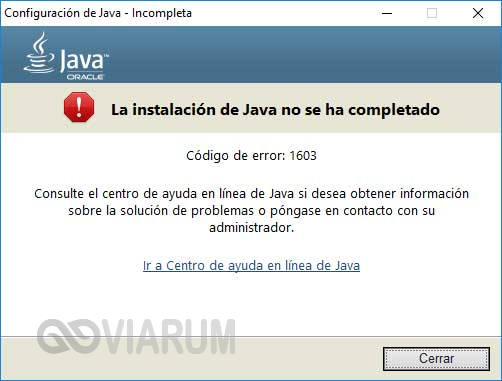
Installing Java updates in Windows 10. The report “Java install did not complete Error Code: 1603″ displays. It is one of the most widespread errors. Malware authors frequently make use of Java weaknesses and vulnerabilities. It is critical to install updates to keep the system secure from potential assaults.
The causes of “Java install did not complete Error Code: 1603” could be various. Antivirus software, web browsers, and other Java-based apps prevent updates from being installed. It prohibits it from being updated, among other things.
This message informs you that you are unable to install the required updates. Suppose a Windows user attempts to update Java when an older version is already installed. They may obtain this error number. The correct Java version should be used according to the user’s Windows operating system.
What is Java error 1603?
The error “Fatal error during installation” is a Windows Installer (MSI) issue. This error usually signifies that “something the installation expected wasn’t available.” Also, “something the installer didn’t expect exists.”
The number 1603 is thrown for a variety of reasons. I will give and then show you how to solve the problem in Java.
Possible Reasons for a Java Error 1603
When the installation starts, Java is already installed.
When you install the JRE-7uxx-windowsxx.exe and the target computer runs Java in a browser, this happens frequently.
The traces of a prior Java installation can be found.
By default, when Java is installed, it tries to delete earlier updates from the same family. Java 7 Update 71, for example, will uninstall Java 7 Update 67 but not Java 6 or Java 8.
The Java Update failed to finish. Previous upgrades aren’t always totally removed. When the updated version tries to install, it may encounter a 1603 error. A stray registry key is sometimes the only trace.
You’re attempting to run an online Java executable.
If you’re going to deploy the EXE, make sure you only install the offline version. If your install file’s name contains the letters “iftw,” you can be sure. Iftw is an acronym for “Install From The Web.” It is a pretty small file.
First and foremost, the Ask Toolbar is typically included in the online version. It’s far worse than any 1603 error you’ll ever come across. Simply use the Java packages from the PDQ Deploy Package Library to get the offline file. Also, use the Java packages from the PDQ Deploy Package Library.
There is a missing installation file.
If you’re installing Java 7 using the extracted MSI, you’ll need files like data1.cab. (Java 8 does not require a separate.cab file.) When deploying Java, an antivirus solution may remove the bundled files, resulting in a 1603 error from the installer.
Methods to fix Java Update Error: 1603

Solve “Java update did not complete Error Code: 1603” by following any of the methods given below.
- Make sure that you are installing the correct version of Java
- Install The Java as administrator
- Turn off Antivirus
- Close programs that run Java
- Task Manager Fix
- Disable Java content
- Uninstall the previous version of Java
- Run Program Install and Uninstall Troubleshooter
- Delete KB2918614 Windows Update
- Don’t install Java with LogMeIn
1. Make sure that you are installing the correct version of Java
Make sure you’re using the correct Java version for your operating system. If you have a 64-bit computer, you need to download 64-bit Java rather than 32-bit Java. Follow these procedures if you’re not sure what version of Windows you’re running.
- Press the Cortana taskbar button in Windows 10.
- In the search area, type in the keyword system.
- Then, to open the window just below, click About your PC.

- Scroll to the System type specification, which indicates whether the platform is 64-bit or 32-bit.
- Make sure you’re not installing 64-bit Java on a 32-bit system first. If you are, this is most likely why Java will not install.
You can choose to download the 32-bit version of Windows x86 Offline. By performing the following tests, you can decide if your system is 32-bit or 64-bit. Another item to consider is if your Java SDK is 32-bit or 64-bit.
If you try to upgrade Java with a 32-bit version to replace a 64-bit Java SDK or the other way around, you may encounter a 64-bit and 32-bit conflict. Install 64-bit Java to replace an old 64-bit version, or update 32-bit Java to the most recent 32-bit version.
2. Install and Run Java as administrator
Installation difficulties can be resolved by installing software as an administrator. As a result, you need to install the most recent Java version as an administrator.
- Install Java by right-clicking it.
- Select the option to run as administrator.

- Begin the setup process and follow the on-screen prompts.
You should no longer get the Java error 1603. However, if the issue persists, attempt the third option.
3. Turn off Antivirus
Another approach is to test your antivirus software. I said that McAfee VirusScan Enterprise has a feature called “Access Protection.” The option to block the installation of browser assistance objects and shell extensions is part of Access Protection. It falls under the heading of “Common Standard Protection.”
The sign explains that enabling this option will prevent Java installation. Because security software frequently blocks Java, your antivirus could be the source of Java error 1603. As a result, to add Java, you should temporarily disable security software:
- Open Task management by right-clicking the taskbar.
- Select your security software from the Startup tab.
- To turn off antivirus, click the Disable option.

- Restart your computer and try again to reinstall Java.
Alternatively, reboot after temporarily removing the antivirus software from the Windows starting. The Task Manager’s Startup tab shows how you may disable antivirus software.
- To prevent the software from starting, press the Disable button.
- After restarting Windows, install Java.
4. Close programs that run Java
Before installing Java, make sure all other programs are closed. When you try to install the latest version, there may be programs that execute Java.
You must close the browser and any other Java-enabled apps after using the Java installation. If you don’t, you can get a Java error 1603.
After downloading the Java installer, close your browser. All other program windows on the taskbar should be closed.
Also, see if there are any third-party program icons in your system tray (notification area). If this is the case, close the programs in the system tray.
5. Task Manager Fix
I have also found that the java error code 1603 error message can also be solved using task manager.
- The Offline Installer is available for download.
- Activate Task Manager.
- All non-system processes, as well as the whole Explorer process tree, should be terminated.
- Start the Task Manager again by pressing Ctrl-Alt-Del.
- Start the Offline Installer by running a file.
- Check To See If JAVA Is Now Installed And Functioning Properly.

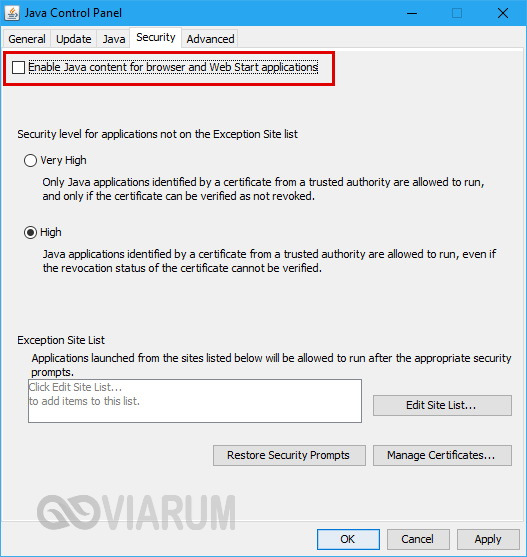
6. Disable/Enable Java content
Before installing, this approach blocks Java content in the browser.

- Shut Down The Installer When You Get The 1603 Error.
- In the Java Control Panel, locate and
- “Enable Java Content” in the Web Browser should be unchecked.
- Select the Security tab (uncheck) in the Java Control Panel.
- Uncheck the option Enable Java Content In The Browser.
- To Verify The Modifications, Select Apply And Then OK.
- Java must be reinstalled, and Java content must be enabled again in the browser.
- The Offline Installer Package can be downloaded and installed.
- If you need to use Java content in the browser, after the installation is complete, re-enable “Enable Java content” in the browser.
7. Uninstall the previous version of Java
Error Code 1603 may be resolved by uninstalling an older version of Java. You can download the Java uninstall programs from the official website. Then start the installer and copy the on-screen instructions.
You can also manually use the Control Panel, which requires you to uninstall it as a regular program and then reinstall it.
8. Run Program Install and Uninstall Troubleshooter
A program installation troubleshooter is not included with Windows. The Program Install and Uninstall troubleshooter is still available for download.
That troubleshooter may be able to help you fix Java problem 1603. By clicking the Download option, you may install the troubleshooter on Windows 10. Then, to launch the window, go to the location where you saved the installer. Double-click MicrosoftProgram Install and Uninstall.meta.diagcab.
- From Microsoft’s official website, download and install the “Program Install and Uninstall troubleshooter.”
- To open the Troubleshooter, double-click the MicrosoftProgram Install and Uninstall.meta.diagcab file.
- In the new window, click Next and follow the on-screen instructions.
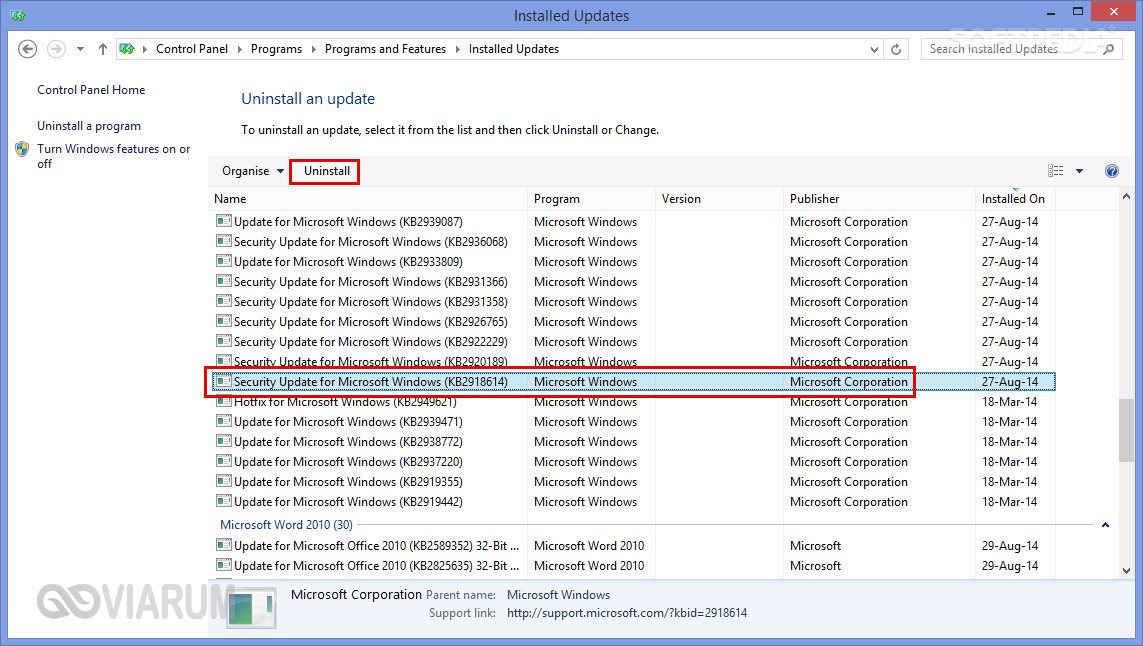
9. Delete KB2918614 Windows Update
For many Windows 10 users, Windows Update KB2918614 appears to generate Java installation and update difficulties. As a result, deleting this update may assist in resolving the issue.
- Using the Windows key + R, open the Run dialogue box. In the Run box that opens up, type appwiz.cpl and click OK.
- When the Programs in Features box displays, click the View installed updates option in the left panel.
- You’ll see a list of updates that have been installed. Look for the code KB2918614.
- Click the Uninstall button next to the KB2918614 Windows update.
- Once the uninstallation is finished, restart your personal computer to see if the Java issue 1603 has been resolved.
Windows may reinstall the KB2918614 update. Disable automatic updates to stop this from happening.
10. Don’t install Java with LogMeIn
When LogMeIn users attempted to install Java remotely. They received the Java error message 1603. The LogMeIn remote desktop software can cause an installation error.
So, if you’re using LogMeIn to install Java. Uninstall it and install Java on your PC without using remote desktop software. Check out other LogMeIn alternatives if you require remote desktop software to install Java.
Conclusion
There are a few options for resolving Java problem 1603. I hope that these suggestions from my list helped resolve Java problem 1603.
Содержание:
- 1 Основные причины возникновения ошибки
- 2 Что предпринять при появлении ошибки установки Java
- 3 Удаление потенциально конфликтных обновлений
- 4 Изменение расположения установки и проверка прав доступа
- 5 Отключение Java-контента в браузере
- 6 Прочие решения
В процессе своей работы многие созданные под Windows приложения используют библиотеки, входящие в состав встроенных или отдельно устанавливаемых фреймворков вроде NET Framework. Одним из наиболее распространенных компонентов подобного рода является Java – программная платформа, разработанная компанией Sun. В свое время Java играла значительную роль в адаптации программного обеспечения, служа своего рода прокладкой между железом, операционной системой и программной средой. Сегодня данное ПО уже не столь востребовано, тем не менее, есть еще немало приложений, которые в нем нуждаются.
Если при установке какая-то программа потребует наличия Java, следует скачать ее последнюю версию с официального сайта и установить на ПК как обычное приложение. Обычно инсталляция пакета проходит без проблем, но в некоторых случаях на этом этапе вас может ждать неприятный сюрприз, а точнее ошибка 1603, указывающая на сбой установки.
Основные причины возникновения ошибки
Сталкиваться с этой неполадкой чаще всего приходится при повторной установке или обновлении Java. Вообще же, error code 1603 является вполне типичной ошибкой инсталляции и возникает не только при установке Java, но и при работе с другими программами. Причины сбоя чаще всего кроются в повреждении установочных файлов, прерывании процесса, некорректной перезаписи или удалении связанных ключей реестра. Кроме того, ошибка Error code 1603 Java может быть спровоцирована недоработанными накопительными обновлениями Windows.
Итак, вы столкнулись с ошибкой error code 1603 Java. Что делать? Наиболее эффективным, а, значит, и правильным решением в таком случае будет полная переустановка компонента. При этом для удаления старой или поврежденной версии Java лучше использовать специальную утилиту Java Uninstall Tool, скачать которую можно с официального сайта www.java.com/ru/download/uninstalltool.jsp.
Для деинсталляции также отлично подходят сторонние приложения, такие как Wise Program Uninstaller или Total Uninstall. В отличие от стандартного средства удаления программ, эти приложения позволяют находить и удалять оставшиеся после деинсталляции «хвосты» – временные файлы, папки и ключи реестра, часто вызывающие конфликты при новой установке.

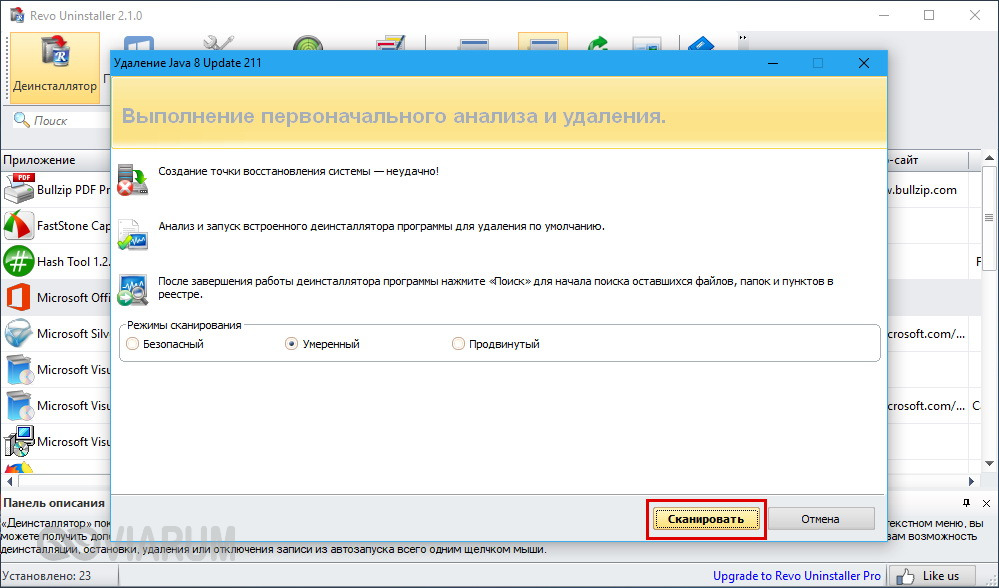
Опытные пользователи могут выполнить дополнительный поиск мусорных каталогов и ключей реестра по ключевому слову «Java», но это довольно рискованная операция, поскольку высока вероятность удалить что-то важное. После деинсталляции платформы следует перезагрузить компьютер.
Удаление потенциально конфликтных обновлений
Если незадолго до появления ошибки error code 1603 при установке Java вы устанавливали накопительные обновления, попробуйте их удалить. В частности, проверьте, имеется ли на вашем компьютере пакет обновления KB2918614, если он есть, удалите его.
Изменение расположения установки и проверка прав доступа
Ошибка 1603 в процессе установки Java иногда возникает по причине отсутствия прав у Системы на каталог, в который устанавливается приложение. С проблемами вам также придется столкнуться, если попытаетесь установить Java на съемный накопитель, зашифрованный диск или в защищенную подобным образом папку. Мы не рекомендуем изменять права доступа на системные каталоги, вместо этого создайте в корне диска С или D отдельную папку и убедитесь, что пользователь СИСТЕМА имеет на нее полные права.
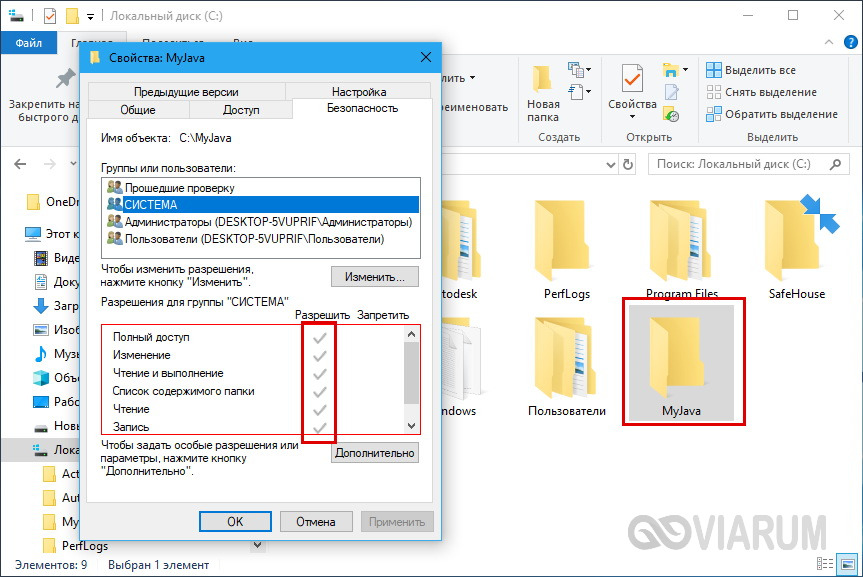
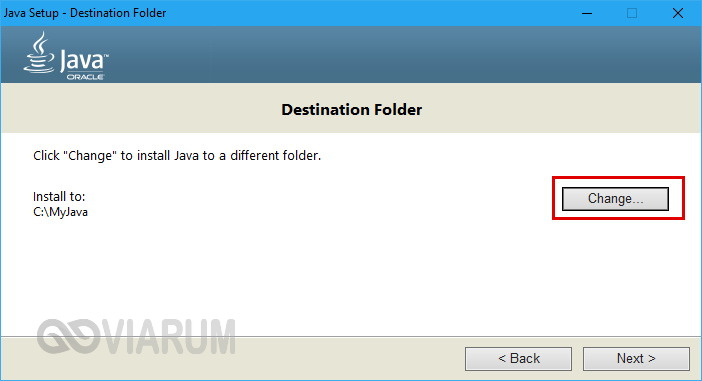
Теперь можно приступать к повторной установке. Скачайте с официального сайта автономный установщик Java, потому что это самый надежный вариант. Перед тем как запускать исполняемый файл установщика, откройте Диспетчер задач и проверьте наличие процесса MSIEXEC.EXE. Если он запущен, завершите его. Запустите установщик Java, отметьте галочкой опцию «Change destination folder» и нажмите «Install».
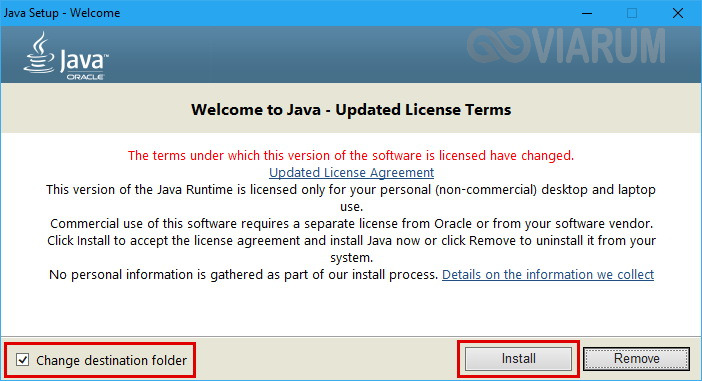
В следующем окне мастера нажмите кнопку «Change», укажите путь к альтернативному месту установки и выполните инсталляцию платформы в штатном режиме.
Отключение Java-контента в браузере
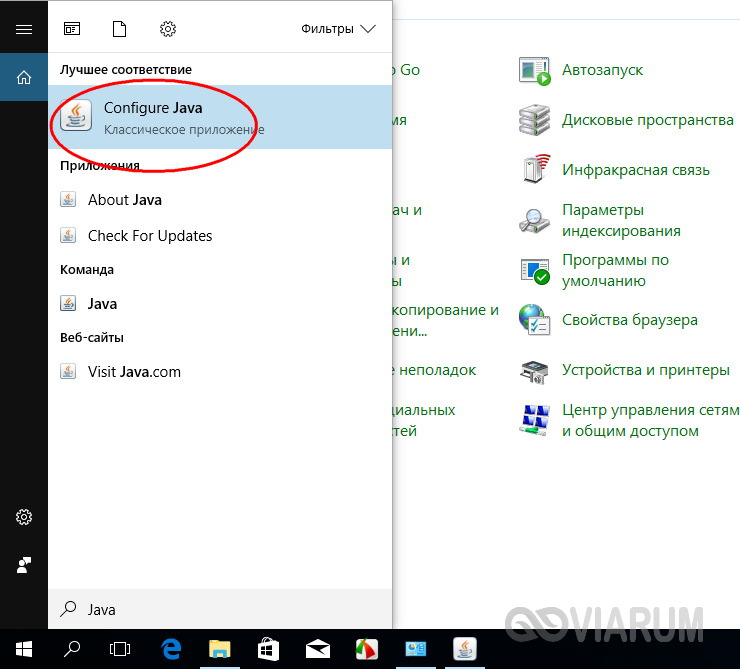
Данный способ не требует радикального удаления старой или поврежденной версии Java, но его можно опробовать в случае появления ошибки 1603 при обновлении Java поверх ранней версии. Откройте панель управления Java (через поиск), переключитесь на вкладку Security и снимите галочку с чекбокса «Enable Java Content for browser…». Сохранив настройки, скачайте автономный установочный пакет Java и осуществите его инсталляцию. По завершении процедуры активируйте ранее отключенную настройку.
Прочие решения
Если у вас не устанавливается Java, выдавая error code 1603, желательно также проверить следующие моменты. Во-первых, убедитесь, что на диске/разделе у вас имеется достаточно места. Во-вторых, проверьте командой sfc /scannow целостность системных файлов (если ошибка возникает при установке и других приложений). В-третьих, выполните откат к предыдущей версии Windows – этот метод является универсальным и позволяет решать разного рода проблемы, связанные с повреждением файлов и реестра.
On my Windows 7 machine the Java update consistently fails with this error message.
(edit: The same thing happens on Windows 8).
This seems to a common problem, does anyone have an insight into what’s going wrong, and is there a fix for it other than either disabling the update check (seems a bad idea from a security point of view) or waiting for the nag message and then manually installing the new version (annoying and stupid from a usability point of view).
Note that I did install the previous version manually (updating from 6.23 to 6.30 I think?), thinking that might resolve the issue, but no luck.
asked Apr 22, 2012 at 2:05
![]()
therefromheretherefromhere
8,42210 gold badges42 silver badges43 bronze badges
3
I finally got this working after reading the following:
It turns out that when the java updater attempts to download new updates, it uses the Windows service called “Background Intelligent Transfer Service” (BITS). If the logged on user is only a standard user, then the java updater fails to correctly use the BITS service to download the new update. However, if the BITS service is not available for use by the java updater (either the service is disabled or permissions are denied to the calling process), the java updater uses an alternate mechanism for downloading and applying updates that works successfully, even if the original user was just a standard user with limited rights (no administrative rights).
In order to elevate the java updater so that standard users can install java updates, we must first set the application compatibility mode of the java updater so that will run in compatibility mode for Windows 2000, which did not have the “Background Intelligent Transfer Service”. This will force the Java updater to use the alternate mechanism to download the java updates.
http://privilegeforum.scriptlogic.com/Forum/aff/3/aft/193/afv/topic.aspx
So what you do is:
- find jucheck.exe (typically under
%PROGRAMFILES%\Common Files\Java\Java Updateor%PROGRAMFILES(x86)%\Common Files\Java\Java Update) - open it’s properties and set it to run in Windows 2000 compatibility mode (for all users or at least for your elevated one!)
- check for updates again through Java Control Panel
The installer will nagg about your OS not being supported, but will allow you to install the update.
I got this working after about ~3 years of searching for a solution. Still waiting for Oracle to fix it. They simply fail to understand that running as superuser all the time is bad practice and a thing of the past.
![]()
answered May 9, 2013 at 17:00
![]()
predipredi
96210 silver badges12 bronze badges
9
Another non-permanent but quick solution is simply running jucheck.exe in administrator mode:
- Find Java updater executable
jucheck.exeby using one of the following:- type
jucheckin the search field of start menu. - Look in
%PROGRAM_FILES%\Common Files\Java\Java Update
- type
- Run Java updater
jucheck.exein administrator mode via context menu:- Push right mouse button on `jucheck.exe
- Select «Run as administrator».
![]()
Run5k
15.8k24 gold badges50 silver badges63 bronze badges
answered Apr 16, 2014 at 10:52
![]()
5
I know this is a very old question, but in case this helps someone else:
I was having this problem, and it turns out I had a couple of «jre*» processes running. I assume these are Java Runtime Environments that had failed to work before, and they had some resource locked.
Just make sure you’re not running any Java apps, then open Task Manager, look for any processes beginning with «jre», and end them. Then try running jucheck.exe again. Worked for me.
answered Aug 12, 2021 at 15:05
![]()
If you are like me and have tried it all without success, especially on Windows 7, make sure the problem isn’t related to secure channel error 409. You won’t see that with jucheck.exe though as it will just keep trying to download an update for a while (0% progress), then fail with download error. It will also fail with Ninite.
What solved it for me and is worth a shot:
- Select Internet Options.
- In the Internet Properties window select the Advanced tab.
- Scroll to the Security section.
- Make sure to select all of Use SSL and Use TLS check boxes.
- Click Apply, then OK.
That’s it. From now on the Java update (as well as Ninite) should work for you. Took me a while to figure this one out, so hopefully it still helps someone in 2022 and beyond 
answered Jul 29, 2022 at 19:20
![]()
monsunemonsune
2411 silver badge4 bronze badges
You should try installing java with Ninite. You can just go to Ninite.com and select java under runtimes. then when you get a notification about a java update run ninite again and it will install the latest java without using the java update mechanism. it is really simple and easy no questions to answer and you can use the same ninite program to update other apps from that site as well.
answered Sep 19, 2012 at 15:37
![]()
d4v3y0rkd4v3y0rk
1,2271 gold badge8 silver badges11 bronze badges
3
You must log in to answer this question.
Not the answer you’re looking for? Browse other questions tagged
.
Not the answer you’re looking for? Browse other questions tagged
.

Устанавливал новую версию Java и в процессе установки получил отчет об ошибке: Java update did not complete
При повторной попытке выскочила еще одна ошибка с кодом 1603.

Немного предыстории. У меня Windows 7, ява слетела, возможно, из-за действия антивирусов (Avira, 360 Total Security), пришлось ставить заново свежую версию. В процессе установки на диске C закончилось место. Место расчистил, но ошибки повторялись.
Пробовал по рекомендации с официального сайта поставить яву из дистрибутива для автономной (ручной) установки https://www.java.com/ru/download/manual.jsp , ошибки повторялись.
Пробовал программу удаления Java с официального сайта: https://www.java.com/ru/download/uninstalltool.jsp — она установленных версий явы у меня не обнаружила.
Итак, выше перечислил все, что не дало желаемого результата.
Далее излагаю шаги которые в моем случае в сумме дали желаемый результат.
- На системном диске, как уже писал выше, было освобождено достаточно места для установки (установленная Java на диске занимает 158 Мб).
- Скачал дистрибутив для автономной установки тут: https://www.java.com/ru/download/manual.jsp
- Зашел в папку, где ранее располагалась ява: C:\Program Files (x86)\Java\ вручную удалил все, что в ней находилось.
- Почистил реестр от поврежденных ключей при помощи RegCleaner — можно использовать любую другую похожую программу, например, тут советуют утилиту Майкрософта:
https://www.java.com/ru/download/faq/uninstaller_toolfaq.xml#tool-tips - Отключил антивирус (Авира)
- Выполнил заново установку Java из скачанного в пункте 2 дистрибутива.

Ява установлена без ошибок! Чего и вам желаю.
Буду рад, если кому-то мой способ решения этой проблемы помог.
Если что-то из вышеописанного непонятно, спрашивайте в комментариях — постараюсь оперативно ответить. Также будет не лишним, указать в комментариях, сработал для вас этот способ или нет.