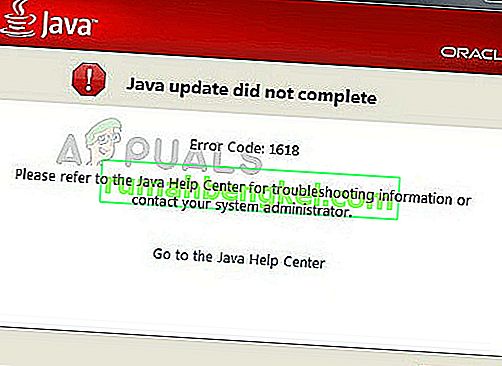
Код ошибки «1618» — довольно распространенная ошибка в Windows, которая запрашивается установщиком Microsoft (.msi), сообщающим, что в настоящее время обрабатывается другой .msi-файл. Пользователи сталкиваются с этой ошибкой установки при установке Java на свои компьютеры.
Обратите внимание, что этот код ошибки не обязательно означает, что должен быть другой экземпляр Java, работающий в фоновом режиме. В процессе установки может быть любая другая установка, которая может заблокировать установку Java. Эта ошибка допустима, если у вас действительно идет установка. В этом случае вам следует подождать и дождаться завершения существующей установки. После этого вы можете снова попытаться установить Java.
Что вызывает «код ошибки Java 1618»?
Как упоминалось ранее, это сообщение об ошибке вызвано конфликтом в установщике Microsoft. Однако есть и другие причины, по которым установка может завершиться неудачно. Некоторые из них:
- Службы в Microsoft Installer находится в состоянии ошибки. Если служба не работает должным образом, процесс установки Java не будет продолжен.
- Существующая установка Java повреждена и неполная.
- Иногда обновление Windows нарушает работу установщика. Если быть точным, KB2918614 сломал модуль установки, что вынудило Java отозвать свой процесс.
- Антивирусное программное обеспечение проявляет особую осторожность при установке приложений. Это программное обеспечение безопасности время от времени блокирует установку из-за ложного срабатывания.
- Также могут быть сторонние приложения, которые автоматически запускают службу установки Windows. В этом случае мы должны диагностировать приложение и остановить его, чтобы устранить сообщение об ошибке.
Как исправить «код ошибки Java 1618»?
Пользователи сталкиваются с сообщением об ошибке «Код ошибки Java 1618» при попытке установить Java на свой компьютер. Как упоминалось ранее, это относится к службе msi самой Windows. Приведенные ниже решения предназначены для всех проблем, с которыми вы можете столкнуться. Убедитесь, что вы вошли в систему как администратор и имеете активное подключение к Интернету.
Решение 1. Перезапуск службы MSIEXEC.EXE
В установщике Microsoft есть служба MSIEXEC.EXE, которая в первую очередь отвечает за установку модулей из установщиков .msi, подобных тому, который есть у нас для java. Если эта служба не работает должным образом или имеет некоторые конфликты с другими службами, это может вызвать ошибки, подобные обсуждаемой. Мы сбросим / отключим службу и попробуем снова установить Java.
- Нажмите Windows + R, введите « taskmgr » в диалоговом окне и нажмите Enter. Выберите вкладку Процессы .
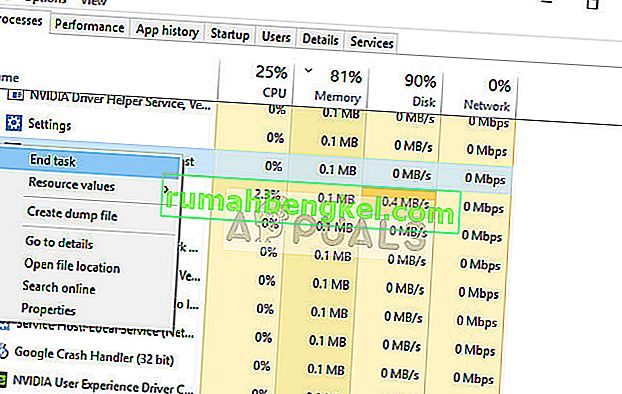
- Оказавшись в службах, найдите службу MSIEXEC. EXE »или« MSIEXE.MSI », щелкните его правой кнопкой мыши и выберите« Завершить процесс ». В Windows 10 это может быть указано как «Установщик Windows».
- Теперь перейдите к установщику Java и соответственно установите Java на свой компьютер.
Если завершение процесса из диспетчера задач не работает, мы можем попробовать перезапустить службу и установить тип запуска как автоматический . Убедитесь, что вы вошли в систему как администратор.
- Нажмите Windows + R, введите « services. msc »в диалоговом окне и нажмите Enter.
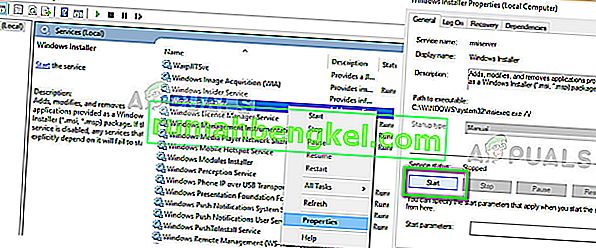
- В службах найдите службу « Установщик Windows », щелкните ее правой кнопкой мыши и выберите « Свойства» .
- В свойствах нажмите « Пуск» . Теперь попробуйте установить Java и посмотрите, устранит ли это сообщение об ошибке.
Решение 2. Использование автономного установщика
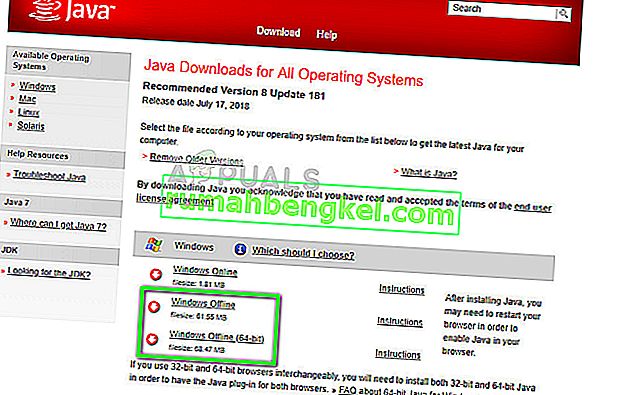
Если перезапуск службы не работает, вы можете попробовать использовать автономный установщик . Установщик Java по умолчанию загружает файлы из Интернета во время загрузки. Если все идет не так, как планировалось, и установщик Windows не может получить файлы, вы можете получить это сообщение об ошибке. Автономный установщик — это файл большего размера, но в нем уже есть все модули, поэтому вам не нужно ничего загружать при установке.
- Удалите все существующие экземпляры Java с вашего компьютера. Теперь перейдите на официальный сайт Java и загрузите оттуда автономный установщик ( Windows в автономном режиме ).
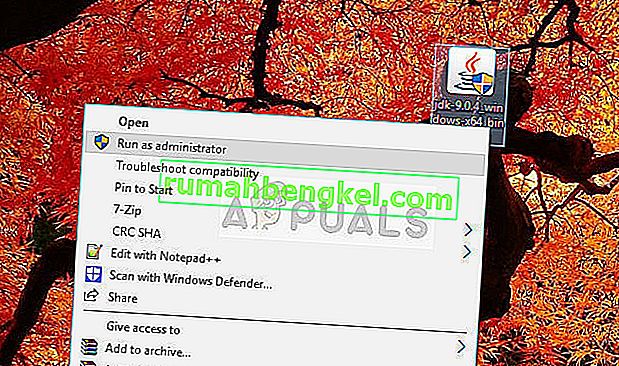
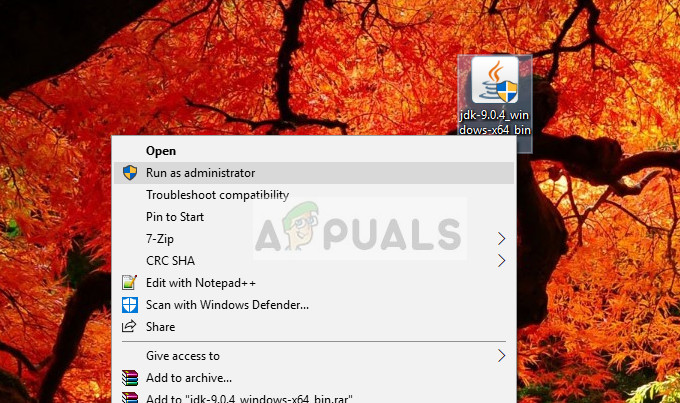
- После загрузки установщика щелкните приложение правой кнопкой мыши и выберите «Запуск от имени администратора». После установки полностью перезагрузите компьютер и проверьте, исчезло ли сообщение об ошибке.
Решение 3. Отключение антивирусного программного обеспечения
Как упоминалось ранее, антивирусное программное обеспечение блокирует доступ к любой программе, которую они считают подозрительной в заражении компьютерной системы. Такое поведение называется ложным срабатыванием, и есть много сообщений о том, что из-за этого не удается установить Java. Известно, что наиболее распространенным антивирусом, вызывающим эту проблему, был McAfee .
Чтобы противостоять этой ситуации, вы можете полностью отключить антивирусное программное обеспечение, а затем попробовать установить его снова. Если на вашем рабочем столе установлено несколько антивирусных программ, сделайте то же самое для всех. Если вы абсолютно уверены, что ни один антивирус не контролирует ваш компьютер, попробуйте снова установить Java от имени администратора.
Решение 4. Проверка Центра обновления Windows
Установщик Windows часто получает обновления от Microsoft для улучшения функций и устранения ошибок и проблем. Недавно появилось обновление Windows ( KB2918614 ), которое, как сообщается, нарушило работу установщика Windows. Это может быть связано с проблемами в реестре или в общей структуре. Поскольку это было решено с помощью другого обновления, есть два варианта; либо вы можете обновить свою Windows до последней сборки, либо вернуться обратно.
Во-первых, вы можете попытаться установить последнее обновление. Если по какой-либо причине вы не можете обновить свой компьютер, вы можете попробовать отменить обновление.
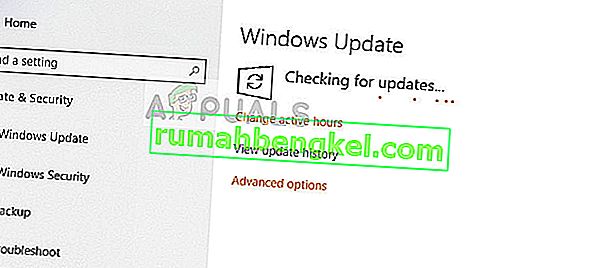
- Нажмите Windows + S, введите « Центр обновления Windows » в диалоговом окне и откройте приложение.
- Нажмите на опцию Проверить наличие обновлений и установите ожидающие обновления.
- Полностью перезагрузите компьютер и попробуйте снова запустить установщик Java.
Если это не сработает, вы можете попробовать откатить обновление KB2918614 для Windows.
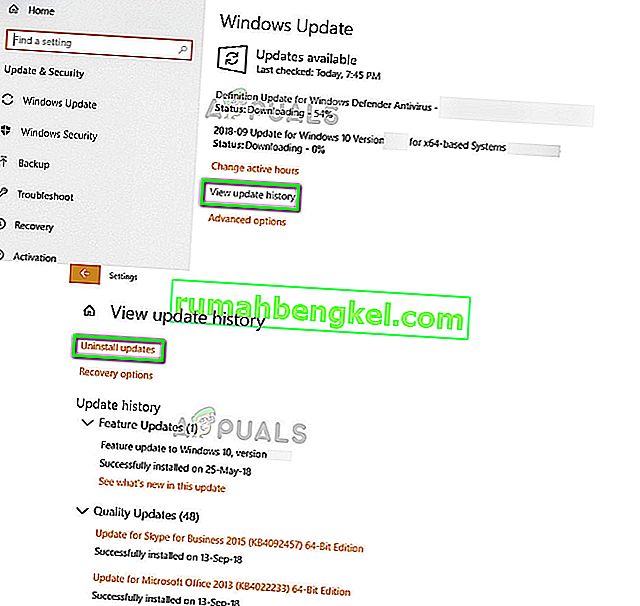
- Откройте настройки обновления, как мы делали ранее, и нажмите « Просмотреть историю обновлений» . В следующем окне выберите Удалить обновления .
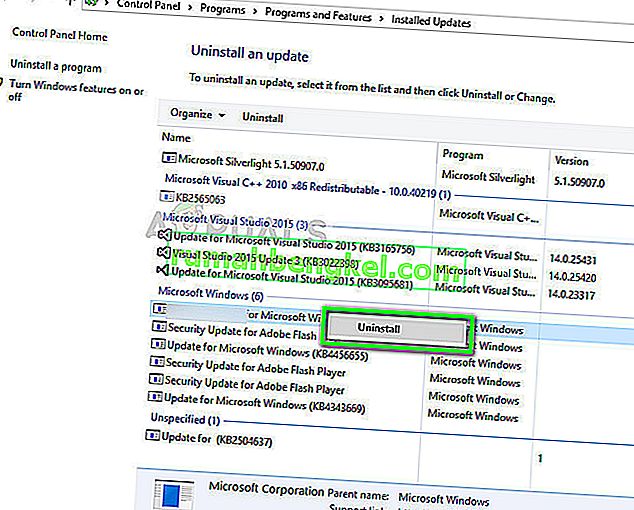
- На вкладке Microsoft Windows щелкните правой кнопкой мыши проблемное обновление и выберите « Удалить» .
- После удаления обновления перезагрузите компьютер и попробуйте снова запустить установщик Java.
Решение 5. Чистая загрузка компьютера
Если все вышеперечисленные методы не работают, но при установке Java вы все равно получаете сообщение об ошибке «Код ошибки Java 1618», вы можете попробовать выполнить «чистую» загрузку компьютера. Этот режим включает вашу систему с минимальным набором драйверов и программ и запускаются только системные службы. После чистой загрузки вы можете попробовать установить Java, и, если она будет успешной, это означает, что какая-то сторонняя программа конфликтует с нашим установщиком.
- Нажмите Windows + R, чтобы запустить приложение «Выполнить». Введите « msconfig » в диалоговом окне и нажмите Enter.
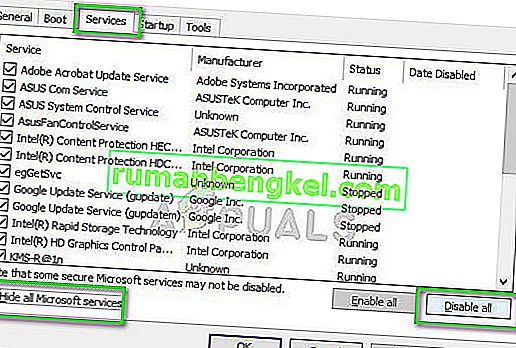
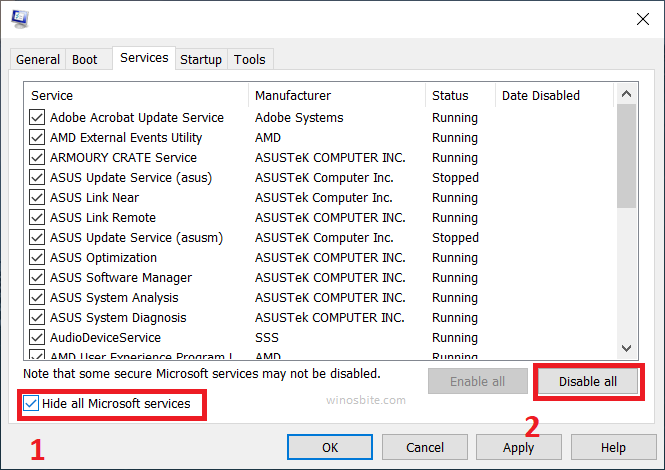
- Перейдите на вкладку Services в верхней части экрана. Отметьте строку « Скрыть все службы Microsoft ». После того, как вы нажмете эту кнопку, все связанные с Microsoft службы будут отключены, оставив все сторонние службы (вы также можете отключить все связанные с Microsoft процессы и более тщательно проверить, нет ли сторонних служб, вызывающих проблему).
- Теперь нажмите кнопку « Отключить все », расположенную внизу в левой части окна. Все сторонние сервисы теперь будут отключены.
- Нажмите Применить, чтобы сохранить изменения и выйти.
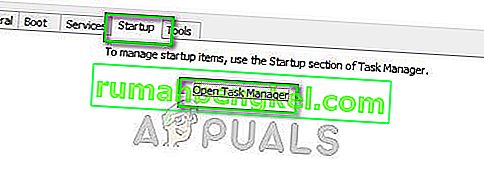
- Теперь перейдите на вкладку «Автозагрузка» и выберите « Открыть диспетчер задач ». Вы будете перенаправлены в диспетчер задач, где будут перечислены все приложения / службы, которые запускаются при запуске вашего компьютера.
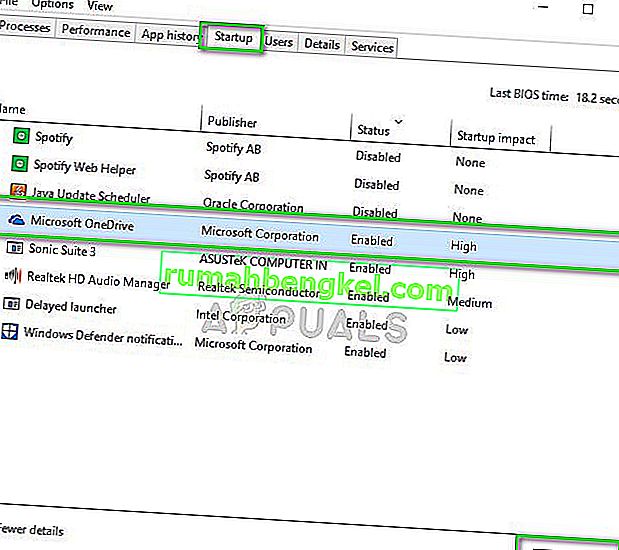
- Выберите каждую службу по очереди и нажмите « Отключить » в правом нижнем углу окна.
- Перезагрузите компьютер, чтобы изменения вступили в силу, и попробуйте запустить установщик.
The error code ‘1618’ is quite a common error in Windows which is prompted from Microsoft Installer (.msi) stating that another .msi is currently being processed. Users encounter this installation error when they are installing Java on their computers.
Do note that this error code doesn’t necessarily mean that there must be another instance of Java running in the background. There can be any other installation being processed which may block the installation of Java. This error is legitimate if you indeed have an installation underway. In that case, you should wait it out and let the existing installation finish. After that, you can attempt at installing Java again.
What causes ‘Java error code 1618’?
Like mentioned before, this error message caused by a clash in Microsoft Installer. However, there are also other reasons why your installation might fail. Some of them are:
- The service of Microsoft Installer is in an error state. If the service isn’t running properly, the installation process for Java will not proceed.
- The existing Java installation is corrupt and incomplete.
- Sometimes, Windows update breaks the installer. To be specific, ‘KB2918614’ broke the installation module which forces Java to withdraw its process.
- Antivirus software is extra cautious when it comes to installing applications. These security software blocks an installation every once in a while with a false positive.
- There can also be third-party applications which start the Windows installer service automatically. In this case, we have to diagnose the application and stop it to solve the error message.
Users face the error message ‘Java error code 1618’ when they try installing Java on their computer. Like mentioned before, it is related to msi service of Windows itself. The solutions below target all the problems which you may face. Make sure you are logged in as an administrator and have an active internet connection.
Solution 1: Restarting the service ‘MSIEXEC.EXE’
Microsoft installer has a service named ‘MSIEXEC.EXE’ which is primarily responsible for installing modules from .msi installers like the one we have for java. If this service is not working properly or has some conflicts with other services, it may induce errors like the one under discussion. We will reset/kill the service and try installing Java again.
- Press Windows + R, type “taskmgr” in the dialogue box and press Enter. Select the tab Processes.
- Once in services, search for the service ‘MSIEXEC.EXE’ or ‘MSIEXE.MSI’, right-click it and select “End process”. In Windows 10, this might be listed as ‘Windows installer’.
- Now navigate to the Java installer and install Java on your computer accordingly.
If ending the process from the task manager doesn’t work, we can try to restart the service and set the startup type as Automatic. Make sure that you are logged as an administrator.
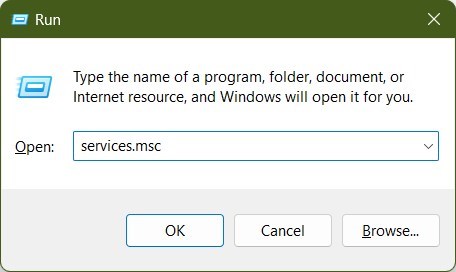
- Press Windows + R, type “services.msc” in the dialogue box and press Enter.
- Once in services, locate the service “Windows Installer”, right-click it and select Properties.
- Once in properties, click on Start. Now try installing Java and see if this fixes the error message.
Solution 2: Using offline installer
If restarting the service doesn’t work, you can try using the offline installer instead. The default Java installer downloads the files from the internet while downloading. If this doesn’t go as planned and the Windows installer is unable to fetch the files, you might experience this error message. The offline installer is a larger file but already has all the modules present so you don’t have to download anything when installing.
- Remove all existing instances of Java from your computer. Now navigate to the official website of Java and download the offline installer from there (Windows offline).
- After downloading the installer, right-click on the application and select “Run as administrator”. After installing, restart your computer completely and check if the error message is resolved.
Solution 3: Disabling Antivirus software
As mentioned earlier, antivirus software block access to any program which they find suspicious of infecting the computer system. This behavior is called a false positive and there are many reports that Java fails to install because of this. The most common antivirus which was known to cause this problem was McAfee.
To counter this situation, you can disable your antivirus software completely and then try installing again. If you have more than one antivirus software on your desktop, do the same for all of them. Once you are absolutely sure that no antivirus is monitoring your computer, attempt at installing Java again as an administrator.
Solution 4: Checking Windows Update
Windows Installer gets frequent updates from Microsoft to improve features and remove bugs and problems. Recently, there was a Windows update (KB2918614) which reportedly broke the Windows installer. This can be due to problems in the registry or in the overall structure. Since this was resolved with another update, there are two options; either you can update your Windows to the latest build or revert back.
First, you can attempt at installing the latest update. If due to any reason you cannot your update your computer, you can try reverting back the update.
- Press Windows + S, type “Windows Update” in the dialogue box and open the application.
- Click on the option Check for updates and install the pending updates.
- Restart your computer completely and try running the Java installer again.
If this doesn’t work, you can try reverting back the KB2918614 update for Windows.
- Open the Update settings like we did earlier and click View update history. From the next window, select Uninstall updates.
- Underneath the tab of Microsoft Windows, right-click on the problematic update and select Uninstall.
- After uninstalling the update, restart your computer properly and try launching the Java installer again.
Solution 5: Clean Booting your Computer
If all the above methods don’t work and you still get the error ‘Java error code 1618’ when installing Java, you can try clean booting your computer. This mode turns on your system with a minimal set of drivers and programs and only system services are being run. Once in clean boot, you can try installing Java and if it is successful, it means there was some third-party program conflicting with our installer.
- Press Windows + R to launch the Run application. Type “msconfig” in the dialogue box and press Enter.
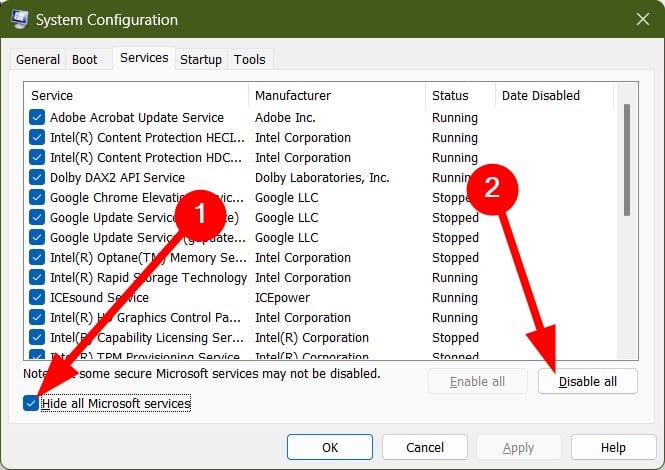
- Navigate to the Services tab present at the top of the screen. Check the line which says “Hide all Microsoft services”. Once you click this, all Microsoft related services will be disabled leaving behind all the third-party services (you can also disable all Microsoft related processes too and check more extensively if there are no third-party services causing the problem).
- Now click the “Disable all” button present at the near bottom at the left side of the window. All the third-party services will now be disabled.
- Click Apply to save changes and exit.
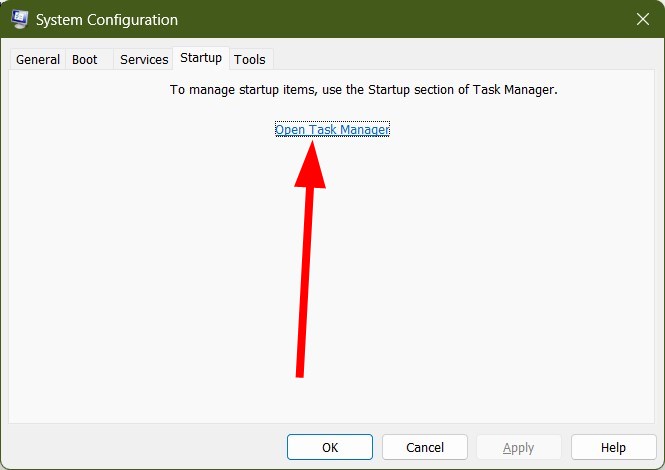
- Now navigate to the Startup tab and click the option of “Open Task Manager”. You will be redirected to the task manager where all the applications/services which run when your computer starts will be listed.
- Select each service one by one and click “Disable” at the bottom right side of the window.
- Restart your computer for the changes to take place and try running the installer.
Kevin Arrows
Kevin Arrows is a highly experienced and knowledgeable technology specialist with over a decade of industry experience. He holds a Microsoft Certified Technology Specialist (MCTS) certification and has a deep passion for staying up-to-date on the latest tech developments. Kevin has written extensively on a wide range of tech-related topics, showcasing his expertise and knowledge in areas such as software development, cybersecurity, and cloud computing. His contributions to the tech field have been widely recognized and respected by his peers, and he is highly regarded for his ability to explain complex technical concepts in a clear and concise manner.
You can try installong Java in a new folder
by Sagar Naresh
Sagar is a web developer and technology journalist. Currently associated with WindowsReport and SamMobile. When not writing, he is either at the gym sweating it out or playing… read more
Updated on
- Java error code 1618 is another dreadful error that prevents you from installing Java on your PC.
- You can resolve it by disabling the Windows Firewall or installing the latest Windows update.
- We would also suggest you try a clean boot and see if this resolves the problem or not.
The Java error code 1618 is a common error that you will come across when trying to install Java on your Windows PC. This issue has been reported by multiple users, and it could pop up because of another instance of Java running on your PC.
What causes Java error code 1618?
After some research, we have found out a few of the most common reasons why you will get the Java error code 1618:
- Java installation: In case you have Java installed on your PC, then you will get this error.
- Antivirus is blocking Java: Aggressive antivirus settings can often lead to it blocking the Java installation.
- The installation file is corrupt: Corrupt installation or program-related files can also trigger this problem, so don’t hesitate to refer to our below solutions.
- Windows installer service is not running: A third-party program might have turned off the Windows Installer service. Here’s what to do if the Windows Installer service can’t be accessed.
- Corrupt registry keys: If some important registry entries are missing or corrupt then they can cause multiple issues.
How can I fix the Java error code 1618?
Here are some quick fixes that you can apply before applying the advanced troubleshooting methods:
- Restart your PC as it will load all the system-related files from scratch.
- Close any other instance of the Java setup running on your PC.
Well, that’s about it. Let us check out the advanced solutions and possibly fix this problem.
1. Restart Windows Installer Service
- Press the Win + I buttons to open the Run dialogue.
- Type services.msc and press Enter.
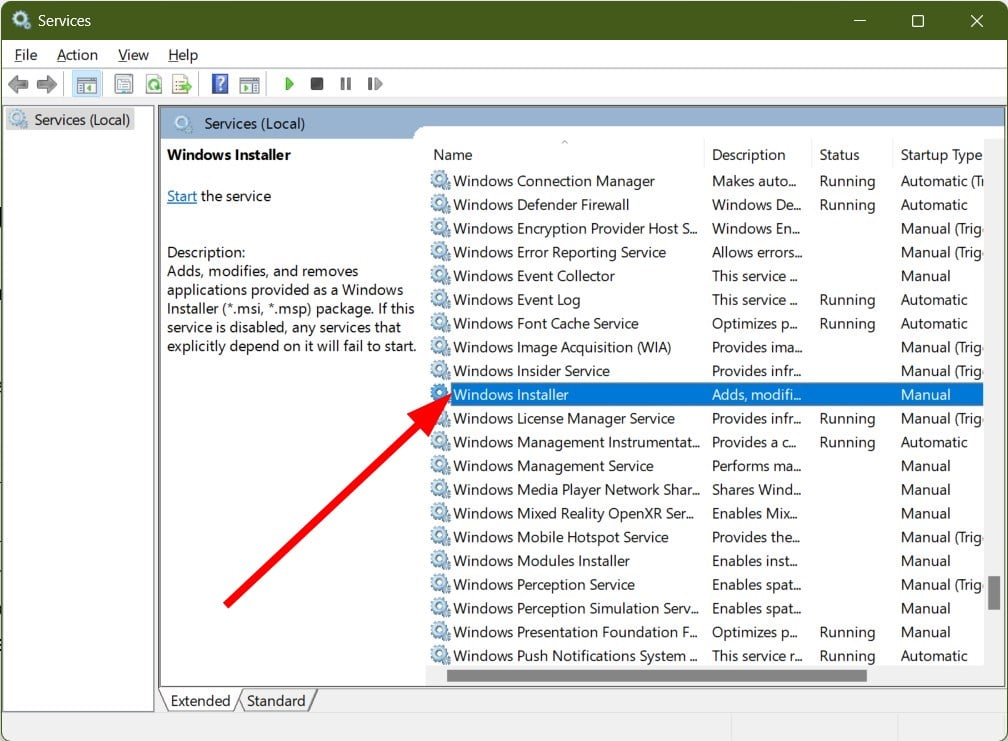
- Locate Windows Installer service.
- Double-click to open it.
- Under Service status, select Start.
You should make sure that the Windows Installer service is running to run the Java installation. Follow the above steps and start the service in case it is stopped.
2. Download Java offline installer
- Remove all instances of Java from your PC.
- Visit the official Java website.
- Download the offline installer.
- Right-click on the downloaded EXE file and select Run as administrator.
- Install the program.
- Restart your PC and check if this fixes the error or not.
Chances are the Java installer is unable to fetch the installation files required to complete the installation. In this case, we would suggest you download the Java offline installer.
The benefit of using an offline installer is that it will download the entire package, i.e., the installation files and other important program-related files required for a successful installation. Once you have downloaded the offline installer, you can install the program without the internet.
- Fix: MSI Afterburner Failed to Start Scanning
- How to Fix Microsoft Common Language Runtime Native Compiler High CPU Usage?
- Epson Easy Photo Print is Not Working? Fix it in 7 Steps
- Excel Keeps Crashing: 5 Simple Ways to Fix
3. Disable antivirus
- Open the Start menu.
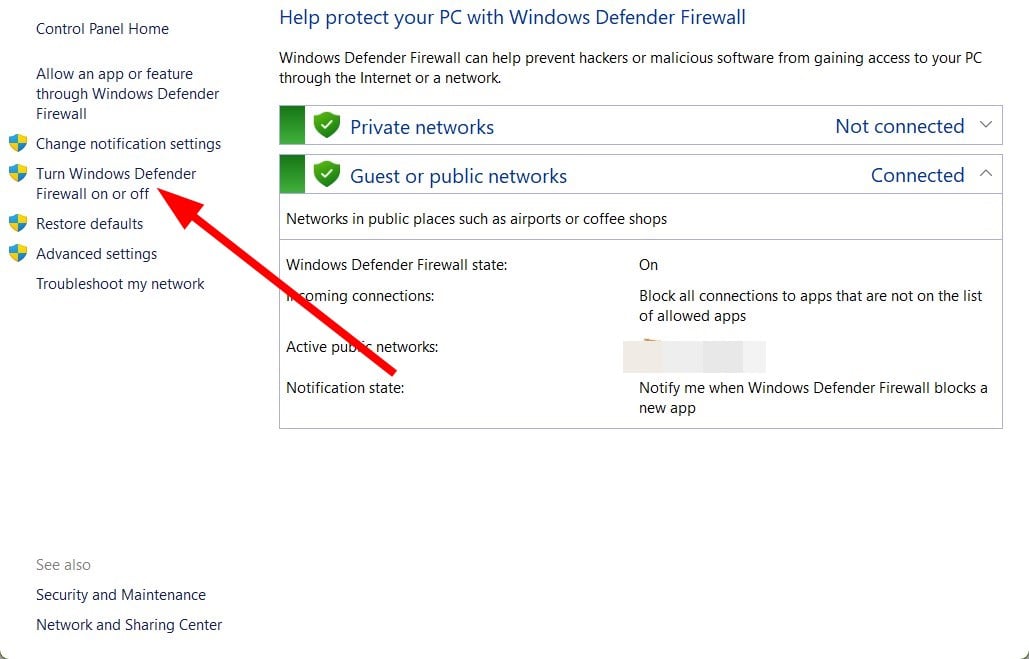
- Open Windows Defender Firewall.
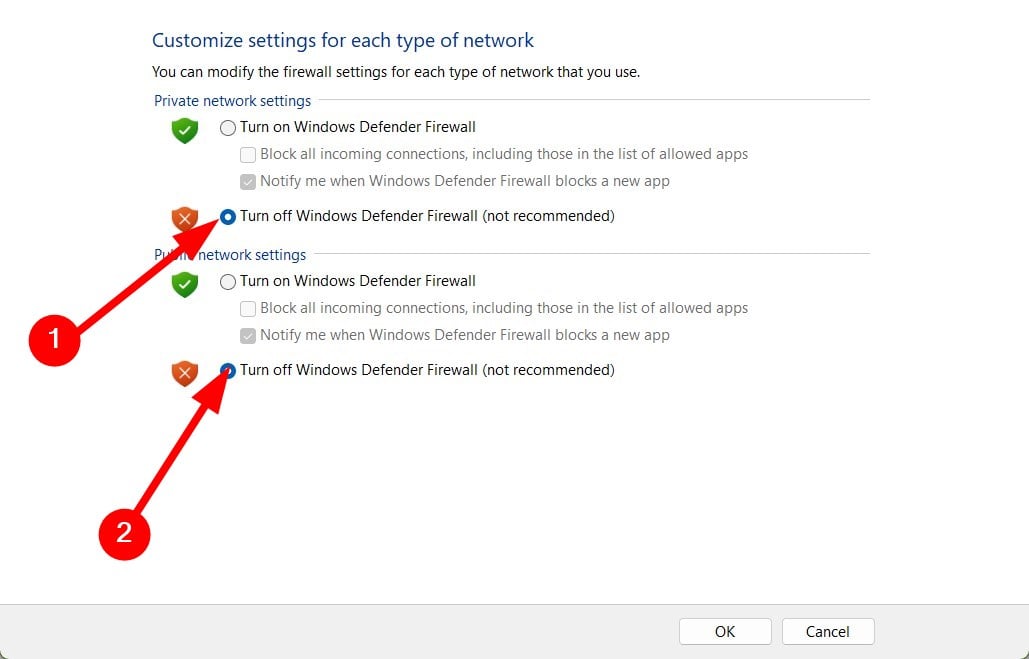
- Click on Turn Windows Defender Firewall on or off.
- Select Turn off Windows Defender Firewall options for both Private and Public network settings.
Your Defender Firewall might be blocking Java installation because of aggressive settings, which is why you are getting the Java error code 1618.
All you need to do is disable the Windows Defender Firewall by following the above steps. We would suggest you turn Firewall back on when the issue has been resolved.
4. Install the latest Windows update
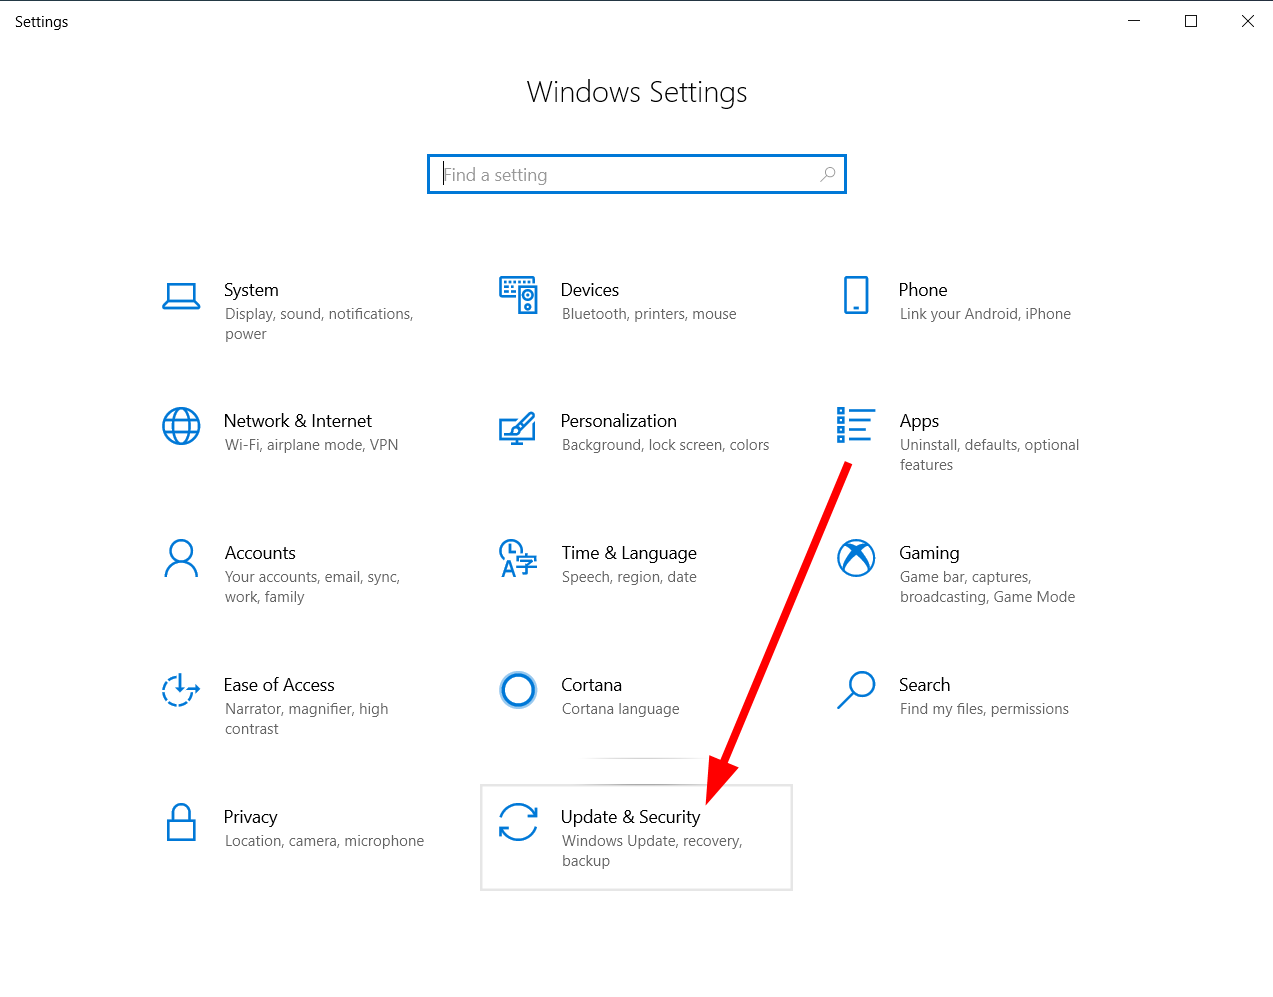
- Press the Win + I buttons to open Settings.
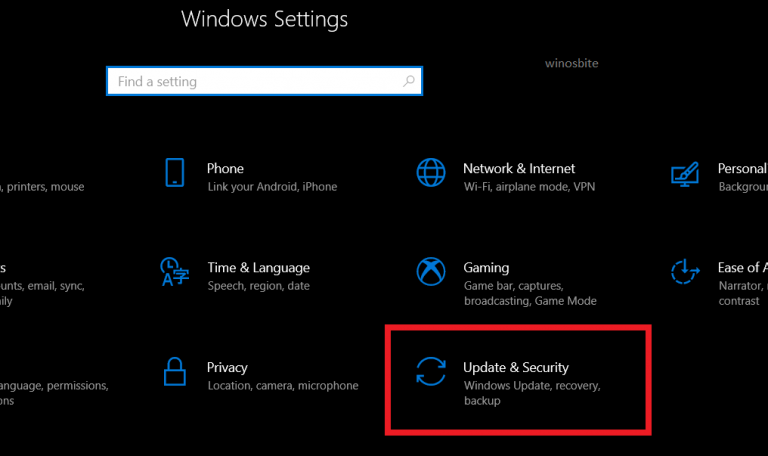
- Select Update & Security.
- Click on Windows Update on the left pane.
- Click the Check for updates button.
- Windows will look for a new update and prompt you to install it if it detects a new one.
Several users have reported that updating their PC with the latest available update resolved the problem. Moreover, this issue was also associated with a specific version of the Windows 10 update.
Reportedly, the Windows 10 update version KB2918614 broke the Windows Installer and hence caused multiple issues including the Java error code 1618.
5. Clean boot your PC
- Press Win + R to launch the Run dialogue.
- Type msconfig and press Enter.
- Click on the Services tab.
- Check the box for Hide all Microsoft services option.
- Click Disable all.
- Click Apply.
- Switch to the Startup tab.
- Select Open Task Manager.
- In the Startup tab, select each service and hit the Disable button.
- Restart your PC and see if this resolves the problem or not.
When you perform a clean boot, your PC boots up with minimal drivers and programs that are the only essential ones required for the PC to function.
This also prevents the situation where a third-party program might be conflicting with the Java installation and trigger the Java error code 1618.
6. Install Java in a new folder
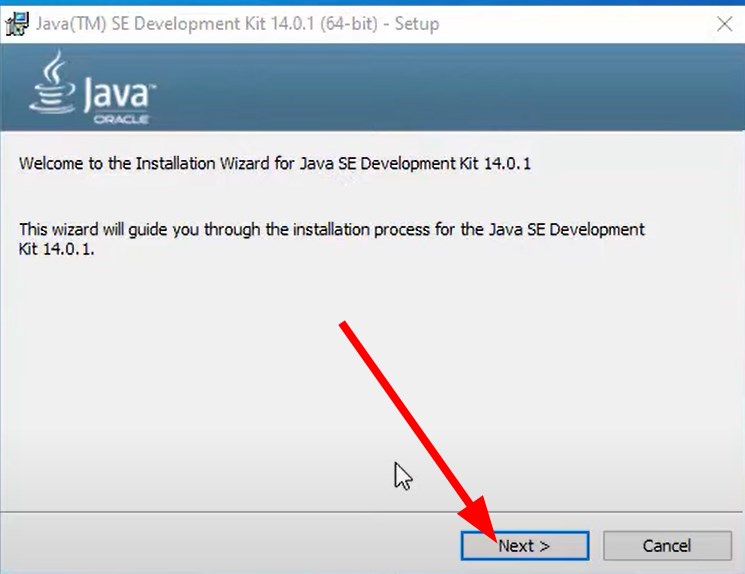
- Launch the Java installer file.
- Click on Next.
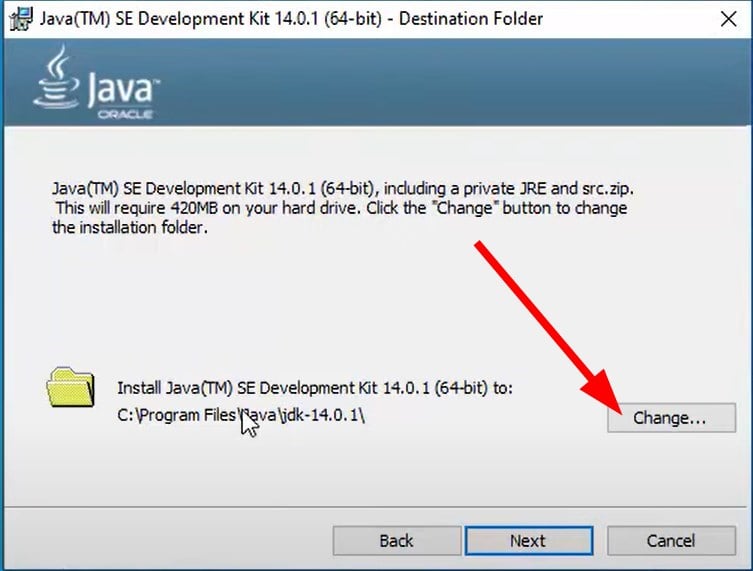
- Click Change.
- Choose a location, most probably C Drive.
- Click OK.
- Install Java and check if this resolves the issue or not.
Often Java can throw errors if the location isn’t apt for its installation. In such a case, we would suggest you install Java in a new folder and see if this resolves the Java error code 1618.
We have a dedicated guide that lists down all the steps that you need to download the latest version of Java, both 32-bit and 64-bit on your Windows PC.
Apart from Java error code 1618, you will also come across Java error 1603. To fix it, we have a guide that will help you. You can also check out our list of the best browsers that support Java and how you can enable it.
Let us know in the comments below, which one of the above solutions helped you resolve the Java error code 1618.
It is a very common issue and is faced by many users using Windows 10. This Java Error Code 1618 message appears when you try to install a program while another one is already being installed or being processed by the MSI (Microsoft Installer). Note that the Microsoft Installer can only run one process at a time. So, running two instances simultaneously can create conflict and can cause some service errors.
Users get this error message when they try to install Java on their system. Also, it’s important to note that it doesn’t necessarily mean that there must be another instance of Java running in the background. It could be any one of the thousands of software that use Microsoft Installation.
What are the Java Error Code 1618 and their causes?
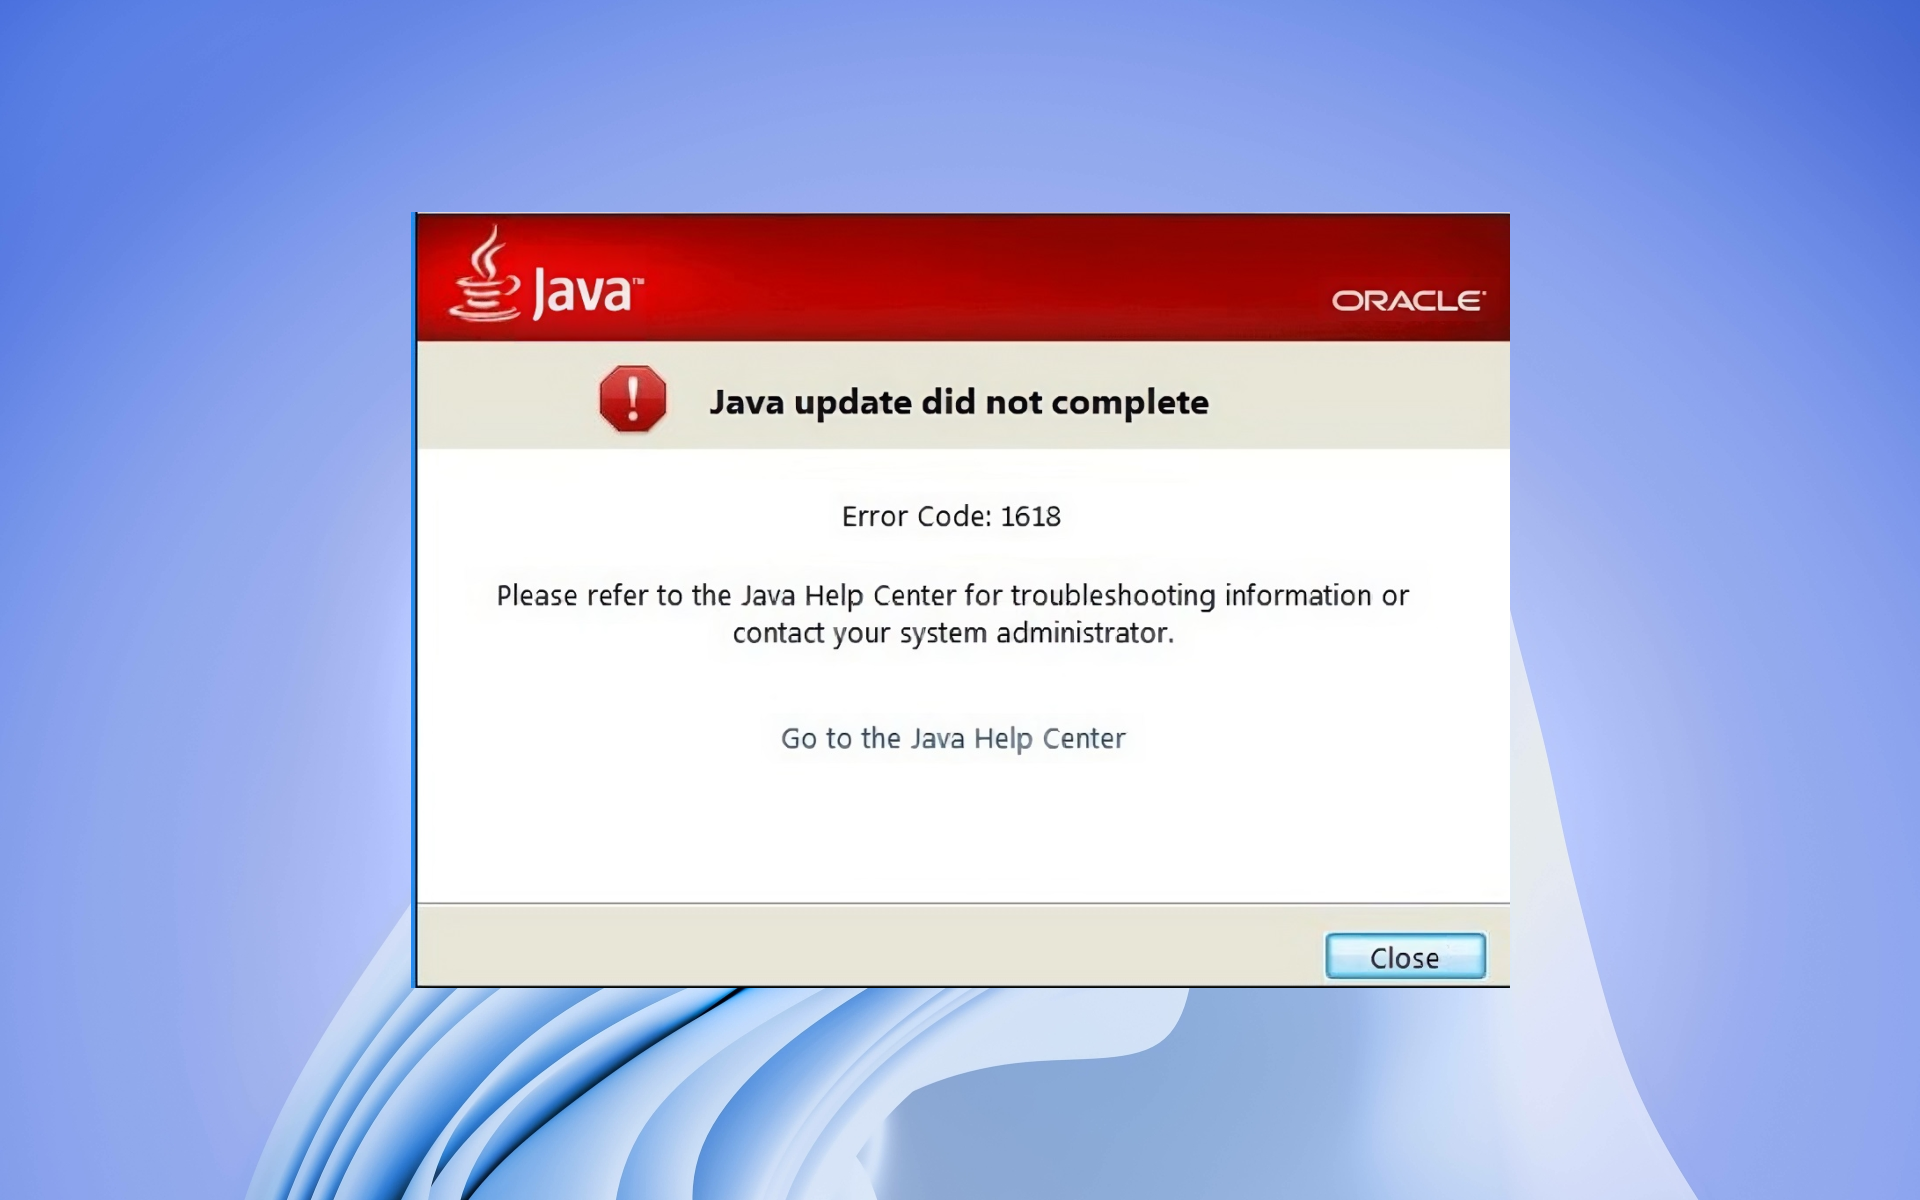
The error message looks like this:
“Java update did not complete: Please refer to the Java Help Center for troubleshooting information or contact your system administrator.”
There can also be many several causes other than the one mentioned above that can cause this error to occur. Some of these are listed below-
- There could be an error in the Microsoft Installer Service: The service might have been stopped or having some error state which can cause hinder the installation.
- Antivirus programs (mostly third-party ones) can be over-protective sometimes causing the Java installation to stop every time it starts
- The existing Java installation might be corrupted
- Windows Update can break the installer sometimes
Follow the methods below to fix the java error code 1618.
Method 1: Wait till the existing installation is complete
Wait till your existing installation is complete as it is already mentioned above that the Microsoft Installer can run only one process at a time. Thus, it will show an error if another instance of the Microsoft Installer is already in use.
You can check if there is an instance that is already running by using the Task Manager.
- Press Ctrl+Shift+Esc together to launch the Task Manager
- Check if there is a process related to Windows Installer running or not; If there is a process running, then just allow it to finish.
Method 2: Restart the Microsoft Installer Service (msiexec.exe)
There are two ways for restarting the Microsoft Installer Service.
From the task manager-
1. Open the Task Manager by pressing Ctrl+Shift+Esc buttons
2. Make sure that you are under the Processes tab
3. Search for the Windows Installer Service process
4. Right-click on the process and click on the End task button
If you are unable to do the steps mention above then follow the next steps.
From services application-
1. Press Ctrl+R simultaneously to open the Run application
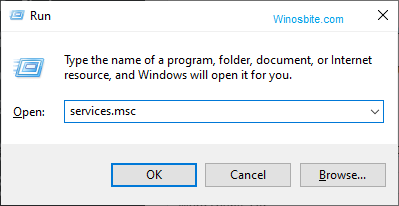
2. Type services.msc to open Services application
3. Locate the Windows Installer service
4. Right-click on it and then click on the Start option
You can also restart the service if it is already running. Simply just click on Restart.
Method 3: Re-install Java
Uninstall the previous version of Java that is already installed. This can be done in two ways-
Using programs and features-
1. Press Ctrl+R to open the Run application
2. Type appwiz.cpl to open the programs and features Window
3. In the list of applications, locate and Right-click on Java, then click Uninstall
Using the Java uninstall tool-
From Java 8 Update 20, a Java Uninstall Tool is provided. It removes all the previous versions of Java automatically.
Now to install java again:
Download the latest version of Java from the official website and install it.
Use this link: https://www.java.com/ES/download/
Method 3: Install JAVA using the offline installer
Sometimes, the Online Installer does not work properly and the Microsoft Installer fails to download files for installation. Thus, it can result in an error. So, just download the offline installer which comes with all the necessary files required for installation and doesn’t need to download any file during the installation.
Uninstall the previous version of Java that is already installed (As we did in the above method)
Download the latest version of the offline installer from the official website of Java and run the installer.
Use the manual link.
If you don’t know which version to download (32-bit or 64-bit), use the following method to check your system type:
1. Press Windows + I to go to Windows Settings
2. Click on System
3. In the left panel, go to the About section and check your system type
My system type is 64-bit, there are 3 types: 64-bit, 32-bit, and ARM64
Method 5: Update Windows on your PC
Windows updates remove bugs and errors. So, if there is an error with the Windows Installer then updating the Windows might fix it.
1. Press Win+I to open Windows Settings
2. Go to the Update & Security option
3. In Windows Update, click on Check for updates
4. Install the latest version if available by clicking on the Install button
Method 6: Disable your antivirus
Antivirus programs can cause issues while installation. So, disabling your antivirus before installing Java can help us avoid the problem. If you don’t have third-party antivirus software, follow the methods below to disable Windows defender temporarily-
1. Go to Windows Security by searching for it the start menu
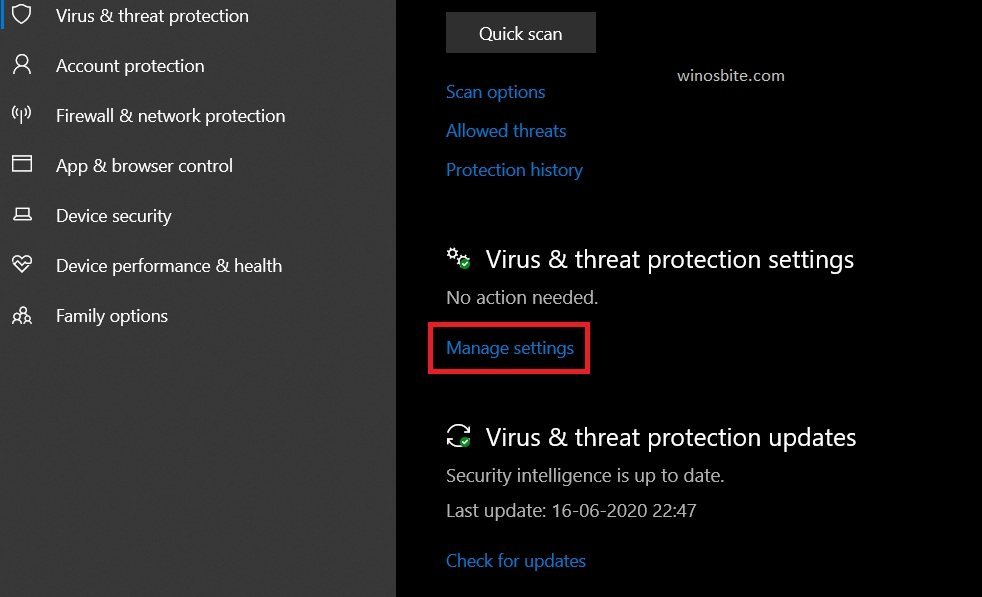
2. Click on ‘Virus & Threat protection’
3. Now click on ‘Manage settings‘
4. Turn off the radio button for Real-Time protection
Method 7: Perform a clean boot and then install Java
Performing a clean boot will disable all the 3rd Party services that are running on your system. So, if all the above-mentioned methods fail then there is a possibility that a third-party application is conflicting with the installation. So, performing a clean boot can fix this. To perform a clean boot, follow the methods as mentioned:
1. Press Ctrl+R
2. Type msconfig and hit ENTER button
3. Under the Selective startup option, uncheck the box that says ‘Load Startup Items’ then proceed to the Services tab
4. Under the Services tab, check the ‘Hide all Microsoft Services‘ that is located on the bottom left corner then click on Disable All
5. In the Startup tab, open the Task manager
6. Go to the Startup tab in Task Manager and disable all of the startup items
Now, restart and try installing Java.
After installation is successfully complete, revert the changes we made in system configuration and task manager-
- Enable all startup items
- Use normal startup instead of the selective startup (refer step 3)
- Enable all services disabled in step 4.
Conclusion
I hope above mentioned methods help you to fix the Java code 1618. Kindly contact us or leave a comment below to give us your queries and suggestions.

Устанавливал новую версию Java и в процессе установки получил отчет об ошибке: Java update did not complete
При повторной попытке выскочила еще одна ошибка с кодом 1603.
Немного предыстории. У меня Windows 7, ява слетела, возможно, из-за действия антивирусов (Avira, 360 Total Security), пришлось ставить заново свежую версию. В процессе установки на диске C закончилось место. Место расчистил, но ошибки повторялись.
Пробовал по рекомендации с официального сайта поставить яву из дистрибутива для автономной (ручной) установки https://www.java.com/ru/download/manual.jsp , ошибки повторялись.
Пробовал программу удаления Java с официального сайта: https://www.java.com/ru/download/uninstalltool.jsp — она установленных версий явы у меня не обнаружила.
Итак, выше перечислил все, что не дало желаемого результата.
Далее излагаю шаги которые в моем случае в сумме дали желаемый результат.
- На системном диске, как уже писал выше, было освобождено достаточно места для установки (установленная Java на диске занимает 158 Мб).
- Скачал дистрибутив для автономной установки тут: https://www.java.com/ru/download/manual.jsp
- Зашел в папку, где ранее располагалась ява: C:\Program Files (x86)\Java\ вручную удалил все, что в ней находилось.
- Почистил реестр от поврежденных ключей при помощи RegCleaner — можно использовать любую другую похожую программу, например, тут советуют утилиту Майкрософта:
https://www.java.com/ru/download/faq/uninstaller_toolfaq.xml#tool-tips - Отключил антивирус (Авира)
- Выполнил заново установку Java из скачанного в пункте 2 дистрибутива.
Ява установлена без ошибок! Чего и вам желаю.
Буду рад, если кому-то мой способ решения этой проблемы помог.
Если что-то из вышеописанного непонятно, спрашивайте в комментариях — постараюсь оперативно ответить. Также будет не лишним, указать в комментариях, сработал для вас этот способ или нет.

