Welcome to a quick tutorial on how to show error messages in HTML forms. This is probably one of the major bugbears for some beginners, how do we handle and show error messages for HTML forms?
There are no fixed ways to show errors in HTML forms, but the common methods to display error messages are:
- Simply add checking attributes to the HTML form fields, and the browser will automatically show the errors. For example,
<input type="text" required> - Use Javascript to show custom error messages as the user types in the fields.
- Collectively show all error messages in a popup box when the user submits an invalid form.
- Show error messages below the invalid fields.
That covers the broad basics, let us walk through detailed examples in this guide – Read on!
ⓘ I have included a zip file with all the source code at the start of this tutorial, so you don’t have to copy-paste everything… Or if you just want to dive straight in.
TABLE OF CONTENTS
DOWNLOAD & NOTES

Firstly, here is the download link to the example code as promised.
QUICK NOTES
If you spot a bug, feel free to comment below. I try to answer short questions too, but it is one person versus the entire world… If you need answers urgently, please check out my list of websites to get help with programming.
EXAMPLE CODE DOWNLOAD
Click here to download all the example source code, I have released it under the MIT license, so feel free to build on top of it or use it in your own project.
DISPLAY ERROR MESSAGES

All right, let us now get into the various examples of displaying error messages in an HTML form.
EXAMPLE 1) DEFAULT ERROR DISPLAY
1-default.html
<form onsubmit="return false;">
<label for="fname">Name</label>
<input type="text" name="fname" id="fname" required minlength="2" maxlength="8">
<label for="fnumber">Number</label>
<input type="number" name="fnumber" id="fnumber" min="1" max="12">
<label for="fyes">Enter "Yes"</label>
<input type="text" name="fyes" id="fyes" required pattern="Yes">
<input type="submit" value="Go!">
</form>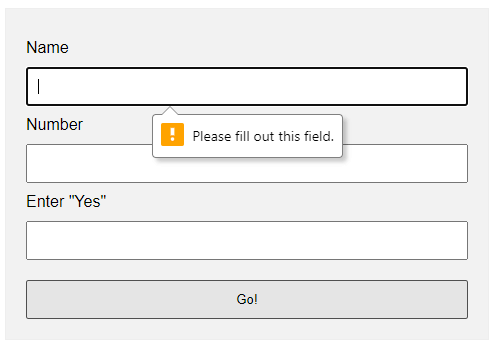 Oh no, displaying error messages is SO DIFFICULT! Not. Just add the form checking attributes to the fields:
requiredSelf-explanatory. A required field that cannot be left blank.min-length max-lengthThe minimum and maximum number of characters allowed.min maxFor number fields only, the minimum and maximum allowed values.patternThis field must match the custom pattern. Will leave a link in the extras section below if you want to learn more.
Yes, that’s all. The browser will do the rest of the magic.
EXAMPLE 2) SHOW ERRORS AS-YOU-TYPE
2-type.html
<!-- (A) HTML FORM -->
<form onsubmit="return false;">
<label for="fname">Name</label>
<input type="text" name="fname" id="fname" required minlength="2" maxlength="8">
<input type="submit" value="Go!">
</form>
<!-- (B) SET CUSTOM ERROR MESSAGE -->
<script>
var fname = document.getElementById("fname");
fname.addEventListener("input", () => {
if (fname.validity.tooLong || fname.validity.tooShort || fname.validity.valueMissing) {
fname.setCustomValidity("Name must be 2-8 characters.");
fname.reportValidity();
} else { fname.setCustomValidity(""); }
});
</script>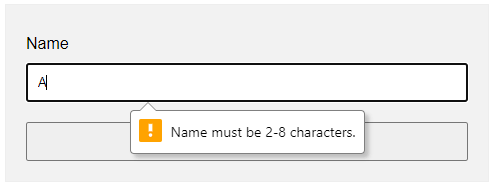 This one is a little naggy and requires some Javascript. A couple of functions and properties to take note of here:
document.getElementById("ID")Get element by ID. Captain Obvious.FIELD.addEventListener("input", FUNCTION)Run this function whenever the user types something in the field.FIELD.validity.tooLong FIELD.validity.tooShort FIELD.validity.valueMissingWe can actually target various invalid statuses and show different messages. Will leave a link in the extras section below to the full list.FIELD.setCustomValidity("MESSAGE")andFIELD.reportValidity()Show custom error message.
EXAMPLE 3) DISPLAY ERROR MESSAGES IN POPUP
3-alert.html
<!-- (A) HTML FORM -->
<form onsubmit="return check()" novalidate>
  <label for="fname">Name</label>
  <input type="text" name="fname" id="fname" required minlength="2" maxlength="8">

  <label for="fnumber">Number</label>
  <input type="number" name="fnumber" id="fnumber" required min="1" max="12">

  <input type="submit" value="Go!">
</form>

<!-- (B) FORM CHECK -->
<script>
function check () {
  // (B1) INIT
  var error = "", field = "";

  // (B2) NAME
  field = document.getElementById("fname");
  if (!field.checkValidity()) {
    error += "Name must be 2-4 characters\r\n";
  }

  // (B3) NUMBER
  field = document.getElementById("fnumber");
  if (!field.checkValidity()) {
    error += "Num must be between 1-12\r\n";
  }

  // (B4) RESULT
  if (error=="") { return true; }
  else {
    alert(error);
    return false;
  }
}
</script>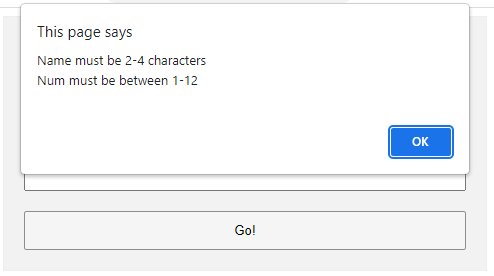
The less naggy method, where all the error messages are compiled into a single popup. Take note:
- A
novalidatehas been added to the<form>tag. This disables the default browser form checking, and we do our own in Javascript usingonsubmit="return check()". - The Javascript is pretty long-winded but straightforward.
- Use
var error = ""to collect all the error messages. - Fetch the field we want to check
field = document.getElementById("ID"). - Add a message if it is invalid
if (!field.checkValidity()) { error += "ERROR"; } - That’s all, repeat the check for all fields.
- Lastly, show the error message if not empty and don’t allow the form submission
if (error !="") { alert(error); return false; }
- Use
EXAMPLE 4) SHOW ERROR MESSAGE UNDER FIELD
4-below.html
<!-- (A) SOME SIMPLE ERROR STYLES -->
<style>
.err { background: #ffe6ee; border: 1px solid #b1395f; }
.emsg { color: #c12020; font-weight: bold; }
</style>
<!-- (B) HTML FORM -->
<form onsubmit="return check()" novalidate>
<label for="fname">Name</label>
<input type="text" name="fname" id="fname" required minlength="2" maxlength="8">
<div id="cname" class="emsg"></div>
<label for="fnumber">Number</label>
<input type="number" name="fnumber" id="fnumber" required min="1" max="12">
<div id="cnumber" class="emsg"></div>
<input type="submit" value="Go!">
</form>
<!-- (C) FORM CHECK -->
<script>
function check () {
// (C1) INIT
var valid = true, error = "", field = "";
// (C2) NAME
field = document.getElementById("fname");
error = document.getElementById("cname");
if (!field.checkValidity()) {
valid = false;
field.classList.add("err");
error.innerHTML = "Name must be 2-4 characters\r\n";
} else {
field.classList.remove("err");
error.innerHTML = "";
}
// (C3) NUMBER
field = document.getElementById("fnumber");
error = document.getElementById("cnumber");
if (!field.checkValidity()) {
valid = false;
field.classList.add("err");
error.innerHTML = "Num must be between 1-12\r\n";
} else {
field.classList.remove("err");
error.innerHTML = "";
}
// (C4) RESULT
return valid;
}
</script>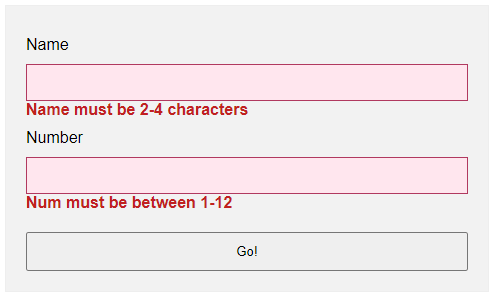 Lastly, this is pretty much similar to the popup example.
- Use
novalidateandonsubmitto do our own customization. - But instead of showing in a popup, we attach a
<div class="emsg">below all fields. - On an invalid input, we show the error message in the
<div>instead.
LINKS & REFERENCES
- HTML Pattern – MDN
- Validity State – MDN
- Form Validation – MDN
- HTML Form Validation Without Javascript – Code Boxx
THE END

Thank you for reading, and we have come to the end. I hope that it has helped you to better understand, and if you want to share anything with this guide, please feel free to comment below. Good luck and happy coding!
For show an error message below this it if a user puts some wrong value inside that field, yes you are talking about showing validation errors. There are two types of these validation error messages available in HTML 5:
- Automatic messages
- Custom messages
Automatic Messages
Automatic messages simply use HTML5 form attributes. But the disadvantage is they are automatic, not customizable by default. For example if you require an email, the default error message on Firefox, when you specify an email input and fail to write one: Please enter an email address, you would not be able to change this using just HTML and CSS.
Another disadvantage is the default message depends on the browser locale, so if for example you are borrowing your friend’s French computer to view an English website, those default error messages will then display in French:

Source: Mozilla Developer Network article: Data form validation
Custom messages
As Data form validation says:
To customize the appearance and text of these messages, you must use JavaScript; there is no way to do it using just HTML and CSS.
HTML5 provides the constraint validation API to check and customize the state of a form element.
The example from Data form validation:
<form>
  <label for="mail">I would like you to provide me an e-mail</label>
  <input type="email" id="mail" name="mail">
  <button>Submit</button>
</form>
var email = document.getElementById("mail");

email.addEventListener("keyup", function (event) {
  if (email.validity.typeMismatch) {
    email.setCustomValidity("I expect an e-mail, darling!");
  } else {
    email.setCustomValidity("");
  }
});
So yes, you can have messages below the input in HTML5. Just beware that they will either be the automatic type, or, to customize, you need to look into using the constraint validation API to write your own messages using JavaScript.
This tutorial will show you how to create and customize error messaging for various form elements. In this tutorial, we will customize everything from a basic error message to input field errors and tooltips. The best part? We will be using only CSS for customizations – that means no images or javascript required!
HTML
Below is the markup for the form elements we will be creating error messaging for. This is all of the HTML used throughout this tutorial. Copy and paste this code into your working file:
<!-- Basic Error Message -->
<div class="error-message">
  <span class="error-text">Checkout could not be completed. Please check your login information and try again.</span>
</div>

<!-- Input Field Error -->
<div class="input-group error">
  <label>Password *</label>
  <input type="text">
  <div class="error-message">Password is a required field.</div>
</div>

<!-- Input Field Error with Tooltip -->
<div class="input-group error">
  <label>Quantity</label>
  <input type="text">
  <div class="error-tip">Enter a quantity</div>
</div>
CSS
Now onto my personal favorite: the CSS. We will keep the basic functionality of the form elements but completely customize their appearance. In the end, they will stand on their own as custom design elements that thoughtfully guide the user through the form process, making it as straightforward and painless as possible.
Basic Error Message
Let’s start with a basic error message. We are going to customize the HTML above to look like this:

This is what we start out with, by default, after adding the HTML:

Customizing a basic error message is really simple. All we have to do is give our text a colored background and a couple font styles using CSS. To style the error message background, add the following styles to your CSS stylesheet:
.error-message {
  background-color: #fce4e4;
  border: 1px solid #fcc2c3;
  float: left;
  padding: 20px 30px;
}
Now let’s style the text itself by adding the following font styles:
.error-text {
  color: #cc0033;
  font-family: Helvetica, Arial, sans-serif;
  font-size: 13px;
  font-weight: bold;
  line-height: 20px;
  text-shadow: 1px 1px rgba(250,250,250,.3);
}
That’s it! Keep reading to learn how to style input field and tooltip errors.
Input Field Error
Now that we have our basic error message styled, let’s work on input field errors. This is what the final product will look like:

And this is what we start out with by default:

First, we want to override the browser’s default styles. Add the following CSS to give your input field a custom look:
/* Basic Input Styling */
.input-group {
  color: #333;
  float: left;
  font-family: Helvetica, Arial, sans-serif;
  font-size: 13px;
  line-height: 20px;
  margin: 0 20px 10px;
  width: 200px;
}

label {
  display: block;
  margin-bottom: 2px;
}

input[type=text] {
  background: #fff;
  border: 1px solid #999;
  float: left;
  font-size: 13px;
  height: 33px;
  margin: 0;
  padding: 0 0 0 15px;
  width: 100%;
}
Next, we need to add the styling for the error message that displays when a user does not correctly fill out an input field (i.e. the “This is a required field” message):
.error-message {
  color: #cc0033;
  display: inline-block;
  font-size: 12px;
  line-height: 15px;
  margin: 5px 0 0;
}
Lastly, add the error-specific styling for the input field elements:
.error label {
  color: #cc0033;
}

.error input[type=text] {
  background-color: #fce4e4;
  border: 1px solid #cc0033;
  outline: none;
}
Input Field Error with Tooltip
The last element we’re tackling is the tooltip. It is slightly more complicated than the others but well worth the effort. We will also be utilizing Sass nesting to better organize our code, and because we are only using SCSS it is 100% editable and scalable.
Once we are done, the tooltip will look like this:

And by default, this is what we start with after adding the HTML:

First, we override the browser’s default styles with our own custom styling:
/* Basic Input Styling */
.input-group {
  color: #333;
  float: left;
  font-family: Helvetica, Arial, sans-serif;
  font-size: 13px;
  line-height: 20px;
  margin-bottom: 10px;
  width: 100%;
}

label {
  display: block;
  margin-bottom: 5px;
}

input[type=text] {
  background: #fff;
  border: 1px solid #ccc;
  color: #333;
  float: left;
  font-family: Helvetica, Arial, sans-serif;
  font-size: 13px;
  height: 33px;
  line-height: 20px;
  margin: 0;
  padding: 0 0 0 15px;
  width: 45px;
}
Just like our previous example, we need to add the tooltip error message styling that displays when a form error occurs. Note: we are using Sass here to nest the tooltip’s left arrow properties. This comes in handy when trying to keep track of which values are assigned to the tooltip specifically:
/* Tooltip Styling */
.error-tip {
  background-color: #fce4e4;
  border: 1px solid #fcc2c3;
  border-radius: 7px;
  -moz-border-radius: 7px;
  -webkit-border-radius: 7px;
  display: inline;
  color: #cc0033;
  float: left;
  font-weight: bold;
  line-height: 24px;
  position: relative;
  padding: 7px 11px 4px;
  margin-left: 17px;
  // Left Arrow Styling Starts Here
  &:after, &:before {
    content: '';
    border: 7px solid transparent;
    position: absolute;
    top: 11px;
  }
  &:after {
    border-right: 7px solid #fce4e4;
    left: -14px;
  }
  &:before {
    border-right: 7px solid #fcc2c3;
    left: -15px;
  }
} // end .error-tip
Now all that’s left to do is define the input’s error-specific styling. Again, we will nest these styles under an “error” class selector to make classification and future changes easier:
/* Error Styling */
.error.input-group {
  label {
    color: #cc0033;
    font-weight: bold;
  }
  input {
    border: 2px solid #cc0033;
    line-height: 37px;
    outline: none;
  }
  .status {
    display: none;
  }
  .error-tip {
    display: inline;
  }
} // end .error
And that’s it! All the code you need to customize error messaging for default form elements. To experiment with the final results and copy and paste to your heart’s content (without fear of breaking anything), jump on over to Codepen by selecting any of the tutorial links below.
Codepen/Tutorial Links
All: codepen.io/seskew/
Basic Error Message: codepen.io/seskew/pen/akhLx
Input Field Error: codepen.io/seskew/pen/XKJKNQ
Input Field Error with Tooltip: codepen.io/seskew/pen/NrPNBp
PHP can be easily embedded in HTML files and HTML codes can also be written in a PHP file. The thing that differentiates PHP from a client-side language like HTML is, PHP codes are executed on the server whereas HTML codes are directly rendered on the browser. To display error for invalid input with HTML and PHP.
Approach:
Display error on invalid error when
- input textbox is left empty.
- input is wrong.
PHP code: The following is the code for “form.php” which is used in the HTML code in the later part.
To show invalid input in PHP, set the name of the input textbox which is in HTML. All the fields are first checked for empty fields and then it is validated for correctness. If all fields are correct then it shows the success message. If the input given by the user is wrong then it will show a message for ” Invalid input!!”.
PHP
<?php
$nameError = "";
$emailError = "";
$passwordError = "";
$mobileError = "";
$success = "";
function validate_input($input) {
$input = trim($input);
$input = stripslashes($input);
$input = htmlspecialchars($input);
return $input;
}
if(isset($_POST['form_submit'])) {
$name = $_POST['name'];
$password = $_POST['password'];
$email = $_POST['user_email'];
$mobile = $_POST['mobile'];
if (empty($_POST["name"])) {
$nameError = "Name is required";
} else {
$name = validate_input($_POST["name"]);
if($name == 'chetan') {
$success= "Thank you ". $name.", ";
echo $success;
}
}
if (empty($_POST["email"])) {
$emailError = "Email is required";
} else {
$email = validate_input($_POST["email"]);
if($email == 'test@email.com') {
$success= $email." is correct";
echo $success;
}
}
if (empty($_POST["password"])) {
$passwordError = "Password is required";
} else {
$password = validate_input($_POST["password"]);
if($password == 'test@123') {
$success= $password." is correct";
echo $success;
}
}
if (empty($_POST["mobile"])) {
$mobileError = "Mobile is required";
} else {
$mobile = validate_input($_POST["mobile"]);
if($mobile == '123456789') {
$success= $mobile." is correct";
echo $success;
}
}
if(empty($success))
echo "Invalid input!!!";
}
?>
HTML code: The following code uses the above PHP “form.php” code.
HTML
<!DOCTYPE html>
<html lang="en" dir="ltr">
<head>
<meta charset="utf-8">
<title>Form</title>
</head>
<body>
<form action="form.php" method="POST">
<input type="text" name="name"
placeholder="Enter name">
<input type="password" name="password"
placeholder="Password">
<input type="email" name="user_email"
placeholder="yourname@gamil.com">
<input type="tel" name="mobile"
placeholder="Mobile no">
<button type="submit" name="form_submit">
Submit
</button>
</form>
</body>
</html>
Output:
- Incorrect input by user
Invalid input!!!
- Correct input by user
Thank you chetan, 123456789 is correct
Last Updated :
31 Dec, 2020
Like Article
Save Article
() translation by (you can also view the original English article)
В этой статье мы рассмотрим HTML атрибут pattern, который помогает нам настроить проверку данных в форме.
Валидация
Валидация форм, как и юзабилити, имеет жизненно важное значение для безопасности сайта. В процессе проверки перед отправкой формы оцениваются значения полей input на корректный формат ввода К примеру, у нас есть поле input для ввода email’а, в таком случае
значением должен выступать правильный адрес почты; адрес должен
начинаться с цифры или буквы, затем знак @ и в конце доменное имя.
Спецификация HTML5 позволяет делать более легкую проверку в связи с введением новых типов таких как email, url, или tel, и с помощью них проверка осуществляется автоматически. Если введенная величина не отвечает ожидаемому формату, эти типы выдают ошибку, в результате чего выдается сообщение об ошибке, и это предотвращает подстановку неверных данных.


Однако, ожидать полной обработки всех возможных сценариев с полем input непрактично. Что если, у вас есть поля для имени пользователя, почтового индекса или другие специализированные типы данных, которые не относятся к типам спецификации? Как тогда проводить проверку этих полей? Вот здесь нам и пригодиться атрибут pattern.
Использование Атрибута Pattern
Атрибут pattern используется только для input элементов. Это позволяет нам задать собственные правила проверки, используя Регулярные Выражения (RegEx). Еще раз, если величина не будет соответствовать заданному шаблону, то ввод вызовет ошибку.
Например, скажем у нас есть форма для ввода имени пользователя. Стандартизированного типа для поля имени пользователя не существует, значит, мы воспользуемся обычным типом text:
1 |
<form action="somefile.php"> |
2 |
<input type="text" name="username" placeholder="Username"> |
3 |
</form>
|
Давайте зададим правило, которое будет использовать в атрибуте pattern. В этом случае, мы зададим, что имя пользователя должно состоять из строчных букв; без заглавных, без чисел или других символов. И кроме того, имя пользователя не должно превышать 15 символов. По правилам регулярных выражений — это может быть записано следующим образом [a-z]{1,15}.
Пропишите [a-z]{1,15} в качестве значения атрибута pattern для поля username:
1 |
<form action="somefile.php"> |
2 |
<input type="text" name="username" placeholder="Username" pattern="[a-z]{1,15}"> |
3 |
</form>
|
Теперь, поскольку допустимы только строчные буквы, подстановка любых других символов вызывает сообщение об ошибке:


Как вы можете видеть выше в сообщении об ошибке сказано «Please match the requested format». То есть, наша проверка формы работает, но это сообщение не дает представление пользователю о том, какой формат ввода от него требуется. А значит это плохой UX.
Настройка Сообщений при Проверке
К счастью, мы можем настроить сообщение, которое будет давать подсказки, и у нас есть два варианта, как это сделать. Самый простой — это задать атрибут title для input-элемента:
1 |
<form action="somefile.php"> |
2 |
<input
|
3 |
type="text" |
4 |
name="username" |
5 |
placeholder="Username" |
6 |
pattern="[a-z]{1,15}" |
7 |
title="Username should only contain lowercase letters. e.g. john"> |
8 |
</form>
|
Теперь заголовок появляется с текстом сообщения по умолчанию:


И все же всплывающее сообщение не очень подходит. Если сравнить это сообщение с сообщением для поля email выше, то инструкция будет куда длиннее.
Второй способ позволяет справиться с данной задачей.
Замена Стандартного Сообщения при Проверке
Давайте заменим стандартный вариант “Please match the requested format” собственным сообщением. Для этого мы используем немного JavaScript.
Начнем с того, что добавим id для input элемента, чтобы мы могли легко к нему обратиться.
1 |
<form action="somefile.php"> |
2 |
<input
|
3 |
type="text" |
4 |
name="username" |
5 |
placeholder="Username" |
6 |
pattern="[a-z]{1,15}" |
7 |
id="username"> |
8 |
</form>
|
Теперь мы можем выбрать input элемент, используя JavaScript и и присвоить ему переменную (код ниже или между тегов script, или в отдельном JS файле, или в панели JS на CodePen):
1 |
var input = document.getElementById('username'); |
И наконец, мы задаем сообщение, которое будет появляться при неправильном заполнении формы.
1 |
input.oninvalid = function(event) { |
2 |
event.target.setCustomValidity('Username should only contain lowercase letters. e.g. john'); |
3 |
}
|
Событие oninvalid наследуется от объекта event, в котором присутствуют несколько свойств, среди которых target (элемент с неправильно введенным текстом) и validationMessage – содержит текст сообщения об ошибке. В примере выше мы переписали текст сообщения при помощи метода setCustomValidity().
Теперь вместо стандартного, используется наше сообщение.


Стилизация
Чтобы дополнить новые типы input и новые методы для настройки проверки сообщений, в новой спецификации CSS3 созданы пара псевдоклассов — :valid и :invalid. Они позволяют нам использовать разное оформление, в зависимости от состояния проверки, например:
1 |
input:invalid { |
2 |
border-color: red; |
3 |
}
|
4 |
input, |
5 |
input:valid { |
6 |
border-color: #ccc; |
7 |
}
|
При использовании этих псевдоклассов необходимо помнить некоторые вещи:
- Первое
:valid— используется по умолчанию, даже если входное значение пустое. Как вы можете видеть выше, мы установили цвет по умолчаниюborder-color:#ccc;. Пустое значение всегда проходит проверку, если не добавить атрибутrequired. В таком случае значение поля становится ошибочным, и его рамка становится красной. - стили для valid и invalid применяются сразу же во время того как пользователь осуществляет ввод, даже если если переменная пустая. Постоянное изменение в оформлении, может озадачить пользователя.
Несколько Слов о Стилизации Всплывающих Сообщений
Проверка заполнения форм стала новым стандартом спецификации HTML5, однако внешний вид всплывающих сообщений полностью лежит на разработчиках браузеров. Поэтому, следует быть готовым к тому, что внешний вид сообщений будет отличаться от браузера к браузеру, что не очень способствует постоянству вашего интерфейса.


Google Chrome убрал возможность настройки стилей всплывающего поля пару лет назад. Если же вам необходимо стилизовать поле под себя, то остается только полностью переписать данное поле с помощью JavaScript. Давайте разберемся, как это сделать!
Усложняем Функционал
Итак, мы собираемся создать собственные всплывающие сообщения, которые появляются, если вводимая величина не верна. Для начала, нам необходимо выбрать требуемые элементы с идентификаторами input и form:
1 |
var input = document.getElementById('username'); |
2 |
var form = document.getElementById('form'); |
Далее, мы создадим новый элемент, который будет содержать наше сообщение:
1 |
var elem = document.createElement('div'); |
2 |
elem.id = 'notify'; |
3 |
elem.style.display = 'none'; |
4 |
form.appendChild(elem); |
Тут мы создали новый div-элемент. Мы присвоили ему id со значением notify и спрятали его при помощи display: none. В конце мы вставляем новый div в form.
Отработка Событий
У нас есть два события, с которыми мы будем иметь дело. Первое, событие — invalid, когда ввод не совпадает с шаблоном. В случае invalid мы запускаем следующий код:
1 |
input.addEventListener('invalid', function(event){ |
2 |
event.preventDefault(); |
3 |
if ( ! event.target.validity.valid ) { |
4 |
elem.textContent = 'Username should only contain lowercase letters e.g. john'; |
5 |
elem.className = 'error'; |
6 |
elem.style.display = 'block'; |
7 |
|
8 |
input.className = 'invalid animated shake'; |
9 |
}
|
10 |
});
|
С помощью event.preventDefault(); мы блокируем результат по умолчанию, поэтому всплывающее окно браузера не появляется. Вместо этого мы будем показывать наше окно, используя элемент div. Мы создали новый текст для сообщения, добавили новый класс error, и показываем сообщение используя display:block .
Мы также добавили класс invalid для input элемента, задав ему красные границы. Также нам необходимо добавить правила в файл стилей.
1 |
input.invalid { |
2 |
border-color: #DD2C00; |
3 |
}
|
Также, вы можете добавить классы анимации shake из Animate.css. Это добавит некоторый эффект, благодаря анимации “встряхивания”.
Второе событие — input. Оно вызывается, когда изменяется величина в input. Мы используем это событие, для возврата поля в нормальное состояние, а также чтобы скрыть всплывающее сообщение.
1 |
input.addEventListener('input', function(event){ |
2 |
if ( 'block' === elem.style.display ) { |
3 |
input.className = ''; |
4 |
elem.style.display = 'none'; |
5 |
}
|
6 |
});
|
Как вы можете видеть выше, мы собираемся убрать классы для поля input и скрываем выпадающее сообщение.


Теперь у нас полностью настроенное сообщение при валидации формы. Протестируйте то, что у нас получилось: введите любое неправильное значение:
Примечание: не забудьте заглянуть на GraphicRiver, если вы ищете что-то вдохновляющее для вашего UI дизайна.
Заключительные Мысли
Использование стандартных типов полей input и атрибута pattern, придадут вашей форме, новый уровень валидации, но при этом не стоит и забывать про проверку на стороне сервера.
Как ни странно даже при отключенном JavaScript, последние версии браузеров показывают всплывающее сообщение и не отправляют форму. Однако, Safari не поддерживает атрибут pattern на момент написания статьи. Похожий функционал можно реализовать с помощью полифилла Webshim Lib.
Надеюсь, вам понравился сегодняшний урок, и вы будете обращаться к этой статье при настройке проверки заполнения форм в HTML5.