Issue Description:
Print cannot boot up into ready state with an error message shown on printer control panel. The error messages include ERROR: B0601/ B0602/ B0603/ B0604/ B0605.
Root Cause:
Firmware crashes.
Note: Inappropriate behavior may cause firmware crash. For example, a printer is turned off when critical firmware update is undergoing.
Solution:
Firmware Update Utility.
note:
This utility can be obtained at hp.com.
There are two use cases when encountering the issue:
-
P2050 series printer software driver is previously installed on the PC.
note:
The instruction have 3 steps and easy to follow as quick fix.
-
P2050 series printer software driver is NOT previously installed on the PC, such as Dead on Arrival unit.
note:
The instruction is only for advanced PC users only as it’s very complicated with 14 steps. Please evaluate the customer knowledge level before helping a customer to do so. Otherwise, replacing formatter is the alternatives.
Instructions for Use case 1: driver is previously installed on PC
-
Place printer in bootcode mode.
-
Hold down the Cancel and OK buttons.
-
Power on printer.
-
Continue to hold down buttons until control panel dislpays Hewlett-
Packard on the first line and Bootcode on the second line.note:
Printer is now in bootcode mode
2.
-
-
Ensure printer is connected via USB to PC. Run HP LJ P2055 Firmware
Update Utility.note:
This utility can be obtained at hp.com.
-
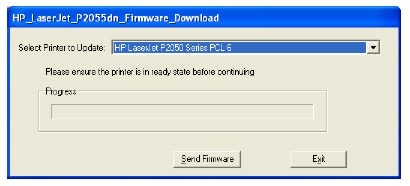
Select the HP LaserJet P2050 series printer from the dropdown list and click
Send Firmware button.
Please observe the printer control panel and verify Downloading Update Data is displayed on control panel followed by Programming App Flash; please wait for
upgrade utility to finish. Printer would be restarted automatically and the control
panel display would show Ready.

Then the firmware is now successfully recovered.
Instructions for use case 2: driver is NOT previously installed
-
Install the driver for HP LaserJet P2050 series printer:
-
Insert printer installation CD.
-
In Windows OS, please go to Start, Settings, Printers and Faxes.
-
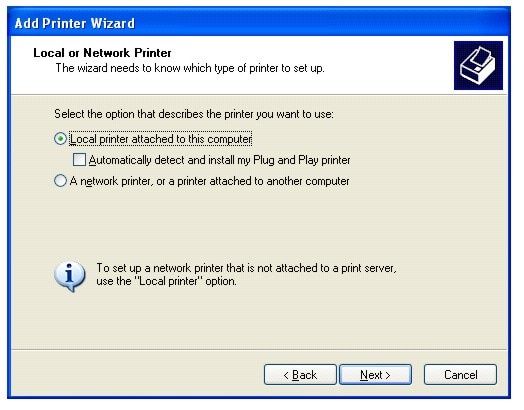
Click Add a printer to start Add Printer Wizard as shown blow and
click on Next button.
-
Check Local printer attached to this computer box; uncheck
Automatically detect and Install my Plug and Play printer box and click on
Next button.
-
Select FILE:(Print to File) in the Use the following port: dropdown list
and click on Next button.
-
Click Have Disk… button.
-
Browse to the CD drive in which the printer installation CD is inserted
previously and click OK button.
-
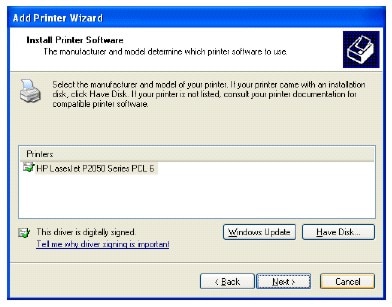
Highlight the HP LaserJet P2050 Series PCL 6 found in the
printer installation CD and click on Next button.
-
Specify the Printer name and click on Next button.
-
Select No for Do you want to print a test page? and click on Next.
-
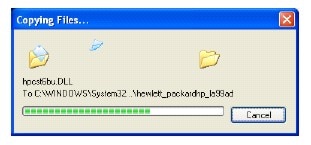
Click the Finish button and allow driver to install as shown below.
-
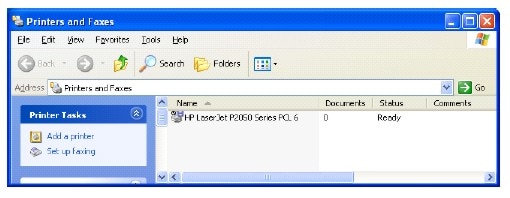
Verify printer is listed in Printer and Faxes window as shown below:
-
-
Place P2055 in boot code mode:
-
Hold down the Cancel and OK buttons.
-
Power on printer.
-
Continue to hold down buttons until control panel dislpays Hewlett-Packard on the first line and Bootcode on the second line
Printer is now in bootcode mode.
-
-
In the Printer and Faxes window, right click on the HP LaserJet
P2050 Series PCL6 icon and select Properties. -
Click the Ports tab and view the USB ports as shown below.
note:
If more than one (USB001) please take note of all listed ports, as other
installed printers may have USB ports (USB002, USB003, etc).
-
Close Properties window.
-
Plug in USB cable from to PC
-
The Found New Hardware Wizard will pop up, and tje printer USB enumeration will
happen. -
Open printer properties and select Ports tab again.
-
In ports tab, tick the correct port that the HP LaserJet P2050 series printer is
enumerated on and click OK.
-
Click Cancel on Found New Hardware wizard window.
note:
Not the driver is installed and it is pointed to correct USB port.
-
Run HP LJ P2055 Firmware Update Utility.
note:
This utility can be obtained
at hp.com. -
Select printer from the dropdown list and click Send Firmware button.
Please observe the printer control panel and verify Downloading Update Data is
displayed on control panel followed by Programming App Flash; please wait for
upgrade utility to finish. Printer would be restarted automatically and the control
panel display would show Ready. Then the firmware is now successfully
recovered. -
Close New Hardware Found Wizard.
-
Delete all instances of P2055 printer in Printers and Faxes and run normal
CD install to install HP LaserJet P2050 series printer drivers properly from printer
installation CD.


Abhitech,
What were you trying to do when this error code happened? Installing a FW upgrade? If so, did you get the FW smiling face and a success! to tell you that you had completed the upgrade successfully?
If you have already sent the FW upgrade to the printer, try powering down the printer, pulling the power cord and letting it sit for about 15 secs. Plug everything back in and start the printer up. What happens? Do you see a new FW initialization (erasing) messaging? If so, let the printer do its job….
If not, try re-sending the printer FW upgrade again using the FW updater — once you have the complete update success message. What happens? Do you have the error message or did the printer initialize (erase), ect.) If not, power down, pull power cord, let sit. Plug everything back in and start up….
I am an HP employee.
Say Thanks by clicking the Kudos Star in the post that helped you.
Please mark the post that solves your problem as Accepted Solution
Обновлено: 29.01.2023
Шаг 1. Верните картридж на место
Рис. : Откройте дверцу доступа к картриджам
Установите картридж с тонером и закройте его дверцу. На картридж с тонером следует надавить до щелчка.
Рис. : Картридж тонером полностью установлен в устройстве
Рис. : Картридж тонером не полностью установлен в устройстве
Если эти действия привели к устранению проблемы, дальнейшие действия не требуются.
Шаг 2. Перезапустите принтер
Прежде чем продолжить, дождитесь полной остановки каретки.
Если принтер включен, отсоедините кабель питания от разъема на задней панели принтера.
Отсоедините кабель питания от электрической розетки.
Компания HP рекомендует напрямую подключать вилку кабеля питания принтера к настенной розетке.
Подсоедините кабель питания к разъему на задней панели принтера.
Включите принтер, если он не включается автоматически.
Для прогрева принтера может потребоваться некоторое время. В это время могут мигать индикаторы принтера, а каретка может перемещаться.
Перед выполнением следующего шага дождитесь завершения процедуры прогрева принтера и убедитесь в том, что принтер полностью остановился и не издает звуков.
Если эти действия привели к устранению проблемы, дальнейшие действия не требуются.
Шаг 3. Замените картридж с тонером
Выполните следующие действия, чтобы заменить картридж с тонером.
Рис. : Откройте дверцу доступа к картриджам
Возьмитесь за ручку на картридже с тонером и потяните картридж, чтобы извлечь его.
Рис. : Извлечение старого картриджа с тонером
Удерживайте новый картридж с тонером горизонтально, затем аккуратно поверните картридж с тонером вперед-назад, чтобы равномерно распределить тонер.
Рис. : Поворот нового картриджа с тонером
Снимите оранжевую крышку с нового картриджа с тонером, затем потяните за оранжевый язычок, чтобы извлечь уплотнитель.
Рис. : Извлеките уплотнитель из картриджа с тонером
Вставьте картридж с тонером в устройство до его фиксации и закройте дверцу отсека для установки картриджей с тонером.
Рис. : Вставьте новый картридж с тонером
Если эти действия привели к устранению проблемы, дальнейшие действия не требуются.
hp-feedback-input-portlet
hp-feedback-banner-portlet
hp-country-locator-portlet
Выбор местоположения
Северная и Южная Америка
Европа, Ближний Восток, Африка
Азиатско-Тихоокеанский регион и Океания
Выберите язык
hp-detect-load-my-device-portlet
hp-hero-support-search
Примеры: “LaserJet Pro M1132 замятие бумаги”, “HP 250 G5 bluetooth”
Ошибка 49 во всех моделях принтеров говорит о том, что произошла критическая ошибка в микропрограмме принтера, в ПЗУ принтера, в форматере принтера.
Чаще всего эта ошибка не фатальна и довольно просто «чиниться».
Вызвать данную ошибку может и компьютер, с которого посылается задание на пе (Подробнее)
Posted by mohammedmogh on May 27, 2015
1 Answer
Ngoro
An expert who has achieved level 3 by getting 1000 points
An expert that got 20 achievements.
An expert that got 10 achievements.

Firmware error B0605 on HP LaserJet P2055dn
Firmware error B0605 on HP LaserJet.
Posted on May 27, 2015
2 Suggested Answers
6ya staff
Hi there,
Save hours of searching online or wasting money on unnecessary repairs by talking to a 6YA Expert who can help you resolve this issue over the phone in a minute or two.
Best thing about this new service is that you are never placed on hold and get to talk to real repairmen in the US.

Instant Repair Help over the Phone
Lorem ipsum dolor sit amet, consectetur adipiscing elit. Aenean euismod bibendum laoreet. Proin gravida dolor sit amet lacus accumsan et viverra justo commodo. Proin sodales pulvinar tempor. Cum sociis natoque penatibus et magnis dis parturient montes, nascetur ridiculus mus. Nam fermentum, nulla luctus pharetra vulputate, felis tellus mollis orci, sed rhoncus sapien nunc eget. Lorem ipsum dolor sit amet, consectetur adipiscing elit. Aenean euismod bibendum laoreet. Proin gravida dolor sit amet lacus accumsan et viverra justo commodo. Proin sodales pulvinar tempor.
Lorem ipsum dolor sit amet, consectetur adipiscing elit. Aenean euismod bibendum laoreet. Proin gravida dolor sit amet lacus accumsan et viverra justo commodo. Proin sodales pulvinar tempor. Cum sociis natoque penatibus et magnis dis parturient montes, nascetur ridiculus mus. Nam fermentum, nulla luctus pharetra vulputate, felis tellus mollis orci, sed rhoncus sapien nunc eget. Lorem ipsum dolor sit amet, consectetur adipiscing elit. Aenean euismod bibendum laoreet. Proin gravida dolor sit amet lacus accumsan et viverra justo commodo. Proin sodales pulvinar tempor.
Информация Неисправность Прошивки Схемы Справочники Маркировка Корпуса Сокращения и аббревиатуры Частые вопросы Полезные ссылки
Справочная информация
Этот блок для тех, кто впервые попал на страницы нашего сайта. В форуме рассмотрены различные вопросы возникающие при ремонте бытовой и промышленной аппаратуры. Всю предоставленную информацию можно разбить на несколько пунктов:
- Диагностика
- Определение неисправности
- Выбор метода ремонта
- Поиск запчастей
- Устранение дефекта
- Настройка
Неисправности
Все неисправности по их проявлению можно разделить на два вида — стабильные и периодические. Наиболее часто рассматриваются следующие:
- не включается
- не корректно работает какой-то узел (блок)
- периодически (иногда) что-то происходит
О прошивках
Большинство современной аппаратуры представляет из себя подобие программно-аппаратного комплекса. То есть, основной процессор управляет другими устройствами по программе, которая может находиться как в самом чипе процессора, так и в отдельных микросхемах памяти.
На сайте существуют разделы с прошивками (дампами памяти) для микросхем, либо для обновления ПО через интерфейсы типа USB.
Схемы аппаратуры
Начинающие ремонтники часто ищут принципиальные схемы, схемы соединений, пользовательские и сервисные инструкции. Это могут быть как отдельные платы (блоки питания, основные платы, панели), так и полные Service Manual-ы. На сайте они размещены в специально отведенных разделах и доступны к скачиванию гостям, либо после создания аккаунта:
Справочники
На сайте Вы можете скачать справочную литературу по электронным компонентам (справочники, таблицу аналогов, SMD-кодировку элементов, и тд.).
Marking (маркировка) — обозначение на электронных компонентах
Современная элементная база стремится к миниатюрным размерам. Места на корпусе для нанесения маркировки не хватает. Поэтому, производители их маркируют СМД-кодами.
Package (корпус) — вид корпуса электронного компонента
При создании запросов в определении точного названия (партномера) компонента, необходимо указывать не только его маркировку, но и тип корпуса. Наиболее распостранены:
- DIP (Dual In Package) – корпус с двухрядным расположением контактов для монтажа в отверстия
- SOT-89 — пластковый корпус для поверхностного монтажа
- SOT-23 — миниатюрный пластиковый корпус для поверхностного монтажа
- TO-220 — тип корпуса для монтажа (пайки) в отверстия
- SOP (SOIC, SO) — миниатюрные корпуса для поверхностного монтажа (SMD)
- TSOP (Thin Small Outline Package) – тонкий корпус с уменьшенным расстоянием между выводами
- BGA (Ball Grid Array) — корпус для монтажа выводов на шарики из припоя
Краткие сокращения
При подаче информации, на форуме принято использование сокращений и аббревиатур, например:
| Сокращение | Краткое описание |
|---|---|
| LED | Light Emitting Diode — Светодиод (Светоизлучающий диод) |
| MOSFET | Metal Oxide Semiconductor Field Effect Transistor — Полевой транзистор с МОП структурой затвора |
| EEPROM | Electrically Erasable Programmable Read-Only Memory — Электрически стираемая память |
| eMMC | embedded Multimedia Memory Card — Встроенная мультимедийная карта памяти |
| LCD | Liquid Crystal Display — Жидкокристаллический дисплей (экран) |
| SCL | Serial Clock — Шина интерфейса I2C для передачи тактового сигнала |
| SDA | Serial Data — Шина интерфейса I2C для обмена данными |
| ICSP | In-Circuit Serial Programming – Протокол для внутрисхемного последовательного программирования |
| IIC, I2C | Inter-Integrated Circuit — Двухпроводный интерфейс обмена данными между микросхемами |
| PCB | Printed Circuit Board — Печатная плата |
| PWM | Pulse Width Modulation — Широтно-импульсная модуляция |
| SPI | Serial Peripheral Interface Protocol — Протокол последовательного периферийного интерфейса |
| USB | Universal Serial Bus — Универсальная последовательная шина |
| DMA | Direct Memory Access — Модуль для считывания и записи RAM без задействования процессора |
| AC | Alternating Current — Переменный ток |
| DC | Direct Current — Постоянный ток |
| FM | Frequency Modulation — Частотная модуляция (ЧМ) |
| AFC | Automatic Frequency Control — Автоматическое управление частотой |
Частые вопросы
Как мне дополнить свой вопрос по теме HP LJ M1120 — ошибка сканера 6?
После регистрации аккаунта на сайте Вы сможете опубликовать свой вопрос или отвечать в существующих темах. Участие абсолютно бесплатное.
Кто отвечает в форуме на вопросы ?
Ответ в тему HP LJ M1120 — ошибка сканера 6 как и все другие советы публикуются всем сообществом. Большинство участников это профессиональные мастера по ремонту и специалисты в области электроники.
Как найти нужную информацию по форуму ?
Возможность поиска по всему сайту и файловому архиву появится после регистрации. В верхнем правом углу будет отображаться форма поиска по сайту.
По каким еще маркам можно спросить ?
По любым. Наиболее частые ответы по популярным брэндам — LG, Samsung, Philips, Toshiba, Sony, Panasonic, Xiaomi, Sharp, JVC, DEXP, TCL, Hisense, и многие другие в том числе китайские модели.
Какие еще файлы я смогу здесь скачать ?
При активном участии в форуме Вам будут доступны дополнительные файлы и разделы, которые не отображаются гостям — схемы, прошивки, справочники, методы и секреты ремонта, типовые неисправности, сервисная информация.
Полезные ссылки
Здесь просто полезные ссылки для мастеров. Ссылки периодически обновляемые, в зависимости от востребованности тем.
Шаг 1. Верните картридж на место
Рис. : Откройте дверцу доступа к картриджам
Установите картридж с тонером и закройте его дверцу. На картридж с тонером следует надавить до щелчка.
Рис. : Картридж тонером полностью установлен в устройстве
Рис. : Картридж тонером не полностью установлен в устройстве
Если эти действия привели к устранению проблемы, дальнейшие действия не требуются.
Шаг 2. Перезапустите принтер
Прежде чем продолжить, дождитесь полной остановки каретки.
Если принтер включен, отсоедините кабель питания от разъема на задней панели принтера.
Отсоедините кабель питания от электрической розетки.
Компания HP рекомендует напрямую подключать вилку кабеля питания принтера к настенной розетке.
Подсоедините кабель питания к разъему на задней панели принтера.
Включите принтер, если он не включается автоматически.
Для прогрева принтера может потребоваться некоторое время. В это время могут мигать индикаторы принтера, а каретка может перемещаться.
Перед выполнением следующего шага дождитесь завершения процедуры прогрева принтера и убедитесь в том, что принтер полностью остановился и не издает звуков.
Если эти действия привели к устранению проблемы, дальнейшие действия не требуются.
Шаг 3. Замените картридж с тонером
Выполните следующие действия, чтобы заменить картридж с тонером.
Рис. : Откройте дверцу доступа к картриджам
Возьмитесь за ручку на картридже с тонером и потяните картридж, чтобы извлечь его.
Рис. : Извлечение старого картриджа с тонером
Удерживайте новый картридж с тонером горизонтально, затем аккуратно поверните картридж с тонером вперед-назад, чтобы равномерно распределить тонер.
Рис. : Поворот нового картриджа с тонером
Снимите оранжевую крышку с нового картриджа с тонером, затем потяните за оранжевый язычок, чтобы извлечь уплотнитель.
Рис. : Извлеките уплотнитель из картриджа с тонером
Вставьте картридж с тонером в устройство до его фиксации и закройте дверцу отсека для установки картриджей с тонером.
Рис. : Вставьте новый картридж с тонером
Если эти действия привели к устранению проблемы, дальнейшие действия не требуются.
hp-feedback-input-portlet
hp-feedback-banner-portlet
hp-country-locator-portlet
Выбор местоположения
Северная и Южная Америка
Европа, Ближний Восток, Африка
Азиатско-Тихоокеанский регион и Океания
Выберите язык
hp-detect-load-my-device-portlet
hp-hero-support-search
Примеры: “LaserJet Pro M1132 замятие бумаги”, “HP 250 G5 bluetooth”
Читайте также:
- Dell 3008wfp не включается
- К какой амортизационной группе относится смартфон apple iphone в 2020 году
- Hp probook 4530s апгрейд
- Intel it 5631 обзор
- Саундбар dexp v100 не включается
Follow the instructions in this article to fix the HP printer error B0605.
To solve this error, you will need to download the Firmware Update Utility from hp.com.
When this error occurs, the use cases are of two types:
i. The driver has been installed on the computer.
ii. The driver hasn’t been installed on the computer.
A Driver has Been Installed on the Computer – Case 1
Follow the instructions below to resolve the error:
Step 1: Place your HP printer in bootcode mode.
i. Press down the “OK” and “Cancel” buttons on your HP printer.
ii. Turn on your printer.
iii. Continue pressing down both buttons until “Hewlett-Packard” is displayed on the control panel’s first line while the second line displays “Bootcode”.
Step 2: Confirm that your computer has been connected to your HP printer via a USB cable.
Step 3: After confirming this, run the Firmware Update Utility you downloaded earlier.
Step 4: Select your printer from the dropdown menu.
Step 5: Click on “Send Firmware”.
Watch the control panel of your printer and ensure that it displays “Downloading Update Data”. After that, “Programming App Flash” should be displayed next. Wait for the utility to complete the upgrade. Once the upgrade is complete, your HP printer will then restart automatically. Once it is fully on, “Ready” will be displayed on the control panel. This signifies that your printer’s firmware has been recovered successfully.
In this article: HP Printer Errors and Solution [Detailed] we provide solutions to a lot of HP printer errors.
Driver Hasn’t Been Installed on the Computer – Case 2 – HP Printer Error B0605
Follow the instructions below to resolve the error:
Step 1: Install the printer driver for your device.
i. Insert your HP printer’s installation CD into your computer.
ii. On your Windows computer, click “Start”, “Settings”, then “Printers and Faxes”.
iii. Click on “Add a printer”. This will launch the “Add Printer Wizard”. Then click “Next”.
iv. Check the option box next to “Local printer attached to this computer”.
v. Uncheck the option box next to “Automatically detect and install my Plug and Play printer”. Then click “Next”.
vi. From the “Use the following port” drop-down menu, choose “FILE: (Print to File)”. After that, click “Next”.
vii. Click on “Have Disk”.
viii. Go to your computer’s CD drive where you inserted the installation CD and click on “OK”.
ix. Highlight your printer driver as seen in the installation CD, then click “Next”.
x. State the name of the printer, and then click “Next”.
xi. When prompted to print a test page, select “NO”.
xii. Click on “Finish” to begin the driver installation.
xiii. Confirm that your HP printer is listed.
Step 2: Place your HP printer in bootcode mode.
i. Press down the “OK” and “Cancel” buttons on your HP printer.
ii. Turn on your printer.
iii. Continue pressing down both buttons until “Hewlett-Packard” is displayed on the control panel’s first line while the second line displays “Bootcode”.
Step 3: In the window for “Printer and Faxes”, right-click on your printer’s PCL6 icon; after that click on “Properties”.
Step 4: Click on the tab labeled “Ports” and examine and take note of the listed USB ports if they are more than one.
Step 5: Click on the “Properties” window.
Step 6: Connect the USB cable plugged into your computer to your HP printer.
Step 7: The action above will pop up the “Found New Hardware Wizard”. Also, the USB enumeration will commence.
Step 8: Open the “Printer properties”, and then click on the tab labeled “Ports”.
Step 9: In the tab labeled “Ports”, select the right port for your HP printer that is itemized, and then click on “OK”.
Step 10: In the “Found New Hardware Wizard” window click “Cancel”.
Step 11: Run the Firmware Update Utility you downloaded earlier.
Step 12: From the dropdown menu, choose your HP printer and click on “Send Firmware”.
Watch the control panel of your printer and ensure that it displays “Downloading Update Data”. After that, “Programming App Flash” should be displayed next. Wait for the utility to complete the upgrade. Once the upgrade is complete, your HP printer will then restart automatically. Once it is fully on, “Ready” will be displayed on the control panel. This signifies that your printer’s firmware has been recovered successfully.
Step 13: Close the window for “Found the New Hardware Wizard”.
Step 14: Delete all occurrences of your devices in the list of Printers and Faxes. Then run the regular installation CD to install the driver.
Skip to content
If you have an HP printer wherein you are encountering the B0605 error, then you must know how to fix the issue. Mostly HP printers work efficiently and are brilliant devices that are used both in offices and homes. However, just like any machine, it tends to show errors. If you are facing a B0605 error printer, then either you can troubleshoot the same by yourself, or you can reach on the Customer Care number to talk with the experts. If you are planning to troubleshoot the problem, then this blog is meant for you.
Reason for the error-
The specific reason due to which the error flashes is because the firmware gets crashed or because of the incapability of the booting process in the ready state. Below is enlisted the method that will help in solving the issue. It is important that the troubleshoot is done carefully. Mentioned under two method. One is when the printer software driver is already on the PC and another when it is not found on the PC. You can select the type as per your requirement.
Placing printer in boot mode-
Type 1-
This method works when the printer software driver is already installed on the PC. Steps to be undertaken under this type are-
- a) Placing printer in boot code mode- In this step, the printer is placed in the boot code mode. For this, the cancel and ok buttons are held down. For activating this mode, these buttons have to be held while the printer is switched on.
- b) Ensure connectivity- One needs to ensure that the printer is connected to PC along USB.
- c) Option selection- This is the last step of the method where the HP printer is selected from the drop-down list and send firmware button is clicked.
Type 2-
In this type, the printer software driver is not found on the PC. The steps under this type are-
- a) Push in the CD of printer installation
- b) Move to start, select settings and from options click Printers and faxes
- c) Select options to add a printer and then select next
- d) Check for any local printer connected to your computer, disallow automatic detection option and install the plug and play printer. Select the next button after following all steps.
- e) Choose file and select have disk button
- f) Browse to find the CD drive in which printer installation CD is inserted, click okay when found.
- g) Select printer installation CD and move to the next button.
- h) Specify the name of the printer, move to next
- i) Click no followed with next selecting finish button at last.
- j) Once done verify if the printer is listed in printer and Faxes window.
- k) On printer and faxes window, click properties that appear as you right click on the printer.
- l) Select ports tab and see USB sort
- m) Close new hardware found wizard as it appears.
If you find yourself unable to solve the issue by following either of the two solutions, it is recommended that an expert’s help is taken. But we are positive this should answer your query on How to Fix HP Printer Error b0605