Hard disk error 3F1 is a problem that mainly happens on HP laptops. If you encounter this error, you will be unable to boot the system and access the desktop. Don’t worry. In this post from the MiniTool Partition Wizard website, you can find some solutions to this problem.
What is hard disk error 3F1? What will happen when you encounter 3F1? Let’s start with a post from the forum:
Hi guys, I have this odd error that appears at bootup. “Hard Disk Error 3F1. Press F2 for system diagnostics.” Now when I do diagnostics, I get no errors, everything passes. Plus if I just f2 and then escape, the system goes on to boot with no problem.http://forum.notebookreview.com/
As you can see, hard disk error 3F1 usually happens on startup with a blue or black screen. It mainly appears on HP laptops and desktops. This error always comes with the following message:
Hard Disk Error
Please run the Hard Disk Test in System Diagnostics
Hard Disk 1 (3F1)
F2 System Diagnostics
In some cases, the error just disappears after a simple restart. In other cases, the odd error appears again and again, which prevents the computer from booting.
Some users also encounter this problem suddenly while the computer is on. They first receive a blue screen of death with the error code “CRITICAL PROCESS DIED”. Then they restart the computer and the hard disk error 3F1 appears.
Why does the hard disk 1 (3F1) error happen? There are various reasons, such as improper BIOS settings, hard drive failure, etc. Don’t worry. If you are bothered by this issue, you can try the following fixes one by one to solve it.
Fix 1: Power Reset Your HP Laptop
If you get HP hard disk error 3F1 on a laptop, you can try performing a power reset to solve the problem. In this way, you can clear information from the laptop’s memory without deleting personal data. Here are the detailed steps.
Step 1: Turn off your laptop.
Step 2: Disconnect the power cord and any other peripheral devices.
Step 3: Remove the battery. Then press and hold the power button for at least 15 seconds to drain the capacitors.
Tip: If the battery is not removable, you just need to disconnect the power cord and any peripheral devices, and then press and hold the power button.
Step 4: Insert the battery and connect the power cord. Please don’t connect other peripheral devices now.
Step 5: Turn on the laptop and check if it works properly.
If your laptop still runs into hard disk error 3F1, you need to move on to the next solution.
Fix 2: Reset BIOS Settings
BIOS refers to Basic Input/Output System, the firmware preinstalled on a computer’s board. It is used to initialize hardware during the booting process. It also provides runtime services for operating systems and programs. BIOS is the first software to run when the computer is turned on. Therefore, if the BIOS settings are improper, the computer might run into a problem like hard disk error 3F1.
To solve the problem in this case, you can try resetting BIOS settings. You won’t lose any personal data by resetting BIOS settings. It just restores the BIOS settings to default.
Here is how to reset BIOS settings on HP computers.
Generally, there are three ways to reset BIOS settings:
- Reset BIOS settings from the BIOS or UEFI
- Reset BIOS settings by reinstalling or replacing the CMOS
- Reset BIOS settings by clearing the jumper on the motherboard.
The last two methods might be too complicated to operate for most common users. Therefore, I’d like to introduce how to reset BIOS settings from the BIOS or UEFI menu. It is easier and you can follow the steps below for operation.
Step 1: Turn off your HP computer and wait for about 10 seconds.
Step 2: Turn on your computer. When you see the HP logo, press F10 quickly to enter BIOS settings.
Tip: You can also boot your computer into Windows Recovery Environment. Then click Troubleshoot > Advanced Options > UEFI Firmware Settings > Restart. Then press the required key to enter BIOS settings.
Step 3: Under the Main tab, select the Restore Defaults option with the up and down arrow keys.
Tip: Depending on the models of laptops, the steps in your case might be different. If you don’t find the Restore Defaults option, you might need to look for phrases like Load Setup Defaults or Load Default Options.
Step 4: Select Yes to confirm the operation. Then select Save Changes and Exit.
After that, you just need to wait patiently until the process is finished. Your computer will restart during the process. If HP disk error 3F1 appears again, keep trying the next method.
Fix 3: Check for Hard Drive Issues
In addition to improper BIOS settings, hard drive issues could also lead to HP hard disk error 3F1. How to fix hard disk error 3F1 in this case? You can boot your computer into Safe Mode with Networking and run hard drive error-checking tools.
Boot into Safe Mode with Networking
If you can’t access the desktop due to hard disk 1 (3F1), you can try booting the computer into Safe Mode with Networking by following the steps below.
Step 1: Shut down your computer. Then turn it on. Once you see the HP logo, turn off your computer. Repeat the process three times.
Step 2: When you turn on your computer for the fourth time, you will enter Windows Recovery Environment. Go to Troubleshoot > Advanced options > Startup Settings > Restart.
Step 3: Press the F5 key to select the Enable Safe Mode with Networking option.
Run Disk Error Checking Tool in Windows
In Safe Mode, you can check for hard drive issues with built-in Windows tools. You just need to:
Step 1: Press Win + E to open File Explorer. Then click This PC.
Step 2: Right-click a logical drive on your computer and select Properties.
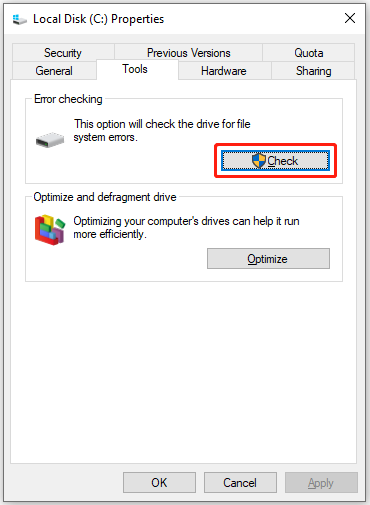
Step 3: In the pop-up window, switch to the Tools tab. Then click the Check button under the Error checking section. Follow the on-screen instructions to finish the process.
Step 4: Repeat the operation to check and repair other logical drives.
Run CHKDSK in Command Prompt
If the error checking tool can’t find any problems, you should run the CHKDSK command in Command Prompt to check and repair your hard drive.
CHKDSK is a built-in utility in Windows operating systems that can check the file system and file system metadata of a volume for logical and physical errors. To check and fix hard drive errors, it needs to be used with certain parameters. Let’s see how to use this tool.
Step 1: Press Win + R to invoke the Run window. Then input cmd in the box and click OK to open Command Prompt.
Step 2: In Command Prompt, type the command chkdsk d: /f /r and press Enter.
- d: refers to the drive letter of a logical drive.
- /f: fixes errors on the disk.
- /r: locates bad sectors and tries to recover readable information.
Step 3: When the error checking process is finished, use the same command and replace the drive letter to check other logical drives.
After checking and repairing hard drive errors, you can exit Command Prompt and restart your computer. Then check whether the hard disk error 3F1 has been solved.
Fix 4: Run HP PC Hardware Diagnostic UEFI
HP PC hardware Diagnostics for Windows is a tool preinstalled in HP computers. It can be used to determine if there is something wrong with the hardware of an HP computer. It has an HP PC Hardware Diagnostics UEFI feature that you can use to check for hard drive issues when you encounter hard disk error 3F1. Follow the steps below to access this tool.
Step 1: Turn off your computer if it is on. Then turn it on and press the ESC key immediately about 5 times until a menu shows up.
Tip: If you can access the desktop, you can just search for HP PC Hardware Diagnostic for Windows to open this tool.
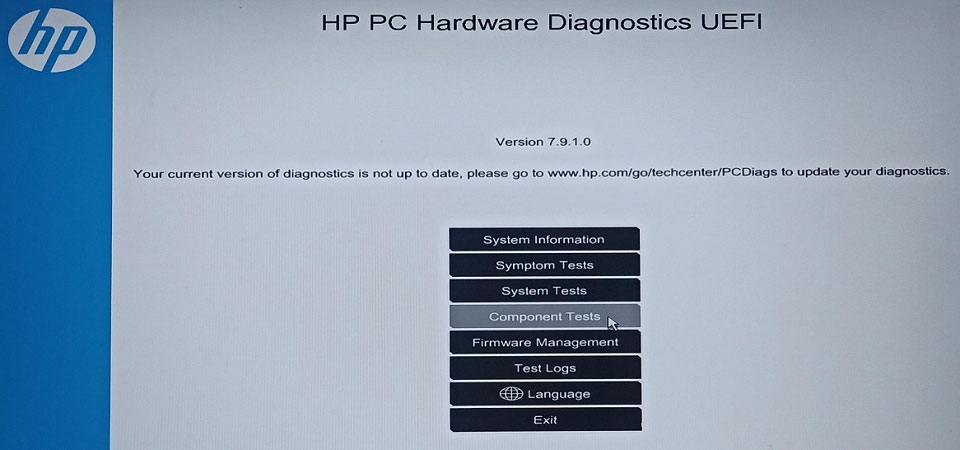
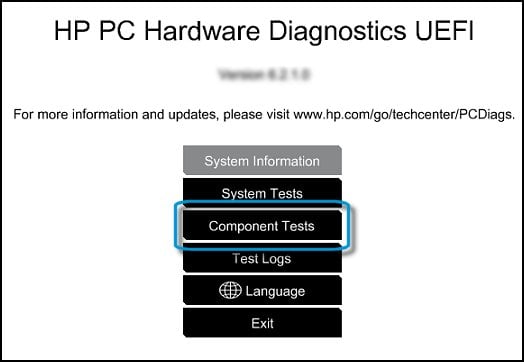
Step 2: Press the F2 key to enter HP PC Hardware Diagnostic UEFI. Then select your language. In the Main Menu of HP PC Hardware Diagnostic UEFI, select Component Tests.
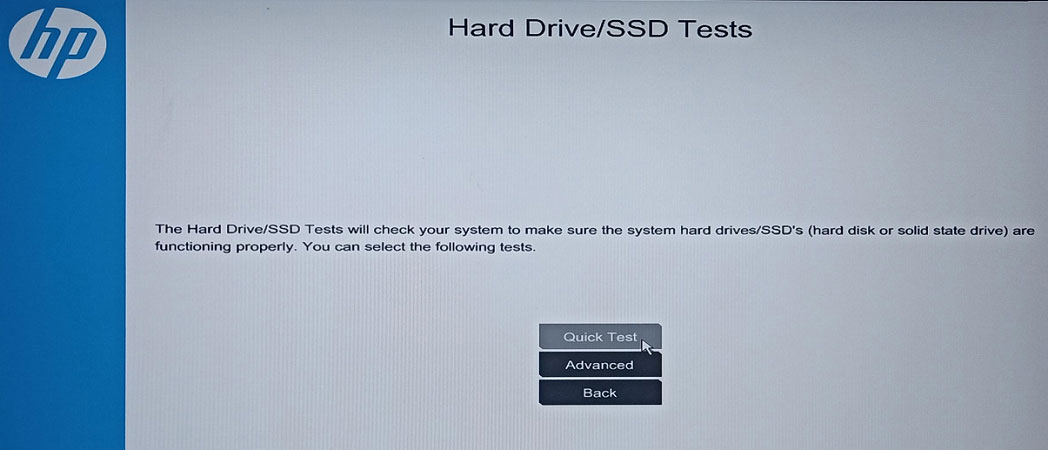
Step 3: Select the Storage category to test your hard drive. Then choose Quick Test.
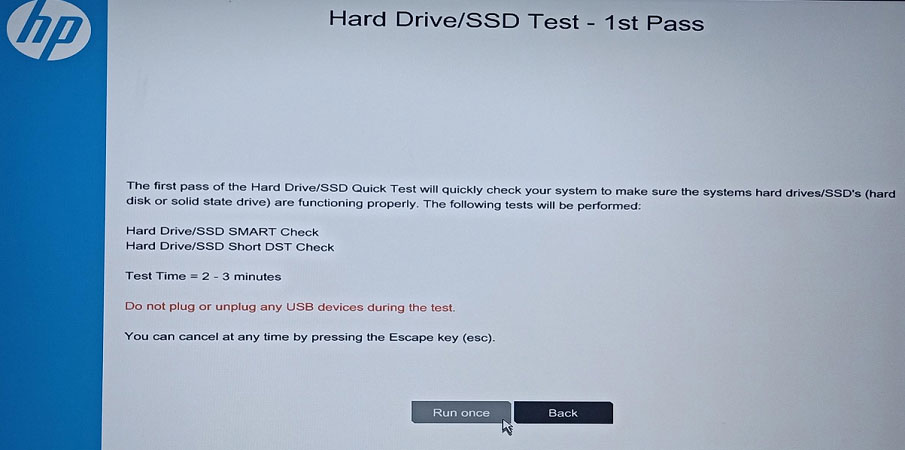
Step 4: On the next page, select the Run once button. Then wait patiently and follow the on-screen instructions to complete. Please note that if any issues are found, you need to click the Troubleshoot button to solve them.
You can visit the official website of HP to know more detailed information about HP PC Hardware Diagnostics for Windows.
After hard-drive testing, you can also run a System Test with this tool if you need it. Then you can restart your computer and check if it helps to fix hard disk error 3F1.
Fix 5: Reconnect Your Hard Drive or Test It on Another PC
You might also encounter hard disk 1 (3F1) when the connection between your laptop and the hard drive. It could happen if your laptop was hit or fall on the ground accidentally. To fix the problem, you need to make sure the hard drive is installed properly.
Just shut down your computer, and disconnect the power cables as well as other peripheral devices such as the keyboard, mouse, etc. Then uninstall the battery, remove the case, and then disconnect the hard drive.
After that, reinstall the hard drive and put everything back, and turn on your laptop. You can also install the hard drive on another computer to test the hard drive.
For more details, you can refer to our previous post: 7 Steps: How to Remove Hard Drive from Laptop.
If the problem still appears, go to the final solution.
Fix 6: Recover Data and Reinstall the Operating System
If the hard disk error 3F1 appears anyway, you might need to format the hard drive on your HP computer and reinstall the operating system. You can also replace the old hard drive with a new one, which is a recommended and better way since the old one is corrupted.
However, you need to recover your data and save it to an external hard drive before that.
As for the data recovery tool, I recommend MiniTool Partition Wizard, a professional and reliable disk manager and data recovery utility.
It can help you recover lost data due to various reasons, such as hard drive corruption, operating system crash, virus attack, deleted or formatted partition, etc.
Here is how to use this tool.
Step 1: Download, install, and launch MiniTool Partition Wizard on another computer.
Step 2: Create a bootable USB drive with Bootable Media Builder via a USB drive. Then connect an external hard drive that is large enough to hold the recovered data to your HP laptop and boot the laptop with this USB drive.
Step 3: On the main interface of MiniTool Partition Wizard, click the Data Recovery feature. Then double-click a logical drive to scan.
Tip: You can also go to the Devices tab to scan the whole hard drive.

Step 4: Once the scanning process is finished, check the files you want to recover and click the Save button.
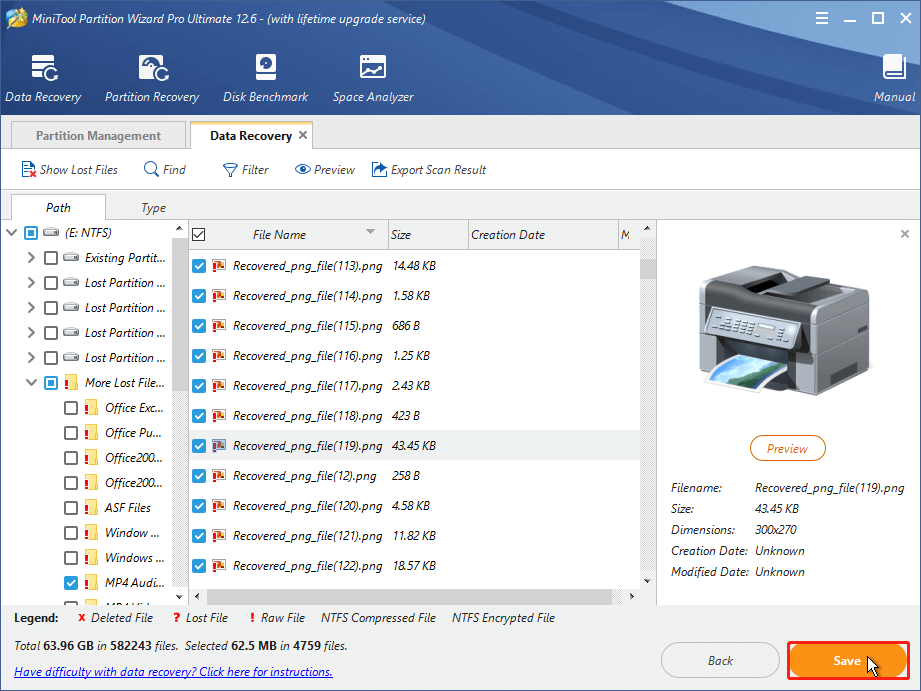
Step 5: In the pop-up window, select a location on your external hard drive to store your files.
After recovering your data, you can reinstall the operating system or replace the old hard drive without any worries. And the following posts might help:
- Detailed Steps and Instructions to Reinstall Windows 10
- How to Upgrade Laptop from HDD to SSD Without Reinstalling OS
How to repair hard disk error 3F1? This post can help.Click to Tweet
Bottom Line
How to fix hard disk error 3F1? You can try the above fixes one by one. You can share your ideas with us in the following comment zone. And for any problems with MiniTool Partition Wizard, you can contact our support team via [email protected].
Автоматический перевод этой страницы выполнен Microsoft Translator
Во время запуска на компьютере выполняется проверка жесткого диска SMART. В случае обнаружения потенциальной проблемы с жестким
диском на черном экране может появиться сообщение об ошибке.

Проверка жесткого диска SMART позволяет прогнозировать возможный отказ жесткого диска, но не свидетельствует о фактическом
сбое. Предупреждение SMART об ошибке жесткого диска может появляться по ряду причин, например при резком падении компьютера
или при воздействии на жесткий диск температур, превышающих обычные.
При появлении этого сообщения об ошибке выполните следующие действия:
-
Немедленно создайте резервную копию всех важных данных и файлов. Хотя ошибка жесткого диска SMART может не означать неизбежную
потерю жесткого диска, лучше подготовиться заранее на тот случай, если диск все-таки откажет. -
Запустите проверку жесткого диска для тестирования его состояния.
Если код ошибки содержит 3F0, см. документ ПК HP – На черном экране в Windows 10 появляется сообщение об ошибке 3F0 «Boot Device Not Found» (Загрузочное устройство не
найдено).
Резервное копирование данных
В ОС Windows 10 выполните резервное копирование на внешний диск или в сетевую папку с помощью функции резервного копирования
«История файлов».
Дополнительные сведения см. в статье Резервное копирование и восстановление в Windows 10 (на английском языке).
-
В ОС Windows выполните поиск и откройте Параметры резервного копирования.
-
Выберите Добавить диск. ОС Windows выполнит поиск доступных для использования дисков на компьютере, на которые можно выполнить резервное копирование.
-
Выберите внешний диск или сетевую папку для сохранения файлы резервных копий.
Открытие меню «Проверки компонентов», если ОС Windows не запускается
Если ОС Windows не запускается, воспользуйтесь следующими инструкциями, чтобы открыть меню «Проверки компонентов».
-
Нажмите и удерживайте кнопку питания не менее пяти секунд, чтобы выключить компьютер.
-
Включите компьютер и сразу нажмите клавишу Esc несколько раз, примерно раз в секунду. Когда появится меню, нажмите клавишу F2.
-
В главном меню выберите Проверки компонентов.
Появится меню «Проверки компонентов».
Меню проверки компонентов может зависеть от компонентов, установленных в компьютере.
Проверка жесткого диска с помощью HP PC Hardware Diagnostics
HP PC Hardware Diagnostics предоставляет несколько тестов для проверки жесткого диска компьютера и подтверждения отказа оборудования.
Сначала запустите быструю проверку (2–3 минуты). Если быстрая проверка не выявит проблему, запустите расширенную проверку
(не менее двух часов). Ее можно запустить один раз или повторять циклически до обнаружения ошибки.
-
В меню Проверки компонентов выберите .
-
Выберите Запустить один раз. Начнется быстрая проверка.
-
Если на компьютере установлено несколько жестких дисков, выберите диск для проверки. Чтобы проверить все жесткие диски, выберите
Проверить все жесткие диски.По завершении проверки на экране появятся ее результаты. Результаты проверки также будут доступны в разделе Журналы проверки в главном меню.
-
Если быстрая проверка жесткого диска прошла успешно, но при этом по-прежнему возникают неполадки с диском, запустите расширенную
проверку. Эта проверка включает в себя проверку SMART, короткую проверку DST, оптимизированную проверку DST и длинную проверку
DST. Чтобы запустить эти проверки по отдельности, выберите их в меню «Проверки жесткого диска». -
Если жесткий диск не проходит проверку, щелкните Устранение неполадок.
-
Выполните инструкции на экране, чтобы попытаться устранить проблему, затем нажмите кнопку Да.
-
Если проблема не устранена, нажмите кнопку Да, чтобы обратиться в службу поддержки клиентов HP.
-
Запишите или скопируйте идентификатор отказа (24-значный код) и идентификатор продукта, которые понадобятся для обращения
в службу поддержки клиентов HP. Данная информация также доступна в разделе «Журналы проверки» в главном меню. -
Если компьютер в сети, нажмите кнопку ДАЛЕЕ, чтобы перейти на веб-сайт службы поддержки клиентов HP.
Если компьютер отключен от сети, используйте свое мобильное устройство для сканирования предоставленного QR-кода и получения
доступа к службе поддержки клиентов HP.
Просмотр результатов проверки жесткого диска
По завершении проверки жесткого диска отображается сообщение с перечнем выполненных действий.
|
Результаты проверки |
Предлагаемое действие |
|---|---|
|
Проверка жесткого диска прошла успешно |
Возобновите нормальную работу с компьютером. |
|
Проблема обнаружена и исправлена |
Возобновите нормальную работу с компьютером. |
|
Поврежденный сектор обнаружен и перемещен |
Перезапустите компьютер.
|
|
Отображается сообщение об определенной ошибке и 24-значный идентификатор сбоя |
Если после проверки жесткого диска отображается сообщение об ошибке и код гарантийного идентификатора, обратитесь в HP. Специалист службы поддержки спросит у вас 24-значный код, если будет необходимо организовать ремонт или замену жесткого диска. Прим.: При обращении в HP специалист службы поддержки проверит, не истек ли срок действия гарантии на ваш компьютер. |
Summary:
Are you facing HARD DISK 1 (3F1) error issue & don’t know why receiving this error code? Then here is the answer of your question, this blog has everything you need to know about HARD DISK 1 (3F1) error and its solutions.

Hard disk error HARD DISK 1 (3F1) is associated with HP laptops and appears when the laptop hard drive that stores the OS gets damaged or corrupt. The HARD DISK 1 (3F1) error can also occur due to damaged operating system files (caused by bad sectors on the hard drive). An HP laptop with affected hard drive displays the following error when you turn it on.
| “Hard Disk Error Please run the Hard Disk Test in System Diagnostics. Hard Disk 1 (3F1) F2 System Diagnostics For more information, please visit: www.hp.com/go/techcenter/startup“ |
In most cases, this problem resides within the hard drive. However, in some cases, the problem can be caused by a malfunctioning hard drive controller but that’s rare. Following are some solutions that you can apply to your system and fix it.
Solution 1. Hard Reset
A hard reset wipes out everything from the computer memory (cache, RAM, etc.) & restores the default functionality thus, re-establishing software connection between the hardware and the BIOS that could probably fix the hard disk error.
To hard reset your HP laptop, follow these instructions:
- Disconnect power cable
- Unplug all peripherals and USB devices
- Remove the battery. If it’s internal, open the laptop casing and disconnect the battery
- Press and hold the power button for a while to discharge any remaining current on the board (stored in capacitors, etc.)
- Then install/connect the battery and turn ON your laptop
Check if your system is able to boot completely. If not, proceed to the next step.
Solution 2. BIOS Reset Defaults
To reset BIOS defaults on your HP laptop, follow these instructions:
- Turn off your system and wait for 10 sec
- Turn it ON and start pressing F10 to enter BIOS
- Press F9 in the BIOS screen to select and load the BIOS Setup Defaults Setting.
- Press F10 to save settings and exit the BIOS
- Use the arrow to select Yes when prompted and then press Enter
Your system will reboot. If it still displays the same error, follow the next step.
Solution 3. Use HP PC Hardware Diagnostics
There are 6 different diagnostic tests that are performed either in Quick mode (takes 1-3 minutes) or extensive mode (takes more than 2 hours). To run diagnostics on hard disk, follow these steps:
- Plug in the AC adapter and make sure no other USB device is connected to the system
- Press and hold the power button for 5 seconds to turn the system off (if it’s on)
- Press the power button to turn the system ON and immediately start pressing the ESC key repeatedly 4-5 times. A menu list appears
- Press the F2 key
- Select Components Test from the HP PC Hardware Diagnostics menu
- Choose the hard drive using the arrow key
- Select Quick Test and then select Run Once
- Wait for the hard drive test to finish. If your system has more than one drive, select Test All Hard drives
- After the test, results are displayed. If the hard drive passes the Quick Test but the problem is still unsolved, run Extensive Test after a restart
Alternatively, you can press the F2 key when the error appears on the screen after turning ON your HP laptop. This opens further options for diagnostics. Press F4 to run Hard Disk Tests.
In case you are still stuck with the error, proceed to the next step
NOTE: Diagnostics can fix most problems but it can also damage the hard drive. As the drive is already damaged, running Extensive test can lead to drive failure. Therefore, recover your data before proceeding to any step that involves the exhaustive use of the hard drive. This precaution can help you save your important data before the drive fails. You can skip to step 5 for data recovery and drive repair process.
Solution 4. Reset the Hard drive
If your computer has fallen off or else has got jarred, it’s possible that the connection to hard drive gets loose.
- Remove the battery and makes sure all USB devices, power cable, etc. are disconnected from the laptop
- Open your HP laptop using Philips Screwdriver or similar tool. Use an anti-static strap or use a conductive foam pad while working with internal components of the laptop
- Unplug the hard drive, and then firmly reconnect it
Boot the system and check if it is able to boot successfully. In case it doesn’t, proceed to the next step.
Solution 5. Remove Hard Drive and Test it
If your system is running Windows XP, possibly the SATA drivers are not installed and that’s the reason why your system fails to boot and gets stuck on the error. Therefore, first check and install the SATA driver (refer to user manual of your system).
Alternatively, you can remove the hard drive from the system and test it by connecting to another PC using SATA to USB connector. If your drive is still not recognized, it’s probably damaged or corrupt. Proceed to the next step for recovery and re-installation process.
Solution 6. Use Data Recovery Tool
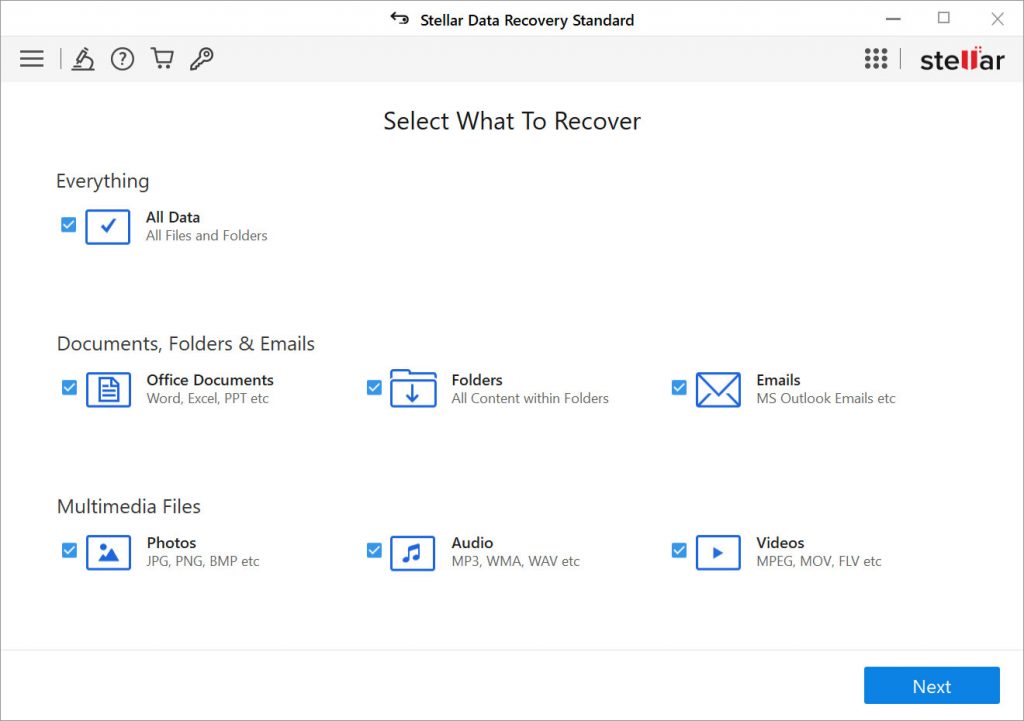
If none of the above-mentioned solutions work, use a reliable data recovery tool such as Stellar Data Recovery- Standard that facilitates recovery from an inaccessible, corrupt, and formatted hard drive. The ‘Deep Scan’ option allows you to recover all your data and perform raw recovery based on file signatures. All files folders, music, videos, pictures, documents, etc. can be easily recovered with the help of this tool.

Its intuitive user interface makes the recovery process easier. Thus, all you need to do is
- Connect the affected hard drive to the system
- Install the Stellar Data Recovery- Standard for Windows tool
- Launch it and recover your lost files folders, documents etc. with just a few clicks.
After you have successfully recovered the data, format the drive using ‘Disk Management’ tool or ‘Disk Part’ command utility. Insert the drive to the HP laptop, install Windows, and then restore your data to the drive. If possible, replace the HDD with a new drive to prevent future data loss situation.
Conclusion:
We learnt why Hard disk error HARD DISK 1 (3F1) occurs and how this error can be solved with the help of HP’s inbuilt diagnostic tools and simple troubleshooting methods. However, such errors can be prevented and data loss situation due to such error can be easily avoided if you keep an eye on your hard drive health using SMART — an inbuilt disk monitoring utility— that comes knotted with modern hard drives and SSDs. You can also run CHKDSK once or twice in a month to keep your drive in good health.
However, if you still ever face a data loss situation due to hard drive errors, use a reliable data recovery tool such as Stellar Data Recovery- Standard for Windows before formatting or repairing the drive. This award-winning software helps you recover your lost data in an efficient and easy fashion.
About The Author

Aruna Attri
Aruna Attri is a Senior Data Recovery Expert at Stellar®. She is a technology blogger and Windows expert. She has experience in Windows data recovery domain. She loves to troubleshoot Windows issue and write technical tips and tutorials.
Одной из самых распространенных проблем, с которыми сталкиваются пользователи ноутбуков HP, является ошибка «Hard disk error» при загрузке операционной системы. Эта ошибка может возникнуть по разным причинам: от неисправности жесткого диска до ошибки в BIOS.
Если вы столкнулись с подобной проблемой, не отчаивайтесь — существует несколько методов, которые помогут вам исправить ошибку «Hard disk error» и успешно загрузить ноутбук. Однако, прежде чем приступать к исправлению проблемы, рекомендуется сделать резервную копию важной информации с жесткого диска.
Первым шагом в решении проблемы является проверка жесткого диска на наличие ошибок. Для этого можно воспользоваться утилитой CHKDSK, встроенной в операционную систему Windows. Она позволит найти и исправить ошибки файловой системы, которые могут быть причиной «Hard disk error». Чтобы воспользоваться утилитой CHKDSK, необходимо открыть командную строку от имени администратора и ввести команду chkdsk c: /f /r, где «c» — буква вашего жесткого диска.
Примечание: Перед сканированием диск будет перезагружен, поэтому сохраните все свои открытые файлы и приложения перед запуском утилиты.
Если проверка жесткого диска не дала результатов, следующим шагом будет обновление BIOS компьютера. Некоторые пользователи сообщают, что обновление BIOS помогает решить проблему «Hard disk error». Для обновления BIOS необходимо перейти на официальный веб-сайт производителя ноутбука и скачать последнюю версию BIOS для вашей модели устройства. После скачивания, следуйте инструкциям на сайте для обновления BIOS.
Если ни один из этих методов не помог вам решить проблему «Hard disk error», рекомендуется обратиться к специалисту сервисного центра. Они смогут проанализировать проблему более точно и предложить подходящее решение, которое поможет решить ошибку при загрузке ноутбука HP.
Содержание
- Что делать, если при загрузке ноутбука HP выводится ошибка «Hard disk error» (3F1)
- Проверьте подключение и состояние жесткого диска
- Запустите диагностику системы и восстановление ОС
- Обратитесь к специалисту или сервисному центру HP
Что делать, если при загрузке ноутбука HP выводится ошибка «Hard disk error» (3F1)
Ошибка «Hard disk error» (3F1) указывает на возникновение проблем с жестким диском вашего ноутбука HP. Такая ошибка может возникнуть по разным причинам, например, из-за повреждений или сбоев в файловой системе, проблем с подключением жесткого диска или неправильной конфигурации BIOS.
Вот несколько действий, которые можно предпринять для исправления ошибки «Hard disk error» (3F1):
Шаг 1: Перезагрузите ноутбук
Перезагрузите ноутбук и проверьте, не исчезла ли ошибка. В некоторых случаях ошибка может быть временной и исчезнуть после перезагрузки.
Шаг 2: Проверьте подключение жесткого диска
Убедитесь, что жесткий диск правильно подключен к материнской плате вашего ноутбука. Попробуйте отключить и снова подключить жесткий диск, чтобы исправить возможное неполадки в подключении.
Шаг 3: Проверьте наличие повреждений файловой системы
Загрузитесь с помощью установочного диска операционной системы или Live-USB и выполните проверку файловой системы жесткого диска с помощью интегрированных инструментов, таких как chkdsk для Windows или fsck для Linux. Это позволит обнаружить и исправить возможные повреждения файловой системы, которые могут вызывать ошибку «Hard disk error» (3F1).
Шаг 4: Проверьте состояние жесткого диска
Используйте программу для проверки состояния и диагностики жесткого диска, такую как CrystalDiskInfo или HD Tune, чтобы определить, есть ли у вашего жесткого диска какие-либо физические повреждения или неисправности. Если обнаружены проблемы, возможно, потребуется заменить жесткий диск.
Шаг 5: Обновите BIOS
Проверьте наличие обновлений BIOS на официальном сайте производителя вашего ноутбука HP. Обновление BIOS может устранить известные проблемы, включая ошибку «Hard disk error» (3F1), связанные с совместимостью или конфигурацией жесткого диска. Будьте осторожны при обновлении BIOS и следуйте указаниям производителя.
Если перечисленные выше методы не помогли исправить ошибку «Hard disk error» (3F1), рекомендуется обратиться к официальному сервисному центру HP или специалисту по ремонту компьютерной техники для дальнейших инструкций или замены жесткого диска.
Проверьте подключение и состояние жесткого диска
Одной из причин возникновения ошибки «Hard disk error» при загрузке ноутбука HP (3F1) может быть отключение или неправильное подключение жесткого диска. Проверьте, что жесткий диск правильно подключен к материнской плате и все кабели надежно закреплены. Если нет, убедитесь в надлежащем подключении и перезагрузите ноутбук.
Кроме того, возникновение ошибки может быть связано с неполадками в состоянии жесткого диска. Для проверки состояния жесткого диска можно воспользоваться утилитой ChkDsk, встроенной в операционную систему Windows. Для этого выполните следующие действия:
- Нажмите клавишу Win + R, чтобы открыть окно «Выполнить».
- Введите команду «cmd» и нажмите Enter, чтобы открыть командную строку.
- Введите команду «chkdsk C: /f /r» и нажмите Enter. Замените «C:» на букву диска, на котором установлена операционная система, если это необходимо.
- Дождитесь завершения проверки и исправления ошибок.
- Перезагрузите ноутбук и проверьте, появляется ли ошибка «Hard disk error» при загрузке.
Примечание: Если утилита ChkDsk обнаружит и исправит ошибки, это может помочь исправить проблему с жестким диском. Однако, если ошибка все равно возникает, возможно, в жестком диске присутствуют серьезные неполадки, и потребуется заменить его или обратиться к специалисту по ремонту.
Запустите диагностику системы и восстановление ОС
Ошибка «Hard disk error» может быть вызвана неисправной работой жесткого диска или повреждением операционной системы. Для решения этой проблемы вам может потребоваться выполнить диагностику системы и восстановить операционную систему. Вот несколько шагов, которые вы можете предпринять для исправления ошибки:
1. Запустите диагностику жесткого диска:
Многие ноутбуки HP имеют встроенную утилиту для проверки жесткого диска. Чтобы ее запустить, включите ноутбук и нажмите клавишу F2 или Esc (зависит от модели ноутбука), пока не появится меню загрузки. Затем выберите опцию «System Diagnostics» или «Hardware Diagnostics» и запустите проверку жесткого диска.
2. Восстановите операционную систему:
Если диагностика не выявила никаких проблем с жестким диском, вероятно, проблема связана с операционной системой. В таком случае вам может потребоваться восстановить операционную систему. Для этого воспользуйтесь функцией «Восстановление системы» или «Переустановка операционной системы» в меню «Настройки» или «Установка» (зависит от версии Windows). Следуйте инструкциям на экране, чтобы выполнить восстановление операционной системы.
Если проблема с ошибкой «Hard disk error» все еще не решена, рекомендуется обратиться к специалисту или связаться с технической поддержкой HP для получения дополнительной помощи.
Обратитесь к специалисту или сервисному центру HP
Специалисты будут иметь опыт работы с оборудованием HP и смогут провести диагностику ноутбука, чтобы определить причину ошибки. Они также смогут предложить наиболее подходящие решения, включая возможность замены или ремонта жесткого диска.
Не рекомендуется пытаться решить данную проблему самостоятельно, особенно если у вас нет соответствующих знаний и опыта. Неправильное вмешательство может привести к дополнительным повреждениям и потере данных.
Обращение к специалисту или сервисному центру HP позволит вам получить квалифицированную помощь, которая будет соответствовать спецификации вашего ноутбука и сохранит его работоспособность в долгосрочной перспективе.
Не откладывайте обращение к специалистам, чтобы восстановить работу вашего ноутбука HP и избежать дальнейших проблем.
Hard disk error 3F1 is a problem that mainly happens on HP laptops. If you encounter this error, you will be unable to boot the system and access the desktop. Don’t worry. In this post from the MiniTool Partition Wizard website, you can find some solutions to this problem.
What is hard disk error 3F1? What will happen when you encounter 3F1? Let’s start with a post from the forum:
Hi guys, I have this odd error that appears at bootup. “Hard Disk Error 3F1. Press F2 for system diagnostics.” Now when I do diagnostics, I get no errors, everything passes. Plus if I just f2 and then escape, the system goes on to boot with no problem.http://forum.notebookreview.com/
As you can see, hard disk error 3F1 usually happens on startup with a blue or black screen. It mainly appears on HP laptops and desktops. This error always comes with the following message:
Hard Disk Error
Please run the Hard Disk Test in System Diagnostics
Hard Disk 1 (3F1)
F2 System Diagnostics
In some cases, the error just disappears after a simple restart. In other cases, the odd error appears again and again, which prevents the computer from booting.
Some users also encounter this problem suddenly while the computer is on. They first receive a blue screen of death with the error code “CRITICAL PROCESS DIED”. Then they restart the computer and the hard disk error 3F1 appears.
Why does the hard disk 1 (3F1) error happen? There are various reasons, such as improper BIOS settings, hard drive failure, etc. Don’t worry. If you are bothered by this issue, you can try the following fixes one by one to solve it.
Fix 1: Power Reset Your HP Laptop
If you get HP hard disk error 3F1 on a laptop, you can try performing a power reset to solve the problem. In this way, you can clear information from the laptop’s memory without deleting personal data. Here are the detailed steps.
Step 1: Turn off your laptop.
Step 2: Disconnect the power cord and any other peripheral devices.
Step 3: Remove the battery. Then press and hold the power button for at least 15 seconds to drain the capacitors.
Tip: If the battery is not removable, you just need to disconnect the power cord and any peripheral devices, and then press and hold the power button.
Step 4: Insert the battery and connect the power cord. Please don’t connect other peripheral devices now.
Step 5: Turn on the laptop and check if it works properly.
If your laptop still runs into hard disk error 3F1, you need to move on to the next solution.
Fix 2: Reset BIOS Settings
BIOS refers to Basic Input/Output System, the firmware preinstalled on a computer’s board. It is used to initialize hardware during the booting process. It also provides runtime services for operating systems and programs. BIOS is the first software to run when the computer is turned on. Therefore, if the BIOS settings are improper, the computer might run into a problem like hard disk error 3F1.
To solve the problem in this case, you can try resetting BIOS settings. You won’t lose any personal data by resetting BIOS settings. It just restores the BIOS settings to default.
Here is how to reset BIOS settings on HP computers.
Generally, there are three ways to reset BIOS settings:
- Reset BIOS settings from the BIOS or UEFI
- Reset BIOS settings by reinstalling or replacing the CMOS
- Reset BIOS settings by clearing the jumper on the motherboard.
The last two methods might be too complicated to operate for most common users. Therefore, I’d like to introduce how to reset BIOS settings from the BIOS or UEFI menu. It is easier and you can follow the steps below for operation.
Step 1: Turn off your HP computer and wait for about 10 seconds.
Step 2: Turn on your computer. When you see the HP logo, press F10 quickly to enter BIOS settings.
Tip: You can also boot your computer into Windows Recovery Environment. Then click Troubleshoot > Advanced Options > UEFI Firmware Settings > Restart. Then press the required key to enter BIOS settings.
Step 3: Under the Main tab, select the Restore Defaults option with the up and down arrow keys.
Tip: Depending on the models of laptops, the steps in your case might be different. If you don’t find the Restore Defaults option, you might need to look for phrases like Load Setup Defaults or Load Default Options.
Step 4: Select Yes to confirm the operation. Then select Save Changes and Exit.
After that, you just need to wait patiently until the process is finished. Your computer will restart during the process. If HP disk error 3F1 appears again, keep trying the next method.
Fix 3: Check for Hard Drive Issues
In addition to improper BIOS settings, hard drive issues could also lead to HP hard disk error 3F1. How to fix hard disk error 3F1 in this case? You can boot your computer into Safe Mode with Networking and run hard drive error-checking tools.
Boot into Safe Mode with Networking
If you can’t access the desktop due to hard disk 1 (3F1), you can try booting the computer into Safe Mode with Networking by following the steps below.
Step 1: Shut down your computer. Then turn it on. Once you see the HP logo, turn off your computer. Repeat the process three times.
Step 2: When you turn on your computer for the fourth time, you will enter Windows Recovery Environment. Go to Troubleshoot > Advanced options > Startup Settings > Restart.
Step 3: Press the F5 key to select the Enable Safe Mode with Networking option.
Run Disk Error Checking Tool in Windows
In Safe Mode, you can check for hard drive issues with built-in Windows tools. You just need to:
Step 1: Press Win + E to open File Explorer. Then click This PC.
Step 2: Right-click a logical drive on your computer and select Properties.
Step 3: In the pop-up window, switch to the Tools tab. Then click the Check button under the Error checking section. Follow the on-screen instructions to finish the process.
Step 4: Repeat the operation to check and repair other logical drives.
Run CHKDSK in Command Prompt
If the error checking tool can’t find any problems, you should run the CHKDSK command in Command Prompt to check and repair your hard drive.
CHKDSK is a built-in utility in Windows operating systems that can check the file system and file system metadata of a volume for logical and physical errors. To check and fix hard drive errors, it needs to be used with certain parameters. Let’s see how to use this tool.
Step 1: Press Win + R to invoke the Run window. Then input cmd in the box and click OK to open Command Prompt.
Step 2: In Command Prompt, type the command chkdsk d: /f /r and press Enter.
- d: refers to the drive letter of a logical drive.
- /f: fixes errors on the disk.
- /r: locates bad sectors and tries to recover readable information.
Step 3: When the error checking process is finished, use the same command and replace the drive letter to check other logical drives.
After checking and repairing hard drive errors, you can exit Command Prompt and restart your computer. Then check whether the hard disk error 3F1 has been solved.
Fix 4: Run HP PC Hardware Diagnostic UEFI
HP PC hardware Diagnostics for Windows is a tool preinstalled in HP computers. It can be used to determine if there is something wrong with the hardware of an HP computer. It has an HP PC Hardware Diagnostics UEFI feature that you can use to check for hard drive issues when you encounter hard disk error 3F1. Follow the steps below to access this tool.
Step 1: Turn off your computer if it is on. Then turn it on and press the ESC key immediately about 5 times until a menu shows up.
Tip: If you can access the desktop, you can just search for HP PC Hardware Diagnostic for Windows to open this tool.
Step 2: Press the F2 key to enter HP PC Hardware Diagnostic UEFI. Then select your language. In the Main Menu of HP PC Hardware Diagnostic UEFI, select Component Tests.
Step 3: Select the Storage category to test your hard drive. Then choose Quick Test.
Step 4: On the next page, select the Run once button. Then wait patiently and follow the on-screen instructions to complete. Please note that if any issues are found, you need to click the Troubleshoot button to solve them.
You can visit the official website of HP to know more detailed information about HP PC Hardware Diagnostics for Windows.
After hard-drive testing, you can also run a System Test with this tool if you need it. Then you can restart your computer and check if it helps to fix hard disk error 3F1.
Fix 5: Reconnect Your Hard Drive or Test It on Another PC
You might also encounter hard disk 1 (3F1) when the connection between your laptop and the hard drive. It could happen if your laptop was hit or fall on the ground accidentally. To fix the problem, you need to make sure the hard drive is installed properly.
Just shut down your computer, and disconnect the power cables as well as other peripheral devices such as the keyboard, mouse, etc. Then uninstall the battery, remove the case, and then disconnect the hard drive.
After that, reinstall the hard drive and put everything back, and turn on your laptop. You can also install the hard drive on another computer to test the hard drive.
For more details, you can refer to our previous post: 7 Steps: How to Remove Hard Drive from Laptop.
If the problem still appears, go to the final solution.
Fix 6: Recover Data and Reinstall the Operating System
If the hard disk error 3F1 appears anyway, you might need to format the hard drive on your HP computer and reinstall the operating system. You can also replace the old hard drive with a new one, which is a recommended and better way since the old one is corrupted.
However, you need to recover your data and save it to an external hard drive before that.
As for the data recovery tool, I recommend MiniTool Partition Wizard, a professional and reliable disk manager and data recovery utility.
It can help you recover lost data due to various reasons, such as hard drive corruption, operating system crash, virus attack, deleted or formatted partition, etc.
Here is how to use this tool.
Step 1: Download, install, and launch MiniTool Partition Wizard on another computer.
Buy Now
Step 2: Create a bootable USB drive with Bootable Media Builder via a USB drive. Then connect an external hard drive that is large enough to hold the recovered data to your HP laptop and boot the laptop with this USB drive.
Step 3: On the main interface of MiniTool Partition Wizard, click the Data Recovery feature. Then double-click a logical drive to scan.
Tip: You can also go to the Devices tab to scan the whole hard drive.
Step 4: Once the scanning process is finished, check the files you want to recover and click the Save button.
Step 5: In the pop-up window, select a location on your external hard drive to store your files.
After recovering your data, you can reinstall the operating system or replace the old hard drive without any worries. And the following posts might help:
- Detailed Steps and Instructions to Reinstall Windows 10
- How to Upgrade Laptop from HDD to SSD Without Reinstalling OS
How to repair hard disk error 3F1? This post can help.Click to Tweet
Bottom Line
How to fix hard disk error 3F1? You can try the above fixes one by one. You can share your ideas with us in the following comment zone. And for any problems with MiniTool Partition Wizard, you can contact our support team via [email protected].
Summary:
Are you facing HARD DISK 1 (3F1) error issue & don’t know why receiving this error code? Then here is the answer of your question, this blog has everything you need to know about HARD DISK 1 (3F1) error and its solutions.
Hard disk error HARD DISK 1 (3F1) is associated with HP laptops and appears when the laptop hard drive that stores the OS gets damaged or corrupt. The HARD DISK 1 (3F1) error can also occur due to damaged operating system files (caused by bad sectors on the hard drive). An HP laptop with affected hard drive displays the following error when you turn it on.
| “Hard Disk Error Please run the Hard Disk Test in System Diagnostics. Hard Disk 1 (3F1) F2 System Diagnostics For more information, please visit: www.hp.com/go/techcenter/startup“ |
In most cases, this problem resides within the hard drive. However, in some cases, the problem can be caused by a malfunctioning hard drive controller but that’s rare. Following are some solutions that you can apply to your system and fix it.
Solution 1. Hard Reset
A hard reset wipes out everything from the computer memory (cache, RAM, etc.) & restores the default functionality thus, re-establishing software connection between the hardware and the BIOS that could probably fix the hard disk error.
To hard reset your HP laptop, follow these instructions:
- Disconnect power cable
- Unplug all peripherals and USB devices
- Remove the battery. If it’s internal, open the laptop casing and disconnect the battery
- Press and hold the power button for a while to discharge any remaining current on the board (stored in capacitors, etc.)
- Then install/connect the battery and turn ON your laptop
Check if your system is able to boot completely. If not, proceed to the next step.
Solution 2. BIOS Reset Defaults
To reset BIOS defaults on your HP laptop, follow these instructions:
- Turn off your system and wait for 10 sec
- Turn it ON and start pressing F10 to enter BIOS
- Press F9 in the BIOS screen to select and load the BIOS Setup Defaults Setting.
- Press F10 to save settings and exit the BIOS
- Use the arrow to select Yes when prompted and then press Enter
Your system will reboot. If it still displays the same error, follow the next step.
Solution 3. Use HP PC Hardware Diagnostics
There are 6 different diagnostic tests that are performed either in Quick mode (takes 1-3 minutes) or extensive mode (takes more than 2 hours). To run diagnostics on hard disk, follow these steps:
- Plug in the AC adapter and make sure no other USB device is connected to the system
- Press and hold the power button for 5 seconds to turn the system off (if it’s on)
- Press the power button to turn the system ON and immediately start pressing the ESC key repeatedly 4-5 times. A menu list appears
- Press the F2 key
- Select Components Test from the HP PC Hardware Diagnostics menu
- Choose the hard drive using the arrow key
- Select Quick Test and then select Run Once
- Wait for the hard drive test to finish. If your system has more than one drive, select Test All Hard drives
- After the test, results are displayed. If the hard drive passes the Quick Test but the problem is still unsolved, run Extensive Test after a restart
Alternatively, you can press the F2 key when the error appears on the screen after turning ON your HP laptop. This opens further options for diagnostics. Press F4 to run Hard Disk Tests.
In case you are still stuck with the error, proceed to the next step
NOTE: Diagnostics can fix most problems but it can also damage the hard drive. As the drive is already damaged, running Extensive test can lead to drive failure. Therefore, recover your data before proceeding to any step that involves the exhaustive use of the hard drive. This precaution can help you save your important data before the drive fails. You can skip to step 5 for data recovery and drive repair process.
Solution 4. Reset the Hard drive
If your computer has fallen off or else has got jarred, it’s possible that the connection to hard drive gets loose.
- Remove the battery and makes sure all USB devices, power cable, etc. are disconnected from the laptop
- Open your HP laptop using Philips Screwdriver or similar tool. Use an anti-static strap or use a conductive foam pad while working with internal components of the laptop
- Unplug the hard drive, and then firmly reconnect it
Boot the system and check if it is able to boot successfully. In case it doesn’t, proceed to the next step.
Solution 5. Remove Hard Drive and Test it
If your system is running Windows XP, possibly the SATA drivers are not installed and that’s the reason why your system fails to boot and gets stuck on the error. Therefore, first check and install the SATA driver (refer to user manual of your system).
Alternatively, you can remove the hard drive from the system and test it by connecting to another PC using SATA to USB connector. If your drive is still not recognized, it’s probably damaged or corrupt. Proceed to the next step for recovery and re-installation process.
Solution 6. Use Data Recovery Tool
If none of the above-mentioned solutions work, use a reliable data recovery tool such as Stellar Data Recovery- Standard that facilitates recovery from an inaccessible, corrupt, and formatted hard drive. The ‘Deep Scan’ option allows you to recover all your data and perform raw recovery based on file signatures. All files folders, music, videos, pictures, documents, etc. can be easily recovered with the help of this tool.
Its intuitive user interface makes the recovery process easier. Thus, all you need to do is
- Connect the affected hard drive to the system
- Install the Stellar Data Recovery- Standard for Windows tool
- Launch it and recover your lost files folders, documents etc. with just a few clicks.
After you have successfully recovered the data, format the drive using ‘Disk Management’ tool or ‘Disk Part’ command utility. Insert the drive to the HP laptop, install Windows, and then restore your data to the drive. If possible, replace the HDD with a new drive to prevent future data loss situation.
Conclusion:
We learnt why Hard disk error HARD DISK 1 (3F1) occurs and how this error can be solved with the help of HP’s inbuilt diagnostic tools and simple troubleshooting methods. However, such errors can be prevented and data loss situation due to such error can be easily avoided if you keep an eye on your hard drive health using SMART — an inbuilt disk monitoring utility— that comes knotted with modern hard drives and SSDs. You can also run CHKDSK once or twice in a month to keep your drive in good health.
However, if you still ever face a data loss situation due to hard drive errors, use a reliable data recovery tool such as Stellar Data Recovery- Standard for Windows before formatting or repairing the drive. This award-winning software helps you recover your lost data in an efficient and easy fashion.
About The Author
Aruna
Aruna Attri is a Senior Data Recovery Expert at Stellar®. She is a technology blogger and Windows expert. She has experience in Windows data recovery domain. She loves to troubleshoot Windows issue and write technical tips and tutorials.
Best Selling Products
Stellar Data Recovery Professional
Stellar Data Recovery Professional softw
Read More
Stellar Data Recovery Premium
Stellar Data Recovery Premium for Window
Read More
Stellar Data Recovery Technician
Stellar Data Recovery Technician intelli
Read More
Stellar Data Recovery Toolkit
Stellar Data Recovery Toolkit is an adva
Read More
Based on a suggestion from Huffer, I’m posting this as a new topic in case anyone else comes across this issue in the future.
System Details:
Product Number : LR738PA#ABG
Description : HP PAVILION DV6-6027TX ENTERTAINMENT NOTEBOOK PC
System Board ID: 1657
Motherboard Part No: 641488-001
BIOS Version: F.1A
Operating System: Windows 7 Home Premium 64 Bit
When starting up this laptop, after successful POST it comes up with the following error:
Hard Disk Error: Hard Disk 1 Error 3F1.
As seen in this screen shot:
.jpg")
Hard Disk 1 in the above picture denotes the internal HDD in the laptop, not an external eSata one.
If your fast enough after the POST screen, you can press F9 boot menu, and choose to ignore the error and continue booting into windows. If you let it just do a normal POST it will halt on this error and won’t allow windows to load.
In an effort to remedy the situation I have tried installing 3 other drives all showing the exact same error.
The other drives are:
— Western Digital Scorpio Blue: WD2500BEVT — 250Gb, pulled from another working laptop.
— A-RAM Pro Series 64Gb 2.5″ SSD, pulled from another working system.
— Western Digital Black: WD5000LPLX — 500Gb, this drive was purchased brand new thinking there was a possibility the other 2 drives might be faulty.
I then ran GSmart HDD Control on all 3 drives attempting to work out why all 3 drives didn’t work.
Link here:
http://gsmartcontrol.sourceforge.net/home/index.php/Downloads
When tested in a standard desktop system on a standard SATA lead all 3 drives return no S.M.A.R.T errors, and all passed a full read test.
When tested with HP’s own testing tools from BIOS on this laptop, the drives also passed the full HDD test, but still fail after the post screen.
In desperation I purchased a compatible mainboard that will fit into the DV6-6027TX chassis with the same board ID, details as follows:
HP Casablanca H710
Product Number: FP27M00#ABA
System Board id: 1657
System Board CT No: PBWQE03HT1Q090
Bios Version: F.1A
Incidentally if you want the best possible Graphics for a replacement board in the System Board id range: 1657, try the following part No’s instead:
650799-001
650800-001
They both have an AMD HD6770 chip, with 2Gb dedicated memory.
Once installed this board also POST’s fine, however it also gives the same Hard Disk 1 Error 3F1.
I looked up the HP BIOS error Codes:
http://h20564.www2.hp.com/hpsc/doc/public/display?docId=emr_na-c01443317
It gives a very generic:
This indicates a potential problem with the hard drive. Please run the hard drive test.
Which as stated above, had already been done.
At this point, having ruled out the HDD’s, this then indicates to me that the issue may lay with either the HDD cable itself or a mainboard issue with HP Pavilion dv6 range of laptops.
I attempted to find a replacement SPS-Cable Kit, Part No: 640422-001 for the original mainboard, however the part is no longer available.
Mumbodog suggested an alternate Part No that is still available: 665301-001.
I have since contacted the Ebay vendor of the replacement mainboard, and requested a HDD cable replacement, as it’s a cheap option if it works, and helps rule another element of the equation out.
I will post back here once I have tried the HDD cable, to let others know if this works or not.
If it doesn’t, then the only other possibility I can think of is 2 faulty mainboards or a common fault in these boards, that requires rectifying.
If anyone else has a good suggestion, or has seen this before, please post your experience here.
@..@
(—-)
( >__ )
^^ ~~ ^^
Некоторые пользователи ноутбуков HP при включении своего аппарата или при проведении теста жесткого диска на нем могут столкнуться с сообщением данного содержания. В данной статье мы расскажем вам что оно означает и что делать при его появлении.
Значение сообщения
Чаще всего ошибка 303 в ноутбуках HP сопровождается ошибкой 3F1 или SMART Hard Disk Error. Все это в сумме или по раздельности говорит об одном — имеются серьезные проблемы с жестким диском.
Его предвестниками является медленная загрузка и работа ноутбука.
Что делать?
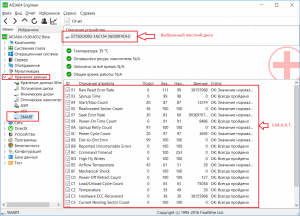
Если операционная система еще загружается, то первым делом советуем вам скопировать все важные данные с жесткого диска на любой другой носитель (флешка, облако, внешний жесткий диск), так как существует большой риск их потери при полном выходе из строя жесткого диска.
Далее нужно убедиться в работоспособности жесткого диска и определить его состояние. Для этого проверяем состояние его рабочей поверхности на предмет наличия BAD секторов, а также смотрим S.M.A.R.T. Как все это делается мы рассказывали в отдельной статье.
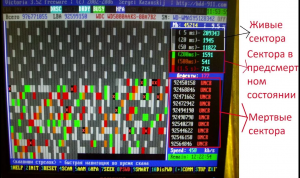
Тест поверхности диска в Victoria
Забегая вперед, стоит отметить, что в 99% случаев при ошибке Hard Disk 1 Quick 303 проблема с диском подтверждается и не остается ничего, кроме его замены на новый.
Почему так происходит?
Любой жесткий диск рано или поздно выйдет из строя. Время, когда это произойдет, зависит от многих факторов, например таких как общее время наработки диска, количество ударов и падений ноутбука, качества сборки самого диска и т.д. Поэтому у некоторых жесткие диски живут по 5-7 лет, а у кого — то и не выхаживают гарантийного срока. По этим причинам с сообщением «Hard Disk 1 Quick 303» можно столкнуться как на старом ноутбуке, так и практически на новом.
Вывод
Если вы столкнулись с сообщением «Hard Disk 1 Quick 303» во время включения ноутбука или при проведении теста жесткого диска, то с 99% вероятностью вам придется его (диск) заменить на новый. Какие — либо манипуляции по продлению его жизни, например проверка программой victoria с активированной функцией Remap, в лучшем лишь не надолго отсрочат замену. При этом на таком диске запрещено хранить что — то очень важное, так как существует огромный риск потери данных.
Digital
Содержание
Как известно, жесткий диск в ноутбуке является достаточно уязвимым, поскольку даже при бережном отношении подвергается микроударам. Это одна из специфик современных мобильных гаджетов. Однако возникшие с ним проблемы не обязательно могут быть связаны с механическими повреждениями или воздействиями. Поэтому при появлении оповещений от системы о возникновении ошибок жесткого диска не следует сразу впадать в панику, а необходимо уделить внимание коду ошибки, чтобы предпринять соответствующие меры.

Владельцы ноутбуков HP иногда сталкиваются с вопросом: что делать, если система оповещает об ошибке Hard Disk 3F0? Такое сообщение однозначно свидетельствует о проблеме с жестким диском. Нюанс заключается в том, что сразу нельзя сказать, насколько серьезной окажется поломка. Решение может быть как предельно простым, и исправление займет минимум времени, так и не очень приятным и затратным, т.е. может потребоваться покупка нового жесткого диска. Но, прежде чем отправляться в магазин, следует попытаться предпринять некоторые «спасательные» мероприятия. К слову, довольно часто они дают абсолютно положительный результат.

Итак, при перезагрузке на экране вы увидели сообщение об ошибке Hard Disk 3F0. Что могло стать причиной и какие действия следует предпринять?
Начнем по порядку.
Самой простой причиной поломки могло стать смещение жесткого диска, отсоединение разъёма, что привело к тому, что BIOS попросту не видит диск. Надо отметить, что такой вариант можно назвать самым простым и даже предпочтительным, поскольку устранение проблемы самое элементарное – необходимо снять защитную крышку и аккуратно проверить подключение разъёма жесткого диска.
Довольно часто подобная ошибка появляется после установки или переустановки ОС.

В таком случае необходимо предпринять следующие шаги:
- зайдите в BIOS
- выберите закладку System Configuration, а далее – Boot Options
- включите Legacy Support
- первым пунктом в разделе Legacy Boot Order выставьте Notebook Hard Drive
- нажмите F10 и можете выходить, обязательно сохранив настройки
- перед вами появится окно с кодом для ввода, вводите этот код и нажимаете Enter
- компьютер должен загрузиться. Если все прошло успешно, то при последующих включениях ошибок не будет возникать, а аппарат начнет работать корректно.

Если предложенные выше манипуляции не привели к желаемому результату, то проблема может быть в самом диске. Чтобы проверить это, установите его на другой ноутбук. Если и другое устройство не видит носитель информации, то это, как минимум, повод обратиться в мастерскую.
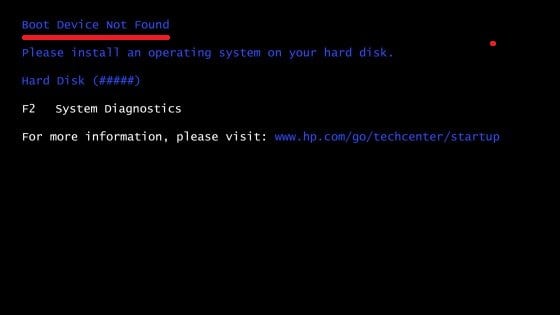
При включении своего ноутбука Hewlett-Packard пользователь может столкнуться с сообщением «Boot Device Not Found» и отказом компьютера загружаться. Причиной указанной дисфункции обычно являются ряд неверных настроек БИОС, но бывают и случаи, когда данная проблема возникает из-за выхода из строя жёсткого диска, или нарушения целостности операционной системы. В этой статье я расскажу, что такое Boot Device Not Found на HP, каковы причины данной дисфункции, и как её исправить на вашем ПК.
 Скриншот ошибки Boot Device Not Found на HP
Перевод и причины Boot Device Not Found
В переводе данный текст звучит как «Загрузочное устройство не найдено», и обычно обозначает ситуацию, когда при включении компьютера система не обнаружила устройство, с которого должна быть произведена загрузка (или установка) операционной системы. Похожая ситуация, когда в диспетчере устройств не видна видеокарта была описана мной в прошлой статье.
Причинами такой дисфункции может быть следующее:
- Неверные настройки БИОС (UEFI) на компьютере;
- Используемый для загрузки жёсткий диск физически повреждён или вышел из строя;
- Загрузочный сектор или MBR жёсткого диска повреждены;
- Файлы операционной системы повреждены;
- Ваш ПК стал объектом атаки вирусных программ.
 Error 3FO
Для решения вопроса с Boot Device Not Found на HP рекомендую выполнить следующее:
- Измените значение параметра «Legacy Support» в БИОС с «Disabled» на «Enabled». Перейдите в БИОС (обычно это получается путём нажатия на Escape, а потом на F10), выберите вкладку «System Configuration», найдите там параметр «Legacy Support», и измените его значение с «Disabled» на «Enabled». Затем нажмите на F10 для сохранения изменений и перезагрузите ваш HP. После перезагрузки компьютер может попросить вас ввести код (его значение будет на экране) и нажать Enter для подтверждения изменений. Введите указанный код, нажмите Enter и компьютер произведёт стандартную загрузку ОС;
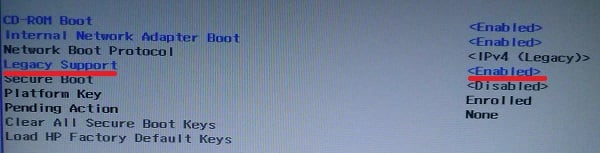 Установите опцию Legacy Support в значение Enabled
Измените значение ряда параметров БИОСа. Перейдите в БИОС, выберите вкладку «System Configuration» — «Boot option». Измените значение опции «Security Boot» с «Enabled» на «Disabled». Затем жмём на «Clear all secure boot keys», вводим цифры (pass code), которые расположены чуть выше и жмём на ввод.
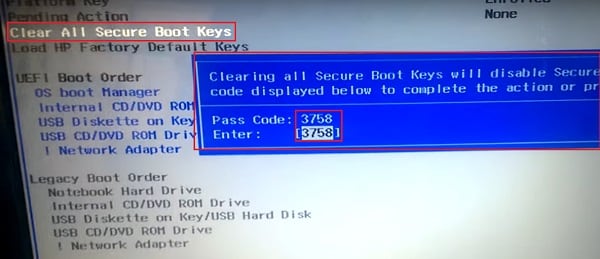 Вводим указанные цифры ключа
Затем меняем значение параметра «Legacy Support» из «Disabled» на «Enabled». В опции «Legacy boot order» выбираем, с чего мы хотим загружаться (обычно, это жёсткий диск ноутбука – hard disk). Для сохранения произведённых изменений жмём на F10, потом на «Yes», и перезагружаем наш ПК, это может помочь избавиться от ошибки Boot Device Not Found на ноутбуке HP;
- Проверьте, виден ли в БИОС ваш жёсткий диск, для исправления Boot Device Not Found. Если нет, тогда проверьте плотность его подключения (выключаем лэптоп, отключаем блок питания, снимаем нижнюю крышку, батарею, отключаем жёсткий диск, визуально проверяем его контакты, подключаем обратно жёсткий диск, батарею, ставим обратно крышку, подключаем блок питания и включаем ноутбук). Если винчестер вновь не виден, тогда есть вероятность, что он вышел из строя (проверьте работоспособность в сервисном центре) или повреждены шлейфы к нему (встречается довольно редко);
- Выполните hard reset вашего HP. Выполнение аппаратного сброса вашего лэптопа (hard reset) позволяет очистить память и восстановить корректные связи между БИОС и аппаратной начинкой ПК. Отключите все внешние, подключенные к ПК, устройства (в частности, USB и блок питания), изымите аккумулятор из ноутбука. Затем нажмите на кнопку питания (Power) и держите её нажатой в течение 15 секунд.
Потом подключите обратно аккумулятор и блок питания, другие внешние устройства не подключайте. Нажмите на кнопку питания, в появившемся меню выберите «Обычная загрузка Виндовс» (Start Windows Normally), и нажмите ввод.
- Загрузите настройки БИОС по умолчанию. Перейдите в БИОС, нажмите на F9 и загрузите настройки БИОС по умолчанию. Затем нажмите на F10, подтвердите изменения, и перезагрузите ваш компьютер;
- Выполните тест вашего компьютера с помощью HP PC Hardware Diagnostics UEFI. Выключите ваш компьютер, затем включите его и быстро нажимайте на клавишу F2. Когда меню HP PC Hardware Diagnostics UEFI появится на экране, выберите тест компонентов (Component Tests). Тестируем компоненты нашего ПК с помощью HP PC Hardware Diagnostics UEFI
 Тестируем компоненты нашего ПК с помощью HP PC Hardware Diagnostics UEFI
В данном меню уделите особое внимание тесту жёсткого диска (Hard Drive – Extensive Test – Run Once). Просмотрите полученные результаты, возможно ваш накопитель попросту вышел из строя, и необходима его замена.
Заключение
Эффективным решением вопроса Boot Device Not Found hard disk (3f0) станет изменение настроек БИОС, аппаратный сброс ПК (hard reset), а также проведение теста структурных элементов лэптопа. В большинстве случаев помогает первый из описанных мной способов, позволяющий устранить ошибку на вашем ПК.
| Summary: The Hard Disk Error 3F1 is primarily related to HP laptops. This error doesn’t allow you to boot the system, and you couldn’t access the data stored on it. If you are getting this error then you need to know the following factors of Hard Disk Error 3F1. |
|---|
The complete error message looks similar to the one given below:
| Hard Disk Error
Please run the Hard Disk Test in System Diagnostics Hard Disk 1 (3F1) F2 System Diagnostics |
|---|
This error typically happens due to the corruption of the hard drive. You may also encounter this error due to faulty BIOS settings. In this post, we’ll share some do-it-yourself methods to fix this error.
इस पोस्ट को हिंदी में पढ़ने के लिए यहां क्लिक करें।
The solution to fix Hard Disk Error 3F1
Solution 1: Reset BIOS
Misconfigured BIOS settings also cause Hard Disk Error 3F1. Resetting the BIOS settings to its factory default settings may help to fix the hard drive 3F1 error.
Resetting BIOS by using BIOS Setup Utility
1. Start/Restart the system.
2. While the screen is blank and the system tries to load, start tapping the F10 key.
This will open the BIOS setup utility.
|
[NOTE]: HP systems use the F10 key to get into the BIOS setup utility. |
|---|
3. Use the keys mentioned on the BIOS setup utility screen to Reset BIOS.
|
[NOTE]: Typically, the terms mentioned on BIOS setup utility to reset BIOS are: load setup defaults, reset to default, factory default, etc. |
|---|
Restart the system, and check if the error is fixed.
Resetting BIOS by using Hard Reset Method
If you’re unable to reset BIOS by the above method, follow the steps for hard resetting the BIOS:
1. Shut down the system, and remove the power supply.
2. With a screwdriver, remove the system cabinet side panel.
3. Remove the CMOS battery (if removable) connected to the motherboard.
4. Connect the CMOS battery.
This resets the BIOS.
Power ON the system and see if the error is fixed.
If you’re unable to fix the error by resetting BIOS, boot your system in safe mode with networking to try the methods that follow. These methods help to fix minor issues with the hard drive due to which you may have encountered the hard disk 3F1 error.
Additional Reading: Data Recovery from Unbootable PC
| [NOTE]: As the most probable cause of HARD DISK 1 (3F1) error is the corruption or physical failure of the drive, it’s recommended to seek the help of a Professional Data Recovery Service provider in the first place to recover your data. This helps prevent further damages and permanent data loss. |
|---|
Solution 2: Safe Mode with Networking
Follow the steps below to enter into safe mode with networking.
1. Turn ON the system.
2. The moment you see the manufacturer’s logo, power OFF your system by pressing the power button again.
3. Repeat this process 3 times.
4. Turn ON the system 4th time and let it load completely this time.
This would open a screen “Choose an option”.
5. From this screen, navigate as follows:
Troubleshoot >> >Advanced options > Startup Settings


6. Click on the Startup Settings option.

Click on the Restart button which will open a new window where you get the option to get into Safe Mode with Networking.
7. Press the F5 key to enter into Safe Mode with Networking.

Solution 2: Use Windows Error Checking Tool
Error checking tool is a Windows utility that can fix minor issues within the drive. Thus, it may also fix a hard drive 3F1 error.
Follow the given steps:
1. Open This PC on your system.
2. Right-click a partition on the drive, and select Properties.

3. Select the Tools tab.
4. Click on the check button.

5. Use the same steps to check and fix issues on other partitions of the drive.
Restarting the system after running this Windows utility should fix the error, giving you access to your data.
Solution 4: Run CHKDSK Command
Running CHKDSK command from Command Prompt helps in fixing disk corruption issues.
Here are the steps:
1. Press Windows + R, and search cmd in the search box and hit enter.
2. Type the command given below, and hit Enter.
chkdsk /f /r x:
Where, x is the drive letter of a volume on your hard disk
/f fixes errors
/r identifies the bad sectors and tries to read information from them

3. When the execution of command completes for the specified partition, run the same command targeting the other partition, and continue doing this for all the other volumes on the drive.
Restart the system and check if Hard Disk Error 3F1 is resolved. If you couldn’t fix the issue even by trying the above methods, it means that the hard disk is severely corrupt or physically damaged. In such a case, it is recommended to contact a data recovery expert like Stellar to recover your precious data from the hard disk. The Professional Data Recovery Service provider uses propriety tools and equipment and can recover data even from the unbootable drive.
Additional Reading: How to Fix Boot Device Not Found 3F0 Error?
Conclusion
Hard Disk 1 (3F1) error leaves your system unbootable making your data inaccessible. This error code signifies that the hard disk has physically crashed, got corrupted or the faulty BIOS settings are causing this issue.
In this blog, we have discussed some methods in detail, to fix the issues that might cause this error. If the error remains unresolved, we also recommended contacting a Professional Data Recovery Service provider like Stellar to recover data from the drive.
|
0 / 0 / 0 Регистрация: 04.04.2015 Сообщений: 23 |
|
|
1 |
|
|
05.04.2015, 13:29. Показов 45928. Ответов 28
Здравствуйте! HP Envy Sleekbook 4-1152er выводит: Hard Disk Error Я сделала диагностику (HP Basic System Diagnostics) и вот результаты: Smart Check: Passed В BIOS заходит. Попробовала сделать загрузочную флешку Livecd и оттуда запустить Викторию,но комп не реагирует, все также выводит эту ошибку. В чем проблема? Добавлено через 10 часов 58 минут 0 |

|
2 / 2 / 0 Регистрация: 22.02.2012 Сообщений: 88 |
|
|
05.04.2015, 14:01 |
2 |
|
Что то не так делаешь
Smart Check: Passed Эта надпись гласит о том что система пропустила проврки давай распиши по шагам приложи фотки. Поссорим что там и как 0 |

|
0 / 0 / 0 Регистрация: 04.04.2015 Сообщений: 23 |
|
|
05.04.2015, 15:03 [ТС] |
3 |
|
Вот: Первое фото это то,что выходит (не сразу, а через 5 минут) каждый раз, когда включаю комп. 0 |
|
2 / 2 / 0 Регистрация: 22.02.2012 Сообщений: 88 |
|
|
05.04.2015, 17:21 |
4 |
|
1 Зайди на их сайт почитай что они пишут Добавлено через 1 минуту 0 |
|
0 / 0 / 0 Регистрация: 04.04.2015 Сообщений: 23 |
|
|
05.04.2015, 18:56 [ТС] |
5 |
|
1. Я у них уже побывала, перед тем как сюда регаться. (И не только у них) 0 |
|
21297 / 12107 / 653 Регистрация: 11.04.2010 Сообщений: 53,466 |
|
|
05.04.2015, 19:22 |
6 |
|
Я у них уже побывала и что они вам ответили? если девайс гарантийный… 0 |
|
0 / 0 / 0 Регистрация: 04.04.2015 Сообщений: 23 |
|
|
05.04.2015, 19:45 [ТС] |
7 |
|
Я им не писала) просто искала аналогичные проблемы и их решения. 0 |
|
21297 / 12107 / 653 Регистрация: 11.04.2010 Сообщений: 53,466 |
|
|
05.04.2015, 19:46 |
8 |
|
естественно, нужно выбрать первичную загрузку с флешки… 0 |
|
0 / 0 / 0 Регистрация: 04.04.2015 Сообщений: 23 |
|
|
05.04.2015, 19:49 [ТС] |
9 |
|
Я сделала boot order «usb diskette on key/usb hard disk» 0 |
|
21297 / 12107 / 653 Регистрация: 11.04.2010 Сообщений: 53,466 |
|
|
05.04.2015, 19:53 |
10 |
|
uefi boot включен? или secure boot? legacy включено? 0 |
|
0 / 0 / 0 Регистрация: 04.04.2015 Сообщений: 23 |
|
|
05.04.2015, 20:07 [ТС] |
11 |
|
secure boot disabled, legacy support enabled Добавлено через 7 минут 0 |
|
21297 / 12107 / 653 Регистрация: 11.04.2010 Сообщений: 53,466 |
|
|
05.04.2015, 20:10 |
12 |
|
для восьмерки… 1 |
|
0 / 0 / 0 Регистрация: 04.04.2015 Сообщений: 23 |
|
|
05.04.2015, 20:21 [ТС] |
13 |
|
нет, увы 0 |
|
21297 / 12107 / 653 Регистрация: 11.04.2010 Сообщений: 53,466 |
|
|
05.04.2015, 20:26 |
14 |
|
достать хард сможете? 0 |
|
0 / 0 / 0 Регистрация: 04.04.2015 Сообщений: 23 |
|
|
05.04.2015, 20:28 [ТС] |
15 |
|
Из ноута? Да 0 |
|
21297 / 12107 / 653 Регистрация: 11.04.2010 Сообщений: 53,466 |
|
|
05.04.2015, 20:30 |
16 |
|
ну достаньте, прицепите его к стационару, и покажите smart и что творится с разделами… 0 |
|
0 / 0 / 0 Регистрация: 04.04.2015 Сообщений: 23 |
|
|
05.04.2015, 20:36 [ТС] |
17 |
|
Вот именно, стационарки нет 0 |

|
21297 / 12107 / 653 Регистрация: 11.04.2010 Сообщений: 53,466 |
|
|
05.04.2015, 20:38 |
18 |
|
да походу никак… 1 |
|
2 / 2 / 0 Регистрация: 22.02.2012 Сообщений: 88 |
|
|
06.04.2015, 07:54 |
19 |
|
Через другой ноут можно. Только цепляй его через USB. Найди от внешнего USB диска коробку, плату, провод, 0 |
|
0 / 0 / 0 Регистрация: 04.04.2015 Сообщений: 23 |
|
|
09.04.2015, 17:09 [ТС] |
20 |
|
вот смарт Миниатюры
0 |
|
IT_Exp Эксперт 87844 / 49110 / 22898 Регистрация: 17.06.2006 Сообщений: 92,604 |
09.04.2015, 17:09 |
|
20 |