Quite often when a page jams a second page will stop somewhere in the printer and block a sensor triggering this error even though you have removed what you thought was the whole jam. Instructions below suggest to check the entire path.
From support documentation:
1. Clear the paper jam in Tray 1.
a. Open Tray 1.
b. If there is any jammed paper visible in Tray 1, gently pull the paper straight out to remove it, and then
close Tray 1.
2. Clear the paper jam in the Tray 1 paper feed guide assembly.
50 Chapter 7 Numerical control panel messages
a. Open tray 2 and lift it up slightly to pull the tray completely out of the printer.
b. Press the jam plate release button to lower the jam clearing plate.
c. If any jammed paper or obstructions are in the paper path, gently pull any jammed paper straight out
to remove the damaged paper.
d. Raise the jam clearing plate back into the correct position.
e. Reinstall Tray 2 in the printer and close the tray.
3. Clear the paper jam in the rear door.
a. Open the rear door.
b. If any jammed paper or obstructions are in the paper path, remove any damaged pages, and then
close the rear door.
4. Ensure that the type and quality of the paper used meets the HP specifications for the printer.
5. If the error persists, please contact customer support.
If you find the information provided useful or solves your problems, help other users find the solution easier by giving kudos and marking my post as an accepted solution.
I am a volunteer, offering my knowledge to support fellow users, I do not work for HP nor speak for HP.


When a jam occurs, the control panel displays a message and an animation that assists in clearing the jam.
-
13.A1.FF error
-
13.A1.A1 error
-
13.A1.D1 error
note:
If the residual jam occurs at power on, the jam code will not display on the control panel; instead it will be listed in the printer’s event log.
The information provided in this document applies to the following printer models:
-
HP LaserJet Enterprise M607
-
HP LaserJet Enterprise M608
-
HP LaserJet Enterprise M609
-
HP LaserJet Enterprise M610
-
HP LaserJet Enterprise M611
-
HP LaserJet Enterprise M612
-
HP LaserJet Managed E60055
-
HP LaserJet Managed E60067
-
HP LaserJet Managed E60075
-
HP LaserJet Managed E60155
-
HP LaserJet Managed E60165
-
HP LaserJet Managed E60175
Follow the steps below in the order presented to clear the paper jam.
note:
Click the step heading to expand that section and then follow the steps provided.
Step one: Clear paper jams in the output bin and in Tray 1
In addition to the instructions provided below, you can view the following video of how to clear a paper jam in Tray 1:

-
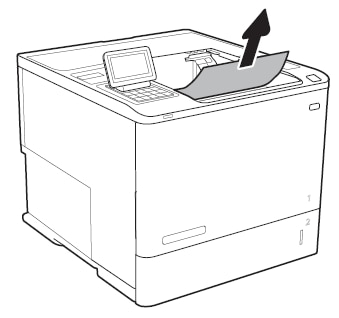
Remove any loose sheets of paper from the output bin.
-
If any paper is visible in the output bin, hold theleading edge of the paper and remove it.
Figure : Remove jammed paper from output bin

-
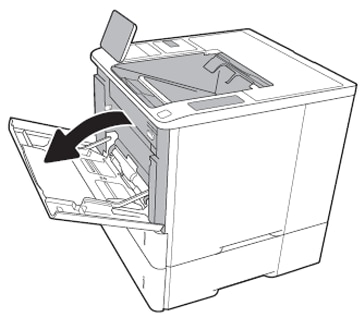
Open Tray 1.
Figure : Open Tray 1
-
If there is any jammed paper visible in Tray 1, gently pull the paper straight out to remove it.
Figure : Remove jammed paper from Tray 1
-
Close Tray 1.
Figure : Close Tray 1


Step two: Clear the paper jam in Tray 2
-
Open Tray 2 and lift it up slightly to pull the tray completely out of the printer.
Figure : Remove Tray 2 from the printer
-
Press the jam plate release button to lower the jam clearing plate.
Figure : Location of the jam plate release button
-
If any jammed paper or obstructions are in the paper path, gently pull the jammed paper straight out to remove it.
Figure : Remove jammed paper
-
Raise the jam clearing plate back into the correct position.
Figure : Lift the jam clearing plate
-
Reinsert Tray 2 in the printer and then close the tray.
Figure : Reinsert and close Tray 2


Step three: Clear the paper jam in the rear door
-
Open the rear door.
Figure : Open the rear door
-
If any jammed paper is visible, gently pull the jammed paper straight out to remove it.
Figure : Remove jammed paper from inside the rear door
-
Close the rear door.
Figure : Close the rear door


Step four: Contact support
If the error persists, contact your HP-authorized service or support provider, or contact HP support at www.hp.com/go/contactHP.
EMAIL ADDRESS
info@printer-repair-experts.net
Printer-Repair-Experts.net
Email Address
info@printer-repair-experts.net
Customer Care Telephone
888-276-4666
HP LASERJET M607 PRINTER REPAIR
HP LASERJET M607 PAPER JAM
HP LASERJET M607 PERFORM PRINTER MAINTENANCE
HP LASERJET M608 PRINTER REPAIR
HP LASERJET M608 PAPER JAM
HP LASERJET M608 PERFORM PRINTER MAINTENANCE
HP LASERJET M608 PRINTER REPAIR
HP LASERJET M608 PAPER JAM
HP LASERJET M608 PERFORM PRINTER MAINTENANCE
Printer Model
HP Laserjet Enterprise M607
HP Laserjet Enterprise M608
HP Laserjet Enterprise M609
Fuser Assembly Part Number
RM2-1256-0020 (110V)
Maintenance Kit Part Number
L0H24A
Tray 2 Roller Kit
J8J70-67904K
Pickup Roller Assembly
RM2-1275-000
Separation Roller Assembly
RM2-6772-000
13.00.EE
A paper jam arose while feeding envelopes from the envelope feed cassette tray.
Suggested Steps:
1. Make sure that high-grade paper is used for the envelopes.
2. Make sure the envelopes are inserted into the envelope feeder properly.
3. Remove the paper cassette tray that contains the envelope feeder by pulling it up as well as lifting slightly.
4. If any envelopes have begun to feed, take out the envelope and reinsert the envelopes.
5. Take away any jammed or torn (damaged) envelopes.
6. Reinstall and close cassette tray
If the problem continues, please contact Printer Repair Experts – Customer Care for further assistance. (888) 276-4666
13.00.EE
A door that is not known is open.
Suggested Steps:
1. Make sure all covers and doors are closed.
13.00.FF
Residual Paper Jam
This error code has no specified sensor identified. Any sensor within the paper path is suspected.
Suggested Steps:
1. Examine the HP Laserjet M607, M608, M609 for a paper jam
2. Remove any media present or paper jams within the paper feed path.
If the problem continues, please contact Printer Repair Experts – Customer Care for further assistance. (888) 276-4666.
13.A1.A1
Paper Jam, no movement from Tray 1
Media never moved from Tray 1 within the specified amount of time while printing from the Manual Feed (Tray 1)
Suggested Steps:
1. Remove the jammed paper.
a. Clear away any jammed media (paper) from tray 1.
b. Take out Tray 2 Paper Cassette and depress the gree access button. The Tray 1 access door will drop down
c. Clear away any jammed media (paper)
d. Reinstall the Tray 2 paper cassette tray and the printer will attempt to clear the paper jam error message.
e. Close the rear and left the door to allow HP Laserjet M607, M608, M609 printer to reset and try to clear the paper jam error message.
2. Examine the Tray 1 paper pickup, feed separation rollers are correctly installed. Make sure they do not show dirty or any wear and tear (damage)
3. Replace Feed / Separation roller and pickup roller.
If the problem continues, please contact Printer Repair Experts – Customer Care for further assistance. (888) 276-4666
13.A1.D1
Paper Delay Jam within Tray 1
Media never moved from Tray 1 within the specified amount of time while printing from the Manual Feed (Tray 1)
Suggested Steps:
1. Remove the jammed paper.
a. Clear away any jammed media (paper) from tray 1.
b. Take out Tray 2 Paper Cassette and depress the gree access button. The Tray 1 access door will drop down
c. Clear away any jammed media (paper)
d. Reinstall the Tray 2 paper cassette tray and the printer will attempt to clear the paper jam error message.
13.A1.FF
Power on Paper Jam at Tray 1 Feed Sensor.
Tray 1 (Manual Feed) sensor discovered paper (media) present in the Manual Feed (Tray 1) paper feed guide assembly.
Suggested Steps
1. Remove the jammed paper from Manual Feed – Tray 1.
a. Open Tray 1 (Manual Feed Tray)
b. If Tray 1 shows any visible jammed paper (media) easily pull the media (paper) straight out to clear out the paper and then shut close tray 1.
2. Remove the paper jam within tray 1 paper feed guide assembly.
a. Remove tray 2 out of the printer.
b. Depress the jam plate release button to lower the jam clearing plate.
c. If there is any media Jammed or any paper blockage within the paper feed path, Remove any jammed media straight out to clear out the damaged media.
d. Lift the jam-clearing plate back in the correct position.
e. Reinsert Tray 2 paper cassette tray and close the tray door.
3. Remove the paper jam at the rear door.
a. Open the rear door
b. If there is any media Jammed or any paper blockage within the paper feed path, Remove any jammed media straight out to clear out the damaged media.
4. Make sure the media type and quality of the paper (media) being utilized meets with HP specifications usage with the HP Laserjet M607, M608, M609.
If the problem continues, please contact Printer Repair Experts – Customer Care for further assistance. (888) 276-4666.13.A3.Dz
Paper Delay Paper Jam Tray 3
550 Sheet feeders can be assembled (stacked) for three extra trays. These trays contain similar sensors and connectors.
- 13.A3.D3 Media did not arrive at the tray 3 feed sensor in the specified time when printing from Tray 3.
- 13.A3.D4 Media did not arrive at the tray 4 feed sensor in the specified time when printing from Tray 4.
- 13.A3.D5 Media did not arrive at the tray 5 feed sensor in the specified time when printing from Tray 5.
Suggested Steps (550 -Sheet Paper Feeder)
1. Remove the paper jam
a. Open up the paper cassette tray and take out any jammed media (paper), and then shut close the paper tray.
b. Open the rear and front door.
c. Take away any blockage or media within the paper path.
2. Make sure the media type and quality of the paper (media) being utilized meets with HP specifications usage with the HP Laserjet M607, M608, M609.
3. If the error continues to persists, make sure the tray width and length guisde are in the correct paper size possition, for paper being ultilized within the paper cassette tray and is not overfilled exceeding the fill mark or the tabs within the paper tray.
4. Examine the Tray 3 paper pickup, feed separation rollers are correctly installed. Make sure they do not show dirty or any wear and tear (damage).
5. Replace Feed / Separation roller and pickup roller.
Suggested Steps (2100-Sheet Paper Feeder)
1. Remove the paper jam
a. Open up the paper cassette tray and take out any jammed media (paper), and then shut close the paper tray.
b. Open the rear and front door.
c. Take away any blockage or media within the paper path.
2. Make sure the media type and quality of the paper (media) being utilized meets with HP specifications usage with the HP Laserjet M607, M608, M609.
3. If the error continues to persists, make sure the tray width and length guisde are in the correct paper size possition, for paper being ultilized within the paper cassette tray and is not overfilled exceeding the fill mark or the tabs within the paper tray.
4. Examine the Tray 3 paper pickup, feed separation rollers are correctly installed. Make sure they do not show dirty or any wear and tear (damage).
5. Replace Feed / Separation roller and pickup roller.
If the problem continues, please contact Printer Repair Experts – Customer Care for further assistance. (888) 276-4666
13.A3.FF
Media Present Error — Paper Jam Tray X
This paper jam displays when paper is present and is detected at the Tray X Feed Sensor.
Suggested Steps
1. Remove the paper jam
a. Open up the paper cassette tray and take out any jammed media (paper), and then shut close the paper tray.
b. Open the rear and front door.
c. Take away any blockage or media within the paper path.
If the problem continues, please contact Printer Repair Experts – Customer Care for further assistance. (888) 276-4666
13.A4.Dz
Paper Delay Paper Jam Tray 3
550 Sheet feeders can be assembled (stacked) for three extra trays. These trays contain similar sensors and connectors.
- 13.A3.D3 Media did not arrive at the tray 4 feed sensor in the specified time when printing from Tray 3.
- 13.A3.D4 Media did not arrive at the tray 4 feed sensor in the specified time when printing from Tray 4.
- 13.A3.D5 Media did not arrive at the tray 4 feed sensor in the specified time when printing from Tray 5.
Suggested Steps (550 -Sheet Paper Feeder)
1. Remove the paper jam
a. Open up the paper cassette tray and take out any jammed media (paper), and then shut close the paper tray.
b. Open the lower right door and front door.
c. Take away any blockage or media within the paper path.
d. Close the lower right door and front door. for the printer to attempt to clear paper jam error message.
2. Make sure the media type and quality of the paper (media) being utilized meets with HP specifications usage with the HP Laserjet M607, M608, M609.
3. If the error continues to persists, make sure the tray width and length guisde are in the correct paper size possition, for paper being ultilized within the paper cassette tray and is not overfilled exceeding the fill mark or the tabs within the paper tray.
If the problem continues, please contact Printer Repair Experts – Customer Care for further assistance. (888) 276-4666
13.AA.EE Front Door Open Error
During the printing process, the front door was opened.
Suggested Steps
Shut close the front door and allow the printer to attempt to clear Paper Jam error code.
13.AB.EE Rear Door Open
During the printing process, the Rear door was opened.Suggested Steps.
Shut close the rear door and allow the printer to attempt to clear Paper Jam error code. 13.B2.Az Paper Jam in the Rear Door.
Paper present jam within the rear door at the image area.
Media is present at registration sensor (PS4550) exceeding a allocated time limit.
* 13.B2.A1
This paper jam happens when the meida is at the registration sensor (PS45) see’s media present longer that the specified time allocated based on the media size when printing from Tray 1.
*13..B2.A2
This paper jam happens when the meida is at the registration sensor (PS45) see’s media present longer that the specified time allocated based on the media size when printing from Tray 2.
*13.B2.A3
This paper jam happens when the meida is at the registration sensor (PS45) see’s media present longer that the specified time allocated based on the media size when printing from Tray 3.
*13.B2.AD
This paper jam happens when the meida is at the registration sensor (PS45) see’s media present longer that the specified time allocated based on the media size when printing froM Duplexing unit.
Suggested Steps.
1. Remove Paper Jam
a. Open Rear Door
b. Search for and remove any paper (media) behind the primary transfer assembly, and also look behind the lower jam access cover.
2. Make sure the media type and quality of the paper (media) being utilized meets with HP specifications usage with the HP Laserjet M607, M608, M609
If the problem continues, please contact Printer Repair Experts – Customer Care for further assistance. (888) 276-4666.
13.B2.D1 Paper Jam in rear door
Paper Delay Paper Jam within the rear door at the imaging area.
Media passed Tray 1 Feed Sensor (PS4750) and did not arrive at the registration sensor within the allocated length of time when printing from Tray 1.
Suggested Steps.
1. Remove Paper Jam
a. Open Rear Door
b. Search for and remove any paper (media) behind the primary transfer assembly, and also look behind the lower jam access cover.
c. Close Rear door to give printer chance to clear paper jam message.
2. Make sure the media type and quality of the paper (media) being utilized meets with HP specifications usage with the HP Laserjet M607, M608, M609
3. Examine the Tray 1 paper pickup, feed separation rollers are correctly installed. Make sure they do not show dirty or any wear and tear (damage)
4. 5. Replace Feed / Separation roller and pickup roller.
If the problem continues, please contact Printer Repair Experts – Customer Care for further assistance. (888) 276-4666
13.B2.D2 Paper Jam in Rear Door
Paper Delary paper Jam within the image area
Paper (media) does not arrive at the registration sensor within the allocated time whenever printingfrom Tray 2
1. Completely remove tray 2 paper cassette tray from printer.
2. Makre Sure the Orange plastic shipping lock are removed.
Images shows paper cassette tray shipping locks
3. Take out any damaged or jammed media from the paper tray.
4. Look out for any paper jams within the HP Laserjet M607, M608, M609.
5. Verify the media type and quality being used meets the HP Specifications for being used with the HP Laserjet M607, M608, M609.
6. Examine the event logs from the HP Laserjet M607, M608, M609 for any occurance of 53.B0.0z. If the event logs shows this error code, this means the feed / separation roller are near end of life and will need replacing.
If the B2.B0.0z error code show in the event log, replace the feed/separation roller for the tray.
7. Verify that the paper tray length and width guides are set to the proper paper size for media being used within the paper tray.
Media Guide Settings
8. Make sure the paper tray adheres the paper tray capacity specs or the stack of media within the paper tray is no above the cassette fill mark (you will see line below with three triangles). See image below
Media Height Guides
Shown Over Filled paper cassette tray.
9. Disconnect power plug from rear of printer and spin printer so that the rear door of the Laserjet printer is in front of you.
10. Open Rear Door and remove any jammed paper or blockage within the printer.
11. Lift up the primary transfer assembly.
Shown Lift Transfer Assembly
12. P:ull the green tabs found in the upper left hand side to open the lower access cover.
Shown Lower Access Cover
13. If the paper jam is noticable within the lower access cover, remove the paper jam by pulling it straight out of the printer.
14. Verify the rollers are installed correctly.
* If the flap of the blue rollers is in the down position, then the rollers are incorrectly installed.
Note:
If the blue flap is in the down position, this will create a paper jam error 13.B2.D2 and / or a Tray 2 Overfilled roller issue error code.
* If the flap of the blue rollers is in the up position, then the rollers are correctly installed.
Shown Feed Roller Flap down position (installed incorrectly)
Shown Feed Roller — Flap in the up position (Installed correctly)
15. If the roller show damage or worn out, replace the rolelrs.
Shown Worn Rollers16. Reinstall Tray 2If the problem continues, please contact Printer Repair Experts – Customer Care for further assistance. (888) 276-466613.B2.Dz Jam in Tray X
Paper Delay Paper Jam along the Image Area.
Paper did not arrive at the registration sensor (PS4550) within allocated time when printing from an optiona paper tray.
* 13.B2.D3 Jam while priting from Tray 3
* 13.B2.D4 Jam while priting from Tray 4
* 13.B2.D5 Jam while priting from Tray 5
* 13.B2.D6 Jam while priting from Tray 6
Suggested Steps
1. Completely remove tray 2 paper cassette tray from printer.
2. Makre Sure the Orange plastic shipping lock are removed.
Images shows paper cassette tray shipping locks
3. Take out any damaged or jammed media from the paper tray.
4. Look out for any paper jams within the HP Laserjet M607, M608, M609.
5. Verify the media type and quality being used meets the HP Specifications for being used with the HP Laserjet M607, M608, M609.
6. Examine the event logs from the HP Laserjet M607, M608, M609 for any occurance of 53.B0.0z. If the event logs shows this error code, this means the feed / separation roller are near end of life and will need replacing.
If the B2.B0.0z error code show in the event log, replace the feed/separation roller for the tray.
7. Verify that the paper tray length and width guides are set to the proper paper size for media being used within the paper tray.
Media Guide Settings
8. Make sure the paper tray adheres the paper tray capacity specs or the stack of media within the paper tray is no above the cassette fill mark (you will see line below with three triangles). See image below
Media Height Guides
Shown Over Filled paper cassette tray.
9. Disconnect power plug from rear of printer and spin printer so that the rear door of the Laserjet printer is in front of you.
10. Open Rear Door and remove any jammed paper or blockage within the printer.
11. Lift up the primary transfer assembly.
Shown Lift Transfer Assembly
12. P:ull the green tabs found in the upper left hand side to open the lower access cover.
Shown Lower Access Cover
13. If the paper jam is noticable within the lower access cover, remove the paper jam by pulling it straight out of the printer.
14. Verify the rollers are installed correctly.
* If the flap of the blue rollers is in the down position, then the rollers are incorrectly installed.
Note:
If the blue flap is in the down position, this will create a paper jam error 13.B2.D2 and / or a Tray 2 Overfilled roller issue error code.
* If the flap of the blue rollers is in the up position, then the rollers are correctly installed.
Shown Feed Roller Flap down position (installed incorrectly)
Shown Feed Roller — Flap in the up position (Installed correctly)
15. If the roller show damage or worn out, replace the rolelrs.
Shown New Roller Surface
16. Reinstall Tray 2
If the problem continues, please contact Printer Repair Experts – Customer Care for further assistance. (888) 276-4666
13.B2.FF Paper Jam in rear door
Paper Present Jam at the Image area.
Media was present at PS4550, when printer was powered up or after removing a paper jam.
Suggested Steps.
1. Remove the jammed papper
a. Open up rear door.
b. Search for any visible paper jams or blockage within the paper path.
c. Close the rear door to let printer try to clear the Paper Jam error code.
d. Replace fuser Assembly.
If the problem continues, please contact Printer Repair Experts – Customer Care for further assistance. (888) 276-4666 13.B9.Az Fuser Jam
Paper present jam within the fuser area.
The paper Jam can be caused by
* Accordian style media jam at the Exit area (fuser)
* Object opbsturcting the paper before arriving the output rollers
* The Output Bin Rollers are not spinning. Since there is minimal distance from the fusing exit to the output bin, media stopped at the rollers may cause a fuser paper jam.
* A fuser flag that doesn’t move freely (sticky). If the fuser flag is delayed briefly or Not moving (stuck) in the ativated position will cause a paper jam.
* 13.B9.A1 A dectection of a paper jam when printing from Tray 1
* 13.B9.A2 A dectection of a paper jam when printing from Tray 2
* 13.B9.A3 A dectection of a paper jam when printing from Tray 3
* 13.B9.A4 A dectection of a paper jam when printing from Tray 4
* 13.B9.A5 A dectection of a paper jam when printing from Tray 5
* 13.B9.AD A dectection of a paper jam when printing from Duplexer.
Suggested Steps
1. Remove the jammed papper
a. Open up rear door.
b. Search for any visible paper jams or blockage within the paper path.
c. Close the rear door to let printer try to clear the Paper Jam error code.
d. Replace fuser Assembly.
2. Make sure the media type and quality of the paper (media) being utilized meets with HP specifications usage with the HP Laserjet M607, M608, M609.
3. Replace the Fuser Assembly as needed.
4. Replace DC Controller
If the problem continues, please contact Printer Repair Experts – Customer Care for further assistance. (888) 276-4666 13.B9.Cz
Fuser Wrap Paper Jam
This paper jam happens when the media vanishes from the fuser output sensor before a specified amount of time after media arrives at fuser output sensor.
This condition happens with the paper wraps around the fuser roller.
* 13.B9.C1 Fuser wrap paper jam with Auto Sense (Normal).
* 13.B9.C2 Fuser wrap paper jam with Normal.
* 13.B9.C3 Fuser wrap paer jam with Light 1 or Light 2.
* 13.B9.C4 Fuser wrap paper jam with Heavy 1.
* 13.B9.C5 Fuser wrap paper jam with Heavy 2.
* 13.B9.C6 Fuser wrap paper jam with Heavy Paper 3.
* 13.B9.C7 Fuser wrap paper jam with Glossy Paper 1.
* 13.B9.C8 Fuser wrap paper jam with Glossy Paper 2.
* 13.B9.C9 Fuser wrap paper jam with Glossy Paper 3.
* 13.B9.CB Fuser wrap paper jam with Transparency.
* 13.B9.CC Fuser wrap paper jam with Label.
* 13.B9.CD Fuser wrap paper jam with Envelope 1 or Envelope 2.
Suggested Steps
1. Remove Paper Jam
a. Open the rear door.
b. Take out the fuser assembly, and take out any pape wrapped around one of the fuser rollers.
Caution
Fuser may be HOT. c. Search for and remove any visible paper or blackage within the paper feed path.
d. Reseat (Install) Fuser Assembly.
e. Shut the rear door to give the printer a chance to clear the displayed paper jam message.
2. Print out a cleaning page, to make sure all toner residue is removed from the fuser rollers.
3. Make sure the media type and quality of the paper (media) being utilized meets with HP specifications usage with the HP Laserjet M607, M608, M609.
4. Replace Fuser Assembly as needed.
13.E1.D3 Fuser Area Jam
Output delivery delay paper jam. Media did not arrive at the output bin full sensor within allocated time frame.
Suggested Steps
1. Follow along directives displayed on the printer control panel to remove the paper jam. Search for paper in all paper jam locations.
2. Make sure no doors are open.
3. Verify that the media is loaded correctly within each paper tray.
4. Make sure the media type and quality of the paper (media) being utilized meets with HP specifications usage with the HP Laserjet M607, M608, M609.
5. Replace rollers that show wear.
6. Open all covers and doors to verify the paper feed path has no paper or blockage.
7. If the printer displays error 59. install toner cartridge. Reinstall toner cartridge.
8. If the 59 error shows again after reinstalling toner cartridge, Replace toner cartridge.
9. Replace developing drive assembly.
13.E1.Dz
Output Delivery delay Paper Jam. Paper did not arrive at the output bin full sensor on time.
* 13.E1.D1 The fuser is printing utilizing fuser mode Auto Sense special case distinguished from «typed» Normal.
* 13.E1.D2 The fuser is printing utilizing fuser mode Normal.
* 13.E1.D3 The fuser is printing utilizing fuser mode Light 1 or Light 2.
* 13.E1.D4 The fuser is printing utilizing fuser mode Heavy 1.
* 13.E1.D5 The fuser is printing utilizing fuser mode Heavy 2.
* 13.E1.D6 The fuser is printing utilizing fuser mode Heavy Paper 3.
* 13.E1.D7 The fuser is printing utilizing fuser mode Glossy Paper 1.
* 13.E1.D8 The fuser is printing utilizing fuser mode Glossy Paper 2.
* 13.E1.D9 The fuser is printing utilizing fuser mode Glossy Paper 3.
Suggested Steps
1. Remove the jammed papper
a. Open up rear door.
b. Search for any visible paper jams or blockage within the paper path.
c. Close the upper right door to let printer try to clear the Paper Jam error code.
2. Check Delivery rollers for wear and tear or damage (debris).
3. Replace Fuser Assembly if needed
4. Replace Delivery Assembly.
If the problem continues, please contact Printer Repair Experts – Customer Care for further assistance. (888) 276-4666
13.FF.FF
Power up Paper Present jam has happened.
This specific error code has no direct sensor assigned. All ‘sensors are supsect within the paper path.
Suggested Steps
1. Remove the jammed papper
a. Open up rear door.
b. Search for any visible paper jams or blockage within the paper path.
c. Close the upper right door to let printer try to clear the Paper Jam error code.
2. Check Delivery rollers for wear and tear or damage (debris).
If the problem continues, please contact Printer Repair Experts – Customer Care for further assistance. (888) 276-4666 13.60.Az
Paper Present Jam within the inner rear door of the Multi-Bin Mailbox (MBM). The media is stopped at the MBM entry sensor.
13.60.Dz
Paper Delay paper jam within inner rear door of the Multi-Bin Mailbox (MBM). The media did not arrive at the MBM entery sensor is the allocated time frame.
13.60.5z
«Paper is too short» media jam within inner rear door or within the Multi-Bin MailBox (MBM).
13.60.6z
Inter page gap paper jam inside inner rear door or Multi-Bin Mailbox (MBM)
13.60.F0
Media jam inside inner rear door of the MBM (Multi-Bin MailBox)
* 13.60.A0 Jam printing unknown output bin.
* 13.60.A1 Jam printing to output Bin 1.
* 13.60.A2 Jam printing to output Bin 2.
* 13.60.A3 Jam printing to output Bin 3.
* 13.60.A4 Jam printing to output Bin 4.
* 13.60.A5 Jam printing to output Bin 5.
* 13.60.D0 Jam printing unknown output bin.
* 13.60.D1 Jam printing to output Bin 1.
* 13.60.D2 Jam printing to output Bin 2.
* 13.60.D3 Jam printing to output Bin 3.
* 13.60.D4 Jam printing to output Bin 4.
* 13.60.D5 Jam printing to output Bin 5.
* 13.60.51 A jam is detected when printing to output 1.
* 13.60.52 A jam is detected when printing to output Tray 2.
* 13.60.53 A jam is detected when printing from Tray 3.
* 13.60.54 A jam is detected when printing from Tray 4.
* 13.60.55 A jam is detected when printing from Tray 5.
* 13.60.5D A jam is detected when printing from the duplexer.
* 13.60.61 A jam is detected when printing to output 1.
* 13.60.62 A jam is detected when printing to outpuy Tray 2.
* 13.60.63 A jam is detected when printing from Tray 3.
* 13.60.64 A jam is detected when printing from Tray 4.
* 13.60.65 A jam is detected when printing from Tray 5.
* 13.60.6D A jam is detected when printing from the duplexer.
1. Remove paper jam
a. Open up output device inner rear door.
b. Remove all paper jams
c. Close the output device innder rear door.
d. Open Printer rear door.
e. Remove Fuser Assemlby
Caution
Fuser may be HOT.
f. Remove any paper jams within printer.
g. Reinstall fuser Assembly
h. Close rear door.
2. Replace inner cover bottom assembly.
If the problem continues, please contact Printer Repair Experts – Customer Care for further assistance. (888) 276-4666
Hours Of Operations | Monday — Friday 9:00AM- 5:00PM | Saturday & Sunday Closed
Email: info@printer-repair-experts.net
Forms of Payment we Accept
Hours of Operations
Hours Of Operations | Monday — Friday 9:00AM- 5:00PM | Saturday & Sunday Closed
Telephone (888) 276-4666
Email: info@printer-repair-experts.net
Paper Jam Error 13.a1.ff, 13.a2.ff, 13.a2.d2, 13.a3.ff and 13.b2.d2 on M601, M602, M603, M604, M605, M606, M607, M608, M609, M610, M611 and M612
Paper Jam errors on LaserJet 600 M601, M602, M603, M604, M605, M606, M607, M608, M609, M610, M611 and M612
- Paper jam error has occurred on Laserjet 600 printer.
- Paper jam 13.00.00 is a generic paper jam event code..
- Paper jam error 13.00.EE unknown door open jam
- HP printer paper jam error 13.A3.FF
- Laserjet 13.D3.DZ late to duplex re-feed jam
- HP paper jam error 13.D3.D1 paper jam
- Laserjet paper jam error 13.D3.D2, 13.D3.D3, 13.D3.D4, 13.D3.D5, 13.D3,D6 paper jams
- HP printer paper jam error 13.D3.DD, and 13.D3.De
- HP printer with paper jam error 13.E5.FF power on jam has occurred
- Paper jam error 13.EA.EE door jam
- Paper jam error 13.EE.FF power on jam
- HP paper jam error 13.FF.EE door Jam has occurred
- Paper jam error 13.FF.FF power on paper jam
- HP printer paper jam 13.WX.EE jam occurs when door is opened during printing
- HP Laserjet 13.WX.FF power on residual paper jam this jam occurs when paper exits on any of the paper path jam sensors at power on door close.
- Paper jam error 13.WX/YZ paper jam in the fuser area
- Laserjet printer 13.WX.YZ paper Jam below the control panel
- HP printer 13.B2.9Z page at duplex switch-back jam Z= source of the tray
- Paper jam error 13.B2.D1 late to registration jam, from tray1 when the paper does not reach the top sensor in designated amount of time from the start of paper pickup when printing from tray 1and duplex
- HP printer with 13.WX.YZ paper jam error in the tray
- Laserjet printer with 13.WX jam inside envelope feeder.
- Laserjet error 13.WX.YZ jam inside top cover
Clearing Paper Jams Laserjet 600 M601, M602, M603, M604, M605, M606, M607, M608, M609, M610, M611 and M612
When clearing jams, be very careful not to tear jammed paper. If a small piece of paper is left in the product, it could cause additional jams.
Figure : Potential jam locations

-
Top-cover and print-cartridge areas
-
Optional envelope feeder
-
Tray areas (Tray 1, Tray 2, and optional trays)
-
Optional duplex paper jam
-
Fuser area paper jams
-
Output areas (top bin; rear bin; and optional stacker, stapler stacker, or 5-bin mailbox)
Paper Jam in the Fuser on HP Laser-jet Enterprise 600 M601, M602, M603
HP Laser-jet Enterprise 600 M601, M602, M603 – 13.B9 jam error in the fuser
13.B9 jam error in the fuser
Use the following procedure to clear a paper jam in the fuser. When a jam occurs, the control panel displays a message and an animation that assists in clearing the jam.
-
13.B9.Az Fuser jam
-
13.B9.Bz Fuser jam
-
13.B9.Dz
HP Laserjet Enterprise M604, M605, M606 — 13.a2.d Jam Error Tray 2 and the 500-sheet Trays
13.A2.D jam error tray 2 and the 500-sheet trays
Use the following procedure to check for paper in all possible jam locations related to Tray 2 and the 500-sheet trays. When a jam occurs, the control panel might display a message and an animation that assists in clearing the jam.
-
13.A2.D2
-
13.A2.Dz
-
Pull the tray completely out of the printer by pulling and lifting it up slightly.
Figure : Remove the tray
-
If the edge of the jammed paper is visible in the feed area, slowly pull the paper down and toward the back of the printer. Then pull it out of the printer. (Do not pull the paper straight out, or it will tear.) If the paper is not visible, look in the next tray or in the top-cover area.
Figure : Remove the jammed paper


HP Laserjet M607-m612, E60055-e60075, E60155-e60175 — 13.b9, 13.b2, 13.ff Jam Error in the Rear Door and Fuser Area
13.B9, 13.B2, 13.FF jam error in the rear door and fuser area
Use the following procedure to clear paper jams in the rear door and fuser area. When a jam occurs, the control panel displays a message and an animation that assists in clearing the jam.
-
13.B2.XX Jam in <cover or door>
-
13.B9.XX Jam in Fuser
-
13.FF
-
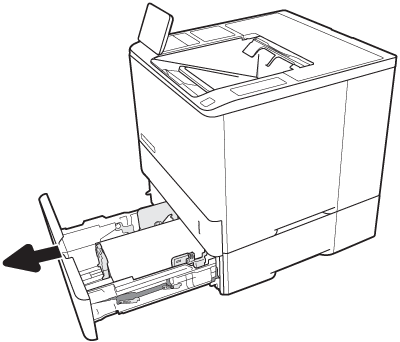
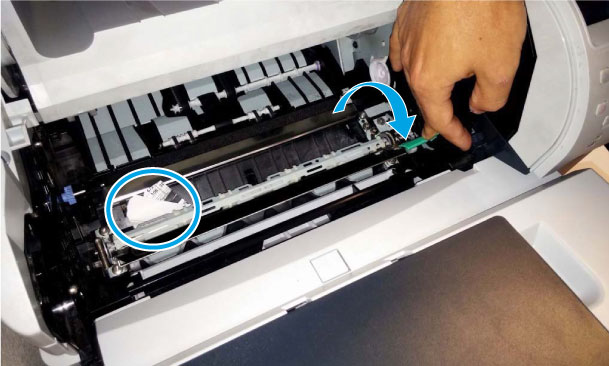
Pull Tray 2 completely out of the printer by pulling and lifting it up slightly.
Figure : Open and pull Tray 2 out of the printer
-
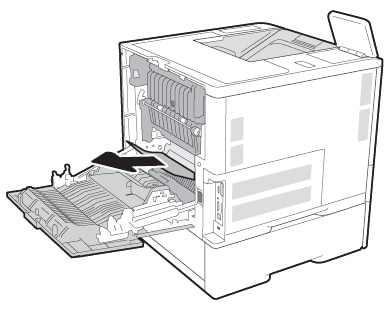
Open the rear door.
Figure : Open the rear door
-
Remove any jammed paper from inside the rear door.
Figure : Remove any jammed paper from inside the rear door

HP M607/m608/m609/m610/m611/m612/e60055/e60065/e6007513.b2.d2, 41.03.or 13.b2.d2 Jam in Rear Door Message Displays on the Printer Control Panel
When a paper jam occurs inside the rear door (or fuser area) in the printer a message will display on the printer control panel.
-
13.B2.D2 Jam in rear door

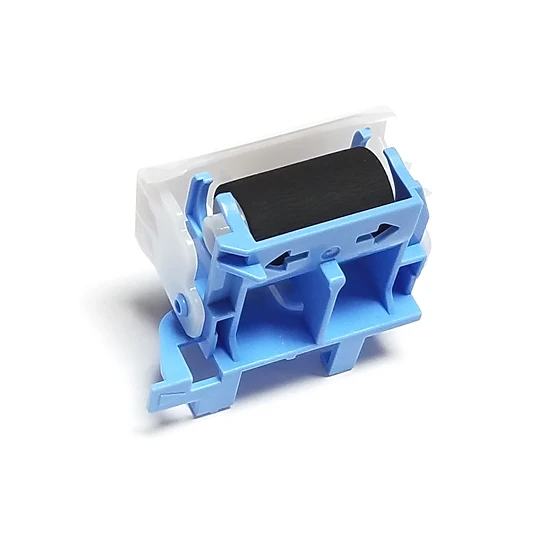
How To Solve The 13.B2.D2 Error Code or Tray 2 Overfill Message On HP Laser Printers

RM2-1275 paper pickup roller assembly
-
Remove the 500 sheet paper tray.
-
Open roller access cover to inspect the position of the separation roller.
-
Replace the RM2-6772 separation roller by sliding to the right so it locks into place.
-
Inspect the position of the paper pickup roller assembly.
-
replace the RM2-1275 paper pickup roller assembly so it locks into place.
-
Test the roller engaging arm which is a white lever located to the left of the separation roller assembly.
-
Test the paper out sensor arm which is a white lever located to the right of the separation roller assembly.
-
Test them by hand by pressing them gently.
-
If with either arm is inoperative the entire paper pickup assembly will need to be replaced.
Laserjet M607, M608 and M609 paper jam error codes we repair
- Error: 13.00.00 Generic jam event code.
- Error: 13.00.EE Unknown door open
- 13.A3.FF Power on jam at the Tray 3 feed sensor.
- 13.B2.9Z Page at duplex switchback jam. Z = the source tray number
- 13.B2.D1 Late to registration jam, from Tray 1 This jam occurs when the paper does not reach the top sensor in designated amount of time from the start of paper pickup at printing from Tray 1 and duplex printing.
- 13.D3.DZ Late to duplex re-feed jam
- 13.E5.FF and 13.EE.FF A power on jam has occurred.
- 13.EA.EE and 13.FF.EE A door jam has occurred.
- Error: 13.FF.FF A power on residual paper jam has occurred (sensor).
- Error: 13.WX.EE This jam occurs when a door is opened during printing.
- Error: 13.WX.FF Power on residual paper jam This jam occurs when the paper exists at any of the paper path jam sensors at power on or door close. Due to the current FW timing requirements, the displayed jam code is always 13.FF.FF, only the event log will have 13.WX.FF
- Error: 13.WX.YZ A jam in the fuser area has occurred.
- Error: 13.WX.YZ Fuser wrap jam
- Error: 13.WX.YZ A misfeed jam has occurred.
- Error: 13.WX.YZ A jam exists inside the envelope feeder.
- Error: 13.WX.YZ Jam inside envelope feeder A jam exists inside the envelope feeder.
- Error: 13.WX.YZ Jam inside top cover A jam exists inside the top cover.
HP Laserjet Enterprise M601, M602, M603, M604, M605 and M606 — 13.a2.ff, 13.a3.ff, 13.b2.ff Errors
Residual paper jam. This error appears when a piece of paper stays in the paper path and the printer is unable to eject it automatically.
Solution:
-
Remove the paper cassettes and the toner cartridge and thoroughly inspect the paper path for remnants of paper.
-
Lift the registration roller plate and look for pieces of paper.
-
Remove the paper from the tray and check that the paper tray size guides are properly set and that the tray is not over filled with paper.
Figure : Paper tray media size guides
Laserjet M607, M608 and M609 13.00, 13.00.ee Paper Jam Error Codes We Repair
- Error: 13.00.00 Generic jam event code.
- Error: 13.00.EE Unknown door open
- 13.A3.FF Power on jam at the Tray 3 feed sensor.
- 13.B2.9Z Page at duplex switchback jam. Z = the source tray number
- 13.B2.D1 Late to registration jam, from Tray 1 This jam occurs when the paper does not reach the top sensor in designated amount of time from the start of paper pickup at printing from Tray 1 and duplex printing.
- 13.D3.DZ Late to duplex re-feed jam
- 13.E5.FF and 13.EE.FF A power on jam has occurred.
- 13.EA.EE and 13.FF.EE A door jam has occurred.
- Error: 13.FF.FF A power on residual paper jam has occurred (sensor).
- Error: 13.WX.EE This jam occurs when a door is opened during printing.
- Error: 13.WX.FF Power on residual paper jam This jam occurs when the paper exists at any of the paper path jam sensors at power on or door close. Due to the current FW timing requirements, the displayed jam code is always 13.FF.FF, only the event log will have 13.WX.FF
- Error: 13.WX.YZ A jam in the fuser area has occurred.
- Error: 13.WX.YZ Fuser wrap jam
- Error: 13.WX.YZ A misfeed jam has occurred.
- Error: 13.WX.YZ A jam exists inside the envelope feeder.
- Error: 13.WX.YZ Jam inside envelope feeder A jam exists inside the envelope feeder.
- Error: 13.WX.YZ Jam inside top cover A jam exists inside the top cover.
HP LaserJet printer repair & service in Orange County, OC, Los Angeles, L.A and San Bernardino by zip codes!
A
90009 Airport Worldway (City of LA)
91802 Alhambra
91803 Alhambra
91801 Alhambra Printer Repair
92656 Aliso Viejo
92698 Aliso Viejo
91001 Altadena
92802 Anaheim
92803 Anaheim
92804 Anaheim
92805 Anaheim
92806 Anaheim
92807 Anaheim
92808 Anaheim
92809 Anaheim
92812 Anaheim
92814 Anaheim
92815 Anaheim
92816 Anaheim
92817 Anaheim
92825 Anaheim
90281 Anaheim Priner Repair
91006 Arcadia
91007 Arcadia
90071 ARCO Towers (City of LA)
91331 Arleta (City of LA)
90680 Artesia
90044 Athens
90039 Atwater Village (City of LA)
92811 Atwood
90704 Avalon
91702 Azusa
B
90008 Baldwin Hills
91706 Baldwin Park
91746 Bassett
90049 Bel Air Estates (City of LA)
90077 Bel Air Estates (City of LA)
90201 Bell
90202 Bell Gardens
90706 Bellflower
90210 Beverly Glen (City of LA
90077 Beverly Glen (City of LA)
90212 Beverly Hills
90210 Beverly Hills Printer Repair
90639 Biola Univ. (La Mirada)
92316 Bloomington
90033 Boyle Heights (City of LA)
92821 Brea
92822 Brea
92823 Brea
90049 Brentwood (City of LA)
90620 Buena Park
90621 Buena Park
90622 Buena Park
91501 Burbank
91502 Burbank
91506 Burbank
91504 Burbank (Glenoaks)
91510 Burbank (Woodbury Univ.)
C
90747 Cal State Dominguez Hills
90840 Cal State Long Beach
91330 Cal State Northridge (City of
91125 Cal Tech (Pasadena)
91126 Cal Tech (Pasadena)
91303 Canoga Park (City of LA)
91304 Canoga Park (City of LA)
90624 Capistrano Beach
90746 Carcon
90747 Carson
90745 Carson Printer Repair
90810 Carson/Long Beach
90067 Century City (City of LA)
90701 Cerritos
90702 Cerritos
90703 Cerritos
91311 Chatsworth (City of LA)
90064 Cheviot Hills (City of LA)
90012 Chinatown (City of LA)
91708 Chino
91710 Chino
91709 Chino Hills
90063 City Terrace
90012 Civic Center (City of LA)
91711 Claremont
92324 Colton
90040 Commerce, City of
90220 Compton
90221 Compton
90222 Compton
92877 Corona
92878 Corona
92879 Corona
92880 Corona
92881 Corona
92882 Corona
92883 Corona
92625 Corona Del Mar
92626 Costa Mesa
92627 Costa Mesa
92628 Costa Mesa
90019 Country Club Park (City of LA)
91722 Covina
91723 Covina
91724 Covina 91722-91724
90008 Crenshaw (City of LA)
90201 Cudahy
90231 Culver City
90232 Culver City
90230 Culver City Printer Repair
90630 Cypress
90065 Cypress Park (City of LA)
D
92629 Dana Point
91789 Diamond Bar
91765 Diamond Bar Printer Repair
90747 Dominguez Hills, Cal State
90240 Downey
90241 Downey
90242 Downey
90013 Downtown L.A. (City of LA)
90014 Downtown L.A. (City of LA)
90015 Downtown L.A. (City of LA)
90016 Downtown L.A. (City of LA)
90017 Downtown L.A. (City of LA)
90021 Downtown L.A. (City of LA)
E
90041 Eagle Rock (City of LA)
92650 East Irvine
90022 East Los Angeles
90023 East Los Angeles (City of LA)
90221 East Rancho Dominguez
90026 Echo Park (City of LA)
93523 Edwards AFB
91731 El Monte
91732 El Monte
90245 El Segundo
90032 El Sereno (City of LA)
92809 El Toro
91316 Encino (City of LA)
91436 Encino (City of LA)
F
90261 Federal Bldg (Lawndale)
92621 Firestone Boy Scout Res.
90001 Florence
92331 Fontana
92334 Fontana
92335 Fontana
92336 Fontana
92337 Fontana
92610 Foothill Ranch
92728 Fountain Valle
92708 Fountain Valley
92832 Fullerton
92833 Fullerton
92834 Fullerton
92835 Fullerton
92836 Fullerton
92837 Fullerton
92838 Fullerton
92831 Fullerton Printer Repair
G
92841 Garden Grove
92842 Garden Grove
92843 Garden Grove
92844 Garden Grove
92845 Garden Grove
92846 Garden Grove
92840 Garden Grove Printer Repair
90247 Gardena
90248 Gardena
90249 Gardena
90065 Glassell Park (City of LA)
91201 Glendale
91208 Glendale
91205 Glendale
91205 Glendale
91214 Glendale (La Crescenta)
91204 Glendale (Tropico)
91046 Glendale (Verdugo City)
91740 Glendora
91741 Glendora
91504 Glenoaks (Burbank)
91344 Granada Hills (City of LA)
92313 Grand Terrace
92324 Grand Terrace
90027 Griffith Park (City of LA)
91743 Guasti
H
91745 Hacienda Heights
90004 Hancock Park (City of LA)
90020 Hancock Park (City of LA)
90710 Harbor City (City of LA)
90716 Hawaiian Gardens
90250 Hawthorne (Holly Park)
90254 Hermosa Beach
92340 Hesperia
92344 Hesperia
92345 Hesperia
93535 Hi Vista
91302 Hidden Hills
92346 highland
90042 Highland Park (City of LA)
90028 Hollywood (City of LA)
90029 Hollywood (City of LA)
90038 Hollywood (City of LA)
90068 Hollywood (City of LA)
92605 Huntington Beach
92615 Huntington Beach
92646 Huntington Beach
92647 Huntington Beach
92648 Huntington Beach
92649 Huntington Beach
90255 Huntington Park
90043 Hyde Park (City of LA)
I
91744 Industry, City of
91746 Industry, City of
91789 Industry, City of
90303 Inglewood
90305 Inglewood
90301 Inglewood Printer
92604 Irvine
92605 Irvine
92612 Irvine
92613 Irvine
92616 Irvine
92618 Irvine
92619 Irvine
92620 Irvine
92623 Irvine
92627 Irvine
92709 Irvine
92710 Irvine
92603 Irvine printer repair
91706 Irwindale
J
90018 Jefferson Park (City of LA)
K
90005 Koreatown (City of LA)
L
91011 La Canada-Flintridge
91214 La Crescenta (Glendale)
90632 La Habra
90633 La Habra
90633 La Habra
90631 La Habra Heights
90631 La Habra Printer Repair
90638 La Mirada
90639 La Mirada (Biola Univ.)
91744 La Puente
91746 La Puente
91745 La Puente (Hacienda Heights)
91748 La Puente (Rowland Heights)
91750 La Verne
91756 Ladera Heights (City of LA)
92694 Ladera Ranch
92651 Laguna Beach
92652 Laguna Beach
92637 Laguna Hills
92653 Laguna Hills
92654 Laguna Hills
92607 Laguna Niguel
92677 Laguna Niguel
92630 Lake Forest
93532 Lake Hughes
93550 Lake Los Angeles
93591 Lake Los Angeles
91342 Lake View Terrace (City of LA)
90712 Lakewood
90713 Lakewood
93534 Lancaster
93536 Lancaster
90260 Lawndale
90261 Lawndale (Federal Bldg)
90045 LAX Area (City of LA)
90008 Leimert Park (City of LA)
90304 Lennox
93543 Littlerock
93544 Llano
92350 Loma Linda
92354 Loma Linda
92357 Loma Linda
90717 Lomita
90832 Long Beach
90804 Long Beach
90805 Long Beach
90806 Long Beach
90807 Long Beach
90810 Long Beach
90813 Long Beach
90814 Long Beach
90815 Long Beach
90822 Long Beach
90840 Long Beach (Cal State Long Bea
90846 Long Beach (McDonnell Douglas)
90805 Long Beach (North Long Beach)
90832 Long Beach (World Trace Ctr)
90831 Long Beach (World Trade Center
90803 Long Beach HP Printer Repair
90802 Long Beach Printer Repair
90720 Los Alamitos
90721 Los Alamitos
91402 Los Angeles
91403 Los Angeles
91444 Los Angeles
91405 Los Angeles
91411 Los Angeles
91423 Los Angeles
90020 Los Angeles
90039 Los Angeles
90068 Los Angeles
91602 Los Angeles
91603 Los Angeles
91604 Los Angeles
91607 Los Angeles
91325 Los Angeles
90732 Los Angeles
91423 Los Angeles
90003 Los Angeles
90007 Los Angeles
90011 Los Angeles
90037 Los Angeles
90047 Los Angeles
90061 Los Angeles
90062 Los Angeles
91042 Los Angeles
90059 Los Angeles
91365 Los Angeles
91366 Los Angeles
91367 Los Angeles
90009 Los Angeles (Airport World way
90071 Los Angeles (ARCO Towers)
91331 Los Angeles (Arleta)
90039 Los Angeles (Atwater Village)
90049 Los Angeles (Bel Air Estates)
90077 Los Angeles (Bel Air Estates)
90077 Los Angeles (Beverly Glen)
90210 Los Angeles (Beverly Glen)
90033 Los Angeles (Boyle Heights)
90049 Los Angeles (Brentwood)
91330 Los Angeles (Cal State Northri
91303 Los Angeles (Canoga Park)
91304 Los Angeles (Canoga Park)
90067 Los Angeles (Century City)
91311 Los Angeles (Chatsworth)
90064 Los Angeles (Cheviot Hills)
90012 Los Angeles (Chinatown)
90019 Los Angeles (Country Club Park
90008 Los Angeles (Crenshaw)
90065 Los Angeles (Cypress Park)
90013 Los Angeles (Downtown)
90014 Los Angeles (Downtown)
90015 Los Angeles (Downtown)
90016 Los Angeles (Downtown)
90017 Los Angeles (Downtown)
90018 Los Angeles (Downtown)
90019 Los Angeles (Downtown)
90020 Los Angeles (Downtown)
90021 Los Angeles (Downtown)
90029 Los Angeles (Downtown)
90041 Los Angeles (Eagle Rock)
90023 Los Angeles (East Los Angeles)
90026 Los Angeles (Echo Park)
90032 Los Angeles (El Seraeno)
91316 Los Angeles (Encino)
90065 Los Angeles (Glassell Park)
91344 Los Angeles (Granada Hills)
90027 Los Angeles (Griffith Park)
90004 Los Angeles (Hancock Park)
90710 Los Angeles (Harbor City)
90042 Los Angeles (Highland Park)
90028 Los Angeles (Hollywood)
90043 Los Angeles (Hyde Park)
90018 Los Angeles (Jefferson Park)
90005 Los Angeles (Koreatown)
90056 Los Angeles (Ladera Heights)
91342 Los Angeles (Lake View Terrace
90045 Los Angeles (LAX Area)
90008 Los Angeles (Leimert Park)
90027 Los Angeles (Los Feliz)
90066 Los Angeles (Mar Vista)
90019 Los Angeles (Mid City)
91345 Los Angeles (Mission Hills)
90031 Los Angeles (Montecito Heights
90046 Los Angeles (Mount Olympus)
90065 Los Angeles (Mt. Washington)
91343 Los Angeles (North Hills)
91601 Los Angeles (North Hollywood)
91324 Los Angeles (Northridge)
90272 Los Angeles (Pacific Highlands
91331 Los Angeles (Pacoima)
90034 Los Angeles (Palms)
91402 Los Angeles (Panorama City)
90036 Los Angeles (Park La Brea)
90006 Los Angeles (Pico Heights)
90293 Los Angeles (Playa del Rey)
91326 Los Angeles (Porter Ranch)
90064 Los Angeles (Rancho Park)
91335 Los Angeles (Reseda)
91731 Los Angeles (San Pedro)
90025 Los Angeles (Sawtelle)
91040 Los Angeles (Shadow Hills)
91403 Los Angeles (Sherman Oaks)
90026 Los Angeles (Silverlake)
90001 Los Angeles (South Central)
91604 Los Angeles (Studio City)
91352 Los Angeles (Sun Valley)
91040 Los Angeles (Sunland)
91342 Los Angeles (Sylmar)
91356 Los Angeles (Tarzana)
90731 Los Angeles (Terminal Island)
91602 Los Angeles (Toluca Lake)
90089 Los Angeles (USC)
91607 Los Angeles (Valley Village)
91401 Los Angeles (Van Nuys)
90002 Los Angeles (Watts)
90016 Los Angeles (West Adams)
90048 Los Angeles (West Beverly)
90035 Los Angeles (West Fairfax)
91307 Los Angeles (West Hills)
90025 Los Angeles (West Los Angeles)
90045 Los Angeles (Westchester)
90057 Los Angeles (Westlake)
90024 Los Angeles (Westwood)
90744 Los Angeles (Wilmington)
90010 Los Angeles (Wilshire Blvd)
91306 Los Angeles (Winnetka)
91364 Los Angeles (Woodland Hills)
91436 Los Angeles Printer Repair
90027 Los Feliz (City of LA)
90606 Los Nietos /Whittie
90262 Lynwood
M
90266 Manhattan Beach
90066 Mar Vista (City of LA)
90292 Marina del Rey
90270 Maywood
90846 McDonnell Douglas (Long Beach)
90019 Mid City (City of LA)
92655 Midway City
91752 Mira Loma
91345 Mission Hills (City of LA)
92690 Mission Viejo
92691 Mission Viejo
92692 Mission Viejo
91016 Monrovia
91710 Montclair
91762 Montclair
91763 Montclair
90640 Montebello
90031 Montecito Heights (City of LA)
90032 Monterey Hills (City of LA)
91754 Monterey Park
91755 Monterey Park
91756 Monterey Park
91020 Montrose
92551 Moreno Valley
92552 Moreno Valley
92553 Moreno Valley
92554 Moreno Valley
92555 Moreno Valley
92556 Moreno Valley
92557 Moreno Valley
90046 Mount Olympus (City of LA)
91023 Mount Wilson
90065 Mt. Washington (City of LA)
N
91321 Newhall (Santa Clarita)
92658 Newport Beach
92659 Newport Beach
92660 Newport Beach
92661 Newport Beach
92662 Newport Beach
92663 Newport Beach
92657 Newport Coast
92860 Norco
91343 North Hills (City of LA)
91602 North Hollywood
91603 North Hollywood
91604 North Hollywood
91605 North Hollywood
91606 North Hollywood
91607 North Hollywood
91601 North Hollywood (City of LA)
90805 North Long Beach (Long Beach)
91325 Northridge
91324 Northridge (City of LA)
91330 Northridge, Cal State Univ
90650 Norwalk
O
91301 Oak Park
91710 Ontario
91758 Ontario
91761 Ontario
91762 Ontario
91764 Ontario
92857 Orange
92858 Orange
92862 Orange
92863 Orange
92864 Orange
92865 Orange
92866 Orange
92867 Orange
92868 Orange
92869 Orange
92856 Orange Printer Repair
P
90272 Pacific Highlands (City of LA)
91331 Pacoima (City of LA)
90034 Palms (City of LA)
90274 Palos Verdes Estates
91402 Panorama City (City of LA)
90723 Paramount
90036 Park La Brea (City of LA)
91102 Pasadena
91103 Pasadena
91104 Pasadena
91105 Pasadena
91106 Pasadena
91107 Pasadena
91125 Pasadena
91126 Pasadena (Cal Tech)
91101 Pasadena Printer Repair
92369 Patton
93553 Pearblossom
91766 Phillips Ranch
90006 Pico Heights (City of LA)
90660 Pico Rivera
92870 Placentia
92871 Placentia
90293 Playa del Rey (City of LA)
90094 Playa Vista (City of LA)
91766 Pomona
91767 Pomona
91768 Pomona
91328 Porter Ranch (City of LA)
R
91701 Rancho Cucamonga
91729 Rancho Cucamonga
91730 Rancho Cucamonga
91737 Rancho Cucamonga
91739 Rancho Cucamonga
90220 Rancho Dominguez
90275 Rancho Palos Verdes
90717 Rancho Palos Verdes
90732 Rancho Palos Verdes
90064 Rancho Park (City of LA)
92688 Rancho Santa Margarita
92373 Redlands
92374 Redlands
90277 Redondo Beach
90278 Redondo Beach
91335 Reseda (City of LA)
92376 Rialto
92377 Rialto
92501 Riverside
92502 Riverside
92504 Riverside
92505 Riverside
92506 Riverside
92507 Riverside
92509 Riverside
92513 Riverside
92514 Riverside
92515 Riverside
92516 Riverside
92517 Riverside
92518 Riverside
92519 Riverside
92521 Riverside
92522 Riverside
90274 Rolling Hills
91770 Rosemead
90222 Rosewood
91748 Rowland Heights (La Puente)
S
92405 San Barnardino
92404 San Bernardino
92672 San Clemente
92673 San Clemente
92674 San Clemente
91773 San Dimas
91340 San Fernando
91776 San Gabriel
91775 San Gabriel Printer Repair
92675 San Juan Capistrano
92693 San Juan Capistrano
91108 San Marino
90731 San Pedro
90732 San Pedro
90733 San Pedro (City of LA)
92701 Santa Ana
92702 Santa Ana
92703 Santa Ana
92704 Santa Ana
92705 Santa Ana
92706 Santa Ana
92706 Santa Ana
92707 Santa Ana
92711 Santa Ana
92712 Santa Ana
92725 Santa Ana
92735 Santa Ana
92799 Santa Ana
91355 Santa Clarita
91351 Santa Clarita (Canyon Country)
91321 Santa Clarita (Newhall)
91354 Santa Clarita (Valencia)
90670 Santa Fe Springs Printer Repai
90402 Santa Monica
90403 Santa Monica
90405 Santa Monica
90401 Santa Monica Printer Repair
91350 Saugus, Agua Dulce
90025 Sawtelle (City of LA)
90740 Seal Beach
91040 Shadow Hills (City of LA)
91423 Sherman Oaks
91403 Sherman Oaks (City of LA)
91024 Sierra Madre
90755 Signal Hill
92676 Silverado
90026 Silverlake (City of LA
90001 South Central (City of LA)
90003 South Central (City of LA)
90007 South Central (City of LA)
90011 South Central (City of LA)
90037 South Central (City of LA)
90047 South Central (City of LA)
90061 South Central (City of LA)
90062 South Central (City of LA)
91733 South El Monte
90280 South Gate
91030 South Pasadena
90605 South Whittier
90680 Stanton
91381 Stevenson Ranch
91604 Studio City (City of LA)
91352 Sun Valley (City of LA)
91040 Sunland (City of LA)
90742 Sunset Beach
90743 Surfside
91342 Sylmar (City of LA)
T
91356 Tarzana (City of LA)
91780 Temple City
90731 Terminal Island (City of LA)
91602 Toluca Lake (City of LA)
90290 Topanga
90502 Torrance
90503 Torrance
90504 Torrance
90505 Torrance
90506 Torrance
90277 Torrance
90278 Torrance
90501 Torrance Printer Repair
92678 Trabuco Canyon
92679 Trabuco Canyon
91204 Tropico (Glendale)
91042 Tujunga (City of LA)
92780 Tustin
92781 Tustin
92782 Tustin
U
91608 Universal City
91785 Upland
91786 Upland91355 Valencia
90089 USC (City of LA)
V
90073 VA Hospital (Sawtelle)
91744 Valinda
91607 Valley Village (City of LA)
93563 Valyermo
91403 Van Nuys
91405 Van Nuys
91406 Van Nuys
91411 Van Nuys
91423 Van Nuys
91401 Van Nuys (City of LA)
90291 Venice (City of LA)
91046 Verdugo City (Glendale)
90058 Vernon
90043 View Park
92861 Villa Park
W
91789 Walnut
90255 Walnut Park
90059 Watts
90002 Watts (City of LA)
90016 West Adams (City of LA)
90048 West Beverly (City of LA)
91790 West Covina
91792 West Covina
91793 West Covina
90035 West Fairfax (City of LA
91307 West Hills (City of LA)
90069 West Hollywood
90025 West Los Angeles (City of LA)
90045 Westchester (City of LA)
92683 Westminster
92684 Westminster
92685 Westminster
90024 Westwood (City of LA)
90601 Whittier
90602 Whittier
90603 Whittier
90604 Whittier
90605 Whittier
90608 Whittier (Whittier College)
90059 Willowbrook
90222 Willowbrook
90744 Wilmington (City of LA)
90010 Wilshire Blvd (City of LA)
90043 Windsor Hills
91306 Winnetka (City of LA)
91510 Woodbury Univ. (Burbank)
91364 Woodland Hills
91365 Woodland Hills
91366 Woodland Hills
91367 Woodland Hills
90831 World Trade Center (LongBeach)
Y
92885 Yorba Linda
92886 Yorba Linda
92887 Yorba Linda9
Relevant to the HP LaserJet M601 and M602
13.AA.FF / 13.A2.FF Paper Jam Error
The 13.AA.FF / 13.A2.FF error is a similar error to the 13.20 error found on previous HP 4000 series models, where the sensor in the front of the machine is blocked. In these newer model printers the front paper jam removal guide has become smaller and smaller. Now it’s almost impossible to find without a microscope. Go to this HP developed guide, (or view original HP guide here)which will help you through the removal procedure of cleaning out paper debris and clearing up these specific errors.
Invisible Paper Jam
When you have a paper jam in the front of these machines the printer doesn’t always report a paper jam message on start up. The sensor only covers a small area so, often times, the paper debris doesn’t block the sensor flag. I’ve seen it happen both ways.
In situations where the paper is not blocking the sensor flag the machine will boot up to a ready state then, when it goes to print, the paper will feed up several inches and give a paper jam message. In most cases, when the cassette tray is pulled out, half the paper is in the machine. In cases like this you will still need to follow the instructions in this link but instead of just running it through the middle of the paper path you need to run it on the sides also.
Repair Note
Always be careful when doing this procedure. Do not stick paper clips, envelope openers or any other sharp items into the machine to try and grab the paper because it’s just out of reach. This is a big no-no as these parts can easily scratch and damage the paper path guides, which leads to more jamming. Personally, I only use hemostats or needle nose pliers to grab the paper making sure not to touch the surfaces of the paper guides (to avoid scratching).
============================================================================================
Kevin Gumpp is a certified printer technician and freelance writer for Market Point. Market Point is a HP PartsOne Partner selling HP printer parts. If you have a question regarding this topic or have any other printer repair related questions or topics for which you would like more information, please send an email to maryp@marketpoint.com.