Если до установки совместимых расходников допустить полное опустошение оригинальных картриджей HP 711, 913, 932, 933, 951, 950 или 953, печатное устройство выдаст ошибку с требованием заменить пустые картриджи.
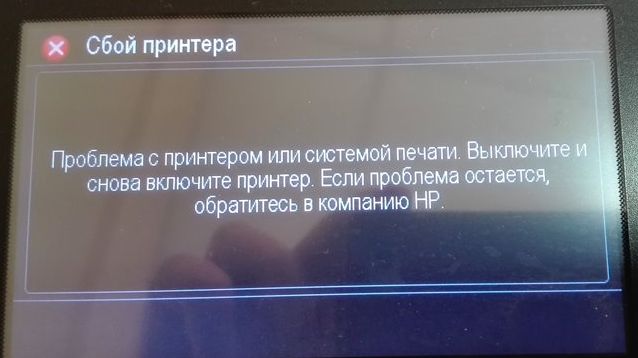
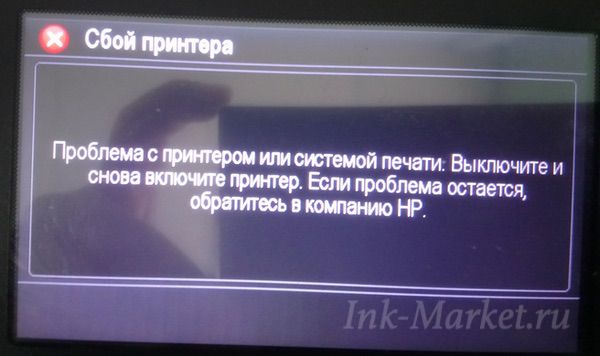
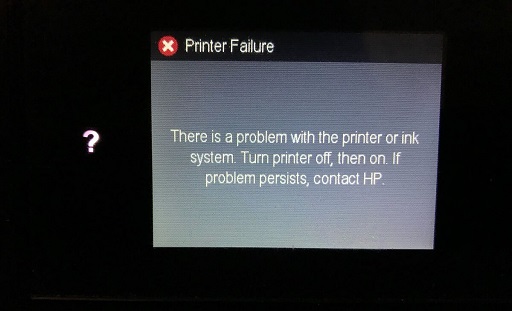
При установке неоригинальных картриджей, ПЗК или СНПЧ данная ошибка часто не исчезает, а лишь меняет текст на «Неисправность системы печати, выключите и включите принтер», «Проблема с принтером или системой печати, выключите и снова включите принтер. При повторном появлении данного сообщения обратитесь в техническую поддержку компании HP» (возможны другие формулировки). Это значит, что сработал датчик в печатающей голове при установленных неоригиналах.
Чтобы ошибка не возникала, следите за уровнем чернил в оригинальных картриджах и не допускайте их полного опустошения. Если всё же ошибка возникла, решается она по этой инструкции.
Содержание этого документа относится к принтерам HP OfficeJet 251dw, 276dw, 3610, 3620, 6100, 6600, 6700, 7110, 7510, 7610, 7612, 8100, 8600, 8610, 8615, 8616, 8620, 8625, 8630, 8640, 8660, 9010, 9012, 9013, 9014, 9015, 9016, 9018, 9019, 9020, 9022, 9023, 9025, 9026, 9028 и 9012.
Принтер не печатает, а на панели управления или на компьютере отображается одно из следующих сообщений об ошибке:
-
Проблема системы печати
-
Проблема системы подачи чернил
-
Проблема системы принтера
Шаг 1. Проверьте картриджи на наличие протечек
Замените любые картриджи, где есть утечка.
Внимание!Не используйте чернильные картриджи с утечкой.
Чтобы узнать номер картриджа и приобрести расходные материалы, такие как чернила или тонер, посетите магазин HP Store или обратитесь в местный магазин розничной торговли. Используйте только подлинные расходные материалы HP, такие как чернила или тонер, предназначенные для вашего принтера. Компания HP не может гарантировать качество или надежность картриджей сторонних производителей или повторно заправленных картриджей. Для проверки подлинности используемых картриджей посетите веб-страницу HP anti-counterfeit (на английском языке).
На неисправный картридж или печатающую головку может распространяться гарантия. Чтобы проверить гарантию на расходные материалы, такие как чернила или тонер, перейдите на веб-страницу Узнайте об оригинальных расходных материалах HP, затем ознакомьтесь с информацией по ограниченной гарантии для своих расходных материалов.
-
Откройте дверцу для доступа к чернильным картриджам.
-
Прежде чем продолжить, дождитесь остановки каретки.
-
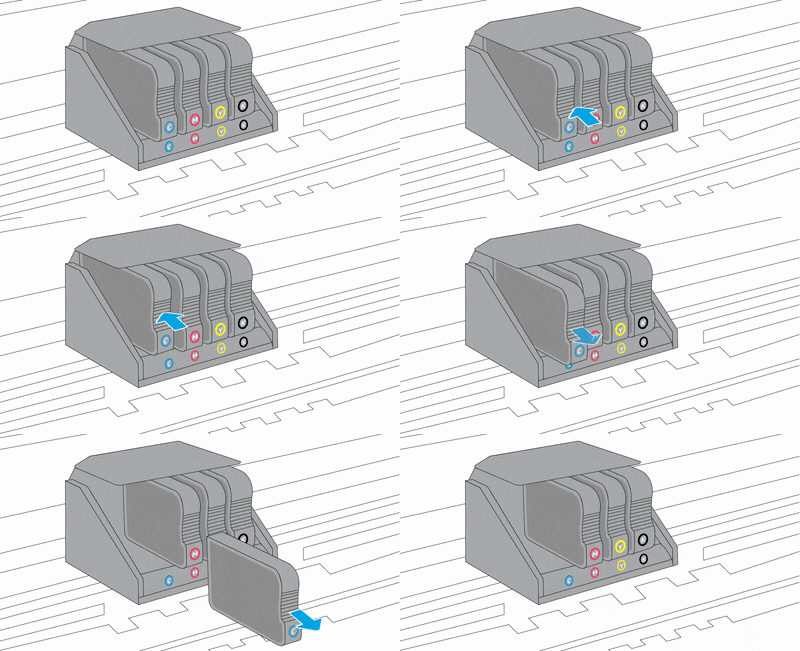
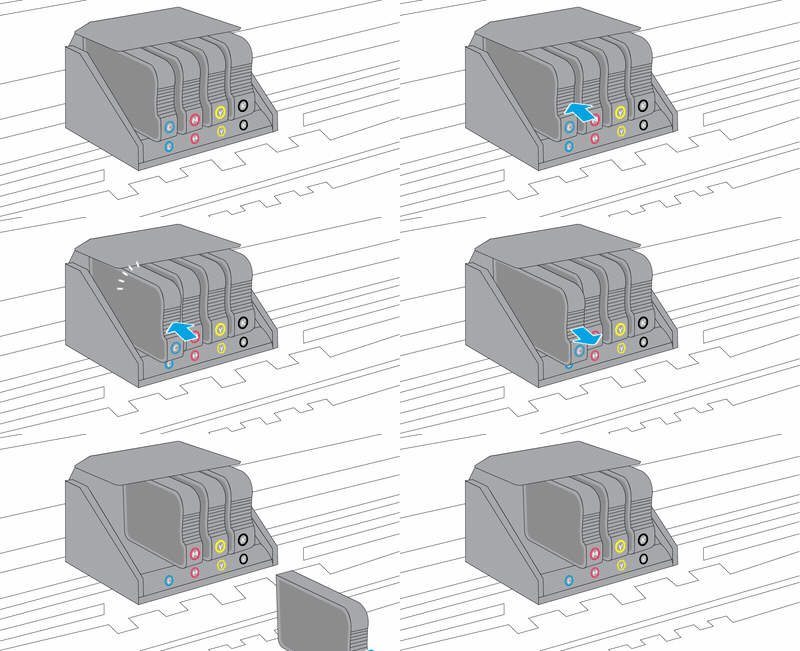
Извлеките чернильный картридж, затем осмотрите его на предмет утечки чернил.
-
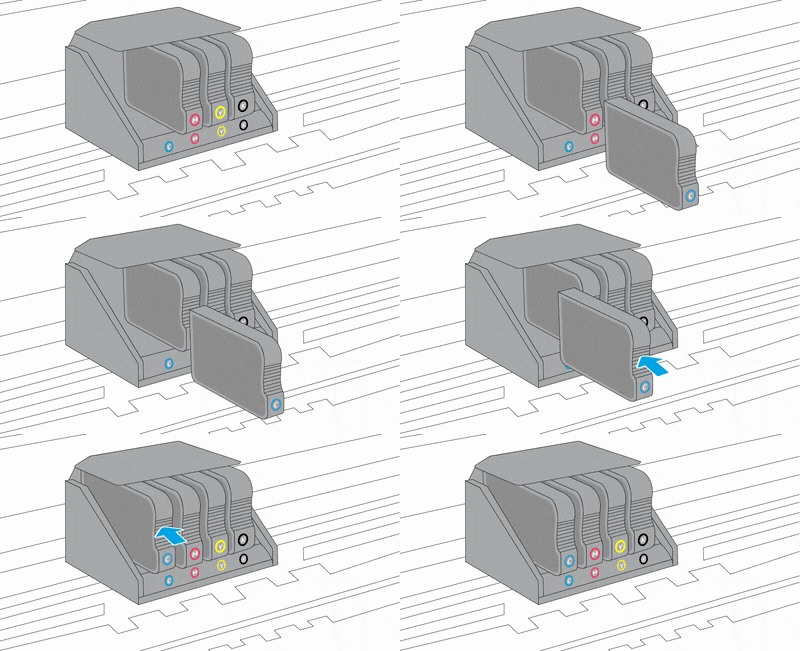
Если картридж протекает, замените чернильный картридж. Если чернильный картридж не протекает, вставьте его в соответствующее гнездо.
-
Повторите эти действия для трех других струйных картриджей.
-
Закройте дверцу отсека картриджей.
Если сообщение об ошибке сохраняется, перейдите к следующему шагу.
Шаг 2. Перезагрузите принтер
Сброс настроек принтера может устранить появление сообщения об ошибке.
-
Когда принтер включен, отсоедините от него кабель питания.
-
Отсоедините кабель питания от источника питания.
-
Подождите 60 секунд.
-
Снова подключите кабель питания к электрической розетке и принтеру.
Примечание.
Компания HP рекомендует подключать принтер напрямую к электрической розетке.
Если сообщение об ошибке сохраняется, перейдите к следующему шагу.
Шаг 3. Проверьте каретку на наличие фиксатора печатающей головки
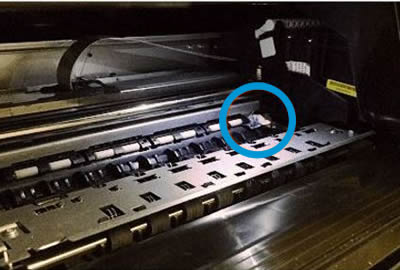
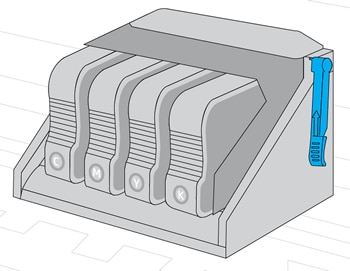
Откройте дверцу, чтобы получить доступ к чернильным картриджам, затем определите, есть ли на картридже, вставленном в принтер, фиксатор печатающей головки.
Пример картриджа с фиксатором
-
Если каретка имеет фиксатор печатающей головки, перейдите к следующему шагу.
Шаг 4. Переустановите печатающую головку три раза
Чтобы удалить сообщение об ошибке, может потребоваться переустановить печатающую головку до трех раз.
-
Откройте дверцу для доступа к чернильным картриджам.
-
Прежде чем продолжить, дождитесь остановки каретки.
-
Отключите кабель питания от задней панели принтера.
Предупреждение.Необходимо отсоединить шнур питания, прежде чем проводить работы внутри принтера.
-
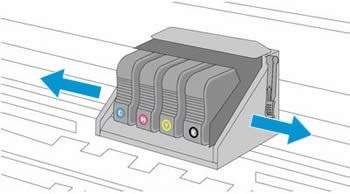
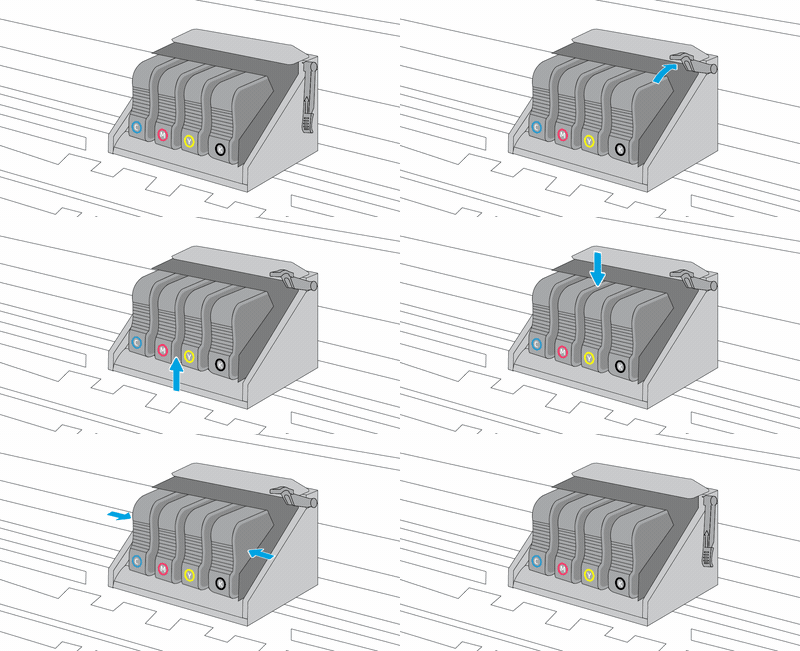
Поднимите фиксатор каретки, приподнимите печатающую головку, опустите печатающую головку обратно в каретку, покачайте печатающую головку влево и вправо, затем опустите фиксатор каретки, чтобы закрепить печатающую головку на месте.
-
Закройте дверцу отсека картриджей.
-
Подсоедините шнур питания к тыльной стороне принтера, затем проверьте панель управления на наличие сообщения об ошибке.
-
Иногда сообщения об ошибке продолжают отображаться после установки печатающей головки. Если сообщение об ошибке продолжает отображаться, повторите действия для повторной установки печатающей головки до трех раз.
Если сообщение об ошибке сохраняется, перейдите к следующему шагу.
Шаг 5. Замените печатающую головку
Если предыдущие решения не помогли устранить неполадку, возможно, закажите новую печатающую головку на замену.
На неисправный картридж или печатающую головку может распространяться гарантия. Чтобы проверить гарантию на расходные материалы, такие как чернила или тонер, перейдите на веб-страницу Узнайте об оригинальных расходных материалах HP, затем ознакомьтесь с информацией по ограниченной гарантии для своих расходных материалов.
Если гарантия на печатающую головку в сборе истекла, можно приобрести новую через Интернет.
-
Если вы находитесь в стране Азиатско-Тихоокеанского региона, вы будете перенаправлены в сервисный центр в вашей стране/регионе.
-
Найдите в магазине комплектующих HP номер детали для своей печатающей головки. См. следующую таблицу, чтобы найти номер детали для своей печатающей головки, используя номера чернильных картриджей, применяемых в принтере.
Номер чернильного картриджа
Страна/регион
Номер детали для печатающей головки
HP 950, 951
Северная и Южная Америка
CR322A
Европа, Ближний Восток, Африка
CR324A
Азиатско-Тихоокеанские страны/регионы, Япония
CR326A
HP 952-959
В любой стране
M0H91A
HP 962-969
В любой стране
3JB16A
-
Следуйте онлайн-инструкциям, чтобы заказать печатающую головку в сборе.
Если сообщение об ошибке сохраняется, перейдите к следующему шагу.
Шаг 6. Выполните сервисное обслуживание принтера
Проведите сервисное обслуживание или замените устройство HP, если выполнение всех вышеуказанных действий не помогло устранить проблему.
Перейдите на веб-страницу Обращение в службу поддержки клиентов HP, чтобы запланировать ремонт или замену устройства. Если вы находитесь в стране Азиатско-Тихоокеанского региона, вы будете направлены в местный сервисный центр в вашей стране/регионе.
Для проверки состояния гарантии перейдите на веб-страницу Проверка гарантии на устройства HP. За ремонт устройств после окончания гарантийного срока может взиматься оплата.
Что делать, если принтер сообщает: «Проблема с принтером или системой печати, выключите и снова включите принтер» или «Неисправность системы печати, выключите принтер».
Такая ошибка чаще всего появляется если перед установкой неоригинальных/совместимых картриджей допустить полное опустошение оригинальных. Такая проблема типична для принтеров с картриджами HP # 711, 913, 932, 933, 951, 950, 953.
В таком случае при установке неоригинальных картриджей, ПЗК или СНПЧ данная ошибка может не пропадает. И при этом часто может появиться и другая ошибка:
- «Неисправность системы печати, выключите и включите принтер»
- «Проблема с принтером или системой печати, выключите и снова включите принтер. При повторном появлении данного сообщения обратитесь в техническую поддержку компании HP»
Для Вас это сигнал, что сработал датчик в печатающей голове и принтер откажется печатать на совместимых картриджах.
Самое простое, но не самое дешевое решение — установить оригинальные картриджи. Если же Вы хотите обойтись «малой кровью», то для вас есть инструкция — «Ошибка опустошения ПГ на картриджах HP 711, 913, 932, 933, 950, 951, 953″
Но чтобы не допускать такой ошибки и обезопасить себя от последствий внимательно следите за уровнем чернил в оригинальных картриджах и не допускайте их полного израсходования.
Содержание этого документа относится к принтерам HP OfficeJet 251dw, 276dw, 3610, 3620, 6100, 6600, 6700, 7110, 7510, 7610, 7612, 8100, 8600, 8610, 8615, 8616, 8620, 8625, 8630, 8640, 8660, 9010, 9012, 9013, 9014, 9015, 9016, 9018, 9019, 9020, 9022, 9023, 9025, 9026, 9028 и 9012.
Принтер не печатает, а на панели управления или на компьютере отображается одно из следующих сообщений об ошибке:
-
Проблема системы печати
-
Проблема системы подачи чернил
-
Проблема системы принтера
Шаг 1. Проверьте картриджи на наличие протечек
Замените любые картриджи, где есть утечка.
Внимание!Не используйте чернильные картриджи с утечкой.
Чтобы узнать номер картриджа и приобрести расходные материалы, такие как чернила или тонер, посетите магазин HP Store или обратитесь в местный магазин розничной торговли. Используйте только подлинные расходные материалы HP, такие как чернила или тонер, предназначенные для вашего принтера. Компания HP не может гарантировать качество или надежность картриджей сторонних производителей или повторно заправленных картриджей. Для проверки подлинности используемых картриджей посетите веб-страницу HP anti-counterfeit (на английском языке).
На неисправный картридж или печатающую головку может распространяться гарантия. Чтобы проверить гарантию на расходные материалы, такие как чернила или тонер, перейдите на веб-страницу Узнайте об оригинальных расходных материалах HP, затем ознакомьтесь с информацией по ограниченной гарантии для своих расходных материалов.
-
Откройте дверцу для доступа к чернильным картриджам.
-
Прежде чем продолжить, дождитесь остановки каретки.
-
Извлеките чернильный картридж, затем осмотрите его на предмет утечки чернил.
-
Если картридж протекает, замените чернильный картридж. Если чернильный картридж не протекает, вставьте его в соответствующее гнездо.
-
Повторите эти действия для трех других струйных картриджей.
-
Закройте дверцу отсека картриджей.
Если сообщение об ошибке сохраняется, перейдите к следующему шагу.
Шаг 2. Перезагрузите принтер
Сброс настроек принтера может устранить появление сообщения об ошибке.
-
Когда принтер включен, отсоедините от него кабель питания.
-
Отсоедините кабель питания от источника питания.
-
Подождите 60 секунд.
-
Снова подключите кабель питания к электрической розетке и принтеру.
Примечание.
Компания HP рекомендует подключать принтер напрямую к электрической розетке.
Если сообщение об ошибке сохраняется, перейдите к следующему шагу.
Шаг 3. Проверьте каретку на наличие фиксатора печатающей головки
Откройте дверцу, чтобы получить доступ к чернильным картриджам, затем определите, есть ли на картридже, вставленном в принтер, фиксатор печатающей головки.
Пример картриджа с фиксатором

-
Если каретка имеет фиксатор печатающей головки, перейдите к следующему шагу.
Шаг 4. Переустановите печатающую головку три раза
Чтобы удалить сообщение об ошибке, может потребоваться переустановить печатающую головку до трех раз.
-
Откройте дверцу для доступа к чернильным картриджам.
-
Прежде чем продолжить, дождитесь остановки каретки.
-
Отключите кабель питания от задней панели принтера.
Предупреждение.Необходимо отсоединить шнур питания, прежде чем проводить работы внутри принтера.
-
Поднимите фиксатор каретки, приподнимите печатающую головку, опустите печатающую головку обратно в каретку, покачайте печатающую головку влево и вправо, затем опустите фиксатор каретки, чтобы закрепить печатающую головку на месте.
-
Закройте дверцу отсека картриджей.
-
Подсоедините шнур питания к тыльной стороне принтера, затем проверьте панель управления на наличие сообщения об ошибке.
-
Иногда сообщения об ошибке продолжают отображаться после установки печатающей головки. Если сообщение об ошибке продолжает отображаться, повторите действия для повторной установки печатающей головки до трех раз.
Если сообщение об ошибке сохраняется, перейдите к следующему шагу.
Шаг 5. Замените печатающую головку
Если предыдущие решения не помогли устранить неполадку, возможно, закажите новую печатающую головку на замену.
На неисправный картридж или печатающую головку может распространяться гарантия. Чтобы проверить гарантию на расходные материалы, такие как чернила или тонер, перейдите на веб-страницу Узнайте об оригинальных расходных материалах HP, затем ознакомьтесь с информацией по ограниченной гарантии для своих расходных материалов.
Если гарантия на печатающую головку в сборе истекла, можно приобрести новую через Интернет.
-
Если вы находитесь в стране Азиатско-Тихоокеанского региона, вы будете перенаправлены в сервисный центр в вашей стране/регионе.
-
Найдите в магазине комплектующих HP номер детали для своей печатающей головки. См. следующую таблицу, чтобы найти номер детали для своей печатающей головки, используя номера чернильных картриджей, применяемых в принтере.
Номер чернильного картриджа
Страна/регион
Номер детали для печатающей головки
HP 950, 951
Северная и Южная Америка
CR322A
Европа, Ближний Восток, Африка
CR324A
Азиатско-Тихоокеанские страны/регионы, Япония
CR326A
HP 952-959
В любой стране
M0H91A
HP 962-969
В любой стране
3JB16A
-
Следуйте онлайн-инструкциям, чтобы заказать печатающую головку в сборе.
Если сообщение об ошибке сохраняется, перейдите к следующему шагу.
Шаг 6. Выполните сервисное обслуживание принтера
Проведите сервисное обслуживание или замените устройство HP, если выполнение всех вышеуказанных действий не помогло устранить проблему.
Перейдите на веб-страницу Обращение в службу поддержки клиентов HP, чтобы запланировать ремонт или замену устройства. Если вы находитесь в стране Азиатско-Тихоокеанского региона, вы будете направлены в местный сервисный центр в вашей стране/регионе.
Для проверки состояния гарантии перейдите на веб-страницу Проверка гарантии на устройства HP. За ремонт устройств после окончания гарантийного срока может взиматься оплата.
HP has been the most acceptable brand in the world. It has a great impression on the users for the excellent services it provides. HP printers have changed people’s lives and provide massive help by printing quality documents at their ease.
As we all know, be it HP or any other brand, errors are natural and certain with electronic devices like printers. There are times when you can face HP 8600 printer failure.
Fortunately, we are here to provide instant solutions to affix HP Officejet Pro 8600 printer failure.. In this guide, you will see a step-by-step guide to resolve HP Officejet pro 8600 printer failure in minutes.
This HP 8600 printer failure error code is followed by several numbers and characters in an alphabetic code. The error message is being shown either on the system or the printer control panel. But before you pick up your phone and dial the customer care number, here are the effective tips to follow and resolve the problem quickly.
Resolve HP Officejet Pro 8600 Printer Failure Conveniently
As we all know system failure occurs due to many reasons, ink cartridge and paper jamming are the major causes. Ink cartridges and paper are the core of the printing session and detaching and replacing these parts are too common, sometimes due to replacing the ink or reloading the paper tray. More often than not, users fail to fix the printer parts again in the correct manner that results in HP Officejet Pro 8600 printer failure.
As soon as you understand the cause behind the problem you will be able to solve the HP 8600 printer failure error. Let’s find the possible solution for the error.
1. Restart the Printer
Whenever you encounter a technical glitch or error, restarting the device is the most suitable solution to fix any sort of issue. With this solution, you can also get rid of HP Officejet Pro 8600 printer failure. Start restarting your printer with the following steps.
- Turn ON the printer.
- Now set up the printer to its idle state.
- It will now instruct the users to disconnect the power from the end.
- Next, Turn OFF the power supply and unplug it from the socket.
- After a few moments, plug the cord in the socket again and Turn On the supply.
- Now the printer will start by itself. If it doesn’t, you need to turn it on.
- You will see the lights of the cartridge flashing and moving.
Most probably, this process will help users to resolve HP Officejet pro printer failure. If not, you can move to the next method that is checking the level of the ink cartridge.
2. Check level if Ink cartridge
Low ink cartridges can be one of the reasons for HP Officejet pro 8600 printer failure. So it is essential to check the level of ink if you want your HP printer to keep working.
The cartridge should be replaced before it reaches the lowest level. Regular cleaning of cartridges is also an essential part of a proper working printer.
3. Fix HP printer cartridge Issue
Sometimes it happens that the ink cartridge of the HP printer doesn’t respond or co-operate. This simply means HP Officejet pro 8600 printer failure error is occurring to the printer. The users should include highly recommended original ink cartridges to your HP printer as the non-HP and low-quality cartridge can fail and doesn’t guarantee to respond properly.
- For this, users are recommended to click on ‘HP Sure Supply’ for help. If necessary, you can insert the region and the country option.
- Now proceed following the on-screen directions.
Hopefully, these methods will be helpful in fixing HP Officejet pro 8600 printer failure. Yes, in some cases, it is possible that these methods won’t work. If this happens to you, you don’t need to stress because there is another option that can help you in fixing the issue.
4. Remove any Jammed paper from the printer
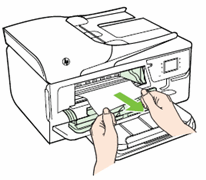
If any piece of paper got stuck in the printer, it can cause HP Officejet pro 8600 printer failure. Remove any jammed paper from the printer, it may work to resolve the issue. Follow the mentioned steps to fix the HP Officejet pro printer failure.
- Firstly, Turn OFF the printer, detach the power cord.
- Now, open the printer entrance door and transit the carriage and toner cartridge smoothly.
- Check the paper trail case and the input tray if there is any piece of paper stuck into it.
- If you got any jammed paper, remove it.
- Replace the tray and other printer parts in the original form.
As soon as you remove the unnecessary paper pieces from the printer HP Officejet Pro 8600 printer failure will be fixed.
Conclusion
Hence, these are the techniques that can help you in fixing HP Officejet pro 8600 failure. However, if you still encounter issues related to the same problem, you can avail help from our experts. Mention your problem in the comment section or write us an email regarding your problem and we will get back to you with effective solutions in the least possible time.
Besides searching on the internet for solutions or asking your friends or directly approach us, share your problem and troubleshoot it. Whether HP 8600 printer failure troubling you or any other, don’t hesitate to contact us. We are 24 hours, 7 days a week available for our readers to help them in their hard times.
Visit Us Again!
This knowledge base article is to resolve HP printer failure or ink system failure error message that occurs on HP Officejet Pro 8600, 8610 series printers.
Causes behind HP printer failure or ink system failure error message
Read out the below-mentioned causes for ink failure error on HP Officejet Pro 8600, 8610 series printers. Because it may help you to decide which cause is behind this error on your printer. Furthermore, go through the appropriate solution to fix the same.
- Use of bogus or refilled ink cartridge
- Hindrances in carriage area
- Overfilled paper tray
- Empty ink cartridge
- Dried ink or blockage
- Incompatible ink cartridge
- Newly installed unreadable ink cartridge
Solutions for printer failure or ink system failure on HP Officejet Pro 8600, 8610
Fix-1] Clear any blockages inside carriage block
Print operations often fail due to unwanted blockages inside the carriage. Thus, it is vital to clear the trash from the carriage path. Also, check the carriage movement; it should be in regular directions. Ensure you perform these steps after turning off the printer and removing the plugs.
- Firstly, turn OFF your printer and unplug the connections. Then examine the carriage block of your printer for any blockages or obstacles.
- After that open the carriage door and look inside the carriage track.
- Furthermore, you are supposed to clear the trash from the carriage path with your hands.
- Right away, you need to check the carriage movement for the regular directions. In short, you ensure that trash is successfully cleared and the carriage moves freely.
- Finally, close the carriage door and make connections to the printer, and check, that it will function normally.
Fix-2] Troubleshooting it by resetting the HP printer
A printer reset can help you to get rid of the HP Officejet pro 8600 printer ink system failure error message. All you need to do is set your printer to an idle mode and unplug the cords from the printer and wall outlet. Later, you can connect the plugs and start your printer.
- Firstly, start your HP printer and set the printer to its idle state during the method before it continues the task.
- Then with the printer powered on, the user needs to unplug the power cord from the back of the HP printer. Next, disconnect the electrical cord from the outlet.
- After that, you can obstruct the cord back into the outlet by connecting the power cord again.
- The user now needs to start the printer if it doesn’t switch on automatically when the lights and the cartridges may start flashing and moving.
Fix-3] Check if the carriage has printhead latch
Every HP printer user should ensure that the carriage has a printhead latch. If it is missing, you might encounter an HP OfficeJet Pro 8600 ink system failure error. To avoid such an issue, one should contact the support system for assistance.
But if your printer carriage has a printhead latch yet you are facing the ink system failure issue, you should continue performing the subsequent methods.
Fix-4] Check if the ink cartridges have leakage issues
As is well known, it is not advisable to use leaking ink cartridges. If your ink cartridges have leakage issues, the HP ink system failure error message is likely to appear. To avoid such problems, it is vital to inspect all the ink cartridges your printer is using and replace them if needed.
Read on to know the detailed steps for the same:
- Access the door of ink cartridges.
- At this moment, you have to wait for the carriage to stop moving.
- Now, gently remove the ink cartridge and check if the ink cartridge is leaking.
- If the ink cartridge is leaking, you need to immediately replace them.
- But, if the ink cartridge has no leakage issues, insert the ink cartridge back into its slot and try other solutions.
This way you check if the ink cartridges have leakage issues. Remember the steps we shared above should be repeated for other ink cartridges placed next. Once done examining the ink cartridge leakage, don’t forget to close the access door.
If this does not resolve the HP printer ink system failure problem, try other repairing methods.
Fix-5] Frequently reseat the printhead to resolve problem with ink system
HP printer problem with ink system can be fixed by moving the printhead here and there. This can be done by accessing the ink cartridge door. All you have to do is to disconnect the power cord, lift up the carriage latch, wiggle the printhead, place it back, and down-lift the latch.
For detailed steps, the following information can be considered:
- Access the door of ink cartridges.
- Now, you have to wait for the carriage to stop moving.
- After this, remove the power cord from the printer rear. Make sure you do it before you reach the printhead.
- Then, you need to uplift the carriage latch, lift the printhead slightly, and put it down again into the carriage. You can also move the printhead left to right.
- Once done, down lift the carriage latch. This will lock the printhead into its place.
- Close the door of the ink cartridge.
Later, you can connect the power cord to the printer and open the control panel to check if there is an HP 8600 ink system failure error. If yes, move to the next solution.
Fix-6] Replace printhead to solve HP printer failure error
Defected or corrupted print heads might create issues during print jobs. This may result in an HP printer failure error. In this scenario, one should replace the printhead.
Before proceeding further, you should check if the printhead or cartridge is under warranty. If it is not then you need to order the new one online.
Below are the important details related to printhead replacement:
- Visit the HP Parts Store.
- Here, you can search for the printhead part number. This number is based on the cartridge numbers that your HP printer uses.
You can move forward by following the instructions displayed on your screen. Once you successfully complete the printhead replacement procedure, check for the error. If you are still bothered by the HP printer failure message, try our next fix.
Fix-7] Reinstall to identify new ink cartridge
The ink cartridges you are using might cause problems with the ink system. By reinstalling the ink cartridges, you can solve the HP printer failure error. If you have been constantly facing HP OfficeJet Pro 8600, 8610 printer failure errors, perform the following steps to get rid of this problem:
- Turn on the HP printer and open the top cover.
- Here, you need to ensure that the ink cartridge is on the right of your printer. It should also not be in use.
- Now press the cartridge down and take it out.
- At this point, you will find the ink cartridge with tri-color on the left and the black one on the right. You need to carefully remove the ink cartridges from both slots.
- Protective tape should also be removed from the cartridges.
- Make sure you hold the cartridge in a way that the copper strings are facing downwards.
- Now, slide the ink cartridge inside the slot. Make sure you place the cartridges in the right slots; the tricolor in the left and the black one in the right slot.
These steps will help you to successfully reinstall the new ink cartridge. After completing these steps, check if the HP printer failure error pop-up on your screen.
Fix-8] Clean blocked ink in cartridge
Clogged ink cartridges often become the reason for the HP 8600, and 8610 printer failure errors. For such a scenario, you should check the ink cartridges and clean the blocked ink. Make sure you use a clean cloth and lukewarm water drops to wipe the dried ink smoothly.
Here, we are providing helpful instructions so you don’t make any mistakes while reinstalling the ink cartridge into the slots:
- Power on the HP printer.
- Access the cover from the top.
- Gently press the cartridge down and take it out.
- Now, you can clean the dried ink by using a clean cloth. To make the cleaning procedure easy, you can use a few drops of lukewarm water on a cloth, then clean the ink properly.
- After that, you can wipe the ink cartridge properly. Make sure you don’t use much pressure.
- Also, don’t use water drops around the wires. Avoid touching the wires if there is no dried ink or dirt.
- It is not advisable to insert the cartridge right after you clean it. Make sure it is properly dried before you place it.
Once done cleaning and reinstalling the ink cartridge, you can close the top cover of your printer. This will solve the HP printer failure error message. Later, you can continue sending the print jobs and check if it is working properly.
Fix-9] Reset the counter to identify the installed ink
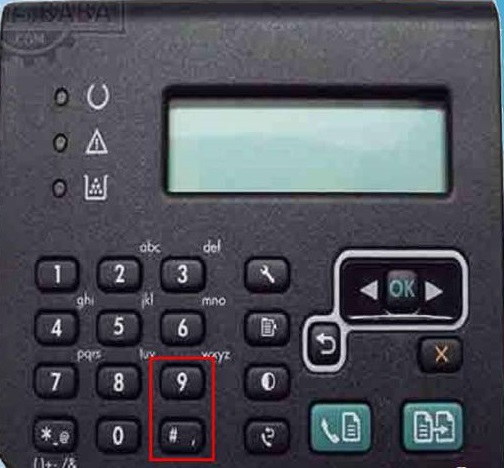
HP OfficeJet Pro 8610 printer failure errors trigger when your printer does not identify the installed ink. However, resetting the counter can enable your printer to identify the ink that has been installed. To reset the counter, you are required to use two specific keys for at least 30 seconds.
Go through the following instructions to perform this method:
- Turn off your printer. Also, remove the plugs.
- Then, press the # button along with 9 for about 30 seconds.
- After this, connect the cables of your printer and power it on.
Don’t forget to hold both the keys during the process. Once you perform these steps, the error will no longer appear on your screen.
Fix-10] Updating printer firmware
Printer firmware with an outdated version may cause certain issues while you initiate print jobs. Hence, updating the forward is necessary to avoid HP printer failure errors. To do so, access the printer’s control panel and check the new update from the settings.
Follow the instructions to update your printer firmware:
- Go to the Control Panel of your printer’s home screen.
- Tap the HP ePrint icon.
- Now, wait until your printer connects to the HP ePrint server. Once it is connected, you will see the HP ePrint status on the screen.
- After this, tap on the Settings located at the bottom left.
- Then, select the Printer Update option.
- Tap on the Check for Update Now option.
Once the printer starts checking the updates, you can wait. If you find any updates, download and install them immediately to avoid errors.
Fix-11] Examining the levels of the ink system on HP printer
Low ink cartridges could also be the reason that you are facing problems with the ink system. In such cases, inspecting the level of the ink system is necessary. If the user perceives an Ink System Failure message due to low ink levels, replace the ink cartridge immediately to resolve the issue.
Fix-12] Clear the paper jam from HP printer
HP printer failure message may display due to paper jam issues. Thus, you should check the paper input tray and remove the papers stuck there. In case you find any torn pieces of paper, remove them too. Make sure you clear the paper jam issue after powering off your printer.
- Turn off the printer then disconnect the power cable.
- Now open the cartridge access door and then move the carriage and toner cartridge gently.
- Furthermore, examine the paper path cover and the input tray.
- If you found any jammed paper then remove it carefully.
- Now, replace all the components or parts as they were.
- Next, you need to connect the power cable and make connections and then turn ON the printer.
- The hp printer keeps jamming problem will be fixed promptly.
Fix-13] Utilizing the original HP ink cartridges
If the ink system cartridges are not compatible with the HP Officejet Pro 8600 series printers, it might trigger an error. As an outcome, you face issues with the ink system and are unable to perform print jobs. Therefore, it is suggested to use genuine ink cartridges to avoid unexpected errors.
This is because there is no guarantee for the operational process of non-HP or refilled ink cartridges. If the user is facing issues then they can follow these steps:
- Firstly, check the authenticity of the cartridge. So, go to official hp anti-counterfeit page to check it. If it is not compatible then proceed to the next step.
- Thereafter go to the HP Store Link and proceed with the on-screen instructions to order the new ink cartridges and watch for the compatibility of the printer.
Final words
Printers are prone to errors. These errors can be displayed on HP Officejet Pro 8600, 8610, and 8620 series printers in different ways such as HP printer failure error, HP ink system failure, problem with printer or ink system, or system supply problems. If you are confronting such error messages, you can perform the troubleshooting methods we discussed above.
Read more:
- HP printer cartridge alignment failed
- Fix HP printer not printing black ink
- HP printer incompatible ink cartridge error

