hp-concentra-wrapper-portlet
![]()
Actions
This document applies to the HP Officejet 7110 Wide Format ePrinter Series
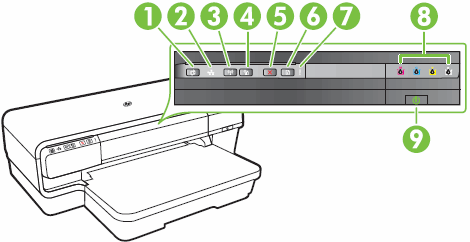
The blinking lights on the front of the printer indicate the printer status. These lights can be on, off, or blinking (flashing), depending on the status of the printer. Blinking lights can indicate error conditions. They might also indicate that the printer is initializing or processing a print job.
Following are the different lights and buttons on the printer control panel.
-
ePrint button and light
-
Ethernet light
-
Wireless button and light
-
Network Information button
-
Cancel button
-
Resume button and light
-
Alert light
-
Ink cartridge lights
-
Power button and light
Figure : Control panel lights and buttons
The following sections describe the most common issues related to the light patterns on your printer. Find the issue related to the blinking lights pattern you are experiencing, and then follow the steps to resolve the issue.
Issue: All lights are off
The following light pattern displays on the printer control panel:
-
All lights: Off
Figure : All lights are off

-
Cause
The printer is turned off, or the power cord is disconnected.
Solution
-
Connect the power cord to the rear of the printer, and then plug the power cord into an electrical outlet.
-
Press the Power button to turn on the printer.
Issue: The Power light is on
In this normal condition, the following light pattern displays on the printer control panel:
-
Power light: On
-
Resume light: Off
-
Wireless light: On or off, depending on the connection status
-
Alert light: Off
-
HP ePrint light: On or off, depending on the connection status
Figure : The Power light is on

-
Cause
The printer is on and ready.
Solution
The printer is turned on and ready to print. No action is required.
Issue: The Power light blinks
In this normal condition, the following light pattern displays on the printer control panel:
-
Power light: Blinks
-
Resume light: Off
-
Wireless light: On or off, depending on the connection status
-
Alert light: Off
-
HP ePrint light: Off
Figure : The Power light blinks

-
Cause
The following reasons can cause the issue:
-
The printer is turning on or off.
-
The printer is processing a print job.
-
The printer is pausing for the ink to dry.
-
Solution
No action is required. Wait for the printer to finish.
Issue: The Power light is on and the Alert light and Resume light blink
The following light pattern displays on the printer control panel:
-
Power light: On
-
Resume light: Blinks
-
Wireless light: On or off, depending on the connection status
-
Alert light: Blinks
-
HP ePrint light: On or off, depending on the connection status
-
Cartridge lights: Off
Figure : The Power light is on and the Resume light blinks

-
Cause
The printer might have a paper jam.
Solutions
Important: You must follow these solutions in the order presented to resolve the issue.
Solution one: Turn the printer off and then on again
Turning off the printer and then turning it on again can recalibrate the cartridges.
Step 1: Turn the printer off and then on again
Follow these steps to turn the printer off and then on again.
-
Press the Power button to turn off the printer. If the printer does not turn off, continue to the next solution.
-
Wait 60 seconds.
-
Press the Power button to turn on the printer.
note:
The printer might go through a warm-up period, which might last several minutes. Wait until the warm-up period completes before you continue.
Step 2: Print a test page
Printing a test page verifies if the hardware functions correctly.
-
Load plain white paper in the paper tray.
-
On the printer control panel, press and hold the Cancel button (
 ) for 3 seconds, and then release. The test page prints.
 ) for 3 seconds, and then release. The test page prints.
Figure : Example of a test page

-
If these steps resolved the issue, and the test page prints, there is no need to continue troubleshooting.
-
If the issue persists, continue with the next solution.
-
If the test page does not print, continue with the next solution.
Solution two: Clear any jammed paper
Follow these steps to clear any jammed paper from the rear of the printer, and then clear any jammed paper from the front.
Step 1: Remove any loose paper
Remove any loose sheets of paper from the input tray and the output tray.
caution:Do not remove jammed paper at this stage. Trying to clear jammed paper from the front of the product can damage theprint mechanism.
Step 2: Clear any jammed paper from the rear of the printer
Follow these steps to remove any jammed paper from the rear of the printer.
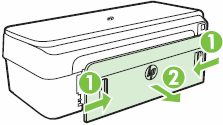
Rear access door
-
Remove the rear access door. Push in the handles on either side of the rear access door, and then pull out the door.
-
Push in the rear access door handles
-
Pull out the door
Figure : Remove the rear access door
-
-
Gently pull the paper out of the rollers inside the printer.
-
Clear any jammed paper from the rear access door.
-
Insert the rear access door. Push in the handles on either side of the rear access door, and then push the door forward until it snaps into place.
Duplexer
-
Remove the duplexer. Push in the buttons on either side of the duplexer, and then pull out the duplexer.
-
Push in the duplexer door buttons
-
Pull out the duplexer
Figure : Remove the duplexer
-
-
Gently pull the paper out of the rollers inside the printer.
-
Clear any jammed paper from the duplexer rollers.
-
Insert the duplexer. Push the duplexer forward until it snaps into place.

Step 3: Clear any jammed paper from the front of the printer
If there were no jams in the rear of the printer and the lights still blink, follow these steps to check for paper jams in the front of the printer.
-
Disconnect the power cord from the rear of the printer.
warning:You must disconnect the power cord before reaching inside the HP printer to avoid risk of injuries or electric shock.
-
Disconnect the USB cable from the rear of the printer if you have a USB connection to the computer.
-
On the front of the printer, open the cartridge access door.
Figure : Open the cartridge access door
-
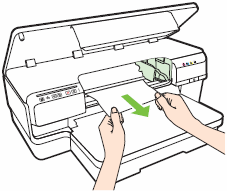
Gently remove any jammed paper and bits of torn paper from the cartridge access area. To avoid tearing any whole sheets of paper, pull the paper with both hands.
Figure : Remove any jammed paper from the cartridge access area
-
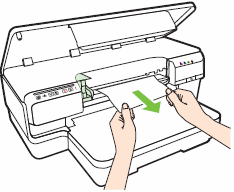
Move the carriage to the left.
Figure : Move the carriage to the left
-
Remove any jammed paper from the right side of the carriage. Pull the paper towards you and through the top of the printer.
Figure : Remove any jammed paper from the right side of the carriage
-
Close the cartridge access door.
Figure : Close the cartridge access door
-
Reconnect the power cord to the rear of the printer.
-
Press the Power button to turn on the printer.


Step 4: Make sure that the carriage can move freely
Follow these steps to make sure that the carriage moves freely across the width of the printer.
-
Press the Power button to turn on the printer if it is not on already.
-
Open the cartridge access door.
note:
The carriage might try to move into the access area. If it does, allow it to move to that position.
Figure : Open the cartridge access door
-
With the printer turned on, disconnect the power cord from the rear of the printer.
-
Unplug the power cord from the power source or electrical outlet.
warning:To avoid the risk of electrical shock, you must unplug the power cord before moving the carriage by hand and resetting the paper feed mechanism.
-
Locate the printhead access cover at the top right side of the carriage access area, and then check to see if it has two screws in it.
Figure : Example of a printhead access cover with two screws
-
Choose the correct option, and then follow the steps.
-
The printhead cover has two screws in it.
-
Check for and remove any loose paper or objects that might be restricting the carriage.
-
Use a flashlight to check for torn pieces of paper that might remain inside the printer. If any torn pieces of paper remain inside the printer, more jams are likely to occur.
Use a flashlight
Paper jammed in carriage path
-
Reach into the cartridge access area, and then manually move the carriage.
-
If the carriage is stuck on the right side of the printer, move the carriage to the left side of the printer.
-
If the carriage is stuck on the left side of the printer, move the carriage to the right side of the printer.
-
If the carriage is stuck in the middle of the printer, move the carriage to the right side of the printer.
-
-
Remove any loose paper or objects found.
-
Make sure that the carriage can move freely across the width of the printer by gently pushing the carriage to the left, and then to the right.
-
Close the cartridge access door.
Figure : Close the cartridge access door
-
Reconnect the power cord to the rear of the printer.
-
Plug the power cord back into the power source or electrical outlet.
-
Press the Power button to turn on the printer.
-
-
The printhead cover does not have two screws in it.
-
Open the printhead access cover by pulling the tab toward you, and then lift up.
Figure : Open the printhead access cover
-
Check for and remove any torn pieces of paper in the printhead access area.
Figure : Remove torn pieces of paper from the printhead access area
-
Close the printhead access cover. Make sure that the hooks on the cover snap securely into place.
Figure : Close the printhead access cover
-
Close the cartridge access door.
Figure : Close the cartridge access door
-
Reconnect the power cord to the rear of the printer.
-
Plug the power cord back into the power source or electrical outlet.
-
Press the Power button to turn on the printer.
-
-


Step 5: Print a test page
Printing a test page verifies if the hardware functions correctly.
How to print a test page
-
Load plain white paper in the paper tray.
-
On the printer control panel, press and hold the Cancel button (
) for 3 seconds, and then release. The test page prints.
-
If these steps resolved the issue, and the test page prints, there is no need to continue troubleshooting.
-
If the issue persists, continue with the next solution.
-
If the test page does not print, continue with the next solution.
Solution three: Clean the paper rollers
Follow these steps to clean the paper rollers and print a test page.
Step 1: Clean the paper rollers
Follow these steps to clean the paper rollers.
Rear access door
-
Gather the following materials:
-
A clean, lint-free cloth, or any cloth that will not come apart or leave fibers
-
Distilled, filtered, or bottled water (tap water might damage the printer)
-
Clean, lint-free cotton swabs
-
-
Press the Power button to turn off the printer, if it is not already off.
-
Disconnect the power cord from the rear of the printer.
warning:You must disconnect the power cord before reaching inside the printer to avoid risk of injuries or electric shock.
-
Remove the rear access door. Push in the handles on either side of the rear access door, and then pull out the door.
-
Push in the rear access door handles
-
Pull out the door
Figure : Remove the rear access door
-
-
Lightly dampen a clean, lint-free cloth with bottled or distilled water, and then squeeze any excess liquid from the cloth.
-
Press the cloth against the rollers, and then rotate them upward with your fingers. Apply a moderate amount of pressure to remove any dust or dirt buildup.
Figure : Clean the rollers
-
Allow the rollers to dry completely (approximately 10 minutes).
-
Insert the rear access door. Push in the handles on either side of the rear access door, and then push the door forward until it snaps into place.

Duplexer
-
Gather the following materials:
-
A clean, lint-free cloth, or any cloth that will not come apart or leave fibers
-
Distilled, filtered, or bottled water (tap water might damage the printer)
-
Clean, lint-free cotton swabs
-
-
Press the Power button to turn off the printer, if it is not already off.
-
Disconnect the power cord from the rear of the printer.
warning:You must disconnect the power cord before reaching inside the printer to avoid risk of injuries or electric shock.
-
Remove the duplexer. Push in the buttons on either side of the duplexer, and then pull out the duplexer.
-
Push in the duplexer door buttons
-
Pull out the duplexer
Figure : Remove the duplexer
-
-
Lightly dampen a clean, lint-free cloth with bottled or distilled water, and then squeeze any excess liquid from the cloth.
-
Press the cloth against the rollers, and then rotate them upward with your fingers. Apply a moderate amount of pressure to remove any dust or dirt buildup.
Figure : Clean the rollers
-
Allow the rollers to dry completely (approximately 10 minutes).
-
Insert the duplexer. Push the duplexer forward until it snaps into place.
Step 2: Print a test page
Printing a test page verifies if the hardware functions correctly.
How to print a test page
-
Load plain white paper in the paper tray.
-
On the printer control panel, press and hold the Cancel button (
) for 3 seconds, and then release. The test page prints.
-
If these steps resolved the issue, and the test page prints, there is no need to continue troubleshooting.
-
If the issue persists, continue with the next solution.
-
If the test page does not print, continue with the next solution.
Solution four: Reset the printer
Sometimes a paper jam error persists even though there is no jammed paper (false paper jam). Resetting the printer clears a false paper jam error.
Step 1: Reset the printer
Follow these steps to reset the printer.
-
With the printer turned on, disconnect the power cord from the rear of the printer.
-
Unplug the power cord from the wall outlet.
-
Wait at least 15 seconds.
-
Plug the power cord back into the wall outlet.
-
Reconnect the power cord to the printer.
-
Turn the printer on.
Step 2: Print a test page
Printing a test page verifies if the hardware functions correctly.
How to print a test page
-
Load plain white paper in the paper tray.
-
On the printer control panel, press and hold the Cancel button (
) for 3 seconds, and then release. The test page prints.
-
If these steps resolved the issue, and the test page prints, there is no need to continue troubleshooting.
-
If the issue persists, continue with the next solution.
-
If the test page does not print, continue with the next solution.
Solution five: Service the printer
If you have completed all the solutions listed above and are still experiencing a problem, continue to the Service the printer section at the end of this document.
Issue: The Power light is on and the Alert light blinks
The following light pattern displays on the printer control panel:
-
Power light: On
-
Resume light: Off
-
Wireless light: On or off, depending on the connection status
-
Alert light: Blinks
-
HP ePrint light: On or off, depending on the connection status
-
Cartridge lights: Off
Figure : Power light is on and the Alert light blinks

-
Cause
One of the printer doors might not be closed.
Solution
-
Make sure that the cartridge access door is closed securely.
-
Make sure that the rear access door is closed securely.
Issue: The Power light is on and the cartridge lights blink one
after the other, from left to right
The following light pattern displays on the printer control panel:
-
Power light: On
-
Resume light: Off
-
Wireless light: On or off, depending on the connection status
-
HP ePrint light: On or off, depending on the connection status
-
Cartridge lights: Blinks one after the other, from left to right
Figure : The Power light is on and the cartridge lights blink one after the other, from left to right

-
Cause
The printhead might be missing or faulty.
Solutions
Follow these steps to turn the printer off and on, and then print a test page.
 Important: You must install SETUP cartridges during the initial printer setup or the computer will display a cartridge error.
Unlike replacement cartridges, SETUP cartridges cannot be purchased from retailers. SETUP cartridges are available only in the box with a new HP printer.
Solution one: Turn the printer off and then on again
Follow these steps to turn the printer off and then on again.
Step 1: Turn the printer off and then on again
Turning off the printer and then turning it on again can recalibrate the cartridges.
-
Press the Power button to turn off the printer. If the printer does not turn off, continue to the next solution.
-
Wait 60 seconds.
-
Press the Power button to turn on the printer.
note:
The printer might go through a warm-up period, which might last several minutes. Wait until the warm-up period completes before you continue.
Step 2: Print a test page
Printing a test page verifies if the hardware functions correctly.
How to print a test page
-
Load plain white paper in the paper tray.
-
On the printer control panel, press and hold the Cancel button (
) for 3 seconds, and then release. The test page prints.
-
If these steps resolved the issue, and the test page prints, there is no need to continue troubleshooting.
-
If the issue persists, continue with the next solution.
-
If the test page does not print, continue with the next solution.
Solution two: Service the printer
If you have completed all the solutions listed above and are still experiencing a problem, continue to the Service the printer section at the end of this document.
Issue: The Power light blinks and the cartridge lights blink one
after the other, from left to right
The following light pattern displays on the printer control panel:
-
Power light: Blinks
-
Resume light: Off
-
Wireless light: On or off, depending on the connection status
-
HP ePrint light: On or off, depending on the connection status
-
Cartridge lights: Blinks one after the other, from left to right
Figure : The Power light blinks and the cartridge lights blink one after the other, from left to right

-
Cause
The printhead might be incompatible, or there might be a problem with the cartridges.
Solutions
Follow these steps to turn the printer off and on, and then print a test page.
Important: You must install SETUP cartridges during the initial printer setup or the computer will display a cartridge error.
Unlike replacement cartridges, SETUP cartridges cannot be purchased from retailers. SETUP cartridges are available only in the box with a new HP printer.
Solution one: Turn the printer off and then on again
Turning the printer off and on again can recalibrate the cartridges.
Step 1: Turn the printer off and then on again
Follow these steps to turn the printer off and then on again.
-
Press the Power button to turn off the printer. If the printer does not turn off, continue to the next solution.
-
Wait 60 seconds.
-
Press the Power button to turn on the printer.
note:
The printer might go through a warm-up period, which might last several minutes. Wait until the warm-up period completes before you continue.
Step 2: Print a test page
Printing a test page verifies if the hardware functions correctly.
How to print a test page
-
Load plain white paper in the paper tray.
-
On the printer control panel, press and hold the Cancel button (
) for 3 seconds, and then release. The test page prints.
-
If these steps resolved the issue, and the test page prints, there is no need to continue troubleshooting.
-
If the issue persists, continue with the next solution.
-
If the test page does not print, continue with the next solution.
Solution two: Remove, inspect, and clean the problem cartridge
Ink buildup or debris on the cartridge contacts might cause a cartridge error. Follow these steps to remove, inspect, and clean the problem cartridge (the cartridge or cartridges indicated in the error message). First, make sure that you are using cartridges that are compatible with your printer.
Purchase replacement cartridges and other supplies from the HP Store or local retailers.
-
If the cartridges are compatible, continue with the steps in this solution to remove, inspect, and clean the cartridges.
Step 1: Remove and inspect the problem cartridge
Follow these steps to remove and then inspect the problem cartridge.
-
Find a clean, lint-free cloth (eyeglass wipes or coffee filters work well) that you can use to clean the cartridge contacts.
-
Press the Power button to turn on the printer.
-
Open the cartridge access door. The carriage moves to the left side of the printer. Wait until the carriage is idle and silent before proceeding.
Figure : Open the cartridge access door
-
Push in on the front of the problem cartridge to release it, and then pull the cartridge toward you to remove it from its slot.
Figure : Remove the problem cartridge from its slot
-
Inspect the copper-colored cartridge contact for ink buildup or debris.
Figure : Copper-colored contact on the cartridge
Step 2: Clean the cartridge contacts
Follow these steps to clean the cartridge contacts.
caution:Clean the problem cartridges one at a time. Do not leave a cartridge outside of the printer for more than 10 minutes. Also, never turn off the printer when a cartridge is removed from its slot. Leaving cartridge slots empty might cause damage to the cartridge ink system.
-
With a clean, lint-free cloth (eyeglass wipes or coffee filters work well), wipe the copper-colored contact on the cartridge.
Figure : Copper-colored contact on the cartridge
-
Carefully reinsert the cartridge into its slot, and then push the cartridge forward until it clicks into place.
Figure : Reinsert the cartridge
note:
Make sure that the colored dot on the cartridge label matches the colored dot on the carriage slot.
-
Repeat these steps for other problem cartridges, if necessary.
-
Close the cartridge access door.
Figure : Close the cartridge access door
Step 3: Print a test page
Printing a test page verifies if the hardware functions correctly.
-
Load plain white paper in the paper tray.
-
On the printer control panel, press and hold the Cancel button (
) for 3 seconds, and then release. The test page prints.
-
If these steps resolved the issue, and the test page prints, there is no need to continue troubleshooting.
-
If the issue persists, continue with the next solution.
-
If the test page does not print, continue with the next solution.
Solution three: Repeat the cartridge cleaning steps
If the error message still displays on the printer control panel, repeat the cartridge cleaning steps in the previous solution.
-
If these steps resolved the issue, and the test page prints, there is no need to continue troubleshooting.
-
If the issue persists, continue with the next solution.
-
If the test page does not print, continue with the next solution.
Solution four: Service the printer
If you have completed all the solutions listed above and are still experiencing a problem, continue to the Service the printer section at the end of this document.
Issue: The Power light is on and one or more of the cartridge
lights blink
The following light pattern displays on the printer control panel:
-
Power light: On
-
Resume light: Off
-
Wireless light: On or off, depending on the connection status
-
HP ePrint light: On or off, depending on the connection status
-
Cartridge lights: One or more blinks
Figure : The Power light is on and one or more of the cartridge lights blink

-
Cause
One or more of the cartridges might be missing or is out of ink.
Solutions
Important: You must follow these solutions in the order presented to resolve the issue.
Solution one: Install cartridges if they have not been installed and then print a test page
Purchase replacement cartridges and other supplies from the HP Store or local retailers.
Important: You must install SETUP cartridges during the initial printer setup or the computer will display a cartridge error.
Unlike replacement cartridges, SETUP cartridges cannot be purchased from retailers. SETUP cartridges are available only in the box with a new HP printer.
Step 1: Install the cartridges
Follow these steps to install cartridges if they have not been installed.
caution:Failure to install the SETUP cartridges that came with the printer causes a cartridge error.
-
Press the Power button to turn on the printer, if it is not already on.
-
Open the cartridge access door.
Figure : Open the cartridge access door
-
Remove the setup cartridge from its packaging.
-
Hold the cartridge so that the cartridge contacts are facing toward the printer.
-
Slide the new cartridge into its slot, and then gently push it forward until it clicks into place.
note:
Make sure that the colored dot on the cartridge label matches the colored dot on the slot.
Figure : Install the cartridge into its color-coded slot
-
Repeat these steps for the other cartridges.
Figure : Install all the cartridges
-
Close the cartridge access door.
Figure : Close the cartridge access door

Step 2: Print a test page
Printing a test page verifies if the hardware functions correctly.
How to print a test page
-
Load plain white paper in the paper tray.
-
On the printer control panel, press and hold the Cancel button (
) for 3 seconds, and then release. The test page prints.
-
If these steps resolved the issue, and the test page prints, there is no need to continue troubleshooting.
-
If the issue persists, continue with the next solution.
-
If the test page does not print, continue with the next solution.
Solution two: Service the printer
If you have completed all the solutions listed above and are still experiencing a problem, continue to the Service the printer section at the end of this document.
Issue: The Power light and one or more of the cartridge lights blink
The following light pattern displays on the printer control panel:
-
Power light: Blinks
-
Resume light: Off
-
Wireless light: On or off, depending on the connection status
-
HP ePrint light: On or off, depending on the connection status
-
Cartridge lights: One or more blinking
Figure : The Power light and one or more of the cartridge lights blink

-
Cause
One or more of the cartridges is faulty, needs attention, is incorrect, missing, damaged, or incompatible.
Solutions
Important: You must follow these solutions in the order presented to resolve the issue.
Solution one: Make sure that the indicated cartridge is installed correctly
Follow these steps to make sure that the cartridge is installed correctly. Remove
and then reinsert the cartridge a few
times if necessary.
Important: You must install SETUP cartridges during the initial printer setup or the computer displays a cartridge error.
Unlike replacement cartridges, SETUP cartridges cannot be purchased from retailers. SETUP cartridges are available only in the box with a new HP printer.
Step 1: Remove and then reinsert the cartridge
Follow these steps to remove and reinsert the cartridge.
note:
Perform these steps only on cartridges that are indicated in the error message.
-
Press the Power button to turn on the printer, if it is not already on.
-
Open the cartridge access door.
Figure : Open the cartridge access door
-
Make sure that the colored dot on the cartridge label matches the colored dot on the carriage slot.
Figure : Properly installed cartridges
-
Push in on the front of the problem cartridge to release it, and then pull the cartridge toward you to remove it from its slot.
Figure : Remove the problem cartridge from its slot
-
Carefully reinsert the cartridge into its slot, and then push the cartridge forward until it clicks into place.
Figure : Reinsert the cartridge
-
Repeat these steps for other problem cartridges, if necessary.
-
Close the cartridge access door.
Figure : Close the cartridge access door
Step 2: Print a test page
Printing a test page verifies if the hardware functions correctly.
How to print a test page
-
Load plain white paper in the paper tray.
-
On the printer control panel, press and hold the Cancel button (
) for 3 seconds, and then release. The test page prints.
-
If these steps resolved the issue, and the test page prints, there is no need to continue troubleshooting.
-
If the issue persists, continue with the next solution.
-
If the test page does not print, continue with the next solution.
Solution two: Check the cartridge compatibility
HP recommends that you use genuine HP ink or toner supplies. HP cannot guarantee the quality or reliability of non-HP or refilled cartridges. If you do not use genuine HP cartridges, the steps in this document might not resolve the issue. To check the authenticity of your cartridges, go to the HP anti-counterfeit webpage (in English).
Purchase replacement cartridges and other supplies from the HP Store or local retailers.
-
If the cartridges are compatible, continue to the next solution to remove, inspect, and clean the cartridges.
Solution three: Remove, inspect, and clean the problem cartridge
Ink buildup or debris on the cartridge contacts might cause a cartridge error. Follow these steps to remove, inspect, and clean the problem cartridge (the cartridge or cartridges indicated by the blinking lights). First, make sure that you are using cartridges that are compatible with your printer.
Step 1: Remove and inspect the problem cartridge
Follow these steps to remove and then inspect the problem cartridge.
-
Find a clean, lint-free cloth (eyeglass wipes or coffee filters work well) that you can use to clean the cartridge contacts.
-
Press the Power button to turn on the printer.
-
Open the cartridge access door. The carriage moves to the left side of the printer. Wait until the carriage is idle and silent before proceeding.
Figure : Open the cartridge access door
-
Push in on the front of the problem cartridge to release it, and then pull the cartridge toward you to remove it from its slot.
Figure : Remove the problem cartridge from its slot
-
Inspect the copper-colored cartridge contact for ink buildup or debris.
Figure : Copper-colored contact on the cartridge
Step 2: Clean the cartridge contacts
Follow these steps to clean the cartridge contacts.
caution:Clean the problem cartridges one at a time. Do not leave a cartridge outside of the printer for more than 10 minutes. Also, never turn off the printer when a cartridge is removed from its slot. Leaving cartridge slots empty might cause damage to the cartridge ink system.
-
With a clean, lint-free cloth (eyeglass wipes or coffee filters work well), wipe the copper-colored contact on the cartridge.
Figure : Copper-colored contact on the cartridge
-
Carefully reinsert the cartridge into its slot, and then push the cartridge forward until it clicks into place.
Figure : Reinsert the cartridge
note:
Make sure that the colored dot on the cartridge label matches the colored dot on the carriage slot.
-
Repeat these steps for other problem cartridges, if necessary.
-
Close the cartridge access door.
Figure : Close the cartridge access door
Step 3: Print a test page
Printing a test page verifies that the hardware functions correctly.
How to print a test page
-
Load plain white paper in the paper tray.
-
On the printer control panel, press and hold the Cancel button (
) for 3 seconds, and then release. The test page prints.
-
If these steps resolved the issue, and the test page prints, there is no need to continue troubleshooting.
-
If the issue persists, continue with the next solution.
-
If the test page does not print, continue with the next solution.
Solution four: Reset the printer
A printer reset can recalibrate the cartridges.
-
With the printer turned on, disconnect the power cord from the rear of the printer.
-
Unplug the power cord from the wall outlet.
-
Wait at least 15 seconds.
-
Plug the power cord back into the wall outlet.
-
Reconnect the power cord to the printer.
-
Turn the printer on.
Solution five: Repeat the cartridge cleaning steps
If the error message still displays on the printer control panel, repeat the cartridge cleaning steps in the previous solution.
Solution six: Replace the cartridges
The light on the control panel indicates the specific cartridge that caused the error. Identify the problem cartridge, and then follow these steps to replace the problem cartridge.
Step 1: Replace the cartridges
If you have a defective cartridge or printhead, it might be under warranty. To check the warranty on your ink or toner supplies, go to Printer and Page Yield Overview, and then review the limited warranty information for your supplies.
-
Press the Power button to turn on the printer, if it is not already on.
-
Open the cartridge access door.
Figure : Open the cartridge access door
-
Push in on the front of the cartridge to release it, and then pull it toward you to remove it from its slot.
Figure : Remove the cartridge from its slot
-
Remove the new cartridge from its packaging.
-
Hold the cartridge so that the cartridge contacts are facing toward the printer.
-
Slide the new cartridge into its slot, and then gently push it forward until it clicks into place.
note:
Make sure that the colored dot on the cartridge label matches the colored dot on the slot.
Figure : Insert the cartridge into its color-coded slot
-
Repeat these steps for other cartridges, if necessary.
-
Close the cartridge access door.
Figure : Close the cartridge access door
Step 2: Print a test page
Printing a test page verifies if the hardware functions correctly.
How to print a test page
-
Load plain white paper in the paper tray.
-
On the printer control panel, press and hold the Cancel button (
) for 3 seconds, and then release. The test page prints.
-
If these steps resolved the issue, and the test page prints, there is no need to continue troubleshooting.
-
If the issue persists, continue with the next solution.
-
If the test page does not print, continue with the next solution.
Solution eight: Service the printer
If you have completed all the solutions listed above and are still experiencing a problem, continue to the Service the printer section at the end of this document.
Issue: The Power light is on and one or more of the cartridge lights is on
The following light pattern displays on the printer control panel:
-
Power light: On
-
Resume light: Off
-
Wireless light: On or off, depending on the connection status
-
HP ePrint light: On or off, depending on the connection status
-
Cartridge lights: One or more are on
Figure : The Power light is on and one or more the cartridge lights are on

-
Cause
One or more of the cartridges might be low on ink.
Solution one: Check the ink levels in the cartridges
If the Power light is on and one or more of the cartridge lights is on steadily, check to see if the cartridges indicated are low on ink.
note:
Ink level warnings and indicators provide estimates for planning purposes only. When an indicator shows low ink levels, consider having a replacement cartridge available to avoid possible printing delays. If you have installed a refilled or remanufactured cartridge or a cartridge that was used in another printer, the ink-level indicator might be inaccurate or unavailable.
Step 1: Check the ink levels
Use one of the following methods to check the ink levels in the cartridges.
Method one: Check the ink levels from the control panel
Print a test page to check the ink levels.
-
Load plain white paper in the paper tray.
-
On the printer control panel, press and hold the Cancel button (
) for 3 seconds, and then release. The test page prints.
Method two: Check the ink levels using HP software
Follow these steps to check the estimated ink levels from the HP software on the computer.
note:
If you are not using the latest version of Windows 8, the information in this document might not match. You can get the latest version from the Microsoft Store.
-
Open the HP software:
-
Windows 8
On the Start screen, click or tap the printer’s tile. The software opens.
note:
You can also open the HP software by clicking or tapping the printer’s icon on the desktop (
). -
Windows 7
Click Start (
), click All Programs, click HP, click the folder for your HP printer, and then click the icon for your HP printer (). -
Windows Vista
ClickStart (
), click Programs, click HP, click the folder for your HP printer, and then click the icon for your HP printer (). -
Windows XP
Click Start (
), click All Programs, click HP, click the folder for your HP printer, and then click the icon for your HP printer (). -
OS X v10.9, v10.8, and v10.7
Click Macintosh HD, click Applications, and then double-click Hewlett-Packard.
note:
You can also open the HP software from your computer desktop; double-click the icon for your HP printer (
).The HP software window opens.
-
-
note:
You can also open the HP software from your computer desktop; double-click the icon for your HP printer.
The HP software window opens.
-
In the HP software window, click Estimated Ink Levels.
The HP Toolbox opens and displays a graphic of the estimated ink levels for each cartridge.
Figure : Estimated ink levels
 ).
). ), click
  ).
). ), click
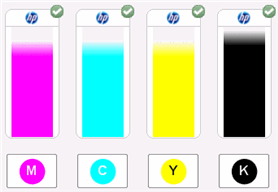
Step 2: Replace the cartridges with low ink levels
If you have a defective cartridge or printhead, it might be under warranty. To check the warranty on your ink or toner supplies, go to Printer and Page Yield Overview, and then review the limited warranty information for your supplies.
Purchase replacement cartridges and other supplies from the HP Store or local retailers.
-
Press the Power button to turn on the printer, if it is not already on.
-
Open the cartridge access door.
Figure : Open the cartridge access door
-
Push in on the front of the cartridge to release it, and then pull it toward you to remove it from its slot.
Figure : Remove the cartridge from its slot
-
Remove the new cartridge from its packaging.
-
Hold the cartridge so that the cartridge contacts are facing toward the printer.
-
Slide the new cartridge into its slot, and then gently push it forward until it clicks into place.
note:
Make sure that the colored dot on the cartridge label matches the colored dot on the slot.
Figure : Insert the cartridge into its color-coded slot
-
Repeat these steps for other cartridges, if necessary.
-
Close the cartridge access door.
Figure : Close the cartridge access door
Issue: The Power light is on and the Resume light and one or more of the cartridge lights blinks
The following light pattern displays on the printer control panel:
-
Power light: On
-
Resume light: Blink
-
Wireless light: On or off, depending on the connection status
-
Alert light: Off
-
HP ePrint light: On or off, depending on the connection status
-
Cartridge lights: One or more blink
Figure : The Power light is on and the Resume light and one or more of the cartridge lights blinks

-
Cause
The cartridge access door is not closed completely.
Solution
Follow these steps to make sure that the cartridge access door is closed.
-
Figure : Open the cartridge access door
-
Figure : Close the cartridge access door
Issue: All lights are on
The following light pattern displays on the printer control panel:
-
Power light: On
-
Resume light: On
-
Wireless light: On
-
Alert light: On
-
HP ePrint light: On
-
Cartridge lights: All on
Figure : All lights are on

-
Cause
A non-recoverable error has occurred.
Solution
Follow these steps to resolve the issue.
Step 1: Disconnect and then reconnect the printer power cord
Follow these steps to disconnect and then reconnect the power cord to the printer.
-
With the printer turned on, disconnect the power cord from the rear of the printer.
-
Unplug the power cord from the wall outlet.
-
Wait at least 15 seconds.
-
Plug the power cord back into the wall outlet.
-
Reconnect the power cord to the printer.
-
Turn the printer on.
Step 2: Print a test page
Printing a test page verifies if the hardware functions correctly.
How to print a test page
-
Load plain white paper in the paper tray.
-
On the printer control panel, press and hold the Cancel button (
) for 3 seconds, and then release. The test page prints.
-
If these steps resolved the issue, and the test page prints, there is no need to continue troubleshooting.
-
If the issue persists, continue with the next solution.
-
If the test page does not print, continue with the next solution.
Step 3: Service the printer
If you have completed all the solutions listed above and are still experiencing a problem, continue to the Service the printer section at the end of this document.
Issue: The Power light is on and the HP ePrint light is off
The following light pattern displays on the printer control panel:
-
Power light: On
-
Resume light: Off
-
Wireless light: On or off depending on the status
-
HP ePrint light: Off
-
Cartridge lights: Off
Figure : The Power light is on and the HP ePrint light is off
-
Cause
The following reasons can cause the issue:
-
HP ePrint has not been set up.
-
HP ePrint has been set up but turned off.
-
HP ePrint is turned on
but is unable to connect. -
HP ePrint has been set
up but has been turned
off because the printer
has not been updated.
-
Solutions
Follow these solutions to resolve the issue.
Solution one: Turn on HP ePrint
To turn on HP ePrint, press the HP ePrint button ( ).
).
Solution two: Try connecting HP ePrint
Press the HP ePrint button () to try connecting.
-
If the printer can
connect, the HP
ePrint light turns
on, and then the printer
prints an
information page. -
If the printer still
cannot connect,
the HP ePrint light
blinks and turns off, and then the
printer prints an
information page.
Solution three: Install a mandatory printer update
If a mandatory update for
the printer is available
but has not been
installed, HP ePrint is
turned off. After the
update has been
installed, HP ePrint turns
on automatically.
Issue: The Power light is on and the HP ePrint light is on
The following light pattern displays on the printer control panel:
-
Power light: On
-
Resume light: Off
-
Wireless light: On or off depending on the status
-
HP ePrint light: On
-
Cartridge lights: Off
Figure : The Power light is on and the HP ePrint light is on

-
Cause
HP ePrint is on and ready to use.
Solution
HP ePrint is on and ready to use.
-
If you press the HP ePrint button (
) once, the printer
prints an information page that
includes the email address you
will use for printing documents
using HP ePrint. -
To turn off HP ePrint, press
and hold the HP ePrint button (). The light blinks for 5
seconds before turning off.
Issue: The Power light is on and the HP ePrint light blinks
The following light pattern displays on the printer control panel:
-
Power light: On
-
Resume light: Off
-
Wireless light: On or off depending on the status
-
HP ePrint light: Blinks
-
Cartridge lights: Off
Figure : The Power light is on and the HP ePrint light blinks

-
Cause
HP ePrint is trying to connect.
Solution
The HP ePrint light blinks when
you turn on or turn off HP
ePrint. Wait for the printer to finish.
-
If HP ePrint is able to connect
successfully, the light blinks
and then turns on. -
If HP ePrint
cannot connect, the light blinks
and then turns off.
Issue: The Power light is on and the Wireless light blinks
The following light pattern displays on the printer control panel:
-
Power light: On
-
Resume light: Off
-
Wireless light: On
-
HP ePrint light: On
-
Cartridge lights: On, off, or blinking, depending on status
Figure : The Power light is on and the Wireless light blinks

-
Cause
The printer cannot connect to your network.
Solution
Connect your printer to a network.
Service the printer
Service or replace your HP product if the issue persists after completing all the preceding steps.
Go to Contact HP Customer Support to schedule a product repair or replacement. If you are in Asia Pacific, you will be directed to a local service center in your area.
To confirm your warranty status, go to HP Product Warranty Check. Repair fees might apply for out-of-warranty products.
Содержание этого документа относится к принтерам HP OfficeJet 251dw, 276dw, 3610, 3620, 6100, 6600, 6700, 7110, 7510, 7610, 7612, 8100, 8600, 8610, 8615, 8616, 8620, 8625, 8630, 8640, 8660, 9010, 9012, 9013, 9014, 9015, 9016, 9018, 9019, 9020, 9022, 9023, 9025, 9026, 9028 и 9012.
Принтер не печатает, а на панели управления или на компьютере отображается одно из следующих сообщений об ошибке:
-
Проблема системы печати
-
Проблема системы подачи чернил
-
Проблема системы принтера
Шаг 1. Проверьте картриджи на наличие протечек
Замените любые картриджи, где есть утечка.
Внимание!Не используйте чернильные картриджи с утечкой.
Чтобы узнать номер картриджа и приобрести расходные материалы, такие как чернила или тонер, посетите магазин HP Store или обратитесь в местный магазин розничной торговли. Используйте только подлинные расходные материалы HP, такие как чернила или тонер, предназначенные для вашего принтера. Компания HP не может гарантировать качество или надежность картриджей сторонних производителей или повторно заправленных картриджей. Для проверки подлинности используемых картриджей посетите веб-страницу HP anti-counterfeit (на английском языке).
На неисправный картридж или печатающую головку может распространяться гарантия. Чтобы проверить гарантию на расходные материалы, такие как чернила или тонер, перейдите на веб-страницу Узнайте об оригинальных расходных материалах HP, затем ознакомьтесь с информацией по ограниченной гарантии для своих расходных материалов.
-
Откройте дверцу для доступа к чернильным картриджам.
-
Прежде чем продолжить, дождитесь остановки каретки.
-
Извлеките чернильный картридж, затем осмотрите его на предмет утечки чернил.
-
Если картридж протекает, замените чернильный картридж. Если чернильный картридж не протекает, вставьте его в соответствующее гнездо.
-
Повторите эти действия для трех других струйных картриджей.
-
Закройте дверцу отсека картриджей.

Если сообщение об ошибке сохраняется, перейдите к следующему шагу.
Шаг 2. Перезагрузите принтер
Сброс настроек принтера может устранить появление сообщения об ошибке.
-
Когда принтер включен, отсоедините от него кабель питания.
-
Отсоедините кабель питания от источника питания.
-
Подождите 60 секунд.
-
Снова подключите кабель питания к электрической розетке и принтеру.
Примечание.
Компания HP рекомендует подключать принтер напрямую к электрической розетке.
Если сообщение об ошибке сохраняется, перейдите к следующему шагу.
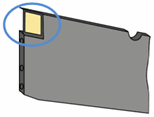
Шаг 3. Проверьте каретку на наличие фиксатора печатающей головки
Откройте дверцу, чтобы получить доступ к чернильным картриджам, затем определите, есть ли на картридже, вставленном в принтер, фиксатор печатающей головки.
Пример картриджа с фиксатором
-
Если каретка имеет фиксатор печатающей головки, перейдите к следующему шагу.
Шаг 4. Переустановите печатающую головку три раза
Чтобы удалить сообщение об ошибке, может потребоваться переустановить печатающую головку до трех раз.
-
Откройте дверцу для доступа к чернильным картриджам.
-
Прежде чем продолжить, дождитесь остановки каретки.
-
Отключите кабель питания от задней панели принтера.
Предупреждение.Необходимо отсоединить шнур питания, прежде чем проводить работы внутри принтера.
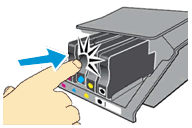
-
Поднимите фиксатор каретки, приподнимите печатающую головку, опустите печатающую головку обратно в каретку, покачайте печатающую головку влево и вправо, затем опустите фиксатор каретки, чтобы закрепить печатающую головку на месте.
-
Закройте дверцу отсека картриджей.
-
Подсоедините шнур питания к тыльной стороне принтера, затем проверьте панель управления на наличие сообщения об ошибке.
-
Иногда сообщения об ошибке продолжают отображаться после установки печатающей головки. Если сообщение об ошибке продолжает отображаться, повторите действия для повторной установки печатающей головки до трех раз.

Если сообщение об ошибке сохраняется, перейдите к следующему шагу.
Шаг 5. Замените печатающую головку
Если предыдущие решения не помогли устранить неполадку, возможно, закажите новую печатающую головку на замену.
На неисправный картридж или печатающую головку может распространяться гарантия. Чтобы проверить гарантию на расходные материалы, такие как чернила или тонер, перейдите на веб-страницу Узнайте об оригинальных расходных материалах HP, затем ознакомьтесь с информацией по ограниченной гарантии для своих расходных материалов.
Если гарантия на печатающую головку в сборе истекла, можно приобрести новую через Интернет.
-
Если вы находитесь в стране Азиатско-Тихоокеанского региона, вы будете перенаправлены в сервисный центр в вашей стране/регионе.
-
Найдите в магазине комплектующих HP номер детали для своей печатающей головки. См. следующую таблицу, чтобы найти номер детали для своей печатающей головки, используя номера чернильных картриджей, применяемых в принтере.
Номер чернильного картриджа
Страна/регион
Номер детали для печатающей головки
HP 950, 951
Северная и Южная Америка
CR322A
Европа, Ближний Восток, Африка
CR324A
Азиатско-Тихоокеанские страны/регионы, Япония
CR326A
HP 952-959
В любой стране
M0H91A
HP 962-969
В любой стране
3JB16A
-
Следуйте онлайн-инструкциям, чтобы заказать печатающую головку в сборе.
Если сообщение об ошибке сохраняется, перейдите к следующему шагу.
Шаг 6. Выполните сервисное обслуживание принтера
Проведите сервисное обслуживание или замените устройство HP, если выполнение всех вышеуказанных действий не помогло устранить проблему.
Перейдите на веб-страницу Обращение в службу поддержки клиентов HP, чтобы запланировать ремонт или замену устройства. Если вы находитесь в стране Азиатско-Тихоокеанского региона, вы будете направлены в местный сервисный центр в вашей стране/регионе.
Для проверки состояния гарантии перейдите на веб-страницу Проверка гарантии на устройства HP. За ремонт устройств после окончания гарантийного срока может взиматься оплата.
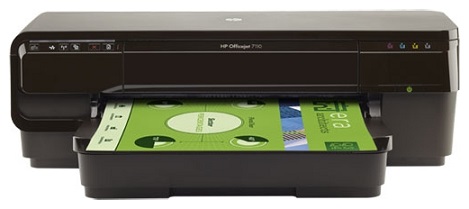
Сервис-центр Комплэйс выполнит ремонт HP Officejet 7110 с гарантией. Обычный срок ремонта один день. Диагностика неисправности бесплатная. Ремонт осуществляется только в мастерской центра. Выезда мастера нет.
Принтер HP OfficeJet 7110 — это шкатулка с сюрпризом, если рассматривать его в качестве ремонта. В первую очередь, потому что диагностика ошибок идиотская, точнее практически отсутствует. Большинство ошибок определяется диагностической программой hp scan and print doctor как «Ошибка принтера». Причем принтер знает, что это за ошибка, но вам не скажет. Например, ошибки позиционирования, застревания каретки, замятия и ошибка датчика ширины бумаги выглядят одинаково — ошибка принтера.
Другой пример. Отличить проблему головки от проблемы картриджей и окисления датчиков давления чернил но только серией экспериментов.
Диагностика для этого принтера — самая сложная работа. Все определяется опытом мастера.
| Работа | Цена руб. |
| Чистка головки | 2000 |
| Принтер не определяет картриджи | 1500 |
| Устранение общей ошибки | 1500-3000 |
| Ремонт узла обслуживания | 2500 |
| Чистка принтера | 1500 |
| Ремонт подачи бумаги | 2500 |
Срок ремонта обычно 1-2 дня.
Общая ошибка принтера Officejet 7110
Неоригинальные картриджи
Принтер HP Officejet 7110 с неоригинальными картриджами при включении выдает фатальную ошибку «Ошибка принтера или системы подачи чернил», одновременно мигают индикатор тревоги !, индикатор желтого картриджа, индикатор питания.
Проблема заключается в неоригинальных картриджах. Принтер не работает просто из-за неоригинального картриджа. Чтобы обойти эту проблему, можно выполнить сброс. Делаем следующие манипуляции в каждом конкретном сеансе печати.
Нажав кнопку отмены Х, включить принтер. Нажать отмену еще 2 раза. Замигает индикатор возобновления печати. Включить принтер. Принтер войдет в режим готовности. Можно печатать.
Для каждого сеанса выполнять указанную процедуру. Потому что после выключения принтера ошибка повторится.
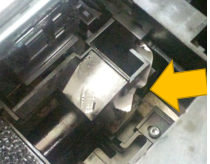
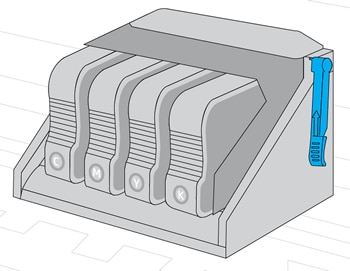
Неисправность узла подачи воздуха
Общая ошибка может также появиться в случае неисправности системы подачи чернил Officejet 7110 и Officejet 7610. Причем принтер выходит в ошибку после начала чистки головки. Эта ошибка возникает из-за нарушения работы узла подачи давления воздуха в картриджи.
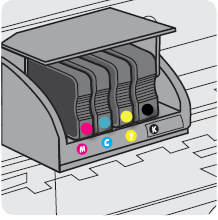
В принтере HP Officejet 7110 чернила в головку подаются путем создания дополнительного давления. Это давление воздухом создается специальным насосом, который расположен в задней части принтера справа внизу. Затем воздух подается в верхнюю часть головки принтера по двум трубкам головки и через резиновые штуцеры поступает в картриджи. На фото внизу — перевернутая верхняя часть головки.

Слева находится штуцер трубки черного картриджа, а также резиновый штуцер, входящий в черный картридж. Справа расположен штуцер трубки цветных картриджей и 3 резиновых штуцера, через которые воздух поступает во все цветные картриджи.
Подключение к насосу осуществляется поочередно поочередно — то к черному картриджу, то к цветным. Потому что насос один. Для этого трубки крепятся на на вращающемся фланце (в головке), который поворачивается узлом переключения и в зависимости от положения соединяется либо к трубке черного картриджа, либо к трубке цветных картриджей.

Если этот узел заклинило или он сломан, появится ошибка.
Еще одной причиной общей ошибки принтера HP Officejet 7110 является неисправность датчика верхней крышки. Ошибка появляется примерно через минуту после включения принтера — начинает мигать восклицательный знак.
Переход на ремонт струйных принтеров HP, а также сбой системы чернил HP.
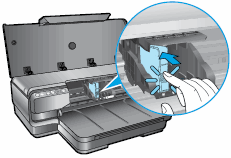
Замятие бумаги HP Officejet 7110
Обычно для струйных принтеров HP сообщение «Замятие бумаги» на 90% не связано с бумагой. Например, это может быть проблема с переключателем слева или узлом обслуживания справа. И то и другое — это геморрой.
Если неисправность в узле очистки, то готовьтесь вымазаться по самые уши в чернилах. Нужно снять кювету и промыть ее всю вместе с абсорберами. Но после чистки нужна тщательная смазка. Затем надо высушить, смазать и установить на место. Кстати, такая работа займет несколько часов и стоит порядка 3000 руб.
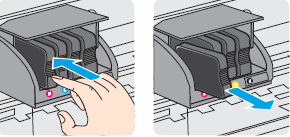
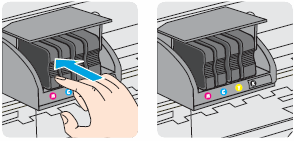
HP Officejet 7110 не распознает картриджи
Распространенная проблема в HP Officejet 7110, если принтер периодически сообщает о проблеме с картриджами, которые еще не кончились. Но принтер требует заменить их, хотя там еще много чернил.
Это проблема в головке, конкретно в датчиках давления чернил. Проблема не очень сложная. Цена решения вопроса 2500 рублей.
Застревание каретки HP 7110, дергается, не двигается
- Если каретка резко дергается и возникает ошибка замятия каретки, застревания, не двигается, то есть несколько причин:
- неисправна головка, поломка датчика энкодера на плате головки — перепаять датчик
- энкодерная лента повреждена или вышла из датчика в головке, неправильно установили печатающую головку
- поврежден шлейф, контакты шлейфа от платы к головке повреждены или в чернилах
- неисправна плата управления
- проблема в блоке питания (были реальные случаи, когда замена адаптера устраняла неисправность)
Ошибка датчика ширины бумаги

Датчик ширины бумаги — очень важный сенсор. Если другие принтеры работают с неисправным датчиком ширины бумаги, то HP Officejet 7110 выдаст ошибку принтера. Причиной неисправности датчика скорее всего являются попадание чернил, выход из строя оптопары или шлейфа.
Плохое качество печати HP Officejet 7110
Плохое качество печати принтера HP Officejet 7110 обычно связывают с засохшей печатающей головкой. Чистку головки обычно начинают с отмачивания в жидкостях, растворяющих пигментные чернила. Однако не всегда такая промывка заканчивается прочисткой дюз. Часто сильно засохшие чернила не позволяют раствору проникнуть в головку. В этом случае следует применять ультразвуковую ванну.
Только комбинация способов чистки позволяет прочищать головки, которые не печатали больше года.
Чистка головка HP Officejet 7110 стоит 2000 рублей.
Разборка HP Officejet 7110
Разборку принтера HP Officejet 7110 начинаем со снятия левой и правой крышек управления и индикации, отжимая их снизу.


Отсоединяем шлейфы. Отвинчиваем винты крепления верхней крышки.

Теперь правую крышку и винты.

Под ней винты верхней крышки откручиваем.


Отвинчиваем все винты задней верхней крышки, чтобы снять ее

вместе с откидывающейся крышкой.

Только потом снимаем боковые крышки.


Откручиваем все винты верхней крышки по периметру.

Отсоединяем шлейфы и снимаем верхнюю крышку принтера.


Широкоформатный принтер HP
Officejet 7110
Руководство пользователя

Информация об авторских правах
© Hewlett-Packard Development Company,
L.P., 2014.
Редакция 2-е, 1/2014
Уведомления компании Hewlett-Packard
Приведенная в этом документе
информация может быть изменена без
уведомления.
Все права защищены. Воспроизведение,
адаптация и перевод без
предварительного письменного
разрешения Hewlett-Packard запрещены
за исключением случаев,
предусмотренных законодательством по
защите авторских прав.
Гарантийные обязательства для
продуктов и услуг HP приведены только
в условиях гарантии, прилагаемых к
каждому
продукту и услуге. Никакие
содержащиеся здесь сведения не могут
рассматриваться как дополнение к этим
условиям гарантии. HP не несет
ответственности за технические или
редакторские ошибки и упущения в
данном документе.
Товарные знаки
Microsoft, Windows, Windows XP,
Windows Vista, Windows 7 и Windows 8
являются зарегистрированными в США
товарными знаками корпорации
Майкрософт.
Название ENERGY STAR и эмблема
ENERGY STAR являются
зарегистрированными в США товарными
знаками.

Информация о безопасности
Для снижения риска получения ожогов
или поражения электрическим током
всегда соблюдайте основные меры
предосторожности при использовании
данного устройства.
1. Внимательно прочтите все инструкции,
которые содержатся в прилагаемой к
принтеру документации.
2. Соблюдайте все предупреждения и
инструкции, указанные на устройстве.
3. Перед очисткой устройства
отсоедините его от электрической
розетки.
4. Не устанавливайте и не используйте
устройство рядом с
водой, а также не
прикасайтесь к нему влажными руками.
5. Устанавливайте устройство на
устойчивой поверхности.
6. Не устанавливайте устройство в таком
месте, где кабель питания может быть
поврежден, а также где можно
споткнуться или наступить на кабель
питания.
7. Если устройство работает
неправильно, см.
Обслуживание
принтера на стр. 19.
8. Внутри устройства нет компонентов,
предназначенных для обслуживания
пользователем. Обслуживание должно
выполняться только квалифицированным
специалистом.


Содержание
1 Начало работы ……………………….…………………..………..…….…………………….………..……….……….……….…….. 1
Специальные возможности ……….………..……….………………………….…..………………………….………….. 2
HP EcoSolutions (HP и окружающая среда) ……..……..………..…….……….……………..….……….……..… 3
Управление электропитанием ……….…………………………………….…………..………..…………. 3
Оптимизация использования расходных материалов .……………………………………………. 4
Описание компонентов принтера …….……..………………………………..…………….……………………….….. 5
Вид спереди ……..……….………….………..……….………………………..……….…………………..…… 5
Отсек для расходных материалов …………………….……………………..…………………………… 5
Панель управления ………………..………..………….…………………………….………..…………….… 6
Вид сзади …….………………………..……..…………………….………..……………………………….……. 7
Выбор бумаги для печати …….………….……………………………….……………..…………..………..……………. 8
Типы бумаги, рекомендуемые для печати …..……..………..……………..………..……….……… 8
Типы бумаги, рекомендуемые для печати фотографий …………………………………………. 9
Рекомендации по
выбору и использованию бумаги ….………….………….…………….…….. 10
Загрузка бумаги ……………..……….………..……..…………….……………………….……………………………..… 12
Загрузка бумаги стандартного размера ……………..………….………………….……….……….. 12
Загрузка конвертов ……………..………..………….………………………….……….…………………… 13
Загрузка открыток и фотобумаги ……………..……..………………………………………………….. 13
Загрузка бумаги нестандартного размера ………..…………………..………..……………..……. 14
Выключение принтера …………….………..……..………..…………….……………..………………..………………. 15
Обновление принтера ……..………………………..…………………….……..………………………..………..……… 16
Установка дополнительных приспособлений ………..………..……….…………..……….……………………. 17
установка устройства автоматической двусторонней печати (дуплексера) ……………. 17
Включение дополнительных приспособлений в принтере печати ……..………………….. 17
Включение дополнительных приспособлений (Windows) ………………….…… 17
Порядок включения
дополнительных приспособлений на компьютерах
с ОС Mac OS X ….……………………….………………….……………………………………. 18
Обслуживание принтера …………………….…………………….………………….………….……………………….. 19
Очистка внешних поверхностей ………………….…………..………..……….………………..……… 19
Восстановление настроек по умолчанию …………………………….……………………….……… 19
Откройте раздел программного обеспечения принтера HP (Windows) ………………………..………. 20
RUWW
v

2 Печать ………………..…………………..…………………………..…………………………………………..…………………………. 21
Печать документов …………….………..…………………..……….…….………..……….………..…………………... 22
Печать документов (Windows) ……………………….………….…………….……….…………………. 22
Печать документов (Mac OS X) ……….…….………..……..……….………………..……….……..… 22
Печать брошюр …………..…………………………………………………………………………………………………….. 24
Печать брошюр (Windows) …..……..……….………..……….……...…………..……….……..………. 24
Печать брошюр (Mac OS X) .………..………..…………………..…………….…………..……….……. 24
Печать на конвертах …..……………..………..……..………..……....………..……….……………….……..……….. 26
Печать на конвертах (Windows) …….…………….………………..……….…………………………... 26
Печать на конвертах (Mac OS X) .……………………..……………………….……………………….. 26
Печать фотографий .………………………………………………….…….……………………………………………….. 28
Печать фотографий на фотобумаге (Windows) ………………………..………..………….……… 28
Печать фотографий на фотобумаге (Mac OS X) ….……………………………………………….. 28
Печать на специальных и нестандартных носителях
……………………………………………………..……. 30
Печать на специальных или нестандартных носителях (Mac OS X) .…………………..…. 30
Настройка нестандартных размеров (Mac OS X) ………….………..………….……….…..……. 31
Печать фотографий и документов без полей …….……….………………..…………………….………………. 32
Печать фотографий и документов без полей (Windows) ………………………………………. 32
Печать фотографий и документов без полей (Mac OS X) …………………………………….. 32
Двусторонняя печать ……….……..………..……..………………..………….……..………..……..………..………… 34
Выполнение двусторонней печати (Windows) ………………………….………………….….……. 34
Выполнение двусторонней печати (Mac OS X) ……….……………….…………………....…….. 34
Советы по успешной печати …………..…………..…………………….……………..…………………….………….. 36
3 HP ePrint …….…………………………..……….…...……….………………………..……………….…………….………..………… 39
Настройка HP ePrint ……………………..…………………………….………………………………….…………….
…… 40
Настройка HP ePrint с помощью встроенного веб—сервера ………..……………………….... 40
Настройка HP ePrint с помощью программного обеспечения принтера HP ……………. 40
Использование HP ePrint ……..……….……………………..……………..…………..………………….…………….. 42
Печать с помощью HP ePrint ………….………………………………….………….……………..…….. 42
Поиск адреса электронной почты принтера ……………………………………………………..…. 42
Отключение HP ePrint …………..……..………..……..………...………..……………….………………. 43
Удаление веб—служб ………………..…….………..……..……….………………..……….……..……..……….……… 44
4 Использование картриджей ………………..………….………..…………..….………..……………………..……….………. 45
Информация о картриджах и печатающей головке ………………………..…………….………..…………… 46
Проверка приблизительного уровня чернил …………………….…………….………….……..……………..… 47
Печать только черными или только
цветными чернилами …………………………………..……………… 48
Замена картриджей ……….……..………………..……..…………….……..……………………….…………………… 49
Хранение расходных материалов …..……..………..……..……………….……..………….……….……………… 51
vi
RUWW

Хранение анонимной информации об использовании …….………..……………………………………..….. 52
5 Решение проблемы ……..……….……………….……………………..………..……….………………….……………….…….. 53
Служба поддержки HP …….……………………………………………..…………………….……….…………………. 54
Получение электронной поддержки ……….……………..………..…….……………..…….…….... 54
Поддержка HP по телефону ………..……..………..…….……………….…………………..…….…… 55
Действия перед обращением …………………………………………………..………….. 55
Период поддержки по телефону ………………………………………….………….…… 56
Номера телефонов службы поддержки ………………………………………….…….. 56
По истечении периода поддержки по телефону ..……………………….…….…… 57
Общие советы и ресурсы для устранения неполадок ……………………..…………………….…………….. 58
Устранение неполадок принтера …..…………………..……………….…………...…………………….………….. 59
Принтер неожиданно
выключается ……………………………..……………………………………… 59
Сбой выравнивания …………………..………………..……………….….………………..……..………... 59
Принтер не отвечает (ничего не печатается) …………………………………………………….… 59
Принтер печатает медленно ……………………………………………..………….………………..….. 60
Решение 1. Выберите более низкое качество печати ……………………….…… 60
Решение 2. Проверьте уровень чернил …………………………………..……………. 60
Решение 3. Обратитесь в службу поддержки HP ………………………………….. 61
При работе принтера слышны какие—то звуки ………………………………..……………..…….. 61
Печать пустых страниц или пропуски печати ………………..……………………….………….... 62
Некоторые фрагменты изображения отсутствуют или
печатаются неправильно ……. 62
Неправильное размещение текста или графики ….………..………….…………………..…….. 63
Устранение неполадок качества печати ………………………….………………….……………..………………. 64
Решение 1. Убедитесь, что используются оригинальные картриджи HP. ………….…… 64
Решение 2. Проверьте уровень чернил …….………………..…………..……….………..……..…. 64
Решение 3. Проверьте бумагу, загруженную во входной лоток …………………………….. 65
Решение 4. Проверьте тип бумаги ……………..…………………..……………….……..……….….. 65
Решение 5. Проверьте параметры печати ……….……………………………..……..…………….. 65
Решение 6. Напечатайте и просмотрите отчет о качестве печати ……………..………….. 66
Решение
7. Обратитесь в службу поддержки HP ………….………………………….………….. 68
Устранение неполадок, связанных с подачей бумаги ……………………………………………………..….. 69
Решение проблем при работе с HP ePrint и веб—сайтами HP ………………………………………………. 71
Решение проблем при работе с HP ePrint …………….……..………..……..……....………….…. 71
Решение проблем при работе с веб—сайтами HP …………………………………………………. 72
Настройка брандмауэра для работы с принтером …….……………….……………………..………..………. 73
Устранение неполадок, связанных с управлением принтером …………….………..…………..………… 75
Не удается открыть
встроенный веб—сервер ……………………………………………………..… 75
Решение проблем в сети ……..………………….…………………………..…………….……….…………………….. 77
Решение проблем проводного сетевого соединения (Ethernet) ………………………..…… 77
RUWW
vii

Устранение неполадок, связанных с беспроводной связью ………….………………………. 77
Устранение основных неполадок беспроводной связи ………….………………. 78
Расширенное устранение неполадок беспроводной связи …..……….……..… 79
Шаг 1. Убедитесь, что компьютер подключен к сети …………..….. 80
Шаг 2. Убедитесь, что принтер подключен к сети ………..………… 81
Шаг 3. Убедитесь, что компьютер не подключен к сети через
частную виртуальную сеть (VPN) …………………………….……………. 83
Шаг 4. Убедитесь, что принтер подключен и готов
к работе …… 83
Шаг 5. Убедитесь, что беспроводная версия принтера
настроена в качестве драйвера принтера по умолчанию
(только для Windows) ……………………………………………..……………. 84
Шаг 6. Убедитесь, что брандмауэр не блокирует обмен
данными ……….………..……………….……….………...…………..……..……. 84
После устранения проблем ……….………………..……………….………….…….…….. 85
Сброс сетевых параметров принтера ………………………………..………………………………… 85
Устранение неполадок, связанных с установкой ……………………………………………………..…………. 86
Рекомендации по установке оборудования ……………………………………………………..….. 86
Рекомендации по установке программного обеспечения HP …………..……..…….……… 86
Сведения об отчете о состоянии принтера …………….…………….………….……………..………………….. 88
Сведения о странице конфигурации сети ……………………………………………………..…………………… 90
Обслуживание печатающей головки ……………..……………………………….……..………………..…………. 93
Очистка печатающей головки ……………..………………..……………………...……………………. 93
Выравнивание печатающей головки ……..……………..………..…….……….………….……..….. 94
Удаление и повторная установка программного обеспечения HP ……………………………………….. 96
Устранение замятий ………………………..…………………….…………………………………….…………………… 98
Устранение замятия бумаги ……………………………….…………………….………………….…….. 98
Предотвращение замятий ………………………………………………………………..…………………. 99
Описание индикаторов панели управления ……………………………………………………..………………. 101
Приложение А Техническая информация ……………….…………………………………….……………………………. 108
Информация о гарантии ……..………………………………..………..…..……..………..……….……….………… 109
Ограниченная
гарантия Hewlett-Packard ………….………………..…………..………………….. 109
Информация о гарантии на картриджи ……….…………………………………………….………. 110
Технические характеристики принтера ………..………….………………….…………....…………..………… 111
Физические характеристики …………..………………..……………………….…………..…………. 111
Функции и характеристики ..………………….……..………………….……..……….……..………… 111
Технические характеристики процессора и памяти …………………………………………… 112
Системные требования ………….……….………..………………….……………..……….………..…. 112
Характеристики сетевых протоколов ………………………….………………………….…………. 112
Технические характеристики встроенного веб—сервера ………………..…………….…….. 112
Характеристики бумаги ……………………………………………………..…………………….………. 113
viii
RUWW

Характеристики поддерживаемых носителей ……………………………….…….. 113
Сведения о поддерживаемых размерах ……………………………..… 113
Сведения о поддерживаемых форматах и плотностях
носителей ………..…………………………………………...…………………... 116
Установка минимальных полей ……………..…………………………………………… 116
Инструкции по печати на обеих сторонах страницы ……………………………. 117
Разрешение печати ………..………….………………………………...……….…………………………. 118
Требования для работы с веб—сайтами HP и HP ePrint ……………………………….………. 118
Требования для работы с HP ePrint ……………………………………………..…….. 118
Требования для работы с веб—сайтами HP ……………..…………………………… 119
Условия окружающей среды …………….………..…………….……………….…………….……….. 119
Электрические характеристики ……………………….…………………………….………..……….. 119
Характеристики акустической эмиссии …………………………………………………………….. 119
Соответствие нормам ……..…………………………….………………..……………..……….………….…………… 121
Нормативный код модели ……….………..………………..………………...………….……….……… 121
Уведомление FCC …..…………..………………………………….……………………………………….. 122
Уведомление для пользователей в Корее ……………………………………………………..….. 122
Уведомление о соответствии требованиям VCCI (Класс B) для пользователей в
Японии …….…….………..……..…….………..…….….……………………………………………………... 123
Уведомление о кабеле питания для пользователей в Японии .……………………………. 123
Уведомление о допустимом уровне шума для Германии ……………………………………. 123
Декларация соответствия (Германия) ………………..………………..……………………….…… 123
Уведомление о
соответствии нормам Европейского Союза ……………………………..…. 123
Сведения о соответствии нормам изделий с беспроводным подключением ………… 125
Воздействие высокочастотного излучения ………………………………..………… 125
Уведомление для пользователей в Бразилии ……………………………………… 125
Уведомление для пользователей в Канаде ……………………………………….… 126
Уведомление для пользователей в Тайване ……………………………………….. 126
Уведомление для пользователей в Мексике ……………………………………….. 127
Уведомление для пользователей в Японии …………………………………………. 127
Программа охраны окружающей среды ………….………………………….………………….………….……… 128
Использование бумаги …….………….…………………….……………...……….………….……….... 128
Пластмассовые детали ………….……………………………..…………..……………………………… 128
Сертификаты
безопасности материалов …………………………..……………………………….. 129
Программа переработки отходов ………..………………………………………………….…………. 129
Программа по утилизации расходных материалов для струйных принтеров HP ….. 129
Утилизация неисправного оборудования частными пользователями в странах
Европейского Союза ……………………..…………………..………….……………………..………..…. 130
Энергопотребление ……….………………….………………………………..……………………………. 130
Химические вещества …..………………………………………………………………………………….. 131
Сведения о батареях ……..………….…………………..………………………………….……………… 131
RUWW
ix

Утилизация батарей в Тайване …………………….…………….………………………. 131
Сведения для пользователей в Калифорнии …………………………..………….. 131
Утилизация батарей в Нидерландах …………………………………………………… 132
Уведомления об ограничении содержания вредных веществ (только для Китая) ... 132
Уведомления об ограничении содержания вредных веществ (только для
Украины) …….…………..………………….………………………………….………..……………………… 132
Лицензии сторонних поставщиков …………………………….……………………….……………………………. 133
Приложение Б Расходные материалы и аксессуары HP ………..………………..………………………..………… 144
Заказ расходных материалов в Интернете ……………….……….…………..……………….……..…………. 145
Расходные
материалы …………….……………….……………….……..…………………….……………….………. 146
Картриджи ….…………………..…………………..………………………..………………………………… 146
бумага HP …………….………………….………………….……………………….…………………………. 146
Приложение В Настройка сети ………………….………….………………….…..………….………..……………………….. 147
Изменение основных сетевых параметров ……………………..……………………….……..……………..…. 148
Просмотр и печать сетевых параметров .…………………………………………………….…….. 148
Включение и выключение беспроводной радиосвязи ………………………….………..……. 148
Изменение дополнительных параметров сети ……..………..……………….………………..….………..…. 149
Настройка скорости соединения ……………………………………………………..………………... 149
Просмотр параметров IP ………….……….………….……….…………..…………..…………………. 149
Изменение параметров IP ……….…………………………………………..…………………….…….. 149
Сброс параметров сети ……………..………..……………..………..………….……….………..…….. 150
Настройка принтера для беспроводного соединения ……………………………………………………..… 151
Перед началом работы ……………………………………………………..
……………….…………….. 151
Настройка принтера в беспроводной сети ………………………..………………..…………..…. 152
Настройка принтера с помощью программного обеспечения принтера
HP ………………………..…………………..……..……….…………………..…………………. 152
Настройка принтера с помощью WiFi Protected Setup (WPS) ……………….. 152
Настройка принтера с помощью встроенного веб—сервера ……….………….. 153
Изменение способа подключения ……..…………..……….…………………….…..…………..….. 153
Как перейти с Ethernet-соединения на подключение по беспроводной
сети …….…………………………………..……….….………………….……….………………. 154
Как перейти с USB-соединения на подключение по беспроводной сети . 154
Как перейти с
беспроводного соединения на подключение USB или
Ethernet ……………………………..……….……………..……….………….…………………. 155
Проверка беспроводной связи …….…………..……………………..………………..………………. 155
Рекомендации по обеспечению безопасности беспроводной сети ……………….……… 155
Обзор параметров безопасности ………………….………………………..………..…. 155
Добавление аппаратных адресов для беспроводного маршрутизатора
(фильтрация MAC) ………………..……….………………….…………….………….…….. 156
x
RUWW

Как добавить аппаратные адреса для маршрутизатора или
точки беспроводного доступа ……………………………………………… 156
Дополнительные рекомендации по безопасности беспроводной сети ..... 156
Рекомендации по снижению помех в беспроводной сети ………..………..……….………. 157
Прямая беспроводная печать HP ……….………….……………………………….…..…………..………………. 158
Как включить прямую беспроводную печать ……………………………………………………... 158
Печать с мобильного устройства с поддержкой беспроводного подключения …….. 159
Печать с компьютера с возможностью беспроводного подключения …………………… 159
Печать с компьютера с
возможностью беспроводного подключения
(Windows) ……..…………………………………………………………..…………..…………. 159
Печать с компьютера с возможностью беспроводного подключения
(Mac OS X) …………………….……………………….………………..…………….………… 160
Приложение Г Средства управления принтером ……………………………….…………………….………………….. 162
Панель инструментов (Windows) ………………..………………….………..…………………….………………… 163
Открытие панели инструментов ……..………..…………………………………….…………………. 163
Утилита HP (Mac OS X) ……..………..………………….……..……..………………………………………………... 164
Как запустить утилиту принтера HP ……………………………………………..…….…………….. 164
Встроенный веб—сервер ……..…………………………………….………..……………………………………………. 165
Сведения о файлах «cookie» ………..……………………………………...…………………………... 165
Как получить доступ к встроенному веб—серверу ……………………………………………….. 166
Приложение Д Приемы
работы ……..…………………………….………………..……………………….………….……….. 167
Приложение Е Ошибки (Windows) .………..……….……………….…………………………………………………….……... 168
Низкий уровень чернил ………..………..…………………..……………..………..………..…………………..……. 170
Проблема с картриджем …………………….……………………………….……….………..…………….…………. 171
Замените картридж ………….…………………..……………………..……………..……….…………..…………….. 172
Несоответствие бумаги ..……………………………..…………………....…………….………………….………….. 173
Перемещение каретки невозможно ……….………….………………………………………………………….…. 174
Замятие бумаги ………………………………………………..…………….……………….………….………………….. 175
В принтере нет бумаги …………….……………………………………….………………….………..……………….. 176
Принтер отключен ………………………………….………………….………………….…………………….…………. 177
Принтер приостановлен …….………..…………..…………………..…….………………….…………..…………… 178
Не удалось напечатать документ .…………….……………………….……………..…..…………..…………….. 179
Сбой принтера …………………..……….……………….…………..……….…….………..……………….………….... 180
Крышка открыта .…………………………………………………….………………………………………………………. 181
Установлены ранее использованные картриджи …………………………….……………………….……….. 182
Закончились чернила
…………………………..………………….……..……….………..……………………………. 183
Сбой картриджа …….…………………………………..…………….……….………………..………………………….. 184
RUWW
xi

Обновление расходных материалов принтера …………………….………………………………...…………. 185
Обновление расходных материалов принтера завершено ………….…………….……………………….. 186
Проблема обновления расходных материалов принтера ………….……………………………………….. 187
Установлены другие картриджи (не HP) …………………………………………………..…..…………………. 188
Вознаграждение за использование оригинальных картриджей HP ……..………………….…………. 189
Рекомендации для поддельных картриджей ………….………………………………………….………..……. 190
Обнаружен использованный, заправленный или поддельный картридж …………………………….. 191
Использование картриджей с меткой SETUP .…………..…………….……………………..………………… 192
Не используйте картриджи SETUP .……………..………………………..……….……..………………………... 193
Недостаточно чернил для запуска ..……………….………………..………………...…………..………..……… 194
Использовать
только черные чернила? …………….………….……….………….……………………………… 195
Использовать только цветные чернила? …….……………..………..……………..……………….……………. 196
Несовместимые картриджи …….……………..………..……………….……..…………….……………….………. 197
Не удается осуществить обмен данными с принтером …..…………………….…………….…………….. 198
Сбой датчика чернил ………………..……………….………………..………….……….………………………..……. 199
Сигнал датчика чернил ……….…….……….……………….…….………….……….……….……..……….………. 200
Проблема при подготовке принтера ……….………..……………….………………......………..……………… 201
В цветном картридже закончились чернила .………..……………….…………………………...……..…….. 202
В черном картридже нет чернил ………….…………………….…………………………..………..…………..…. 203
Проблема с системой подачи чернил ………………….……..…….………..……..……………..……….…….. 204
Указатель ……….………….……….………………….………………………………..………..………..……….…..…………………. 205
xii
RUWW

1
Начало работы
Это руководство предоставляет подробные сведения об использовании принтера и решении
проблем.
●
Специальные возможности
●
HP EcoSolutions (HP и окружающая среда)
●
Описание компонентов принтера
●
Выбор бумаги для печати
●
Загрузка бумаги
●
Выключение принтера
●
Обновление принтера
●
Установка дополнительных приспособлений
●
Обслуживание принтера
●
Откройте раздел программного обеспечения принтера HP (Windows)
ПРИМЕЧАНИЕ. Если принтер используется с компьютером, работающим под управлением
Windows XP Starter Edition, Windows Vista Starter Edition, Windows 7 Starter Edition или Windows
8 Starter Edition, некоторые функции могут быть недоступны. Дополнительные сведения см. в
разделе
Системные требования на стр. 112.
RUWW
1

Специальные возможности
Принтер предоставляет ряд функций для людей с ограниченной трудоспособностью.
Визуальное восприятие
Прилагаемое к принтеру программное обеспечение HP доступно людям с нарушениями зрения
или слабым зрением благодаря специальным программам и функциям операционной системы.
Программное обеспечение также поддерживает такие специализированные средства, как
программы для чтения экрана, шрифт Брайля и приложения для преобразования голоса в
текст.
Для пользователей с нарушенным цветовосприятием на цветных кнопках и вкладках,
используемых в программном обеспечении HP, имеются простые текстовые метки или значки,
обозначающие соответствующие действия.
Подвижность
Пользователи с нарушением опорно—двигательного аппарата могут использовать команды
клавиатуры для управления функциями программного обеспечения HP. Программное
обеспечение HP также поддерживает такие специальные возможности Windows, как
озвучивание, залипание клавиш, фильтрация
нажатий и управление с клавиатуры. Крышки
принтера, кнопки, лотки и направляющие для бумаги легко доступны и не требуют
значительных усилий для действий с ними.
Поддержка
Подробнее о специальных возможностях данного принтера и обязательствах компании HP,
касающихся специальных возможностей при использовании принтера, см. на веб—сайте HP по
адресу:
www.hp.com/accessibility.
Сведения о специальных возможностях при использовании Mac OS X см. на веб—сайте Apple по
адресу:
www.apple.com/accessibility.
2
Глава 1 Начало работы RUWW

HP EcoSolutions (HP и окружающая среда)
Компания Hewlett-Packard призвана помочь оптимизировать влияние вашей работы с
принтером на окружающую среду и призывает вас к ответственности во время выполнения
печати — как дома, так и на работе.
Подробную информацию о принципах, которым следует HP в процессе производства своих
товаров с целью снижения влияния на окружающую среду, см. на сайте
Программа охраны
окружающей среды на стр. 128. Подробную информацию о мерах HP в отношении защиты
окружающей среды см. по адресу
www.hp.com/ecosolutions.
Этот раздел содержит указанные ниже темы.
●
Управление электропитанием
●
Оптимизация использования расходных материалов
Управление электропитанием
В целях экономии электроэнергии принтер оснащен следующими функциями.
Спящий режим
В спящем режиме расход электроэнергии снижается. После начальной настройки принтер
автоматически переходит в спящий режим после 5 минут бездействия.
Чтобы изменить параметры настройки, выполните следующие действия.
1. Откройте встроенный веб—сервер. Дополнительные сведения см. в разделе
Встроенный
веб—сервер на стр. 165.
2. Щелкните вкладку Параметры.
3. В разделе Управление питанием нажмите Энергосберегающий режим и выберите
необходимый параметр.
4. Щелкните Применить.
Автоотключение
При включении принтера по умолчанию автоматически активируется автоотключение. Если
автоотключение активировано, принтер автоматически выключается после 8 часов
бездействия для уменьшения расхода электроэнергии. Функция автоотключения
автоматически выключается во время установки беспроводного соединения или соединения
Ethernet (
если поддерживается). Изменить параметры автоотключения можно с помощью
программного обеспечения принтера. После изменения параметров принтер устанавливает
параметры, выбранные пользователем. Поскольку функция автоотключения полностью
выключает принтер, необходимо использовать кнопку питания, чтобы снова включить его.
Windows. Откройте панель инструментов. Дополнительную информацию см. в разделе
Открытие панели инструментов на стр. 163. На вкладке Дополнительные параметры
щелкните Изменить и выберите необходимое время.
Mac OS X. Запустите утилиту HP. Дополнительную информацию см. в разделе
Утилита HP (Mac
OS X) на стр. 164. В разделе Параметры принтера щелкните Управление питанием и
выберите необходимое время.
RUWW HP EcoSolutions (HP и окружающая среда)
3

СОВЕТ: В случае печати по беспроводной сети или по сети Ethernet функцию автоотключения
необходимо выключить, чтобы не потерять задания печати. Даже если функция
автоотключения не работает, принтер перейдет в спящий режим автоматически после 5 минут
бездействия для уменьшения расхода электроэнергии.
ПРИМЕЧАНИЕ. Спящий режим и функция автоотключения будут временно недоступны, если в
принтере отсутствует один или несколько картриджей. Эти функции станут снова доступны
после установки картриджа на место.
ПРЕДУПРЕЖДЕНИЕ. HP рекомендует как можно скорее заменять отсутствующие картриджи
во избежание проблем с качеством печати и возможного перерасхода чернил или
повреждения системы подачи чернил. Никогда не выключайте принтер, если отсутствуют
картриджи.
Оптимизация использования расходных материалов
В целях экономии расходных материалов для печати, например чернил и бумаги, попробуйте
следующее.
●
Утилизируйте картриджи HP через программу HP Planet Partners. Дополнительную
информацию см. на сайте
www.hp.com/recycle.
●
Печатайте на обеих сторонах страницы для экономии бумаги. Если у принтера имеется
модуль автоматической двусторонней печати HP (устройство двусторонней печати), см.
Двусторонняя печать на стр. 34. Либо сначала можно напечатать только нечетные
страницы, затем перевернуть их и напечатать только четные страницы.
●
Чтобы сэкономить чернила и бумагу при выполнении печати веб—контента, используйте
программу HP Smart Print. Дополнительную информацию см. на сайте
www.hp.com/go/
smartprint.
●
Установите режим черновой печати. В режиме черновой печати расход чернил меньше.
●
Не очищайте печатающую головку без необходимости. При этом расходуются чернила и
сокращается срок службы картриджей.
4
Глава 1 Начало работы RUWW
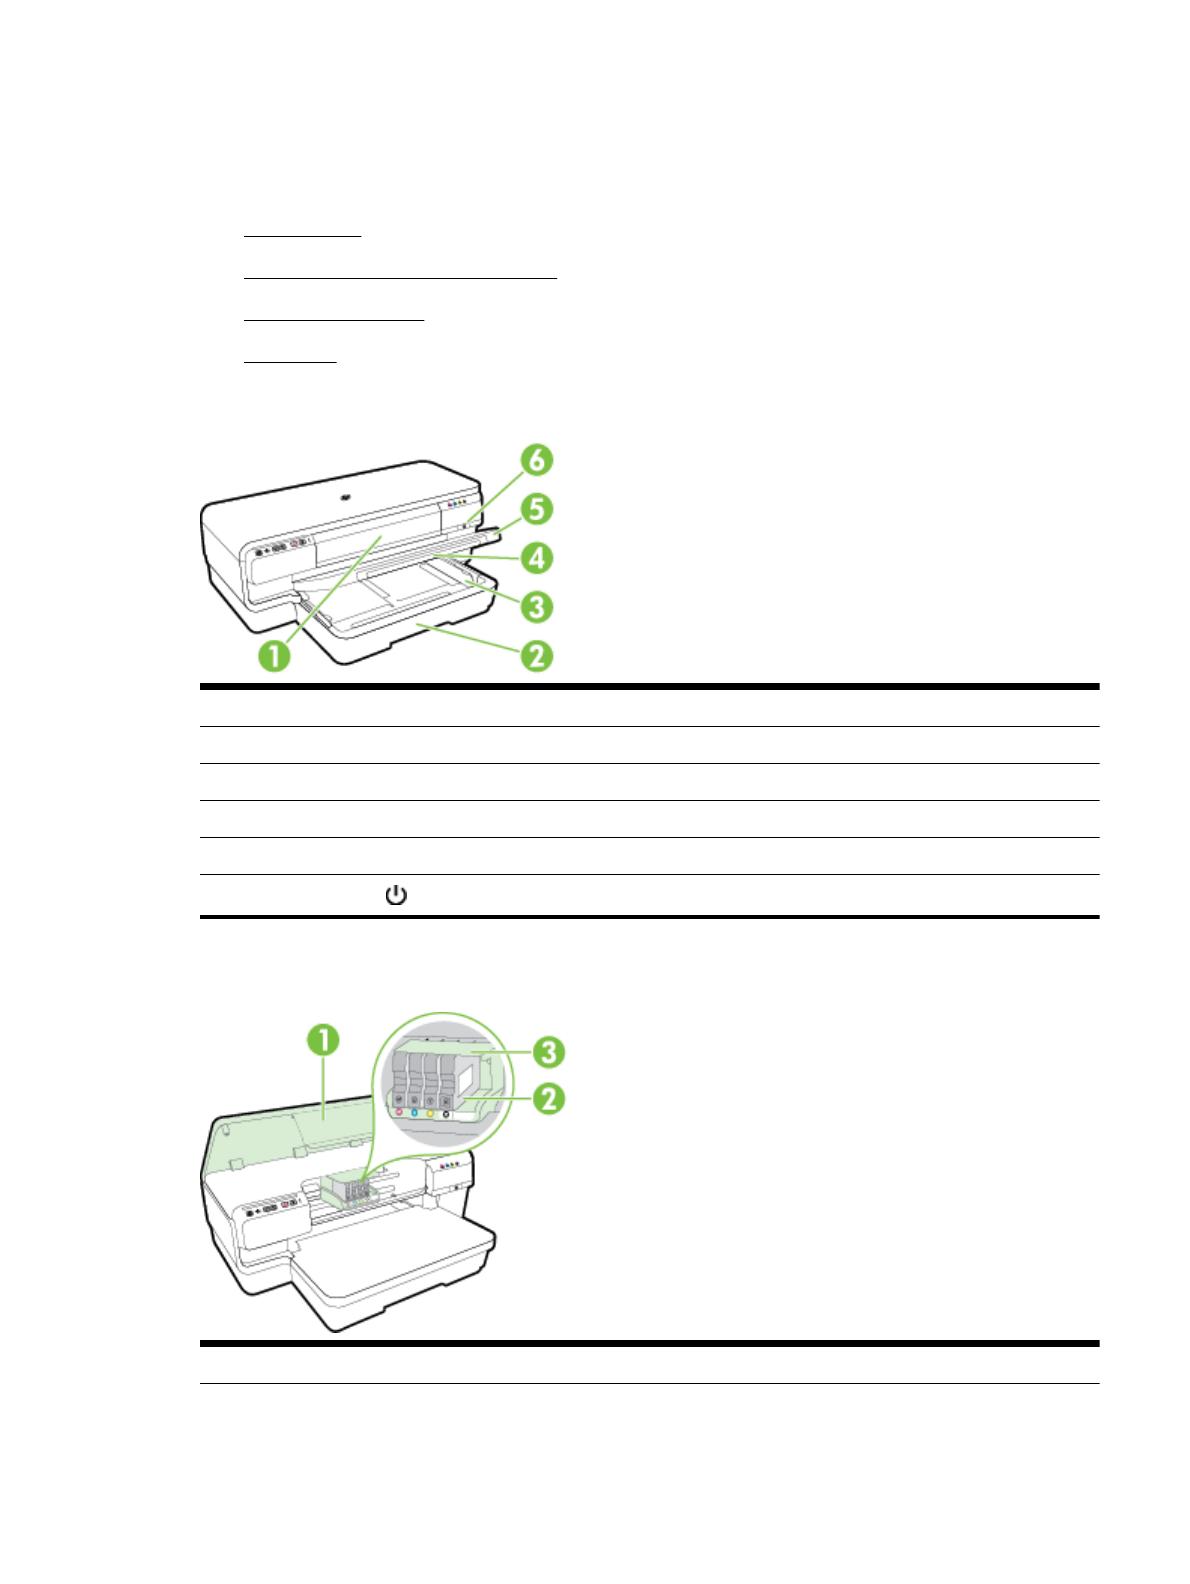
Описание компонентов принтера
Этот раздел содержит указанные ниже темы.
●
Вид спереди
●
Отсек для расходных материалов
●
Панель управления
●
Вид сзади
Вид спереди
1
Крышка доступа к картриджам
2
Входной лоток
3
Направляющие бумаги
4
Удлинитель лотка
5
Выходной лоток
6
Кнопка питания
и индикатор
Отсек для расходных материалов
1
Крышка доступа к картриджам
RUWW Описание компонентов принтера
5
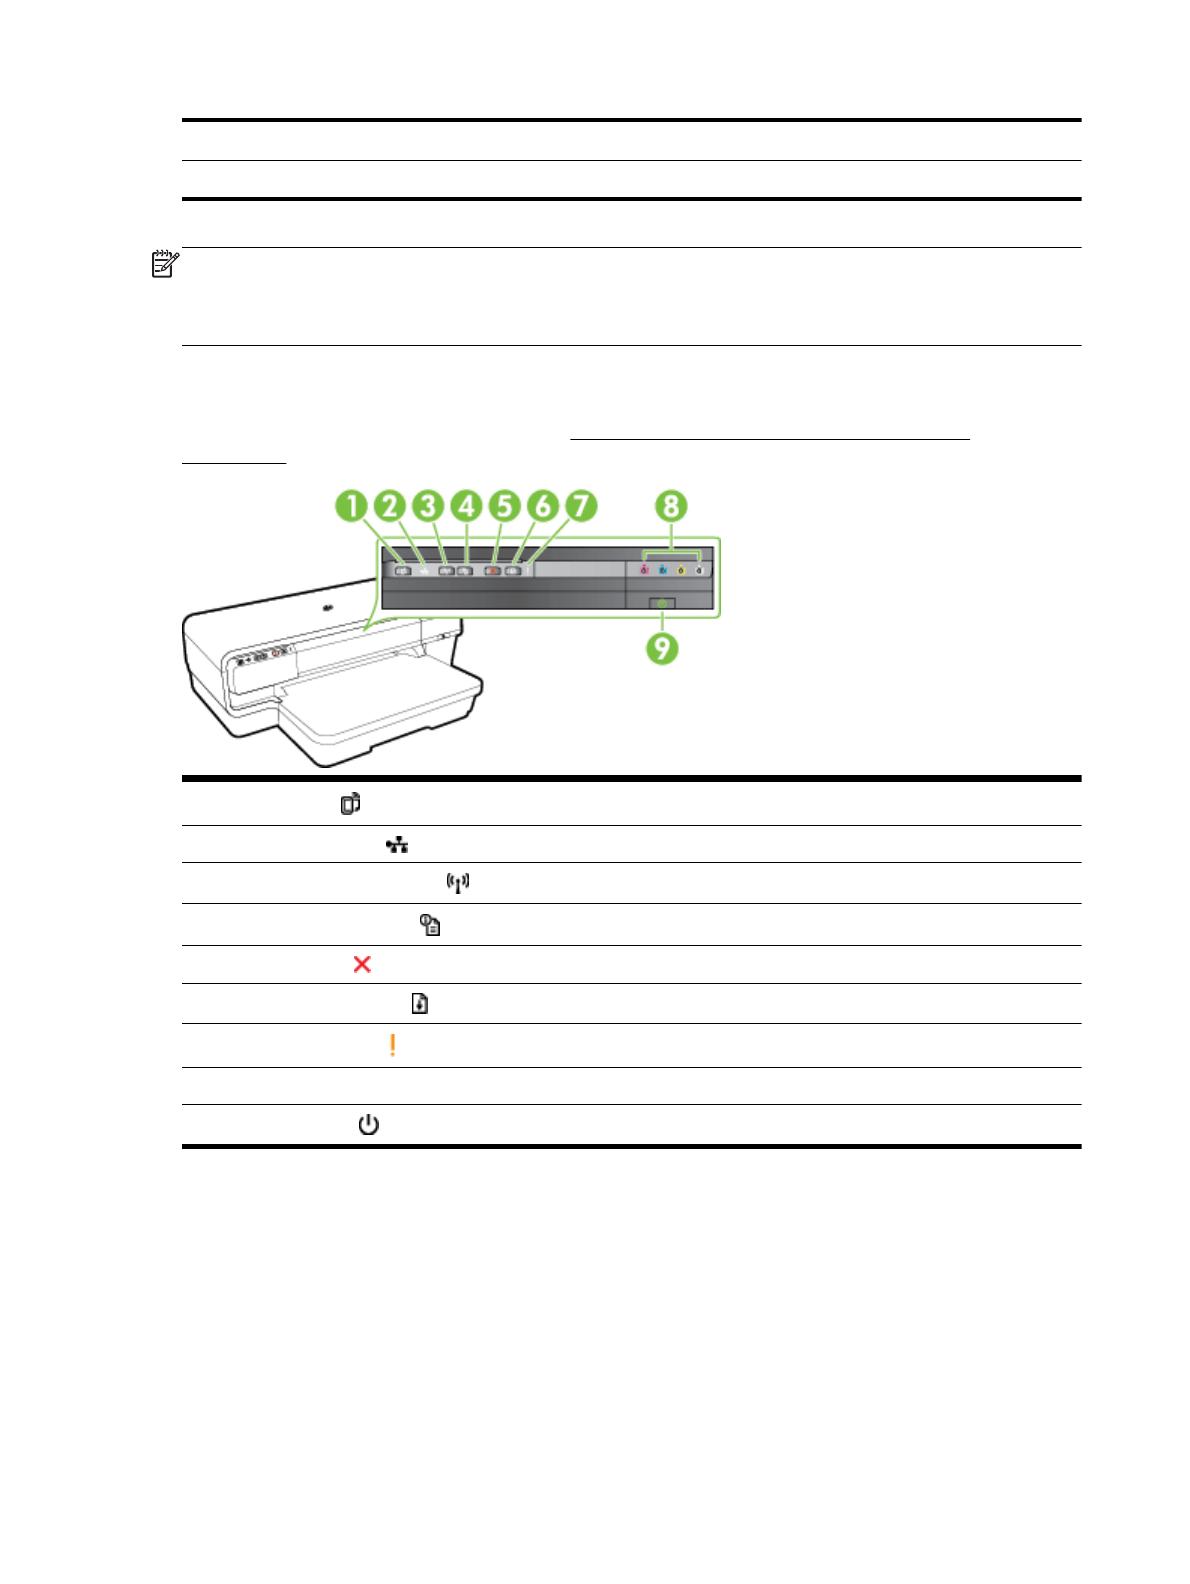
2
Картриджи
3
Блок печатающих головок
ПРИМЕЧАНИЕ. Во избежание ухудшения качества печати или повреждения блока
печатающих головок не извлекайте расходные материалы из принтера без необходимости. Не
извлекайте расходные материалы на длительное время. Не выключайте принтер, если
отсутствует картридж.
Панель управления
Дополнительные сведения см. в разделе Описание индикаторов панели управления
на стр. 101.
1
Кнопка ePrint
и индикатор
2
Индикатор Ethernet
3
Кнопка Беспроводная связь
и индикатор
4
Сведения о сети кнопка
5
Кнопка Отмена
6
Кнопка Возобновление
и индикатор
7
Индикатор тревоги
8
Индикаторы картриджей
9
Кнопка питания
и индикатор
6
Глава 1 Начало работы RUWW
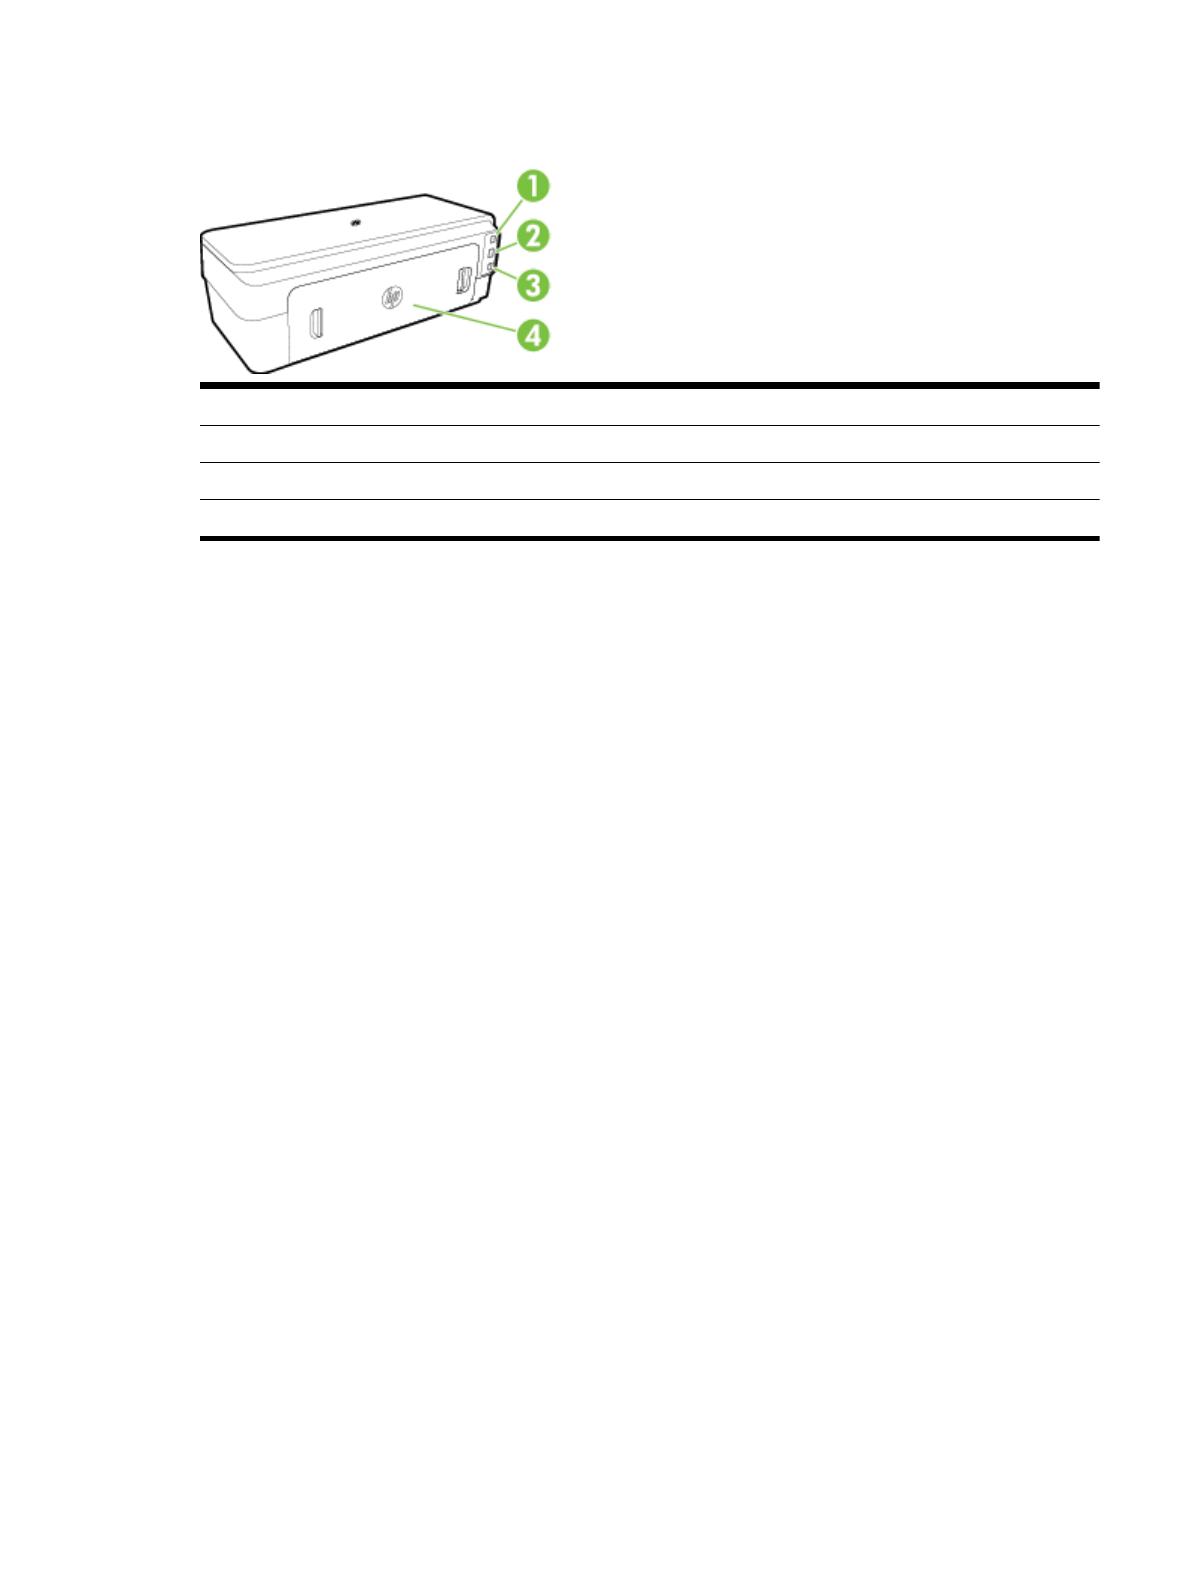
Вид сзади
1
Порт USB
2
Сетевой порт Ethernet
3
Разъем питания
4
Задняя панель доступа
RUWW Описание компонентов принтера
7
Сервис-центр Комплэйс выполнит ремонт HP Officejet 7110 с гарантией. Обычный срок ремонта один день. Диагностика неисправности бесплатная. Ремонт осуществляется только в мастерской центра. Выезда мастера нет.
Принтер HP OfficeJet 7110 — это шкатулка с сюрпризом, если рассматривать его в качестве ремонта. В первую очередь, потому что диагностика ошибок идиотская, точнее практически отсутствует. Большинство ошибок определяется диагностической программой hp scan and print doctor как «Ошибка принтера». Причем принтер знает, что это за ошибка, но вам не скажет. Например, ошибки позиционирования, застревания каретки, замятия и ошибка датчика ширины бумаги выглядят одинаково — ошибка принтера.
Другой пример. Отличить проблему головки от проблемы картриджей и окисления датчиков давления чернил но только серией экспериментов.
Диагностика для этого принтера — самая сложная работа. Все определяется опытом мастера.
Цены на ремонт HP OfficeJet 7110
| Работа | Цена руб. |
| Чистка головки | 2000 |
| Принтер не определяет картриджи | 1500 |
| Устранение общей ошибки | 1500-3000 |
| Ремонт узла обслуживания | 2500 |
| Чистка принтера | 1500 |
| Ремонт подачи бумаги | 2500 |
Срок ремонта обычно 1-2 дня.
Общая ошибка принтера Officejet 7110
Неоригинальные картриджи
Принтер HP Officejet 7110 с неоригинальными картриджами при включении выдает фатальную ошибку «Ошибка принтера или системы подачи чернил», одновременно мигают индикатор тревоги !, индикатор желтого картриджа, индикатор питания.
Проблема заключается в неоригинальных картриджах. Принтер не работает просто из-за неоригинального картриджа. Чтобы обойти эту проблему, можно выполнить сброс. Делаем следующие манипуляции в каждом конкретном сеансе печати.
Нажав кнопку отмены Х, включить принтер. Нажать отмену еще 2 раза. Замигает индикатор возобновления печати. Включить принтер. Принтер войдет в режим готовности. Можно печатать.
Для каждого сеанса выполнять указанную процедуру. Потому что после выключения принтера ошибка повторится.
Неисправность узла подачи воздуха
Общая ошибка может также появиться в случае неисправности системы подачи чернил Officejet 7110 и Officejet 7610. Причем принтер выходит в ошибку после начала чистки головки. Эта ошибка возникает из-за нарушения работы узла подачи давления воздуха в картриджи.
В принтере HP Officejet 7110 чернила в головку подаются путем создания дополнительного давления. Это давление воздухом создается специальным насосом, который расположен в задней части принтера справа внизу. Затем воздух подается в верхнюю часть головки принтера по двум трубкам головки и через резиновые штуцеры поступает в картриджи. На фото внизу — перевернутая верхняя часть головки.
Слева находится штуцер трубки черного картриджа, а также резиновый штуцер, входящий в черный картридж. Справа расположен штуцер трубки цветных картриджей и 3 резиновых штуцера, через которые воздух поступает во все цветные картриджи.
Подключение к насосу осуществляется поочередно поочередно — то к черному картриджу, то к цветным. Потому что насос один. Для этого трубки крепятся на на вращающемся фланце (в головке), который поворачивается узлом переключения и в зависимости от положения соединяется либо к трубке черного картриджа, либо к трубке цветных картриджей.
Если этот узел заклинило или он сломан, появится ошибка.
Еще одной причиной общей ошибки принтера HP Officejet 7110 является неисправность датчика верхней крышки. Ошибка появляется примерно через минуту после включения принтера — начинает мигать восклицательный знак.
Переход на ремонт струйных принтеров HP, а также сбой системы чернил HP.
Замятие бумаги HP Officejet 7110
Обычно для струйных принтеров HP сообщение «Замятие бумаги» на 90% не связано с бумагой. Например, это может быть проблема с переключателем слева или узлом обслуживания справа. И то и другое — это геморрой.
Если неисправность в узле очистки, то готовьтесь вымазаться по самые уши в чернилах. Нужно снять кювету и промыть ее всю вместе с абсорберами. Но после чистки нужна тщательная смазка. Затем надо высушить, смазать и установить на место. Кстати, такая работа займет несколько часов и стоит порядка 3000 руб.
HP Officejet 7110 не распознает картриджи
Распространенная проблема в HP Officejet 7110, если принтер периодически сообщает о проблеме с картриджами, которые еще не кончились. Но принтер требует заменить их, хотя там еще много чернил.
Это проблема в головке, конкретно в датчиках давления чернил. Проблема не очень сложная. Цена решения вопроса 2500 рублей.
Застревание каретки HP 7110, дергается, не двигается
- Если каретка резко дергается и возникает ошибка замятия каретки, застревания, не двигается, то есть несколько причин:
- неисправна головка, поломка датчика энкодера на плате головки — перепаять датчик
- энкодерная лента повреждена или вышла из датчика в головке, неправильно установили печатающую головку
- поврежден шлейф, контакты шлейфа от платы к головке повреждены или в чернилах
- неисправна плата управления
- проблема в блоке питания (были реальные случаи, когда замена адаптера устраняла неисправность)
Ошибка датчика ширины бумаги
Датчик ширины бумаги — очень важный сенсор. Если другие принтеры работают с неисправным датчиком ширины бумаги, то HP Officejet 7110 выдаст ошибку принтера. Причиной неисправности датчика скорее всего являются попадание чернил, выход из строя оптопары или шлейфа.
Плохое качество печати HP Officejet 7110
Плохое качество печати принтера HP Officejet 7110 обычно связывают с засохшей печатающей головкой. Чистку головки обычно начинают с отмачивания в жидкостях, растворяющих пигментные чернила. Однако не всегда такая промывка заканчивается прочисткой дюз. Часто сильно засохшие чернила не позволяют раствору проникнуть в головку. В этом случае следует применять ультразвуковую ванну.
Только комбинация способов чистки позволяет прочищать головки, которые не печатали больше года.
Чистка головка HP Officejet 7110 стоит 2000 рублей.
Разборка HP Officejet 7110
Разборку принтера HP Officejet 7110 начинаем со снятия левой и правой крышек управления и индикации, отжимая их снизу.
Отсоединяем шлейфы. Отвинчиваем винты крепления верхней крышки.
Теперь правую крышку и винты.
Под ней винты верхней крышки откручиваем.
Отвинчиваем все винты задней верхней крышки, чтобы снять ее
вместе с откидывающейся крышкой.
Только потом снимаем боковые крышки.
Откручиваем все винты верхней крышки по периметру.
Отсоединяем шлейфы и снимаем верхнюю крышку принтера.
TL;DR issue resolved
I followed KrazyToad’s instructions to the letter (to the A4 in my case, actually). When it came to the step «— Remove the ink cartridges from the printer«, I had difficulty. I could not make the printer move the ink carriage to the middle to enable me to remove the cartridges. By pressing the alert button, the printer went through a (noisy) procedure which included moving the ink carriage. During the third such procedure, I grabbed the carriage and managed to remove the cartridges. It was then that I noticed a single scrunched up A4 sheet being pressed firmly to the right of the printer carriage by the ink holder. I hadn’t seen it before, because it was, of course covered by the ink carriage. I removed said scrunched up paper.
After continuing with the instructions the printer took about five minutes to go through its warm-up procedure whilst making horrible grinding noises. At this stage, I thought it was not going to work. After finishing its warm-up the green night turned solid and the alert light turned off. I went to my MacBook Pro and printed a test page. Bingo. Everything is fine.
So. Thank you so much KrazyToad. You have rescued what turns out to be a solid printer.
I should point out that I bought an HP A3 printer in the early 2000’s (I think it might have been a DesignJet 70 or similar) and ran it until it packed up about 2014/15 or so. I was very very happy with that printer. I am also happy with its replacement, this OfficeJet 7110 wide-format printer; particularly as it turns out to be so robust and this forum so helpful. Thank you once again.
Grytr1