-
Contents
-
Table of Contents
-
Troubleshooting
-
Bookmarks
Quick Links
HKS ELECTRONICS TECHNOLOGY
Instruction Manual
This manual assumes that you have and know how to use the tools and equip-
ment necessary to safely perform service operations on your vehicle.
This manual assumes that you are familiar with typical automotive systems and
basic service and repair procedures.Do not attempt to carry out the operations
shown in this manual unless these assumptions are correct. Always have
access to a factory repair manual. To avoid injury, follow the safety precautions
contained in the factory repair manual.
NOTICE
E05121-K00121-00
2009.10.01
Ver. 3-1.01
Summary of Contents for HKS EVC-S
The EVC-S has a self diagnosis function. If the EVC-S detects any unusual condition, an error
number appears on the monitor and the boost pressure is reduced to the factory boost pressure
setting.
When an error number appears on the monitor, inspect the cause referring to the table below.
If the cause of the error can not be figured out, contact an Authorized HKS Dealer.
Error No.
2 or 3
Boost Sensor Malfunction
Power Supply/Voltage Error
4 or 5
5
Solenoid Valve Malfunction
6
EVC-S Communication Error
Other
Other Error
Error number 2 appears.
Error number 5 appears.
Description
Boost Sensor wiring
Battery voltage and/or power supply harness.
Solenoid Valve wiring
Wiring between the Display Unit and Control Unit.
Contact an Authorized HKS Dealer.
Item to Inspect
Всем привет!
Решил рассказать свою версию настройки бустконтроллера HKS evc-s.
После покупки ская, я сразу же поковырялся в настройках все сбил, а потом заново настроил и все было гуд, но это было около 2 лет назад, и как мне это удалось я не помню.
Сейчас буквально месяц назад мне снова захотелось покрутить настройки, не запоминая тех, которые были установлены ранее и получилось так, что после этого, начала происходить дичь, короче говоря все просто сбилось и никуда не ехало.
На просторах интернета я нашёл инструкцию на английском и 2 видео, одно на лауреле, в котором человек просто показывал какие у него стоят настройки и как это едет, и второе уже более подробное с объяснением какая настройка что означает. Эта информация помогла, но вернуть прежние настройки с помощью этого не удавалось. В результате перевода мануала на русский прояснилось ещё несколько вещей, но и так же некоторые моменты стали ещё более запутаны для полного понимания процесса настройки.
Я хотел понять именно сам процесс, а не получить конкретные числа поставив которые все поедет как надо.
Спрашивал нескольких людей которые могли бы знать как это делается, ответ был одинаковый что этот буст контроллер в плане настройки гемор ещё тот😄
В процессе настройки происходило следующее, что бы я не делал, сначала был передув, далее буст падал на 0.4-0.5 и держался на этом уровне, либо в зависимости от настроек, после передува он падал, а потом снова начинал передувать.
Исходя из графиков в мануале я понял, что в случае передува вначале, нужно уменьшать «response» это значение в процентах и уменьшал я его до 1% — лучше не становилось.
Ещё интересные фразы из мануала «отредактируйте значение over boost(opt) до тех пор пока значение не будет превышено или останется в пределах значения off set value(Ofs)” в каких «пределах» не ясно тк opt в кПа, а ofs в процентах.
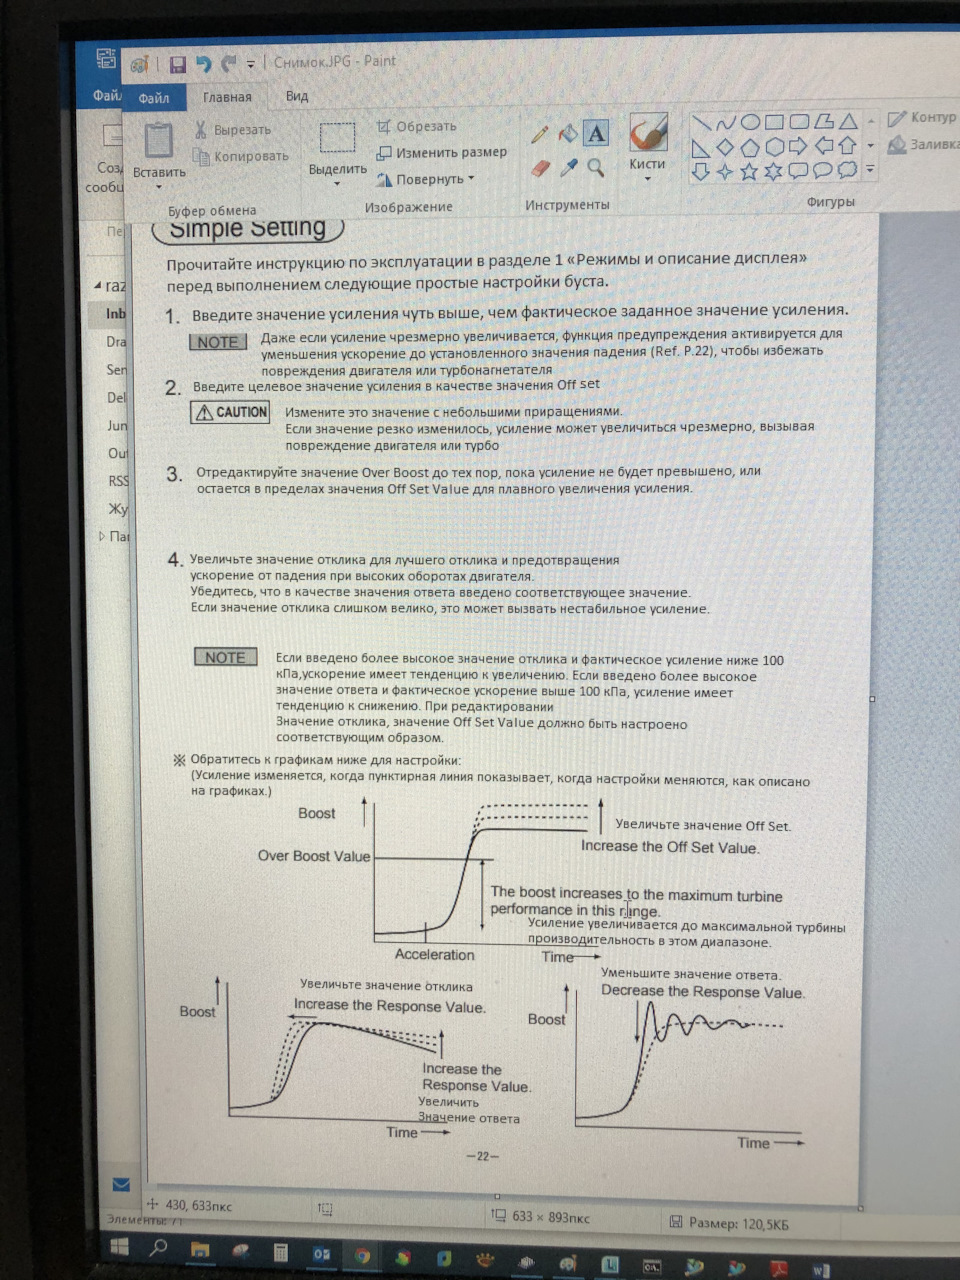
И ещё «при редактировании значения отклика(rsp), значение ofs должно быть настроено соответствующим образом.» Каким «соответствующим», опять не понятно.
Катался я так пару дней пока не выдался свободный денёк, и я поехал на свободную дорогу, раз 10-12 катался туда сюда, меняя настройки.
Иногда общаемся с предыдущим владельцем, он сказал попробовать поднять значение rsp с 10% до 50% и посмотреть что будет. По графику из мануала мне казалось что увеличение этого значения должно увеличить буст, а ещё больших передувов не хотелось допускать, но все же решил попробовать и о чудо все стало ясно, передув в начале пропал, буст стал плавнее, осталось только настроить так чтобы достигнуть желаемого буста.
Так вот описание настроек.
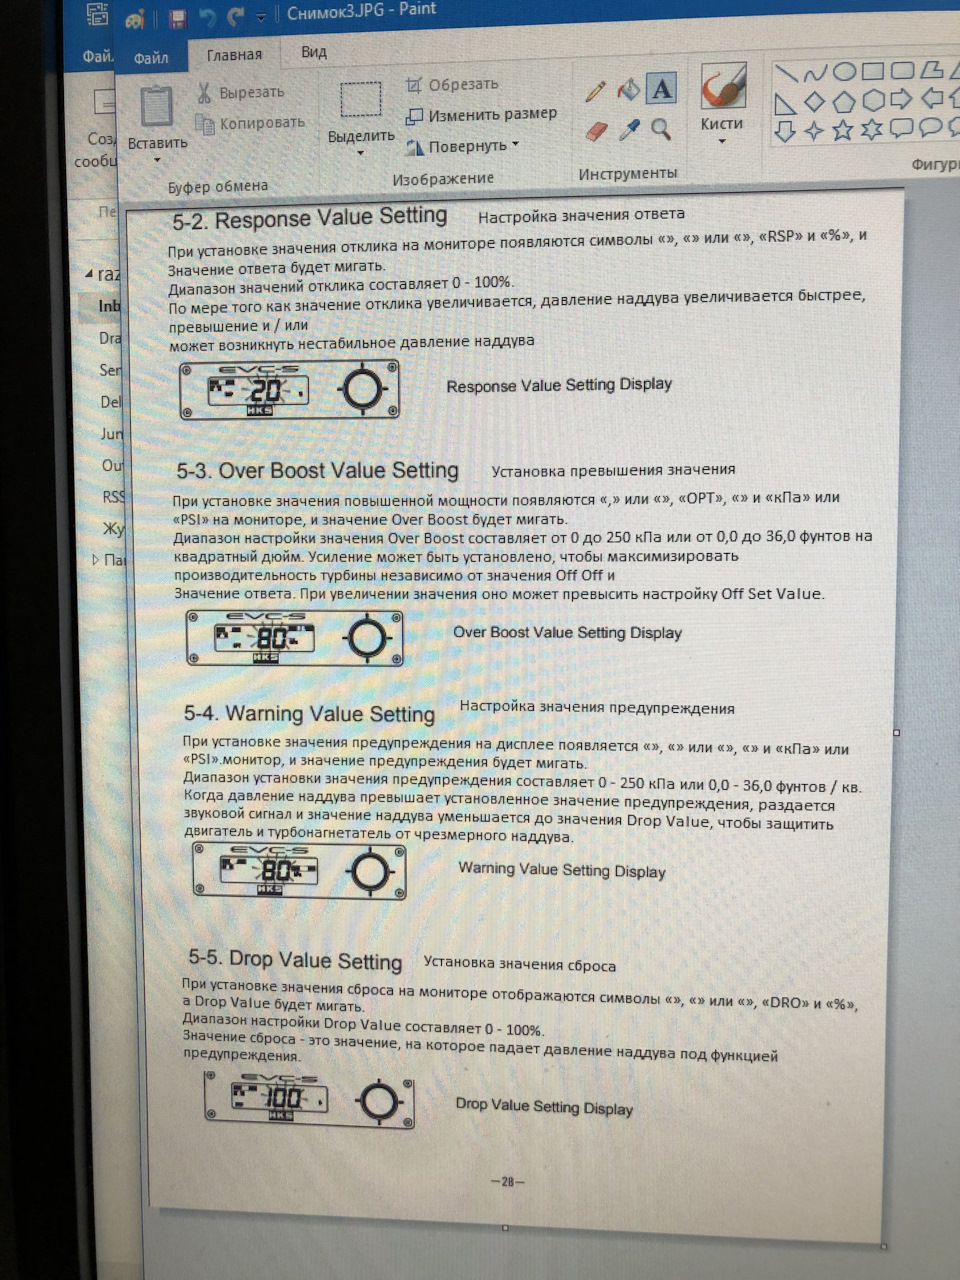
Ofs значение буста в процентах 0-100%, бустконтроллер рассчитан на давление от 0-250кПа, переводим проценты в кПа и понимаем что 5%=12.5кПа; 10%=25кПа для простоты шага настройки. Отсюда понятно что например для того чтобы выставить 0.8бар нужно поставить это значение равным 32%. *10кПа=0.1бар
С этим значением разобрались после того как высчитали значение и выставили его на бустконтроллер больше его не трогаем.
Dro (drop) значение на которое будет сброшен буст при достижение варнинга(wrn).
Не совсем понял от какого значения будет сброшено давление, или это работает по той же схеме в переводе процентов на кПа…
Я оставил пока 10%, тк передувы пропали совсем, если что поменяю на 50%.
Wrn это и есть то самое варнинг значение при достижении которого будет срабатывать дроп.
Если не хотите дуть больше 1бара например, то выставляем 100кПа.(схема перевода кПа в бар выше)
Opt оно тоже влияет на буст, но каким образом не понятно, рекомендовано выставлять в значении стокового буста. Я выставил 50кПа(0.5бар).
Rsp время реакции соленоида. Чем ниже значение, тем больше будет передув вначале, вообще это значение тесно связано с ofs, чем выше выставить rsp тем плавнее будет раздув, но слишком высокое значение 90+ тоже ухудшает ситуацию, при значении 5-10% идёт резкий набор буста, передув в самом начале, срабатывает drop и вы едете хуже стока. Это значение рекомендую ставить 50-80% уже по ощущениям в зависимости от того какой у вас спек и остальные настройки контроллера. По моему наблюдается зависимость что чем меньше у вас буст (ofs), тем выше нужно ставить rsp чтобы ты избежать передувов в начале. Если буст проседает к отсечке то это значение нужно уменьшать и пробовать снова, чтобы поймать грань отсутствия передува вначале и более менее стабильного буста на всем диапазоне.
После всех настроек я снова узнал Скай, едет бодро вся 2 в буксе если газ в пол. Видимо пора обновлять 265 вестлейк на новый.
Надеюсь это кому то поможет избежать долгих поисков и настроек, ну и может кто-то добавит или исправит меня:)

Регистрируясь на данном ресурсе Вы соглашаетесь с действующими Правилами форума и обязуетесь их соблюдать.
Незнание правил не освобождает Вас от наказания за их нарушение!
На форуме действует ряд ограничений для новых пользователей: запрещено заниматься торговлей, устанавливать автар и подпись, принимать участие в опросах, личный ящик ограничен 10-ю сообщениями.
Для снятия ограничений Вам надо оставить на форуме более 10 сообщений, а также с момента вашей регистрации должно пройти не менее 30 дней.
Для участников клуба доступна различная клубная атрибутика: рамки, наклейки, футболки, толстовки, кружки, карты и т.д. Причем некоторые виды атрибутики распространяются бесплатно на встречах. Более подробную информацию узнавайте в своем региональном разделе или теме. Также если Вы хотите заниматься клубной атрибутикой в своем городе, то напишите об этом администрации.
С уважением, администрация форума TourerV.ru
Table of Contents for HKS EVC-S:
-
㧙㧙 INTRODUCTION INDEX SAFETY PRECAUTION PARTS LIST �
-
㧙㧙 Simple Setting Read the operational instructions from Section 1 «Modes & Display Descriptions» before carrying out the following simple boost settings. 1. Enter the boost value slightly higher than the actual target boost setting. Even if the boost increases excessively, the Warning Function activates to decrease the boost to the set Drop Value (Ref. P.22) to avoid damage to the engine or turbo. Change this value in small increments. I
-
㧙㧙 TROUBLESHOOTING ˴If this product is not functioning properly, make sure all wiring and/or hose routing is connected properly and refer to the symptoms described below. SYMPTOM CAUSE SOLUTION The unit does not turn on. Error Number appears. Boost is unstable. Boost does not increase. Boost control malfunction Boost increases excessively. Warning function doesn’t work. Setting cannot be changed. Warning function activates when the power is on. Connect the crimp connector securely. Replace the fuse and make sure the harness is not shorted.
-
1. Modes & Display Description 1-1. Boost Control Mode This mode controls the boost pressure and starts once the ignition is turned on. If the unit was previously in the Control Off Mode, it will remain in that mode when the ignition is initally turned on. The Boost Control Mode has an A Mode and B Mode which allows for 2 different boost settings. Input values for each of the following modes to maximize the vehic
-
2-3.2 For Applications with a Boost Pressure Control Solenoid Valve 1 Before Installation (Factory Connection Layout) After Installation 6mm Hose Turbine Actuator Boost Control Solenoid Valve Compressor Airflow Meter Throttle Valve Air Cleaner Surge Tank Fuel Regulator 6mm Hose 4mm Hose 4-4-4mm T-fitting 6mm Hose Turbine Actuator Boost Control Solenoid Valve Compressor Airflow Meter Throttle Valve Air Cleaner Surge Tank Fuel Regulator Rubber Cap Rubber Cap ٨ For vehicles equipped with a boost pressure c
-
㧙㧙 Off Set Value Setting Response Value Setting Warning Value Setting Drop Value Setting Boost Setting Mode or or or To edit value(r1) or To edit value(r10) or Unit Setting After Image Setting Data Lock Setting All Data Reset Function Setting Mode or or or To edit setting or Press any switch direction to return to the Function Setting Mode
-
㧙㧙 ٨Warning Function ˴˴If the boost level exceeds the warning value, the unit will warn the user will an audible buzzer and visually on the display. The boost value will be lowered to the set value. This function protects the engine and turbocharger from excessive boost. ٨After Image Display Function ˴˴When the boost changes from positive pressure to negative pressure, the maximum boost under positive pressure
-
㧙㧙 4-4. Securing Hoses and Harnesses 5. After Installation (1) Reinstall all removed factory parts. (2) Reconnect the negative cable to the battery. (1) Secure hoses and harnesses using the provided Tie Wraps. NOTE Leave some slack for the harnesses and hoses to avoid tension during engine movement. CONFIRMATION AFTER INSTALLATION NOTE Do not raise the engine RPM right after the engine is started. (Let it idle.) CHECK CHECK˴˴˴˴˴˴
-
Instruction Manual E05121-K00121-00 2009.10.01 Ver. 3-1.01 HKS ELECTRONICS TECHNOLOGY NOTICE This manual assumes that you have and know how to use the tools and equip- ment necessary to safely perform service operations on your vehicle. This manual assumes that you are familiar with typical automotive systems and basic service and repair procedures.Do not attempt to carry out the operations shown in this manual unless these assumptions are correct. Always have access to a factory repair manual. To avoid inj
-
㧙㧙 Date 2009㧛 ˴˴˴˴˴˴˴˴˴˴˴Details 1st Edition REVISION OF MANUAL Unit Conversion Table Output Torque Pressure Engineering Unit = SI Unit 㧝㧼㧿㧩 0.735 㨗㨃 㧝㨗㨓㨒㨙㧩 9.81 㧺㨙 㧝㨗㨓㨒/㨏㨙 2 㧩 98.1 㨗㧼㨍 㧝㧼㧿㧵㧩 6.895 㨗㧼㨍 㧝㨙㨙㧴㨓㧩 0.1333 㨗㧼㨍 SI Unit = Engineering Unit 㧝㨗㨃㧩 1.36 㧼㧿 㧝㧺㨙㧩 0.1
-
2WTUWKPIVJG7NVKOCVGKP’PIKPG2GTHQTOCPEGCPF’HHKEKGPE[ 2TQFWEGFD[*-5%QORCP[.KOKVGF 㨇ήᢿⶄ౮ォタ㨉©㧔ᩣ㧕ࠛ࠶࠴ࠤࠛࠬ
-
4. Mounting Components Display Unit (Back) 4-1. Mounting the Display Unit 4-2. Mounting the Solenoid Valve (1) Install the Valve Bracket to the Solenoid Valve using the M4 bolts from the Valve Bracket Set. (2) Secure the Valve Bracket and the Solenoid Valve to the vehicle using the Valve Installation Hardware. ˴˴ Double-sided Tape Valve Bracket Valve Bracket Bolt (M4) Solenoid Valve Valve Installation Hardware 4-3. Mounting the Boost Sensor Boost Se
-
㧙㧙 2-2. Connecting the Solenoid Valve Swing Valve Type (2) Install the Fittings to the COM terminal and NO terminal. (3) Cut the 6mm Hose to 5cm in length, and connect the cut hose to the Fitting on the NO terminal and the 6mm Vacuum Filter. Swing Valve Type (1) Remove the caps on the COM terminal, NO terminal, and NC terminal. Poppet Valve Type (2) Install the Fittings to the COM term
-
(1) Connect the Solenoid Valve to the Valve Extension Harness. Pull the Valve Extension Harness and the harness connected to the Boost Sensor from the engine compartment into the vehicle’s interior. (2) Connect the Valve Extension Harness and the Boost Sensor to the Control Unit. (3) Connect the Display Unit to the Control Unit. (4) Connect the Power Supply Harness. Connect the red wire of the Power Supply Harness to a 12V IG (Ignitio
-
7. Error Display The EVC-S has a self diagnosis function. If the EVC-S detects any unusual condition, an error number appears on the monitor and the boost pressure is reduced to the factory boost pressure setting. When an error number appears on the monitor, inspect the cause referring to the table below. If the cause of the error can not be figured out, contact an Authorized HKS Dealer.˴ φError number 2 appears. φError nu
-
㧙㧙 6-3. Data Lock When setting the Data Lock, «LOCK» blinks on the lower right corner of the monitor. When the Data Lock is on, «ON» appears, and when the Data Lock is off, «OFF» appears. ˴ To turn on or off the Data Lock, press the center of the switch. The set values can be locked by entering a lock number to prevent unintentional editing of data. To edit data again af
Questions, Opinions and Exploitation Impressions:
You can ask a question, express your opinion or share our experience of HKS EVC-S device using right now.