На чтение 3 мин Просмотров 768 Опубликовано
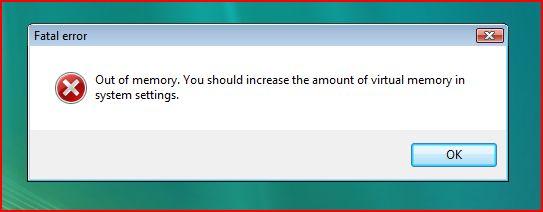
Если вы стали свидетелем того, что при открытии браузера Google Chrome, у вас вместо новой вкладки высветилась ошибка «Out of Memory», не расстраивайтесь. Такая формулировка свидетельствует о нехватке свободной памяти. Вреда системе она не принесет, к тому же является очень распространенной среди пользователей. Как же понять причину неисправности и устранить ее на своем устройстве, расскажем в нашей статье.
Содержание
- Что такое ошибка Out of Memory?
- Причины неисправности браузера
- Как убрать ошибку?
- Включение экономии памяти
- Включение файла подкачки
- Освободите место на диске
Что такое ошибка Out of Memory?
Код ошибки «Out of Memory» в Chrome — одна из наиболее частых неисправностей работы популярного браузера. Она возникает, когда Хром не может выделить достаточный объем свободного места для выполнения запрошенной задачи. Такая ситуация влечет к ухудшению функционирования браузера, его замедлению и полному зависанию.
Причины неисправности браузера
Причины появления ошибки «Out of Memory» в Google Chrome разнообразны.
К основным относятся следующие моменты:
- Активные страницы и расширения. Каждая открытая страница и установленное расширение используют память. Если вы используете слишком много таких объектов или устанавливаете множество расширений, Chrome может заполнить свободное место и выдать ошибку.
- Низкие системные ресурсы. Если компьютер или другое электронное устройство имеет ограниченные ресурсы, например, недостаточное количество оперативной памяти или малый объем свободного места на жестком диске, Chrome часто сталкивается с проблемой недостатка памяти.
- Утечка памяти. Некоторые веб-сайты или расширения содержат ошибки программирования, которые приводят к утечкам. Это означает, что Chrome не может правильно освободить место после использования, что со временем приводит к исчерпанию доступных ресурсов и высвечиванию данной ошибки.
- Конфликты с другими программами. Некоторый софт и сторонние утилиты, работающие на компьютере, иногда конфликтуют с Chrome и используют больше запланированной памяти, чем следовало. Это вызывает ошибку, которая говорит, что недостаточно памяти для загрузки страницы Хром.
Как убрать ошибку?
Если вы увидели на экране ошибку «Out of Memory», то как ее исправить? Есть несколько простых вариантов.
Включение экономии памяти
Следуйте такой последовательности:
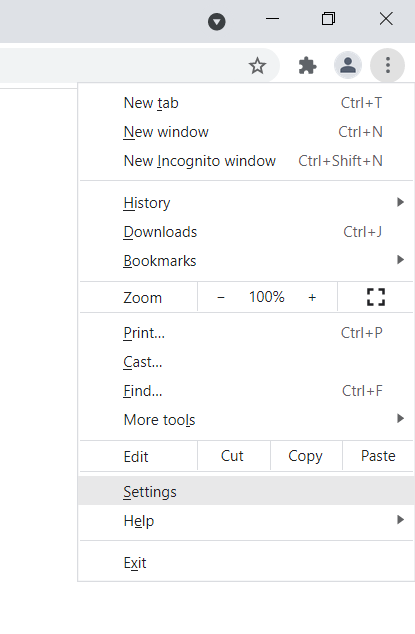
- Войдите в Гугл Хром.
- Активируйте функцию экономии. Она находится в разделе браузера в категории настроек.
- Проследуйте в категорию “Производительность” и найдите в ней опцию экономии.
- Поставьте активный статус.
Включение файла подкачки
Следующий способ связан с файлом подкачки Виндовс.
Для его активации следует:
- Одновременно зажмите кнопки Win и R на клавиатуре.
- В появившемся окне вставьте команду “sysdm.cpl”. Подтвердите действия на Энтер.
- Войдите в категорию “Дополнительно”, затем через “Параметры” проследуйте в “Виртуальную память”. В ней найдите пункт “Изменить” и поставьте статус с автоматическим выбором объема подкачки.
Освободите место на диске
Закройте неиспользуемые вкладки. Если у вас одновременно активно большое количество страниц, выйдите из них. Также ограничьте количество установленных расширений. Деактивируйте или удалите ненужные, чтобы уменьшить потребление места.
Не забудьте очистить кэш браузера и выберите автоматическую очистку данных через определенный промежуток времени. Так, вы не забудете вовремя убрать лишние сведения.
В некоторых случаях помогает активация аппаратного ускорения на Гугл Хроме. Включение функции производится через Настройки браузера.
При большой заторможенности проверьте разрядность Google Chrome. Она есть в категории справки. Если вы являетесь обладателем 64 битной версии, то установите 32 бита. Это уменьшит нагрузку и станет помощником в решении проблемы при нехватке места.

admin
Администратор и автор данного сайта. Специалист в области ИТ-технологий. Опыт работы в сфере информационных технологий с 2012 года.
Оцените автора
( 1 оценка, среднее 5 из 5 )
Contents
- What Is the “Ran Out of Memory” Error in Google Chrome for Windows 10?
- How to Fix the Google Chrome “Ran Out of Memory” Aw Snap Error
- Restart your device
- Update Google Chrome
- Clear the browser’s cache
- Disable extensions
- If you don’t know how to disable extensions in Chrome, here’s what you have to do:
- Uninstall unwanted or suspicious Google Chrome apps
- Follow these steps:
- Clear temporary files
- Using the Disk Cleanup tool:
- Going through Settings:
- Disable hardware acceleration
- Run Google Chrome’s Cleanup Tool
- We recommend that you run the Cleanup Tool. Follow these steps:
- Use Chrome’s Task Manager
- Here’s how to open and use the Task Manager:
- Increase the browser’s memory limit
- Increase your paging file
- These steps will show you what to do:
- Perform a clean boot
- Firstly, follow these steps to disable startup programs:
- Follow these steps to disable startup services:
- You can follow these steps if you don’t want to go through the startup items one after the other:
- Reinstall Google Chrome
- Follow these steps to remove Chrome from your system:
- Conclusion

Chrome is an integral part of the Google ecosystem. It explains why it’s difficult to switch to an alternative after experiencing errors that should compel you to walk away. For example, you can tie your passwords, browsing history, and browser extensions to your Google account, and Chrome will integrate everything once you log in with the browser. And we’ve not mentioned shared documents and Google Drive.
Chrome still enjoys the lion’s share of the web browser market, thanks to Google’s practice of making its services smoother with the browser. When users see errors, the automatic response would be fixing them, instead of being fed up. And since other browsers have their own demons, it makes all the more sense to deal with the devil they know.
Being on this webpage (likely on another browser) means you’re looking for how to fix an “aw, snap!” page crash on Google Chrome for Windows. The error in question means you are out of memory.
What Is the “Ran Out of Memory” Error in Google Chrome for Windows 10?
Sometimes, Chrome webpages crash because the browser lacks the required memory to load them. This problem could be the result of insufficient system memory, extension issues, or problematic browser cache. The error could also be showing up because your video RAM is not up to par or Chrome has reached its allowed memory limit.
Can you resolve the problem? Sure. All you have to do is handle the root cause.
How to Fix the Google Chrome “Ran Out of Memory” Aw Snap Error
Knowing the cause of the error would make things easy, but that’s not always possible. The only reasonable way to go about it in most cases is tackling the possible root causes one after the other. It would be best if you started from the most likely causes, just as we’ve laid them out below.
Restart your device
One system reboot can resolve many errors. Multiple background processes and the applications you work with create temporary cache and logs when your system is running. These processes leave footprints behind that can clog the system memory. When your RAM reaches capacity and can’t hold data for the CPU anymore, a memory leak sets in and triggers errors and problems across different applications.
Restarting your system will shut down these applications and clear the RAM. That way, your computer can start with a clean slate. A reboot also clears out other errors, such as app conflicts and hardware malfunctions that result in BSODs.
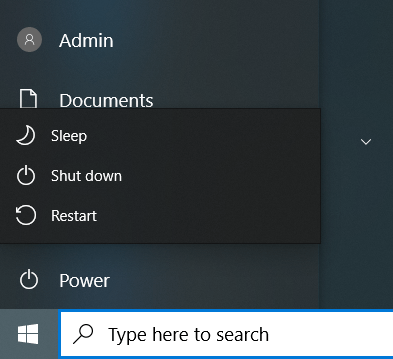
Note that you have to use the Restart option. Using the Shutdown command won’t do the job, especially if the “Fast startup” option is enabled. So, open Start, click on the Power icon, and then select Restart.

Update Google Chrome
Google releases updates to patch bugs and vulnerabilities and improve Chrome’s performance. Outdated applications tend to spit errors once in a while. If you haven’t updated the program for a long time, you should do that immediately. That could be the fix you’ve been looking for.
To update Chrome, do the following:
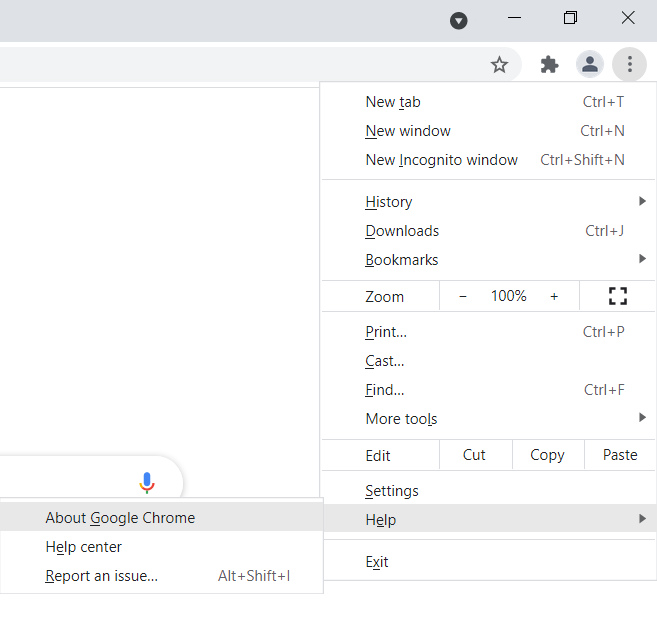
- Go to the top-right corner of the browser.

- Click on the three dots, select Help and click About Google Chrome.

- Select Update Google Chrome and wait until the latest Chrome version is installed.


If the button isn’t available, you’re on the browser’s latest version.
Clear the browser’s cache
Your browser saves portions of websites (especially images and videos) in what is known as cache files. These files allow the browser to load these web pages faster when you visit them in the future. Cache files can range from hundreds to thousands. Sometimes, they grow so large that your browser can’t process them, causing the memory error to show up.
Clear Chrome’s cache and check for the issue. These steps will show you how to clear the browser’s cache:
- Launch Search, search for Chrome, and then launch the browser.
- Once Chrome opens, go to the top-right corner and click on the three dots.
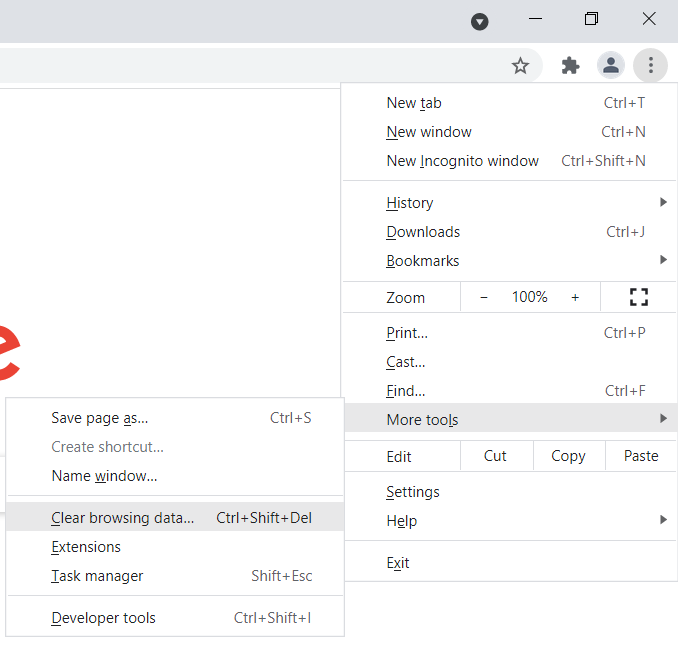
- After the menu opens, select More Tools and click on “Clear Browsing Data” in the menu that slides out.

- After the “Clear Browsing Data” dialog opens, stay under the Basic tab, select a time range, and tick the checkbox for “Cached images and files.” You can also click on “Cookies and other site data,” but note that you might lose saved forms and passwords.
- Click on Clear Data.

- Restart your browser and check for the problem.

Disable extensions
Extensions help you organize things better and allow you to tweak how you interact with the browser. As good as they are, sometimes, they can constitute a nightmare for users, and that’s without adding the security and privacy concerns surrounding them.
You should turn off your extensions or completely uninstall them. To confirm that an extension is the cause of the problem, try opening Chrome in incognito mode. If the error doesn’t show up, then you should definitely get rid of your extensions.
To open a new incognito window, go to the top-right corner of the browser and click on the three dots, then select New Incognito Window.
If you don’t know how to disable extensions in Chrome, here’s what you have to do:
- Launch the Start menu, search for Chrome, and then launch the browser.

- Once Chrome opens, go to the top-right corner and click on the three dots.
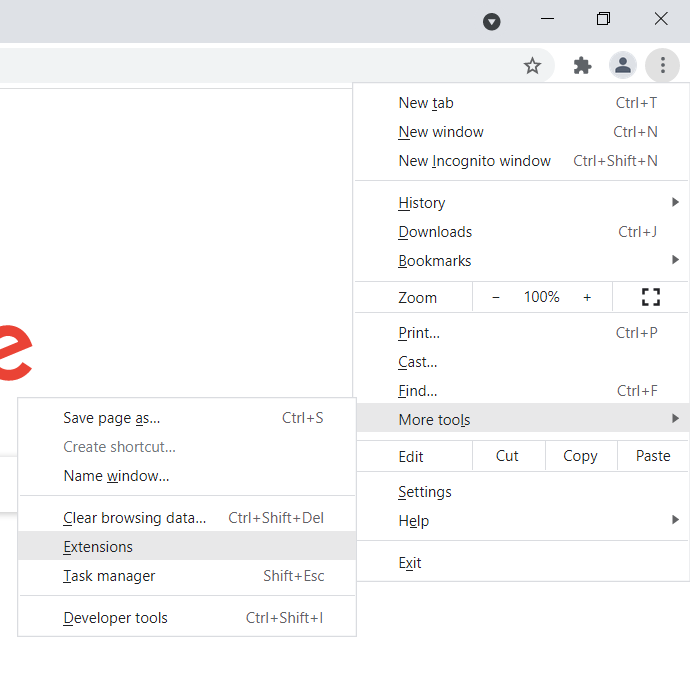
- After the menu opens, select More Tools and click on Extensions.

- Once the Extensions page opens, turn off the switch for each extension to disable them.


- After that, restart Chrome and check if the problem has been resolved.
- If the problem goes away, return to the Extensions page and uninstall your installed extensions. To do that, click on the Remove button and select Remove in the confirmation dialog.


Uninstall unwanted or suspicious Google Chrome apps
A web app you downloaded from the Chrome Web Store or installed via your browser might be the cause of the error. Remove the app and check if the problem persists. You can get rid of all your web apps to troubleshoot the problem.
Follow these steps:
- Launch Chrome, go to a new tab, paste “chrome://apps” into the address bar and press Enter.

- Once your apps appear, right-click on the app you want to uninstall and click on “Remove from Chrome” in the context menu.

- Select Remove in the confirmation dialog box.


Clear temporary files
Your browser and other applications create temporary files they don’t use after a while. Over time, these files grow large and begin to cause problems, from storage shortage to system memory leaks. They could be the reason you’re seeing the “out of memory” error in Google Chrome.
Getting rid of temporary files can help you fix the problem. There are two different ways to do that: using the Disk Cleanup tool and going through the Settings app.
We’ll walk you through both methods.
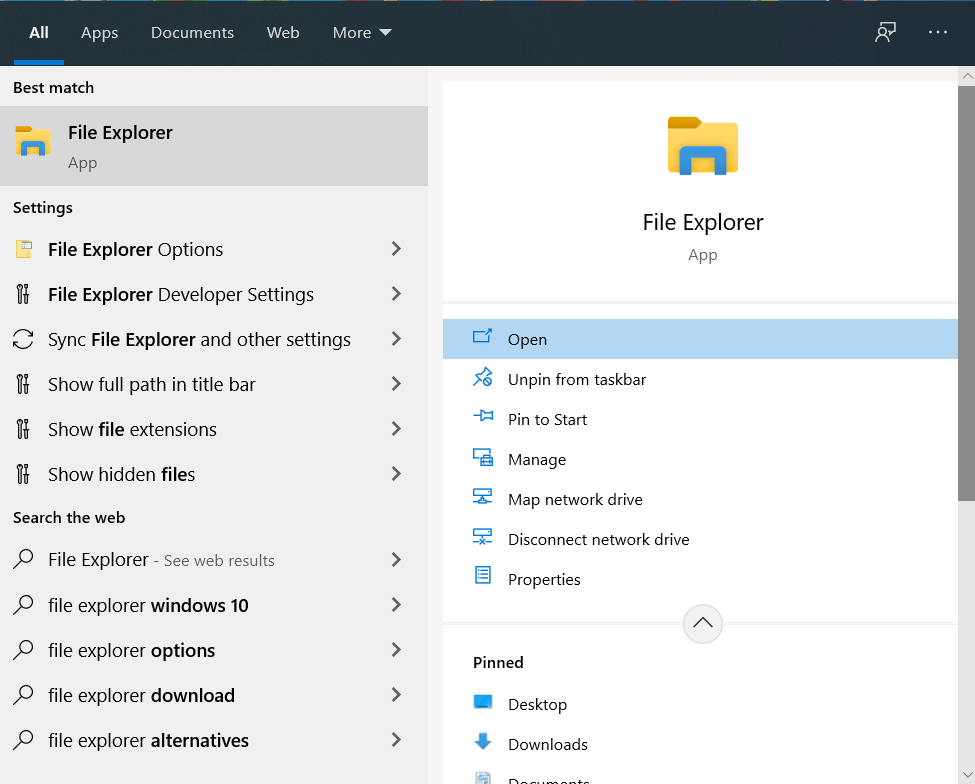
Using the Disk Cleanup tool:
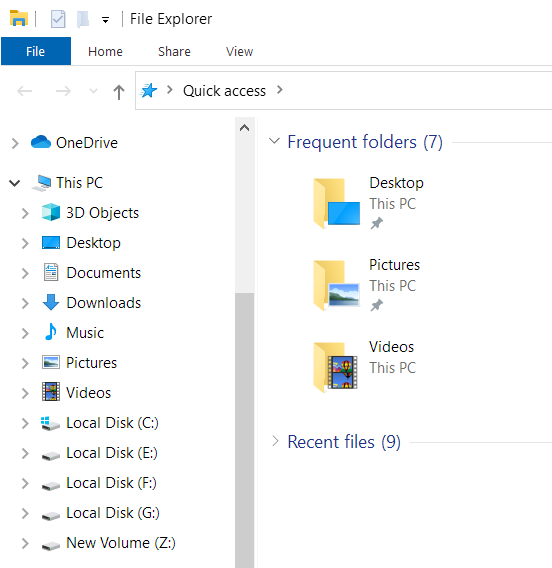
- Open Search, type File Explorer and click Open.

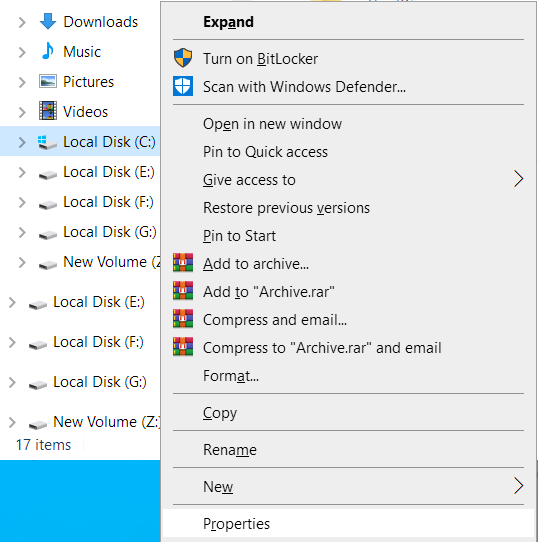
- After the File Explorer window opens, go to the left pane and right-click on your hard drive under This PC.

- In the context menu, select Properties.

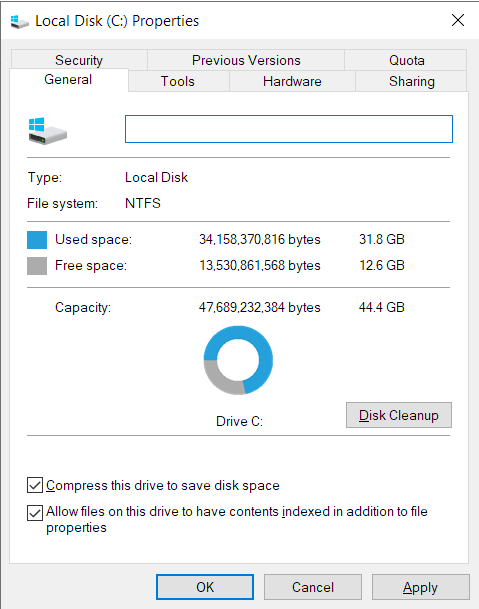
- Once the drive’s Properties dialog box pops up, click on Disk Cleanup in the Capacity section of the General tab.

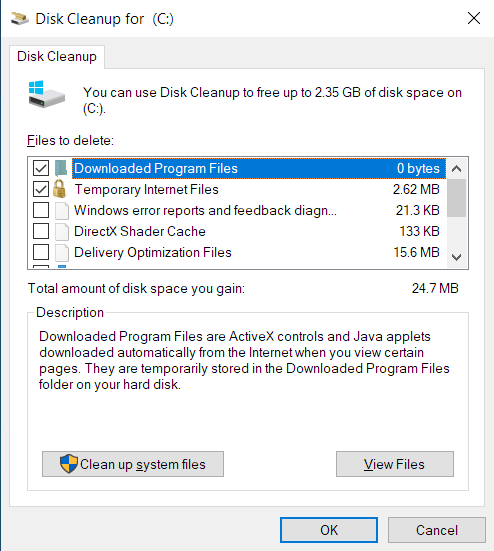
- The tool will locate temporary files on the hard drive and list them.
- After you see the list of temporary files in the Disk Cleanup dialog window, select the categories you want to delete and click on OK.
- Click on “Clean up system files” if you want to remove temporary files created during system app and update installations.

- After the tool clears the files, restart your system and open Chrome to check for the error.
Going through Settings:
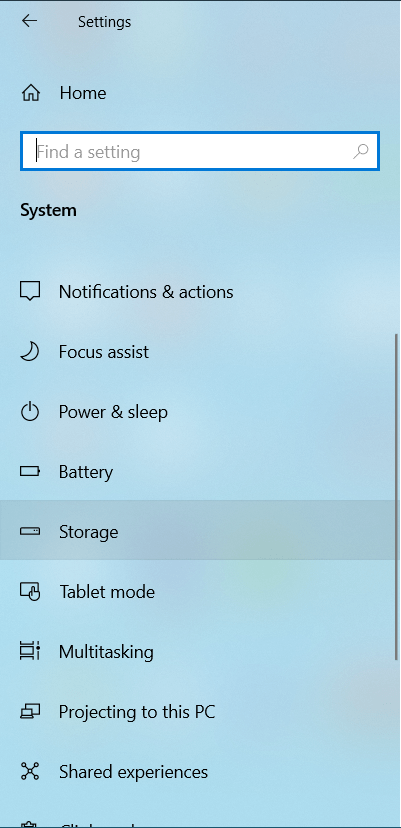
- Tap the Windows logo and I keyboard keys to open the Settings app and click on System.

- Once you get to the System page, switch to the left pane and click on Storage.

- Under Storage, click on Temporary Files.


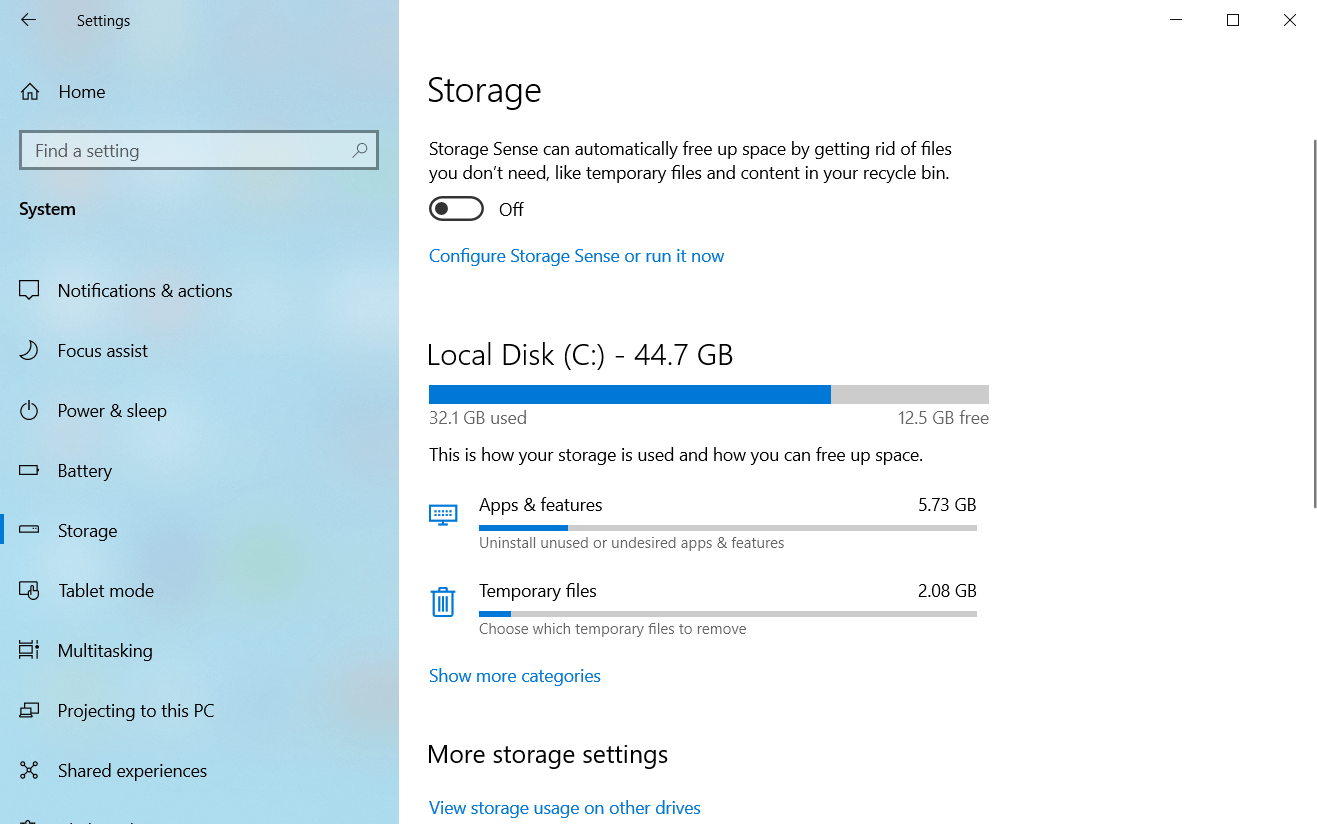
Note: The immediate file categories that you’ll see on the Storage page are those for the drive or partition where Windows is installed. If you want to delete temporary files on another drive or partition, go to the “More storage settings” section and click on “View storage usage on other drives.” After that, select a drive on the next page, then click on Temporary Files.
4. Once the Temporary Files interface appears, Windows will scan your temporary files and list the categories of temporary files on your system. The size of each category will also be displayed.
5. Use the checkboxes to choose the categories you want to clean up and click on “Remove files.”
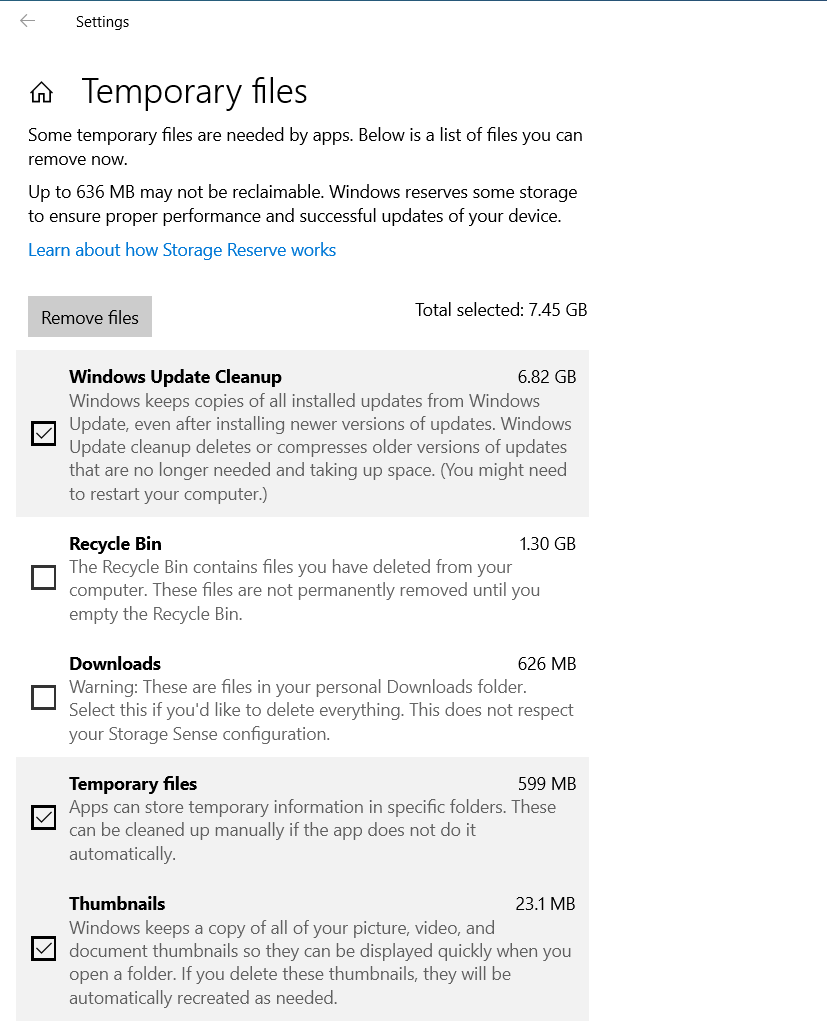
6. Once the files are deleted, restart your system and open Chrome to check for the “out of memory” error.
You can also use a program designed to detect junk files and remove them. Auslogics BoostSpeed does a good job of keeping the system memory free of entities that can easily cause leaks.
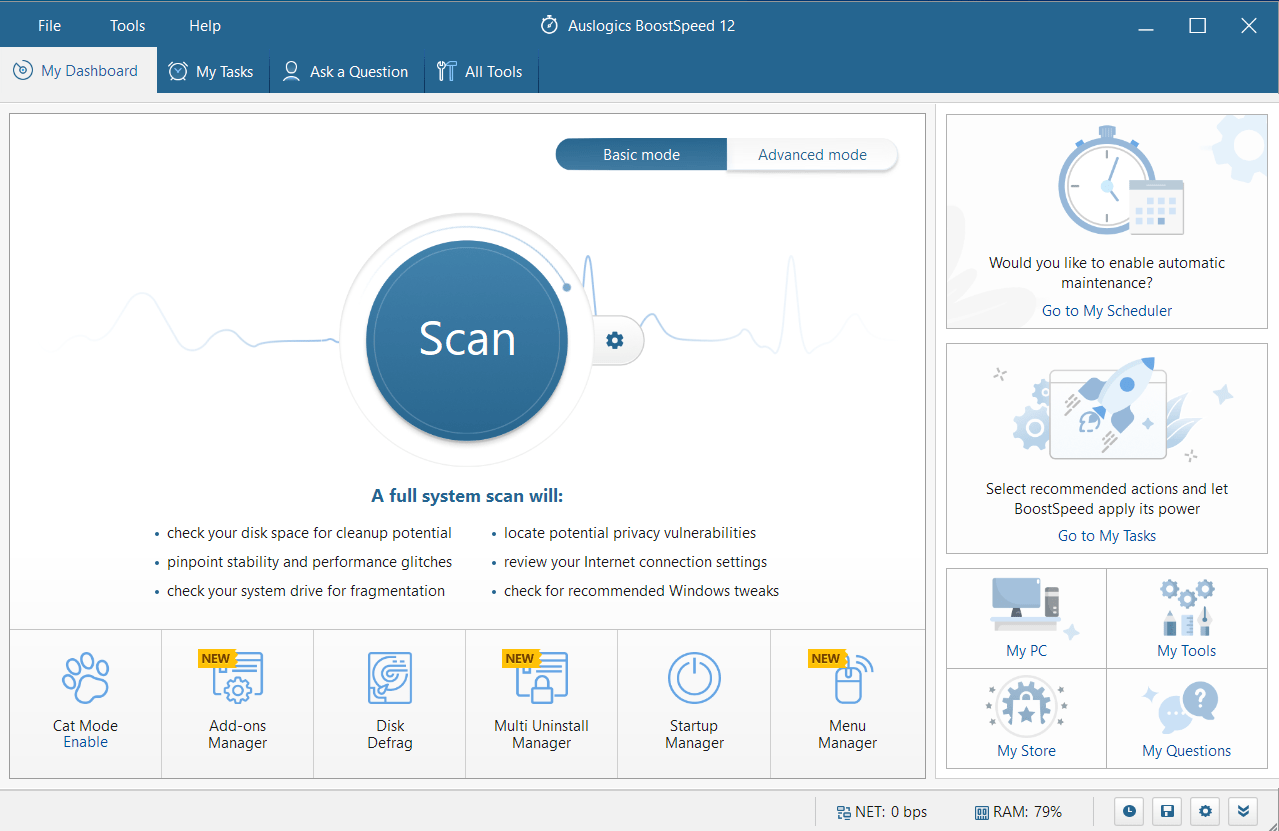
It also scans the system registry for leftover keys that can be harmful to the system in the future and removes them.
Disable hardware acceleration
Google Chrome’s hardware acceleration feature allows it to offload tasks from the CPU to other hardware devices. For example, it can assign video processing tasks to the GPU, even though the CPU can handle them, the reason being that offloading the tasks to hardware specially designed for performing them will take the burden off the CPU and allow things to run smoothly.
Hardware acceleration is intended to boost performance and foster seamless browsing. However, the feature backfires sometimes. If there is not enough memory on your graphics card, you could easily see the “out of memory” error when Chrome assigns heavy tasks to the GPU. Sometimes, hardware acceleration just flat out fails regardless of your video card’s condition and capacity.
Turn off the feature to check if it’s the cause of the error. The following steps will show you how to do that:
- Click the Start button, search for Chrome, and then launch the browser.

- Once Chrome opens, go to the top-right corner and click on the Menu icon (the three dots).
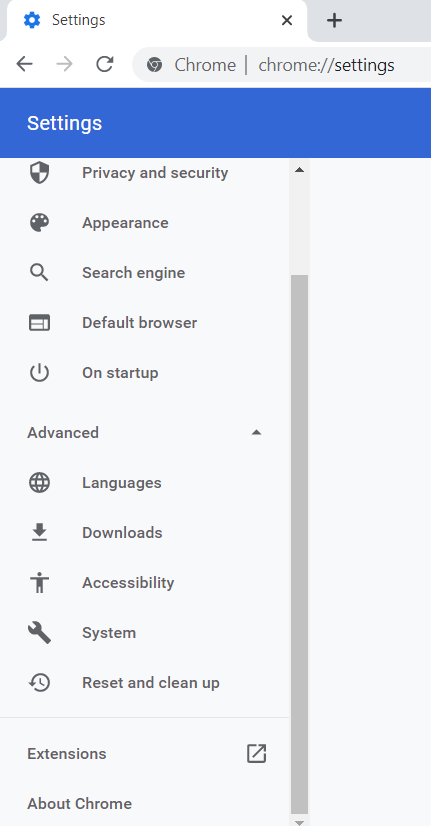
- After the menu opens, select Settings.


Note: Another way to open the Settings page in Chrome is by typing “chrome://settings/” into the Omnibox and pressing Enter.
Here is what you should do next:
- When you see the Settings page, navigate to the left side of the window and click on the arrow beside Advanced to open the section.

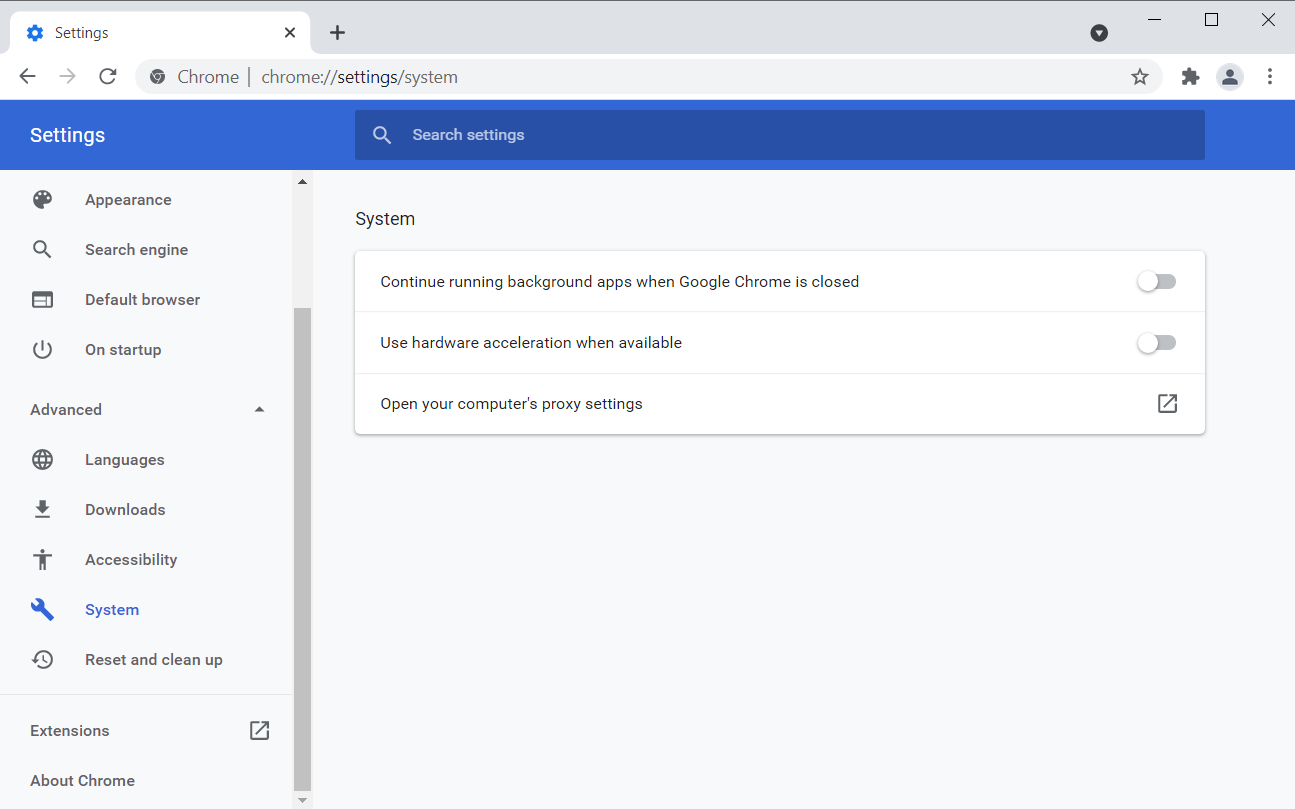
- Click on System under Advanced.

- Go to the right side of the window and toggle off the switch for “Use hardware acceleration when available.”

- Restart Chrome and check for the error.

Run Google Chrome’s Cleanup Tool
The Chrome Cleanup Tool is the browser’s antivirus program. It works by scanning your computer for malicious programs that can harm Chrome. The main concern about the Cleanup Tool for many is privacy. True, the program scans every file on your hard drive, but Google claims it doesn’t have access to them. It only detects malicious files that might be connected to Google Chrome.
Once it finds a program that poses a threat to the browser, it alerts you and deletes the malicious entity after you grant it permission. Normally, the tool sends the metadata of the file and some system information to Google before a pop-up shows up. You can uncheck the “Report details to Google” checkbox to prevent it from sending the details of the malware file to Google.
We recommend that you run the Cleanup Tool. Follow these steps:
- Launch the Start menu, search for Chrome, and then launch the browser.
- Once Chrome opens, go to the top-right corner and click on the three dots.
- After the menu opens, select Settings.


Note: Another way to open the Settings page in Chrome is by typing “chrome://settings/” into the Omnibox and pressing Enter.
Now follow the instructions below:
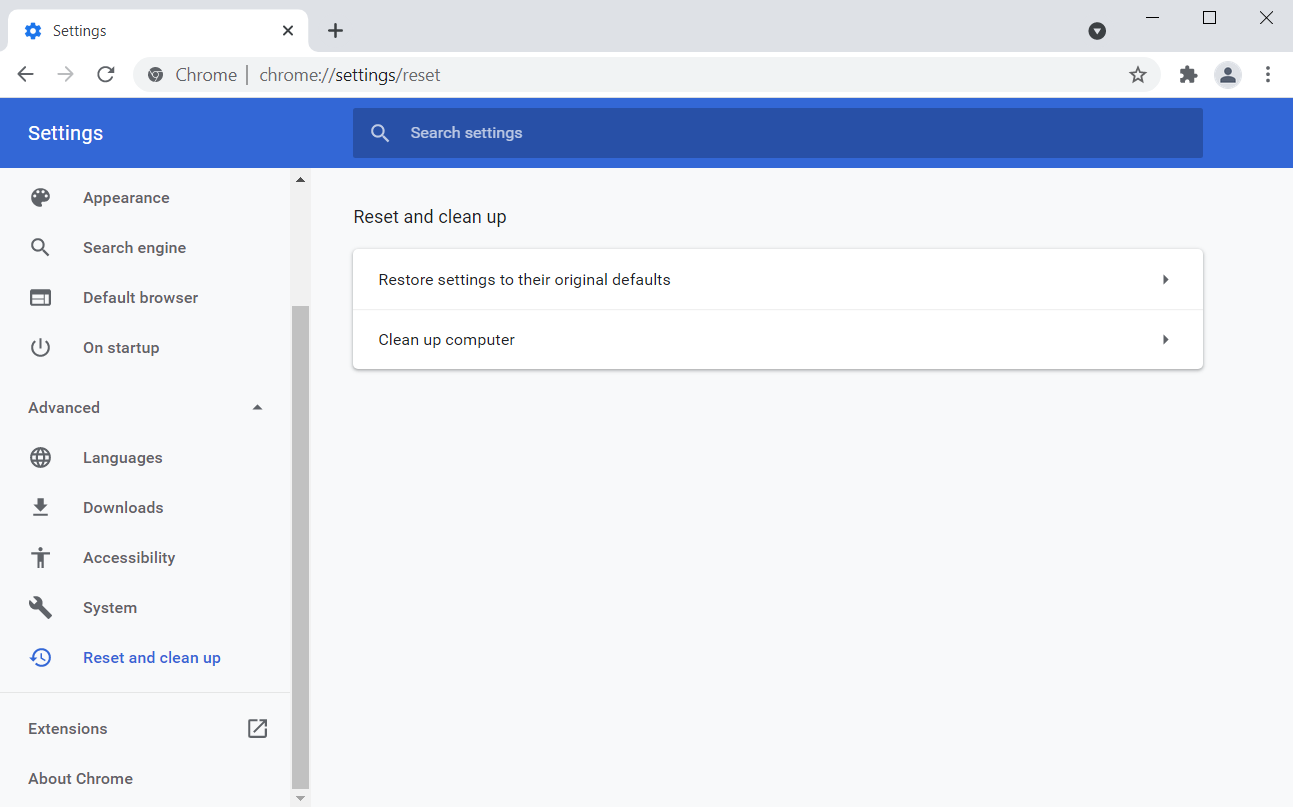
- When you see the Settings page, navigate to the left side of the window and click on the arrow beside Advanced to open the section.
- Click on “Reset and clean up” under Advanced.

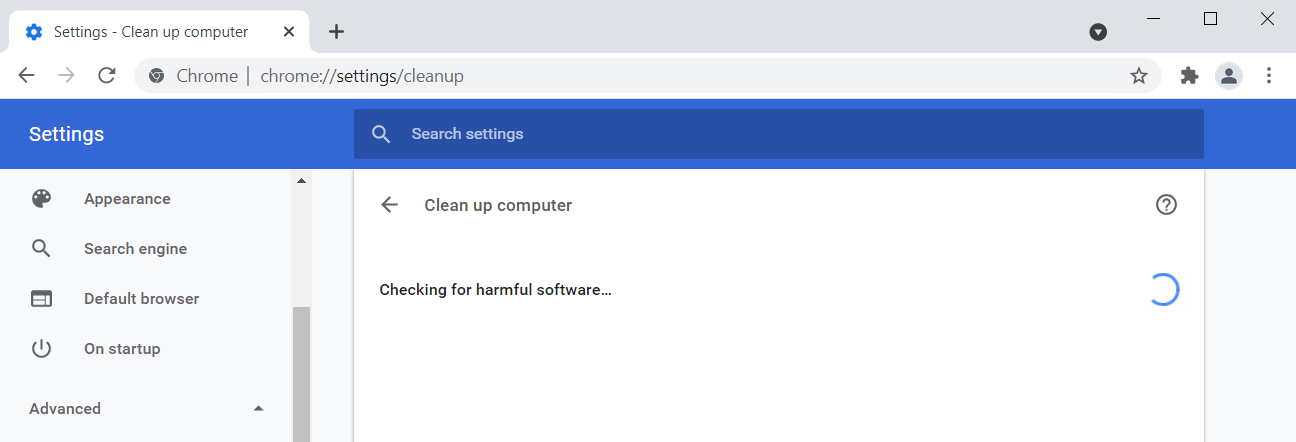
- Go to the right pane and click on “Clean up computer.”

- If you don’t want the tool to send details to Google, uncheck the box next to “Report details to Google about harmful software, system settings, and processes that were found on your computer during this cleanup.”

- After that, click on “Find.”
- The tool will begin to search for harmful software and notify you about its findings once the scan is complete.


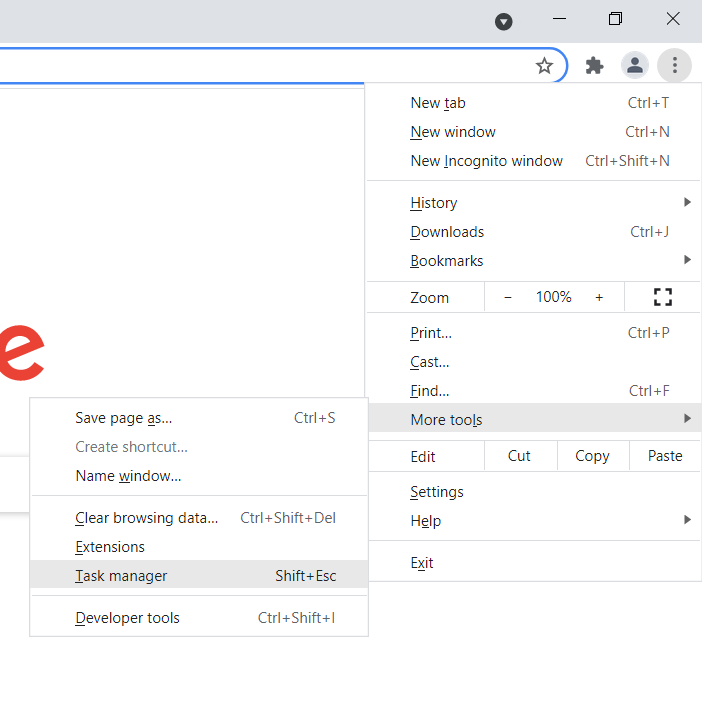
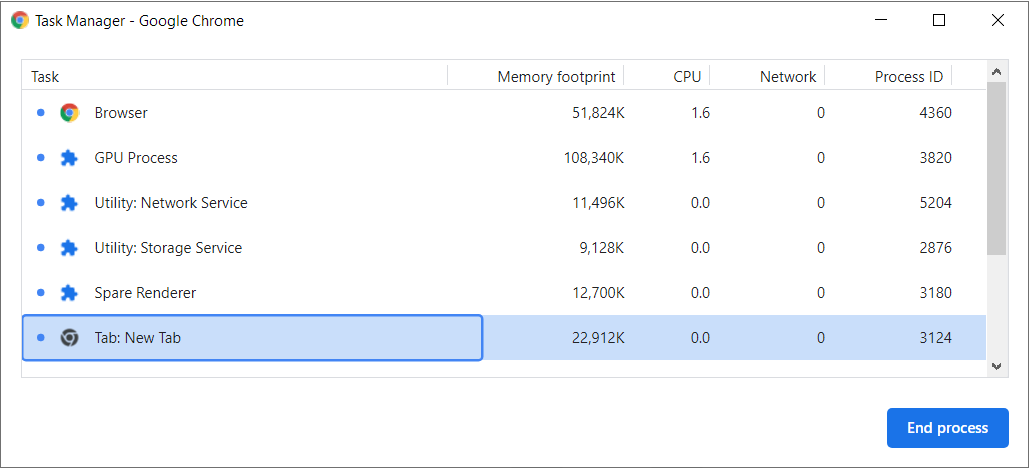
Use Chrome’s Task Manager
Like Windows, Chrome comes with a built-in task manager that allows you to monitor and manage tabs and extensions. The browser’s Task Manager has a simple and straightforward interface. It shows you the process IDs of subtasks and their individual memory footprints. This way, you’ll get to find out which process is consuming Chrome’s allocated memory and causing the problem.
Here’s how to open and use the Task Manager:
- Launch the Start menu, search for Chrome, and then launch the browser.
- Once Chrome opens, go to the top-right corner and click on the three dots.
- After the menu shows up, select More Tools and click on Task Manager.

- Once the Task Manager floating window opens, scroll through to find a tab or extension with an unnaturally high memory footprint and end it. To end a process, click on it and select End Process in the bottom-right corner of the window.


Increase the browser’s memory limit
Chrome comes with a memory cap by default. The caps are different for 32-bit and 64-bit operating systems, and they’re set for each tab in the browser. Google Chrome is configured to save a tab’s operations to the system memory when the user has switched to a different tab. This way, the browser can easily display the tab whenever the user activates it without having to reload the webpage again.
The default memory limit is normally enough for regular browsing. But if you’re working with websites that require huge memory, you can increase Chrome’s memory limit.
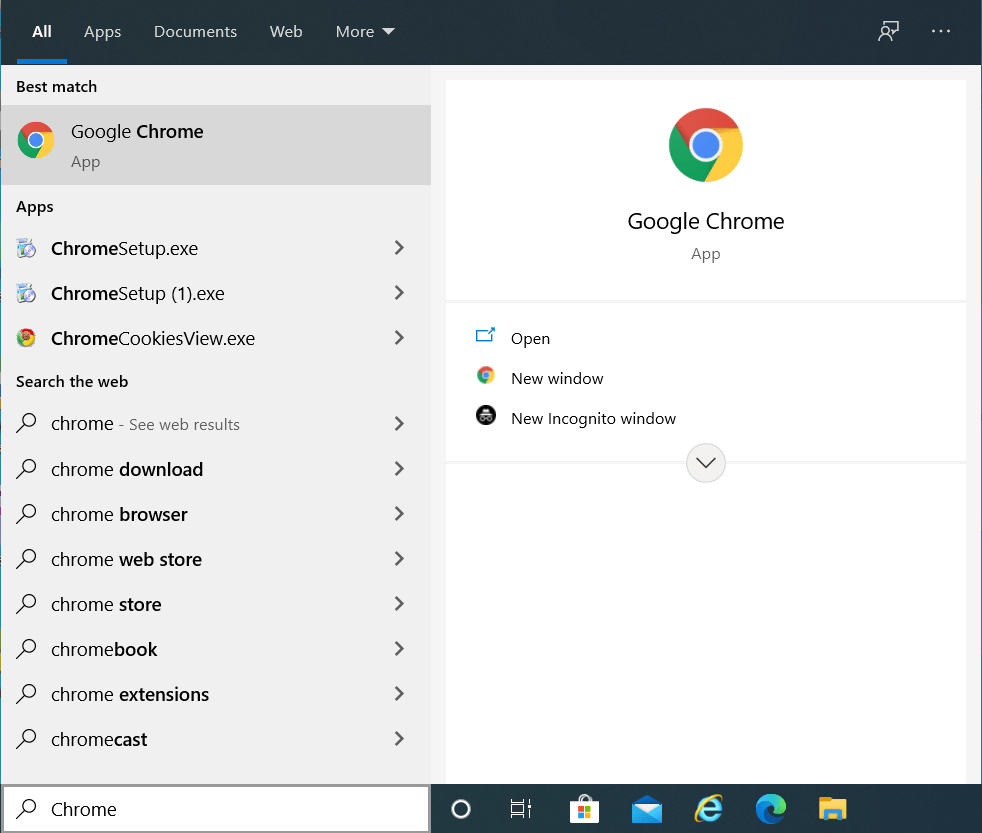
The memory limit for 32-bit systems is 512MB, while the limit for 64-bit systems is 1.4GB. To change the limit, you have to modify the target link for Chrome’s Start menu shortcut. Follow these steps:
- Press the Windows and S buttons on the keyboard or go to the taskbar and click on the magnifying glass icon.
- Once the search box comes up, type Chrome.

- Right-click on Google Chrome in the search results and select “Open file location” from the context menu.

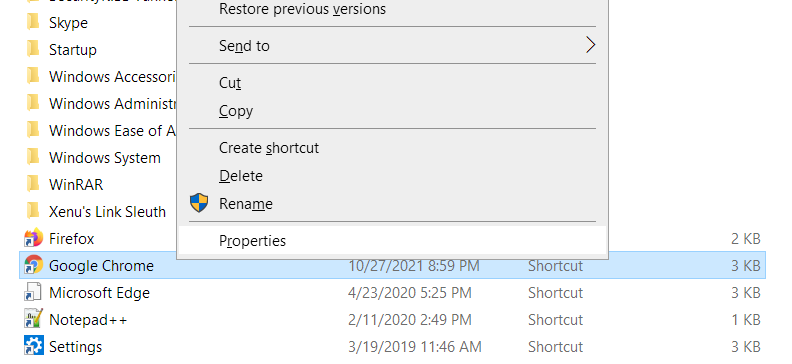
- Right-click on the Google Chrome shortcut and click on Properties in the context menu.

- Once you see the Properties dialog window, replace “C:\Program Files (x86)\Google\Chrome\Application\chrome.exe” with “C:\Program Files (x86)\Google\Chrome\Application\chrome.exe” –max_old_space_size=4096″.
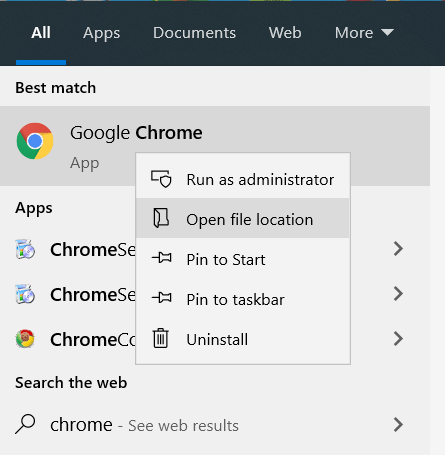
Note: All you’re doing is adding –max_old_space_size=4096 to the current target location. Don’t copy and paste the path above if it’s not the same as the target location in the Target box.
- Click on OK and open Chrome to check for the problem.
Increase your paging file
Windows creates a paging file on your hard drive when the main system memory reaches capacity. Also known as a swap file, the virtual memory is intended to supplement the main memory so that you don’t have memory leaks.
The paging file also has its limit. Windows does not increase the file’s size if it’s set to automatically manage the page file. And if the size of the virtual memory isn’t sufficient to extend the RAM, you’ll experience issues.
So, increase the page file and check if it has resolved the “out of memory” problem in Chrome.
These steps will show you what to do:
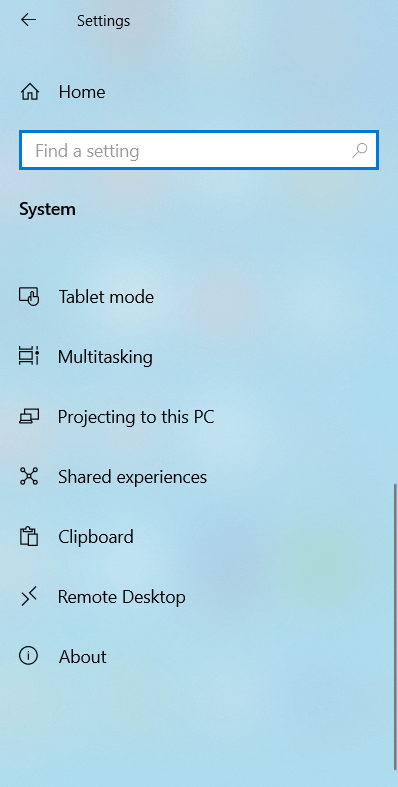
- Tap the Windows and I keyboard keys to open the Settings app.
- After Settings shows up, click on System.
- Once you get to the System page, switch to the left pane, scroll down, and click on About.

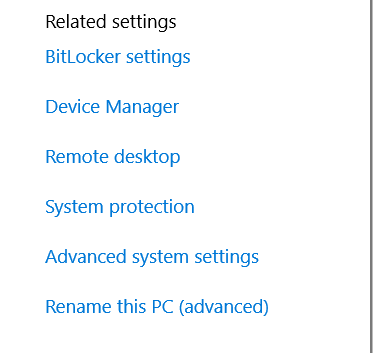
- Head to the right side of the screen and click on “Advanced systems settings” under “Related settings”.

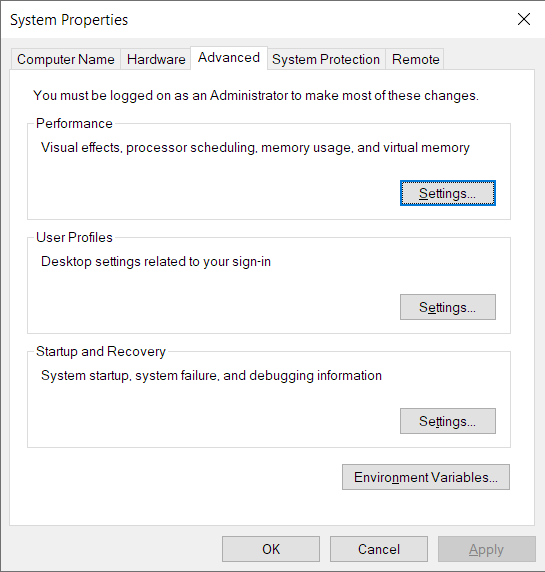
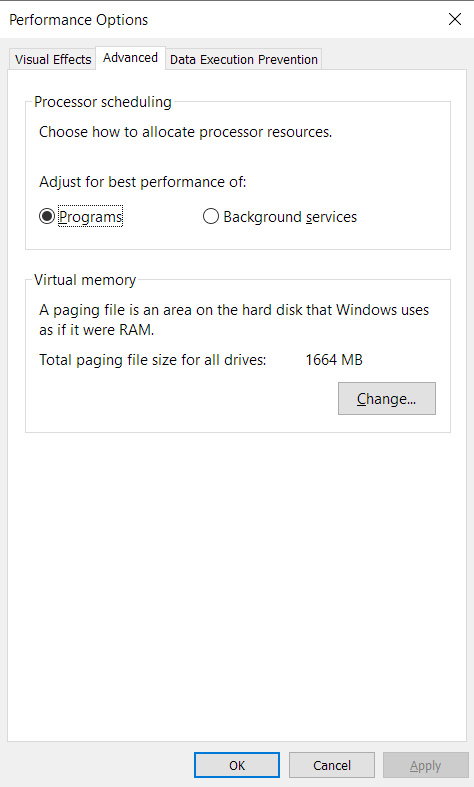
- Once you see the Advanced tab of the System Protection dialog, click on Settings under Performance.

- Go to the Advanced tab of the Performance Options dialog box and click on Change under Virtual Memory.

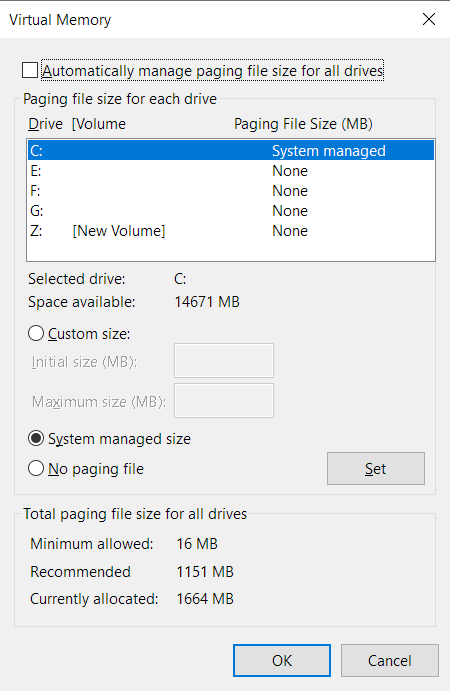
- After the Virtual Memory dialog box opens, uncheck the box next to “Automatically manage paging file size for all drives” and select your main Windows drive.

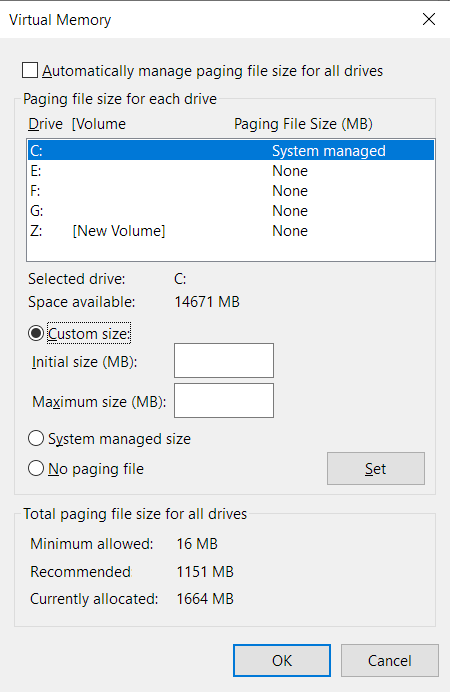
- Click on the Custom Size radio button and increase the Initial Size and Maximum Size of the paging file in megabytes.

- Click on OK after entering the figures, then open Chrome and check for the error.

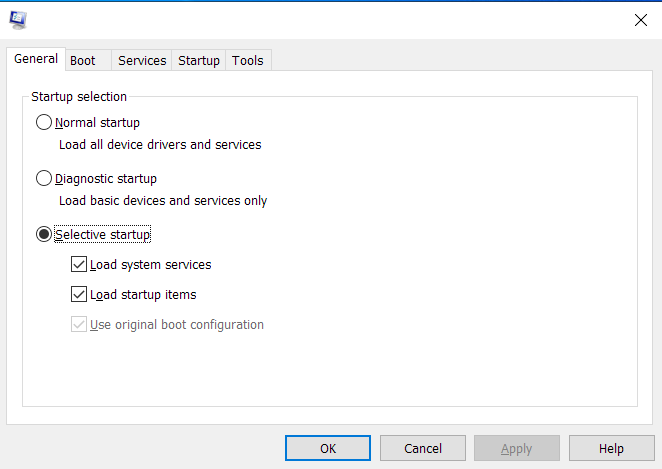
Perform a clean boot
Other applications can use up your system memory and cause Google Chrome to spit out the annoying error. Some of these applications are startups. They launch when Windows boots up and continue to run in the background. Running a clean boot will allow you to confirm whether a startup app is the cause of the problem and identify the culprit.
To run your system in a clean boot state, you have to disable every startup program and service, then restart your computer.
Firstly, follow these steps to disable startup programs:
- Tap the Windows and I keyboard buttons at the same time to open the Settings app.
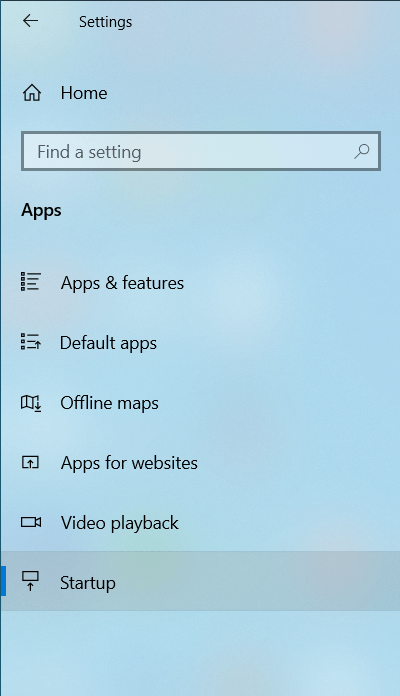
- After Settings shows up, click on the Apps icon.

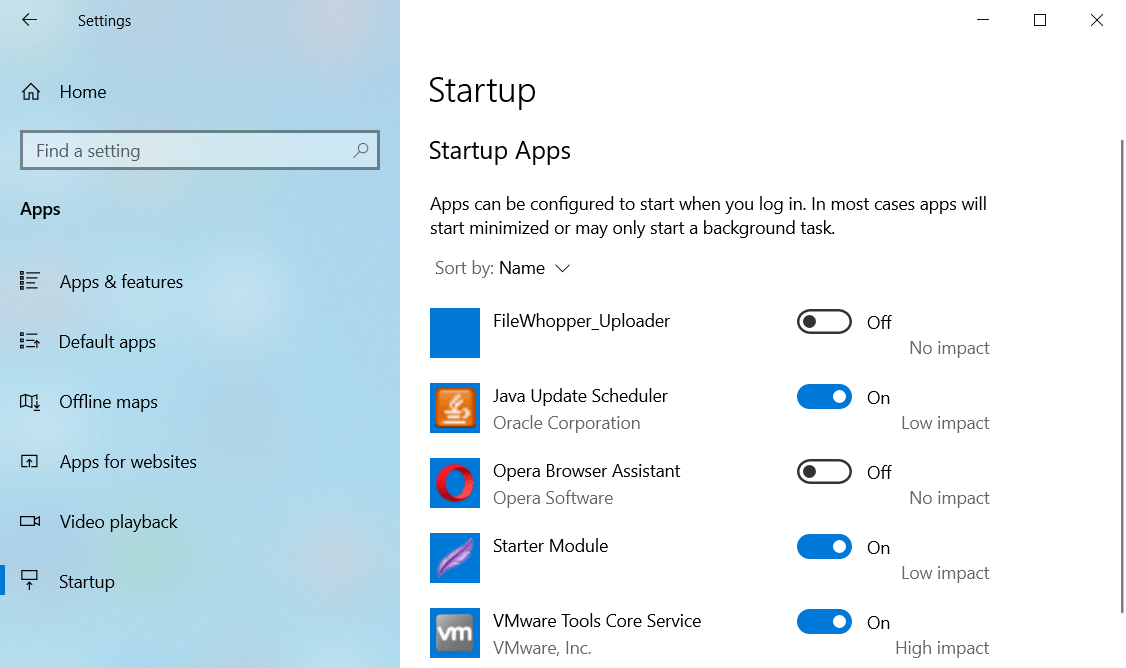
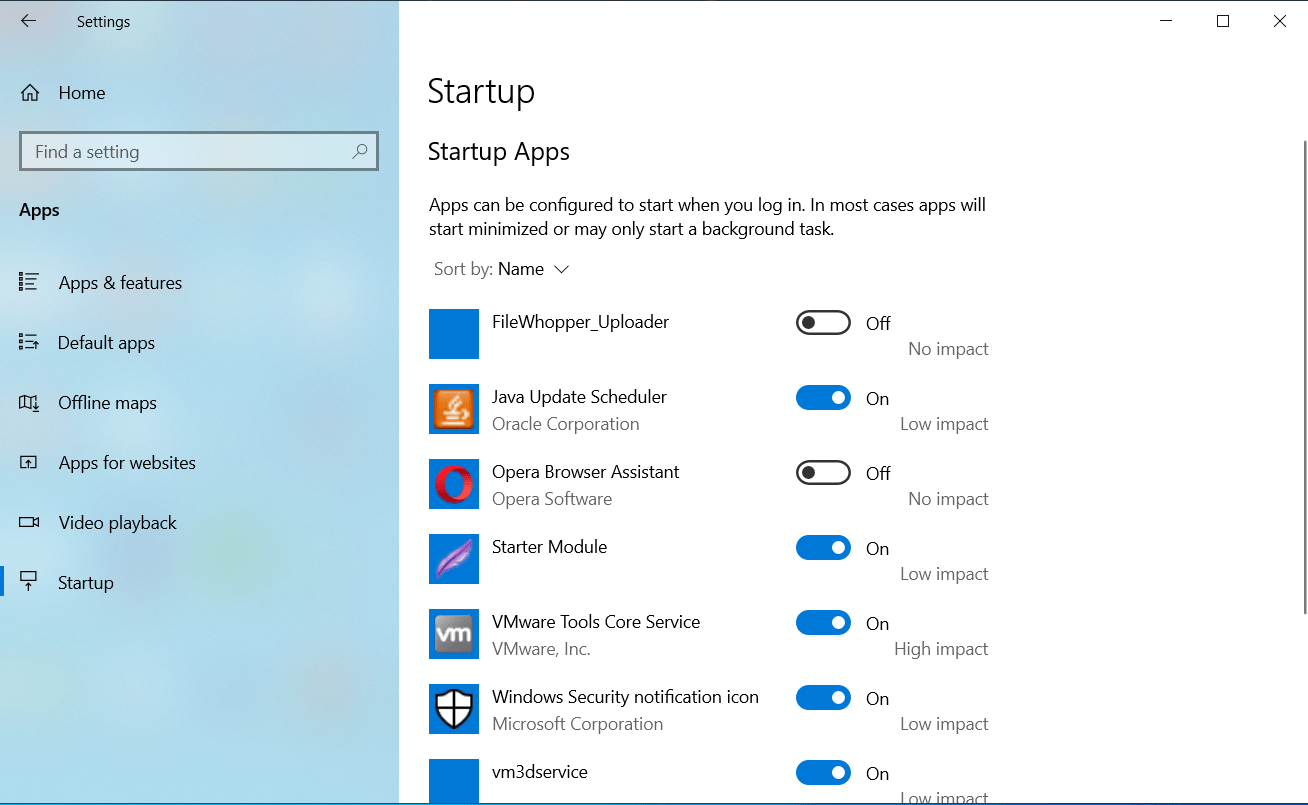
- Once you see the Apps interface, go to the left pane and click on Startup.

- Head to the main page and toggle off the switch for the programs under Startup Apps.


Follow these steps to disable startup services:
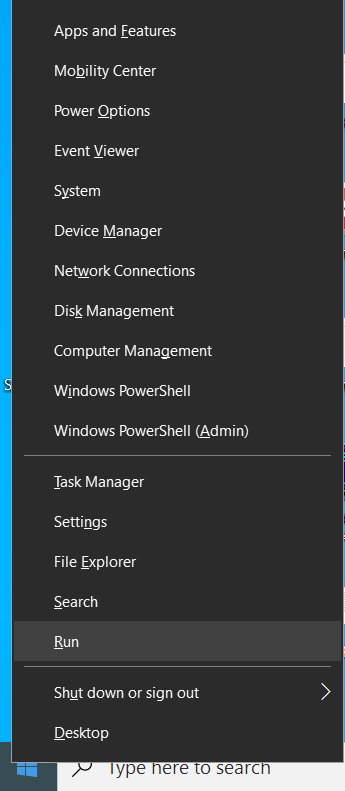
- Right-click the Start button in the taskbar and click on Run in the Power User menu.

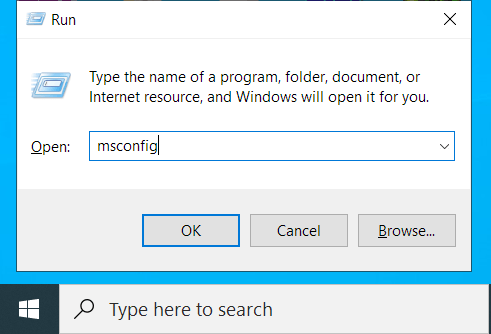
- After the Run dialog window opens, type “msconfig” and punch the Enter key on your keyboard.

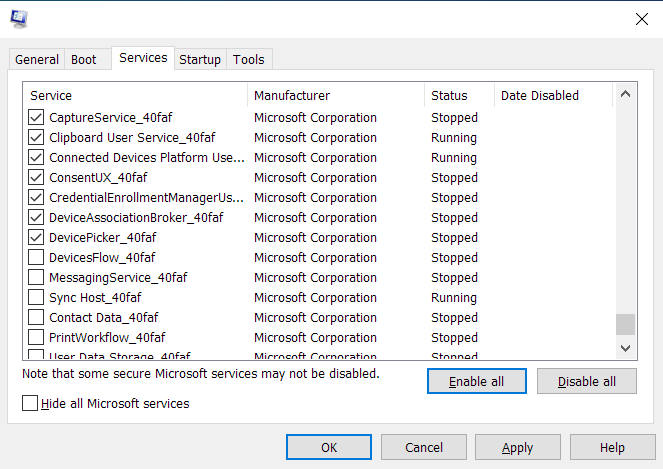
- You’ll now see the System Configuration dialog box. Switch to the Services tab.

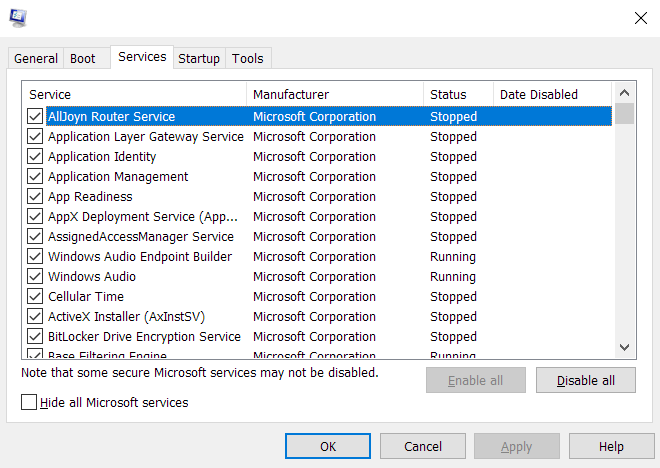
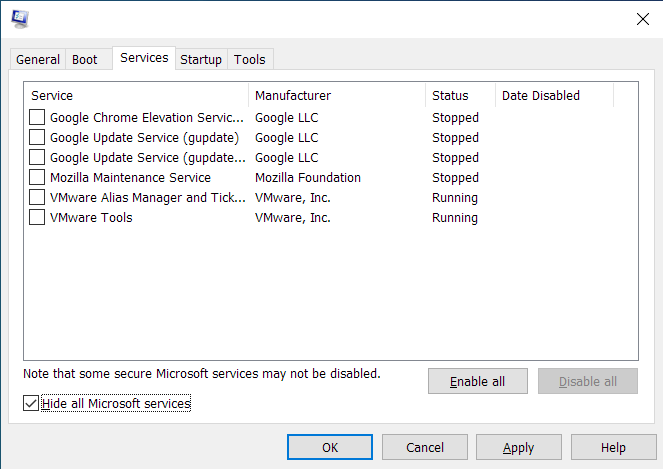
- Once you get to the Services tab, mark the box for “Hide all Microsoft services” to exclude operating system services from the list.

- Next, click on the Disable All button.

- Click on OK, then restart your computer.


After your system starts in a clean boot environment, open Google Chrome and load a website. If you don’t see the error message, you just confirmed that a startup program is behind the problem. To find the culprit, you have to enable one of these apps, restart your system, then check for the problem. If the first startup service or program doesn’t trigger the error, move on to the next. Continue until the error appears again, and make sure you take note of the last item you enable.
You can follow these steps if you don’t want to go through the startup items one after the other:
- Launch the System Configuration dialog box.
- After the window opens, go to the Services tab.

- Select half of the services under the tab (from the top) and click on Enable All. If all the services are checked, uncheck half from the bottom.
- Click on OK, then restart your computer and open Chrome to check for the error.
- If the error appears, one of the services you enabled is the cause. This means you don’t have to check other services, just the ones you enabled. If the error doesn’t occur, then you can ignore the services you enabled and check the others.
- Use the same technique for the startup programs in the Settings app.
- Enable half and check if one of the programs in the group is the cause of the problem.


However, if the error shows up after starting your system in a clean boot state, none of the startup items is the cause of the problem.
Reinstall Google Chrome
If none of the methods above has worked, your next step should be reinstalling Chrome. At this point, it makes sense to suspect that some of the browser’s installation files are corrupt. Installing a fresh copy of Chrome’s updated version should get rid of the problem.
Since your browsing history, extensions, apps, and passwords are attached to your Google account, you should have no problem with reinstalling the browser. The only thing that will happen differently is that the browser will have to load those services again.
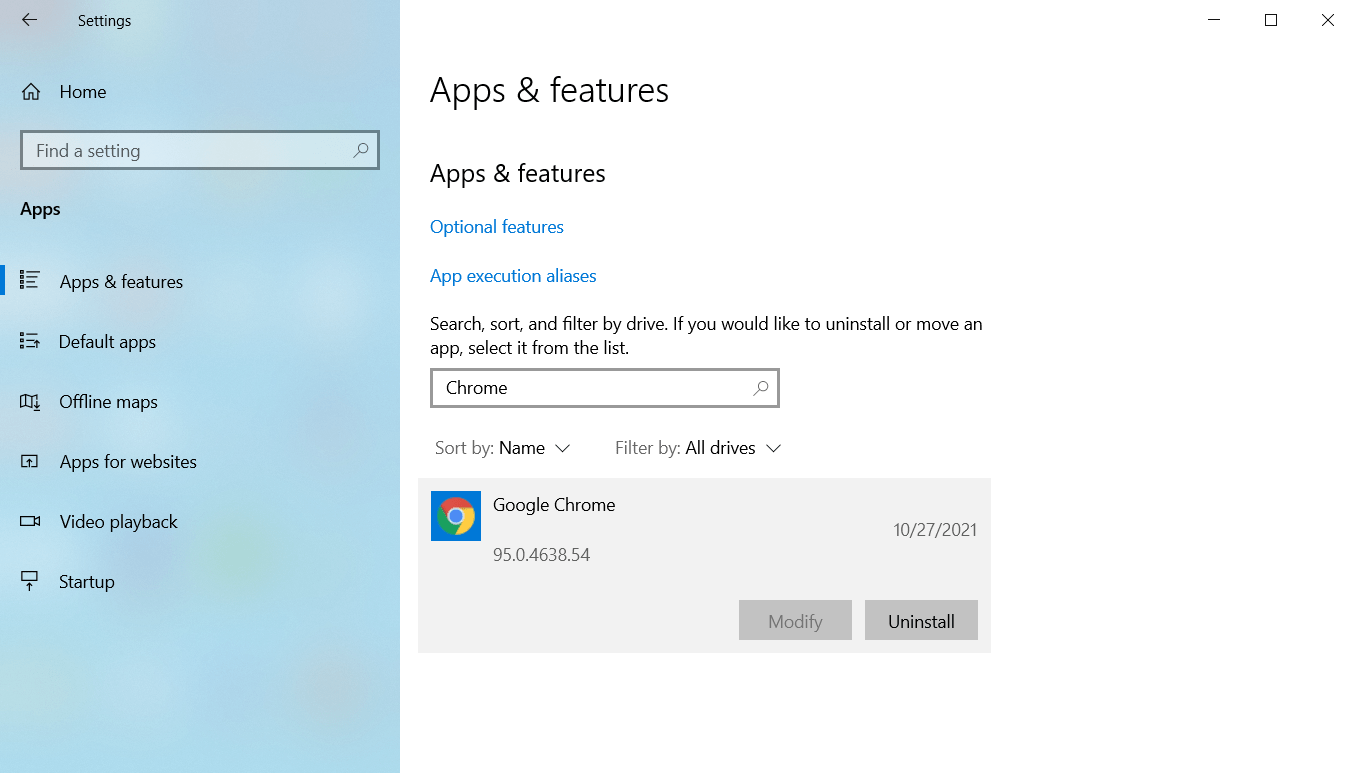
Follow these steps to remove Chrome from your system:
- Tap the Windows and I keyboard buttons at the same time to open the Settings app and click on the Apps icon.
- Once you see the Apps interface, go to the search box under Apps & Features and type “Chrome.”

- Click on Google Chrome.

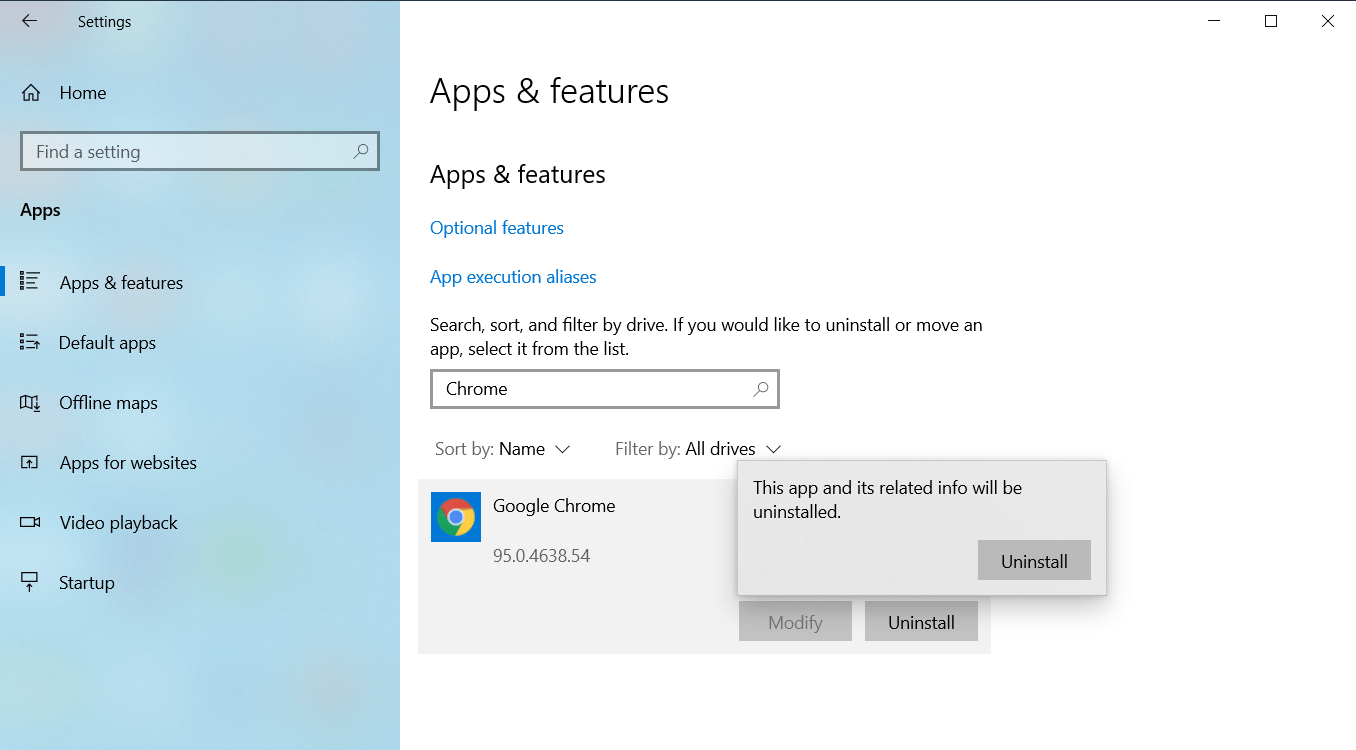
- Then click on Uninstall.

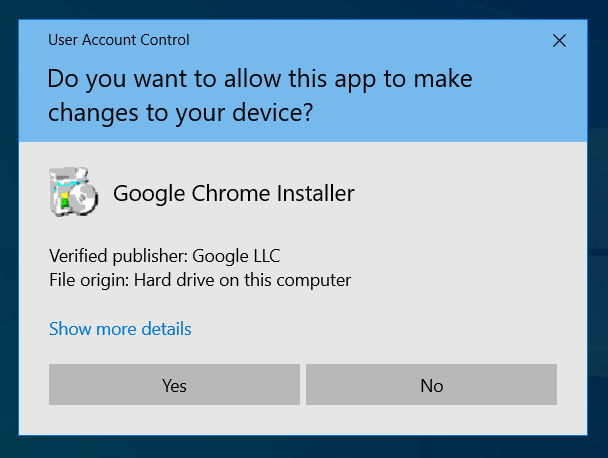
- Click on Yes once the User Account Control pops up and requests permission.

- Follow the subsequent instructions to complete the process.

- After Windows removes Chrome, restart your computer.

- Next, fire up another web browser, head to Google’s website, and download Chrome.

- Install the browser and things should normalize.
Conclusion
That’s how to fix Chrome’s “out of memory” issue. Remember to use specialized software such as Auslogics BoostSpeed to keep your system optimized. The program comes with tools that focus on keeping your system’s performance at the best level.
Chrome is one of the most-used browsers in the world. Millions of users love it because of its incredible customization and easy-to-use interface. But like a coin of two sides, Chrome also faces some errors sometimes. One such common error is Aw Snap! Chrome ran out of memory. As the name indicates, when Google Chrome consumes more RAM in your PC, you will face this error. We bring to you a perfect guide that will help you fix Chrome out of memory issues. So, continue reading!

Table of Contents
How to Fix Chrome Ran Out of Memory in Windows 10
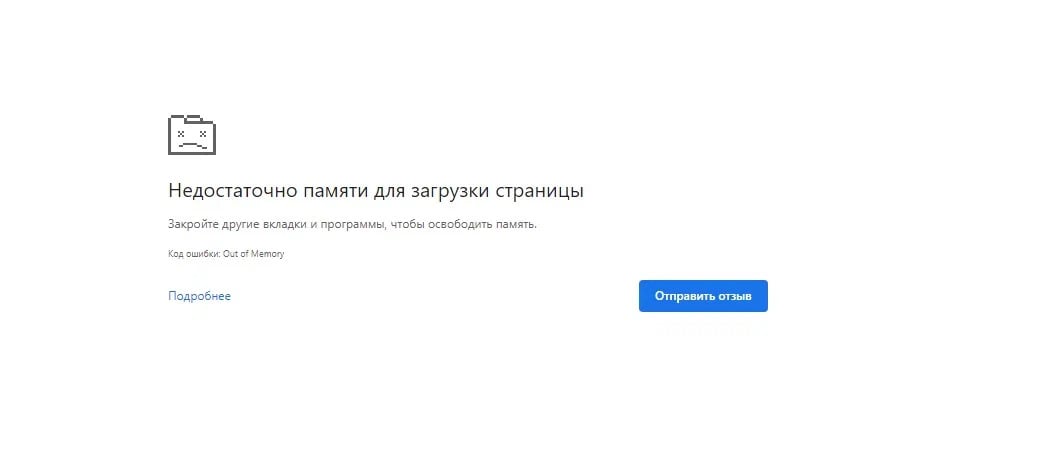
Following is the error that you may face if Chrome runs out of memory on Windows 10.
Aw, Snap!
Google Chrome ran out of memory while trying to display this webpage.
The reason for this error is not very obvious. Yet, there are some root causes for this Chrome browser out of memory issue listed below. Either random or specific, if you face this error in your browser, we will help you resolve the same by this guide.
- Internet connectivity issues
- Damaged or bulky browser cache
- Incompatible extensions
- Bulged temporary files in PC
- A glitch in the User profile
- Unwanted or incompatible programs in PC
- Outdated browser
- Site blocked by firewall
Basic Troubleshooting
Here are some basic troubleshooting steps are given below to fix this error. You should follow these points before going through the methods given in this article.
- Restart your PC: In most cases, a simple restart may fix the issue without any challenging layouts. Alternatively, you can entirely shut down the system using the Power options and turn it on again.
- Ensure Proper Internet Connectivity: This is the most apparent reason that causes the discussed error. When your internet connectivity is not optimum, the connection interrupts more frequently. You can run a speed test to know the optimum level of network speed required for the proper connection. You can also prefer a new faster internet package and buy it from your network provider.
- Close Unwanted Tabs: This might help in fixing the error. If none of these basic troubleshooting tips helped you, then close all the tabs and restart the Chrome browser.
Still, if you face the same error, go ahead with the troubleshooting methods given below. Follow them in the same order to attain quicker results.
Method 1: Update to 64-bit Version of Chrome
First, check if you use the 64-bit version of Chrome. If the browser consumes a lot of RAM from your processors, you must be sure of using a 64-bit version instead of a 32-bit version. This manages more computer resources, thereby resolving the said problem. Here are a few instructions to check and update the version of Google Chrome.
1. Launch the Google Chrome Browser.
2. Click on the three dots icon and hover to Help and select the About Google Chrome option.

3. Here, check if Google Chrome is of 64-bit version or not.

4. If there is 32-bit given next to the version of Chrome, you have to download the 64-bit version of Google Chrome.

5. Run the downloaded setup file to install Google Chrome 64-bit version.
Method 2: End Google Chrome Processes
Like Windows, Chrome also has Task Manager that allows you to manage its tabs and extensions. The interface of this setting is very straightforward, and you can abort or end any high resource-consuming Chrome tasks. For example, you can distinguish which process consumes allocated memory contributing to this error. Thus, you can eliminate that particular tab instead of closing all the tabs. Here are a few instructions to manage tabs in Chrome.
1. Open Google Chrome and press Shift + Esc keys together to open Task Manager – Google Chrome.
2. Now, scroll down and check if you have an unusual Memory footprint value.
3. If so, click on the End Process button for the respective Task.

4. Now, reload the site and check if you face the error again.
Also Read: How to Fix Chrome Keeps Crashing
Method 3: Restart Google Chrome Process
If you did not attain a fix by terminating specific Chrome tabs and extensions from the above method, try to force shutdown all the Chrome tasks you do regularly in Task Manager. There may be plenty of applications that run in the background. This will increase the CPU and memory space, thereby affecting the performance of the system. Follow the below-mentioned steps to close the Chrome background tasks.
1. Launch Task Manager by hitting Ctrl + Shift + Esc keys simultaneously.
2. In the Processes tab, search and select the Chrome process.
3. Then, click on the End task button as depicted in the below picture.

4. Now, relaunch Google Chrome and check if you have fixed the issue.
Method 4: Clean up Temporary Files
When your system has any corrupt temporary files or folders, you may encounter this Chrome out of memory error. You can sort out this error by clearing the temporary files in your system. Then, follow the instructions to implement the same.
1. Press the Windows + R keys simultaneously to open Run dialog box.
2. Type %temp% and hit Enter key to open AppData Local Temp folder.

3. Press Ctrl + A keys together to select all the unrequired files and right-click on the file and select the Delete option.
Note: Some files cannot be deleted coz they are being used, so you can skip these.

4. Finally, redirect to the Recycle Bin and permanently delete the files and folders you have deleted now.
Method 5: Use Private Browsing
In some cases, using private surfing mode could resolve this error since some details of the web pages are hidden in it. Below are some advantages of using Incognito mode in Chrome. The Incognito Mode in Chrome & Edge browsers is primarily designed for secure and private browsing.
- It is made for users who do not want their search history or recent pages saved on their device.
- Due to its privacy policy, this mode does not allow users to record their screens or take screenshots.
- It blocks cookies, hides search history, but provides the freedom to browse the desired website.
Follow the below-mentioned steps to open desired web page in private mode:
1A. Go to Google Chrome and click on the three-dotted icon. Here, select the New Incognito window option as shown.
![]()
1B. Alternatively, you can also press Ctrl + Shift + N keys together to launch the New Incognito window.
Also Read: How to Fix PDFs Not Opening in Chrome
Method 6: Clear Cache and Cookies in Chrome
Try clearing cache and cookies to fix Chrome ran out of memory error by implementing the following steps.
1. Launch Google Chrome.
2. Then, click on the three-dotted icon > More tools > Clear browsing data… as illustrated below.

3. Check the following options.
- Cookies and other site data
- Cached images and files
4. Now, choose the All time option for Time range.

5. Finally, click on Clear data.
Method 7: Disable Hardware Acceleration
Sometimes, web browsers may run in the background, and this will consume the CPU resources. Hence, it is better to disable the hardware acceleration in the browser to fix Chrome out of memory error.
1. Launch Google Chrome and click on the three-dotted icon present at the top right corner.
2. Now, click on Settings as depicted in the below picture.
![]()
3. Now, expand the Advanced section in the left pane and click on System, as shown.

4. Here, switch Off the toggle for Use hardware acceleration when available option.

5. Then, click on the Relaunch option.

Also Read: How to Remove Chrome Themes
Method 8: Disable Extensions (If Applicable)
Follow these steps to disable the extensions which has high memory usage to fix Chrome out of memory error.
1. Launch Chrome and type chrome://extensions in URL Bar. Hit Enter to get the list of all installed extensions.

2. Switch Off the toggle for the extension you want to disable.

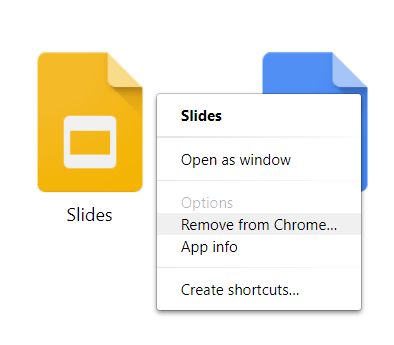
Method 9: Remove Extensions (If Applicable)
A web app extension in the Chrome browser might also cause this error. You should remove those unwanted apps extension individually to check whether the issue still persists or not. Follow the below-mentioned instructions to delete the extensions from Google Chrome.
1. Launch Chrome and type chrome://extensions in URL Bar. Hit Enter to get the list of all installed extensions.
2. Switch Off the toggle for the recently installed extension to disable it.

3. Repeat the same one by one for each extension, until you find the corrupt extension.
4. Once found, click on the Remove button to uninstall the corrupt extension.
Note: We have shown the MetaMask extension as an example.

Refresh your browser and check if the issue is fixed now.
Method 10: Remove Harmful Software from Chrome
The Chrome Cleanup Tool is an antivirus program for your browser.
- It scans your PC for malicious programs that affect the browser.
- Since Google has assured privacy over data scanned by the tool thus, it cannot access them in any way.
Only the harmful programs are detected by the tool, and the tool warns you with an alert. Usually, the tool alerts you for malicious programs after sending the metadata files to Google. If you do not want your files to be sent to Google, you can uncheck the box Report details to Google box.
Here’s how to run Chrome Cleanup Tool to fix Chrome ran out of memory issue:
1. Launch Google Chrome and click on three-dotted icon > Settings as shown highlighted.
![]()
2. Here, click on the Advanced setting in the left pane and select Reset and clean up option.

3. Now, select the Cleanup computer option as depicted below.

4. Here, click on the Find button to enable Chrome to find harmful software on your computer.

5. Wait for the process to be completed and remove the harmful programs detected by Google Chrome.
6. Reboot your PC and check if the issue is resolved.
Also Read: Fix Crunchyroll Not Working on Chrome
Method 11: Create New User Profile
If there are any damaged files or glitches in data stored by Google Chrome on your PC, then renaming the default folder might help you resolve Chrome out of memory error. This may also occur when you have a damaged user profile. Here are a few instructions to rename your user profile folder.
Note: Renaming the folder will not affect the functionality. The folder will be recreated once you restart the browser.
1. Press and hold Windows + E keys together to open the File Explorer.
2. Now, paste the following path in the address bar and hit Enter key.
%LOCALAPPDATA%\Google\Chrome\User Data\

3. Locate the Default folder and right-click on it.
4. Then, select the Rename option as shown.

5. Next, rename the folder to Old Default and hit the Enter key.

6. Finally, restart Chrome and check if you have fixed the issue.
Method 12: Increase Memory Limit of Chrome
If you are handling web pages that require high memory, you can increase the memory limit of the browser by modifying the target link as instructed below to fix Chrome ran out of memory problem.
1. Hit the Windows key, type chrome, and click on the Open file location option.

2. Then, right-click on Google Chrome and click on Properties as shown.

3. In the Google Chrome Properties window, add -max_old_space_size=4096 in the Target field as illustrated below.

4. Finally, click on Apply and then OK to save the changes.

Also Read: How to Enable DNS over HTTPS in Chrome
Method 13: Update Chrome
If you have an outdated browser, the improved features of the OS will not be supported. This may also result in Chrome ran out of memory issues. To fix this error, you should update Chrome by following the steps below.
1. Launch Google Chrome.
2. Click on the three-dotted icon to expand the Settings menu.
3. Then, select Help > About Google Chrome as illustrated below.
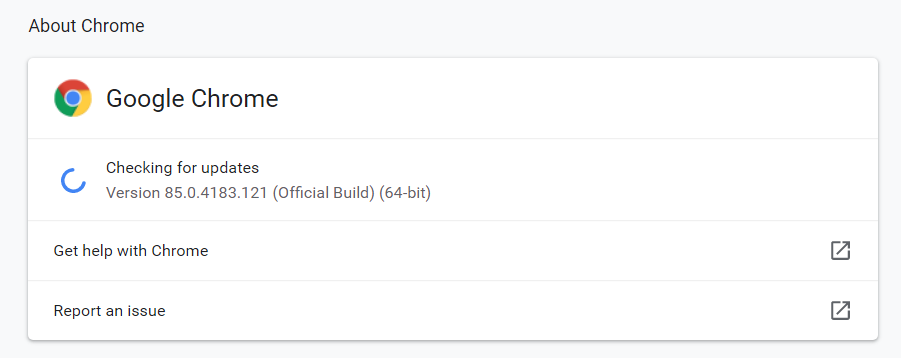
4. Allow Google Chrome to search for updates. The screen will display Checking for updates message, as shown.

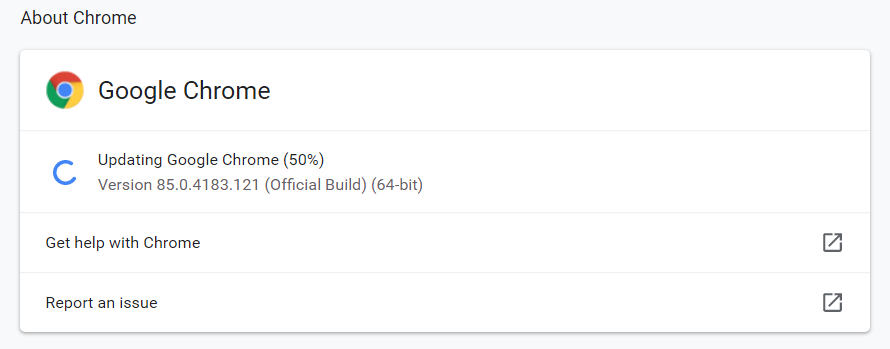
5A. If updates are available, click on the Update button.
5B. If Chrome is already updated then, Google Chrome is up to date message will be displayed.

6. Finally, launch the updated browser and check again.
Method 14: Reset Chrome
Resetting Chrome will restore the browser to its default settings, and there are more possibilities that you can fix the discussed error. Follow the below-mentioned steps to reset Google Chrome and check if the issue is resolved.
1. Open Google Chrome and go to chrome://settings/reset
2. Click on the Restore settings to their original defaults option, shown highlighted.

3. Now, confirm your action by clicking on the Reset Settings button.

Now, launch the website again and check the issue is resolved.
Also Read: How to Export Saved Passwords from Google Chrome
Method 15: Reinstall Chrome
If none of those mentioned above methods have helped you, you can try reinstalling Google Chrome to fix Chrome ran out of memory issue. Doing this will fix all the relevant issues with the search engine, updates, or other related problems triggering this issue.
Note: Back up all favorites, saved passwords, bookmarks and sync your google account with your Gmail. Uninstalling Google Chrome will delete all the saved files.
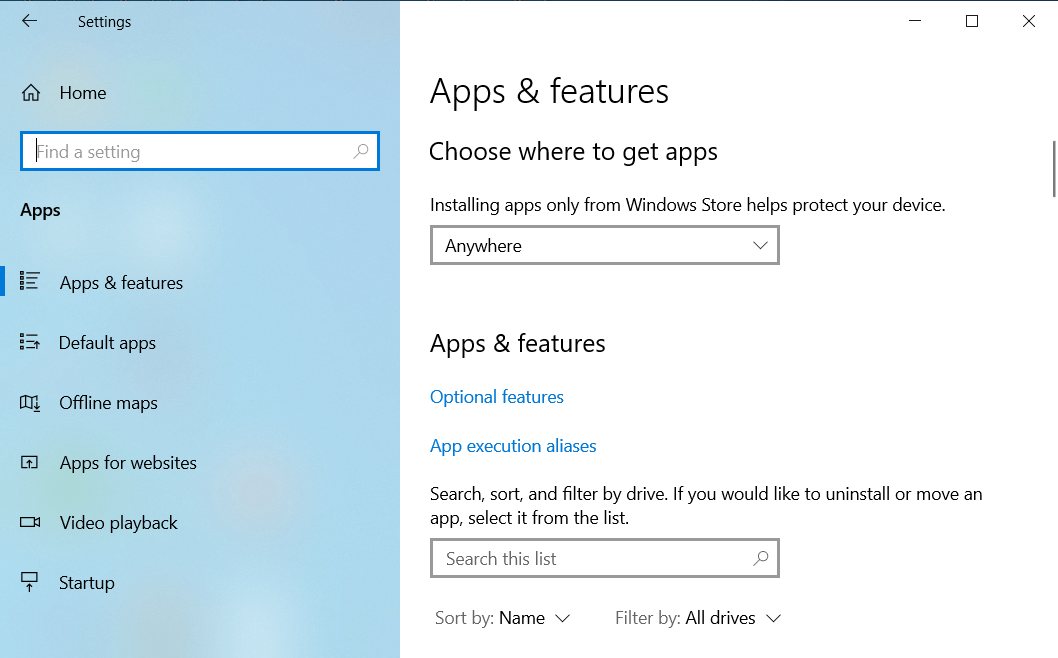
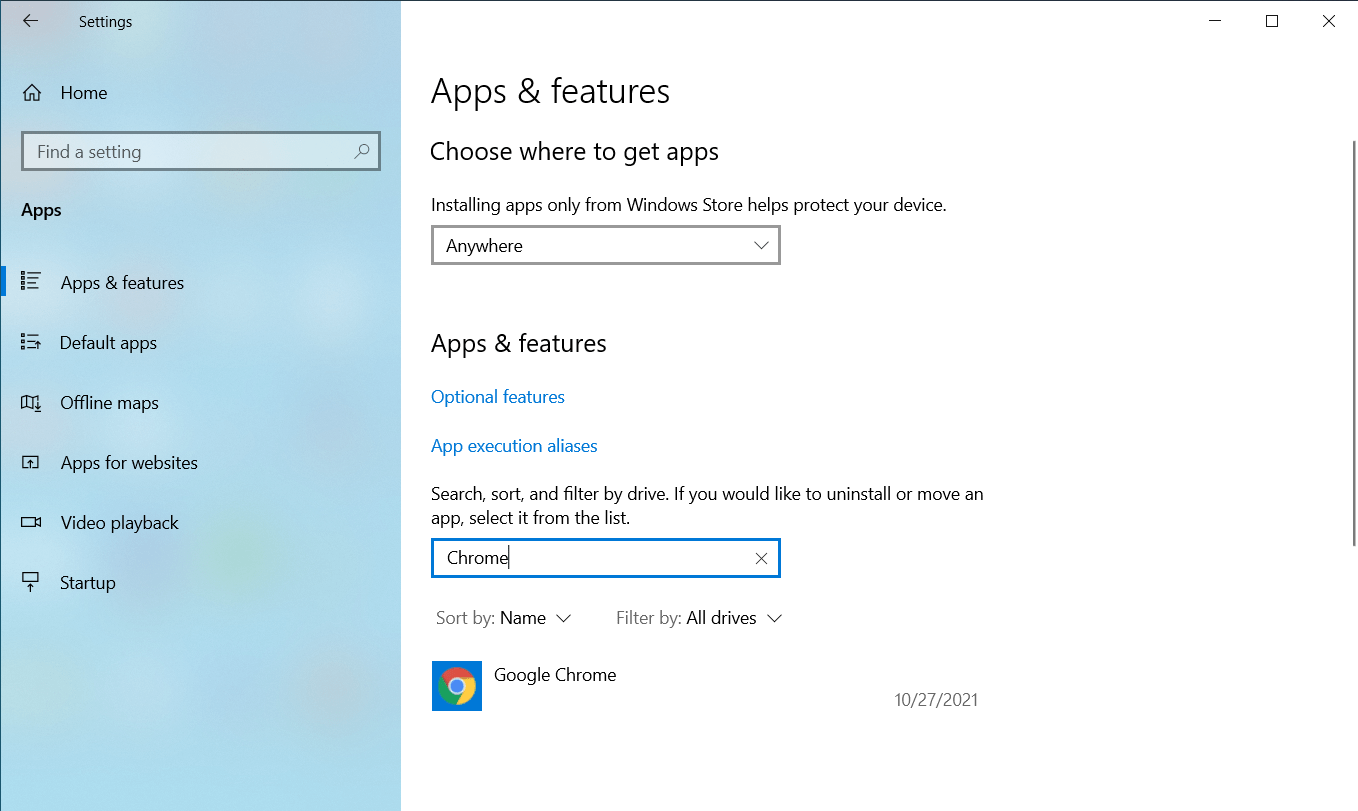
1. Hit the Windows key, type apps and features, and click on Open.

2. Search for Chrome in Search this list field.
3. Then, select Chrome and click on the Uninstall button shown highlighted.

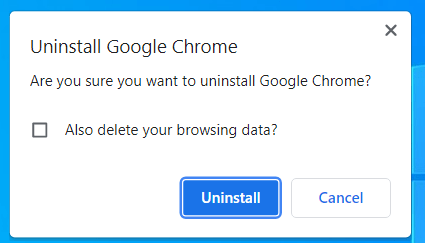
4. Again, click on Uninstall to confirm.
5. Now, press the Windows key, type %localappdata%, and click on Open to go to AppData Local folder.

6. Open the Google folder by double-clicking on it.

7. Right-click on the Chrome folder and select the Delete option as depicted below.

8. Again, hit the Windows key, type %appdata%, and click on Open to go to AppData Roaming folder.

9. Again, go to the Google folder and delete the Chrome folder as shown in steps 6 – 7.
10. Finally, restart your PC.
11. Next, download the latest version of Google Chrome as shown.

12. Run the setup file and follow the on-screen instructions to install Chrome.

Recommended:
- How to Fix Audio Buzzing in Windows 11
- How to Fix Skyrim Crash to Desktop
- How to Fix Steam Not Opening on Windows 10
- Fix File Explorer Not Responding in Windows 10
We hope that this guide was helpful and you could fix Chrome ran out of memory issue in your system. Let us know which method worked for you the best. Also, if you have any queries/suggestions regarding this article, then feel free to drop them in the comments section.
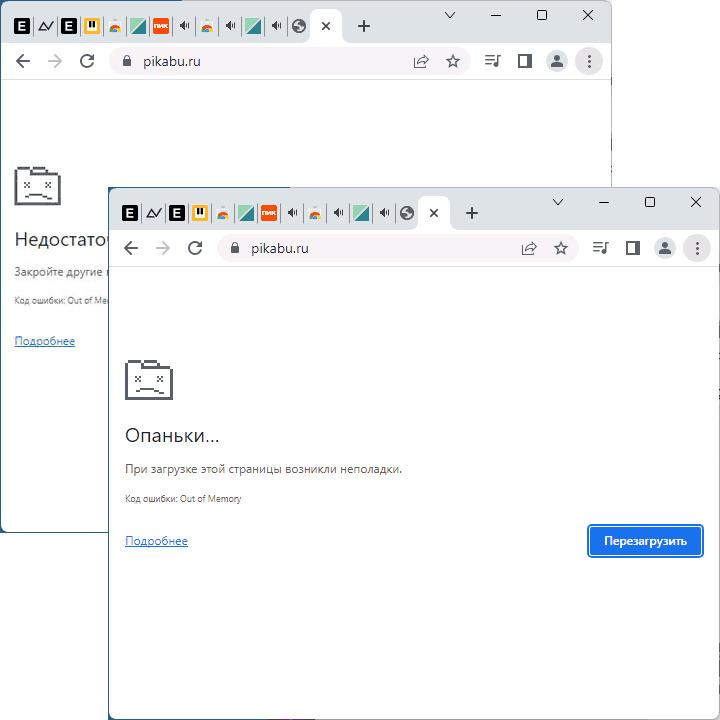
Код ошибки: Out of Memory можно встретить при веб-серфинге в браузере Google Chrome. Как правило, ошибка возникает из-за недостатка оперативной памяти (ОЗУ), однако существуют и другие причины, например, отключенный файл подкачки или отсутствие свободного места на диске. Спешим вас обрадовать: ошибка не является серьезной и зачастую решается в течение нескольких минут.
Решение кода ошибки Out of Memory в Google Chrome
Решение №1 Закрыть ненужные вкладки (и ПО на фоне)
Тут все, конечно, зависит от объемов доступной оперативной памяти, но если у вас открыт десяток (или несколько десятков) вкладок, то неудивительно, что вы столкнулись с ошибкой о недостатке памяти. Старайтесь держать открытыми только самые важные для вас вкладки. С уменьшением нагрузки на ОЗУ ваша ОС будет работать на порядок быстрее, что однозначно плюс.
Кстати, рекомендуем обратить внимание на ПО, которое работает на фоне. Возможно, какие-то из программ запрашивают слишком большие объемы ОЗУ, вследствие чего последней банально не хватает для браузера.
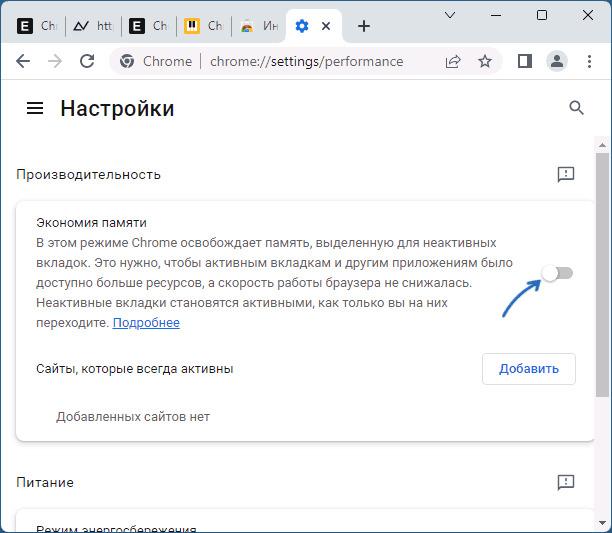
Решение №2 Активация режима экономии памяти
Цены на электронику в последние годы взлетели до небес — это факт. Далеко не у каждого пользователя есть в распоряжении 32, 16 или даже 8 Гб оперативной памяти. В такой ситуации спасает функция экономии памяти, которую можно активировать в настройках браузера. Делается это следующим образом:
- откройте «Настройки» браузера;
- перейдите в раздел «Производительность»;
- активируйте опцию «Экономия памяти», переключив соответствующий ползунок;
- перезапустите браузер и протестируйте его работу.
Решение №3 Освобождение дополнительного места на диске
Недостаток свободного места на диска также может приводить к появлению ошибки «Out of Memory» в Google Chrome. Воспользуйтесь встроенными средствами своей ОС Windows, чтобы освободить дополнительное место, а затем протестируйте работу браузера. Постарайтесь сделать так, чтобы на диске было доступно хотя бы 5-10 Гб.
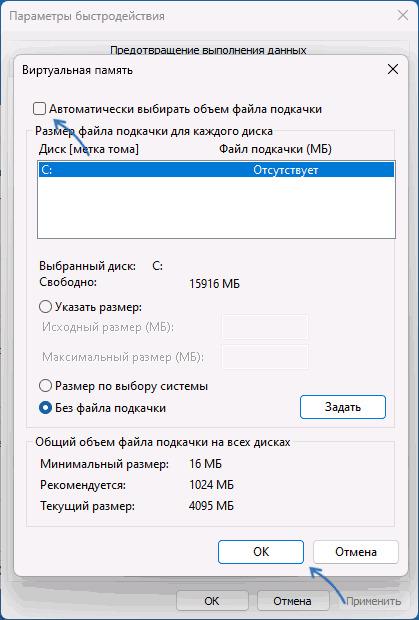
Решение №4 Активация файла подкачки
Ошибка о нехватке памяти в Google Chrome (да и других браузерах) может возникать из-за отсутствия файла подкачки в системе. Файлом подкачки — виртуальной памятью, другими словами — можно отчасти компенсировать нехватку ОЗУ для тех или иных задач. Чтобы создать и активировать на своем ПК файл подкачки, нужно сделать следующее:
- нажмите WIN+R для вызова диалогового окошка «Выполнить»;
- пропишите в пустой строке sysdm.cpl и нажмите ENTER;
- в новом окошке перейдите во вкладку «Дополнительно»;
- кликните на кнопку «Изменить…» в разделе «Виртуальная память»;
- поставьте галочку возле опции «Автоматически выбирать объем файла подкачки»;
- сохраните внесенные изменения и перезагрузите ПК.
Решение №5 Сброс кэша и данных Google Chrome
Кэш, куки и другие данные сайтов многократно ускоряют работу браузера, но и они же могут вызывать кучу самых разных проблем, включая и сегодняшнюю ошибку «Out of Memory». Чтобы избавиться от кэша и прочих данных, нужно сделать следующее:
- откройте Google Chrome привычным образом;
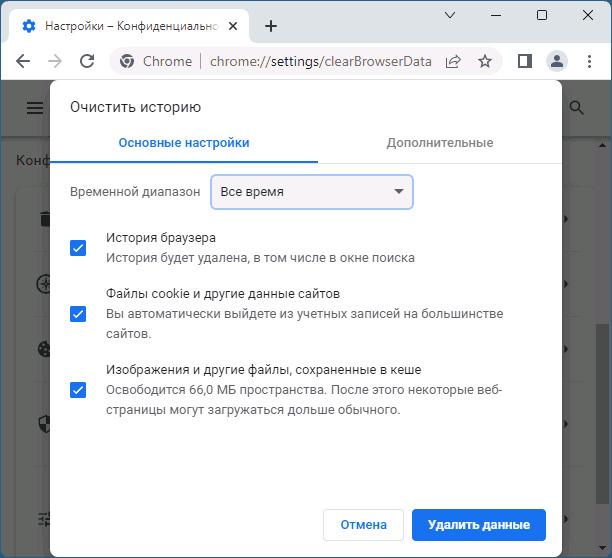
- перейдите в «Настройки»→«Дополнительные инструменты»→«Удаление данных о просмотренных страницах»;
- выберите нужный вам временной диапазон (желательно за все время, но решать вам);
- отметьте опции «Файлы cookie и другие данные сайтов»→«Изображения и другие файлы, сохраненные в кеше»;
- кликните на кнопку «Удалить данные»;
- перезагрузите браузер и проверьте наличие проблемы.
Дополнительные решения Out of Memory в Google Chrome
Если ничего из вышеуказанного не сработало, можно опробовать ряд дополнительных решений. За их эффективность ручаться мы не станем, но некоторые пользователи в сети утверждают, что они смогли им помочь.
- Ради эксперимента отключите все установленные расширения, даже те, которые считаете важными. Дело в том, что некоторые из них могут требовать для своей работы высокие объемы памяти.
- Аппаратное ускорение — чрезвычайно полезная функция, которая позволяет значительно ускорить работу браузера. Но она также повышает расход системных ресурсов, включая и ОЗУ. Отключите функцию через настройки браузера (в разделе «Настройки»).
- Убедитесь, что у вас на ПК установлен Google Chrome той же разрядности, что и ваша ОС Windows. Найти сведения о разрядности браузера можно в «Справка»→«О браузере Google Chrome».
Избавиться от ошибки Out of Memory в Google Chrome, как правило, довольно просто. Если у вас остались какие-то вопросы по теме, пожалуйста, оставляйте их в комментариях ниже.
This issue is associated with system RAM and often resolved by vacating it. However, that is not always the case and the issue is not fixed. Here are some other…
The Chrome web browser is the most-used web browser in the computer industry. However, it also has its caveats. Even though it is a famous browser, primarily because of its features and performance, it is also notorious for high memory consumption.
As the days go by, the Chrome browser is being updated every 4 weeks. However, somehow, it is also taking up more and more RAM. But what if your computer runs out of memory to give to Chrome? This is when you are met with the “Out of memory” error code. This issue disrupts your browsing experience, leaving you puzzled and in need of a solution.
But fear not, within this challenge lies an opportunity to overcome memory limitations and unravel the mysteries of Chrome’s out-of-memory conundrum. Today, we will navigate the intricate labyrinth of this enigma, discovering ways to triumph over memory constraints and restore seamless browsing on Chrome.
On This Page
What Causes the “Out of Memory” Error in Chrome?
As the error code suggests, you may encounter it when the Chrome browser runs out of memory to operate. This error indicates that the browser has run out of memory, and in some cases, the computer may still have available RAM. However, the problem usually arises because the system resources (RAM) are occupied by Chrome and other processes.
This causes the issue to rise unexpectedly, without any prior warnings or specific indications. This error can occur on any webpage, whether randomly or on specific sites, and it is not related to a particular website’s configuration.
Several factors could contribute to this error, such as the unavailability of excess memory, problematic extensions, a corrupted user profile, or an incompatible version of Chrome. Given the diverse potential causes, there are multiple solutions available to address this issue.
These solutions aim to troubleshoot the specific underlying cause. By applying the appropriate solution, users can resolve the error and regain normal browsing functionality without encountering the error message repeatedly.
Fix Out of Memory Error in Chrome
While the general causes for the “Out of Memory” error code have been outlined above, the specific circumstances of each occurrence may vary. Therefore, it is recommended to analyze the individual situation and choose the most relevant solution accordingly.
Following are some of the most effective ways of getting rid of the Chrome error code.
Restart the Computer
In many cases, a straightforward solution to resolve various issues in your system is to restart your PC. Therefore, if you encounter a Chrome error code “out of memory”, it is advisable to begin troubleshooting by restarting your system.
A system restart reboots all services and processes. If any item had previously encountered an error, malfunctioned, and took up significant RAM resources, then it could potentially be fixed by a simple restart.
If the problem persists despite the restart, then you can proceed to explore alternative methods for resolving the issue.
Close Unnecessary Tabs
If you have a plethora of tabs open in Chrome, we recommend that you close the ones you are not using.
Background tabs still consume system memory, and may take up significant amounts of RAM. Therefore, we advise that you close all unnecessary tabs to make room for the more useful web pages, and then reload the page on which you encountered the “out of memory” error.
If this fixes the issue, it means that you are running more processes than the system is meant to handle. In this case, we suggest that you increase the installed memory capacity of your computer.
Close RAM-Hungry Applications and Processes
Just like the tabs, you should also close any background applications and programs that may be consuming significant amounts of RAM. Closing them would vacate the RAM resources for Chrome, and this could potentially resolve the “out of memory” error and open the web page.
To close any processes consuming system memory, open the Task Manager and switch to the Processes tab. Click on the “Memory” column header to sort the processes in descending order, and then kill the apps/processes that you do not need.

Update Chrome to Latest Version
You might be using an older version of Chrome due to which the error code popped up. Check your Chrome version and download the latest (64-bit) version. Here are the steps:
-
Open Google Chrome and click on the ellipses (3 dots) in the top-right corner.

Click the ellipses -
Expand Help and click “About Google Chrome.”
The About page will now open and the browser will automatically begin downloading the latest available Chrome version.
About Google Chrome -
Once the update is complete, click “Relaunch.”
Note: The browser closes when you click Relaunch and then reopens, restoring all closed tabs.

Relaunch Chrome


Once the browser is updated, check to see if the error goes away. If it is still there, continue to perform the remaining solutions provided below.
Clear Browsing Data and Cache
Regularly clearing your browsing history and cache in Chrome is highly recommended for a smooth browsing experience. When you visit websites, Chrome saves browsing data to provide quick access to previously visited sites and keep you logged in. However, this stored data can occasionally interfere with Chrome’s functionality, leading to random errors.
Browsers, including Chrome, accumulate temporary files and cached data, such as images and videos, to speed up website loading and improve efficiency. Unfortunately, over time, these files can become corrupted or outdated, causing problems. If left uncleared, they may trigger Chrome error codes and disrupt your browsing activities.
By clearing your browsing history and cache, you can address these issues effectively. Firstly, it helps maintain your privacy by removing traces of the websites you have visited, ensuring that sensitive information remains confidential. Secondly, it frees up valuable storage space on your device, which can be especially useful if you have limited storage capacity.
To clear the browsing data and cache, follow these steps:
-
Open Chrome and press Ctrl + H.
It will open the browsing history.

Click on Clear Browsing Data -
From the left side of the screen, click on “Clear Browsing Data.”
Clear browsing data in Chrome 
Clear browsing history and cache from Chrome -
Tick the boxes for “Browsing history” and “Cached images and files.” Make sure to set the time range to “All time.”
If you wish to sign out your accounts from different sites, you can also select “Cookies and either data sites” as well.
Clear browsing history and cache from Chrome -
Click “Clear data.”


Once done, close the Chrome window and open it again. Check to see if the “out of memory” error has been mitigated.
Disable or Remove Problematic Extensions
Browser extensions enhance Chrome’s functionality but can strain its memory. Each extension is allocated memory based on its needs. However, some extensions request excessive memory, depriving other components.
Like an orchestra, when an extension hogs memory, it disrupts the harmony, causing performance issues. Chrome’s memory capacity can be exhausted, leading to the out of memory error. That said, make sure to disable or remove the unused and problematic extensions.
-
On your Chrome browser, click on the “puzzle icon” on the top right corner of the browser and then click “Manage extensions.”

Manage Chrome extensions -
Locate the extension you want to remove and click on the “Remove” button.
If you want to disable the extension and not remove it, then toggle the slider instead.

Remove or disable Chrome extensions


Once the problematic web extensions have been disabled/removed, check to see if the issue has been resolved.
Reset Chrome settings
Do you remember the last time you made changes to your Chrome? Whenever you face any Chrome error codes, it is advised to reset the browser to its default settings.
Here are the steps to reset the Chrome browser:
Note: Resetting Chrome settings will remove your extensions and disable any customizations you have made. It will also clear your browsing history, cookies, and cache. Make sure to back up any important data before resetting, as it cannot be recovered.
-
In the browser, click on the ellipses (3 dots) in the top-right corner of the browser and then click “Settings.”
Open Chrome settings -
Click “Reset settings” from the left pane.

Open Chrome’s reset settings -
Click “Restore settings to their original defaults.”
Restore Chrome to default settings This will invoke a popup.
-
Click “Reset Settings.”
Reset Google Chrome


Create a New User Profile in Chrome
If you are repeatedly encountering the “out of memory” error, it is possible that your user profile in Chrome has become corrupted. In such cases, creating a new user profile could potentially resolve the issue.
Simply put, a user profile is like a personal space within Chrome where your settings, preferences, and browsing data are stored. Creating a new profile/account will enable you to start fresh with a clean slate. After creating the new profile, you can check if the error persists.
Follow these steps to create a new user profile on Chrome:
-
Open Chrome and click on your profile picture in the top right corner.
-
Click “Add” from the expanded menu.
Here, you can either sign in with your account or continue without signing in.

Create a new user account in Chrome

You can switch between user profiles by clicking on the profile icon located in the top right corner of the browser window. However, we advise that you continue to use your new Chrome account and see if it resolves the issue.
Disable Hardware Acceleration
Hardware acceleration refers to utilizing a computer’s hardware to perform tasks faster than software alone. It can significantly enhance application performance.
While it is generally recommended to keep hardware acceleration enabled, there are cases where disabling it may be necessary. Doing so forces an application to use software rendering, potentially impacting its performance.
In the context of Chrome, hardware acceleration uses the computer’s graphics processing unit (GPU) to enhance graphics rendering. However, excessive GPU memory usage can occur, leading to the “out of memory” error.
This happens when the GPU’s memory demands exceed available resources, depriving other critical components of memory. Striking a balance between performance and memory allocation is crucial to prevent this error and ensure a seamless browsing experience.
You can disable hardware acceleration in Chrome by following these steps:
Note: Remember that disabling hardware acceleration may affect the performance of certain graphics-intensive tasks in the browser, so it’s recommended to enable it unless you encounter specific issues.
-
Open “Settings” in Chrome from the three-dot menu and click “System” from the menu on the left side.
Alternatively, you can directly enter “chrome://settings/system” in the address bar to access the System settings.
-
Toggle the slider in front of “Use hardware acceleration when available” into the Off position.

Disable hardware acceleration from Chrome settings -
After disabling hardware acceleration, scroll back up and click on the “Relaunch” button to restart Chrome and apply the changes.

Increase Pagefile Size
The Pagefile, or virtual memory, is a hidden system file on your hard drive that is primarily there to compensate for low RAM. Pagefile serves as an extension to RAM. Data that cannot be processed in RAM due to lack of space is saved in pagefile and swapped in RAM when it is free.
When Chrome runs out of physical memory, virtual memory kicks in by temporarily moving data from RAM to the hard drive. This allows Chrome to free up precious RAM for other tasks, preventing the error.
Use the following steps to increase the pagefile size on a Windows computer:
-
Open the System Properties applet by typing in “sysdm.cpl” in the Run Command box.

Open the System Properties applet -
Switch to the “Advanced” tab and then click “Settings” under the “Performance” section.

Open performance settings -
Switch to the “Advanced” tab and click “Change” under the “Virtual memory” section.

Click Change from Virtual Memory settings -
Uncheck the “Automatically manage paging file size for all drives” checkbox and select the “Custom size” option and enter the initial (minimum) and the maximum size for the Pagefile.
In the Initial size (MB) field, enter the initial size of the virtual memory. This value represents the minimum amount of disk space allocated for virtual memory.
Whereas, in the Maximum size (MB) field, enter the maximum size of the virtual memory. This would be the maximum amount of disk space that can be used for virtual memory.

Enter values for virtual memory -
Once you have entered the values, click Set and then click Ok to save the changes.
-
Restart your computer for the new virtual memory settings to take effect.


Once the computer restarts, check to see if the “out of memory” error has been resolved in Chrome.
Reinstall Chrome
If the issue persists, it is recommended to uninstall the Chrome browser. Uninstalling and reinstalling Chrome can be an effective way to fix the problem since it helps address potential issues with the browser’s installation or faulty core app files.
-
Go to the following:
Settings app >> Apps >> Installed apps
-
Scroll through the list of applications and locate “Google Chrome” then click on it. Click “Uninstall” and confirm your choice.

Uninstall Google Chrome from Settings -
Once the app is uninstalled, restart your computer.
-
After the reboot, download Google Chrome, and then run the setup to install it.

When it reinstalls, check to see if the issue has been mitigated.
Use a different browser as an alternative
If all of the aforementioned solutions fail, the only thing you can do is use a different browser as an alternative. Fortunately, there are numerous free and reliable options available. Here is a list of recommended free web browsers, along with their respective hyperlinks for easy access:
- Mozilla Firefox: It is a popular open-source web browser known for its strong emphasis on privacy, customization options, and support for extensions.
- Microsoft Edge: Developed by Microsoft, it offers a fast and secure browsing experience with features like seamless integration with Windows 10 and compatibility with Microsoft services.
- Opera: It is a feature-rich browser that focuses on speed and efficiency, providing users with a built-in ad blocker, VPN, and customizable user interface.
- Brave: It is a privacy-oriented browser that blocks ads and trackers by default. It also offers a unique feature that allows users to earn cryptocurrency by opting into privacy-respecting ads.
- Vivaldi: Designed for power users, it is a highly customizable browser. It offers a range of advanced features, including tab stacking, quick commands, and extensive customization options.
Final Words
Encountering the Chrome error code “out of memory” while browsing the internet can be frustrating. But don’t worry. We have delved into the depths of the mysterious Chrome error code “out of memory” to find solutions for you.
However, it’s important to keep in mind that not every solution will work. So, be persistent and open-minded, and try the different methods listed in this article. Remember, versatility is crucial in overcoming this common problem in the digital world.