Параметры fsck
Пример проверки диска на ошибки с помощью fsck
Запуск автоматической проверки и исправления найденных ошибок
Ручное добавление параметров в меню GRUB при загрузке ОС
Добавление параметров в меню GRUB с помощью утилиты grubby
Создание файла /forcefsck
Запуск проверки в ручном режиме
Использование загрузочного диска/flash для проверки файловой системы на ошибки
Проверка LVM-разделов с помощью утилиты fsck
В определенных случаях (в результате сбоя или некорректного завершения работы) на файловой системе могут накапливаться ошибки. В РЕД ОС для проверки файловой системы и исправления ошибок имеется утилита fsck («file system consistency check»).
Инструмент fsck обладает следующим функционалом:
-
проверка файловой системы при возникновении проблем (не загружается система/поврежденные файлы) или в качестве профилактического обслуживания;
-
диагностика состояния внешних накопителей, таких как SD-карты или USB-накопители.
Базовый синтаксис соответствует следующему шаблону:
fsck <опции> <файловая_система>
В качестве файловой системы может быть устройство, точка монтирования или раздел, в том числе LVM.
На нашем Youtube-канале вы можете подробнее ознакомиться с возможностями проверки файловой системы на наличие ошибок, просмотрев видео Проверка файловой системы на наличие ошибок, а также найти много другой полезной информации.
Параметры fsck
fsck –p – утилита автоматически исправит найденные ошибки.
Вывод аналогичен простой проверке.
fsck –с – проверка файловой системы на поврежденные сектора.

Для получения списка команд наберите fsck ––help или fsck –h.
| Опция | Описание |
| -a | Устаревшая опция. Указывает исправлять все найденные ошибки без одобрения пользователя. |
| -r | Применяется для файловых систем ext. Указывает fsck спрашивать пользователя перед исправлением каждой ошибки |
| -n | Выполняет только проверку ФС, без исправления ошибок. Используется также для получения информации о ФС |
| -c | Применяется для файловых систем ext3/4. Помечает все повреждённые блоки для исключения последующей записи в них |
| -f | Принудительно проверяет ФС, даже если ФС исправна |
| -y | Автоматически подтверждает запросы к пользователю |
| -b | Задаёт адрес суперблока |
| -p | Автоматически исправлять найденные ошибки. Заменяет устаревшую опцию -a |
| -A | Проверяет все ФС |
| -С [<fd>] | Показывает статус выполнения. Здесь fd – дескриптор файла при отображении через графический интерфейс |
| -l | Блокирует устройство для исключительного доступа |
| -M | Запрещает проверять примонтированные ФС |
| -N | Показывает имитацию выполнения, без запуска реальной проверки |
| -P | Проверять вместе с корневой ФС |
| -R | Пропускает проверку корневой ФС. Может использоваться только совместно с опцией -A |
| -r [<fd>] | Выводит статистику для каждого проверенного устройства |
| -T | Не показывать заголовок при запуске |
| -t <тип> | Задаёт ФС для проверки. Можно задавать несколько ФС, перечисляя через запятую |
| -V | Выводит подробное описание выполняемых действий |
Пример проверки диска на ошибки с помощью fsck
Запуск автоматической проверки и исправления найденных ошибок
Существует несколько способов запуска автоматической проверки на ошибки:
1. Ручное добавление параметров в меню GRUB при загрузке ОС.
2. Добавление параметров в меню GRUB с помощью утилиты grubby.
3. Создание файла /forcefsck.
1. Ручное добавление параметров в меню GRUB при загрузке ОС
Первый вариант проверки и исправления ошибок на разделах жесткого диска.
В меню GRUB перейдите в режим редактирования загрузочной строки, нажав при этом клавишу e. Добавьте параметры:
fsck.mode=force fsck.repair=yes
в конец предпоследней строки.
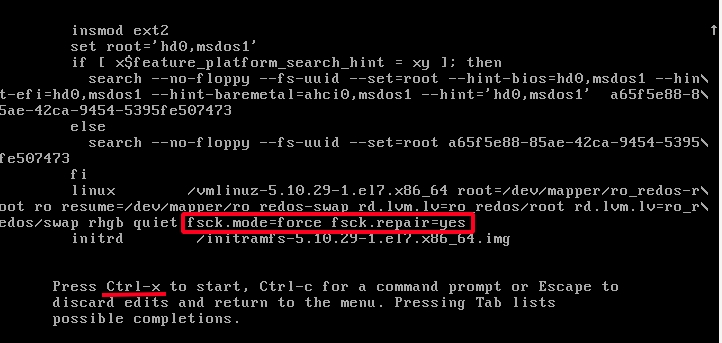
Нажмите Ctrl+Х для запуска ОС с этими параметрами, во время запуска будет произведена проверка разделов диска, и при наличии ошибок произведено их исправление.
2. Добавление параметров в меню GRUB с помощью утилиты grubby
Существует еще один способ добавления параметров ядра для принудительной проверки файловой системы на ошибки и их исправления. Добавить параметры можно командой:
grubby --update-kernel /boot/vmlinuz-$(uname -r) --args="fsck.mode=force fsck.repair=yes"
Удалить установленные параметры можно следующей командой:
grubby --update-kernel /boot/vmlinuz-$(uname -r) --remove-args="fsck.mode=force fsck.repair=yes"
3. Создание файла /forcefsck
Бывают ситуации, когда систему необходимо проверить на наличие ошибок в незапланированный момент. Для этого можно принудительно запустить утилиту fsck для проверки при следующей перезагрузке. Запуск осуществляется командой:
sudo touch /forcefsck
Команда sudo (после ввода пароля) предоставит права для создания с помощью touch пустого файла в корне диска /forcefsck, который послужит сигналом (флагом) для fsck, что нужно проверить диски.
Останется только перезагрузить компьютер и fsck начнет проверять все жесткие диски, указанные в /etc/fstab.
Запуск проверки в ручном режиме
Следующий метод относится к проверке диска, когда операционная система загружена в режиме single mode.
1. Запустим ОС в single mode, для этого пропишите в меню загрузки grub параметр init=/bin/bash в конце строки, которая начинается на linux16, см. рисунок.
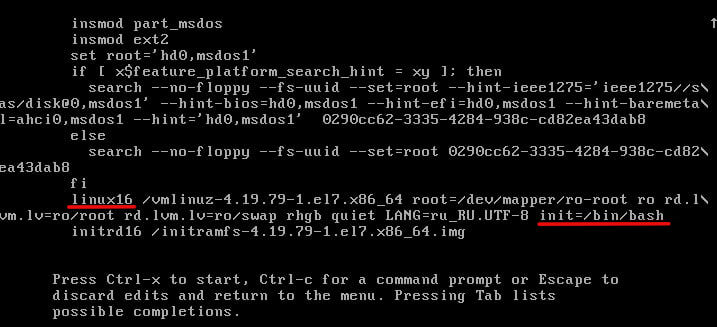
Также данная строка может начинаться с linuxefi, этот параметр характерен для систем с загрузкой в UEFI. Нажмите «ctrl+x» для запуска с этим параметром(init=/bin/bash).
2. Запустите проверку выполнив команду:
/usr/sbin/fsck -ACVfyv
Во время проверки на экране появится отчет о выполненных операциях, если отчет длинный, то можно его можно пролистать вверх сочетанием клавиш shift+PageUp. После проверки дисков перезагрузите компьютер, нажав на кнопку на системном блоке.
Наглядное видео примера проверки диска на ошибки:
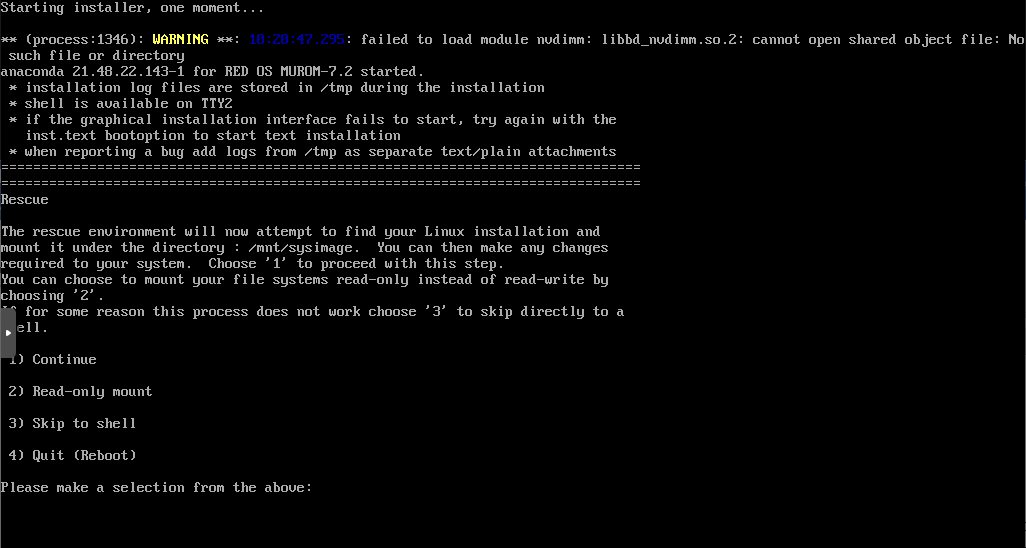
Использование загрузочного диска/flash для проверки файловой системы на ошибки.
Загрузившись в режим восстановления операционной системы РЕД ОС с помощью загрузочного диска или съемного накопителя с установленным образом операционной системы РЕД ОС. Выберите пункт: «Решение проблем» -> «Исправить установленную RED OS».

Система перезагрузится в режим восстановления. Введите «2» и нажмите 2 раза Enter. Так вы смонтируете операционную систему в режим «Только для чтения»
Для корректного отображения в терминале кириллических символов введите команду:
setfont cyr-sun16
Потом введите команду:
# сhroot /mnt/sysimage
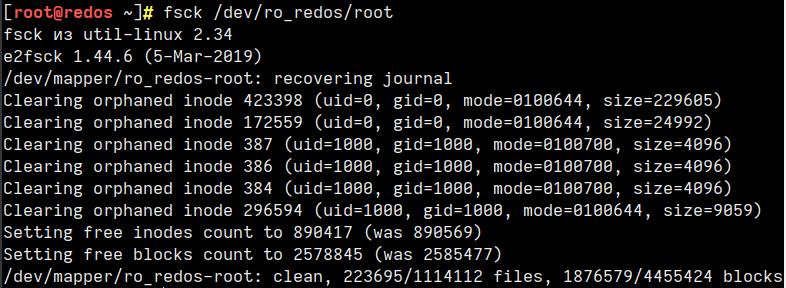
После этого можете вводить fsck:
# fsck -ACVfyv
Если проверка завершится с такой ошибкой:
[путь_к_файловой_системе] is mounted
Введите:
umount [путь_к_файловой_системе]
И еще раз запустите утилиту fsck:
# fsck -ACVfyv
fsck from util-linux 2.30.2
…
Если система не выявит ошибок, то получится такой вывод:
[путь_к_файловой_системе] clean …
Чтобы выйти из режима восстановления, вы должны смонтировать все разделы, которые были отмонтированы командой umount, с помощью команды mount, нажать сочетание клавиш сtrl+d, а затем ввести команду reboot, которая перезапустит вашу операционную систему.
# reboot
По умолчанию, утилита fsck при проверке будет использовать разделы, указанные в /etc/fstab/, сформированные при установке операционной системы РЕД ОС.
Проверка LVM-разделов с помощью утилиты fsck
Перед проведением проверки необходимо найти устройство и размонтировать его.
Для просмотра всех подключенных устройств и проверки расположения диска выполните команду:
lsblk

 NAME MAJ:MIN RM SIZE RO TYPE MOUNTPOINTS
 sda 8:0 0 20G 0 disk
 ├─sda1 8:1 0 1G 0 part /boot
 └─sda2 8:2 0 19G 0 part
 ├─ro_redos-root 253:0 0 17G 0 lvm /
 └─ro_redos-swap 253:1 0 2G 0 lvm [SWAP]
 sr0 11:0 1 4,3G 0 rom /run/media/user/redos-MUROM-7.3.1 x86_64
При попытке запустить проверку на смонтированном диске или разделе в консоли появляется предупреждение о том, что невозможно продолжить проверку, так как диск смонтирован.
fsck -nf /dev/ro_redos/root

 fsck из util-linux 2.37.3
 e2fsck 1.44.6 (5-Mar-2019)
 Warning! /dev/mapper/ro_redos-root is mounted.
Для того чтобы размонтировать диск, следует использовать команду:
umount <файловая_система>
Однако попытка выполнить данную процедуру на работающей ОС ни к чему не приведет.
umount /dev/ro_redos/root

 umount: /: target is busy.
Также проблемой при попытке проверить LVM-разделы может быть и то, что они являются не активными. Для проверки следует использовать команду:
lvscan

 ACTIVE            '/dev/ro_redos/swap' [2,00 GiB] inherit
 ACTIVE            '/dev/ro_redos/root' [<17,00 GiB] inherit
Для активации раздела служит команда:
vgchange –ay <раздел>
Таким образом, можно сделать вывод, что проверка LVM-разделов через консоль с использованием утилиты fsck невозможна. Но это не значит, что LVM-разделы совсем не подлежат проверке. Существует как минимум два способа, позволяющие провести диагностику LVM-разделов.
Первым способом является проведение проверки через консоль загрузчика операционной системы GRUB.
А вторым — запуск утилиты fsck в live-сессии системы.
Очевидным плюсом при проверке дисковых пространств, в том числе LVM-разделов, через live-сессию является то, что разделы там по умолчанию являются не смонтированными. Поэтому проверка LVM-раздела будет выполнена с первого раза.
Дата последнего изменения: 18.01.2023
Если вы нашли ошибку, пожалуйста, выделите текст и нажмите Ctrl+Enter.

In this article, you will learn how to repair Linux disk errors by using fsck and xfs_repair commands.
Table of Contents:
- What is FSCK?
- List Linux Disk Partitions and Types
- Get Last Scanned Time of a Linux Disk
- Scan & Repair a Ext4 Type Disk Partition
- Enable Scanning of Ext4 Disk Partitions at Linux Startup
- What is XFS_REPAIR?
- Scan & Repair a XFS Type Disk Partition
- Enable Scanning of XFS Disk Partitions at Linux Startup
- Conclusion
What is FSCK?:
The system utility fsck (file system consistency check) is a tool for checking the consistency of a file system in Unix and Unix-like operating systems, such as Linux, macOS, and FreeBSD.
Generally, fsck is run either automatically at boot time, or manually by the system administrator. The command works directly on data structures stored on disk, which are internal and specific to the particular file system in use — so an fsck command tailored to the file system is generally required. The exact behaviors of various fsck implementations vary, but they typically follow a common order of internal operations and provide a common command-line interface to the user. (Source: Wikipedia)

List Linux Disk Partitions and Types:
First of all you need to identify the disk partitions in your Linux server, their respective file systems and the path where they are being mounted.
If you are not used to Linux commandline then we recommend that you should attend online training Linux Command Line: From novice to wizard![]()
By using a console or a ssh client, connect with your Linux server as root user.
You can execute the lsblk command with following switches at the Linux bash prompt to list the required information.
# lsblk -o NAME,FSTYPE,MOUNTPOINT
NAME        FSTYPE      MOUNTPOINT
sda
├─sda1      ext4        /boot
└─sda2      LVM2_member
  ├─cl-root xfs         /
  ├─cl-swap swap        [SWAP]
  └─cl-home xfs         /home
sr0
Get Last Scanned Time of a Linux Disk:
You can find the last scan time for Linux Ext4 type partitions with the help of following command.
# tune2fs -l /dev/sda1 | grep checked
Last checked:             Sun Sep 29 20:03:14 2019
Scan & Repair a Ext4 Type Disk Partition:
To scan a Linux disk partition, you can use fsck (File System Consistency Check) command. But you are required to unmount that partition before checking and repairing it.
# umount /dev/sda1
After successful unmount, execute fsck command at Linux bash prompt.
# fsck.ext4 /dev/sda1
e2fsck 1.45.6 (20-Mar-2020)
/dev/sda1: clean, 320/65536 files, 61787/262144 blocks
After checking and repairing your Linux disk, mount the partition again at its respective mountpoint.
For this purpose, execute following Linux command to mount all the disk partitions listed in /etc/fstab file.
# mount -a
Enable Scanning of Ext4 Disk Partitions at Linux Startup:
To enable disk checking at the time of Linux startup. You have to modify the Mount Count parameter for that disk partition.
# tune2fs -c 1 /dev/sda1
tune2fs 1.45.6 (20-Mar-2020)
Setting maximal mount count to 1
Reboot your Linux server now.
# reboot
Linux command fsck is now check your Ext4 disk partition on startup.
After reboot, get the Last Checked value for your disk partition, now it will show you the time of last Linux startup.
# tune2fs -l /dev/sda1 | grep checked
Last checked:             Sun Aug  1 22:50:46 2021
Set back the Mount Count parameter, or it will keep performing disk scans on each Linux boot.
# tune2fs -c -1 /dev/sda1
tune2fs 1.45.6 (20-Mar-2020)
Setting maximal mount count to -1
What is XFS_REPAIR?:
XFS is a high-performance 64-bit journaling file system created by Silicon Graphics, Inc (SGI) in 1993. It was the default file system in SGI’s IRIX operating system starting with its version 5.3. XFS was ported to the Linux kernel in 2001; as of June 2014, XFS is supported by most Linux distributions, some of which use it as the default file system.
The xfs_repair utility is highly scalable and is designed to repair even very large file systems with many inodes efficiently. Unlike other Linux file systems, xfs_repair does not run at boot time, even when an XFS file system was not cleanly unmounted. In the event of an unclean unmount, xfs_repair simply replays the log at mount time, ensuring a consistent file system.
Scan & Repair a XFS Type Disk Partition:
XFS type disk partitions have their own set of commands, that are a little bit different from Ext4.
You must unmount a XFS disk partition before checking it for consistency.
# umount /dev/mapper/cl-home
We have xfs_repair command for checking and repairing the disk errors.
In some Linux distros, you may also find xfs_check command. This command only perform scanning of XFS type disk partitions and do not perform any repair.
But xfs_check command is not available in all Linux distros.
Alternatively, you can use xfs_repair command with -n switch to get the same functionality as of xfs_check.
# xfs_repair -n /dev/mapper/cl-home
Phase 1 - find and verify superblock...
Phase 2 - using internal log
        - zero log...
        - scan filesystem freespace and inode maps...
        - found root inode chunk
Phase 3 - for each AG...
        - scan (but don't clear) agi unlinked lists...
        - process known inodes and perform inode discovery...
        - agno = 0
        - agno = 1
        - agno = 2
        - agno = 3
        - process newly discovered inodes...
Phase 4 - check for duplicate blocks...
        - setting up duplicate extent list...
        - check for inodes claiming duplicate blocks...
        - agno = 0
        - agno = 1
        - agno = 2
        - agno = 3
No modify flag set, skipping phase 5
Phase 6 - check inode connectivity...
        - traversing filesystem ...
        - traversal finished ...
        - moving disconnected inodes to lost+found ...
Phase 7 - verify link counts...
No modify flag set, skipping filesystem flush and exiting.
The above command only perform disk checking and do not try to repair any error.
Now, execute the xfs_repair command without -n switch and it will perform scanning and repairing of Linux disk partitions.
# xfs_repair /dev/mapper/cl-home
Phase 1 - find and verify superblock...
Phase 2 - using internal log
        - zero log...
        - scan filesystem freespace and inode maps...
        - found root inode chunk
Phase 3 - for each AG...
        - scan and clear agi unlinked lists...
        - process known inodes and perform inode discovery...
        - agno = 0
        - agno = 1
        - agno = 2
        - agno = 3
        - process newly discovered inodes...
Phase 4 - check for duplicate blocks...
        - setting up duplicate extent list...
        - check for inodes claiming duplicate blocks...
        - agno = 0
        - agno = 1
        - agno = 2
        - agno = 3
Phase 5 - rebuild AG headers and trees...
        - reset superblock...
Phase 6 - check inode connectivity...
        - resetting contents of realtime bitmap and summary inodes
        - traversing filesystem ...
        - traversal finished ...
        - moving disconnected inodes to lost+found ...
Phase 7 - verify and correct link counts...
done
Remount the XFS partition at its original mountpoint as listed in /etc/fstab file.
# mount -a
Enable Scanning of XFS Disk Partitions at Linux Startup:
In some scenarios you cannot unmount a disk partition, if the disk is in use by the Linux operating system. For this reason you may have to defer the disk checking until next system boot.
To enable xfs_repair command to run on Linux startup, add «fsck.mode=force fsck.repair=yes» at the end of GRUB menu kernel command.
You can refer to our previous post about Editing GRUB menu.
After Linux startup, check the system log to verify the execution of disk repair command.
# journalctl | grep systemd-fsck
To permanently enable disk checking at startup, you have to add «fsck.mode=force fsck.repair=yes» in GRUB configuration files.
Edit grub configuration file in vim text editor.
# vi /etc/default/grub
Locate GRUB_CMDLINE_LINUX parameter and append «fsck.mode=force fsck.repair=yes» at the end of line.
GRUB_CMDLINE_LINUX="resume=/dev/mapper/cl-swap rd.lvm.lv=cl/root rd.lvm.lv=cl/swap rhgb quiet fsck.mode=force fsck.repair=yes"
Regenerate GRUB menu configurations based on new parameters.
# grub2-mkconfig
Reboot your Linux operating system to verify the new settings.
# reboot
Conclusion:
You have successfully performed scanning and repairing of Linux Disk partitions of Ext4 and XFS types. If you feel any difficulty understanding this Linux tutorial, we suggest that you should read The Linux Command Line, 2nd Edition by William Shotts.
Fsck command is used to check filesystem consistency in Linux and Unix-like operating systems. On the system, fsck runs either automatically or manually. The filesystem shouldn’t be mounted while running the fsck. We can force fsck to run on reboot for both root and non-root filesystems.
In this tutorial, we learn how to force fsck on reboot to check for filesystem errors.
Using Grub
Many modern Linux distributions are now adopted to systemd system. The traditional way of using tune2fs works only in sysvinit or upstart systems.
For systemd-based Linux distributions, add fsck.mode=force to your grub configuration file as a kernel parameter. It’s important to note that systemd-fsck doesn’t know anything about the filesystem, so it just runs file system checkers specific to each filesystem type (/sbin/fsck.*). If you have an ext4 filesystem, for example, systemd-fsck will run /sbin/fsck.ext4.
You need to add fsck.mode=force to GRUB_CMDLINE_LINUX_DEFAULT, at the end of the last quote («).
For example:
GRUB_CMDLINE_LINUX_DEFAULT="quiet splash fsck.mode=force"You can edit the grub configuration using the nano command.
sudo nano /etc/default/grubOutput:
# If you change this file, run 'update-grub' afterwards to update
# /boot/grub/grub.cfg.
 # For full documentation of the options in this file, see:
# info -f grub -n 'Simple configuration'
 GRUB_DEFAULT=0
 GRUB_TIMEOUT=5
 GRUB_DISTRIBUTOR=lsb_release -i -s 2> /dev/null || echo Debian
 GRUB_CMDLINE_LINUX_DEFAULT="quiet"
 GRUB_CMDLINE_LINUX=""
 # Uncomment to enable BadRAM filtering, modify to suit your needs
 # This works with Linux (no patch required) and with any kernel that obtains
 # the memory map information from GRUB (GNU Mach, kernel of FreeBSD …)
 # GRUB_BADRAM="0x01234567,0xfefefefe,0x89abcdef,0xefefefef"
 # Uncomment to disable graphical terminal (grub-pc only)
 # GRUB_TERMINAL=console
 # The resolution used on graphical terminal
 # note that you can use only modes which your graphic card supports via VBE
 # you can see them in real GRUB with the command `vbeinfo'
# GRUB_GFXMODE=640x480
 # Uncomment if you don't want GRUB to pass "root=UUID=xxx" parameter to Linux
 # GRUB_DISABLE_LINUX_UUID=true
 # Uncomment to disable generation of recovery mode menu entries
 # GRUB_DISABLE_RECOVERY="true"
 # Uncomment to get a beep at grub start
 # GRUB_INIT_TUNE="480 440 1"
If you want to automatically repair problems that are easily fixed, you can add the option fsck.repair=yes to the grub configuration file. The yes in fsck.repair indicates that the system accepts «yes» as an answer to all fsck questions; use no if you want the system to accept «no» as an answer.
You need to edit the grub configuration file as before and add fsck.repair=yes or fsck.repair=no to the GRUB_CMDLINE_LINUX_DEFAULT.
For fsck.repair=yes
GRUB_CMDLINE_LINUX_DEFAULT="quiet splash fsck.mode=force fsck.repair=yes"For fsck.repair=no
GRUB_CMDLINE_LINUX_DEFAULT="quiet splash fsck.mode=force fsck.repair=no"Make sure that you do not make any additional changes and the changes you made are correct, or your system will fail to boot. After you have made the changes, you can save the nano file and exit.
After you’ve finished editing and saved your file, run the following command to update the Grub2 configuration for Linux distribution.
sudo update-grubYou must now reboot the system, and fsck will perform a filesystem consistency check on boot.
If you do not want fsck to perform a filesystem consistency check on each boot, you must delete any additional steps you have added to the grub configuration file.
For systemd to perform single time force fsck during the boot:
- Boot to the Grub menu
- While entry is highlighted, press ‘e’ to edit the commands
- Press «End» button to move cursor to the last
- Add a space and then add the kernel parameter
fsck.mode=force - Press Ctrl + x to close and boot the system
Using tune2fs
There are two ways to perform force fsck in old Linux Distribution: using tune2fs and forcefsck.
If a file system is defined as corrupt or after a particular number of boots or time, fsck executes at boot time. Only EXT4, EXT3, and EXT2 filesystems can be forced to perform fsck on each reboot.
The tune2fs allows adjusting of various tunable filesystem parameters on Linux. We will use this command for our purpose.
The following command tune2fs command sets the filesystem (/dev/sda1) to perform fsck every system reboot:
sudo tune2fs -c 1 /dev/sda1Basically, we are telling the system that after how many mounts the partition should be checked.
Also make sure in the /etc/fstab file, the pass the last, 6th column ([PASS]) is greater than zero.
0— Do not check.1— The file systems to be checked first. Usually root partition set this value2— The file systems which are checked last and possibly in parallel.
If you want to force fsck to run the filesystem check after 10 boots, set the value of -c to 10.
sudo tune2fs -c 10 /dev/sda1To stop the fsck to run on each boot, you can replace the value of -c with -1 and run the command.
sudo tune2fs -c -1 /dev/sda1The tune2fs tool can be used to check the current mount count, maximum mount count, the time it was last checked, and interval.
sudo tune2fs -l /dev/sda1 | grep -i 'last checked\|mount count\|check interval'Output:
 $ sudo tune2fs -l /dev/sda1 | grep -i 'last checked|mount count|check interval'
 Mount count:              31
 Maximum mount count:      -1
 Last checked:             Fri May  8 08:08:15 2020
 Check interval:           0 ()
The “Maximum mount count” is the maximum number of mounts before the filesystem is reviewed. The fsck will never run if the maximum value is 0 or -1. The “check interval” refers to the amount of time that passes between two filesystem checks.
It’s possible to run the fsck after a certain number of mounts, for example, if you want to run fsck after every 10 mounts, you can use the following command.
sudo tune2fs -c 10 /dev/sda1Output:
sudo tune2fs -c 10 /dev/sda1
 tune2fs 1.45.6 (20-Mar-2020)
 Setting maximal mount count to 10
sudo tune2fs -l /dev/sda1 | grep -i 'last checked|mount count|check interval'
 Mount count:              31
 Maximum mount count:      10
 Last checked:             Fri May  8 08:08:15 2020
 Check interval:           0 ()
forcefsck
In older Linux distributions just simply creating a file named forcefsck under the root directory (/) partition will perform force fsck on the root partition.
sudo touch /forcefsckCheck to see if the file is created.
sudo ls /forcefsckOutput:
sudo touch /forcefsck
sudo ls /forcefsck
/forcefsck
$
Now you can perform a reboot or on your next reboot, the system will perform fsck on the root filesystem.
Normally /forcefsck file is removed automatically after the fsck, if not removed you can manually delete that file.
Conclusion
In this tutorial, we learned how to force fsck on root and non-root filesystems in Linux. Thanks for reading, please give your suggestion in the comment section.
About The Author
Bobbin Zachariah

Bobbin is a seasoned IT professional with over two decades of experience. He has excelled in roles such as a computer science instructor, Linux system engineer, and senior analyst. Currently, he thrives in DevOps environments, focusing on optimizing efficiency and delivery in AWS Cloud infrastructure. Bobbin holds certifications in RHEL, CCNA, and MCP, along with a Master’s degree in computer science. In his free time, he enjoys playing cricket, blogging, and immersing himself in the world of music.
- Печать
Страницы: [1] Вниз

Тема: как добавить проверку дисков при загрузке в меню Grub (Прочитано 1146 раз)
0 Пользователей и 1 Гость просматривают эту тему.

timur73_73

Собственно вопрос таков: как добавить проверку дисков при загрузке в меню Grub?
В моей сборке rubuntu нет автоматической проверки дисков после (допустим) 45 загрузок, но есть паранойя. Поэтому хотелось бы запускать fsck при загрузке вручную по мере обострения паранойи 
Runtu 14.04.2 LTS х64, XFCE 4, 2x Intel(R) Core(TM)2 Duo CPU E6550 2.33GHz, RAM 4Gb, GeForce 210/PCIe/SSE2 512Mb
userok2008
timur73_73,
Если нужно проверить, то можно и без меню груб).
sudo touch /forcefsck и после перезагрузки будет проверка).
Для повторной проверки, команду можно повторить.
Debian Squeeze 6.10 PPC/i486, Wheezy 7.8 PPC/i686, Jessie 8.2 i686
timur73_73
Тоже вариант, но хотелось бы через меню grub (если есть такая возможность)
Runtu 14.04.2 LTS х64, XFCE 4, 2x Intel(R) Core(TM)2 Duo CPU E6550 2.33GHz, RAM 4Gb, GeForce 210/PCIe/SSE2 512Mb
userok2008
Debian Squeeze 6.10 PPC/i486, Wheezy 7.8 PPC/i686, Jessie 8.2 i686
timur73_73
Спасибо,очень хорошая статья. Проверю в работе.
Runtu 14.04.2 LTS х64, XFCE 4, 2x Intel(R) Core(TM)2 Duo CPU E6550 2.33GHz, RAM 4Gb, GeForce 210/PCIe/SSE2 512Mb
- Печать
Страницы: [1] Вверх
Further investigation and updates on the existing answer
I now just wanted to check, whether the above still works on Ubuntu 20.04/22.04-LTS-based systems (directly tested on Linux Mint 20/21 Cinnamon amd64 desktop and Ubuntu MATE 20.04/22.04 amd64 desktop), and I found out a few things, let’s start with the file system check interval (I ran all commands as root (as you might notice ~# in front of commands):
File system check interval
~# LC_ALL=C tune2fs -l /dev/nvme0n1p2 | grep 'Check interval'

Check interval:           0 (<none>)
Well, this was unexpected. I thought we took care of it, but can be fixed very easily. Take note, the number it takes as an argument is by default in days, so be sure to use 1s (1 seconds) instead of just 1 which would mean 1 day (86400 seconds):
~# LC_ALL=C tune2fs -i 1s /dev/nvme0n1p2

tune2fs 1.45.5 (07-Jan-2020)
Setting interval between checks to 1 seconds
Now, if we repeat the above check, we get:
Check interval: 1 (0:00:01)
This does not mean the file system will be checked every second, of course. Rather, in effect it will force the file system check on every file system mount. (As there is no way of booting any system twice in one second 😀.)
File system maximum number of mounts before check
Default setting:
~# LC_ALL=C tune2fs -l /dev/nvme0n1p2 | grep 'Maximum mount count'

Maximum mount count:      -1
This setting adjusts how many mounts it takes till the file system gets checked. It’s ok what is written in the original answer:
~# LC_ALL=C tune2fs -c 1 /dev/nvme0n1p2

tune2fs 1.45.5 (07-Jan-2020)
Setting maximal mount count to 1
Just make sure you do not use 0 or -1 as it would become disregarded.
—
Combination of both — The recommended way
Here you only change your disk name (e.g. sda, vda, nvme0n1, etc.), and partition number:
First, we find out the current status with:
partition=/dev/nvme0n1p2; LC_ALL=C tune2fs -l $partition | grep -E 'Check\ interval|Maximum\ mount\ count'
=
Maximum mount count:      -1
Check interval:           0 (<none>)
Afterward, we set these values so that the file system is checked on every boot with:
partition=/dev/nvme0n1p2; LC_ALL=C tune2fs -i 1s -c 1 $partition 2>&1 | grep Setting
=
Setting maximal mount count to 1
Setting interval between checks to 1 seconds
Finally, let’s review the new status with the same first command:
partition=/dev/nvme0n1p2; LC_ALL=C tune2fs -l $partition | grep -E 'Check\ interval|Maximum\ mount\ count'
=
Maximum mount count:      1
Check interval:           1 (0:00:01)
Information sources:
tune2fsman page
Keep checking (pun intended)! 😎