Some users that have previously configured their computers to dual-boot Windows and Linux distributions (most commonly with Ubuntu) are reporting that their PC is entering Grub Rescue Mode and displaying the error No Such Partition – Grub Rescue.
After investigating this particular issue thoroughly, it turns out that there are several different situations that might trigger the apparition of this issue. Here’s a list of potential culprits that might be responsible for this issue:
- GRUB Bootloader is Corrupted or Deleted – If you are seeing this error due to some type of corrupted data associated with the GRUP Bootloader or after you have unwillingly deleted data associated with it, you can fix the issue by manually reconfiguring the utility to boot using the correct files.
- The bootloader is Misconfigured or Corrupted – Since this issue can also occur due to misconfigured or corrupted BCD data, you should be able to fix the issue by rebuilding the Boot Configuration data from an elevated Command Prompt.
- Current Boot Configuration is inconsistent – In case the issue is being caused by bad data that’s being fed into the GRUB bootloader, you can potentially fix the issue by using a Registry Backup to restore your computer back to a good configuration.
Now that you know every potential culprit, here’s a list of methods that other affected users have successfully used to fix the issue and prevent their computer from booting into Grub rescue mode:
Method 1: Manually Reconfigure GRUB Bootloader
By far, the most effective fix and the one you should start with since it’s the least destructive is to manually reconfigure the GRUB bootloader and make sure that the primary OS is prioritized.
Several affected users have confirmed that they finally managed to bypass the GRUB rescue state by following a set of instructions designed to manually reconfigure the GRUP Bootloader to prioritize the main OS.
If this scenario is applicable, follow the instructions below to do so directly via the GRUB Rescue menu:
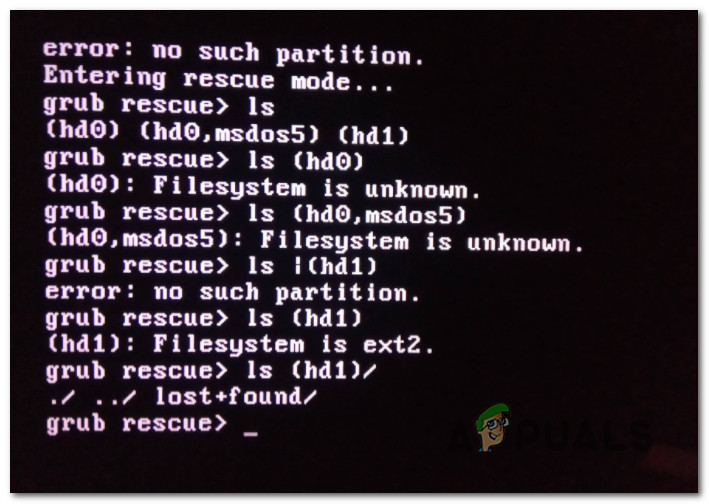
- Once your PC enters GRUB Rescue Mode, type the following command and press Enter to get an overview of all your available partitions:
ls
- After you do this, you should get an overview of all partitions that you currently have on your primary disk. At this point, you need to make sure that you select the primary OS. In our case, the correct partition is (hd0,msdos2), so we used the following command to interrogate the partition:
ls (hd0, msdos2)
Note: Make sure to replace the partition with the correct example in your case. If you get a message saying something like ‘File System is ext2 or ext3‘, you have correctly identified the partition that holds your primary OS.
Note 2: If you interrogate a partition and you get the message ‘Filesystem is unknown‘, you didn’t select the correct partition.
Incorrect partition error message in GRUB - Once the correct partition is selected, type the ‘set‘ and press Enter to interrogate and get a definitive listing of your main partition.
- Next, type the following commands and press Enter after each command to change the priority of GRUB Bootloader to the correct one:
set boot = (hd0, msdos5)
set prefix=(hd0, msdos5)/boot/grub
insmod normal
normal
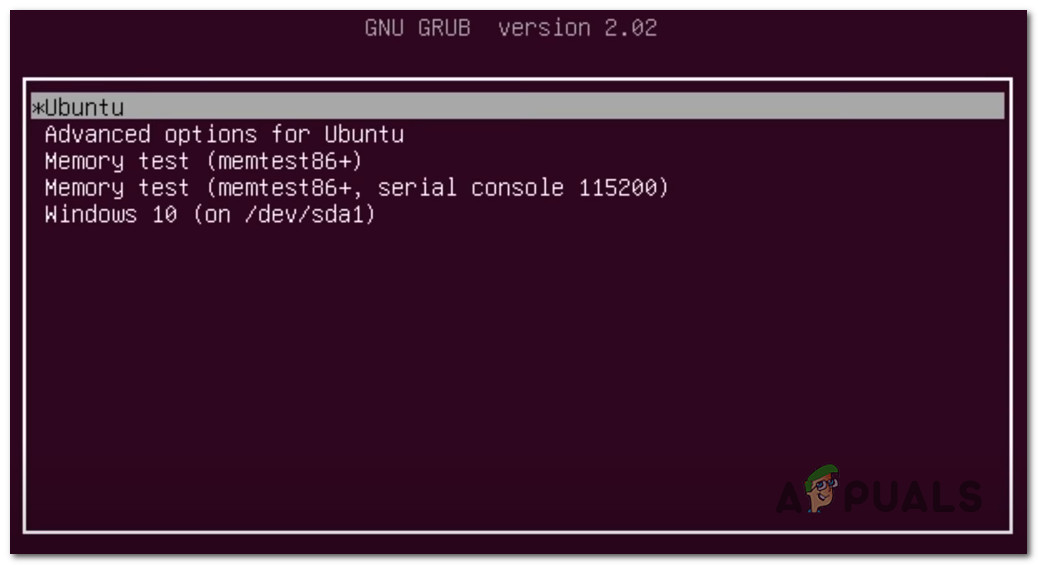
- After you input the final command, you’ll be taken to the main GNU Grub menu. Once you get to this screen, simply select the OS that you want to boot from and press Enter.

Booting from the main partition in GRUB
In case this method didn’t work for you and the booting sequence eventually boots in the same No Such Partition -Grub Rescue error, move back to the next potential fix below.
Method 2: Rebuilding the Boot Configuration Data files (BCD)
If the first method didn’t work for you, the next step would be to use the Boot Configuration Data (BCD) utility to locate the Windows installation files on all disks and add them back to the boot list so that the booting sequence can locate it during startup.
This method was successfully used by a lot of users that were previously dealing with No Such Partition – Grub Rescue error. Rebuilding the BCD file clusters successfully allowed them to dual-boot normally without being forced into the GRUP Rescue menu.
IMPORTANT: This method will require you to plug in a compatible installation Windows installation media. If you don’t have one at the ready, you can create the Windows installation media from scratch and load it on a USB drive.
Once you meet all requirements, follow the instructions below:
- Plug-in the USB stick containing the installation media and start your computer normally via the power button.
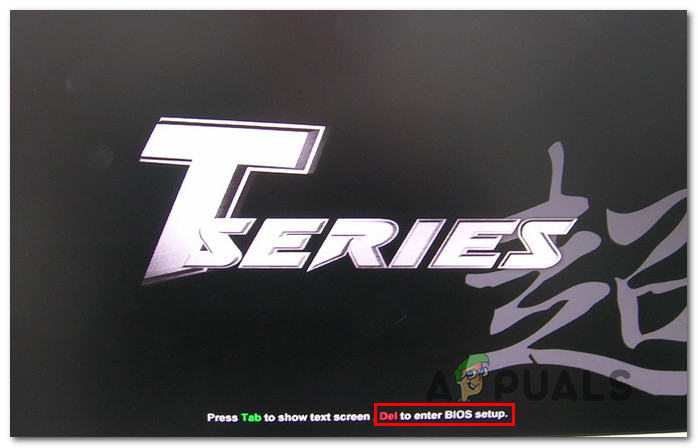
- Access the Setup key by pressing the correspondent button depending on your motherboard manufacturer.

Accessing the BIOS / UEFI Setup menu Note: The setup key will be different from manufacturer to manufacturer. Most commonly the Setup key is either one of the F keys (F2, F4, F6, F8), the Esc key, or the Del key (on Del computers/laptops). If you’re having trouble accessing the Setup menu, search online for specific instructions on accessing it.
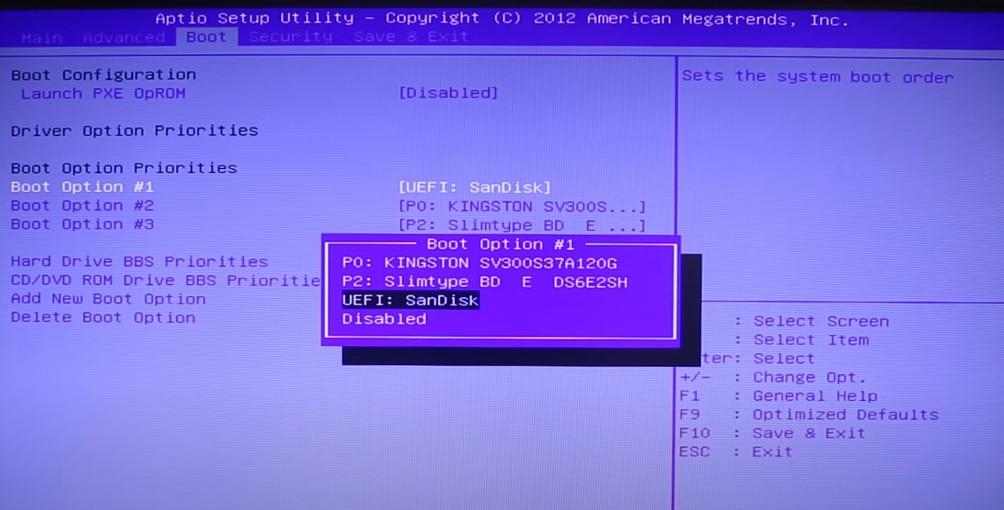
- Once you’re inside the Setup menu, access the Boot tab and make sure to set the USB stick containing the installation media as Boot Option #1.

Booting from the installation media - Save the changes, then restart and allow your computer to boot from the installation media and wait for the installation files to load.
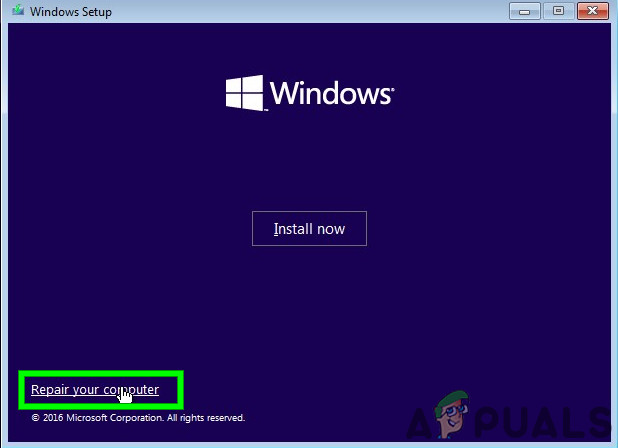
- Once you get to the first page, click on Next, then click on Repair your computer from the bottom-right corner of the screen.

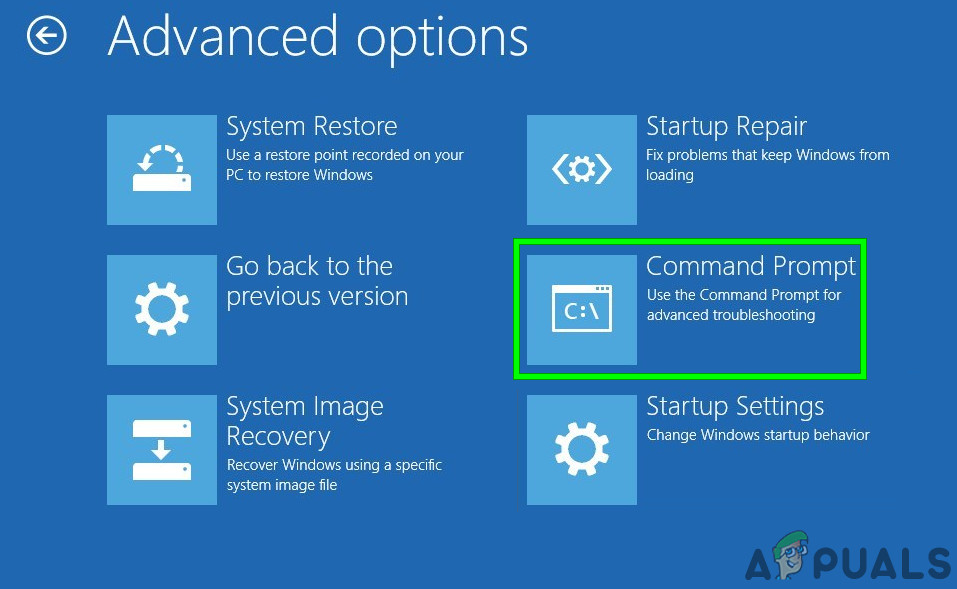
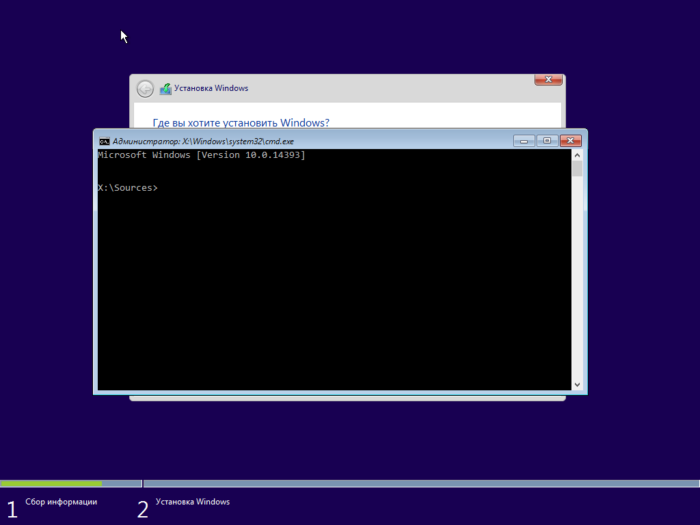
Repairing Computer via installation media - Next, wait for the Recovery menu to load, then select Troubleshoot and click on Command Prompt from the list of available options:

Accessing the Command Prompt via the Recovery menu Note: On certain Windows 10 versions, you might also be able to boot from the Recovery menu by forcing 3 consecutive system interruptions during the startup procedure.
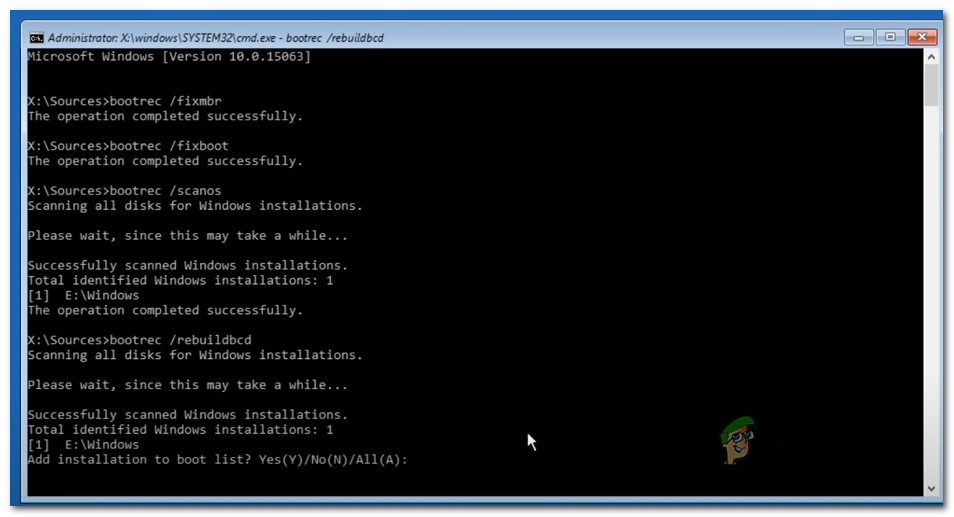
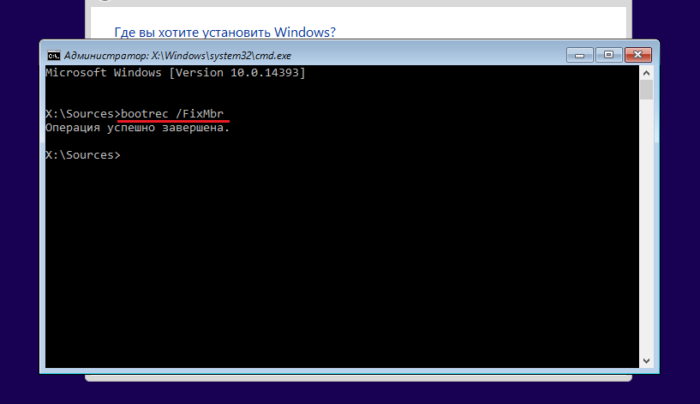
- Once you’re inside the elevated Command Prompt, type the following command and press Enter to fix the MBR dependencies associated with your Windows installation:
bootrec /fixmbr
- Once the command is processed successfully, type the following commands and press Enter to fix the Boot Configuration Data associated with your Windows installation:
bootrec /fixboot
Note: If you get the ‘Access is denied’ error while inputting one of the 2 commands above, follow these instructions to fix the bootrec access problem.
- Next, type the following command and press Enter to scan all your disks for the Windows installation media:
bootrec /scanos
Note: This operation might take some time depending on the size of your partitions. Don’t close this window until the operation is complete.
- If the operation is completed successfully, type the following command to effectively rebuild the BCD configuration data:
bootrec /rebuildbcd
- When asked to confirm, type Y and press Enter to confirm and start the operation.

Confirm the operation of building the BCD file system - Finally, type ‘exit’ and press enter to effectively leave the elevated CMD prompt and allow your Windows to boot normally.

In case the end result is the same (the boot attempt ends with the same No Such Partition error), move down to the next method below.
Method 3: Using the Registry Backup to Restore the last good Configuration
If none of the methods above have worked for you, you might be able to fix the current configuration with the last known good backup that should allow you to dual boot without issues.
Doing this will require you to use the Advanced Options menu to open an elevated Command Prompt and run a series of commands that will allow you to boot using the last known good configuration.
This method was reportedly used successfully by a lot of users dealing with the No Such Partition -Grub Rescue error.
In order to use the Registry Backup to restore the last known good configuration, follow the instructions below:
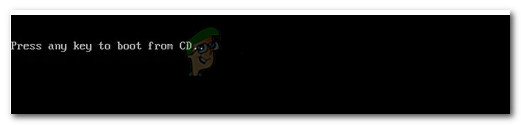
- Insert a compatible Windows installation media and boot from it by pressing any key when prompted to do so.

Booting from the installation media Note: If you don’t have a compatible installation media or your system doesn’t boot from it, follow steps 1 to 4 from Method 2.
- Once you manage to successfully boot from the installation media, click on Repair your computer from the bottom-left corner of the screen.
Repairing your computer - Once you’re finally inside the Advanced Recovery menu, click on Troubleshoot, then click on Command Prompt from the list of available Options.
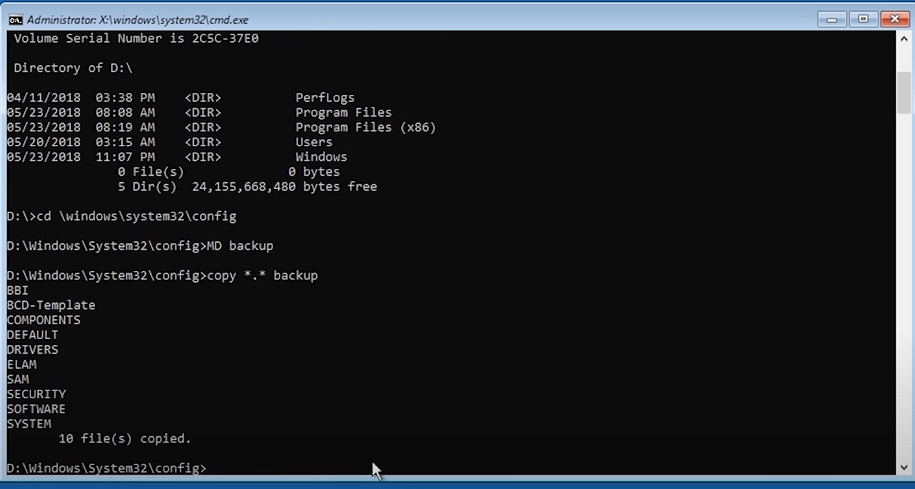
Accessing the Command Prompt via the Recovery menu - Once you are inside the elevated Command prompt, type ‘C:‘ and press enter to access the partition where you installed Windows. If you installed Windows on a different partition, replace the letter accordingly.
- Next, type ‘dir‘ and press Enter to access the root location of your OS drive.
Note: It’s recommended to back up the current registry before going forward. To do this, input the following command and press Enter after each command:cd \windows\system32\config MD backup copy *.* backup

Backing up the Registry - Next, type the following commands and press Enter to access the last known good configuration and modify the default behavior to boot from it:
CD regback
copy *.* ..
- When prompted by the prompt, press A and hit Enter once again.
- Finally, type exit and press Enter to exit and boot normally. This should take you to the main GRUP menu where you should be able to dual boot as you see fit.

Kevin Arrows
Kevin Arrows is a highly experienced and knowledgeable technology specialist with over a decade of industry experience. He holds a Microsoft Certified Technology Specialist (MCTS) certification and has a deep passion for staying up-to-date on the latest tech developments. Kevin has written extensively on a wide range of tech-related topics, showcasing his expertise and knowledge in areas such as software development, cybersecurity, and cloud computing. His contributions to the tech field have been widely recognized and respected by his peers, and he is highly regarded for his ability to explain complex technical concepts in a clear and concise manner.
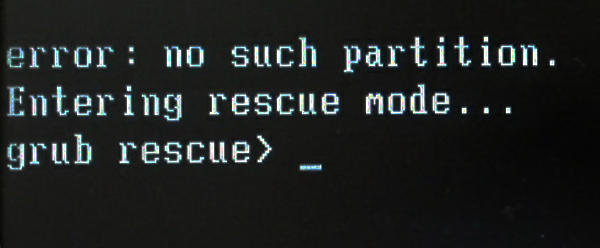
Ever get into the freaking condition, when your system doesn’t boot successfully and throw your control to a grub rescue utility informing the following error?
error: no such partition.
Entering rescue mode...
grub rescue>
I went through this situation today. And here is how I rescued with it.
Note: Other possible solutions might be available, but this is just what worked for me. You are recommended to explore the web first, then go with the solution that suits *your* condition perfectly.
1. Reason
Actually, I was trying to resize my Linux (Ubuntu 16.04 LTS) partition which is dual booted with Windows 10. For that, my first step was to unallocate the partition which I wanted to merge with my ext4 (Linux partition). For this, first I logged in Windows and tried to unallocate the partition I wanted to merge (Local Disk :D) but I found out that it can be done with Gparted from Ubuntu as well. But still.
“I started to explore windows storage management console, and a couple of times I detached and reallocate this partition, together with separating out a partition of 3 GB from it. I was just playing and testing the working of the console. But this fun, lead me to freak, later in the day.”
2. Problem
Now the next step was to use Gparted from Linux. But for that, I needed to reboot and login to my Ubuntu 16.04 LTS and here is the twist. When I did reboot my laptop to switch the OS. Oh my God! I get encountered with this scary error.
error: no such partition.
Entering rescue mode...
grub rescue>
I was screwed up! I didn’t know what the hack is done with my system.
I searched the web and found out the reason for this error that was “I deleted a Windows partition. and somehow (I don’t know how), I messed up with some grub configurations.”
3. Solution
But something worked like heaven for me. Here is the solution, if you ever get into this, proceed as follows.
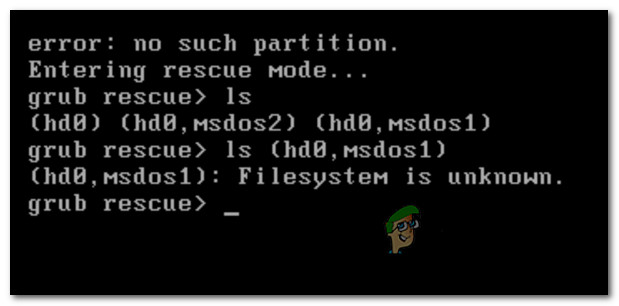
4. List File Systems
error: no such partition.
Entering rescue mode...
grub rescue> ls
(hd0) (hd0,msdos5) (hd0,msdos3) (hd0,msdos2) (hd0,msdos1)
This “ls” command will list possible file systems where grub might be available. Now our next step is to find out, that which among these listed systems is the one that we can use for booting.
5. Find the File System we may use to boot
grub rescue> ls (hd0,msdos1)
(hd0,msdos1): Filesystem is unknown.
grub rescue> ls (hd0,msdos2)
(hd0,msdos2): Filesystem is unknown.
grub rescue> ls (hd0,msdos3)
(hd0,msdos3): Filesystem is unknown.
grub rescue> ls (hd0,msdos5)
(hd0,msdos5): Filesystem is ext2.
Hurray! we have found out, that which filesystem we have to choose for booting. In this case, it is (hd0, msdos5).
6. Configuration
grub rescue> set root=(hd0,msdos5)
grub rescue> set prefix=(hd0,msdos5)/boot/grub
grub rescue> insmod normal
grub rescue> normal
After this, I could see the old booting menu, where I may select between Ubuntu and Windows. At this point, it seems that the problem is solved, but that’s not the truth!
Now if you again reboot your system, you will again get into this grub rescue. If you want to permanently fix this issue. Proceed as follows (after step 3).
7. Updating System grub
Login to Ubuntu and just give these 2 commands.
$ sudo update-grub
$ sudo grub-install /dev/sda
Now try to reboot! Hopefully, you are back to your previous experience of booting. After going through this, now I don’t feel that grub rescue is a freaking issue, on the other hand, it’s a simple utility to rescue our system with faulty grub configurations.
Updated:
- Unfortunately, sometimes this process doesn’t work. I recommend you to have a look at this post if you want to give a try to recover your files.
- Recently, I found out here, that sometimes
insmod normaldoesn’t work due to the absence of a complete path ofnormalmodule. If this is the case, please try the complete path withinsmod (hdX, Y)/boot/grub/normal.mod. If this doesn’t work please try the command using “semicolon” instead of “coma” after “hdX” as pointed out here. - Also, the location of the complete path to
normal.modis not consistent across all the systems. Therefore, you may uselsorsearch.filecommands to find out the exact location of your system’s `normal.mod` as explained here. - In my case, I didn’t get into condition when
insmod normaldoesn’t work. So, all these additional updates, I have not performed myself. Therefore, I request you all if any of these *updated* points doesn’t work or if you see a bug in these, then please let me know in the comments section below.
Aftermath:
When I was back with my Linux and an unallocated partition, I proceeded ahead for my goal of re-sizing. Explore the second part of this journey on How to resize your Linux partition with Gparted?
See you in the next post.
Главная » Windows » Появляется ошибка error no such partition | Как восстановить загрузчик
Хочу поделиться небольшой историей о том, как я благополучно снес Ubuntu, но ничем хорошим это не кончилось.
У меня на ноутбуке HP стоит Windows 10, но мне захотелось попрактиковаться в работе с Linux-системами, для чего я установил Ubuntu. Поработав в ней немного, я решил ее снести (стёр раздел с Ubuntu утилитой AOEMI Partition Assistant) и установить на виртуальную машину – Virtual Box. При этом, ноутбук я не выключал.
Я отошел на час и когда вернулся ноутбук выключен, когда я его включил, появляется сообщение на черном экране – no such partition grub rescue.
В нашем случае, GRUB – загрузчик для Linux, ведет запись информации на первый раздел диска MBR, файлы загрузчика помещаются на раздел с установленной системой в моем случае на раздел с Ubuntu.
Я удалил раздел с системой Ubuntu, в итоге загрузчика физически не существует, о нем остались только некоторые записи. Ноутбук не может ничего делать, а в Windows просто так вы не попадете.
- Проводим восстановление загрузчика Windows 7
- Как восстановить загрузчик в Windows 8
- Проводим восстановление загрузчика Windows 10
К счастью, решение проблемы я нашел быстро, причем не одно, сейчас я расскажу, что нужно делать при появлении такой проблемы.
Для решения этой проблемы есть два способа – использование загрузочного Live CD дистрибутива Linux, либо загрузочный диск или флешка с Windows. При себе я имел только флешку с Windows. Но расскажу и о методе при помощи Linux.
Полезно: Как установить Ubuntu (Подробная инструкция)
Исправляем с помощью Linux
Возьмите загрузочный диск, можно и флешку с Linux, например, Mint, а может быть у вас есть Ubuntu. Создать такой носитель придется на другом компьютере. Загрузитесь с него. Теперь нам понадобится терминал, для этого зажимаем клавиши Ctrl+Alt+T. В терминале пишем команду:
sudo apt-get install lilo
Начинается загрузка пакета, а потом его установка, после чего вводим вот эту команду:
sudo lilo -M /dev/sda mbr
Хочу заметить, что для установки пакета вам понадобится интернет.
Теперь вы можете перезагрузить компьютер и убедиться, что ошибка error no such partition entering rescue mode исчезла.
Скорее всего вы столкнулись с проблемами еще при вводе команд. Например, не установился пакет lilo, либо вторая команда вообще не помогла. У меня было тоже самое и я не нашел этому решения, поэтому рекомендую использовать загрузочный диск с Windows.
Это интересно: Как избавиться от ошибки disk read error occurred
Исправляем с помощью Windows
В данном пункте мы будет восстанавливать загрузчик, а старые записи о grub будут очищены. Вот, что необходимо сделать:
- При установленной операционной системе Windows 7 необходим загрузочный носитель, либо флешка с этой системой, хотя, может подойти и любая другая, например, Windows 8.
- Загрузитесь с установочного диска / флешки. Должно появиться окно с предложением об установки Windows.
- Нам нужна только командная строка, поэтому нажимаем комбинацию клавиш Shift+F10.
- В окне командной строки нужно ввести команду bootrec. На выходе мы получаем ключи, которые можем использовать с этой командной:
- Bootrec /FixMbr – мы записываем главную загрузочную запись в системный раздел, а таблица раздела при это не перезаписывается. Применяем при повреждении загрузочной записи;
- Bootrec /FixBoot – записывает новый загрузочный сектор. Применяется, если загрузочный сектор был заменен, поврежден;
- Bootrec /ScanOs – ведется сканирование диска на все операционные системы, установленные на диске;
- Bootrec /RebuildBcd – используется для поиска всех ОС на диске, а также для перестройки хранилища конфигурации загрузки.
Для восстановления загрузочной записи я ввел команду с таким ключом – Bootrec /FixMbr.
После этого я перезагрузил компьютер и все стало работать. Появилась эмблема Windows 10, и я благополучно оказался в системе.
Это интересно: Что делать при появлении ошибки The boot configuration data file is missing some required information или 0xc0000034 в Windows 8 | 8.1 | 10
Надеюсь данная статья поможет вам в решении ошибки error no such partition.
( 24 оценки, среднее 4.21 из 5 )
The No Such Partition Grub Rescue error is also known as the ‘Death Screen of Linux’. And this error mainly occurs when your grub configuration is messed up for some reason. In this article, we will try to solve this problem of ours using a live CD image of the same OS and try to fix your installation.
Pre-requisites
- You have a live CD/DVD/USB of the Operating System (must be of the same version).
- You have a stable internet connection.
- And you do not have a Wubi (Ubuntu inside Windows) installation on your system.
Let’s get started!
6 Easy Steps to Fix No Such Partition Grub Rescue Error
We need to re-install grub because it is either deleted or corrupt. And to re-install, we will copy the grub file from the live USB to your grub directory. Note that this will remove any custom configuration you have made to the grub file. Follow these steps to fix your grub file.
1. Locate your Root/boot partition
Boot from the Live USB stick and, in the terminal, type the following commands to gain administrative privileges :
Now, type the following commands to know your disk partitioning structure :
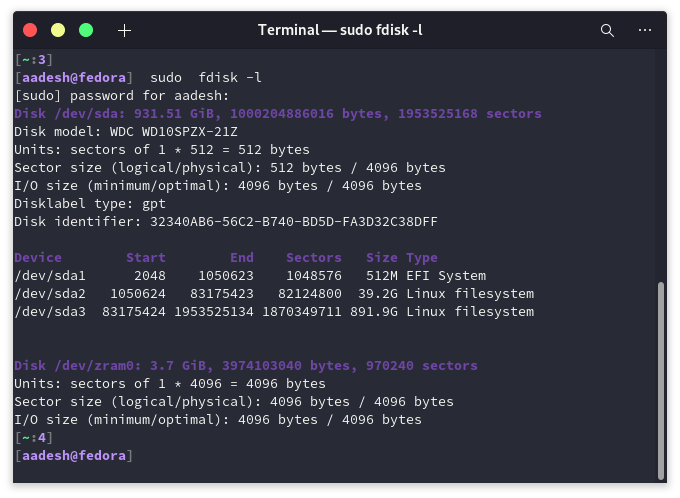
In the output, you will see text like /dev/sda1 or /dev/sda2 etc. If you have a separate Boot partition (EFI filesystem), note its location (usually it is 500 MB). And, if you don’t have a separate boot partition, then locate your root (/) partition. If you don’t know where your root is located, then you have to guess. Typically, it’s 30-50 GB in size.
2. Mount the Root/Boot Partition
To modify the changes in our root/boot partition, we will have to mount it first. To do that, type the following commands in your terminal :
sudo mkdir /mnt/temp
sudo mount /dev/sda2 /mnt/temp
Your sdX number can be different from mine, use the number where your root partition is located. And for separate boot partition, mount it as follows :
sudo mkdir /mnt/temp /mnt/temp/boot
sudo mount /dev/sdXY /mnt/temp  # Mount the main partition.
sudo mount /dev/sdXZ /mnt/temp/boot  # Mount the /boot partition.
3. Be CHROOT
Now that we have mounted the partition, we will have to mount several items in preparation of the chroot, run the following commands :
for i in /dev /dev/pts /proc /sys; do sudo mount -B $i /mnt/temp$i;  done
sudo cp /etc/resolv.conf /mnt/temp/etc/resolv.conf
sudo chroot /mnt/temp
If everything went well, you will see ‘root’ in the terminal prompt.
4. Update apt and Purge GRUB2 packages
Run the following commands as chroot to update apt :
Now, purge the old damaged grub files using these commands :
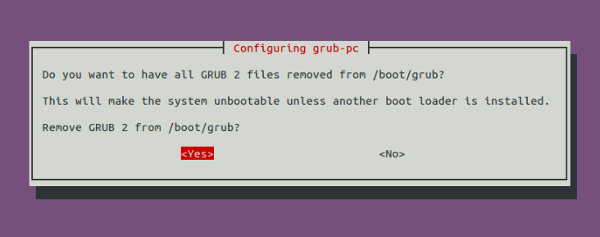
apt-get purge grub grub-pc grub-common
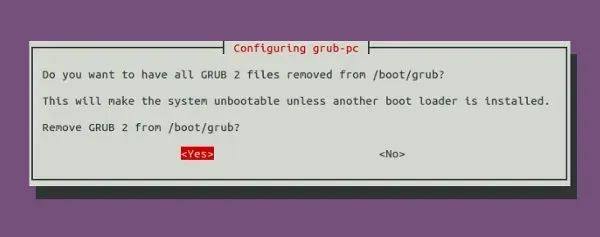
A prompt will appear asking for your confirmation to remove GRUB2 press and then press enter.
5. Re-install GRUB bootloader
We need to keep a few things in our mind before we we-install GRUB :
- While installation, it will ask you to add extra kernel options, if you don’t know about it then you probably don’t need it too. Just press the Tab key to navigate to Ok and press Enter.
- Installation notes will appear before your screen. Again, press Ok to continue.
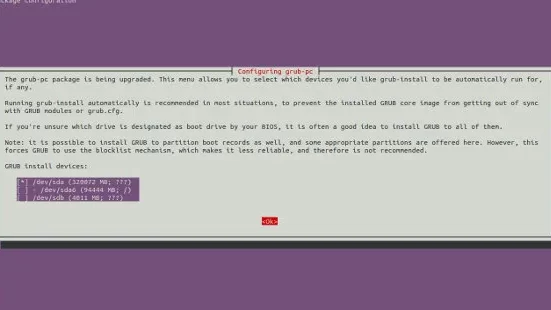
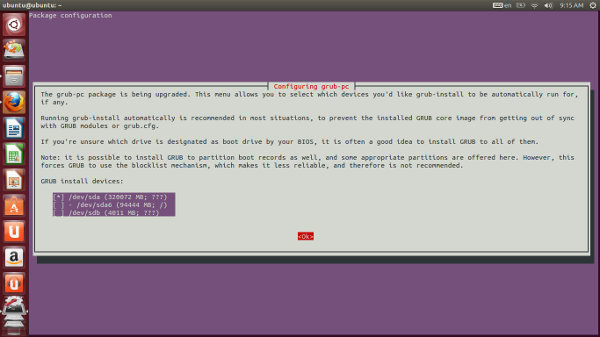
- It will now ask you to select the drive where it will install the GRUB bootloader. DO NOT select a partition (sda1, sda2) – select a drive (sda, sdb) using the spacebar. The selected drive will be highlighted using an asterisk (*).
Now, use the following commands to install GRUB again :
apt-get install grub-common grub-pc
Now, update GRUB and exit out of chroot:
6. Unmount all the Partitions
If you have only mounted the root partition before, run the following commands :
for i in /dev/pts /dev /proc /sys; do sudo umount /mnt/temp$i ; done
And if you have also mounted the /boot partition, then run the following commands :
for i in /dev/pts /dev /proc /sys /boot; do sudo umount /mnt/temp$i ; done
Finally, reboot the system and remove the live USB stick.
Summary
The recovery process was a little exhaustive, but it works. Hopefully, you were able to access your PC after this troubleshooting process.
References
- https://ubuntuforums.org/showthread.php?t=1581099
The other day I was trying to extend my root partition of Ubuntu which I dual boot with Windows. The partition extension was successful except that I screwed up the Grub configuration. When I booted in my laptop after the partition changes, I was welcomed by the Death Screen of Linux saying:
error: no such partition
grub rescue
After googling a bit, I found this mega thread on Ubuntu forum that helped me. But since it is a very complicated thread, I have re-written the tutorial so that one can follow it easily. So there are some assumption and some requirements to fix the error: no such partition grub rescue problem.
Requirements and presumptions:
- You must have a live CD/DVD/USB of the same version of OS
- You must have internet connection
- You are dual booting Windows with Ubuntu (no Wubi installation)
- You do not have a separate /boot partition
Now let’s see how can you rescue the grub here.
🚧
This element indicates a warning or caution.
You’ll be using chroot to rescue grub. The whole concept is that since grub configuration files have been deleted or corrupted, it need to be re-installed. And using the live CD of the exact OS version, we can install the grub configuration again. It will delete all the changes (if any) you have made to the grub.
Please follow these steps to easily fix grub rescue problem in Ubuntu (or other Linux distributions):
Step 1: Know you root partition
Boot from live CD, DVD or USB drive. Try Ubuntu from live disk. Open a terminal (Ctrl+Alt+T) and use the following command:
sudo su
fdisk -l
Here, you will see the drive name and partition number. It should look like sdXY. Where X is the drive letter and Y is the partition number. Usually it should be like sdaY. You have to recognize the partition where root has been installed.
Step 2: Mount the root partition
Once we have got the partition where root has been installed, we’ll mount the root partition where Ubuntu has been installed. Use the following commands to mount it:
sudo mkdir /mnt/temp
sudo mount /dev/sdXY /mnt/temp
Replace XY with appropriate values.
Step 3: Be the CHROOT
Once we have the partition mounted, next step is to mount certain items in preparation of the chroot. Run the following commands one by one:
for i in /dev /dev/pts /proc /sys; do sudo mount -B $i /mnt/temp$i;  done
sudo cp /etc/resolv.conf /mnt/temp/etc/resolv.conf
sudo chroot /mnt/temp
If the above commands ran successfully, you’ll see root@ubuntu:/# in the terminal indicating that you are in chroot mode.
Step 4: Purge Grub 2 packages
Now when we are in chroot environment (you can think of it as if we are behaving as root for the mounted partition)., time to get rid of the Grub 2 packages but before that lets update the repository.
apt-get update
apt-get purge grub grub-pc grub-common
While removing the grub, you’ll see a strange screen asking if you want to remove Grub 2 packages. Press TAB to select Yes. It will be highlighted once selected. Press enter to proceed.
Step 5: Re-install Grub packages
As we deleted the previous Grub, we deleted the messed up settings as well as any favourite settings stored in it. Now we’ll install a new and fresh Grub. Few things to keep in mind before you go on with the command to install the Grub.
- While installing the new Grub, it will ask you to add extra kernel options. Just press TAB to go to OK and press enter to continue.
- It will bring you the installation notes. Press Tab to OK followed by enter and continue.
- When it presents with you the device option (to ask on which partition should it install Grub), choose the option in the format of sdX. DO NOT select the drive partition in 4 letter format i.e. sda4 etc. When you select the partition, it should have an asterisk (*) before it like [*] sdX. If it does not, highlight (with tab) and press SPACE to select it. Tab OK and press enter.
It should look like this:
Now when you taken all those things in mind, use the command below to install the Grub.
apt-get install grub-common grub-pcUpdate the grub and exit the chroot:
update-grub
exit
Step 6: Unmount the partition:
We mounted something at the start, didn’t we? Well lets just unmount them.
for i in /dev/pts /dev /proc /sys; do sudo umount /mnt/temp$i ; doneThat’s it. Reboot your system and you should see the good old Grub boot screen as before. I hope this tutorial helped you to get rid of error: no such partition grub rescue problem and the tutorial was easy to follow. Any question, suggestions or a word of thanks is always welcomed. Stay tuned for more Linux tutorials.
About the author

Abhishek Prakash
Created It’s FOSS 11 years ago to share my Linux adventure. Have a Master’s degree in Engineering and years of IT industry experience. Huge fan of Agatha Christie and classic detective mysteries 🕵️♂️