
Preface
Please read this manual thoroughly before testing. It provides all information you need to use the product. Please only purchase test strips in your country. Use of test strips from different countries might get deviated test results under such circumstance. We hereafter call RightestTM GM100 Blood Glucose Monitoring System as GM100 BGMS, RightestTM GM100 Blood Glucose Meter as GM100 meter, and RightestTM GS100 Blood Glucose Test Strip as GS100 test strip for short. It is recommended to monitor blood glucose regularly. To prevent derived complications effectively, it is recommended to monitor blood glucose regularly. GM100 BGMS accurate and easy-to-use, is your reliable assistant for diabetes management.
GM100 BGMS was manufactured and supported by BionimeCorporation and its authorized representative. If you have any question or concern, please contact your localBionimeCustomerServiceoremailto rightest@bionime.com. We will provide best assistance and solutions for you.
Intended Use
GM100 BGMS is intended for in vitro (oustside the body) diagnostic use and self-testing only. Coding is not required. The testing result is calibrated to plasma equivalent with fresh capillary whole blood samples from the fingertip, palm or forearm. You may consult your healthcare professional for instructions how to use the system correctly. Our customer support staff is also available to assist you.
Package of Meter Kit

- GM100 Meter (with one CR2032 battery installed)
- GS100 Test Strips (0/10/25 pcs) *
- Control Solution *
- GM100 meter Instructions for Use
- GS100 Test Strips Package Insert *
- GD500 Lancing Device *
- Disposable Lancets (10pcs) *
- Instructions for the lancing device *
- Log Book
- Warranty Card + Emergency Card
- Carrying Case *
(Different packages have different bundled items. Some of packages might not include items.)
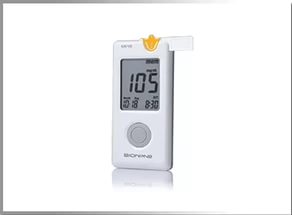
The RightestTM Meter

Test Strip Port
Insert test strip here until you hear a click.
Display Window
Show your test result, messages and relative information.
Main Button
For operating the meter, please check details in following sections.
Plastic Tape
Pull it off to activate meter. (If time and date of your meter has been set in advance, the plastic tape will be removed. Hence, please discard this step)
Battery Cover
Slide cover to change battery.
Precautions
GS100 Test Strips
GM100 meter is designed to use with GS100 test strip only. Please note that misuse of other test strips might cause unexpected damage or produce inaccurate test results.
Sample Entry
Apply a drop of blood or Control Solution here. The test request is only 1.4 µL of blood.
Hand Bar
Grip here to insert test strip into meter.
View Window
This window is yellow before applying blood sample. It gradually turns red when filled with blood.
Indication Symbol
Insert strip with indication symbol up and toward meter.
Electrode Contacts
Sensing signal output terminals.
PRECAUTION
- Re-cap the test strip vial immediately after removing a test strip.
- Do not reuse test strips.
- Do not use expired test strips.
- Record the date of opening a new test strip vial for the first time. Discard the vial of test strips after 3 months from opening.
- Store the test strips in a cool and dry location. Do not expose to direct sunlight or heat.
- For detailed information, please refer to the GS100 Test Strips Package Insert.
Battery Installation
Your meter comes with one CR2032, 3 volt, battery installed. One new battery will provide power to perform about 1,000 tests under normal use. Before using it, please pull off the plastic tape and press the main button to activate the meter (If time and date of your meter has been set in advance, the plastic tape will be removed. Hence, please discard this step).
- Turn the meter over. Press and push battery cover to open.
- Install the battery. Be sure to put battery in correct direction.

- Slide the battery cover back until it snaps into place.
- The meter performs a self-test and all symbols on the display will blink.
- Press any button to exit the self-test and enter Setting Mode.
- Set the time and date when the battery is replaced. See Setting the Date, Time and Unit section. Prior test results are still stored in the memory.


PRECAUTION
- Danger of explosion might happen if the battery is incorrectly replaced.
- Please follow the local regulation and discard a used battery properly.
Setting Up Your Meter-Setting the Date, Time, and Unit……
You can enter Setting Mode by below two ways.
- Reload battery
After removing the battery, please press the main button for several times until no signal on screen, then follow the battery installation steps to load battery. The meter will do self test. Press the main button to close the test and enter Setting Mode. - With Battery inserted
Press the main button first to turn on the meter. Then press and hold the main button for 5 seconds (the meter will be turned off during this period, please keep pressing) until you hear a beep, indicating you have successfully entered Setting Mode. The display screen will show setting data.
 NOTE
NOTE
- When you keep pressing the main button for 2 seconds, the display on screen will turn off. Please don’t care it. Keep pressing the main button till entering setting data.
- Quick press the main button allows you to change setting while hold it for 2 seconds will confirm the setting. However, if you press and hold the main button over 5 seconds it will escape from setting mode and return to time screen.
- Year setting
With the year format blinking, press the main button to adjust it. Then hold the same button for 2 seconds to confirm it. Meantime, it will shift to next digit for setting. Repeat the above action until the year setting is completed. Then it will move to month setting. - Month setting
With the month blinking, press the main button until the current month appears. Then hold the same button for 2 seconds to confirm it and move to day setting. - Day setting
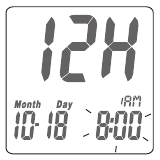
With the day blinking, press the main button to adjust it. Then hold the same button for 2 seconds to confirm it. Meantime, it will shift to next digit for setting. Repeat the above action until the day setting is completed. Then it will move to time format setting. - Time format
12/24H selection With the time format blinking, press the main button to adjust it. Then hold the same button for 2 seconds to confirm it and move to hours setting. - Hour setting
With the hour blinking, press the main button until the current hour appears. Then hold the same button for 2 seconds to confirm it and move to minute setting. - Minute setting
With the minute blinking, press the main button to adjust it. Then hold the same button for 2 seconds to confirm it. Meantime, it will shift to next digit for setting. Repeat the above action until the minute setting is completed. Then it will move to measurement of unit setting. - Ending setting
After confirming the setting, you’ll hear a sound of » beep «. All the settings are saved and completed and will return to time screen.


 NOTE
NOTE
- When you do not do any settings of meter for over 2 minutes, the meter will leave setting mode and power off automatically.
- Any time you would like to escape from the setting mode, please press and hold the main button for over 5 seconds. Meantime, all the current settings will be saved.
Turning on /off the Meter
- How to turn on the Power
- Press the main button
- Insert one piece of test strip
- Manual Power off
If you want to turn off the meter, please keep pressing the main button for 2 seconds. - Auto Power off
The meter will power off automatically if you don’t operate it over 2 minutes.
Performing a Blood Test

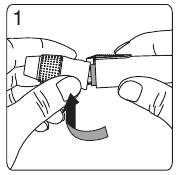
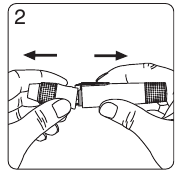
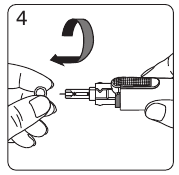
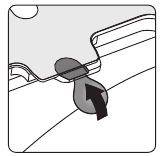
- Hold the adjustable cap in one hand and hold the hub in the other hand. Bend the cap towards the down side. When a gap appears between the cap and hub, pull them off in opposite directions.
- Pull off the depth adjustable cap.
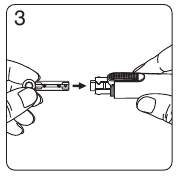
- Insert a new disposable lancet firmly into lancet carrier.
- Twist off and set aside the protective cover of the disposable lancet.
- Replace the depth adjustable cap.
- Choose a depth of penetration by rotating the top portion of the depth adjustable cap until the setting depth matches the window. Settings are based on skin type «» for soft or thin skin; «» for average skin; «» for thick or calloused skin.
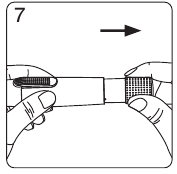
- Hold the hub in one hand and pull on the plunger in the other hand. The device will be cocked. Release the plunger, it will automatically move back to its original position near the hub.
- Wash your hands with warm soapy water and dry thoroughly.
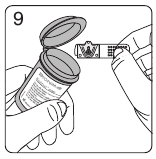
- Take one strip from the vial. Re-cap the vial cap immediately.
- Insert the strip into the strip port on meter with the indication symbol facing up.
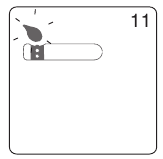
- While the blood drop symbol flashing, you are ready to apply the blood sample.
- Place the lancing device against the pad of your fingertip and press the release button. The best puncture sites are on the middle or ring fingers. Press the release button.
- Touch and hold the drop to the edge of sample entry until you hear a » beep » and the view window is totally filled with blood. If the view window is not totally filled with blood or the test does not start. Please discard the test strip and repeat the test with a new test strip.
- You will see the countdown mode on the screen. After 8 seconds, the test result appears.
- Pull off the depth adjustable cap. Without touching the used disposable lancet, stick the lancet tip into the protective cover.
- Hold the release button in one hand and pull on the plunger in the other hand will safely eject the used disposable lancet.
- Discard the used disposable lancet into an appropriate puncture-proof or biohazard container.
- Replace the depth adjustable cap after finishing the test.


PRECAUTION
Do not touch your blood drop to the sample entry on the strip until you see the « » appear. The meter is performing an internal test and will display «» and «
 » if you apply blood too soon. Then you will waste a test strip.
View window appearance
Make sure your blood sample covers the whole area of the View Window to get an accurate test result. Insufficient blood sample will cause inaccurate test result. Repeat the test with a new test strip.
PRECAUTION

- Check the expiration date printed on the package every time you use a test strip. Do not use expired test strips.
- Use each test strip immediately after removing from the vial.
- Do not reuse test strips.
- Do the test at least 30 minutes after moving into a different location with significant change in temperature.
- Place the blood drop only on the sample entry of the test strip.
- Please don’t drip or inject the blood sample directly by syringe to the entry port of test strip. Doing this might contaminate the meter or cause damage and is not recommended.
Blood glucose test results are shown on the meter as mg/dL or mmol/L, depending on which unit of measurement you have chosen. ( This meter * for some countries is fixed at mmol/L or mg/dL and is not able to be changed freely.) Consult your healthcare professional before making any changes to your diabetes medication program. If your blood glucose result is unusually high or low, or if you question your testing results, repeat the test with a new test strip. You can also run a Quality Control Test with to check your meter and test strip. If the test result still remains unusually high or low, contact your healthcare professional immediately. If you are experiencing symptoms that are not consistent with your blood glucose test results and you have made sure to follow all instructions of this manual, contact your healthcare professional immediately.
Recalling Test Result & Average
The GM100 meter is able to store 150 test results with time and date automatically. If your meter has stored 150 results, which is the maximum memory of the meter, the newest test result will replace the oldest one.
To recall your test memory, start with the meter without test strip inserted.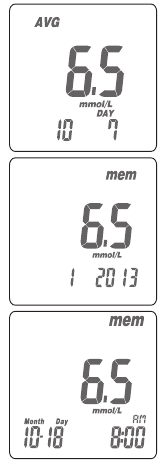
- Press the main button to switch to screen to memory function, you will see «AVG» symbol on the up left corner of the screen. The display sequence will be 1-day, 7-day, 14-day, 30-day, 90- day average, and then memory 1 reading, memory 2 reading,…until memory 150 reading which will show «MEM» on the up right corner of the screen.
- Under average screen, the number on the down right corner of the screen means how many days of readings have been calculated as the average while the number on the down left corner of the screen means how many readings have been counted in. Under memory screen, it will show the sequence number on the down left corner and then display date and time.
- Quick Searching: you could also quick press the main button twice, and then it will automatically display the average and memory by sequence. Anytime you want to stop it, you could just press the main button again. It will stop and display the reading right at the moment you press the main button. You could just apply the way above; especially when you find a particular reading you want to check with.
- Reading right after test: if you just finish the test and press the main button to review. The display sequence will be the latest reading, 1-day, 7-day, 14- day, 30-day, 90-day average, and the memory 2 reading until the oldest one (memory 150 reading).
The GM100 meter displays results between 0.6 and 33.3 mmol/L. If your test result is below 0.6 mmol/L, « » will appear on the screen. Please repeat your test again by a new test strip. If you still get » » result, you should immediately contact your healthcare professional.
If your test result is above the high end of the system’s detection range 33.3 mmol/L, « » will appear on the screen. Please repeat your test again by a new test strip. If you still get «
 » result, you should immediately contact your healthcare professional.
PRECAUTION
Quality Control Test
Please use Control Solution tested with GM100 BGMS under Control Solution Mode. If the test result is within the Control Solution Range printed on the strip vial label, the GM100 BGMS passes Quality Control Test. That means your GM100 BGMS is working correctly.
Entering Control Solution Mode
Insert the strip into the strip port on meter. While the blood drop symbol flashing, press and hold the main button for over 5 seconds. Then you will see « » symbol blinking on the screen indicating that you’ve successfully entered the Control Solution Mode. Control Solution Range
Control Solution Range
Example of Control Solution Range printed on your test strip vial label.
When should perform a Quality Control Test?
Before doing a blood glucose test with your meter for the first time.
When you open and start using a new test strip vial.
When your meter is dropped or splashed with liquids.
Whenever you think your test result does not consistent with the way you feel.
Whenever you want to check if your system is working properly or not. Whenever you want to practice testing and check correct procedure.
The possible reasons your Control Solution results are out of the range:
- Your Control Solution has expired or after 3 months since opened.
- Your test strip has expired.
- You leave the cap off the vial of test strips or Control Solution for a long time.
- You didn’t perform the test proce — Malfunction of the meter.
If Control Solution results are out of the range, your GM100 BGMS may not be working properly. Repeat the Quality Control Test. If your Control Solution results outside the range still exist, do not use the GM100 BGMS to test your blood glucose. And contact Bionime authorized representative or Customer Service.
PRECAUTION
Each time you open a new bottle of Control Solution, write the discard date on the label. Control Solution is good for 3 months after opening the bottle, or until the expiration date printed on the label, whichever comes first.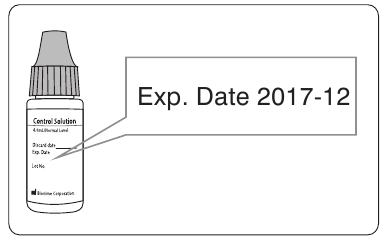
Performing a Quality Control Test
Use with Control Solution


PRECAUTION
Maintenance
Keep your meter and test strip free of dust, water or any other liquid. Store the meter in the carrying case when not in use. If meter is dropped or damaged, perform a Quality Control Test before doing a blood glucose test.
Cleaning Meter
Clean the outside of the meter with a damp cloth and mild soap/detergent. Keep the test strip port from getting wet.
Error Message and Trouble Shooting
Er1 — The inserted test strip has been used or damaged. Please use a new test strip from vial.
Er2 — Meter has malfunctioned. Do the Quality Control Test or reinstall the battery to see if the meter works properly.
Er3 — Signal transmission is disrupted, repeat the test. Above, if error screen still appears contact Bionime authorized representative or Customer Service.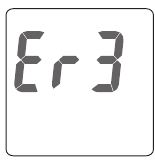
Battery Error

Temperature Error
In order to get accurate test result, perform testing between 10 ~40 ˚C (50 ~ 104 ˚F).
Sampling Error
Before « » appears. Please don’t apply the blood to the entry of the strip because the meter is still doing internal check. If you do so, the meter will show «
 » and ««. Please remove the test strip and insert a new one to do the test again.
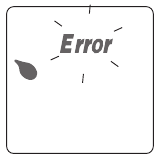
Meter Malfunction
If you find the meter can’t be switched on, please follow the steps below for quick inspection.
- Open the battery cover, take out the battery.
- Wait for 5 minutes and reload the new battery.
The meter should be work normally after finishing above steps. If not, please contact Bionime authorized representative or Customer Service.
Specification
| Measurement Technology | Oxidase Electrochemical Sensor |
| Sample | Capillary whole blood |
| Minimum Sample Volume | 1.4 microliters ( µL ) |
| Measuring Range | 0.6 — 33.3 mmol/L |
| Test Time | 8 seconds |
| Memory Capacity | 150 blood glucose test results with date and time |
| Power Saving | Turn off automatically after 2 minutes no use. Or press the « » button for 2 seconds. » button for 2 seconds. |
| Operating Temperature | 10 ~ 40 ˚C (50 ~ 104 ˚F) |
| Operating Relative Humidity | 10 — 90 % |
| Hematocrit | 35 — 48 % |
| Power Supply | One CR2032 battery |
| Battery Life | About 1,000 tests |
| Meter Dimension | 95.0 mm x 43.8 mm x 13.0 mm |
| Meter Weight | 43.0 g with batteries |
| Monitor Display Area | LCD display 38.0 mm x 29.0 mm |
| Meter Storage Conditions | -10 ~ 60 ˚C (14 ~ 140 ˚F) |
| Test Strip Storage Conditions | 4~30 ˚C(39~86 ˚F), < 90% relative humidity |
Limitations
- GM100 BGMS is not intended for serum or plasma test.
- Inaccurate test results may be obtained at high altitude more than about 10,000 feet ( 3,048 meters ) above sea level.
- Severe dehydration and excessive water loss may cause inaccurately low results.
- GM100 BGMS has not been validated for use on neonates.
- The glucose test may be interfered under abnormal concentration of
Ascorbic Acid ≧ 5 mg/dL ( 0.28 mmol/L )
Dopamine Hcl ≧ 2 mg/dL ( 0.11 mmol/L )
L-Dopa ≧ 3 mg/dL ( 0.15 mmol/L )
Tolazamide ≧ 15 mg/dL ( 0.48 mmol/L )
Cholesterol ≧ 500 mg/dL ( 12.93 mmol/L )
Glutathione reduced ≧ 60 mg/dL ( 1.95 mmol/L )
Hemoglobin ≧ 6,000 mg/dL ( 0.94 mmol/L )
Uric acid ≧ 9 mg/dL ( 0.54 mmol/L )
Customer Service
We sincerely like to provide complete, considerate services to our customers. Please review all the instructions to make sure you are performing the steps correctly. If you have any questions or problems of RightestTM GM100 products, please contact your local Bionime distributor. Or email to rightest@bionime.com.
Warranty
Bionime Corporation warrants that your GM100 Meter will be free from defects in materials and workmanship for five years from the date of purchase.
This warranty does not apply to the performance of a GM100 Meter that has been altered, misused, tampered with or abused in any way.
This warranty applies only to the original purchaser of the meter. Please complete and return the enclosed warranty card to Bionime authorized representative.
Different models have different specifications. Some of the models are not included with the warranty card.
Parts of Critical Component
Blood Glucose Meter, Test Strip, Control Solution and Lancing Device
Manufacturer: Bionime Corp.
Product complied with In Vitro Diagnostic Medical Device Directive 98/79/EC.
(CE 0197)
EU Rep: BIONIME GmbH; Tramstrasse 16, 9442 Berneck, Switzerland E-mail: info@bionime.ch
Disposable Sterile Lancets
Manufacturer: SteriLance Medical (SuZhou) Inc.
No.68 LiTangHe RD, XiangCheng, SuZhou, JiangSu 215133, P.R. China EC- Rep:
EMERGO EUROPE, Molenstraat 15, 2513 BH The Hague, The Netherlands
Product complied with Medical Device Directive 93/42/EEC ( CE0197 ).
 BIONIME CORPORATION
No. 100, Sec. 2, Daqing St., South Dist.,
Taichung City 40242, Taiwan
Tel: +886 4 23692388
Fax: +886 4 22617586
E-mail: info@bionime.com
http://www.bionime.com

Bionime GmbH
Tramstrasse 16
9442 Berneck
Switzerland
E-mail: info@bionime.ch


Here you can download full pdf version of manual, it may contain additional safety instructions, warranty information, FCC rules, etc.
10:50 17 Августа 2023
Здравствуйте. Купила сегодня глюкометр bionaim gs700. Провизор мне сказала для него подходят полоски от gs 100. Я новичок, первый раз столкнулась с этим. 2 часа разбиралась с инструкциями и мои нервы не выдерживают. Когда вставляю полоску в аппарат пишет error. Пришла к выводу что эти полоски от gs 100 неподходят к данному аппарату. Могу ли я вернуть купленные полоски (вскрытые и некоторое количество уже использовано) или обменять на те что действительно должны подходить. Провизор не сказала есть они в наличии или нет а просто дала мне те что по ее мнению подходят. Как я могу поступить в данной ситуации?
-
Ответ 10:06 18 Августа 2023
Просто вернуть указанные товары Вы не можете, но можете пробовать оспорить саму сделку, как сделку совершенную под влиянием заблуждения. Пишите претензию в аптеке, в большинстве аптек ведется аудиозапись и руководство сможет разобраться, ввел ли провизор Вас в заблуждение.
-
Показать все ответы
01:27 27 Декабря 2018
почему пропали из аптек Беларуссии тестполоски к глюкометру Bionime GM-300 и появится ли они когда нибудь.
-
Пока полоски присутствуют более чем в 300 аптеках РБ. Наберите в поиске BIONIME RIGHTEST GS 300.
-
Показать все ответы
05:39 3 Февраля 2018
Ольховик Маргарита Вячеславовна спрашивает:
Здравствуйте.Скажите пожалуйста,есть ли в продаже тест полоски bionime rightest gm 550. Поиск на сайте не дал результата а в аптеке предложили сменить глюкометр.Спасибо.
-
Есть в продаже по республике в 300 аптеках, наберите в поиске BIONIME RIGHTEST GS 550. Также Бионаймы хорошо распространены в магазинах медтехники. Аппараты разных марок сегодня стоят очень дешево, часто по акциям их можно получить и вовсе практически бесплатно, поэтому вполне целесообразны рекомендации иметь дома несколько аппаратов чтобы не испытывать проблем с поиском расходников.
-
Показать все ответы
04:53 22 Январь 2018
Здравствуйте, нигде не могу купить тест-полоски к Bionime GS 300! Кто может мне помочь?
-
Данные полоски плохо дистрибутированы по аптекам. Пробуйте искать в магазинах медтехники. Поставщик информирует об отсутствии каких-либо проблем с поставками.
-
Показать все ответы
08:05 12 Февраля 2017
Где в Могилеве можно купить тест полоски bionime GS300 174 код (25 штук)
-
Наберите в поиске BIONIME GS 300. В результатах по Могилеву 40 аптек. Что такое 174 код нам неизвестно.
-
Показать все ответы
11:42 9 Февраля 2017
Где в Барановичах можно купить тест-полоску в глюкометр bionime GM550
-
Наберите в поиске BIONIME RIGHTEST GS 550. В результатах 9 аптек. Уточняйте наличие звонком.
-
Показать все ответы
08:40 22 Ноября 2016
Почему нет в продаже в гомеле тест полосок к глюкометру бионайм-GS 300 в упаковке по 25 штук?
-
На нашей памяти их нет достаточно давно, уже несколько лет. Точные причины почему не поставляются на данный момент неизвестны. Вопрос уточняется.
-
Показать все ответы
03:45 18 Июля 2016
Необходимы тест-полоски для контроля глюкозы в крови GS 100. Хотелось бы узнать стоимость в аптеках г. Минска
-
Набирайте в поиске GS 100. Уточняйте наличие и цену звонком в аптеку.
-
Показать все ответы
04:40 3 Февраля 2016
подскажите пожалуйста,как вводить в строку поиска название тест полосок для глюкометра Бионорика BG 100 спасибо.
-
Подобные глюкометры нам неизвестны. Возможно Вы имели ввиду BIONIME GS 100. Наберите наименование в поиске.
-
Показать все ответы
01:41 1 Июня 2015
Скажите пожалуйста, когда появятся тест-полоски BIONIME Rightest GM 300 в аптеках?
-
Полоски называются BIONIME RIGHTEST GS 300 и присутствуют в поиске.
-
Показать все ответы
09:35 18 Декабря 2014
Украина. Как можно купить бионайм 550, у Вас есть доставка или другие варинты
-
К сожалению аптеки не занимаются доставкой товаров почтой. Попробуйте поискать по интернет-магазинам.
-
Показать все ответы
05:37 15 Ноября 2014
Где в Гомеле можно купить тестовые полоски для глюкометра Bionime Rightest GM300? Спасибо
-
Наберите в поиске BIONIME RIGHTEST GS 300.
-
Показать все ответы
01:03 30 Августа 2014
где в Витебске можно купить тест-полоски gs300?
-
Наберите в поиске GS 300.
-
Показать все ответы
04:22 17 Марта 2014
где в Витебске можно купить тест полоски к глюкометру бионайм-300
-
Вероятнее всего подойдут полоски GS 300. Наберите в поиске GS 300.
-
Показать все ответы
09:27 9 Январь 2014
Есть ли в продаже в Беларуси нанопластыри nano patch gs
-
Нет, к сожалению не встречаются.
-
Показать все ответы
07:15 26 Декабря 2013
ГДЕ МОЖНО ПРИОБРЕСТИ ТЕСТ-ПОЛОСКИ К ГЛЮКОМЕТРУ бИОНАЙМ 100?
-
Если Вы имеете ввиду глюкометр GM100, то совместимые полоски GS100, наберите в поиске GS 100.
-
Показать все ответы
03:51 12 Февраля 2013
Где в Бобруйске можно купить тест-полоски для контроля глюкозы в крови BIONIME GS300?
-
Наберите в поиске GS 300.
-
Показать все ответы
04:08 20 Сентября 2012
Почему я не могу на сайте найти наличие в аптеках тест-полосок к Bionime GS300.В ответе указывается какая-то ошибка в поиске. Как не задаю вопрос, так никакого результата, пробовала и по-русски писать, хотя раньше получалось.Спасибо.
-
Виктория, нами классифицируются данные только по лекарственным средствам. По прочей продукции в ассортименте аптеки данные представляются в исходном виде написания аптек. Поэтому для поиска не набирайте сложные запросы. Наберите просто GS300 или GS 300, по каждому из запросов Вы получите результаты. Ошибки запросов возможны в редких случаях если Ваш запрос попадает на момент обновления данных, в ближайшее время мы исправим эту ситуацию.
-
Показать все ответы
12:28 20 Январь 2012
где можно приобрести тест полоски для определения сахара в крови BIONIME GS 300
-
Наберите в поиске BIONIME GS 300.
-
Показать все ответы
Blood Glucose Monitoring System
Instructions for Use
Preface
Thank you for selecting the
Blood Glucose Monitoring System.
Please read this manual thoroughly before you start testing. It provides all the
information you need to use the product. You will get a correct test result by the
following instruction of this manual. Please only purchase the test strips in
your country, the use of the test strips of different countries is not
suggested and might get deviated test results under such circumstance.
It is quite important for you to monitor blood glucose regularly. A derived
complication can thus be effectively reduced. Through the assistance of
Blood Glucose Monitoring system, which provides considerate
design and accurate results, your diabetes management can become more
reliable and ease-to-use.
The
Blood Glucose Monitoring System was manufactured by
supported by Bionime Corporation and its authorized representative. If you
have any questions or concerns, please contact your Bionime authorized
representative or call us by phone number, 886 4 24951268 ( GMT+08:00,
08:30~17:30 ). We will provide best assistance and solutions for you.
1.
Intended Use
The
Blood Glucose Monitoring System is intended for in vitro
diagnostic use ( for self-testing ) only ( outside the body ) and coding is not
required. The testing result is calibrated to be plasma equivalent for test with
fresh capillary whole blood samples from the fingertip, palm or forearm
depends on what kind of lancing device you are using. You may consult your
healthcare professional for instructions on how to use the system correctly. Our
customer support staff is available to assist you as well.
2.
Package of Meter Kit
1.
Meter
7. Disposable Sterile Lancets
(10pcs) *
2.
Test Strips (0/10/25 pcs) *
8. Instruction for the lancing device *
3.
Control Solutions *
9. Log Book
4.
Instructions for Use
10. Warranty Card + Emergency
5.
Blood Glucose Test Strip
11. CR2032 Battery (Inserted into the
Package Insert *
meter)
6.
Lancing Device *
12. Carrying Case *
( Different packages have different bundled items. Some of packages might not
include * items.)
2 *
3 *
4
1
Test Strips
5 *
7 *
8 *
6 *
3.
The
Meter
Test Strip Port
Insert test strip here until you
hear a click.
Display Window
Show your test result,
messages and relative
Model Number
information.
Meter Serial
Number
Main Button
Press to turn on/off meter.
Battery Cover
Switch different function
Slide cover to
screen.
change battery.
Press and hold down until
enter to the setting mode.
Plastic Tape
(There will be a power-off
Pull it off to activate meter.
period during this process.)
4.
Precautions
— Before using the
System to test your blood glucose, please read
all the instructions and practice the tests including quality control test.
— Please do the quality control test regularly to make sure the test results are
accurate .
— The
GM100 Blood Glucose Meter can only be used with the
GS100 Blood Glucose Test strips. The use of any other brand
strips should not be used under any circumstances. The use of other brands
of strips may produce inaccurate results.
— The
Blood Glucose Monitoring System is intended for self-testing. It
should not be used to diagnose diabetes mellitus.
—
Blood Glucose Monitoring System has not been validated for use
on neonates. Therefore, it’s not intended for use of neonates.
— This meter can be only tested with capillary whole blood. Please don’t test with
arterial blood.
— Do the test at least 30 minutes after moving into a different location with
significant change in temperature.
— Dispose of used batteries properly.
— Please note the meter kit contains small parts like test strips which could result
in a choking hazard for children.
— Prevent water from entering the meter. Never immerse the meter or hold it
under running water.
— The minimum blood sample size for testing is 1.4µl 
)
1.0
µl
1.4
µl
2.0
µl
3.0
µl
Sample Size Example
We suggest you use a sample between 1.4~2.5µl. A blood sample size above
4.0µl is too large. A blood sample size below 1.4µl may give an inaccurate test
result. In this case, repeat the test with a new test strip.
5.
The
Test Strip ( GS100 Test Strip )
GM100 is designed to use with GS100 strip only. Please note that
misuse of other strips might cause unexpected damage or produce
inaccurate test results.
Sample Entry
Noble Metal Electrodes
Apply a drop of blood or control solution
Electrochemical sensor
here. The test request is only 1.4 of blood.
Hand Bar
Grip here to insert
test strip into meter.
Indication Symbol
View Window
Insert strip with indication symbol
This window is yellow before applying
up and toward meter.
blood sample. It gradually turns red
when filled with blood.
Electrode Contacts
Sensing signal output terminals.
PRECAUTION
— Re-cap the test strip the vial immediately after removing a test strip.
— Do not reuse test strips.
— Do not use expired test strips.
— Record the date of opening a new strip vial for the first time. Discard the
vial of strips after 3 month from opening.
— Store the test strips in a cool and dry location. Do not expose to direct
sunlight or heat.
— For detailed information, please refer to the
GS100 Test Strip
Package Insert.
6.
Battery Installation
Your meter comes with one CR2032, 3volt, battery installed. One
new battery will provide power to perform about 1000 tests under
normal use. Before using it, please pull off the plastic tape and
press the main button to activate the meter. The low battery
symbol «
» will keep appearing on your display if your battery
runs low. Please keep spares on hand and replace the battery
soon when a battery symbol appears.
1. Turn the meter over. Press and push battery
cover to open.
2. Install the battery. Be sure to put battery in
correct direction.
3. Slide the battery cover back until it snaps into place.
4. The meter performs a self-test and all symbols on the display
will blink.
5. Press any button to exit the self-test and enter Setting Mode.
6. Set the time and date when the batteries are replaced. See Setting the Date,
Time and Unit section. Prior test results are still stored in the memory.
PRECAUTION
— Danger of explosion might happen if the battery is incorrectly replaced.
— Please follow the local regulation and discard a used battery properly.
7.
Setting Up Your Meter-Setting the Date, Time, and Unit ……
You can enter Setting Mode by below two ways.
1. Reload battery
After removing the battery, please press the main button for several times
until no signal on screen, then follow the battery installation steps to load
battery. The meter will do self test. Press the main button to close the test
and enter Setting Mode.
2. With Battery inserted
Press the main button first to turn on the meter. Then press and hold the main
button for 5 seconds (the meter will be turned off during this period, please
keep pressing) until you hear a beep, indicating you have successfully
entered Setting Mode. The display screen will show setting data.
NOTE
— When you keep pressing the main button for 2 seconds, the display on
screen will turn off. Please don’t care it. Keep pressing the main button
till entering setting data.
— Quick press the main button allows you to change setting while hold it
4 µl
.0
for 2 seconds will confirm the setting. However, if you press and hold
the main button over 5 seconds it will escape from setting mode and
return to time screen.
1. Year setting
With the year format blinking, press the main button to adjust
it. Then hold the same button for 2 seconds to confirm it.
Meantime, it will shift to next digit for setting. Repeat the above
action until the year setting is completed. Then it will move to
month setting.
2. Month setting
With the month blinking, press the main button until the
current month appears. Then hold the same button for 2
seconds to confirm it and move to day setting.
µl
3. Day setting
With the day blinking, press the main button to adjust it. Then
hold the same button for 2 seconds to confirm it. Meantime, it
will shift to next digit for setting. Repeat the above action until
the day setting is completed. Then it will move to time format
setting.
4. Time format 12/24H selection
With the time format blinking, press the main
button to adjust it. Then hold the same button
for 2 seconds to confirm it and move to hours
setting.
5. Hour setting
With the hour blinking, press the main button until the current
hour appears. Then hold the same button for 2 seconds to
confirm it and move to minute setting.
6. Minute setting
With the minute blinking, press the main button
to adjust it. Then hold the same button for 2
seconds to confirm it. Meantime, it will shift to
next digit for setting. Repeat the above action
until the minute setting is completed. Then it will
move to average-day setting.
7. Average-day setting
With the number » 1, 7, 14, 30 » blinking, press
the main button for the days of the average you
would like to read. Then hold the same button
for 2 seconds to confirm it and move to
measurement unit setting.
8. Setting the unit of measurement
With milligrams per deciliter (mg/dL) or
minimole per liter (mmol/L) blinking, press the
main button to switch. Then hold the same button for 2 seconds to confirm it.
9. Ending setting
After confirm the measurement unit, you’ll hear a sound of » beep «. All the
settings are saved and completed and will return to time screen.
NOTE
— When you do not do any settings of meter for over 2 minutes, the meter
will leave setting mode and power off automatically.
— Any time you would like to escape from the setting mode, please press
and hold the main button for over 5 seconds. Meantime, all the current
settings will be saved.
Turning on /off the Meter
1. Auto Power off
The meter will power off automatically if you don’t operate it over 2 minutes.
2. Manual Power off
If you want to turn off the meter, please keep pressing the main button for 2
seconds.
3. How to turn on the Power
1) Press the main button
2) Insert one piece of test strip
8.
Performing a Blood Test
Depth adjustable cap
Release button
Plunger
Lancet carrier
Hub
1. Pull off the depth adjustable cap.
2. Insert a new disposable lancet firmly into lancet carrier.
3. Twist off and set aside the protective cover of the disposable lancet.
4. Replace the depth adjustable cap.
1
2
3
4
5. Choose a depth of penetration by rotating the
5
top portion of the depth adjustable cap until
the setting depth matches the window.
Settings are based on skin type «
» for soft
or thin skin; «
» for average skin; «
» for
thick or calloused skin.
6. Hold the hub in one hand and pull on the plunger in the other hand. The
device will be cocked. Release the plunger, it will automatically move back to
its original position near the hub.
7
8
7. Wash your hands with warm
soapy water and dry thoroughly.
8. Take one strip from the vial. Re-
cap the vial cap immediately.
9. Insert the strip into the strip port on meter with the indication symbol facing
up.
10. While the blood drop symbol flashing, you are ready to apply the blood
sample.
10
11. Place the lancing device against the pad of
your fingertip and press the release button.
The best puncture sites are on the middle or
ring fingers. Press the release button.
12
12. Touch and hold the drop to the edge of
sample entry until you hear a » beep » and the
view window is totally filled with blood. If the
view window is not totally filled with blood or
the test does not start. Please discard the test
strip and repeat the test with a new test strip.
13. You will see the countdown mode on the
screen. After 8 seconds, the test result
appears.
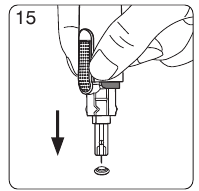
14. Pull off the depth adjustable cap. Without touching the used disposable
lancet, stick the lancet tip into the protective cover.
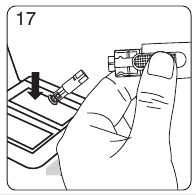
15. Hold the release button in one hand and pull on the plunger in the other
hand will safely eject the used disposable lancet.
16. Discard the used disposable lancet into an appropriate puncture-proof or
biohazard container.
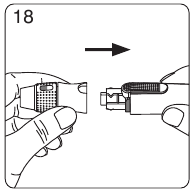
17. Replace the depth adjustable cap after finishing the test.
14
15
16
17
2
1
PRECAUTION
Do not touch your blood drop to the sample entry on the strip until you
see the «
» appear. The meter is performing an internal test and will
display «
» and «
» if you apply blood too soon. Then you will waste
a test strip.
6
9
11
13
Свернуть
- Модели и стоимость
- Комплектация
- Особенности и плюсы
- Использование
- Тест-полоски
- Видео
В настоящее время на рынке представлено множество моделей качественных современных глюкометров, которые необходимы диабетикам для контроля за своим состоянием. Они отличаются по дополнительному функционалу, точности, производителю и цене. Нередко выбрать подходящий по всем параметрам бывает нелегко. Некоторые пациентов отдают предпочтение устройству Биониме той или иной модели.
Модели и стоимость

Чаще всего в продаже можно встретить модели GM300 и GM500. Несколькими годами ранее активно реализовались и bionime gm 110 и 100. Однако, в настоящий момент они не пользуются большим спросом, так как модели GM 300 и 500 обладают большим функционалом и точностью, при одинаковой цене. Сравнительные характеристики устройств приведены в таблице ниже.
Сравнительные характеристики устройство GM300 и GM500
| Параметр | GM300 | GM500 |
| Цена, рублей | 1450 | 1400 |
| Память, количество результатов | 300 | 150 |
| Отключение | Автоматическое через 3 минуты | Автоматическое через 2 минуты |
| Питание | ААА 2 шт. | CR2032 1 шт. |
| Габариты, см | 8,5х5,8х2,2 | 9,5х4,4х1,3 |
| Вес, грамм | 85 | 43 |
Глюкометр bionime gm 100 инструкция и техническая документация характеризуют почти также. И GM100, и GM110 обладают аналогичными характеристиками.
к содержанию ↑
Комплектация
Глюкометр бионайм 300и другие его аналоги, произведенные тем же брендом, имеют достаточно широкую комплектацию. Она, тем не менее, может варьироваться в зависимости от точки и региона продажи, а также модели устройства (не у всех моделей одинаковый комплект поставки). Кроме того, полнота комплектации непосредственно влияет на цену. Зачастую в комплект входят следующие составляющие:
- Собственно измеритель с элементом питания (батарейкой типа «таблетка» или «пальчиковая»;
- Тест полоски для устройства (различаются в зависимости от модели аппарата) 10 штук;
- Стерильные ланцеты для прокалывания кожи при заборе пробы крови -10 штук;
- Скарификатор – устройство со специальным механизмом, позволяющее осуществить быстрый и безболезненный прокол кожи;
- Кодирующий порт, благодаря которому нет необходимости дополнительно кодировать устройство каждый раз при открытии новой упаковки тест-полосок;
- Контрольный ключ;
- Дневник учета показаний измерителя для предоставления врачу отчета о состоянии здоровья;
- Инструкция по применению, подходящая к конкретному устройству;
- Гарантийный талон для получения сервисного обслуживания в случае поломки;
- Чехол для хранения измерителя и сопутствующих расходных материалов.
Данная комплектация поставляется с устройством глюкометр bionime rightest gm300 и у других моделей может немного отличаться.
к содержанию ↑
Особенности и плюсы
Устройство bionime gm100 или другое из этой линейки обладает рядом характерных особенностей и преимуществ, которые заставляют пациентов отдавать предпочтение измерителям от данного производителя. Особенности bionime gm100 таковы:
- Время проведения исследования – 8 секунд;
- Объем пробы для проведения анализа 1,4 мкл;
- Определение показаний в диапазоне от 0,6 до 33 ммоль на литр;
- Глюкометр bionime gm 100 инструкция позволяет хранить при температуре от -10 до +60 градусов;
- Может хранить в памяти до 300 последних измерений, а также делать расчет усредненных значений за день неделю, две недели и месяц;
- Bionime gm100 позволяет провести до 1000 измерений, используя только одну батарейку;
- Устройство включается и отключается автоматически (включение при установки ленты, отключение – через три минуты после установки ленты происходит автоматически);
- Нет необходимости перекодировать устройство перед каждым следующим открытием упаковки тестовых лент.
Кроме технических характеристик, многие пользователи также отмечают низкий вес устройства и небольшие габариты, благодаря которым его удобно брать с собой в дорогу или на работу.
–СНОСКА—
Прочный пластиковый корпус делает измеритель нехрупким – он не разобьется при падении, не треснет при несильном нажатии и т. д.
к содержанию ↑
Использование
Устройство bionime gm 110 должно быть выключено. Откройте упаковку тест-полосок, достаньте из нее контрольный порт и установите его в разъем в верхней части устройства до упора. Теперь нужно вымыть руки и вставить ланцет в скарификатор для глюкометра bionime. Глубину прокола для взрослого выставите около 2 – 3. Далее действуйте по алгоритму:
- Вставьте в глюкометр bionime rightest gm300 ленту. Прозвучит звуковой сигнал и устройство включится автоматически;
- Дождитесь, пока глюкометр bionime rightest gm300 не отразит на дисплее значок-каплю;
- Возьмите скарификатор и проколите кожу. Выдавите и сотрите первую каплю крови;
- Дождитесь появления второй капли и нанесите ее на тест-ленту, вставленную в глюкометр бионайм 300;
- Подождите 8 секунд до тех пор, пока bionime gm100 или друга модель завершит анализ. После этого результат отобразиться на экране.
Если использовать глюкометр bionime gm 100 инструкция по его применению рекомендует именно такую последовательность использования. Но она справедлива и для других аппаратов данного бренда.
к содержанию ↑
Тест-полоски
К глюкометру необходимо приобретать два типа расходных материалов – тест-полоски и ланцеты. Эти материалы необходимо периодически заменять. Тест-ленты являются одноразовыми. Ланцеты, применяемые для прокалывания кожи, одноразовыми не являются, но также требуют периодической замены при затуплении. Ланцеты к gs300 или другим моделям относительно универсальны и найти подходящие к конкретному скарификатору не сложно.
Сложнее дело обстоит с полосками. Это специфичный материал, который должен приобретаться к определенной модели глюкометра (настройки аппарата к полоскам настолько тонкие, что для этого необходимо перекодировать некоторые устройства при открытии новой упаковки полосок)потому использовать неподходящие нельзя – это чревато получением искаженных показаний.
Есть несколько правил эксплуатации тест-полосок для bionime gm 110 или иной модели:
- Закрывать упаковку сразу после извлечения ленты;
- Хранить при нормальной или низкой влажности воздуха;
- Не использовать по истечению срока годности.
Нарушения этих правил при использовании тест-лент gs 300 или других приведет к получению некорректных показаний.
к содержанию ↑