In a previous blog post I showed you how to install a global error handler in JavaScript with window.onerror or window.addEventListener('error', event => { ... }) and then send the error report to a server with the Beacon API.
In this blog post, we take a closer look at how to install a global error handler in an Angular application.
The previously mentioned events also work in an Angular application, but Angular provides a more idiomatic way to install an error handler. All you have to do is creating a class that implements the ErrorHandler interface from the @angular/core package. The class has to implement the handleError() method.
export class AppGlobalErrorhandler implements ErrorHandler {
  handleError(error) {
    console.error(error);
  }
}
Then in app.modules.ts, you need to tell Angular that it should use our error handler. You do that by adding the following entry to the providers configuration.
  providers: [
    // ...
    {provide: ErrorHandler, useClass: AppGlobalErrorhandler}
  ],
This is already everything you have to do. From now on, all uncaught exceptions thrown anywhere in your application, are handled by the AppGlobalErrorhandler class.
Sending report to a server
In the next step, we want to send the error reports to a back end. Printing application errors into the browser console is useful during development but does not help us when the application runs in production.
For this example, I wrote a simple Spring Boot application with a RestController and one POST mapping that handles the error report sent from the client.
  @PostMapping("/clientError")
  public void clientError(@RequestBody List<ClientError> clientErrors) {
    for (ClientError cl : clientErrors) {
      System.out.println(cl);
    }
  }
ErrorController.java
In this example, the server prints out the error into the console. In a real application you could send the report with an email to the developers, insert the report into a database or, if your issue reporting system provides an API, directly create an issue.
Next we change the handleError() method. Here the application collects some information from the browser. This gives us a bit more information in what environment the error occurred.
The error object that Angular passes to our error handler contains a property stack that contains the stack trace as a string. Depending on the way how you want to handle the error on the back end, this might not be that useful. In this example, I use the stacktrace.js library to split the stack trace into a string array. Each entry in the array represents one line of the stack trace.
After collecting and preparing the data, the method sends it with a POST request to the server
  async handleError(error) {
    const userAgent = {
      language: navigator.language,
      platform: navigator.platform,
      userAgent: navigator.userAgent,
      connectionDownlink: navigator['connection'].downlink,
      connectionEffectiveType: navigator['connection'].effectiveType
    };
    const stackTrace = await StackTrace.fromError(error, {offline: true});
    const body = JSON.stringify({ts: Date.now(), userAgent, stackTrace});

    fetch(`${environment.serverURL}/clientError`, {
      method: 'POST',
      body: `[${body}]`,
      headers: {
        'content-type': 'application/json'
      }
    });
  }
One thing you need to be aware of is that this can easily overwhelm your back end if you have thousands of users. Imagine your client application periodically connects to a remote API to send and fetch data. If this server suddenly crashes, it would generate a lot of errors and a lot of POST request to your error reporting back end. To prevent such errors, you could analyze the stack trace in your error handler and don’t report specific errors to the back end.
Or handle these errors directly in the application code, so that these errors are not uncaught and never sent to the global error handler.
Or, if you still want to send the report to the server, add a random wait time before the error handler sends the report. This way not every client sends the report at the same time.
delayRandom(maxSeconds) {
  return new Promise(resolve => {
    setTimeout(resolve, Math.random() * maxSeconds * 1000);
  });
}

  ...
  await this.delayRandom(30);
  fetch(`${environment.serverURL}/clientError`, {
  ....
On the back end, you also need to handle this situation when clients send the same error multiple times. If you send reports via email, this could easily clog the developer’s inbox. One approach is to create a key from the error report. For example, you could create a hash from the first three lines of the stack trace and then use this hash as key in a database or issue management system.
Lie-Fi and offline
If you are creating a web application that also runs when the device is offline or has a spotty internet connection, you might also be interested in error reports that occur during these offline periods. In this scenario, we can’t directly send the report with fetch and hope the device is online.
Probably the best way to handle this is with the Background Sync API. Unfortunately, Background Sync is not yet supported by all browsers, but if you are interested in this API take a look at my blog post.
In this example, we’re going to utilize a different approach. The error handler first tries to send the report with fetch. If that fails, it stores the report in IndexedDB and starts a job that tries to send the data periodically.
This is an approach that I learned from this video from Google:
https://www.youtube.com/watch?v=1nzCeB9sjWk
In this example, we’re not going to use the native IndexedDB API. Instead, we’re using Dexie.js. First, we create a class that extends from Dexie and defines the structure of the database. The following code creates a database with the name ClientErrors containing one object store errors. Each object in this object store contains the fields id and error. The error field stores the error report as JSON that we want to send to our error reporting back end.
import Dexie from 'dexie';


export class ClientErrorDb extends Dexie {
  errors!: Dexie.Table<ClientError, string>;

  constructor() {
    super('ClientErrors');
    this.version(1).stores({
      errors: '++id'
    });
  }
}

export interface ClientError {
  id?: number;
  error: string;
}
clientErrorDb.ts
See also my blog post about Dexie.js and Typescript for more information.
Next, we create a service that instantiates the ClientErrorDb class and provides some methods we’re going to call from the global error handler.
import {ClientError, ClientErrorDb} from './clientErrorDb';
import {Injectable} from '@angular/core';

@Injectable({
  providedIn: 'root'
})
export class ClientErrorService {

  private db: ClientErrorDb;

  constructor() {
    this.db = new ClientErrorDb();
  }

  async store(body: string): Promise<void> {
    await this.db.errors.add({error: body});
  }

  async delete(ids: string[]): Promise<void> {
    await this.db.errors.bulkDelete(ids);
  }

  async getAll(): Promise<ClientError[]> {
    return this.db.errors.toArray();
  }

}
clientError.service.ts
Like in any other class, we can inject other services into the global error handler. Here we inject the ClientErrorService service into our handler.
@Injectable()
export class AppGlobalErrorhandler implements ErrorHandler {

  private isRetryRunning = false;

  constructor(private readonly clientErrorService: ClientErrorService) {
    this.sendStoredErrors();
    window.addEventListener('online', () => this.sendStoredErrors());
  }
app.global.errorhandler.ts
When the user opens the application, the constructor first calls the sendStoredErrors() method. This method looks for stored error reports in the database and tries to send them to the server.
Next, the constructor installs an event listener for the online event. Each time the browser emits this event, the application calls the sendStoredErrors() method. See this MDN page for more information about the online event
The handleError() method collects a few browser information, like in the example before. It then tries to post the data to the server. When this call fails, it stores the report into the database and schedules a call to sendStoredErrors() method in 60 seconds with setTimeout().
  async handleError(error: any): Promise<void> {
    console.error(error);

    // @ts-ignore
    const connection = navigator.connection;

    const userAgent = {
      language: navigator.language,
      platform: navigator.platform,
      userAgent: navigator.userAgent,
      connectionType: connection?.type,
    };
    const stackTrace = await StackTrace.fromError(error, {offline: true});
    const body = JSON.stringify({ts: Date.now(), userAgent, stackTrace});

    const wasOK = await this.sendError(body);
    if (!wasOK) {
      await this.clientErrorService.store(body);
      setTimeout(() => this.sendStoredErrors(), 60_000);
    }

  }
app.global.errorhandler.ts
The sendStoredErrors() first fetches all stored error reports from IndexedDB. If there is one or more, it tries to send them with the sendError() method. If this call succeeds, the method deletes all sent reports in IndexedDB, if the call fails, it schedules a new job run with setTimeout(). The method increases the wait time exponentially up to a maximum of 32 minutes.
  private async sendStoredErrors(): Promise<void> {
    if (this.isRetryRunning) {
      return;
    }

    let attempts = 1;
    const retry = async () => {
      const errors = await this.clientErrorService.getAll();
      if (errors.length === 0) {
        return;
      }

      const wasOK = await this.sendError(errors.map(error => error.error));
      if (wasOK) {
        const deleteIds: string[] = [];
        for (const error of errors) {
          if (error.id) {
            deleteIds.push(String(error.id));
          }
        }
        await this.clientErrorService.delete(deleteIds);
        this.isRetryRunning = false;
        return;
      }

      this.isRetryRunning = true;
      if (attempts < 32) {
        attempts = attempts * 2;
      }
      setTimeout(retry, attempts * 60_000);
    };

    await retry();
  }
app.global.errorhandler.ts
And finally, the code for the sendError() method. This method handles either single or multiple reports. Before sending the reports to the server, it wraps them into a JSON array. On the server, we map the request body to a java.util.List and don’t have to care if the client sends only one or multiple error reports.
The method then tries to send a POST request and returns either true when the call succeeds or false if it fails.
  private async sendError(errors: string[] | string): Promise<boolean> {
    if (navigator.onLine) {
      try {

        let body;
        if (Array.isArray(errors)) {
          body = `[${errors.join(',')}]`;
        } else {
          body = `[${errors}]`;
        }

        const response = await fetch(`${environment.serverURL}/clientError`, {
          method: 'POST',
          body,
          headers: {
            'content-type': 'application/json'
          }
        });
        if (response.ok) {
          return true;
        }
      } catch (error) {
        console.log(error);
      }
    }

    return false;
  }
app.global.errorhandler.ts
In this blog post, we created a global error handler in an Angular application that sends error reports to a back end. If the device does not have a connection to our error reporting back end, it stores the reports in IndexedDB and tries to post them periodically.
You find the complete source for this application on GitHub:
https://github.com/ralscha/blog/tree/master/ngerrorhandler
In this tutorial, we look at how error handling in Angular. We also learn how to create a Global Error handler or custom error handler in Angular. We learn why we need to handle errors and some of the best practices. In the end we will learn few tips like how to Inject services to global error handler, How to show user notification page etc.
Table of Contents
- Why Handle Errors
- HTTP Errors
- Client Side Errors
- Default Error Handling in Angular
- Error Handling Example
- Global Error Handler
- How to Create Global Error Handler ?
- Error Handler Example
- Best Practices in Handling Errors
- Tips for Error Handler
- Injecting other services to the global error handler
- User Notification Page
- Handling HTTP Errors
- References
Why Handle Errors
Handling error is an important part of the application design. The JavaScript can throws errors each time something goes wrong. For Example, the Javascipt throws errors in the following conditions
- When we reference a non-existent variable.
- The value provided is not in the range of allowed values.
- When Interpreting syntactically invalid code
- When a value is not of the expected type
- Internal errors in the JavaScript engine
The apart from the above, the unexpected errors can happen any time. like broken connection, null pointer exception, no internet, HTTP errors like unauthorized user, session expired etc.
The Angular handles the errors, but it wont do anything except writing it the console. And that is not useful either to the user or to the developer.
There are two types of error handling mechanism in Angular. One catches all the client side errors and the other one catches the HTTP Errors.
HTTP Errors
The HTTP Errors are thrown, when you send a HTTP Request using the HttpClient Module. The errors again falls into two categories. One is generated by the server like unauthorized user, session expired, Server down etc. The Other one is generated at the client side, while trying to generate the HTTP Request. These errors could be network error, error while generating the request etc
The HTTP errors are handled by the HTTP Interceptors
Client Side Errors
All other errors thrown by the code falls into this category. These are are handled by the ErrorHandler class, which is the default error handler for Angular.
The default Error handling in Angular is handled by Errorhandler class, which is part of the @angular/core module. This is global error handler class which catches all exception occurring in the App. This class has a method handleError(error). Whenever the app throws an unhandled exception anywhere in the application angular intercepts that exception. It then invokes the method handleError(error) which writes the error messages to browser console.
Error Handling Example
Create a new Angular application. Add the following code snippet to app.component.html & app.component.ts
app.component.html
|
<h1> {{title}} </h1> <button (click)=«throwError1()»> Throw Error—1 </button> <button (click)=«throwError2()»> Throw Error—2 </button> <router—outlet></router—outlet> |
app.component.ts
|
1 2 3 4 5 6 7 8 9 10 11 12 13 14 15 16 17 18 19 20 21 22 23 24 25 26 |
import { Component } from ‘@angular/core’; @Component({ selector: ‘app-root’, templateUrl: ‘./app.component.html’, styleUrls: [‘./app.component.css’] }) export class AppComponent { title: string = ‘Global Error Handler in Angular’ ; throwError1() { var a= b; } throwError2() { try { var a= b; } catch (error) { //here you can handle the error // } } } |
The code mimics an error by using the statementvar a= b;, where b is not defined. The first method throwError1() does not handle error, while throwError2() method uses try..catch block to handle the error.
Run the app and keep the chrome developer tool open. Click on throw error 1 button. The default Error Handler of angular intercepts the error and writes to the console as shown in image below
But, clicking on the throw error 2 button, does not trigger the Error Handler as it is handled by using the try..catch block.
If you are not handling the error in the try..catch block, then you must use throw error so that the default error handler can catch it.
|
throwError2() { try { var a= b; } catch (error) { throw error; //rethrow the error } } |
Global Error Handler
The built in ErrorHandler is simple solution and provides a good option while developing the app. But it does not help to find out the error thrown in the the production environment. We have no way of knowing about the errors which happen at the users end.
Hence, it advisable to create our own global error handler class, because
- We can show a simple error page to the user, with a option to retry the operation
- We can log the errors back to the back end server, where we can read all the errors. Then we can make necessary changes to the app to remove the error
How to Create Global Error Handler ?
To create a custom error handler service, we need to use the following steps.
First.create a GlobalErrorHandlerService which implements the ErrorHandler
Then, override the handleError(error) method and handle the error.
|
export class GlobalErrorHandlerService implements ErrorHandler { constructor() { } handleError(error) { console.error(‘An error occurred:’, error.message); } } |
Next, register the GlobalErrorHandlerService in the Application root module using the token ErrorHandler.
|
@NgModule({ —— providers: [ { provide: ErrorHandler, useClass: GlobalErrorHandlerService }, ] }) export class AppModule { } |
Error Handler Example
Create global-error-handler.service.ts and add the following code.
|
1 2 3 4 5 6 7 8 9 10 11 12 13 14 15 16 17 |
import { ErrorHandler, Injectable} from ‘@angular/core’; @Injectable() export class GlobalErrorHandlerService implements ErrorHandler { constructor() { } handleError(error) { console.error(‘An error occurred:’, error.message); console.error(error); alert(error); } } |
Next, open the pp.module.ts and register the GlobalErrorHandlerService using the injection token ErrorHandler.
|
1 2 3 4 5 6 7 8 9 10 11 12 13 14 15 16 17 18 19 20 21 22 |
import { BrowserModule } from ‘@angular/platform-browser’; import { NgModule,ErrorHandler } from ‘@angular/core’; import { AppComponent } from ‘./app.component’; import {GlobalErrorHandlerService} from ‘./global-error-handler.service’; @NgModule({ declarations: [ AppComponent ], imports: [ BrowserModule, ], providers: [ { provide: ErrorHandler, useClass: GlobalErrorHandlerService }, ], bootstrap: [AppComponent] }) export class AppModule { } |
Run the app and you will see that the our custom error handler gets invoked, when you click on the button throw error.
Best Practices in Handling Errors
Now, we learned how to handle errors, here are a few things you should keep in mind while designing an Error Handler service.
- Use a try.. catch block to handle the known errors. Handle it accordingly. If you are not able to handle it, then re-throw it.
- Use a global error handler to trap all unhandled errors and show a notification to the user.
- The ErrorHandler does not trap HTTP Errors, You need to Use HTTP Interceptors to handle HTTP Errors. You can refer to this article how to handle HTTP Errors in Angular.
- Check for type of error in the error handler and act accordingly.
- For Example, if is an error from the back end (HTTP Error) you can use the HTTP Status Code to take necessary action.
- 401 Unauthorized error you can redirect the user to the login page.
- 500 Internal Server Error you can ask the user to retry after some time while sending a notification to the server administrator e
- For all other unhandled errors, log the errors back to the back end server ( or to any third party error providers). You can then look at those logs and make necessary changes to the app.
Tips for Error Handler
Injecting other services to the global error handler
The Angular creates the error handler service before the providers. Otherwise, it won’t be able catch errors that occur very early in the application. It also means that the angular providers won’t be available to the ErrorHandler.
What if we wanted to use another service in the error handler. Then, we need to use the Injector instance to directly to inject the dependency and not depend on the Dependency injection framework
To do that first we need to import the injector
Then we need to inject the injector to the GlobalErrorHandlerService.
Finally, use the injector to get the instance of any required service.
The following example service uses the injector to get the Router Service.
|
1 2 3 4 5 6 7 8 9 10 11 12 13 14 15 16 17 18 19 20 |
import { ErrorHandler, Injectable, Injector} from ‘@angular/core’; import { Router } from ‘@angular/router’; @Injectable() export class GlobalErrorHandlerService implements ErrorHandler { constructor(private injector: Injector) { } handleError(error) { let router = this.injector.get(Router); console.log(‘URL: ‘ + router.url); console.error(‘An error occurred:’, error.message); alert(error); } } |
User Notification Page
It is a good design practice to notify the user regarding the error by using the error page.
error.component .ts
|
import { Component } from ‘@angular/core’; @Component({ template: ` <h2>An unknown error occurred.</h2> ` }) export class ErrorComponent { } |
Do not forget to add it in the routing Module.
app-routing.module.ts
|
1 2 3 4 5 6 7 8 9 10 11 12 13 14 15 16 17 |
import { NgModule } from ‘@angular/core’; import { Routes, RouterModule } from ‘@angular/router’; import { ErrorComponent } from ‘./error.component ‘; const routes: Routes = [ {path: ‘error’, component: ErrorComponent } ] @NgModule({ imports: [RouterModule.forRoot(routes)], exports: [RouterModule], providers: [] }) export class AppRoutingModule { } |
And in the GlobalErrorHandlerService, inject router and use router.navigate(['/error']) to go to the custom error page
|
1 2 3 4 5 6 7 8 9 10 11 12 13 14 15 16 17 18 19 20 |
import { ErrorHandler, Injectable, Injector} from ‘@angular/core’; import { Router } from ‘@angular/router’; @Injectable() export class GlobalErrorHandlerService implements ErrorHandler { constructor(private injector: Injector) { } handleError(error) { let router = this.injector.get(Router); console.log(‘URL: ‘ + router.url); console.error(error); router.navigate([‘/error’]); } } |
Handling HTTP Errors
You can refer to the tutorial HTTP Error Handling in Angular
References
Error Handler API

Approximately a year ago, I have implemented the first e2e tests on a project. It was a rather big application using JAVA SpringBoot on the back-end and Angular on the front-end. We used Protractor as a testing tool, which uses Selenium. In the front-end code there was a service, which had an error handler method. When that method was called, a modal dialog popped up and the user could see the details of the errors and the stack-trace.
The problem was that while it has tracked every error that happened on the back-end, the front-end failed silently. TypeErrors, ReferenceErrors and other uncaught exceptions were logged only to the console. When something went wrong during e2e test runs the screenshot, which was taken when the test step has failed, has shown absolutely nothing. Have fun debugging that!
Luckily Angular has a built-in way of handling errors and it is extremely easy to use. We just have to create our own service, which implements Angular’s ErrorHandler interface:
import { ErrorHandler, Injectable } from '@angular/core';

@Injectable({
    providedIn: 'root'
})
export class ErrorHandlerService implements ErrorHandler{
    constructor() {}

    handleError(error: any) {
        // Implement your own way of handling errors
    }
}
While we could easily provide our service in our AppModule, it might be a good idea to provide this service in a separate module. This way we could create our own library and use it in our future projects as well:
// ERROR HANDLER MODULE
import {ErrorHandler, ModuleWithProviders, NgModule} from '@angular/core';
import {ErrorHandlerComponent} from './components/error-handler.component';
import {FullscreenOverlayContainer, OverlayContainer, OverlayModule} from '@angular/cdk/overlay';
import {ErrorHandlerService} from './error-handler.service';
import {A11yModule} from '@angular/cdk/a11y';

@NgModule({
  declarations: [ErrorHandlerComponent],
  imports: [CommonModule, OverlayModule, A11yModule],
  entryComponents: [ErrorHandlerComponent]
})
export class ErrorHandlerModule {
  public static forRoot(): ModuleWithProviders {
    return {
      ngModule: ErrorHandlerModule,
      providers: [
        {provide: ErrorHandler, useClass: ErrorHandlerService},
        {provide: OverlayContainer, useClass: FullscreenOverlayContainer},
      ]
    };
  }
}
We used the Angular CLI for generating the ErrorHandlerModule, so we already have a component generated, which can be our modal dialog’s content. In order for us to be able to put it inside an Angular CDK overlay, it needs to be an entryComponent. That is why we have put it into the ErrorHandlerModule‘s entryComponents array.
We also added some imports. OverlayModule and A11yModule comes from the CDK module. They are needed for creating our overlay and to trap focus when our error dialog is opened. As you can see, we provide OverlayContainer using the FullscreenOverlayContainer class because if an error occurs, we want to restrict our users’ interactions to our error modal. If we don’t have a fullscreen backdrop, the users might be able to interact with the application and cause further errors. Let’s add our newly created module to our AppModule:
// APP MODULE
import {BrowserModule} from '@angular/platform-browser';
import {NgModule} from '@angular/core';

import {AppRoutingModule} from './app-routing.module';
import {AppComponent} from './app.component';
import {MainComponent} from './main/main.component';
import {ErrorHandlerModule} from '@btapai/ng-error-handler';
import {HttpClientModule} from '@angular/common/http';

@NgModule({
  declarations: [ AppComponent, MainComponent ],
  imports: [
    BrowserModule,
    HttpClientModule,
    ErrorHandlerModule.forRoot(),
    AppRoutingModule,
  ],
  bootstrap: [AppComponent]
})
export class AppModule {
}
Now that we have our `ErrorHandlerService` in place, we can start implementing the logic. We are going to create a modal dialog, which displays the error in a clean, readable way. This dialog will have an overlay/backdrop and it will be dynamically placed into the DOM with the help of the Angular CDK. Let’s install it:
npm install @angular/cdk --save
According to the documentation, the Overlay component needs some pre-built css files. Now if we would use Angular Material in our project it wouldn’t be necessary, but that is not always the case. Let’s import the overlay css in our styles.css file. Note, that if you already use Angular Material in your app, you don’t need to import this css.
@import '~@angular/cdk/overlay-prebuilt.css';
Let’s use our handleError method to create our modal dialog. It is important to know, that the ErrorHandler service is part of the application initialisation phase of Angular. In order to avoid a rather nasty cyclic dependency error, we use the injector as its only constructor parameter. We use Angular’s dependency injection system when the actual method is called. Let’s import the overlay from the CDK and attach our ErrorHandlerComponent into the DOM:
// ... imports

@Injectable({
   providedIn: 'root'
})
export class ErrorHandlerService implements ErrorHandler {
   constructor(private injector: Injector) {}

   handleError(error: any) {
       const overlay: Overlay = this.injector.get(Overlay);
       const overlayRef: OverlayRef = overlay.create();
       const ErrorHandlerPortal: ComponentPortal<ErrorHandlerComponent> = new ComponentPortal(ErrorHandlerComponent);
       const compRef: ComponentRef<ErrorHandlerComponent> = overlayRef.attach(ErrorHandlerPortal);
   }
}
Let’s turn our attention towards our error handler modal. A pretty simple working solution would be displaying the error message and the stacktrace. Let’s also add a ‘dismiss’ button to the bottom.
// imports
export const ERROR_INJECTOR_TOKEN: InjectionToken<any> = new InjectionToken('ErrorInjectorToken');

@Component({
  selector: 'btp-error-handler',
  // TODO: template will be implemented later
  template: `${error.message}<br><button (click)="dismiss()">DISMISS</button>`
  styleUrls: ['./error-handler.component.css'],
})
export class ErrorHandlerComponent {
  private isVisible = new Subject();
  dismiss$: Observable<{}> = this.isVisible.asObservable();

  constructor(@Inject(ERROR_INJECTOR_TOKEN) public error) {
  }

  dismiss() {
    this.isVisible.next();
    this.isVisible.complete();
  }
}
As you can see, the component itself is pretty simple. We are going to use two rather important directives in the template, to make the dialog accessible. The first one is the cdkTrapFocus which will trap the focus when the dialog is rendered. This means that the user cannot focus elements behind our modal dialog. The second directive is the cdkTrapFocusAutoCapture which will automatically focus the first focusable element inside our focus trap. Also, it will automatically restore the focus to the previously focused element, when our dialog is closed.
In order to be able to display the error’s properties, we need to inject it using the constructor. For that, we need our own injectionToken. We also created a rather simple logic for emitting a dismiss event using a subject and the dismiss$ property. Let’s connect this with our handleError method in our service and do some refactoring.
// imports
export const DEFAULT_OVERLAY_CONFIG: OverlayConfig = {
  hasBackdrop: true,
};

@Injectable({
  providedIn: 'root'
})
export class ErrorHandlerService implements ErrorHandler {

  private overlay: Overlay;

  constructor(private injector: Injector) {
    this.overlay = this.injector.get(Overlay);
  }

  handleError(error: any): void {
    const overlayRef = this.overlay.create(DEFAULT_OVERLAY_CONFIG);
    this.attachPortal(overlayRef, error).subscribe(() => {
      overlayRef.dispose();
    });
  }

  private attachPortal(overlayRef: OverlayRef, error: any): Observable<{}> {
    const ErrorHandlerPortal: ComponentPortal<ErrorHandlerComponent> = new ComponentPortal(
      ErrorHandlerComponent,
      null,
      this.createInjector(error)
    );
    const compRef: ComponentRef<ErrorHandlerComponent> = overlayRef.attach(ErrorHandlerPortal);
    return compRef.instance.dismiss$;
  }

  private createInjector(error: any): PortalInjector {
    const injectorTokens = new WeakMap<any, any>([
      [ERROR_INJECTOR_TOKEN, error]
    ]);

    return new PortalInjector(this.injector, injectorTokens);
  }
}
Let’s focus on providing the error as an injected parameter first. As you can see, the ComponentPortal class expects one must-have parameter, which is the component itself. The second parameter is a ViewContainerRef which would have an effect of the component’s logical place of the component tree. The third parameter is our createInejctor method. As you can see it returns a new PortalInjector instance. Let’s take a quick look at its underlying implementation:
export class PortalInjector implements Injector {
 constructor(
   private _parentInjector: Injector,
   private _customTokens: WeakMap<any, any>) { }

 get(token: any, notFoundValue?: any): any {
   const value = this._customTokens.get(token);

   if (typeof value !== 'undefined') {
     return value;
   }

   return this._parentInjector.get<any>(token, notFoundValue);
 }
}
As you can see, it expects an Injector as a first parameter and a WeakMap for custom tokens. We did exactly that using our ERROR_INJECTOR_TOKEN which is associated with our error itself. The created PortalInjector is used for the proper instantiation of our ErrorHandlerComponent, it will make sure that the error itself will be present in the component.
At last, our attachPortal method returns the recently instantiated component’s dismiss$ property. We subscribe to it, and when it changes we call the .dispose() on our overlayRef. And our error modal dialog is dismissed. Note, that we also call complete on our subject inside the component, therefore, we don’t need to unsubscribe from it.
Now, this is excellent for errors that are thrown when there’s an issue in the clinet side code. But we are creating web applications and we use API endpoints. So what happens when a REST endpint gives back an error?
We can handle every error in its own service, but do we really want to? If everything is alright errors won’t be thrown. If there are specific requirements, for example to handle 418 status code with a flying unicorn you could implement its handler in its service. But when we face rather common errors, like 404 or 503 we might want to display that in this same error dialog.
Let’s just quickly gather what happens when an HttpErrorResponse is thrown. It is going to happen async, so probably we are going to face some change detection issues. This error type has different properties than a simple error, therefore, we might need a sanitiser method. Now let’s get into it by creating a rather simple interface for the SanitisedError:
export interface SanitizedError {
  message: string;
  details: string[];
}
Let’s create a template for our ErrorHandlerComponent:
// Imports

@Component({
  selector: 'btp-error-handler',
  template: `
    <section cdkTrapFocus [cdkTrapFocusAutoCapture]="true" class="btp-error-handler__container">
      <h2>Error</h2>
      <p>{{error.message}}</p>
      <div class="btp-error-handler__scrollable">
        <ng-container *ngFor="let detail of error.details">
          <div>{{detail}}</div>
        </ng-container>
      </div>
      <button class="btp-error-handler__dismiss button red" (click)="dismiss()">DISMISS</button>
    </section>`,
  styleUrls: ['./error-handler.component.css'],
})
export class ErrorHandlerComponent implements OnInit {
 // ...
}
We wrapped the whole modal into a <section> and we added the cdkTrapFocus directive to it. This directive will prevent the user from navigating in the DOM behind our overlay/modal. The [cdkTrapFocusAutoCapture]=»true» makes sure that the dismiss button is focused immediately. When the modal is closed the previously focused element will get back the focus. We simply display the error message and the details using *ngFor. Let’s jump back into our ErrorHandlerService:
// Imports

@Injectable({
  providedIn: 'root'
})
export class ErrorHandlerService implements ErrorHandler {
  // Constructor

  handleError(error: any): void {
    const sanitised = this.sanitiseError(error);
    const ngZone = this.injector.get(NgZone);
    const overlayRef = this.overlay.create(DEFAULT_OVERLAY_CONFIG);

    ngZone.run(() => {
      this.attachPortal(overlayRef, sanitised).subscribe(() => {
        overlayRef.dispose();
      });
    });
  }

  // ...

  private sanitiseError(error: Error | HttpErrorResponse): SanitizedError {
    const sanitisedError: SanitizedError = {
      message: error.message,
      details: []
    };
    if (error instanceof Error) {
      sanitisedError.details.push(error.stack);
    } else if (error instanceof HttpErrorResponse) {
      sanitisedError.details = Object.keys(error)
        .map((key: string) => `${key}: ${error[key]}`);
    } else {
      sanitisedError.details.push(JSON.stringify(error));
    }
    return sanitisedError;
  }
  // ...
}
With a rather simple sanitiseError method we create an object which is based on our previously defined interface. We check for error types and populate the data accordingly. The more interesting part is using the injector to get ngZone. When an error happens asynchronously, it usually happens outside change detection. We wrap our attachPortal with ngZone.run(/* … */), so when an HttpErrorResponse is caught, it is rendered properly in our modal.
While the current state works nicely, it still lacks customisation. We use the Overlay from the CDK module, so exposing an injection token for custom configurations would be nice. Another important shortcoming of this module is that when this module is used, another module can’t be used for error handling. For example, integrating Sentry would require you to implement a similar, but lightweight ErrorHandler module. In order to be able to use both, we should implement the possibility of using hooks inside our error handler. First, let’s create our InjectionToken and our default configuration:
import {InjectionToken} from '@angular/core';
import {DEFAULT_OVERLAY_CONFIG} from './constants/error-handler.constants';
import {ErrorHandlerConfig} from './interfaces/error-handler.interfaces';

export const DEFAULT_ERROR_HANDLER_CONFIG: ErrorHandlerConfig = {
  overlayConfig: DEFAULT_OVERLAY_CONFIG,
  errorHandlerHooks: []
};

export const ERROR_HANDLER_CONFIG: InjectionToken<ErrorHandlerConfig> = new InjectionToken('btp-eh-conf');
Then provide it with our module, using our existing forRoot method:
@NgModule({
  declarations: [ErrorHandlerComponent],
  imports: [CommonModule, OverlayModule, A11yModule],
  entryComponents: [ErrorHandlerComponent]
})
export class ErrorHandlerModule {

  public static forRoot(): ModuleWithProviders {
    return {
      ngModule: ErrorHandlerModule,
      providers: [
        {provide: ErrorHandler, useClass: ErrorHandlerService},
        {provide: OverlayContainer, useClass: FullscreenOverlayContainer},
        {provide: ERROR_HANDLER_CONFIG, useValue: DEFAULT_ERROR_HANDLER_CONFIG}
      ]
    };
  }
}
Then integrate this config handling into our ErrorHandlerService as well:
// Imports
@Injectable({
  providedIn: 'root'
})
export class ErrorHandlerService implements ErrorHandler {
  // ...

  handleError(error: any): void {
    const sanitised = this.sanitiseError(error);
    const {overlayConfig, errorHandlerHooks} = this.injector.get(ERROR_HANDLER_CONFIG);
    const ngZone = this.injector.get(NgZone);

    this.runHooks(errorHandlerHooks, error);
    const overlayRef = this.createOverlayReference(overlayConfig);
    ngZone.run(() => {
      this.attachPortal(overlayRef, sanitised).subscribe(() => {
        overlayRef.dispose();
      });
    });
  }
  // ...
  private runHooks(errorHandlerHooks: Array<(error: any) => void> = [], error): void {
    errorHandlerHooks.forEach((hook) => hook(error));
  }

  private createOverlayReference(overlayConfig: OverlayConfig): OverlayRef {
    const overlaySettings: OverlayConfig = {...DEFAULT_OVERLAY_CONFIG, ...overlayConfig};
    return this.overlay.create(overlaySettings);
  }
  // ...
}
And we are almost ready. Let’s integrate a third-party error handler hook into our application:
// Imports
const CustomErrorHandlerConfig: ErrorHandlerConfig = {
  errorHandlerHooks: [
    ThirdPartyErrorLogger.logErrorMessage,
    LoadingIndicatorControl.stopLoadingIndicator,
  ]
};

@NgModule({
  declarations: [
    AppComponent,
    MainComponent
  ],
  imports: [
    BrowserModule,
    HttpClientModule,
    ErrorHandlerModule.forRoot(),
    AppRoutingModule,
  ],
  providers: [
    {provide: ERROR_HANDLER_CONFIG, useValue: CustomErrorHandlerConfig}
  ],
  bootstrap: [AppComponent]
})
export class AppModule {
}
As you can see, handling errors is an extremely important part of software development, but it can also be fun.
Thank you very much for reading this blog post. If you prefer reading code, please check out my ng-reusables git repository. You can also try out the implementation using this npm package.
You can also follow me on Twitter or GitHub.
Learn to code for free. freeCodeCamp’s open source curriculum has helped more than 40,000 people get jobs as developers. Get started
Table of Contents
- What is a HTTP Interceptor?
- How to catch HTTP Errors with HttpInterceptor with an Example
- Developing an Error Handler Interceptor
- Handling Error at the Calling Component
- Registering Interceptor in AppModule
- Conclusion
What is a HTTP Interceptor?
A HTTP Interceptor helps in intercepting and handling an HttpRequest or HttpResponse. It is available in @angular/common/http library.
In the previous article, we discussed in detail on how to make HTTP requests to APIs from an Angular Application and how HttpInterceptors help us in tweaking and fiddling the requests or responses as they move out of the application scope and before they reach their calling components.
We looked at how we can create our own HttpInterceptor by implementing the HttpInterceptor interface and for our requirement we’ve used it to add a default Request Header which must be passed on for all requests which are headed towards Posts API.
Some other possible applications of Interceptors are –
- adding an Authentication header which authorizes the client request at the API end.
- adding a timestamp query parameter at the end of all requests so that the API recognizes each request uniquely.
- capturing an ETag from the response headers as the response arrives from the API and preserve it.
- read response headers for any other required values.
Another use case of HttpInterceptors can be catching exceptions which might occur during an API request and handle these scenarios so that the calling components or services may not need to handle them explicitly, leading to a sort of safe-path for all HTTP requests.
How to catch HTTP Errors with HttpInterceptor with an Example
To implement this, we create another class ErrorInterceptor which implements HttpInterceptor and within the intercept() method.
Instead of working on the HttpRequest object like how we did before, we will now work with the result of a HTTP call, i.e, once the next.handle() returns to this interceptor.
Developing an Error Handler Interceptor
import {
    HttpInterceptor,
    HttpRequest,
    HttpHandler,
    HttpEvent,
    HttpErrorResponse
} from '@angular/common/http';
import { Observable, throwError } from 'rxjs';
import { catchError } from 'rxjs/operators';


export class ErrorInterceptor implements HttpInterceptor {


    intercept(req: HttpRequest<any>, next: HttpHandler)
        : Observable<HttpEvent<any>> {
        var res = next.handle(req);
        res.pipe(
            catchError((error: HttpErrorResponse) => {
                // process the obtained error
                // for logging or monitoring
                console.log("Interceptor Log: " + error.message);


                // create new Observable stream
                // which the clients
                // can subscribe and
                // catch the Erroneous response
                return throwError(error);
            }));
    }
}
Observe that we’ve added a pipe() to the HttpResponse Observable, which the next.handle(req) returns. This res object contains the result of the HTTP request which has been sent to the remote API and a response is awaited.
Using a pipe() we pull out the Response stream and then catch in case the response stream has thrown an exception in its course of HTTP request.
To catch the error, we use catchError – an RxJs operator which tracks the stream and catches any runtime errors which occur.
Within the catchError() we add a callback, to which the error of the type HttpErrorResponse is passed. Within this method, we can handle the error we have now caught and process it to any logging engine (like all other applications do) or do something else.
Handling Error at the Calling Component
Finally, we pass on the error using throwError() method, which creates a new Stream with the error that we’re now aware of. At clients, we can catch this error during the subscription and handle it according to the context.
this.postsUpdatedSubs = this.postsService.getPosts();
this.postsUpdatedSubs.subscribe((posts) => {
    this.posts = [...posts];
}, (error) => {
    // handle error
    console.log("Error in PostListComponent: " + error.message);
});
Registering Interceptor in AppModule
We register this Interceptor at the AppModule level, so that it can be available for access across all the sub modules in the application.
@NgModule({
    declarations: [
        AppComponent,
        NavbarComponent
    ],
    imports: [
        BrowserModule,
        PostsModule,
        AuthModule,
        RouterModule.forRoot(routes)
    ],
    providers: [{
        provide: HTTP_INTERCEPTORS,
        multi: true,
        useClass: ErrorInterceptor
    }],
    bootstrap: [AppComponent]
})
export class AppModule { }
Observe that we have defined our ErrorInterceptor in the same way as we define any other HTTP Interceptor and attached it to the HTTP request pipeline.
Once we run the application, every HTTP request made by the application would pass through the ErrorInterceptor we just registered along with all other Interceptors created as well as the default ones built into the angular system.
When an error occurs, the ErrorInterceptor receives the error through the catchError() operator, where it gets access to the error object casted to HttpErrorResponse type.
It’s up to us how we can handle it: we can log it or do some analysis out of it or any other app specific operation.
Finally, we rethrow the error as a new Observable stream which the subscribed components receive and handle in their own way.
Conclusion
For example, back in our OpenSocialApp let’s run the application without having the API available, and see if the error is handled by the Interceptor as we expected.
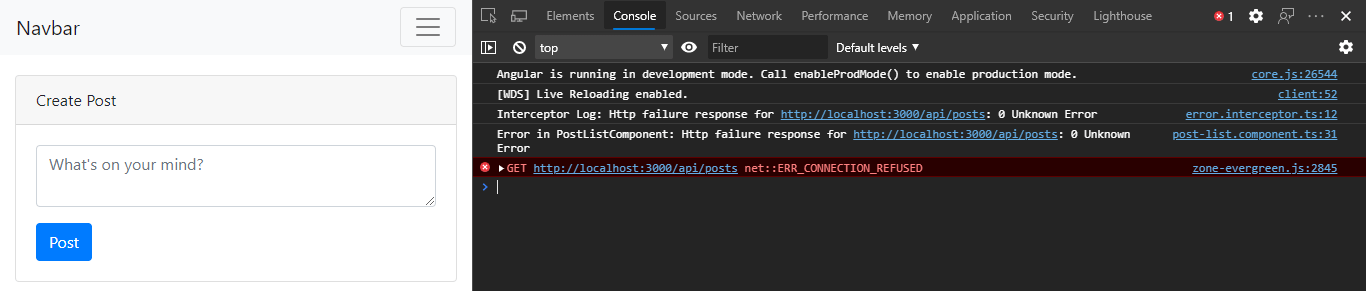
As we can see in the logs printed on the Developer Console, the response passes through the ErrorInterceptor which first catches and prints the Error Log and later on is handled at the PostListComponent which also catches and reinitializes its posts model so that the view is not impacted of any issues.
Extensive features, strong community support, comprehensive documentation, and vast ecosystem of libraries and tools make Angular a valuable skill to acquire for career growth in 2023.
Check out this most popular Angular course in Udemy at a HUGE DISCOUNT for a LIMITED PERIOD – Angular – The Complete Guide (2023 Edition) exclusive for our readers!

Angular Global Error Handling
In this post, we will implement global error handling in Angular.
Global error handling is one of the first things I implement in a new project. It helps avoid repetitive try/catch blocks in Angular components, services or directives. It gives me confidence that all errors will be captured consistently.
Create error handler
First things first, let’s create a new class to handle global errors.
import { ErrorHandler, Injectable } from '@angular/core';
@Injectable()
export class GlobalErrorHandler implements ErrorHandler {

    handleError(error: Error) {
        const err = {
            message: error.message ? error.message : error.toString(),
            stack: error.stack ? error.stack : ''
        };

        // Log the error to browser console
        console.log(err);
        // Strongly consider sending it to backend API
        // Notify the user
    }
}Code language: TypeScript (typescript)
We will use Angular’s dependency injection mechanism to plug-in our global error handler.
Our error handler class above implements ErrorHandler interface, which gives us a way to use handleError().
This makes our job pretty easy, we just construct a json object with the important bits of the error and log it to the console.
At this point, you can decide what to do with the error.
I recommend using NGXLogger or Application Insights to persist the details somewhere remote such as a database.
The last thing we need to do is tell Angular to use our global error handler in the root module of our app.
You only need to register it once in your app.module or core.module.
import { BrowserModule } from '@angular/platform-browser';
import { NgModule, ErrorHandler } from '@angular/core';
import { AppComponent } from './app.component';
import { GlobalErrorHandler } from './globar-error.handler';
@NgModule({
  declarations: [AppComponent],
  imports: [BrowserModule],
  providers: [
    {
      provide: ErrorHandler,
      useClass: GlobalErrorHandler
    }
  ],
  bootstrap: [AppComponent]
})
export class AppModule { }
Code language: TypeScript (typescript)
With all of the wiring done, let’s throw a new error in the main app.component:
export class AppComponent {
  constructor() {
    throw new Error('Required');
  }
}Code language: TypeScript (typescript)
When you run the app, you will notice that our global error handler has logged the error in the console:

So that’s how you implement global error handling in Angular.
If you found this useful, let me know in the comments below!
Check out the source code on GitHub.

Umut Esen
I am a software developer and blogger with a passion for the world wide web.