
#1
![]()
OFFLINE
FoPo
-

- Пользователи
-
- 8 сообщений
Начинающий летчик


- Город:Мурманск
- Коптер:CX-20, DJI Mavic Pro
Отправлено 21 мая 2018 — 10:30
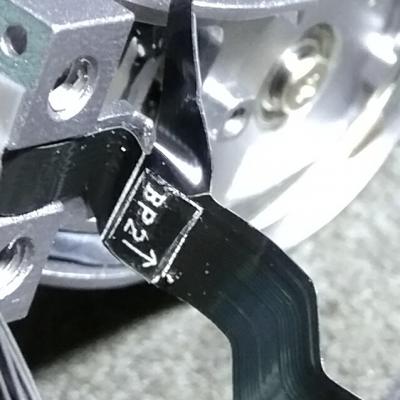
Упал друг с двух метров.
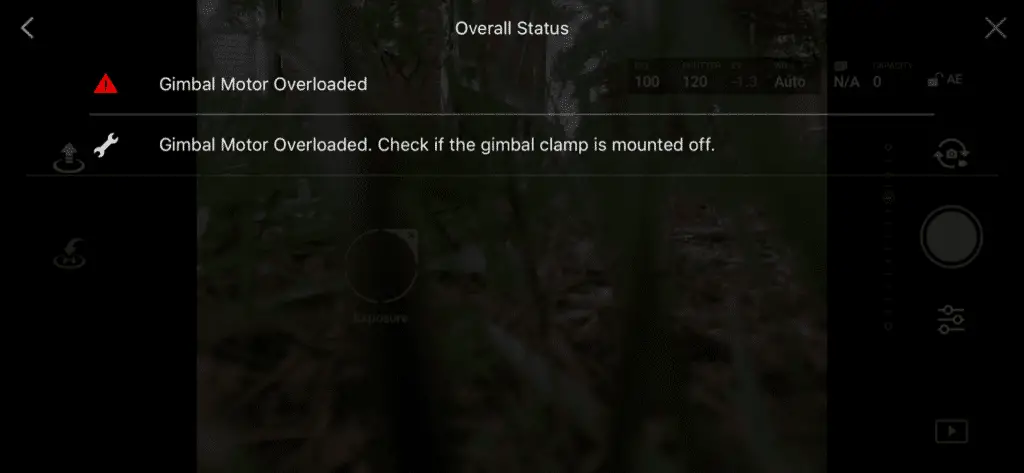
Теперь проблема с подвесом, выдаёт ошибку «Gimbal motor overloaded. Check whether the gimbal clamp has been removed.»
Везде пишут, что порван шлейф.
Разобрал, шлейф целый, разъёмы на месте (да и где им быть, они либо залиты, либо зажаты).
При включении калибрует камеру, что опять говорит в пользу целого шлейфа.
Но я обратил внимание на одну странность, камера в одну сторону поворачивается градусов на 25-30, а в другую на 100-120. Очень большая разница для симметричной конструкции. Может двигатель подзаклинило или песчинка попала.
Не можете посмотреть как у ваших мэвиков крутится «глаз»?
Заранее спасибо.
Прикрепленные изображения
-
0
#2
![]()
OFFLINE
Parcifall
Parcifall
- Город:Moscow
- Коптер:Mavic air/pro
Отправлено 21 мая 2018 — 10:33
Это шлейф. Недавно сам менял. Так же писал о перезагрузке подвеса постоянно. Визуально можно и не увидеть, в моем случае погасла и картинка, хотя косичка была визуально целая. Делов на 1000р. И пару недель ожидания с Али.
Даже если не понадобится сейчас, это расходник, который всегда нужен
Сообщение отредактировал Parcifall: 21 мая 2018 — 10:34
-
0
#3
![]()
OFFLINE
FoPo
FoPo
-
- Пользователи
-
- 8 сообщений
Начинающий летчик
- Город:Мурманск
- Коптер:CX-20, DJI Mavic Pro
Отправлено 21 мая 2018 — 10:35
Да вот с временем проблема, через неделю в отпуск еду. Устроил себе подарок… А такие виды хотел поснимать.
За ответ спасибо, буду заказывать.
-
0
#4
![]()
OFFLINE
Parcifall
Parcifall
- Город:Moscow
- Коптер:Mavic air/pro
Отправлено 21 мая 2018 — 11:51
FoPo, можно наверное и в городе у себя найти, зачем отпуск портить ?!
Тем более дрон уже разобран. Делов на часа 2 ))
Менять шлейф подвеса — работа ювелирных дел мастеров ))
-
0
#5
![]()
OFFLINE
FoPo
FoPo
-
- Пользователи
-
- 8 сообщений
Начинающий летчик
- Город:Мурманск
- Коптер:CX-20, DJI Mavic Pro
Отправлено 21 мая 2018 — 02:41
У нас глухо. Я как-то левосторонню гайку на CX-20 искал, на меня такие глаза делали…
-
0
#6
![]()
OFFLINE
Micha
Micha
- Город:Саратов
- Коптер:MAVICи
Отправлено 21 мая 2018 — 06:04
Лучший Ответ
Если успею получить до Вашего отъезда, могу выслать… Потом купите, отдадите… Не пропадать же отпуску… Я давно заказал, должны скоро подойти… Ставить не так уж и сложно… но по первости… не привычно… Но раз имеете дело с гайками, да еще с левой резьбой, то справитесь… Уверен!!!
Добавлено позже (21 Май 2018 — 19:04)
Сейчас на почтовый сайт заходил… Посылка уже на почте… Могу выслать какой нибудь экспресс почтой хоть завтра… Решайте… Завтра утром заберу…
Сообщение отредактировал Micha: 21 мая 2018 — 06:01
-
5
#7
![]()
OFFLINE
FoPo
FoPo
-
- Пользователи
-
- 8 сообщений
Начинающий летчик
- Город:Мурманск
- Коптер:CX-20, DJI Mavic Pro
Отправлено 23 мая 2018 — 06:53
Micha, вот же я пропустил два дня впустую. Заработался перед отпуском и не заметил сообщение. Мысль очень здравая. Если верить сайту EMS Почты России доставит за 2-4 дня за 150-390 р. Даже ещё вечер для ремонта останется.
-
0
#8
![]()
OFFLINE
Micha
Micha
- Город:Саратов
- Коптер:MAVICи
Отправлено 23 мая 2018 — 07:56
Написал в личку. Давайте адрес, завтра отправлю. ЕМС?… Могу экспресс почтой любой…
-
1
#9
![]()
OFFLINE
FoPo
FoPo
-
- Пользователи
-
- 8 сообщений
Начинающий летчик
- Город:Мурманск
- Коптер:CX-20, DJI Mavic Pro
Отправлено 29 мая 2018 — 10:22
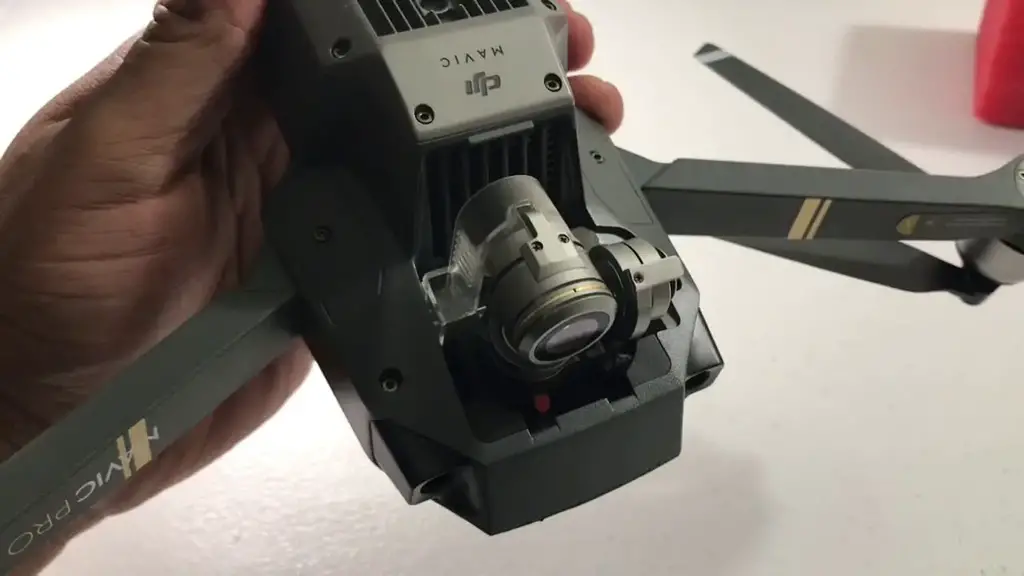
Как оказалось был надорван шлейф.
Огромное спасибо Михаилу (Micha), он выслал мне из своих запасов.
Вчера получил, заменил, Mavic ожил.
P.S. Менять шлейф ещё то муторное занятие, очень всё мелкое.
Прикрепленные изображения
Сообщение отредактировал FoPo: 29 мая 2018 — 10:25
-
3
#10
![]()
OFFLINE
Parcifall
Parcifall
- Город:Moscow
- Коптер:Mavic air/pro
Отправлено 29 мая 2018 — 10:54
Михаилу респект!!
Добавлено позже (29 Май 2018 — 10:54)
FoPo,удачного отпуска!
-
0
#1
![]()
OFFLINE
FoPo
-
- Пользователи
-
- 8 сообщений
Начинающий летчик
- Город:Мурманск
- Коптер:CX-20, DJI Mavic Pro
Отправлено 21 Май 2018 — 10:30
Упал друг с двух метров.
Теперь проблема с подвесом, выдаёт ошибку «Gimbal motor overloaded. Check whether the gimbal clamp has been removed.»
Везде пишут, что порван шлейф.
Разобрал, шлейф целый, разъёмы на месте (да и где им быть, они либо залиты, либо зажаты).
При включении калибрует камеру, что опять говорит в пользу целого шлейфа.
Но я обратил внимание на одну странность, камера в одну сторону поворачивается градусов на 25-30, а в другую на 100-120. Очень большая разница для симметричной конструкции. Может двигатель подзаклинило или песчинка попала.
Не можете посмотреть как у ваших мэвиков крутится «глаз»?
Заранее спасибо.
Прикрепленные изображения
-
0
#2
![]()
Parcifall
- Город:Moscow
- Коптер:Mavic air/pro
Отправлено 21 Май 2018 — 10:33
Это шлейф. Недавно сам менял. Так же писал о перезагрузке подвеса постоянно. Визуально можно и не увидеть, в моем случае погасла и картинка, хотя косичка была визуально целая. Делов на 1000р. И пару недель ожидания с Али.
Даже если не понадобится сейчас, это расходник, который всегда нужен
Сообщение отредактировал Parcifall: 21 Май 2018 — 10:34
-
0
#3
![]()
FoPo
-
- Пользователи
-
- 8 сообщений
Начинающий летчик
- Город:Мурманск
- Коптер:CX-20, DJI Mavic Pro
Отправлено 21 Май 2018 — 10:35
Да вот с временем проблема, через неделю в отпуск еду. Устроил себе подарок… А такие виды хотел поснимать.
За ответ спасибо, буду заказывать.
-
0
#4
![]()
Parcifall
- Город:Moscow
- Коптер:Mavic air/pro
Отправлено 21 Май 2018 — 11:51
FoPo, можно наверное и в городе у себя найти, зачем отпуск портить ?!
Тем более дрон уже разобран. Делов на часа 2 ))
Менять шлейф подвеса — работа ювелирных дел мастеров ))
-
0
#5
![]()
FoPo
-
- Пользователи
-
- 8 сообщений
Начинающий летчик
- Город:Мурманск
- Коптер:CX-20, DJI Mavic Pro
Отправлено 21 Май 2018 — 02:41
У нас глухо. Я как-то левосторонню гайку на CX-20 искал, на меня такие глаза делали…
-
0
#6
![]()
Micha
- Город:Саратов
- Коптер:MAVICи
Отправлено 21 Май 2018 — 06:04
Лучший Ответ
Если успею получить до Вашего отъезда, могу выслать… Потом купите, отдадите… Не пропадать же отпуску… Я давно заказал, должны скоро подойти… Ставить не так уж и сложно… но по первости… не привычно… Но раз имеете дело с гайками, да еще с левой резьбой, то справитесь… Уверен!!!
Добавлено позже (21 Май 2018 — 19:04)
Сейчас на почтовый сайт заходил… Посылка уже на почте… Могу выслать какой нибудь экспресс почтой хоть завтра… Решайте… Завтра утром заберу…
Сообщение отредактировал Micha: 21 Май 2018 — 06:01
-
5
#7
![]()
FoPo
-
- Пользователи
-
- 8 сообщений
Начинающий летчик
- Город:Мурманск
- Коптер:CX-20, DJI Mavic Pro
Отправлено 23 Май 2018 — 06:53
Micha, вот же я пропустил два дня впустую. Заработался перед отпуском и не заметил сообщение. Мысль очень здравая. Если верить сайту EMS Почты России доставит за 2-4 дня за 150-390 р. Даже ещё вечер для ремонта останется.
-
0
#8
![]()
Micha
- Город:Саратов
- Коптер:MAVICи
Отправлено 23 Май 2018 — 07:56
Написал в личку. Давайте адрес, завтра отправлю. ЕМС?… Могу экспресс почтой любой…
-
1
#9
![]()
FoPo
-
- Пользователи
-
- 8 сообщений
Начинающий летчик
- Город:Мурманск
- Коптер:CX-20, DJI Mavic Pro
Отправлено 29 Май 2018 — 10:22
Как оказалось был надорван шлейф.
Огромное спасибо Михаилу (Micha), он выслал мне из своих запасов.
Вчера получил, заменил, Mavic ожил.
P.S. Менять шлейф ещё то муторное занятие, очень всё мелкое.
Прикрепленные изображения
Сообщение отредактировал FoPo: 29 Май 2018 — 10:25
-
3
#10
![]()
Parcifall
- Город:Moscow
- Коптер:Mavic air/pro
Отправлено 29 Май 2018 — 10:54
Михаилу респект!!
Добавлено позже (29 Май 2018 — 10:54)
FoPo,удачного отпуска!
-
0

Few things are as frustrating for drone pilots as a gimbal motor overload error. After all, the gimbal is a key piece of equipment that allows the drone pilot to navigate, shoot video, and take photos. Thus, a malfunctioning gimbal essentially renders the drone useless.
So, what exactly is a gimbal overload error, and what causes it? In this guide, we will discuss this common error in-depth, and we will also provide a troubleshooting guide so you can fix the problem and get your DJI Mini 2/DJI Air 2S/Mavic Air 2/Mavic Mini or Phantom up in the air.
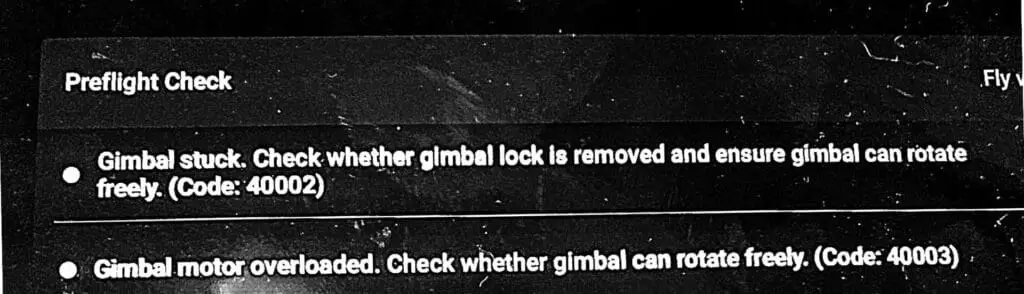
What Is The Gimbal Overload Error?
When the display shows that there is a gimbal motor overload, and you may get an error code 40003, it simply means that something is inhibiting the gimbal’s movement which causes the gimbal motor to be strained. It is important to address this error quickly, as excessive strain can cause lasting damage to the gimbal’s motor.
It is also worth mentioning that this error can happen both on the ground and in flight.
What Causes DJI Gimbal Motor Overload?
There are several things that can cause a gimbal motor overload error. Here we will discuss these culprits.
Launch Site Obstruction
The most common culprit is tall grass or something else on the ground in close proximity to the gimbal. If the drone is attempting its startup sequence in tall grass, the grass can prevent the gimbal from achieving the full range of motion necessary to properly calibrate.
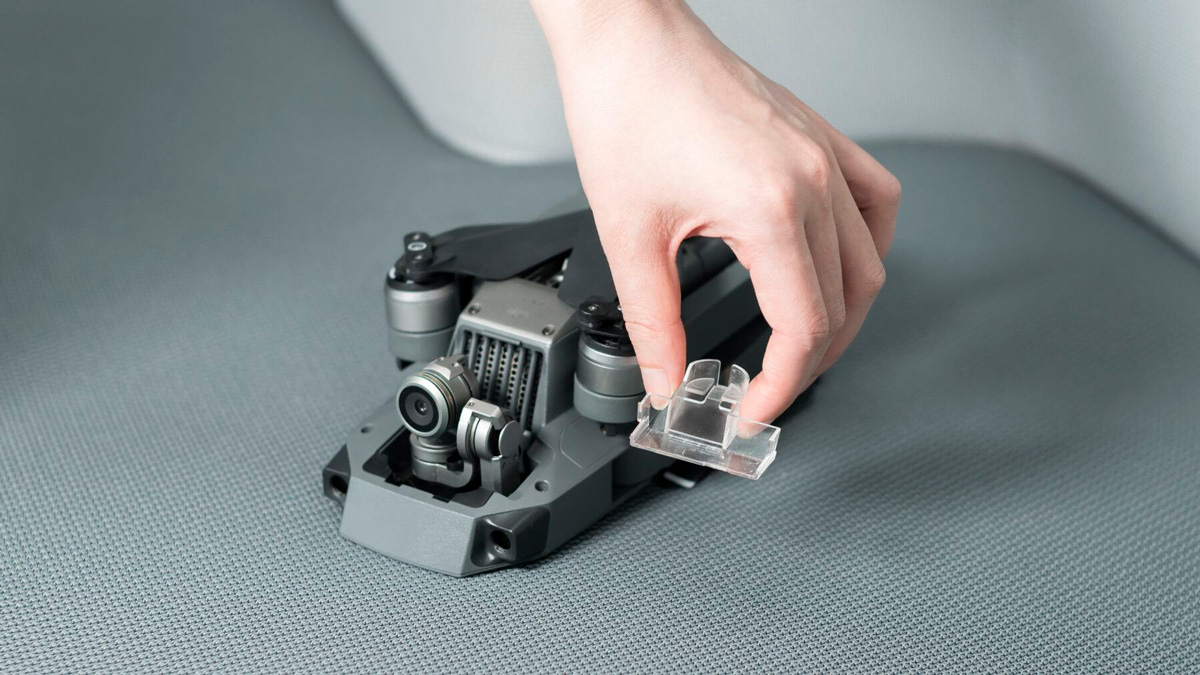
Forgetting To Remove The Gimbal Cover
You can also get a gimbal motor overload error if the gimbal cover is still on while the drone is powered on. The gimbal cover is only meant to protect the gimbal while the drone is in transit or not being used. If the cover is still in place when the drone is turned on, it will limit the gimbal’s range of motion, preventing it from completing its calibration sequence.

It will happen to every drone pilot eventually—excitement gets the better of you, and you rush through your preflight checklist, turn the drone on, and are ready to get up in the air…but the gimbal cover is still on. You realize your mistake when you hear the gimbal hitting up against the cover as it tries to calibrate, and a gimbal motor overload error flashes on your device. I speak from experience here…
Debris Stuck In The Gimbal

If you take off from sandy or dusty surfaces, it is possible for small pieces of debris to get lodged in the gimbal. The gimbal is a very sensitive piece of equipment, so even the smallest of obstructions can prevent it from moving correctly which will trigger this error message.
Third-Party Accessories
Using non-approved third-party accessories on the gimbal can also result in this error message.
Third-party accessories are accessories that are not produced by the drone manufacturer. If the manufacturer releases an accessory for a drone (in this case, the Mavic or Phantom), it is guaranteed that the accessory will not adversely affect the drone’s performance or operational capabilities.

However, third-party accessories can sometimes cause problems. While they might fit the drone perfectly in terms of dimensions, the material used might be too heavy or might otherwise compromise the drone’s performance. For example, some ND filters might add too much weight to the gimbal, causing excess strain on the gimbal motor.
Strain On The Gimbal During Flight
You can also get this error message while in flight. Sudden movements—namely yaw movements—while flying fast (such as in Sport Mode) can trigger this error. Remember, the gimbal and the gimbal motor are extremely sensitive, so the g-forces associated with fast flight maneuvers can strain the gimbal motor as it tries to keep up.
Faulty/Broken Hardware
Lastly, you might get this error message if the gimbal and/or gimbal motor have faulty or broken hardware. If your drone has crashed at some point, the gimbal likely sustained damage.
Here we will discuss the troubleshooting steps you should follow if you experience a gimbal motor overload error on your DJI Mavic or Phantom.
Step 1: Ensure That The Ground Is Clear Of Obstacles
When powering on your drone, if you get a gimbal motor overload error, the first thing to do is ensure that the ground around the gimbal is clear of obstacles. If the drone is not on flat, clear ground, power it off, move it to a flat and open area, and turn it back on. If the error is gone, it means something on the ground was previously interfering with the gimbal’s range of motion.

To prevent this altogether, we suggest always powering the drone on when it is on flat ground or a launchpad. It is a good idea to always visually inspect the area around the gimbal for anything that might interfere with the gimbal’s movement. This will ensure that the gimbal will be unobstructed during its calibration sequence.
Step 2: Check For Debris In The Gimbal
If motor overload error persists after you confirmed that the launch site is clear of obstacles, there might be debris in the gimbal. As mentioned, sand, dust, and other small particles can get lodged in the gimbal’s joints. Power the drone off and blow on the gimbal to remove any debris. Then, turn the drone back on.
Step 3: Ensure That Third-Party Accessories By The Gimbal Aren’t Too Heavy
If you are not using any third-party accessories with your drone (i.e. ND filters, an anti-glare hood, etc.), go ahead and skip to the next step.
If you are using a third-party accessory, turn the drone off, remove the accessory, and turn the drone back on. If the error message is no longer displayed, the third-party accessory was the likely culprit.
If you are using several third-party accessories located by or on the gimbal, turn the drone off, remove one accessory, and turn it back on. Repeat this process until you have identified which accessory was causing the problem.
If there is any doubt about what might have been causing the gimbal motor overload error, check online forums and reviews of the accessory in question to see if other people have had similar issues.
Step 4: Calibrate The Gimbal
As with most electronics, some errors seemingly happen for no reason at all. If this error has persisted up to this point, chances are it can be fixed by simply calibrating the gimbal.
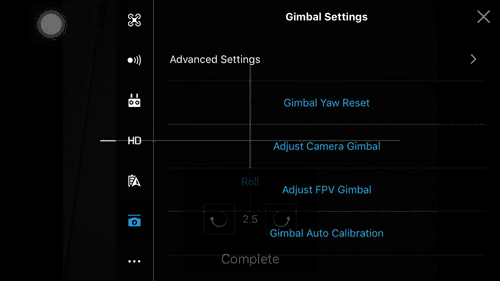
Calibrating the gimbal is a quick and easy procedure that can be done on the DJI GO 4 or DJI Fly app. The gimbal calibration process is virtually the same for the Mavic and the Phantom. Just follow these steps:
- Tap on the three dots in the upper right corner of the screen.
- Tap on the gimbal symbol.
- Select gimbal calibration.
- A message will appear prompting you to ensure that the aircraft is level and that nothing is obstructing the gimbal’s range of motion. Ensure that the drone is level and that nothing is obstructing the gimbal.
- Select OK, and the gimbal calibration process will begin.
Step 5: Fly Less Aggressively
If you get a gimbal motor overload error while your Mavic or Phantom is in flight, it is more than likely a result of aggressive flying. To remedy this, simply fly slower, and refrain from conducting quick maneuvers that might strain the gimbal.
While the Mavic and Phantom are incredibly adept at flying, it is important to remember that they are not racing drones; they are first and foremost flying cameras.
Step 6: Send The Drone To DJI
If all else fails, unfortunately, your drone will need to be repaired by DJI.
It is possible to fix faulty or broken hardware on your own, but it requires a high level of skill and competence in working with electronics. Since most people simply do not have the experience or skill required for such repairs, it is better to send it in for repair.
Furthermore, there could be an underlying software issue causing the error, and this is something only DJI can fix.
In Closing
We hope this guide has helped you better understand what the gimbal motor overload error is, what causes the error, and how to troubleshoot it on the DJI Mavic and Phantom.
The drone industry has advanced heavily over the years. DJI, the most popular drone manufacturer has dominated the industry with around 70% of the market share. One of the benefits of having a drone like DJI Mini 2 is that firmware updates are released directly to your device and you can download them without much efforts. These drone updates keep your device secure and free from malfunctions. Although software releases are constant, there are still hardware issues that can arise when flying. One of such issues is the «Gimbal Motor Overload» error message that is caused as a result of the hardware.
DAMAGED?
Receiving an error message can be quite frustrating, especially if you are unable to get your drone up in the air. This «Gimbal Motor Overload» message is usually followed by a shaky gimbal that becomes unstable. Once you see this message, it might become impossible to move your camera around (at least until the issue is fixed). Before you start to panic, your drone is not damaged and it has not been hacked! As a matter of fact, it’s a very simple fix for DJI Drones.
Drone pilots can experience this error message if they:
- have not calibrated their gimbal (especially during the first flight)
- try to take off on an uneven / dusty surface.
- land the drone too harshly or not using a landing pad
- have previously crashed the drone
SOLUTION
Gimbal errors can also be caused by the environment where you are flying the drone. The good news is that a well designed gimbal will usually regain full functionality once the issue is resolved. If you have received a «Gimbal Motor Overload» error message for your DJI drone, the simplest solution is to follow these three steps:
- Recalibrate the gimbal before flying. Ensure to follow the instructions that you see on the screen by placing the aircraft on a level surface and keeping it stationary. You must see «calibration successful» before you continue.
- Look around your gimbal to check for any dust or particles. You can use a straw to gently blow out any dirt around the gimbal.
- You need to ensure that you take-off on a flat surface and use a landing pad.
If the problem persists, please visit the DJI Repair Services for the next steps. You might be eligible for a free repair if your drone is still under warranty. One of the benefits of buying a DJI Drone from us is that it comes with One Year Manufacturer’s Warranty.
SHOP DJI DRONES
Gimbal Motor Overload has been an issue on DJI drones especially, Mavic pro, air, mini and phantom 4, but even on the older drones like the spark and phantom 3 nonetheless, DJI doesn’t seem to come up with a solution.
And this error is not something you can ignore or say I will come back to it later because it affects your gimbal, and without a proper working gimbal, your drone is basically useless.
I had this problem with on Mavic pro a couple of weeks ago, and after contacting DJI, reading a bunch of forums, hours of frustration, and trying different things, I almost gave up until I called a friend of mine who is a drone technician and he told me what causes this problem and different DJI drones and how you can fix it, and it saved me 100s of dollars so I thought I could do the same for others.
Note: By attempting to repair or replace a damaged part on your DJI drone it is very important to understand that you can void your warranty by doing so!
So what causes gimbal motor overload and how do you fix it?
“Gimbal Motor Overloaded” error can be caused by a restricted gimbal movement, faulty gimbal, faulty ribbon cable, or a corrupted software. To fix this problem you can try air dusting the gimbal and calibrating the gimbal in DJI go 4, if the error persists, you might have to send the drone to DJI for service.
If you are not a technical person to simplify it, “gimbal motor overload” means the motor that runs the gimbal is having a hard time doing its job.
However there are different levels of severity with this issue, it can be a small temporary overload, which can be due to strong wind and excessive sports mode tilts and this will disappear on its own, and the worst can be permanently damaged gimbal outputting shaking jelly videos.
This issue can come from both hardware and software issues, software issues won’t cause any harm and can be fixed with a simple firmware refresh, hardware issues might need a professional assistance.
one way to know if you are having software or a hardware issue is by looking if you have a shaky gimbal.
If the gimbal is visibly shaky or if it outputs a shaky video it is most likely a hardware issue you are having and by hardware I mean something is damaged or loose or there is something that is restricting its movement, and sometimes the shakiness of the gimbal might not be clearly visible, to check the stability you can yaw your drone left to right and right to left, it is a software issue the stabilization does a good job of negating the rolling shutter if there is a hardware problem vertical structures may appear very tilted. Another way to check is if you do a spherical panorama, the full movement of the gimbal will also test the stabilization.
so let me start out by listing what can possibly cause this issue
- The most common issue, gimbal being tainted by excessive dust.
- The ribbon cable restricting the gimbal specifically on phantom 4
- Loose gimbal mounting bracket common on Mavic pro
- Faulty yaw motor common on phantom 4
- The camera/gimbal being pressed against something while on initial start-up such as grass or an uneven surface.
- Starting the drone while it is still in your hand, this can cause aggressive tilts and the gimbal motors can overload while trying to compensate for your hand’s movement.
- Using third-party accessories on or around the gimbal such as flare hoods and ND filters
- Forgetting To Remove The Gimbal Cover
- Overheated gimbal motors – common when flying in sport mode when there is fast yaw movements.
- A hardware failure – if the gimbal is broken or if it needs to be professionally reviewed.
- A hardware failure- a faulty ribbon cable that needs to be replaced
- A software glitch that can be fixed by a firmware refresh or a factory reset
- Faulty Core Modular Board
- Damaged gimbal vibration-absorbing damper or the gimbal axis
- You can also get this error on a brand new drone right out of the box. This may be due to poor handling while in transit, which causes wires to get detached, in this case, DJI will get it fixed without any cost to you.
1. clean gimbal
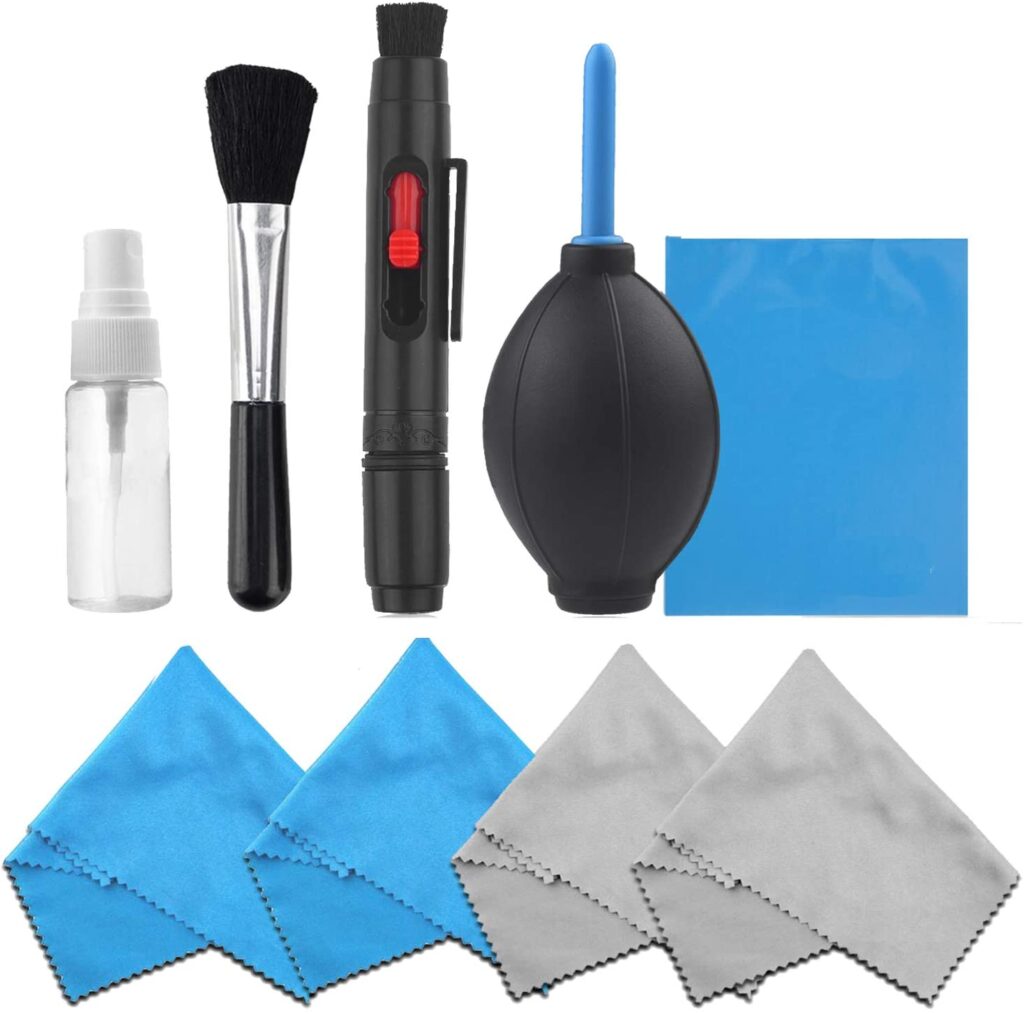
the most common cause of this issue is dust particles stuck in the gimbal restricting its movement. the gimbal uses very little force to move around so few dust particles in the wrong opening can stop its movement easily
If you take off from or land on sandy or dusty surfaces, it is possible for small pieces of debris to get lodged in the gimbal, which decreases the agility and give the motors a hard time functioning.
sometimes dust particles can even cause a full restricted movement and you can get “gimbal stuck” error simultaneously with “gimbal motor overloaded”.
so you can fix this problem by moving it with your finger slowly and lightly in every direction, while doing so you can blow air on it by your mouth to help tiny particles to get unclogged.
If there is something that won’t come out you can buy an air duster and Shoot the air into the rotating parts of the gimbal.
Repeat this process until the gimbal is able to do its start-up routine freely, the gimbal should be pointing forward when it is in a good condition.
Make sure it’s working by moving the aircraft around, and check if the gimbal is able to compensate its movement on every axis which means if the gimbal will move up-down, left-right, counterclockwise, and clockwise), if it does those movements freely you are good to go.
However never use oils or grease, it will make it worse.
2. Calibrate gimbal while the cover is still on
I am not sure how this works and I don’t recommend a quick fix but calibrating the gimbal while the gimbal cover is on seems to work for a lot of people so you can try that.
3. The ribbon cable restricting the gimbal specifically on phantom 4
4. Faulty Ribbon Cable on mavic pro
A ribbon cable is a cable with many conducting wires running parallel to each other on the same flat plane.
If you had a crash or a hard landing then there is a good chance the ribbon cables have been damged or been loose, if there is a loose ribbon cable there won’t be a full transmission/connection to the gimbal motors which makes it hard to function the gimbal.
This error doesn’t necessarily appear spontaneously after a crash, It may take time for a wire that was jarred during the crash to finally break after a crash, wires become loosely connected at first, then when you have a hard landing the loose wires become detached completely.
5. Loose Gimbal Mounting Bracket
The gimbal on DJI drones is mounted with three or four brackets depending on the drone you own, if one of these mounting brackets becomes loose, the gimbal will become loose and end up getting misaligned from its normal position. This means that the gimbal will brush against the body of the drone, preventing it from moving within its full range of motion, and it becomes difficult for the gimbal motors to stabilize the camera.
And for Mavic pro owners the brackets that anchor the gimbal to the body of the Mavic Pro tend to come loose and soft over time, in that case, you might have to get it replaced.
6. A faulty core modular board
A faulty Core Modular Board (motherboard) can also cause a gimbal motor overload.
This is not as common but I have seen at least 3 people send their drone to DJI because they had a gimbal motor overload warning where it end up being the motherboard has been damaged.
The problem here is there is no way to know whether it is the motherboard that is damaged or not so you might have to send it to DJI to get it professionally reviewed.
Not to forget replacing the motherboard can do a lot of damage to your pocket.
7. Refresh the drones firmware in DJI assistant 2
Not as common but a simple firmware refresh can fix the problem so it definitely is worth trying.
- Power on the drone
- Connect it to your computer using the USB cable DJI provides
- Open the DJI Assistant 2 software on your laptop
- Log in to the DJI Assistant 2 app and select your drone
- Next, you will see the firmware version
- Tap update and choose the latest version
- If it is already the latest version click refresh
- Repeat process with every battery you own
You can also refresh the firmware in DJI go 4 app.
8. Downgrade firmware
If refreshing the current firmware doesn’t seem to work, you can downgrade the firmware untill the next update comes out.
You can downgrade your firmware both in DJI assistant and DJI go 4.
To downgrade firmware in DJI assistant–
- Power on the drone
- Connect it to your computer using the USB cable
- Open the DJI Assistant 2 software on your laptop
- Log in to the DJI Assistant 2 app and select your drone
- Next, you will see the firmware version and older versions lined up
- Choose the version one below the current version you have
- Then click install
- Then the drone will automatically restart
To downgrade firmware in DJI go 4
Press and hold the menu icon (three horizontal lines in the top right corner) for five seconds and a special firmware menu appears. You can now select which previous firmware version you would like to downgrade to. Check it out.
9. Factory reset and recalibrate your drone and controller
Before trying to fix the gimbal or sending to DJI for a fix to make sure it is not a software problem you are having try factory resetting the drone.
- First, Install the DJI Assistant 2 Program on your device, make sure you download the proper one.
- Connect your drone to your laptop using the USB cable provided, and wait for the software till it detects your drone
- You’ll be able to see your drone on the Connected Devices screen. Select your drone and then click on confirm.
- Click on Firmware Update. After that, you’ll be able to see the “Restore factory defaults” button.
- Click on the factory reset button and then confirm when you are asked to confirm the reset. A progress bar will pop up showing the progress of the reset. You’ll be notified when the reset is complete.
Note: After a factory reset you have to calibrate everything again.
You can also hard reset the controller
To reset the RC: Turn on the controller, the aircraft should be off. * Press C1, C2, and shutter (top right button nearest antenna) on the controller and hold for about 2 seconds or so until it beeps, then turn the controller off.”
10. Calibrate The Gimbal
the first thing that comes to mind when you have a gimbal error is to calibrate the gimbal ofcorses you most likey have done so already but if you have you should
Calibrating the gimbal is a quick and easy procedure that can be done both on the DJI GO 4 or DJI Assistant 2. The gimbal calibration process is virtually the same for the Mavic and the Phantom. Just follow these steps:
- Tap on the three dots in the upper right corner of the screen.
- Tap on the gimbal symbol.
- Select gimbal calibration.
- A message will appear prompting you to ensure that the aircraft is level and that nothing is obstructing the gimbal’s range of motion. Ensure that the drone is level and that nothing is obstructing the gimbal.
- Select OK, and the gimbal calibration process will begin.
11. Remove Third-Party Accessories
If you are using any third-party accessories with your drone such as ND filters, an anti-glare hood, turn the drone off, remove the accessory, and turn the drone back on. If the error message is no longer displayed, the third-party accessory was the likely culprit.
If you are using several third-party accessories located by or on the gimbal remove each one one by one till you find which one is causing the problem.
12. Bad compass module
Even though the compass module seems unrelated to the gimbal it sure can cause a lot of problems related to the gimbal.
so please make sure you do a compass calibration before you decide to send your drone to the final option you have and that is sending it to DJI where you will get charged your house rent.
Final choice
So, your final option I to send it to DJI to get it professionally reviewed
If you have DJI care there is a good chance you can get it fixed without any cost.
DJI might ask you to send the drone even if it is to refresh the firmware so make sure you do everything you can first.
If you don’t have DJI care you might have to pay from $150 up to $250 for a gimbal replacement but can go up to $400 if the board is damged
After you hand it to DJI it can take up to 15 days till they fix it and send it back to you, and it can take longer if you don’t live in the united states
If you are located in Armenia, you may contact the local dealer or DJI’s support via email to start a case and send the unit back.
Use a gimbal lock to prevent gimbal motor overload for the future
may have wondered if the plastic piece that was holding your gimbal in place was necessary, it most definitely is!
That gimbal lock keeps your camera and gimbal components from swinging every-which-way while moving from place to place which helps avoid damge
Not only does it keep everything from swinging freely, but it protects the gimbal if you were to place the drone down on an object that made contact with the camera.
Drone investments to avoid this problem
To avoid this problem in the future you should buy a gimbal lock if the previous one is broken but most importantly you should get a landing/take-off pad to avoid dust particles from getting to your gimbal
So, this afternoon I misjudged my stopping distance and clipped a 10ft tree catching the drone on a branch.
I managed to grab the drone in the tree, so it didn’t have a bad fall or anything. It seems to operate fine flight wise, however, I’m getting a «Gimbal Motor load too large» message and the camera gimbal on startup calibration always ends up looking to the right.
I can not properly recalibrate the gimbal as (I’m assuming) the gimbal is restarting (I get that message alongside the overload message)
Earlier on, when fiddling with the gimbal and checking it was moving freely. I was able to ease it into position, it seemed to stay where it should (and stabilized) my overload message also disappeared… After that, I recalibrated my gimbal successfully it all looked like it was okay!
…Then I restarted the drone it reverted back to looking right again…
There is no visible damage on the drone, and for a brief moment, the gimbal recovered after a bit of manual fiddling. But it always reverts on a restart. Has anyone experienced this before? I’d really like to avoid sending this off if it’s a fixable software/calibration issue.
Any help would be much appreciated!

3D Insider is ad supported and earns money from clicks, commissions from sales, and other ways.
The original Mavic Pro was released by DJI in 2016, kicking off a whole catalog of ultra-portable drones that continue to be released until today. Although the Mavic Pro has stood the test of time as one of the most reliable ultra-portable drones, it is by no means a perfect drone. One of the most common concerns that continue to crop up among new and old Mavic Pro owners is the dreaded “gimbal overload” error message. What causes this error and how can you solve it? Read on as we attempt to find out.
About the Mavic Pro gimbal
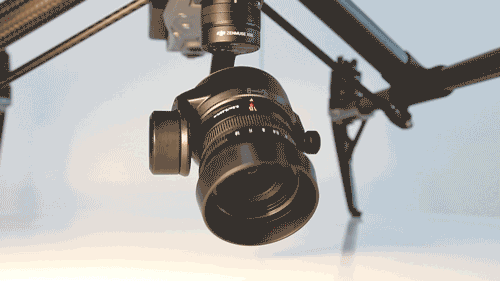
Despite its age, the Mavic Pro has managed to remain relevant until today. After all, it was the first 4K drone that can be folded down and carried in your backpack. Although its popular successors, including the DJI Mavic Air and Parrot Anafi, have managed to improve on its design, the Mavic Pro will always be the classic ultra-portable drone.
Supporting the 4K camera of the Mavic Pro is a 3-axis stabilizing gimbal. Although the ability to capture mechanically stabilized footage was well-appreciated, the gimbal was also one of the most oft-criticized parts of the Mavic Pro. It looked and felt very fragile and transporting the Mavic Pro involved having to secure the gimbal with a clear plastic cage.
True enough, most crashes involving the Mavic Pro have ended in broken gimbals that need to be replaced. It doesn’t even take a major crash to damage the Mavic Pro gimbal. Even careless handling such as folding or unfolding the drone have resulted in the gimbal suffering minor damage.
The gimbal overload error
The gimbal problems of the Mavic Pro don’t stop there. Throughout the years, Mavic owners have reported getting the dreaded “gimbal overload” message. There does not seem to be a single event that precedes getting this error message. Sometimes it happens after a crash, other times it happens after the drone has not been used for a long time. In very rare cases, even the owners of relatively new Mavic 2 drones have received this error message.
Possible reasons behind the error message
What does the error message mean? Simply put, a motor overload means that something is stopping the gimbal from moving the way it normally does. The DJI GO app only recommends that you check if the gimbal clamp has been removed, which isn’t helpful at all. Finding the root cause of this error message has been a complicated matter, as it could be any of a number of things.
1. Loose gimbal mounting bracket
Many users have noticed that the brackets that anchor the gimbal to the body of the Mavic Pro tend to come loose over time. The mounting mechanism of the gimbal also has a rubber component that tends to soften and stretch over time, especially under intense heat.
A loose mounting bracket will definitely result in a gimbal motor overload, as the gimbal will end up getting misaligned from its original position. This means that the gimbal will tend to brush against the body of the drone, preventing it from moving within its full range of motion.
2. Damaged ribbon cable
Some users have claimed to have resolved the problem of the gimbal motor overload by replacing the ribbon cable that runs through the printed circuit board (PCB) of the gimbal. A defective ribbon cable will probably result in a host of gimbal problems, which may not be limited to just a gimbal motor overload. Considering how thin and flimsy the ribbon cable is, this is a perfectly reasonable theory.
3. Out-of-calibration gimbal
The gimbal of the Mavic Pro can get out of calibration after several uses, which can result to a tilted horizon or shaky footage. An uncalibrated gimbal is also prevented from moving at its maximum range of movement, which can lead to a gimbal overload error message. Fortunately, doing a gimbal calibration is probably one of the easiest fixes you can do using the DJI Go app.
4. Out-of-date firmware
For drone pilots who have not touched their Mavic Pro in quite a while, it is easy to conclude that an out-of-date firmware is the cause of the gimbal overload error message. We’re not quite sure how this works exactly, but some users swear that a simple firmware update solved the problem.
How to solve the problem?
With all the possible causes of the gimbal overload error, the fixes that Mavic Pro owners have come up with has become similarly varied. We do not guarantee that any of these fixes work – do them at your own risk. If you are not sure about what you are doing, it is best to let the experts at DJI solve the problem for you.
1. Quick but temporary fix
If you run into the gimbal overload error in the middle of a shoot or while you’re in vacation, then you have very little time or resources to fully address the problem. Creative Mavic Pro owners have come up with this quick fix which everyone admits is only temporary, since it does not address any possible causes for the error.
To do the quick fix, all you need to do is to hold the Mavic Pro sideways and wait for the gimbal to restart. It will go through the motions of testing its full range of motion, after which the gimbal should function normally. There’s no guarantee that it will work, but it’s better than nothing.
Again, this method does nothing to address the underlying cause of the gimbal overload error. This means that the error will almost certainly recur at some point down the line. Once you have the time, it is recommended to come up with a more long-term solution.
2. Check the integrity of the mounting bracket
The moment you receive a gimbal overload error, the first thing you should inspect is the gimbal mounting bracket. The gimbal is mounted on three brackets – two on the front, and another one on the back. The back bracket is especially problematic, as many Mavic Pro owners have not even seen it or know that it exists.
In the case of the rubber element of the bracket getting deformed, you will have to resort to reinforcing the bracket of the gimbal with a soft material such as rubber or foam. There are video tutorials on how to do this, but the objective is to prevent the gimbal from brushing up against the belly of the drone.
3. Clean the gimbal
The gimbal of the Mavic Pro is especially fragile and delicate. In fact, the gimbal is so delicate that some dust or sand particles can stop it from moving. Some users have found that a simple cleanup of the gimbal does the trick. Just in case you end up landing on a sandy beach, it is best to be ready with a cheap camera cleaning kit.
4. Check takeoff conditions
Any obstacle in the immediate surroundings of the gimbal can put it under unexpected pressure and prevent it from moving at its maximum range. Taking off from tall grass has been shown to be a major reason for gimbal overload messages, although these error messages commonly disappear after about a minute of flight.
For better care and maintenance of your gimbal, it is best to take off from and land on clean and flat surfaces. If this type of surface is hard to come by, then you might need to consider investing in a landing pad. They are not expensive and can prevent further damage to your camera and gimbal setup.
5. Calibrate the gimbal
Calibrating your gimbal returns it to the settings and movement range that manufacturers have designed it for. Fortunately, calibration is very easily and quickly done through the DJI GO mobile app. Take note that some users have reported that it can take more than one recalibration cycle for the gimbal overload error to be resolved. In any case, it is always good practice to recalibrate your gimbal regularly.
6. Update firmware
If you have not flown your Mavic pro for a long time, then perhaps it is time to update your firmware. This can be done through the DJI GO app, although it is much faster to do it through the DJI Assistant 2 desktop software. Firmware updating only takes a few minutes at most and is one of the least effort solutions for the gimbal overload error.
7. Replace the ribbon cable
This solution requires a high level of experience in working with electronics, as well a genuine curiosity for how to take apart a drone. Basically, the ribbon cable that runs through the PCB of the gimbal can be easily broken, resulting in a lot of potential error messages. Fortunately, a replacement ribbon cable can easily be purchased and at a very low price.
The real challenge of doing this fix is in taking apart the drone and figuring out how to properly install the ribbon cable. There are several video tutorials on how to do this, but we must stress the importance of documenting what you are doing so you can take a step back in case you make a mistake.
8. Send the drone to DJI for repair
Finally, when you have exhausted all DIY fixes, you have no choice but to defer to the expertise of DJI. If your drone is still under warranty, then you’re extremely lucky. If not, a fix done by DJI can set you back by as much as $400.
This is not the best solution if you are in a hurry, as it can take more than 3 weeks before the drone will be returned to you. The high cost and long turnover of DJI fixes is one of the primary reasons for the high number of DIY fixes for the gimbal overload error.
Final thoughts
Considering the high cost of getting a Mavic Pro, it is perfectly understandable when the owners of this drone freak out at the slightest error message. However, this whole debacle points to a problem that appears to be more prevalent than what we have discussed in this article. Several Mavic Air owners have reported the same problem. In a slightly more concerning twist, gimbal problems have plagued even the newly released Mavic 2 Pro and Mavic 2 Zoom.
It’s important to be aware that doing any repairs or even opening up your Mavic drone could void your warranty. We only recommend these fixes if you’re outside the warranty period or under time constraints.
While it is easy to see that the gimbal is one of the most delicate parts of any drone, there is still no reason that a drone that costs more than $1500 would have a gimbal that cannot withstand a minor crash without suffering some damage. To be fair, the design of gimbals in the later Mavic drones appear to be much more robust and rugged compared to the original Mavic Pro. However, this is a department where DJI still has much room to improve.

When a gimbal error warning message pops up in the DJI GO or GO 4 app, it can really get your pulse going. Tilted horizon, gimbal motor overload, and abnormal gimbal vibrations are some errors you might experience. For some pilots, especially newbies, the first reaction is usually to fix the gimbal by twisting it manually, DO NOT do this as it doesn’t work and can damage your gimbal.
So what’s the right thing to do? It’s very likely that you are just a few taps away from resolving your gimbal issue in the DJI GO apps. For instance, by performing an IMU and gimbal calibration in the DJI GO apps you can fix a tilted horizon. By inspecting your take-off site, you can check if the gimbal motor overload is caused by obstructions stopping the gimbal from rotating. If the gimbal vibrates abnormally, you definitely need to check if any anti-vibration parts such as the vibration absorbing board, dampers, and rubber balls are malfunctioning.
Furthermore, gimbal errors can be caused by environmental factors. For example, flying in heavy fog or clouds may make the gimbal wet, leading to temporary failure. The good news is that you don’t need to worry as the gimbal will recover full functionality once it dries.
To help you, even more, we have provided more detailed gimbal troubleshooting steps below.


Are you still having gimbal problems after trying out these steps? Then contact DJI Support and we will gladly help you fix your gimbal errors.
You might also like:
Drone Maintenance Checklist
10 Drone Safety Tips for a Safe Flight
You Can Fly, Too! Drone-Flying Tips for Newbies
10 Common Mistakes Mavic Pro Pilots Make
Top 5 Ways to Prevent Flyaways – Must-Have Knowledge for Drone Pilots
For more from DJI Support, find us on:
DJI Facebook Support
DJI Twitter Support

Когда в приложениях DJI GO или GO 4 всплывает сообщение об ошибке в работе стабилизатора, у вас наверняка учащается пульс. Неправильный уровень горизонта, перегруженность мотора или ненормальные колебания – это только некоторые ошибки, с которыми вы могли столкнуться. Первой реакцией многих, особенно начинающих пилотов, является попытка исправить стабилизатор вручную. НЕ ДЕЛАЙТЕ этого, потому что это не только не поможет, но и приведет к поломке стабилизатора.
Так как же поступить в таком случае? Очень может быть, что решение вашей проблемы вы найдете за пару касаний в приложениях DJI GO. К примеру, изменив параметры инерциальной навигации и калибровки стабилизатора, вы можете исправить уровень горизонта. Перед взлетом вы можете проверить, не мешает ли что-то вращению стабилизатора, тем самым вызывая перегруженность его мотора. При ненормальных колебаниях стабилизатора вам необходимо проверить, не вышли ли из строя такие части, как вибропоглощающая пластина, гасители колебаний и резиновые демпфирующие шары.
Другие неполадки могут быть вызваны окружающими условиями. Например, полет в плотном тумане или облаках может привести к временным неполадкам стабилизатора из-за влаги. Плюс в том, что вам не надо беспокоиться об этом, так как стабилизатор самостоятельно придет в рабочее состояние, когда влага испарится. Чтобы помочь вам с другими проблемами, мы составили более подробные инструкции по исправлению неполадок.
Неполадки в работе стабилизатора
Ошибка наклона камеры
Если уровень камеры не выровнен, не пытайтесь вручную вращать стабилизатор. Чтобы настроить уровень, выполните следующие шаги:
1 калибровка инерциальной навигации
Расположите дрон на горизонтальной поверхности для калибровки инерциальной навигации. Запустите приложения DJI GO, зайдите в «Основные настройки управления» -> «Расширенные настройки» -> «Сенсоры» -> «Инерциальная навигация» и выберите «Калибровка инерциальной навигации». Затем следуйте инструкциям на экране.

2 автоматическая калибровка стабилизатора
Если стабилизатор находится не на уровне после калибровки инерциальной навигации, запустите автоматическую калибровку стабилизатора. Застите приложения DJI GO на вашем устройстве, выберите «Камера» -> «Настройки» -> «Стабилизатор». В меню «Стабилизатор» выберите «Автоматическая калибровка стабилизатора». Нажмите ОК для запуска калибровки.
3 регулировка ролика стабилизатора
Если после автоматической калибровки стабилизатора камера не выровнена, воспользуйтесь ручной регулировкой ролика стабилизатора в приложениях DJI GO. Зайдите в «Настройки стабилизатора», выберите «Регулировка ролика стабилизатора». На экране появится вид с камеры для настройки уровня.
Перегруженность мотора стабилизатора
Если в приложении всплывает предупреждение о перегруженности мотора стабилизатора, проверьте, нет ли каких-либо препятствий для его работы.
1 Снимите фиксатор стабилизатора
Убедитесь в том, что фиксатор и другая защита сняты со стабилизатора. Не забывайте их убирать перед полетом!
2 Проверьте дрон на наличие помех
Проверьте, не мешает ли что-либо вращению стабилизатора, затем запустите автоматическую калибровку стабилизатора.
Ошибка, связанная с колебанием камеры
При всплывании предупреждения «ненормальные колебания камеры» и появлении нестабильного изображения видео необходимо незамедлительно посадить дрон и проверить его на наличие повреждений.
1 Вибропоглощающая пластина и гасители колебаний
Если стабилизатор колеблется, это значит, что колебания дрона влияют на работу стабилизатора. Поэтому вам необходимо проверить состояние и работу всех деталей, ответственных за амортизацию. Необходимо заменить каждую поврежденную часть перед полетом.
2 Проверьте пропеллеры
Также колебания могут появиться, если пропеллеры не сбалансированы. Замените поврежденные пропеллеры для безопасного полета и хорошего изображения.
Few things are as frustrating for drone pilots as a gimbal motor overload error (code 40003). After all, the gimbal is a key piece of equipment that allows the drone pilot to navigate, shoot video, and take photos. Thus, a malfunctioning gimbal essentially renders the drone useless.
So, what exactly is a gimbal overload error, and what causes it? In this guide, we will discuss this common error in-depth, and we will also provide a troubleshooting guide so you can fix the problem and get your DJI Mini 2/DJI Air 2S/Mavic Air 2/Mavic Mini or Phantom up in the air.
What Is The Gimbal Overload Error?
When the display shows that there is a gimbal motor overload, and you may get an error code 40003, it simply means that something is inhibiting the gimbal’s movement which causes the gimbal motor to be strained. It is important to address this error quickly, as excessive strain can cause lasting damage to the gimbal’s motor.
It is also worth mentioning that this error can happen both on the ground and in flight.
What Causes DJI Gimbal Motor Overload?
There are several things that can cause a gimbal motor overload error. Here we will discuss these culprits.
Launch Site Obstruction
The most common culprit is tall grass or something else on the ground in close proximity to the gimbal. If the drone is attempting its startup sequence in tall grass, the grass can prevent the gimbal from achieving the full range of motion necessary to properly calibrate.
Forgetting To Remove The Gimbal Cover
You can also get a gimbal motor overload error if the gimbal cover is still on while the drone is powered on. The gimbal cover is only meant to protect the gimbal while the drone is in transit or not being used. If the cover is still in place when the drone is turned on, it will limit the gimbal’s range of motion, preventing it from completing its calibration sequence.
It will happen to every drone pilot eventually—excitement gets the better of you, and you rush through your preflight checklist, turn the drone on, and are ready to get up in the air…but the gimbal cover is still on. You realize your mistake when you hear the gimbal hitting up against the cover as it tries to calibrate, and a gimbal motor overload error flashes on your device. I speak from experience here…
Debris Stuck In The Gimbal
If you take off from sandy or dusty surfaces, it is possible for small pieces of debris to get lodged in the gimbal. The gimbal is a very sensitive piece of equipment, so even the smallest of obstructions can prevent it from moving correctly which will trigger this error message.
Third-Party Accessories
Using non-approved third-party accessories on the gimbal can also result in this error message.
Third-party accessories are accessories that are not produced by the drone manufacturer. If the manufacturer releases an accessory for a drone (in this case, the Mavic or Phantom), it is guaranteed that the accessory will not adversely affect the drone’s performance or operational capabilities.
However, third-party accessories can sometimes cause problems. While they might fit the drone perfectly in terms of dimensions, the material used might be too heavy or might otherwise compromise the drone’s performance. For example, some ND filters might add too much weight to the gimbal, causing excess strain on the gimbal motor.
Strain On The Gimbal During Flight
You can also get this error message while in flight. Sudden movements—namely yaw movements—while flying fast (such as in Sport Mode) can trigger this error. Remember, the gimbal and the gimbal motor are extremely sensitive, so the g-forces associated with fast flight maneuvers can strain the gimbal motor as it tries to keep up.
Faulty/Broken Hardware
Lastly, you might get this error message if the gimbal and/or gimbal motor have faulty or broken hardware. If your drone has crashed at some point, the gimbal likely sustained damage.
Here we will discuss the troubleshooting steps you should follow if you experience a gimbal motor overload error on your DJI Mavic or Phantom.
Step 1: Ensure That The Ground Is Clear Of Obstacles
When powering on your drone, if you get a gimbal motor overload error, the first thing to do is ensure that the ground around the gimbal is clear of obstacles. If the drone is not on flat, clear ground, power it off, move it to a flat and open area, and turn it back on. If the error is gone, it means something on the ground was previously interfering with the gimbal’s range of motion.
To prevent this altogether, we suggest always powering the drone on when it is on flat ground or a launchpad. It is a good idea to always visually inspect the area around the gimbal for anything that might interfere with the gimbal’s movement. This will ensure that the gimbal will be unobstructed during its calibration sequence.
Step 2: Check For Debris In The Gimbal
If motor overload error persists after you confirmed that the launch site is clear of obstacles, there might be debris in the gimbal. As mentioned, sand, dust, and other small particles can get lodged in the gimbal’s joints. Power the drone off and blow on the gimbal to remove any debris. Then, turn the drone back on.
Step 3: Ensure That Third-Party Accessories By The Gimbal Aren’t Too Heavy
If you are not using any third-party accessories with your drone (i.e. ND filters, an anti-glare hood, etc.), go ahead and skip to the next step.
If you are using a third-party accessory, turn the drone off, remove the accessory, and turn the drone back on. If the error message is no longer displayed, the third-party accessory was the likely culprit.
If you are using several third-party accessories located by or on the gimbal, turn the drone off, remove one accessory, and turn it back on. Repeat this process until you have identified which accessory was causing the problem.
If there is any doubt about what might have been causing the gimbal motor overload error, check online forums and reviews of the accessory in question to see if other people have had similar issues.
Step 4: Calibrate The Gimbal
As with most electronics, some errors seemingly happen for no reason at all. If this error has persisted up to this point, chances are it can be fixed by simply calibrating the gimbal.
Calibrating the gimbal is a quick and easy procedure that can be done on the DJI GO 4 or DJI Fly app. The gimbal calibration process is virtually the same for the Mavic and the Phantom. Just follow these steps:
- Tap on the three dots in the upper right corner of the screen.
- Tap on the gimbal symbol.
- Select gimbal calibration.
- A message will appear prompting you to ensure that the aircraft is level and that nothing is obstructing the gimbal’s range of motion. Ensure that the drone is level and that nothing is obstructing the gimbal.
- Select OK, and the gimbal calibration process will begin.
Step 5: Fly Less Aggressively
If you get a gimbal motor overload error while your Mavic or Phantom is in flight, it is more than likely a result of aggressive flying. To remedy this, simply fly slower, and refrain from conducting quick maneuvers that might strain the gimbal.
While the Mavic and Phantom are incredibly adept at flying, it is important to remember that they are not racing drones; they are first and foremost flying cameras.
Step 6: Send The Drone To DJI
If all else fails, unfortunately, your drone will need to be repaired by DJI.
It is possible to fix faulty or broken hardware on your own, but it requires a high level of skill and competence in working with electronics. Since most people simply do not have the experience or skill required for such repairs, it is better to send it in for repair.
Furthermore, there could be an underlying software issue causing the error, and this is something only DJI can fix.
In Closing
We hope this guide has helped you better understand what the gimbal motor overload error is, what causes the error, and how to troubleshoot it on the DJI Mavic and Phantom.

So, you have everything ready and rearing to go on your next aerial photography shoot. But wait, as you go to take off, a ‘gimbal error’ notification displays on your screen. You may also notice that your gimbal is shaking erratically.
Upon closer inspection, you realize that the culprit is your gimbal overloaded with the weight of your camera and lens. This is a common problem, especially for those that fly drones often. Fortunately, there are several steps you can take to fix this issue and get back in the air ASAP.
You can fix a gimbal overload error by ensuring the surface is clear of any obstruction. If you are flying in a windy environment, try to find an area with fewer gusts for a steadier shot. Always make sure all of your screws and bolts on the drone and gimbal are tightened securely.
These measures will help distribute the weight evenly and prevent any excess shaking. Always check to ensure the third-party accessories are not too heavy. You may also want to check for any debris that may be interfering with the gimbal’s motor.
By the way, here are a few of my other articles on fixing drone issues you might be interested in:
- Fix a drone that fell in water
- Drone is not taking off
- Drone battery won’t charge
- Drone tilting to one side
Gimbal overload may be a common occurrence during drone operation, but this doesn’t have to be. We take a closer look at this error to understand what causes it and how best to avoid it while in operation.
What Is Gimbal Overload in a drone?
Getting a gimbal overload error on your DJI drone can be frustrating. It means that the camera or gimbal is overloaded and may not be working properly.
Gimbal overload is a case where the device’s gimbal struggles to support the weight of the camera and lens. This can cause the drone to shake erratically and make it difficult to take steady shots. Anything that inhibits the gimbal’s movement causes a gimbal error.
After installing third-party accessories, like a lens filter or ND filter, the weight of your camera and gimbal system could exceed what is recommended by the manufacturer. This will cause an error message to appear on the screen saying “Gimbal Overload”, «error code 4003» or “Camera Error.”

What Causes Gimbal Motor Overload?
Several factors can contribute to gimbal overload on your drone. While some of them are obvious, others may not be so apparent.
Gimbal overload can be caused by such factors as gimbal debris, obstruction at launch, broken hardware, heavy third-party accessories, or poor weight distribution. It can sometimes result from strain on the gimbal motor or the camera.
- Gimbal debris
Debris on the gimbal arm can cause it to overload and lead to a gimbal overload error. This is because the debris interferes with how the camera moves, resulting in uneven weight distribution or extra strain on one side of the system.
The best solution for this problem would be to thoroughly clean your drone’s gimbal before every flight. This helps ensure that there is no build-up of dirt or other materials that can cause the arm to shake.
- Obstruction at launch
An obstruction at launch, such as a tree branch or building, can also be a major contributor to gimbal overload. When the drone lifts off, the camera and lens are suddenly subjected to more strain than they are used to, which can cause the device to shake.
To avoid this, always make sure there is plenty of clearance at takeoff and be aware of your surroundings. If an obstruction is noted, try to find a different take-off point or use a smaller drone that will fly over the obstacle.
- Broken or faulty hardware
A broken screw or other hardware on your drone can also lead to gimbal overload. This is especially true if the camera and lens are not secured properly. It causes them to move around during the flight, resulting in uneven weight distribution.
It’s important that you always check for any loose screws or other faulty hardware before each flight. Ensure that all components are tightened securely to help distribute the weight evenly.
- Heavy third-party accessories
Adding heavy third-party accessories, such as a lens filter or ND filter, can overload the gimbal and cause the error message to appear. This is because they add extra weight to an already overloaded system.
When purchasing aftermarket accessories, it’s important to make sure they are lightweight and compatible with your drone. If necessary, install new screws that are strong enough to hold up under heavy strain but not too tight not to damage any components.
- Poor weight distribution
The weight of the camera or gimbal can sometimes be unevenly distributed. This causes one side to become overloaded and causes shaking or vibration during flight.
You can fix this problem by adjusting the center of gravity on your drone and ensuring all components are properly balanced. To do so, use a bubble level to ensure everything is in alignment before each takeoff.
- Forgotten gimbal cover
Sometimes, excitement can get the better of us during pre-flight preparations. As a result, the gimbal cover is forgotten and not removed from the drone before takeoff. Without realizing it, you fly off with your drone while its gimbal cover remains on.
If this happens to you, just ground your aircraft immediately after observing that something doesn’t look right. Turn it off and remove the gimbal cover before you take off again.
Other notable fixes for gimbal overload
If none of the above fixes work, it could be an issue of poor calibration. Calibrating the drone’s gimbal can help to improve its overall performance. You can also try using a different type of battery or lens if your camera and lens are too heavy for the drone.
Make your flights less aggressive by reducing the speed and height of your drone. You can consider taking off from an elevated platform, like a table or desk, to give your drone some extra space for takeoff (and landing). In cases where you can figure out the issue, it is best that you contact the drone manufacturer for support. Otherwise, if you’re still experiencing gimbal overload errors after trying all these fixes, then it may be time to upgrade your drone with a new one.
How do I fix gimbal overload errors on DJI drones?
DJI drones have a built-in system that alerts pilots when the gimbal is overloaded. This usually happens due to too much weight or imbalance on the camera and lens. When this error message pops up, it’s important to take action right away to prevent any damage from occurring.
You can fix gimbal overload errors on DJI drones by reducing the weight or changing orientation. Ensure that all components are balanced and secure before each takeoff. Adjust your drone’s center of gravity by adding weights to the arms or swapping heavier batteries with lighter ones.
For a more focused fix, you can follow these steps:
- Turn off your drone and remove all cables from its ports (including USB).
- Wait for about 30 seconds to one minute before restarting again. This is because some cameras may require time to cool down after being overheated by heavy usage or high temperatures outside.
- Once you’ve restarted your drone, make sure there are no cables connected to it again.
- If you’re using a lens or accessory that is too heavy for the gimbal system on your drone, remove them before taking off (or replace them with lighter ones). You can also try balancing all components evenly by adding weights like coins or washers to the drone’s frame.
- If none of the above solutions work, you can try recalibrating your drone’s gimbal in its settings menu. This will help improve your aircraft’s overall performance and stability during flight.
How do I fix the gimbal overload on a DJI mini 2?
The DJI mini 2 is a small, lightweight drone, perfect for beginner pilots. However, even this little guy can experience gimbal overload if too much weight is added to the camera and lens.

You can fix the gimbal overload on a DJI mini 2 by:
-Recalibrating your drone’s gimbal system in its settings menu
-Refresh its firmware
-Remove any accessories or lenses that may be causing an imbalance
-Reduce the weight of your drone or its accessories by replacing heavier items with lighter ones.
How do I fix gimbal overload on a DJI Air 2s?
The DJI Air 2s is a great option for pilots looking for an affordable, easy-to-use drone. However, even this model can experience gimbal overload if too much weight is added to the camera and lens.
You can fix gimbal overload on a DJI Air 2s by recalibrating your drone’s gimbal system. Alternatively, you can also refresh its firmware. Try removing any accessories or lenses that may be causing an imbalance and reducing the weight of your drone by replacing heavier accessories with lighter ones.
DJI Air 2s is one of the most stable drones on the market. If you’re still experiencing problems with gimbal overload after trying all these solutions, seek assistance from the drone manufacturer.
How do you calibrate a drone gimbal?
Drone pilots use calibration to adjust and improve the performance of their aircraft’s gimbals. This process helps to ensure that your shots are smooth and level, regardless of how crazy things may get during flight. The gimbal calibration takes less than five minutes
To calibrate a drone gimbal:
- Tap the three dots on the upper right corner of your screen
- Open up its settings menu
- Scroll down and tap on «Calibration» option and then
- Hold your drone completely still in all three axes for five seconds. DJI drones will make a sound when successfully calibrated.
There are two types of calibration that you may need to perform on your drone:
— Gimbal calibration — This adjusts the position of the gimbal to improve its accuracy and stability.
— Compass calibration — This calibrates the compass sensor to ensure that your drone knows where it is in relation to Earth’s magnetic fields.
You should do both types of calibration before every flight session.
Conclusion- How do you fix drone overload quickly?
There are a few solutions that you can try if your drone experiences gimbal overload.
Based on the error noted, try recalibrating the gimbal system, refreshing the firmware, removing any accessories or lenses that may be causing an imbalance, and reducing the weight of your drone or its accessories by replacing heavier items with lighter ones.
If none of these solutions work, seek assistance from the drone manufacturer. DJI has a great customer service team, and they are always happy to help. Do some research to find out how heavy your drone can be and what type of gimbal it uses. This will help prevent issues in the future.