Состояние перевода: На этой странице представлен перевод статьи fsck. Дата последней синхронизации: 10 июля 2021. Вы можете помочь синхронизировать перевод, если в английской версии произошли изменения.
fsck (file system check) — утилита для проверки и восстановления файловых систем Linux. Проверка файловых систем разных физических дисков выполняется параллельно, что позволяет значительно её ускорить (см. fsck(8)).
Процесс загрузки Arch включает в себя процедуру fsck, поэтому проверка файловых систем на всех носителях выполняется автоматически при каждой загрузке. По этой причине обычно нет необходимости выполнять её через командную строку.
Проверка при загрузке
Механизм
Существует два возможных варианта:
- mkinitcpio предоставляет хук
fsckдля проверки корневой файловой системы перед монтированием. Корневой раздел должен быть смонтирован на запись и чтение (параметр ядраrw) [1]. - systemd проверяет все файловые системы, которым задано значение fsck больше 0 (либо параметром fstab, либо в пользовательском файле юнита). Корневая файловая система изначально должна быть смонтирована только на чтение (параметр ядра
ro), и лишь позже перемонтирована на чтение-запись в fstab. Имейте в виду, что опция монтированияdefaultsподразумеваетrw.
Рекомендуется по умолчанию использовать первый вариант. Если вы устанавливали систему в соответствии с руководством, то использоваться будет именно он. Если вы хотите вместо этого использовать вариант 2, то удалите хук fsck из mkinitcpio.conf и задайте параметр ядра ro. Кроме того, параметром ядра fsck.mode=skip можно полностью отключить fsck для обоих вариантов.
Принудительная проверка
Если вы используете base-хук mkinitcpio, то можно принудительно выполнять fsck во время загрузки, задав параметр ядра fsck.mode=force. Проверена будет каждая файловая система на машине.
В качестве альтернативы можно воспользоваться службой systemd systemd-fsck@.service(8), которая проверит все настроенные файловые системы, которые не были проверены в initramfs. Тем не менее, проверка корневой файловой системы этим способом может стать причиной задержки в время загрузки, поскольку файловая система будет перемонтироваться.
Примечание: Если вы используете другие дистрибутивы GNU/Linux, то учтите, что старые методы проверки вроде файлов forcefsck для каждой файловой системы или команды shutdown с флагом -F будут работать только с SysVinit и ранними версиями Upstart; работать с systemd они не будут. Решение, предложенное выше, является единственным рабочим для Arch Linux.
Советы и рекомандации
Восстановление повреждённых блоков
Следующая команда позволяет восстановить повреждённые участки файловых систем ext2/ext3/ext4 и FAT:
Важно: Разрешение на восстановление запрошено не будет. Подразумевается, что вы уже ответили «Да», запустив команду на выполнение.
# fsck -a
Интерактивное восстановление повреждённых блоков
Полезно в том случае, если файлы на загрузочном разделе были изменены, а журнал не обновился соответствующим образом. В этом случае размонтируйте загрузочный раздел и выполните:
# fsck -r диск
Изменение частоты проверки
Примечание: Команды tune2fs и dumpe2fs работают только с файловыми системами ext2/ext3/ext4.
По умолчанию fsck проверяет файловую систему каждые 30 загрузок (вычисляется отдельно для каждого раздела). Чтобы изменить частотку проверок, выполните:
# tune2fs -c 20 /dev/sda1
Здесь 20 — число загрузок между проверками. Если задать значение 1, то проверка будет выполняться при каждой загрузке, а значение 0 отключит сканирование.
Текущую частоту проверок и опции монтирования конкретного раздела можно узнать командой:
# dumpe2fs -h /dev/sda1 | grep -i 'mount count'
Параметры fstab
fstab — файл системных настроек, который используется для передачи ядру Linux информации о том, какие разделы (файловые системы) монтировать и в какие точки дерева файловой системы.
Записи в /etc/fstab выглядят примерно следующим образом.
/dev/sda1   /         ext4      defaults       0  1
/dev/sda2   /other    ext4      defaults       0  2
/dev/sda3   /win      ntfs-3g   defaults       0  0
Шестое поле каждой строки (выделено) — опция fsck:
0— не проверять.1— файловая система (раздел), которая должна быть проверена первой; для корневого раздела (/) должно использоваться именно это значение.2— прочие файловые системы, которые должны быть проверены.
Решение проблем
Не запускается fsck для отдельного раздела /usr
- Убедитесь, что используются соответствующие хуки в
/etc/mkinitcpio.conf, а также что вы не забыли пересоздать initramfs после последнего редактирования этого файла. - Проверьте fstab! Только корневому разделу должен быть задан параметр
1в последнем поле, все остальные разделы должны иметь либо2, либо0. Также проверьте файл на наличие иных опечаток.
ext2fs: no external journal
Иногда (например, из-за внезапного отключения питания) файловые системы ext(3/4) могут повредиться так сильно, что восстановить их обычным способом не удастся. Как правило, при этом fsck выводит сообщение о том, что не удалось найти журнал (no external journal). В этом случае выполните команды ниже.
Отмонтируйте раздел от соответствующего каталога:
# umount каталог
Запишите на раздел новый журнал:
# tune2fs -j /dev/раздел
Запустите fsck, чтобы восстановить раздел:
# fsck -p /dev/раздел
Introduction
The fsck (File System Consistency Check) Linux utility checks filesystems for errors or outstanding issues. The tool is used to fix potential errors and generate reports.
This utility comes by default with Linux distributions. No specific steps or an installation procedure is required to use fsck. Once you load the terminal, you are ready to exploit the functionalities of the tool.
Follow this guide to learn how to use fsck to check and repair filesystem on a Linux machine. The tutorial will list examples of how to use the tool and for which use cases.
Prerequisites
- Linux or UNIX-like system
- Access to a terminal or command line
- A user with root permissions to run the tool
When to Use fsck in Linux
The fsck tool can be used in various situations:
- Use fsck to run a filesystem check as preventive maintenance or when there is an issue with your system.
- One common problem fsck can diagnose is when the system fails to boot.
- Another one is when you get an input/output error when the files on your system become corrupt.
- You can also use the fsck utility to check the health of external drives, such as SD cards or USB flash drives.
Basic fsck Syntax
The basic syntax for the fsck utility follows this pattern:
fsck <options> <filesystem>In the above example, filesystem can be a device, a partition, a mount point, etc. You can also use filesystem-specific options at the end of the command.
There are a few steps to do before you check and repair your file system. You need to locate a device and unmount.
View Mounted Disks and Partitions
To view all mounted devices on your system and check disk location, use one of the available tools in Linux.
One method to locate the disk you want to scan is to list the filesystem disks with the df command:
df -h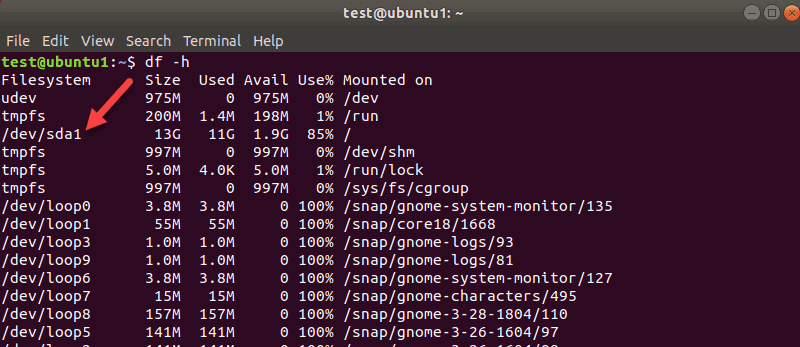
The tool prints the data usage on your system and filesystems. Take note of the disk you want to check with the fsck command.
To view partitions for your first disk, for example, use the following command:
sudo parted /dev/sda 'print'sda is how Linux refers to your first SCSI disk. If you have two, the second would be sdb, and so on.
In our example, we got one result since there was only one partition on this virtual machine. You will get more results if you have more partitions.
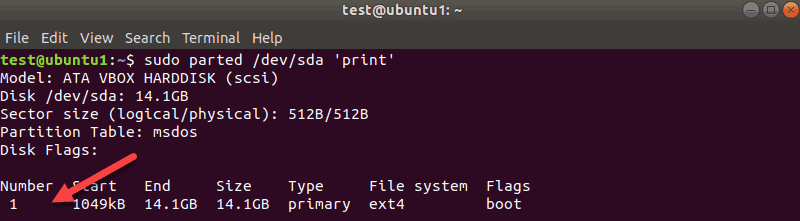
The disk name here is /dev/sda and then the number of partitions is shown in the Number column. In our case, it is one: sda1.
Unmount the Disk
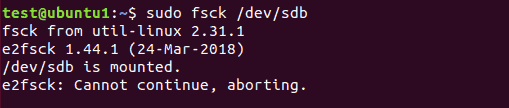
Before you can run a disk check with fsck, you need to unmount a disk or partition. If you try to run fsck on a mounted disk or partition, you will get a warning:
Make sure to run the unmount command:
sudo umount /dev/sdbReplace /dev/sdb with the device you want to unmount.
Note that you cannot unmount root filesystems. Hence, now fsck can’t be used on a running machine. More on that towards the end of the guide.
Run fsck to Check for Errors
Now that you unmounted the disk, you can run fsck. To check the second disk, enter:
sudo fsck /dev/sdb
The above example shows the output for a clean disk. If there are multiple issues on your disk, a prompt appears for each one where you have to confirm the action.
The exit code the fsck utility returns is the sum of these states:
Mount the Disk
When you finish checking and repairing a device, mount the disk so you can use it again.
In our case, we will remount the sdb disk:
mount /dev/sdbDo a Dry Run with fsck
Before you perform a live check, you can do a test run with fsck. Pass the -N option to the fsck command to perform a test:
sudo fsck -N /dev/sdbThe output prints what would happen but does not perform any actions.
Fix Detected Errors Automatically with fsck
To try to fix potential problems without getting any prompts, pass the -y option to fsck.
sudo fsck -y /dev/sdbThis way, you say “yes, try to fix all detected errors” without being prompted every time.
If no errors are found, the output looks the same as without the -y option.
Skip Repair but Print fsck Errors in the Output
Use the -n option if you want to check potential error on a file system without repairing them.
We have a second drive sdb with some journaling errors. The -n flag prints the error without fixing it:
sudo fsck -n /dev/sdb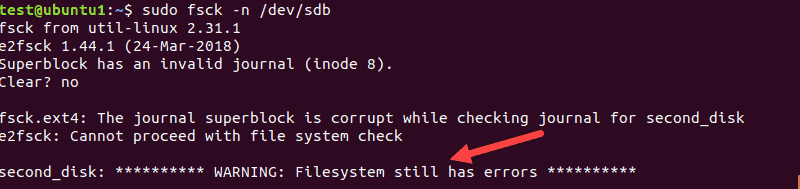
Force fsck to Do a Filesystem Check
When you perform a fsck on a clean device, the tool skips the filesystem check. If you want to force the filesystem check, use the -f option.
For example:
sudo fsck -f /dev/sdb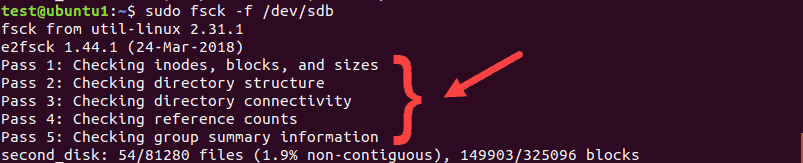
The scan will perform all five checks to search for corruptions even when it thinks there are no issues.
Run fsck on All Filesystems at Once
If you want to perform a check on all filesystems with fsck in one go, pass the -A flag. This option will go through the etc/fstab file in one run.
Since root filesystems can’t be unmounted on a running machine, add the -R option to skip them:
fsck -ARTo avoid the prompts, add the -y option we talked about.
Skip fsck on a Specific Filesystem
If you want fsck to skip checking a filesystem, you need to add -t and “no” before a filesystem.
For example, to skip ext3 filesystem, run this command:
sudo fsck -AR -t noext3 -yWe added -y to skip the prompts.
Skip Fsck on Mounted Filesystems
To make sure you do not try to run fsck on a mounted filesystem, add the -M option. This flag tells the fsck tool to skip any mounted filesystems.
To show you the difference, we will run fsck on sdb while it is mounted, and then when we unmount it.
sudo fsck -M /dev/sdb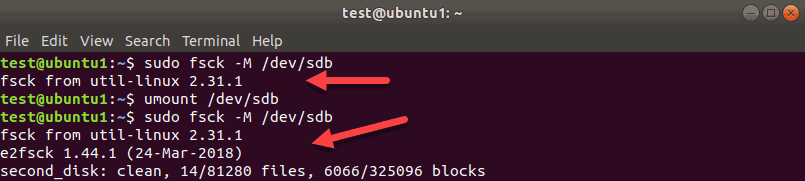
While sdb is mounted, the tool exits without running a check. Then, we unmount sdb and run the same command again. This time, fsck checks the disk and reports it as clean, or with errors.
Note: To remove the first title line of the fsck tool “fsck from util-linux 2.31.1” use the -T option.
Run fsck on Linux Root Partition
As we already mentioned, fsck cannot check root partitions on a running machine since they are mounted and in use. However, even Linux root partitions can be checked if you boot into recovery mode and run the fsck check:
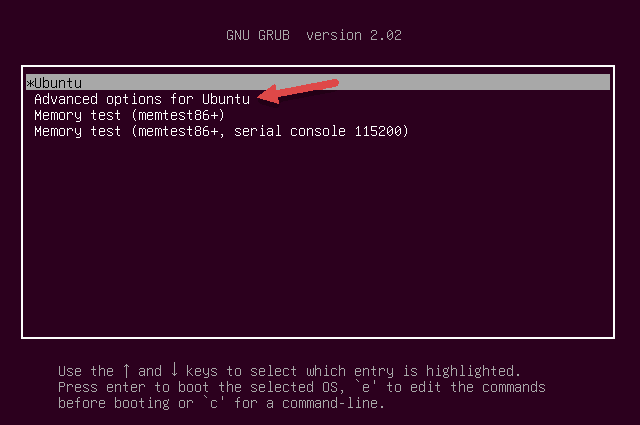
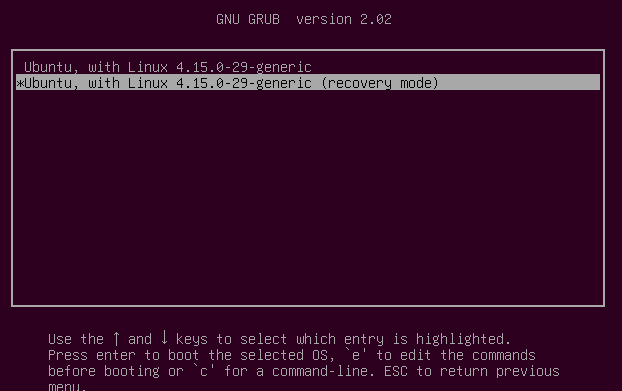
1. To do so, power on or reboot your machine through the GUI or by using the terminal:
sudo reboot2. Press and hold the shift key during boot-up. The GNU GRUB menu appears.
3. Select Advanced options for Ubuntu.
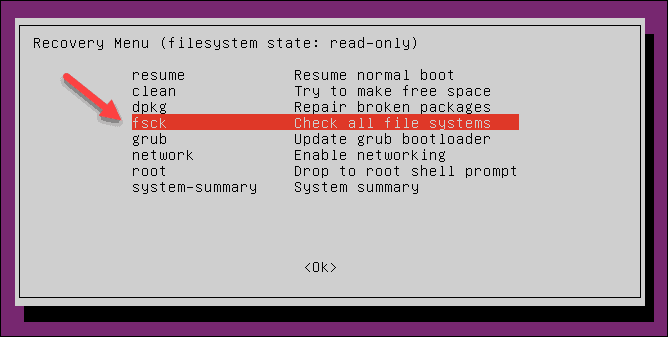
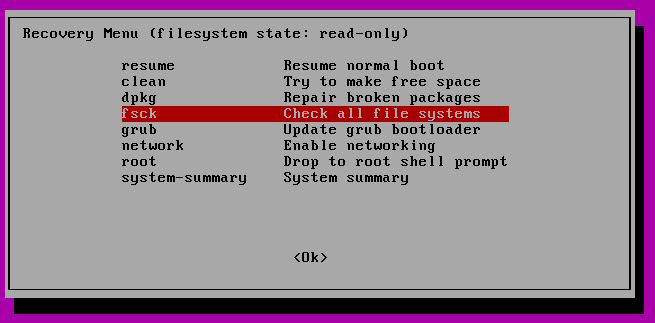
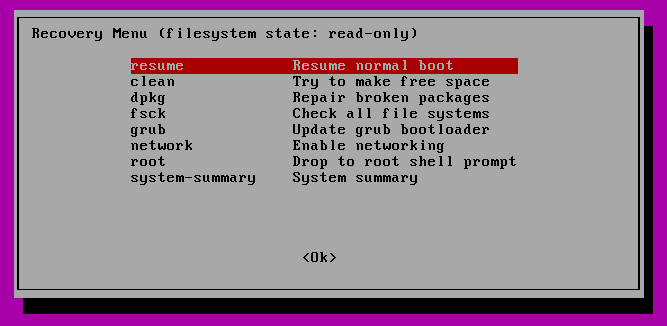
4. Then, select the entry with (recovery mode) at the end. Let the system load into the Recovery Menu.
5. Select fsck from the menu.
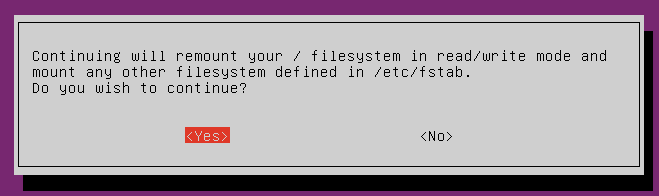
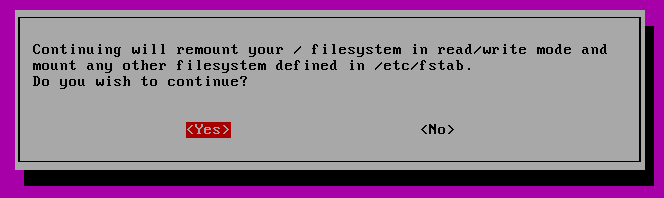
6. Confirm by selecting <Yes> at the prompt.
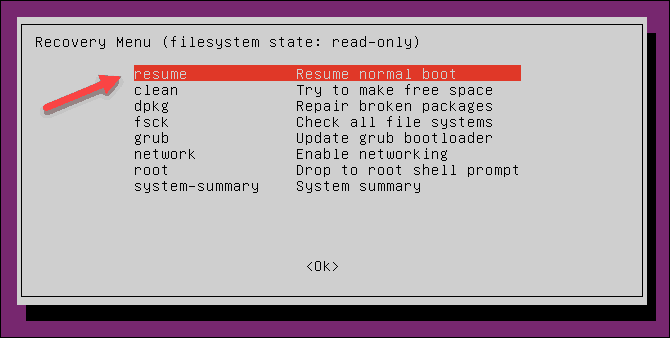
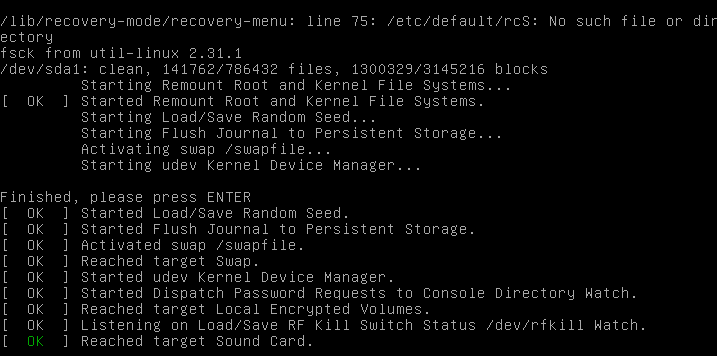
7. Once finished, select resume at the recovery menu to boot up the machine.
What if fsck is Interrupted?
You should not interrupt the fsck tool while it is in progress. However, if the process is interrupted, fsck will finish the ongoing check and then stop.
In case the utility found an error while the check was in process, it will not try to fix anything if interrupted. You can rerun the check next time and let it finish.
fsck Linux Command Options Summary
To wrap up, below is the list of the options you can use with the fsck Linux utility.
| Option | Description |
|---|---|
-a |
Try to repair filesystem errors automatically. There will be no prompts, so use it with caution. |
-A |
Check all filesystems listed in /etc/fstab. |
-C |
Show progress for ext2 and ext3 filesystems. |
-f |
Force fsck to check a filesystem. The tool checks even when the filesystem appears to be clean. |
-l |
Lock the device to prevent other programs from using the partition during the scan and repair. |
-M |
Do not check mounted filesystems. The tool returns an exit code 0 when a filesystem is mounted. |
-N |
Do a dry run. The output prints what the fsck would do without executing any actions. The warning or error messages are printed as well. |
-P |
Use to run a scan on multiple filesystems in parallel. It can cause issues, depending on your setup. Use with caution. |
-R |
Tell the fsck tool not to check the root filesystems when you use the -A option. |
-r |
Print device statistics. |
-t |
Specify which filesystems type(s) to check with fsck. Consult the man page for detailed information. |
-T |
Hide the title when the tool starts. |
-y |
Try to repair filesystem errors automatically during the check. |
-V |
Verbose output. |
Note: Learn about the error code SIGSEGV (signal segmentation violation) and how to troubleshoot it.
Conclusion
Now you know how to use fsck Linux command to check and repair filesystems. The guide provided examples of the tool’s functionalities and features.
Make sure you have root permissions before running the listed commands. For a detailed description of all options, you can consult the man file of the tool or visit the fsck Linux man page.
Welcome, FOSS Linux readers, to this comprehensive guide on checking hard disks in Linux using the fsck command! As a passionate Linux user myself, I understand the importance of maintaining a healthy and error-free storage system. In this article, we will explore the fsck utility, its significance in disk maintenance, and how to utilize it effectively. So, let’s dive in!
Understanding fsck
The fsck command, short for “file system consistency check,” is a powerful utility that helps detect and repair errors in file systems. It is particularly useful for analyzing and correcting inconsistencies, ensuring the integrity of your hard disk.
Viewing the list of partitions
Viewing list of partitions using lsblk
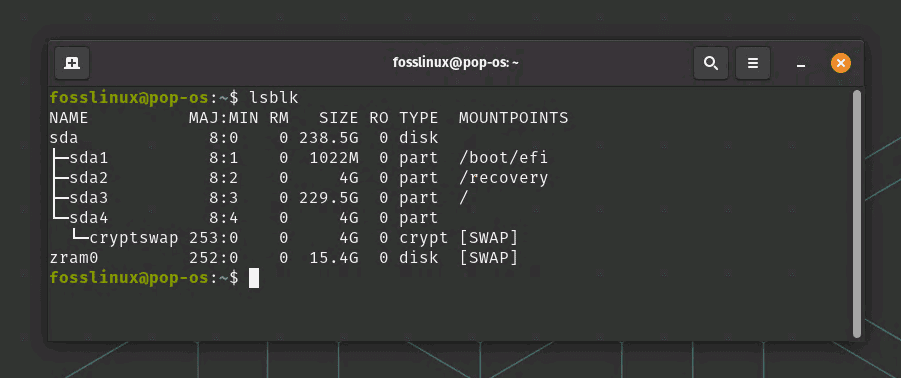
Before running fsck on a specific partition, it is essential to identify the correct device name corresponding to that partition. To view the list of partitions on your Linux system, you can utilize the lsblk command. This command provides a convenient way to visualize the block devices, including disks and partitions, in your system.
Here’s how you can view the list of partitions using lsblk:
Step 1: Open a terminal on your Linux system.
Step 2: Enter the following command:
lsblk
Step 3: The output will display a tree-like representation of the block devices and their corresponding partitions, including their device names, sizes, mount points, and other relevant information. Analyze the output to identify the partition you wish to check using fsck. This is why I recommend lsblk over the fdisk command. Incase you system doesn’t have lsblk installed, you can easily install it using the following commands:
Here are the commands to install lsblk on a few popular Linux distributions:
Debian and Ubuntu:
sudo apt-get update
sudo apt-get install util-linux
CentOS and Fedora:
sudo yum install util-linux
Arch Linux:
sudo pacman -Syu util-linux
openSUSE:
sudo zypper install util-linux
These commands will install the util-linux package, which includes the lsblk command, on your system. After the installation, you should be able to use lsblk to view the list of partitions.
Example output:
NAME MAJ:MIN RM SIZE RO TYPE MOUNTPOINT
sda 8:0 0 250G 0 disk
├─sda1 8:1 0 100G 0 part /
├─sda2 8:2 0 50G 0 part /home
└─sda3 8:3 0 100G 0 part /data
In this example, the output shows the device name /dev/sda1 corresponding to the partition mounted as the root directory (“/”), /dev/sda2 corresponding to the partition mounted as “/home,” and /dev/sda3 corresponding to the partition mounted as “/data.”
By using the lsblk command, you can easily identify the device names associated with the partitions in your system. This knowledge is crucial for running fsck on the desired partition and ensuring accurate disk checks and repairs.
Now that you have obtained the necessary information about your partitions, let’s proceed with running fsck on the selected partition.
Different Linux distributions and fsck
Linux comes in various flavors, each with its own package management system. Let’s take a closer look at how to utilize fsck on three popular distributions: Debian, Arch Linux, and RPM-based distros.
Debian
Debian-based distributions, such as Ubuntu and Linux Mint, rely on the Advanced Packaging Tool (APT) for package management. To check your hard disk using fsck on Debian, follow these steps:
Step 1: Open a terminal.
Step 2: Type the following command to check the file system on the next boot:
sudo touch /forcefsck
Step 3: Reboot your system, and fsck will automatically scan your hard disk during the boot process.
Arch Linux
Arch Linux, known for its simplicity and flexibility, utilizes the Pacman package manager. To perform a hard disk check using fsck on Arch Linux, proceed as follows:
Step 1: Open a terminal.
Step 2: Enter the command below to unmount the desired partition:
sudo umount /dev/[partition]
Note: Replace [partition] with the actual partition name, such as /dev/sda1.
Step 3: Run the fsck command with the appropriate options:
sudo fsck -f /dev/[partition]
The -f option forces fsck to scan the partition even if it appears clean.
Step 4: After fsck completes its analysis, you will receive a report on any detected errors or inconsistencies.
RPM-based Distros
RPM-based distributions like Fedora and CentOS use the Yellowdog Updater Modified (yum) or Dandified yum (dnf) package managers. To check your hard disk using fsck on RPM-based distros, follow these steps:
Step 1: Open a terminal.
Step 2: Type the following command to unmount the desired partition:
sudo umount /dev/[partition]
Step 3: Execute the fsck command with the appropriate options:
sudo fsck -a /dev/[partition]
The -a option automatically repairs detected errors without user intervention.
Step 4: Once fsck completes the scan, it will display the results, including any repaired errors.
As a Linux user, I appreciate the flexibility and control it offers. The ability to utilize fsck to ensure the stability and reliability of my hard disk is invaluable. However, it’s important to note that the process can be time-consuming, especially for larger storage systems. Patience is key!
Wait, can I run fsck in the Terminal?
In addition to the option of performing a disk check during the boot process, fsck can also be executed directly within the terminal. This method allows for a more thorough analysis of the file system, as it can be performed on an unmounted partition. However, it is crucial to ensure that the file system is unmounted before running fsck to avoid data corruption. Here’s how you can run fsck in the terminal:
Step 1: Open a terminal on your Linux system.
Step 2: Ensure that the file system you want to check is unmounted. You can use the umount command to unmount the desired partition. For example:
sudo umount /dev/[partition]
Replace [partition] with the actual partition name, such as /dev/sda1.
For example, we will assume that /dev/sda1 is already unmounted. If it is mounted, you can use the following command to unmount it:
sudo umount /dev/sda1
Step 3: Run the fsck command with the appropriate options to check the file system. The exact syntax may vary depending on your Linux distribution and file system type. Generally, you would use a command like:
sudo fsck -f /dev/[partition]
The -f option forces fsck to scan the partition even if it appears clean. Again, replace [partition] with the actual partition name.
As an example, for ext4 file systems, you can use the following command:
sudo fsck.ext4 -f /dev/sda1
Step 4: fsck will begin analyzing the file system and display any errors or inconsistencies it detects. It may prompt you to confirm repairs or require your intervention in certain cases.
Step 5: Once fsck completes the analysis and any necessary repairs, it will provide a report indicating the actions taken and the current status of the file system.
Here is an example output from fsck:
fsck from util-linux 2.36.1
e2fsck 1.46.3 (27-Jul-2021)
Pass 1: Checking inodes, blocks, and sizes
Pass 2: Checking directory structure
Pass 3: Checking directory connectivity
Pass 4: Checking reference counts
Pass 5: Checking group summary information
/dev/sda1: X/Y files (Z/Z blocks)

Filesystem errors were corrected successfully.
In this example, fsck checks the ext4 file system on /dev/sda1 and reports that it corrected filesystem errors successfully.
Running fsck in the terminal allows you to perform a detailed analysis of unmounted file systems and address any issues that may be present, helping to maintain the health and integrity of your storage devices.
Advanced uses of fsck
While fsck is commonly used to check and repair file systems, it offers several advanced options that can be useful in specific scenarios. Let’s explore some of these advanced uses of fsck to enhance your disk maintenance capabilities.
1. Force a file system check on every boot
By default, most Linux distributions perform file system checks periodically or based on specific criteria. However, you can use fsck to force a file system check on every boot. This can be particularly helpful when you suspect persistent issues with your file system. To enable this option, follow these steps:
Step 1: Open a terminal.
Step 2: Edit the /etc/fstab file using a text editor with root privileges, such as:
sudo nano /etc/fstab
Step 3: Locate the entry for the file system you want to check and add the fsck.mode=force option to the options column. For example:
/dev/sda1 / ext4 errors=remount-ro 0 1
becomes:
/dev/sda1 / ext4 errors=remount-ro,fsck.mode=force 0 1
Step 4: Save the changes and exit the text editor.
Step 5: The next time you boot your system, fsck will automatically run a file system check on the specified partition.
2. Repair file system automatically
By default, fsck prompts for user intervention when it encounters errors during a file system check. However, you can use the -y option to automatically repair the file system without any user interaction. Be cautious when using this option, as it can potentially lead to data loss. To automatically repair file system errors, use the following command:
sudo fsck -y /dev/[partition]
Replace [partition] with the actual partition name.
3. Specify file system type
In some cases, fsck may not be able to automatically determine the file system type. You can use the -t option to explicitly specify the file system type. For example, to check an ext4 file system, you can use the following command:
sudo fsck -t ext4 /dev/[partition]
Replace [partition] with the actual partition name.
4. Check multiple partitions simultaneously
If you want to check multiple partitions simultaneously, you can specify them as arguments to the fsck command. For example:
sudo fsck /dev/sda1 /dev/sdb1
This command will run fsck on both /dev/sda1 and /dev/sdb1 concurrently, saving time when dealing with multiple partitions.
By leveraging these advanced features of fsck, you can further tailor your disk maintenance and repair procedures to suit your specific needs.
Applicability for HDDs and SSDs
The tutorial presented in this guide is applicable to both Hard Disk Drives (HDDs) and Solid-State Drives (SSDs). While there are some differences between the underlying technologies of these storage devices, the process of checking the file system using fsck and ensuring its integrity is relevant for both HDDs and SSDs. Let’s explore why this tutorial is beneficial for both types of drives:
File system consistency: Regardless of whether you have an HDD or an SSD, maintaining a consistent and error-free file system is crucial for the stability and reliability of your Linux system. By using fsck to check and repair file system inconsistencies, you can identify and rectify issues that may cause data corruption or system instability on both types of drives.
Detecting errors: Both HDDs and SSDs can experience errors in the file system due to various factors such as power outages, improper shutdowns, or hardware failures. Running fsck enables you to detect and resolve these errors, ensuring the integrity of your data and preventing potential issues from escalating on both types of drives.
Performance optimization: Regular disk checks using fsck can help optimize the performance of both HDDs and SSDs. By identifying and repairing file system errors, you can improve read and write speeds, reduce disk fragmentation, and enhance overall system responsiveness for both drive types.
Longevity considerations: While SSDs have a limited number of write cycles compared to HDDs, occasional disk checks using fsck are still beneficial for maintaining the file system’s health on SSDs. While it’s important to be mindful of unnecessary writes and excessive disk checks on SSDs to preserve their lifespan, performing periodic file system checks can help identify and address any underlying issues that may affect the drive’s performance and longevity.
Manufacturer-specific tools: While this tutorial focuses on the general usage of fsck, it’s worth noting that some SSD manufacturers and Linux distributions provide specialized tools or utilities for managing and maintaining SSDs. These tools may offer specific optimizations and features tailored to SSDs, such as wear-leveling algorithms or TRIM support. In such cases, it is recommended to refer to the documentation provided by your SSD manufacturer or the specific Linux distribution you are using for any additional guidance on SSD maintenance.
Best practices and additional tips
To ensure a smooth and successful hard disk check using fsck, consider the following best practices:
Backup your data: Before initiating a disk check, it’s essential to back up your important data. Although fsck is generally safe to use, there is always a small chance of data loss or further disk corruption. By having a backup, you can restore your data in case of any unforeseen issues.
Schedule regular checks: Prevention is better than cure. To maintain a healthy disk, it is recommended to schedule regular checks using fsck. This proactive approach can help detect and resolve potential issues before they escalate.
Use live CDs or USBs: If you encounter problems with your root file system, it is often easier to perform a disk check using a live CD or USB. This allows you to unmount the affected partition and run fsck without any interference from the operating system.
Take note of error messages: During the fsck process, pay close attention to any error messages or warnings displayed. These messages can provide valuable insights into the nature of the issues detected and guide you towards the appropriate actions for resolution.
Conclusion
In this comprehensive guide, we have delved into the world of checking hard disks in Linux using the powerful fsck command. By understanding the purpose and significance of fsck, as well as its usage on different Linux distributions such as Debian, Arch Linux, and RPM-based systems, we have equipped ourselves with the knowledge and tools to effectively maintain the integrity of our file systems.
We have learned how to utilize fsck both during the boot process and within the terminal, with detailed step-by-step instructions for each method. Additionally, we explored advanced uses of fsck, including forcing file system checks on every boot, automatically repairing file systems, specifying file system types, and checking multiple partitions simultaneously. These advanced options provide a deeper level of control and customization for disk maintenance.
Throughout the article, I have also emphasized the importance of backups, regular disk checks, and the need to exercise caution when making repairs. By following best practices, such as scheduling regular checks, taking note of error messages, and seeking professional assistance when necessary, we can ensure the stability and reliability of our storage systems.
Оригинал: How to Use ‘fsck’ to Repair File System Errors in Linux
Автор: Marin Todorov
Дата публикации: 1 октября 2018 года
Перевод: А. Кривошей
Дата перевода: июль 2019 г.
Файловые системы отвечают за организацию хранения данных. Так или иначе, со временем файловая система может быть повреждена и некоторые ее части могут быть недоступны. Если ваша файловая система имеет такое несоответствие, рекомендуется проверить ее целостность.
Это можно выполнить с помощью системной утилиты fsck (file system consistency check). Эта проверка может быть выполнена автоматически во время загрузки или запущена вручную.
В этой статье мы рассмотрим утилиту fsck и ее использование, чтобы помочь вам исправить дисковые ошибки.
Когда нужно использовать fsck в Linux
Существуют разные сценарии, когда вам понадобится запустить fsck. Вот несколько примеров:
Система не загружается.
Файлы в системе поврежденны (часто вы можете увидеть ошибку ввода/вывода).
Подключенный диск (включая флэшки/SD-карты) не работает должным образом.
Опции fsck
Команда Fsck должна быть запущена с привилегиями суперпользователя (root). Вы можете использовать ее с разными аргументами. Их использование зависит от вашего конкретного случая. Ниже вы увидите некоторые из наиболее важных опций:
-A — используется для проверки всех файловых систем. Список берется из /etc/fstab.
-C — показывать индикатор выполнения.
-l — блокирует устройство, чтобы гарантировать, что никакая другая программа не попытается использовать раздел во время проверки.
-M — не проверять смонтированные файловые системы.
-N — только показывать, что будет сделано — не делать никаких реальных изменений.
-P — если вы хотите проверять файловые системы параллельно, включая корневую.
-R — не проверять корневую файловую систему. Это полезно только вместе с ‘-A‘.
-r — предоставить статистику для каждого проверяемого устройства.
-T — не показывает заголовок.
-t — исключительно указать типы файловых систем, которые будут проверяться. Типы могут быть разделены запятыми.
-V — предоставить описание того, что делается.
Как запустить fsck для исправления ошибок файловой системы Linux
Чтобы запустить fsck, вам нужно убедиться, что раздел, который вы собираетесь проверить, не смонтирован. Для этой статьи я буду использовать мой второй диск /dev/sdb, смонтированный в /mnt.
Вот что произойдет, если я попытаюсь запустить fsck на смонтированном разделе.
# fsck /dev/sdb
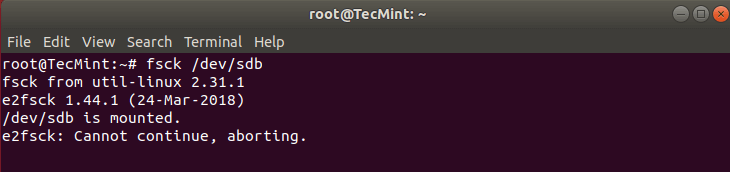
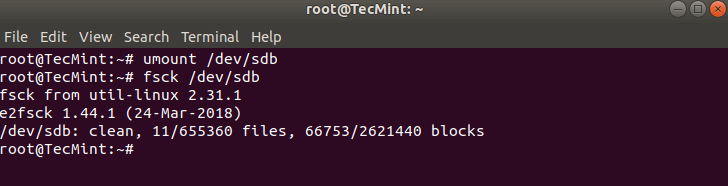
Чтобы избежать этого, размонтируйте раздел с помощью команды:
# umount /dev/sdb
Теперь fsck можно запустить безопасно.
# fsck /dev/sdb
Понимание кодов выхода fsck
После запуска fsck она вернет код выхода. Эти коды можно увидеть в руководстве fsck, выполнив:
# man fsck

0       Нет ошибок
1       Исправлены ошибки файловой системы
2       Система должна быть перезагружена
4       Ошибки файловой системы остались без исправления
8       Операционная ошибка
16     Ошибка использования или синтаксиса
32     Проверка отменена по запросу пользователя
128  Ошибка общей библиотеки
Исправление ошибок файловой системы Linux
Иногда в файловой системе можно найти ошибки. В таких случаях вы захотите, чтобы fsck автоматически пыталась исправить ошибки. Это можно сделать с помощью следующей команды:
# fsck -y /dev/sdb
Флаг -y автоматически даёт ответ «да» на любые запросы от fsck для исправления ошибок.
Точно так же вы можете запустить команду на всех файловых системах (без корневой):
$ fsck -AR -y
Как запустить fsck в корневом разделе Linux
В некоторых случаях вам может потребоваться запустить fsck в корневом разделе вашей системы. Поскольку вы не можете запустить fsck на смонтированном разделе, вы можете попробовать один из следующих вариантов:
1. Принудительно использовать fsck при загрузке системы
2. Запустить fsck в режиме восстановления
Мы рассмотрим обе ситуации.
Принудительная проверка корневой файловой системы с помощью fsck при загрузке системы
Это относительно легко выполнить, единственное, что вам нужно сделать, это создать файл с именем forcefsck в корневом разделе вашей системы. Используйте следующую команду:
# touch /forcefsck
Во время следующей загрузки будет выполняться fsck. Если время простоя является критическим, рекомендуется тщательно спланировать эту проверку, так как если в вашей системе много используемых inode, fsck может занять некоторое, довольно значительное время.
После загрузки системы проверьте, существует ли этот файл:
# ls /forcefsck
Если он есть, вы можете удалить его, чтобы избежать запуска fsck при каждой загрузке системы.
Запуск fsck в режиме восстановления
Запуск fsck в режиме восстановления требует еще нескольких шагов. Сначала подготовьте систему к перезагрузке. Остановите все важные службы, такие как MySQL/MariaDB и т. д., а затем перезагрузите компьютер.
# reboot
Во время загрузки удерживайте нажатой клавишу Shift, чтобы отобразилось меню grub. Выберите «Advanced options».
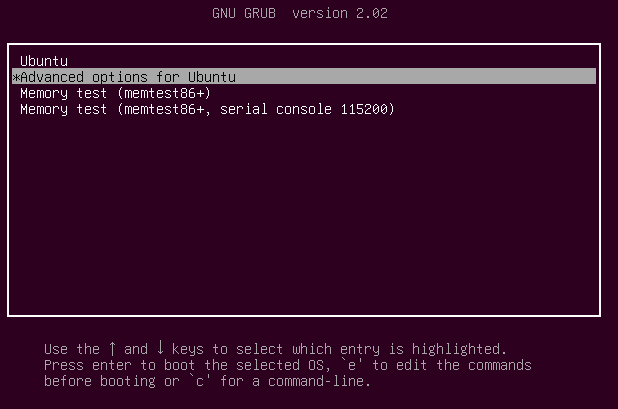
Затем выберите «Recovery mode».
В следующем меню выберите «fsck».
Вас спросят, хотите ли вы перемонтировать вашу корневую файловую систему. Выберите «yes».
Вы должны увидеть что-то похожее на это.
Затем вы можете вернуться к нормальной загрузке, выбрав «Resume».
Заключение
Из этого руководства вы узнали, как использовать fsck и выполнять проверки согласованности в разных файловых системах Linux. Если у вас есть какие-либо вопросы о fsck, пожалуйста, не стесняйтесь задавать их в разделе комментариев ниже.
Другие статьи о команде fsck в Linux:
- Программа fsck
- 4 утилиты для устранения проблем файловых систем EXT2, EXT3 и EXT4 в Linux
- Проверка жесткого диска на плохие сектора и блоки в Linux
- Software-RAID HOWTO. 4. Восстановление ошибок
Если вам понравилась статья, поделитесь ею с друзьями:
Updated: 03/13/2021 by

On Unix-like operating systems, the fsck command checks and repairs a Linux file system.
This page describes the GNU/Linux version of fsck.
Description
fsck stands for :file system consistency check:. On most systems, fsck is run at boot time if certain conditions are detected. Usually, these conditions are:
- A file system is marked as «dirty» — its written state is inconsistent with data that was scheduled to be written; or,
- A file system was mounted a set number of times without being checked.
The fsck command itself interacts with a matching filesystem-specific fsck command created by the filesystem’s authors. Regardless of filesystem type, fsck generally has three modes of operation:
- Check for errors, and prompt the user interactively to decide how to resolve individual problems;
- Check for errors, and attempt to fix any errors automatically; or,
- Check for errors, and make no attempt to repair them, but display the errors on standard output.
While normally run at boot time, fsck can run manually on unmounted filesystems by a superuser.
Technical description
fsck is used to check, and optionally repair, one or more filesystems.
filesys is a device name (e.g., /dev/hdc1, /dev/sdb2), a mount point (e.g., /, /usr, /home), or an ext2 label or UUID specifier (for example «UUID=8868abf6-88c5-4a83-98b8-bfc24057f7bd» or «LABEL=root«).
Normally, fsck tries to handle filesystems on different physical disk drives in parallel to reduce the time needed to check all of them.
If no filesystems are specified on the command line, and the -A option is not specified, fsck defaults to checking filesystems in /etc/fstab serially. This is equivalent to the combination of the -A and -s options.
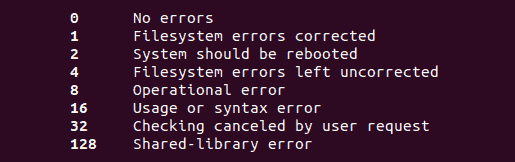
The exit code returned by fsck is a unique number representing the sum of the following condition values:
0 — No errors
1 — Filesystem errors corrected
2 — System should be rebooted
4 — Filesystem errors left uncorrected
8 — Operational error
16 — Usage or syntax error
32 — Fsck canceled by user request
128 — Shared-library error
The exit code returned when multiple filesystems are checked is the bitwise OR of the exit codes for each filesystem that is checked.
In actuality, fsck is a front-end for the various filesystem checkers (fsck.fstype) available under Linux. The filesystem-specific checker is searched for in /sbin first, then in /etc/fs and /etc, and finally in the directories listed in the PATH environment variable.
Read filesystem-specific checker manual pages for further details. For example, to learn more about ext3-specific fsck checking, run:
man fsck.ext3
Syntax
fsck [-lsAVRTMNP] [-C [fd]] [-t fstype] [filesys...]
     [--] [fs-specific-options]
Options
| -l | Lock the whole-disk device by an exclusive flock. This option can be used with one device only (this means that -A and -l are mutually exclusive). This option is recommended when more fsck instances are executed in the same time. The option is ignored when used for multiple devices or for non-rotating disks. fsck does not lock underlying devices when executed to check stacked devices (e.g., MD or DM); this feature is not implemented yet. |
| -s | Serialize fsck operations. This is a good idea if you are checking multiple filesystems and the checkers are in an interactive mode. Note: e2fsck runs in an interactive mode by default. To make e2fsck run in a non-interactive mode, you must specify the -p or -a option, if you want for errors to be corrected automatically, or the -n option if you do not. |
| -t fslist | Specifies the type(s) of filesystem to be checked. When the -A flag is specified, only filesystems that match fslist are checked. The fslist parameter is a comma-separated list of filesystems and options specifiers. All the filesystems in this comma-separated list may be prefixed by a negation operator ‘no‘ or ‘!‘, which requests that only those filesystems not listed in fslist are checked. If none of the filesystems in fslist are prefixed by a negation operator, then only those listed filesystems are checked.
Options specifiers may be included in the comma-separated fslist. They must have the format opts=fs-option. If an options specifier is present, then only filesystems which contain fs-option in their mount options field of /etc/fstab are checked. If the options specifier is prefixed by a negation operator, then only those filesystems that do not have fs-option in their mount options field of /etc/fstab are checked. For example, if opts=ro appears in fslist, then only filesystems listed in /etc/fstab with the ro option are checked. For compatibility with Mandrake distributions with boot scripts dependant on an unauthorized UI change to the fsck program, if a filesystem type of loop is found in fslist, it is treated as if opts=loop were specified as an argument to the -t option. Normally, the filesystem type is deduced by searching for filesys in the /etc/fstab file and using the corresponding entry. If the type cannot be deduced, and there is only a single filesystem given as an argument to the -t option, fsck uses the specified filesystem type. If this type is not available, then the default filesystem type (currently ext2) is used. |
| -A | Walk through the /etc/fstab file and try to check all filesystems in one run. This option is used from the /etc/rc system initialization file, instead of multiple commands for checking a single filesystem.
The root filesystem is checked first unless the -P option is specified (see below). After that, filesystems are checked in the order specified by the fs_passno (the sixth) field in the /etc/fstab file. Filesystems with a fs_passno value of 0 are skipped and are not checked at all. Filesystems with a fs_passno value of greater than zero are checked in order, with filesystems with the lowest fs_passno number being checked first. If there are multiple filesystems with the same pass number, fsck attempts to check them in parallel, although it avoids running multiple filesystem checks on the same physical disk. fsck does not check stacked devices (RAIDs, dm-crypt, …) in parallel with any other device. See below for FSCK_FORCE_ALL_PARALLEL setting. The /sys filesystem is used to determine dependencies between devices. Hence, a very common configuration in /etc/fstab files is to set the root filesystem to have a fs_passno value of 1 and to set all other filesystems to have a fs_passno value of 2. This allows fsck to automatically run filesystem checkers in parallel if it’s advantageous to do so. System administrators might choose not to use this configuration if they need to avoid multiple filesystem checks running in parallel for some reason — for example, if the machine in question is short on memory so that excessive paging is a concern. fsck normally does not check whether the device actually exists before calling a filesystem specific checker. Therefore, non-existing devices may cause the system to enter filesystem repair mode during boot if the filesystem specific checker returns a fatal error. The /etc/fstab mount option nofail can have fsck skip non-existing devices. fsck also skips non-existing devices that have the special filesystem type auto. |
| -C [fd] | Display completion/progress bars for those filesystem checkers (currently only for ext2 and ext3) which support them. Fsck manages the filesystem checkers so that only one of them displays a progress bar at a time. GUI front-ends may specify a file descriptor fd, where the progress bar information is sent to that file descriptor. |
| -M | Do not check mounted filesystems and return an exit code of 0 for mounted filesystems. |
| -N | Don’t do anything; show what would be done. |
| -P | When the -A flag is set, check the root filesystem in parallel with the other filesystems. This is not the safest thing in the world to do; if the root filesystem is in doubt, things like the e2fsck executable might be corrupted! This option is mainly provided for those sysadmins who don’t want to repartition the root filesystem to be small and compact (which is really the right solution). |
| -R | When checking all filesystems with the -A flag, skip the root filesystem. This is useful in case the root filesystem is already mounted read-write. |
| -T | Don’t show the title on startup. |
| -V | Produce verbose output, including all filesystem-specific commands that are executed. |
Filesystem-specific options
Options that are not understood by fsck are passed to the filesystem-specific checker. These arguments must not take arguments, as there is no way for fsck to be able to properly guess which options take arguments and which don’t.
Options and arguments which follow the — are treated as filesystem-specific options to be passed to the filesystem-specific checker.
Please note that fsck is not designed to pass arbitrarily complicated options to filesystem-specific checkers. If you’re doing something complicated, execute the filesystem-specific checker directly. If you pass fsck some horribly complicated options and arguments, and it doesn’t do what you expect, you’re almost certainly doing something you shouldn’t be doing with fsck. Options to different filesystem-specific fsck‘s are not standardized. If in doubt, please consult the man pages of the filesystem-specific checker. Although not guaranteed, the following options are supported by most filesystem checkers:
| -a | Automatically repair the filesystem without any questions (use this option with caution). Note that e2fsck supports -a for backward compatibility only. This option is mapped to e2fsck‘s -p option that is safe to use, unlike the -a option that some filesystem checkers support. |
| -n | For some filesystem-specific checkers, the -n option causes the fs-specific fsck to avoid attempting to repair any problems, but report such problems to stdout. However, this is not true for all filesystem-specific checkers. In particular, fsck.reiserfs does not report any corruption if given this option. fsck.minix does not support the -n option at all. |
| -r | Interactively repair the filesystem (ask for confirmations). Note: It is generally a bad idea to use this option if multiple fsck‘s are being run in parallel. Also, note that this is e2fsck‘s default behavior; it supports this option for backward compatibility reasons only. |
| -y | For some filesystem-specific checkers, the -y option causes the fs-specific fsck to always attempt to fix any detected filesystem corruption automatically. Sometimes an expert can do better driving the fsck manually. Note that not all filesystem-specific checkers implement this option. In particular, fsck.minix and fsck.cramfs do not support the -y option. |
Examples
Warning
Do not run fsck on a mounted filesystem! If you run fsck on a filesystem that is currently mounted, (at best) you receive an error message, and (at worst) corrupt your filesystem data. If you’re going to check your filesystem with fsck, drop into single-user mode and make sure the filesystem is unmounted before you proceed.
Dropping into single-user mode
These instructions should help you bring your Linux system into single-user mode and unmount any filesystems you want to check with fsck.
First, initiate runlevel 1 (single-user mode) with the init command:
sudo init 1
Now unmount the filesystem using umount. For instance, if /home is mounted on /dev/sda2, you could run:
umount /home
…or:
umount /dev/sda2
Make sure to run umount for any filesystem you want to check with fsck.
Checking filesystems
fsck /dev/sda2
This command attempts to check /dev/sda2, and report any errors it finds.
fsck -y /dev/sda2
Check /dev/sda2, and attempt to automatically fix any errors found.
fsck -A
Check all configured filesystems. fsck processes the file /etc/fstab and check all file systems listed there. Systems are checked in order of their <pass> value, as listed in the fstab file. Systems with a pass value of 0 are skipped; the system with a pass value of 1 is listed first, and remaining systems are checked in ascending order of their pass value.
cat /etc/fstab
View all configured filesystems. Output resembles the following:
# /etc/fstab: static file system information.
#
# Use 'blkid' to print the universally unique identifier for a
# device; this may be used with UUID= as a more robust way to name devices
# that works even if disks are added and removed. See fstab man page.
#
# <file system> <mount point>   <type>  <options>       <dump>  <pass>
# / was on /dev/sda5 during installation
UUID=c3a6839b-00f1-4cf4-8b00-e61fbcdba6c0 /               ext4    errors=remount-ro 0       1
# /home was on /dev/sda7 during installation
UUID=afceabb6-a3f4-41c2-9ae6-0393d85c7c70 /home           ext4    defaults        0       2
# swap was on /dev/sda6 during installation
UUID=c6ca8b8f-0b46-4c06-a934-a9dd3525faa7 none            swap    sw              0       0
#/dev/sdb1       /media/usb0     auto    rw,user,noauto  0       0
ls /sbin/fsck.*
View all filesystems that can be checked with fsck. Filesystems appear as extensions to the fsck.* files; for example:
fsck.cramfs  fsck.ext3  fsck.ext4dev  fsck.minix  fsck.nfs      fsck.reiserfs  fsck.xfs
fsck.ext2    fsck.ext4  fsck.jfs      fsck.msdos  fsck.reiser4  fsck.vfat
fsck -n /dev/sda2
Check /dev/sda2 for errors, but do not attempt to repair them; instead, print any errors to standard output.
fsck -f /dev/sda2
Normally, fsck skips parts of the filesystem marked as «clean» — meaning all pending writes were successfully made. The -f («force») option specifies that fsck should check parts of the filesystem even if they are not «dirty». The result is a less efficient, but a more thorough check.
fsck -t ext2 /dev/fd0
This command checks the ext2 filesystem on the floppy diskette device /dev/fd0.
mkfs — Build a Linux file system, usually a hard disk partition.