Японская компания Kyocera производит высококачественные лазерные принтеры и МФУ для офисной печати. Их продукция одна из самых востребованных на сегодняшний день. Ведь печатающие устройства Kyocera характеризуются высокой надежностью, износостойкостью и большим сроком эксплуатации. Однако даже их изделия не являются вечными. Со временем принтеры Kyocera начинают сбоить.
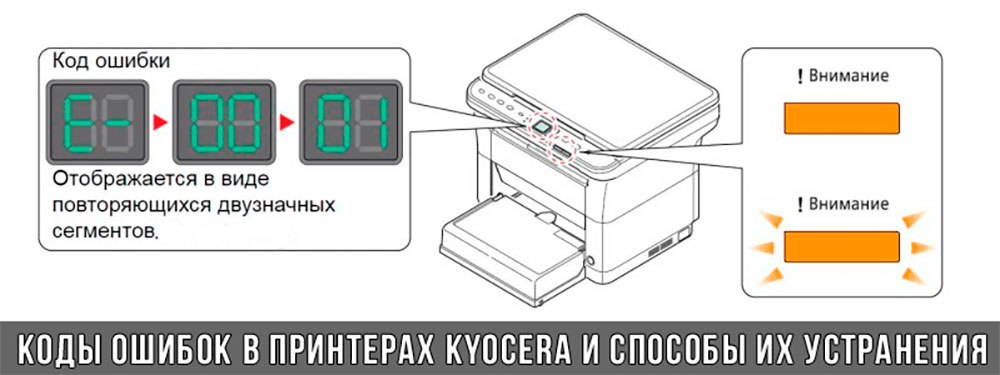
К счастью, оргтехника Kyocera оснащена системой самодиагностики (так же, как и струйные принтеры Canon). Поэтому, в случае возникновения проблемы, устройство самостоятельно выявит уязвимое место и сообщит Вам об этом миганием соответствующего индикатора на панели управления либо кодом ошибки, выведенным на дисплей принтера.
Если Вы не являетесь мастером по обслуживанию принтеров и МФУ Kyocera, то, чтобы понять, о чем сообщает печатающее устройство, Вам потребуется расшифровать указанный им код. Для этого мы добавили в статью таблицу кодов ошибок лазерных принтеров Kyocera серии FS и не только.
Коды ошибок принтеров и МФУ Kyocera, которые можно исправить самостоятельно
|
Код ошибки |
Значение ошибки |
Решение проблемы |
|
E-0001 (E1) |
Поврежден чип картриджа либо установлен неоригинальный картридж. |
Замените установленный картридж оригинальной версией изделия. Если хотите сэкономить, тогда купите и установите новый чип на картридж или перепрошейте принтер Kyocera. Однако предварительно не помешает попробовать сбросить ошибку соответствующей комбинацией клавиш (как это сделать, читайте в статье «Сброс ошибки установки неоригинального картриджа в принтерах Kyocera»). |
|
E-0002 (E2) |
Регион использования картриджа и принтера не совпадают. |
Замените чип или прошейте принтер Kyocera. |
|
E-0003 (E3) |
Заполнена память принтера или МФУ Kyocera. |
Отпечатайте ранее отсканированные листы или очистите очередь печати нажатием кнопки Стоп/Сброс (ранее отсканированные листы также удалятся из памяти принтера, даже если они еще не были распечатаны). |
|
E-0007 (E7) |
Тонер-картридж Kyocera израсходовал ресурс красящего вещества. |
Замените или заправьте картридж Kyocera (если используете совместимый или перезаправленный расходник, то после установки его в принтер не забудьте сбросить ошибку зажатием на 3-5 секунды кнопок [Ок] и [Сброс/Стоп]). |
|
E-0008 (E8) |
Открыта крышка принтера либо не работает датчик закрытия крышек устройства. |
Откройте и еще раз закройте переднюю и заднюю крышку принтера. Во время закрытия Вы должны услышать характерный щелчок. Если не помогло, то причина в неисправности датчика. |
|
E-0009 (E9) |
Лоток приема бумаги полон. |
Уберите все отпечатанные листы бумаги из выходящего лотка. Чтобы возобновить печать, нажмите кнопку [Старт]. |
|
E-0012 (E12) |
Ошибка памяти принтера Kyocera. |
Попробуйте уменьшить разрешение печати. Скорее всего, формат создаваемого отпечатка не соответствует возможностям принтера. |
|
E-0014 (E14) |
Установлен неверный формат бумаги (неподдерживаемый принтером Kyocera). |
Поменяйте бумагу на поддерживаемую принтером либо смените ее формат в настройках печати. Попробуйте обновить программное обеспечение. Возможно, это расширит поддерживаемые принтером Kyocera форматы. |
|
E-0015 (E15) |
Устройство не подключено к электрической сети либо на компьютере нет (не работает) драйвера принтера Kyocera. |
Проверьте подключение печатающего аппарата к электрической сети, а также целостность кабеля. Если ошибка не исчезает, скачайте драйвер принтера Kyocera и установите его на компьютер. |
|
E-0017 (E17) |
Ошибка передачи данных. |
Проверьте подключение принтера к компьютеру. Кабель не должен быть длиннее 5 метров, а также обязан поддерживать стандарт USB 2.0. Кроме того, переустановите драйвер принтера и утилиту Kyocera Client Tool. |
|
E-0018 (E18) |
Очередь печати заполнена. |
Очистите очередь печати нажатием кнопки [Сброс] либо через драйвер принтера. |
|
E-0019 (E19) |
Неверный формат печати. |
Отмените печать нажатием кнопки [Стоп/Сброс]. Выберите в настройках принтера соответствующий режим печати, а также установите в лоток поддерживаемый принтером формат бумаги. |
|
J-0000 (jam0000) |
Замятие бумаги за задней крышкой. |
Откройте крышку и извлеките бумагу. Проверьте надежность крепления бумаги в лотке, а также принтер на наличие посторонних предметов. Еще причина может быть в пружине выходного флажка. Если она растянулась, то может плохо работать фиксатор. Также проблема может быть из-за печки, сделайте ее ревизию, переборку и смазку. |
|
J-0501 (jam0501) |
Бумага застряла в принтере Kyocera |
Извлеките замятую бумагу. Проверьте надежность установки бумаги во входной лоток. Проверьте целостность роликов протяжки бумаги, а также принтер на наличие посторонних предметов. Если не помогло, стоит внимательно осмотреть ребра на направляющей пластине. На них могут образоваться сколы, трещины и заусенцы. Их можно слегка подчистить наждачной бумагой (нулевкой). |
|
J-0511 (jam0511) |
Принтер Kyocera замял бумагу. |
Извлеките замятую бумагу и повторите печать. Если проблема не исчезла, несите принтер в сервис. Скорее всего, изношен ролик протяжки бумаги. |
|
C7990 |
Бункер драм-картриджа (блока фотобарабана) заполнен отработанным тонером либо неисправен счетчик отработки красящего вещества. Еще проблема может быть в главной плате PWB. |
Осуществите чистку драм-картриджа (блока фотобарабана). Если проблема в датчике или плате, то нужно отнести принтер в СЦ на диагностику. |
|
F248 |
Ошибка обработки отпечатываемого материала. |
Перезагрузите принтер. Уберите неподдерживаемые спецсимволы из отпечатка. Обновите ПО принтера Kyocera. Смените режим работы принтера с PDL на GDI (Пуск -> Принтеры -> Свойства -> Параметры устройства). |
|
PF |
Отсутствует бумага в лотке подачи. |
Загрузите листы бумаги во входной лоток. Если принтер по-прежнему не печатает, значит нужно искать проблему в чем-то другом. |
|
1101 |
Ошибка сканирования через сеть из-за неправильного имени SMTP сервера. |
Пропишите DNS-адреса помимо прочих настроек печати по сети. |
|
1102 |
Некорректная настройка сканера для работы через сеть |
Зайдите в Web-панель управления принтером (нужно в адресную строку браузера ввести iP принтера Kyocera). Далее в зависимости от модели введите логин и пароль (Admin/Admin или просто admin00 без логина). Далее следуйте инструкции:
Логин и пароль нужны обязательно, если их нет, то следует создать. |
|
2101 |
Ошибка передачи данных при сканировании через сеть. |
Правильно настройте параметры (как для ошибки 1102), только предварительно отключите на ПК антивирус и брандмауэр. |
Если Вы испытали все способы, но не смогли убрать ошибку, то следует нести печатающее устройство в сервисный центр. Кроме того, есть ряд ошибок (высвечиваемых на дисплее принтера), которые нельзя устранить в домашних условиях. Соответствующие коды ошибок принтеров Kyocera представляем в очередной таблице.
Коды ошибок принтеров и МФУ Kyocera, которые нужно устранять в сервисном центре
|
Код ошибки |
Значение ошибки |
Решение проблемы |
|
0030 |
Неисправность платы управления факсом принтера. |
Замена платы. |
|
0100 |
Неисправность платы управления или флеш-памяти принтера. |
Замена платы. |
|
0120 |
Ошибка чтения mac-адреса из-за неисправности флеш-памяти принтера. |
Замена платы. |
|
0190 |
Неисправность платы управления или флеш-памяти принтера. |
Замена платы. |
|
0630 |
Неисправность платы управления принтера. |
Замена платы. |
|
1020 |
Неисправность мотора, привода или отсутствие контакта. |
Разборка принтера и замена изношенных частей. Проверка надежности подключений, замена разорванных (прогоревших) кабелей. Ремонт или замена привода мотора. |
|
1040 |
Неисправность мотора, привода или отсутствие контакта. |
Разборка принтера и замена изношенных частей. Проверка надежности подключений, замена разорванных (прогоревших) кабелей. Ремонт или замена привода мотора. |
|
2000 |
Неисправность главной платы управления, соединительного кабеля или привода принтера. |
Проверить ремни, шестерни и ролики привода. Смазать или заменить, если есть дефекты. Заменить привод или главную плату. |
|
3100 (C3100) |
Неисправность главной платы, привода сканера, датчика положения или нарушение целостности соединений. |
Проверить наличие разрывов и отсутствия контакта. Смазать или заменить изношенные элементы привода. Заменить привод, главную плату, датчик или соединительный кабель. Если Вам повезло, то возможно забыли отключить фиксатор блока сканера. |
|
3101 |
Сетевой кабель не подсоединен, или нарушена работа концентратора. Еще может быть из-за наличия вирусов в системе или неправильно заданным параметрам сервера SMTP. |
Проверить соединения, правильно настроить параметры сети. |
|
3300 |
Неисправность главной платы, датчика CIS или соединительного кабеля. |
Проверить контакты, заменить плату или датчик. |
|
3500 |
Неисправность главной платы или нарушение соединения контактов. |
Проверить контакты, заменить плату. |
|
4000 (C4000) |
Неисправность главной платы, привода сканера или нарушение соединений. Однако чаще всего ошибка лазера. |
Проверить контакты, заменить плату или привод блока сканера. Почистить лазер, смазать ось полигон-мотора, либо полностью заменить блок лазера. |
|
4200 |
Неисправность главной платы, блока сканера или датчика BD. |
Отключить питание принтера на 30 минут. Если не помогло, то следует заменить привод сканера или главную плату принтера. |
|
6000 (С6000) |
Неисправность главной платы, термостата, печки или нарушение соединения контактов. |
Проверить и поправить контакты. Заменить фьюзер. Ремонт или замена печки, термодатчика, термопредохранителя и т.д. |
|
6020 |
Сгорание термистора или главной платы. |
Замена термистора или главной платы. |
|
6030 |
Неисправность главной платы, термостата или термистора. Возможно, причина в отсутствии контакта. |
Проверить соединения. Заменить плату, термостат или термистор. |
|
6400 |
Неисправность главной платы, отсутствие питания или контакта. |
Заменить плату или источник питания. |
|
F000 |
Неисправность главной платы или отсутствие контакта. |
Проверить соединение ремня безопасности. Заменить ремень или плату управления. |
|
F020 |
Неисправность элементов памяти принтера. |
Перезагрузить принтер. Если ошибка не устранилась – заменить плату управления. |
|
F040 |
Неисправность главной платы принтера. |
Перезагрузить принтер. Если ошибка не устранилась – заменить плату управления. |
|
F05D |
Неисправность главной платы. Сбой программного оборудования привода. Проблемы с прошивкой принтера Kyocera. |
Перезагрузить принтер. Если ошибка не устранилась – заменить плату управления. Перепрошить принтер Kyocera. |
|
F245 F246 F247 F375 |
Принтер Kyocera заблокирован из-за проблемы, вызванной отказом источника питания. |
Нужно перепрошить принтер специальной сервисной микропрограммой. |
Обратите внимание: Если у печатающего устройства нет дисплея, то определить проблему можно по светодиодным индикаторам, встроенным в панель управления принтером. Например, у Kyocera Ecosys P2135D нужно сосчитать количество миганий индикаторов красного цвета и таким образом определить число, указывающее на ту или иную ошибку. В свою очередь, у модели Kyocera FS-1040 все зависит от темпа мигания светодиода с надписью «Внимание!» («Attention!»):
- Мигает медленно – указывает на отсутствие бумаги в лотке или тонера в картридже.
- Мигает быстро – оповещает о проблеме с памятью устройства, переполненном лотке или замятии бумаги, а также об использовании неоригинальных расходных материалов.
- Горит постоянно – говорит о проблемах с картриджем или фотобарабаном либо указывает на открытые крышки принтера.

Чтобы потребитель мог наверняка определить проблему, рекомендуем использовать утилиту Kyocera Client Tool, которая идет в комплекте с драйверами принтера.
Ваше Имя:
Ваш вопрос:
Внимание: HTML не поддерживается! Используйте обычный текст.
Оценка:
Плохо
Хорошо
Введите код, указанный на картинке:


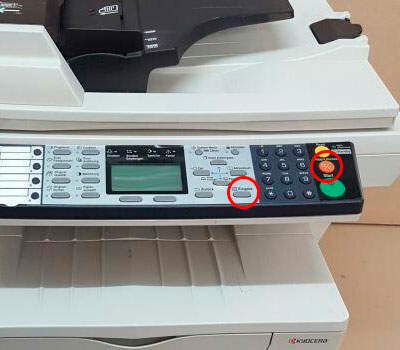
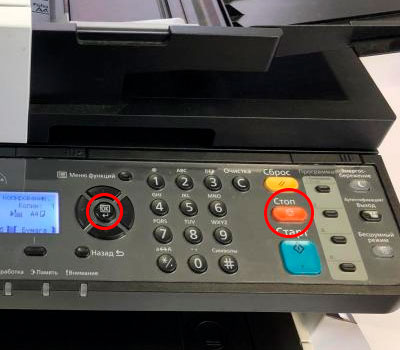
Главная \ Сброс ошибки E-0001 у Kyocera FS-1020MFP
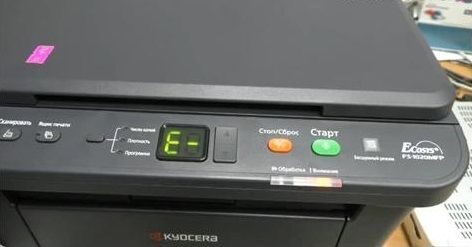
Перезаправив картридж у KYOCERA FS-1020MFP, иногда можно столкнуться с проблемой — аппарат позволит напечатать несколько листов, а потом впадает в ошибку E-0001.
Эта ошибка очень просто сбрасывается нехитрыми действиями:
Наблюдаем на экране ошибку E-0001
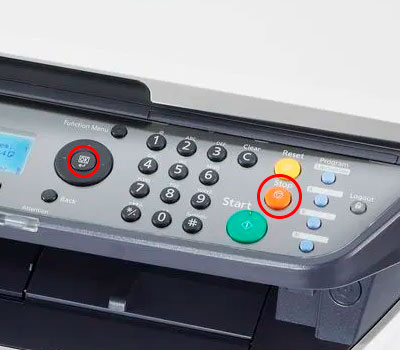
Дабы сбросить её, одновременно зажимаем «Стоп/Сброс» и кнопку с левой стороны от дисплея, находящуюся возле трех индикаторов (кнопки показаны на картинке)
Удерживаем эти кнопки 3-8 секунд, до появления бегущих по кругу индикаторов на дисплее, и отпускаем.
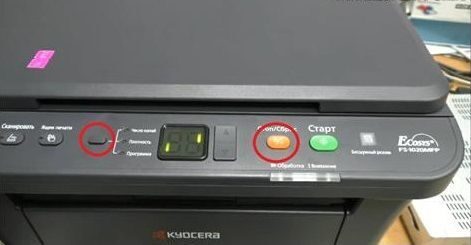
Секунда-две, и аппарат входит в готовность
Можно пользоваться! Спасибо за внимание!
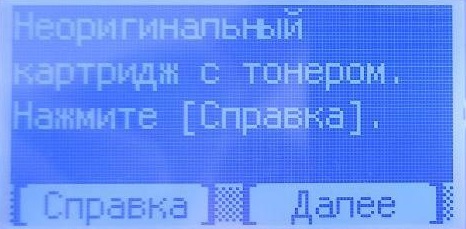
Подскажем и покажем, что делать и как быстро убрать ошибку, если Ваш принтер Kyocera пишет сообщение “Неоригинальный картридж с тонером”. Здесь найдете инструкция по сбросу уведомлений о неоригинальном порошке в устройствах печати этого японского бренда.
Почему возникает ошибка
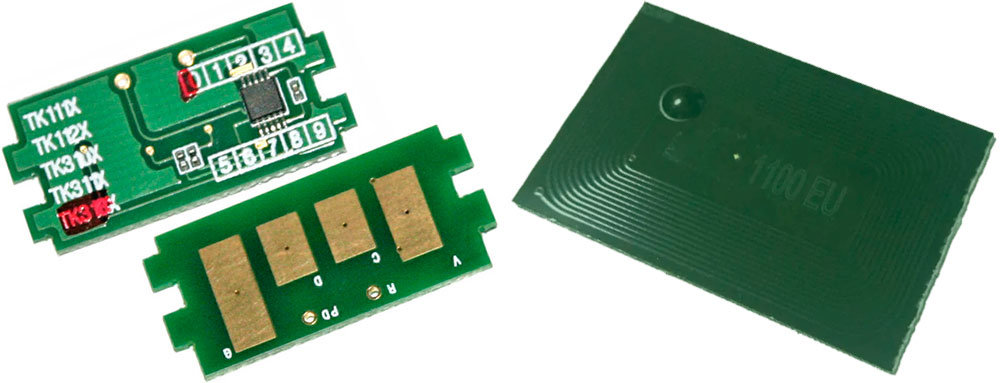
Принтеры или МФУ, которые японцы продали за последние почти десять лет, были оснащены специальной системой слежения за использованием расходных материалов. Представляет она собой небольшую микроплату (чип), расположенную на корпусе картриджа. Если порошок заканчивается, то выводится сообщение сначала «Добавьте тонер», а потом «Закончился тонер» и печать, а собственно вся работа аппарата, останавливается.
Дальнейшими действиями владельца принтера будет заправка имеющегося «расходника» или покупка нового, но не всегда фирменного товара. Описанная выше система слежения может это определять, а потому и происходит блокировка печатающего устройства с «требованием» использовать оригинальные расходники. А также все это может сопровождаться уведомлением «Установлен неизвестный тонер pc Kyocera».
Кроме вывода документов на принтер, также будут недоступны некоторые кнопки на корпусе в панели управления. Не стоит пугаться или думать, что те поломались.
Еще одной причиной может быть плохой контакт между чипом на картридже и считывающим устройством внутри принтера. Чтобы устранить это, нужно правильно установить тубу с порошком внутрь устройства. Действуйте по инструкции:
- Откройте переднюю крышку. Придерживайте ее за края.
- Картридж вставляйте в блок проявки. Следите, чтобы он был расположен ровно без перекосов и зазоров.
- Толчком от себя «загоните» тубу на ее место. В конце Вы должны услышать характерный звук щелчка.
- Обратите внимание на стрелки справа. Они должны «смотреть» одна на другую ровно.
Источник: http://printeru.info/oshibki-i-problemy/neoriginalnuj-toner-kuosera
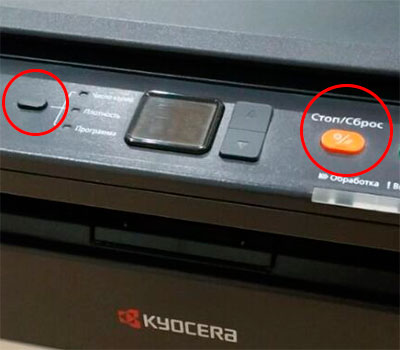
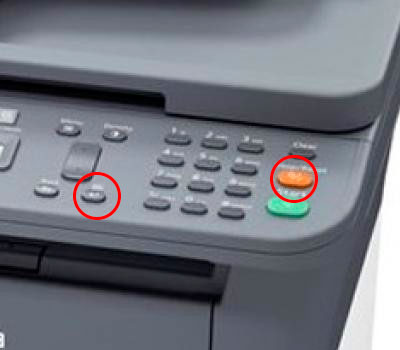
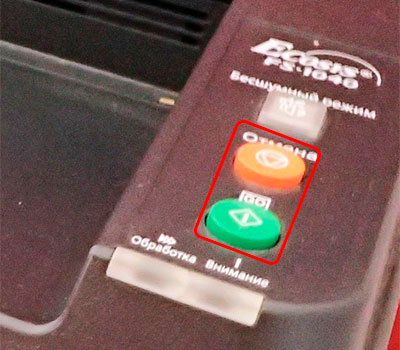
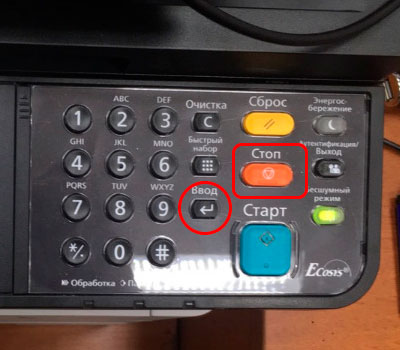
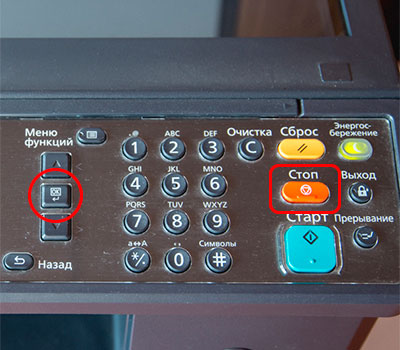
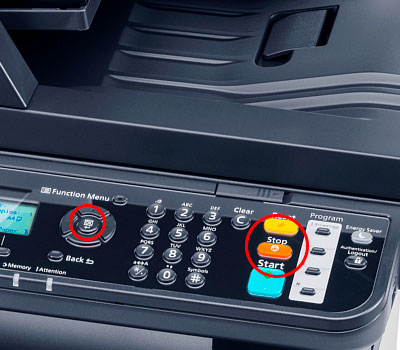
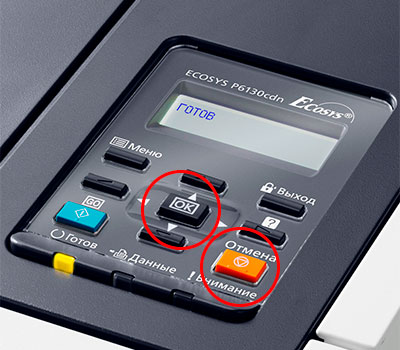
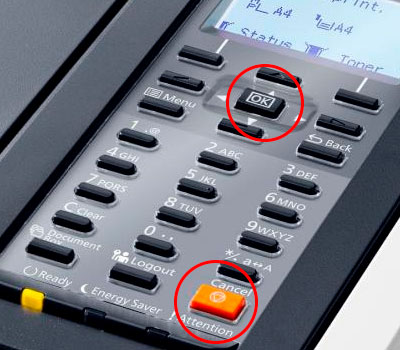
Как уже было сказано, чтобы избавиться от ошибки «Установлен неоригинальный картридж», нужно нажать на определенные кнопки, расположенные на панели управления принтера. Как правило, следует одновременно зажать на 3 секунды кнопки выбора и сброса печати. Однако у некоторых моделей функциональное назначение клавиш может значительно отличаться. Поэтому мы добавили таблицу, в которой указано, какими клавишами нужно сбрасывать ошибку установки совместимых и перезаправленных картриджей для некоторых моделей оргтехники Kyocera:
|
Модели Kyocera |
Кнопки для сброса ошибки (одновременно зажать на 3 секунды) |
Изображение панели управления МФУ Kyocera |
|
FS-118mfp |
[Enter] и [Stop/Clear, красную] |
 |
|
FS-1020mfp |
[Выбор режима печати] и [Стоп/Сброс, красную] |
|
|
FS-1025mfp FS-1120mfp FS-1125mfp FS-1320mfp FS-1325mfp |
[Ок] и [Stop/Reset, красную] |
|
|
FS-1040 FS-1041 FS-1060dn FS-1061dn |
[GO, зеленую] и [Отмена, красную] |
|
|
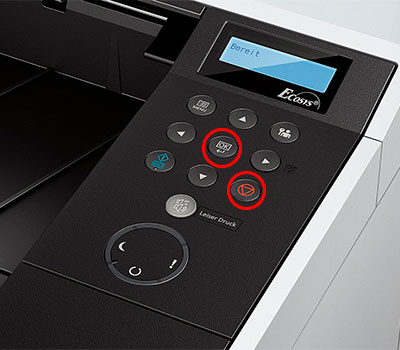
FS-1030mfp FS-1130mfp FS-1035mfp FS-1135mfp ECOSYS M2030dn ECOSYS M2035dn ECOSYS M2530dn ECOSYS M2535dn |
[Ok] и [Stop, красную] |
|
|
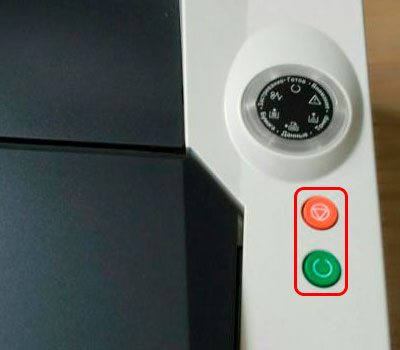
FS-1100 FS-1110 FS-1120d FS-1300d FS-1320d FS-1320dn ECOSYS P2035d |
[Зеленую, с изображением неполного круга] и [Красную, с изображением треугольника в круге] |
|
|
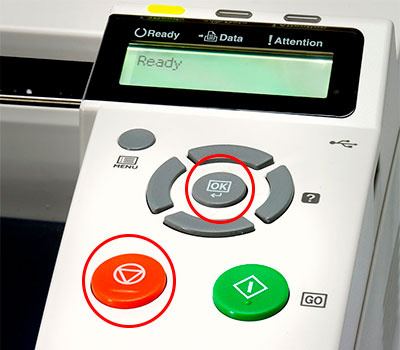
FS-1370dn ECOSYS P2135dn |
[Ok] и [Красную, с изображением треугольника в круге] |
|
|
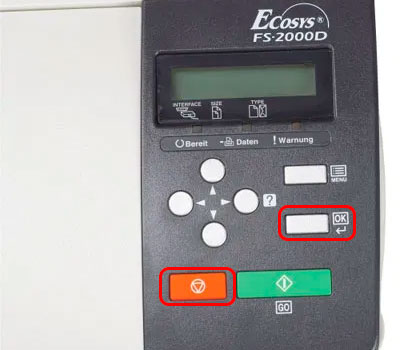
FS-2000d |
[Ok] и [Красную, с изображением треугольника в круге] |
|
|
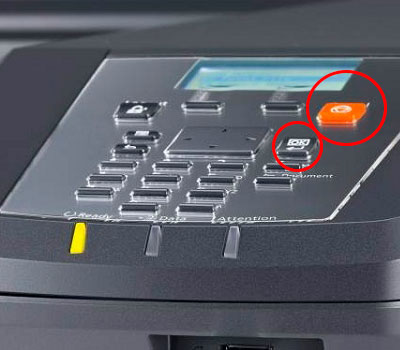
FS-2100d FS-2100dn FS-4100dn FS-4200dn FS-4300dn ECOSYS P3045dn ECOSYS P3050dn ECOSYS P3055dn ECOSYS P3060dn ECOSYS P4040dn |
[Ok] и [Cancel, красную] |
|
|
FS-C8600dn FS-C8650dn |
[Ок] и [Отмена, красную] |
|
|
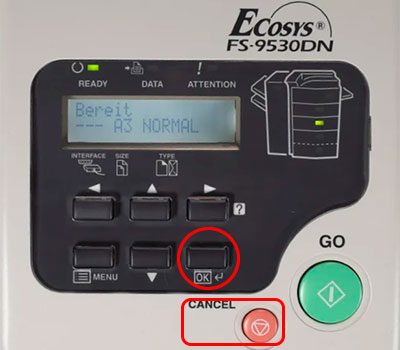
FS-9130dn FS-9530dn |
[Ok] и [Cancel, красную] |
|
|
ECOSYS P2040dn ECOSYS P2040dw ECOSYS P5021cdn ECOSYS P5021cdw ECOSYS P5026cdn ECOSYS P5026cdw |
[Ok] и [Красную, с изображением треугольника в круге] |
|
|
ECOSYS M2040dn ECOSYS M2135dn ECOSYS M2540dn ECOSYS M2540dw ECOSYS M2635dn ECOSYS M2635dw |
[Ок] и [Стоп, красную] |
|
|
ECOSYS M2235dn ECOSYS M2735dn ECOSYS M2835dw ECOSYS P2335d ECOSYS P2335dn ECOSYS P2335dw |
[Ввод] и [Стоп] или на сенсорной панели нажать «Далее» -> «Продолжить» -> «Закрыть» |
|
|
ECOSYS P2235dn ECOSYS P2235dw |
[GO, зеленую] и [Красную, с изображением треугольника в круге] |
|
|
TASKalfa 1800 |
[Ок] и [Стоп, красную] |
|
|
ECOSYS M3040dn ECOSYS M3145dn ECOSYS M3540dn ECOSYS M3645dn ECOSYS M5521cdn ECOSYS M5521cdw ECOSYS M6030cdn ECOSYS M6530cdn TASKalfa1801 TASKalfa 2201 |
[Ок] и [Стоп, красную] |
|
|
ECOSYS P6130cdn ECOSYS P6230cdn |
[Ok] и [Cancel, красную] |
|
|
ECOSYS P6035cdn ECOSYS P6235cdn ECOSYS P7040cdn ECOSYS P7240cdn |
[Ok] и [Cancel, красную] |
|
|
ECOSYS M2640idw ECOSYS M2735dw ECOSYS M3040idn ECOSYS M3145idn ECOSYS M3540idn ECOSYS M3550idn ECOSYS M3560idn ECOSYS M3645idn ECOSYS M3655idn ECOSYS M3660idn ECOSYS M4125idn ECOSYS M4132idn ECOSYS M6035cidn ECOSYS M6230cidn ECOSYS M6235cidn ECOSYS M6535cidn ECOSYS M6630cidn ECOSYS M6635cidn ECOSYS M8124cidn ECOSYS M8130cidn ECOSYS P8060cdn FS-6525mfp FS-6530mfp FS-C8520mfp FS-C8525mfp TASKalfa 306ci TASKalfa 307ci TASKalfa 356ci TASKalfa 406ci TASKalfa 2552ci TASKalfa 3011i TASKalfa 3212i TASKalfa 3511i TASKalfa 4002i TASKalfa 5002i TASKalfa 5052ci TASKalfa 6002i TASKalfa 6052ci TASKalfa 7002i TASKalfa 7052ci TASKalfa 8002i TASKalfa 8052ci TASKalfa 9002i |
На сенсорной панели нажать «Далее» -> «Продолжить» -> «Закрыть» |
Внимание:
- После выключения и обратного включения принтера ошибка снова появится, после чего произойдет блокировка устройства. Чтобы избавиться от нее, повторно осуществите процедуру с нажатием комбинации кнопок, соответствующей Вашей модели принтера.
- Установка перезаправленного картриджа в принтер Kyocera, и нажатие соответствующей комбинации кнопок, может не сбросить ошибку. Дело в том, что система посчитает чип старым (либо такое может быть в случае, если версия прошивки чипа не совпадает с версией прошивки принтера). В этом случае избавиться от проблемы поможет покупка и установка нового чипа Kyocera.
- Если Вы установили перезаправленный картридж в принтер Kyocera, ошибка не убралась, а переквалифицировалась в «Добавьте тонер» или «В картридже нет тонера», это указывает на то, что расходник был неправильно заправлен. Обратитесь в сервисный центр либо замените картридж новым изделием.
Заказать картриджи для принтеров Kyocera как оригинального, так и аналогового образца можно в нашем интернет-магазине. Здесь представлен огромный выбор расходников для оргтехники Kyocera по самым лояльным расценкам. Качество продукции соответствует всем международным нормам и стандартам качества. Решение заказать картридж для принтера Kyocera у нас является верным. Мы гарантируем это.
Источник: http://kartridge.org/blog/sbros-oshibki-ustanovki-neoriginalnogo-kartridzha-s-tonerom-kyocera.html
Устранение ошибки «Установлен неоригинальный картридж с тонером» для других моделей Kyocera.
Kyocera ECOSYS P2335d

Одновременно нажмите на кнопки [OK] и [Стоп] и подождите не менее 3 секунд.
Kyocera ECOSYS M2535dn/ M2530dn/ M2035dn/ M2030dn

Избавиться от ошибки «Установлен неоригинальный картридж с тонером» поможет одновременное зажатие [OK] и [Стоп] и удержание не менее 3 секунд.
Kyocera ECOSYS M2540dw/ M2540dn/ M2635dw/ M2635dn/ M2040dn/ M2135dn/ M3540DN/ M3040DN

Удерживайте не менее 3 секунд зажатые клавиши [OK] и [Стоп].
Kyocera FS-4300DN/ FS-4200DN/ FS-4100DN/ FS-2100DN/ FS-2100D

Устраните ошибку «Установлен неоригинальный картридж с тонером» самостоятельно: удержите [OK] + [Отмена] на время не менее 3 секунд.
Kyocera FS-1320D/ FS-1120D/ FS-1300D/ FS-1110/ FS-1100

А для этих моделей, следует на 3-4 секунды зажать красную и зеленую клавиши на панели принтера.
Kyocera FS-1135MFP/ FS-1035MFP/ FS-1130MFP/ FS-1030MFP

Удерживайте [OK] + [Стоп] одновременно чуть больше 3 секунд.
Kyocera FS-1061DN/ FS-1060DN/ FS-1041/ FS-1040

Комбинация [Отмена] и [GO], зажатая не менее 3 секунд, позволит устранить ошибку принтера «Установлен неоригинальный картридж с тонером».
Kyocera FS-1325MFP/ FS-1320MFP/ FS-1125MFP/ FS-1120MFP/ FS-1025MFP

Для устранения ошибки, воспользуйтесь клавишами [Стоп/Сброс] и [OK]. Зажмите их не менее чем за 3 секунды.
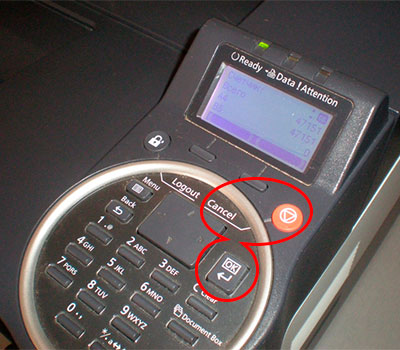
Kyocera FS-1020MFP

Удерживайте кнопку [Стоп/Сброс] и «Выбор режима» 3-5 секунд.
02.04.2020 г.
Источник: http://35zip.ru/articles/sbros-oshibki-kyocera-neoriginalnyj-kartridzh-s-tonerom/
Сброс счетчика или ошибки чипа на Kyocera
На большинстве картриджей разных компаний установленны чипы (микросхемы), которые служат для учета напечатанных страниц.
Некоторые устройства, когда заканчивается тонера в картридже, просто сигнализируют лампочкой или сообщением “тонер закончился”, “замените картридж”, но дают при этом печатать дальше.
Но есть и такие модели, где производители принтеров, намеренно устанавливают чипы, которые блокируют устройства, тем самым подталкивая вас купить оригинальный картридж.
Вариантов решения проблем с такими принтерами, несколько:
1. Купить новый картридж (оригинальный или совместимый)
2. Прошить аппарат, если это технически возможно и забыть про замену чипов.
3. Заправить картридж с заменой чипа
4. Сбросить ошибку (в основном только для Kyocera)
Как сбросить ошибку E-0001 на Kyocera мы ответим ниже.
Красная светодиодная индикация или ошибка E-0001 на Kyocera говорят нам о том, что тонер в картридже закончился (а точнее чип на картридже посчитал, что тонер закончился).
В большинстве случаев, сброс счетчика страниц происходит одновременным нажатием кнопок “OK” и «Стоп/Сброс»(оранжевая) на несколько секунд (3-4)
Разберем сброс счетчика страниц Kyocera на нескольких основных моделях:
1. Сброс счетчика страниц на Kyocera FS-2000D
2. Сброс счетчика страниц на Kyocera Ecosys P2035d

3. Сброс ошибки чипа на МФУ Kyocera FS-1125MFP

4. Сброс информации в МФУ Kyocera FS-1020MFP

5. Сброс счетчика информации на МФУ Kyocera 3140

6. Сброс ошибки чипа в МФУ Kyocera FS-1135MFP

Хотя в данных примерах далеко не все устройства приведены, но общий смысл должен быть понятен.
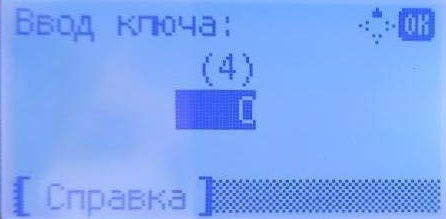
Есть еще некоторые модели, которые требуют дополнительного ввода ключа. В МФУ Kyocera M3145dn/M3645dn и некоторых других моделях, при включении аппарата появляется ошибка “Неоригинальный картридж с тонером”. Нажимаем “Далее” и видим что от нас требуют ввести ключ, сам ключ указан в скобках (цифра). Вводим ту цифру, которая указана, жмем “OK” и МФУ продолжает работу.
Если у вас возникли проблемы со сбросом счетчика страниц или ошибки “Неоригинальный картридж с тонером” напишите нам указав модель вашего устройства и точную проблему или позвоните по контактным телефонам мы Вам поможем.
Источник: http://orangecomp.ru/novosti-stati-i-aktsii/post/sbros-schetchika-stranic-kyocera-obnulenie-chipa
Описание и решение проблемы
Если использовать не оригинальные картриджи в многофункциональном устройстве Kyocera ECOSYS M3645dn, то можно столкнуться с тем, что при включении появляется ошибка “Неоригинальный картридж с тонером”, а после нажатия кнопки “Далее” аппарат потребует ввод некого ключа, для дальнейшего использования.
На самом деле все просто – необходимый ключ написан прямо на экране – он состоит всего из одной цифры (на картинке ниже показан данный ключ в виде цифры 4). Достаточно его ввести и нажать кнопку “ОК”, после чего можно без проблем пользоваться многофункциональным устройством.
Источник: http://sysadmin.ru/articles/kyocera-ecosys-m3645dn-pishet-o-neoriginalnom-kartridzhe-i-trebuet-vvod-klyucha
Kyocera м3145 Неоригинальный тонер Обновленная прошивка
Ищем решение возникающих проблем при заправке картриджей.
Модератор: kvg
Правила форума
Просьба ознакомиться с
Правилами форума.
Также большая просьба, картинки выкладывать или в
Галерею
, или прикрепляйте их к своим сообщениям.
Ссылки в темах на сторонние фотохостинги (кроме вконтакте)
заблокированы.

![]() Ted » Вт авг 27, 2019 6:40 am
Ted » Вт авг 27, 2019 6:40 am


На прошлой неделе видимо прилетела всем клиентам новая прошивка на аппарат.
Теперь он просит некую капчу ввести(Стоп+Ок более не канает). У всех это случилось?
Вот думаю – ввели ли ограничения на эту капчу. Можно так же бесконечно вводить просимые цифры (1, 5, 9, 3, 5, 6 и тд) или он ведет некий отчет?
Совместимые чипы кто-нибудь ставил на новые прошивки?
Последний раз редактировалось
Ted
Ср авг 28, 2019 10:37 am, всего редактировалось 1 раз.
![]()
Ted Заправил картридж  Сообщений: 170Изображений: 1Зарегистрирован: Чт ноя 08, 2012 7:26 am Информация о сыгравших: 0 Побед в поединках: 0 Флаг страны:
 Репутация: 0 [ ? ] Благодарил (а): 26 раз. Поблагодарили: 9 раз.

- Kyocera 1035 “бледная” печать
srMax в форуме Принтеры, МФУ, факсы, копиры формата A4 2 9749 srMax
Пт янв 23, 2015 2:49 pm
- Kyocera FS-1120d индикатор “Нет бумаги”
vs-dos в форуме Принтеры, МФУ, факсы, копиры формата A4 8 9496 kaoc
Чт янв 14, 2021 1:18 pm
- [SCANNER ERROR] Lamp Error Kyocera FS-1016
мастерчип в форуме Принтеры, МФУ, факсы, копиры формата A4 3 3786 Усатый Полосатый
Вс окт 28, 2018 11:08 pm
- Kyocera Ecosys M2635dn “поворот” изображения
Искатель в форуме Принтеры, МФУ, факсы, копиры формата A4 10 2135 MatrixAgent
Ср апр 08, 2020 5:18 am
- Установка Fuser Unit (печки) в Kyocera 5500i при error C6040
Engine в форуме Принтеры, МФУ, копиры формата A3 0 1804 Engine
Вт фев 05, 2019 11:14 am
Вернуться в Картриджи, их заправка и дефекты.
Кто сейчас на форуме
Сейчас этот форум просматривают: нет зарегистрированных пользователей и гости: 28
Источник: http://testcopy.ru/forum/viewtopic.php?f=1&t=13303
Что делать (какие клавиши нажимать) для продолжения печати
Не нужно разочаровываться из-за этой проблемы, так как выход из ситуации есть. В принтерах Киосера все же предусмотрена возможность печати с использованием не их фирменного тонера. Чтобы ее активировать, следует единожды нажать определенную комбинации клавиш или зажать на несколько секунд несколько кнопок одновременно. Такую процедуру нужно проводить после каждого пополнения тонера или замены картриджа на новый неоригинальный.
Ниже приведены точные комбинации для разных моделей. Найдите среди них свою, а затем выполните рекомендации.
- FS-1020mfp — нажмите клавишу «Выбор режима» вместе с «Стоп» или «Сброс» и держите 3–5 секунд.
- FS-1040,FS-1041, 1060DN, 1061DN — зажмите на 5 секунд кнопки «Cancel» и «GO».
- FS-1025mfp,1120MFP, 1125MFP,1320MFP, 1325MFP, 1030MFP, 1130MFP, 1035MFP, 1135MFP — вместе «Stop/Cancel» и «OK» на 5 сек.
- FS-2100D, 4100DN, 4300DN, 2100DN — держите 3–5 секунд «Cancel» с «OK».
- FS-1100, 1320D, 1110, 1120D — держите зеленую и оранжевую клавиши пять и более секунд пока сообщение не исчезнет.
- ECOSYS M2530dn, M2030dn, M2035dn, M2135dn, M2040dn, M2635dn, M2635dw, M2540dn, M2540dw — нажмите «Стоп» вместе с «Ок». Аналогичная ситуация с P2335d, M2835dw, M2735dn, M2235dn, P2335dn, P2335dw.
-
Не, ничего не выходит. 76%, 97 голосов
97 голосов 76%
97 голосов – 76% из всех голосов
-
Да, все отлично! 24%, 30 голосов
30 голосов 24%
30 голосов – 24% из всех голосов
Всего голосов: 127
23.01.2020
×
Вы или с вашего IP уже голосовали.
Универсальным вариантом сочетания клавиш для сброса является комбинация «Стоп» с «ОК» вместе на 3–5 секунд. Попробуйте ее!

Для цветных принтеров вариантов сброса кнопками не существует. В таком случае нужно в обязательном порядке менять чип на новый.
Использование сочетания клавиш требуется после каждой заправки или замены картриджа. Правильным вариантом исправления ошибки будет поиск ее причин. Это могут быть: низкий остаток красителя, его полное отсутствие, использование неоригинальных материалов. В первых двух случаях следует заправить картридж самостоятельно. Полного решения проблемы в третьем случае, кроме покупки фирменных товаров, что материально невыгодно, не существует.
Источник: http://printeru.info/oshibki-i-problemy/neoriginalnuj-toner-kuosera
Другие ошибки в Kyocera
Эти модели устройств подвержены и другим ошибкам, например, «узел проявки не установлен». Но это не означает, что вам необходимо сразу же обращаться в сервис технического обслуживания. Если у вас будет хорошая инструкция по устранению этой ошибки, вы сможете достаточно легко исправить её самостоятельно. Иногда получается избавиться от этой ошибки, нажав вместе следующие кнопки на панели: «Стоп» и «Ок». Но это лишь краткосрочная мера и она не устраняет ошибку полностью.
Чтобы избавиться от сообщения «Неоригинальный картридж с тонером» насовсем, нужно сначала установить из-за чего появляется эта проблема. Это может случиться при недостаточном количестве тонера. Или простыми словами — заканчиваются краски. При использовании неоригинальных картриджей с тонером. Устройство Kyocera в этом случае не может определить уровень оставшегося тонера и выдает ошибку. Иногда это возникает даже при использовании оригинальных картриджей. Для устранения таких сбоев вы можете также воспользоваться подсказками выше.
Источник: http://rusadmin.biz/oshibki/neoriginalnyj-kartridzh-s-tonerom-v-kyocera/
Возможные другие проблемы с картриджами или принтерами Куосера
Еще одной из самых популярных ошибок этих устройств является сообщение «Узел проявки не установлен». Не стоит пугаться, сразу обращаться за платной помощью к специалистам. Эта проблема также решается самостоятельно в домашних условиях. Универсальный метод — это нажать одновременно клавиши «Stop» и «OK» на панели управления устройства.
Отлично!
В знак благодарности расскажите о статье своим друзьям и знакомыми в социальных сетях. Используйте кнопки слева или внизу страницы. Это не занимает более 15 секунд. Спасибо!
Источник: http://printeru.info/oshibki-i-problemy/neoriginalnuj-toner-kuosera
Японский производитель оргтехники Kyocera выпускает одни из самых качественных печатающих устройств на рынке, которые, в первую очередь, пользуются высоким спросом у бизнеса. А это уже говорит о многом!
На заметку! В отличие от частных покупателей, сильно подверженных рекламе и маркетинговым уловкам, большинство предпринимателей предпочитают вкладывать средства рационально.
Тем не менее, даже самая качественная оргтехника может давать сбои. Особенно, если за ней не следить!
Поэтому сегодня мы рассмотрим наиболее распространенные коды ошибок у популярных принтеров Kyocera FS-1020MFP, FS-1025MFP, FS-1030MFP, FS-1120MFP, FS-1125MFP, FS-1220MFP и прочих моделей, чтобы разобраться, какие неполадки можно устранить своими руками, а в каких случаях необходимо воспользоваться помощью специалистов.
- Сброс ошибок у принтеров Kyocera своими руками
- Устранение ошибок у принтеров Kyocera в сервисном центре
Под сбросом ошибок у принтеров Kyocera нужно понимать комплекс мероприятий, которые потенциально может осуществить опытный пользователь, чтобы восстановить работоспособность печатающих устройств без обращения в сервисный центр.
|
Ошибка № |
Причина |
Решение проблемы |
|
E-0001 |
В принтере установлен совместимый картридж или чип расходника был поврежден. | Проблема решается несколькими способами:
1. установка оригинального картриджа; 2. замена поврежденного чипа; 3. прошивка принтера – затем в печатающее устройство можно будет установить любой картридж неограниченное количество раз; 4. сброс ошибки – зажмите на несколько секунд кнопки «Режим» и «Сброс». |
|
E-0002 |
Регион используемого картриджа не соответствует характеристикам принтера. | Проблема решается несколькими способами:
1. установка соответствующего региону принтера картриджа; 2. замена чипа; 3. прошивка принтера. |
|
E-0003 |
Память печатающего устройства заполнена. | Распечатайте уже отсканированные документы или сбросьте операцию соответствующей кнопкой. |
|
E-0007 |
В картридже закончился тонер. | Замените картридж на новый оригинальный, совместимый или заправьте расходник. |
|
E-0008 |
Одна из крышек принтера не закрыта. | Захлопните заднюю и переднюю крышки принтера, ощутив характерный щелчок. |
|
E-0009 |
Лоток с отпечатками переполнен. | Извлеките распечатанные листы с бумагой, а затем возобновите печать кнопкой «Старт». |
|
E-0012 |
Память принтера заполнена. | Измените разрешение печати в меньшую сторону – до 600 dpi. |
|
E-0014 |
Установлена бумага такого формата, который принтер не поддерживает. | Замените бумагу листами совместимого формата.
Иногда функционал принтера может быть ограничен на софтверном уровне. Чтобы расширить диапазон форматов, мы рекомендуем обновить ПО печатающего устройства. |
|
E-0015 |
1. У принтера отсутствует питание.
2. Сетевой кабель не подключен. 3. На персональном компьютере отсутствует драйвер. |
Проверьте целостность сетевого кабеля.
Включите принтер. При необходимости установите драйвер. |
|
E-0018 |
Выбранный файл отсутствует в очереди на печать. | Сбросьте операцию, нажав на кнопку «Сброс». Затем выберите новый файл и продолжите печать. |
|
E-0019 |
Формат печати не поддерживается принтером. | Сбросьте операцию, нажав на кнопку «Сброс». |
|
J-0511 |
Бумагу зажевало. | Аккуратно извлеките остатки бумаги из корпуса принтера. |
|
PF |
Отсутствует бумага во входном лотке. | Установите бумагу во входной лоток и возобновите печать, нажав на кнопку «Старт». |
Устранение ошибок у принтеров Kyocera в сервисном центре
| Ошибка № |
Возможная причина |
|
0030 |
Неисправна PWB-плата. |
|
0100 |
Неисправна Flash-память или плата PWB. |
|
0120 |
Неисправна Flash-память. |
|
0190 |
Неисправна Flash-память или плата PWB. |
|
0630 |
Неисправна PWB-плата. |
|
2000 |
1. Неисправна PWB-плата;
2. неисправен соединительный кабель или нарушена целостность соединения контактов; 3. неисправен привод или его отдельные узлы. |
|
3100 |
1. Неисправен соединительный кабель или нарушена целостность соединения контактов;
2. неисправен датчик положения; 3. неисправен привод сканера; 4. неисправна PWB-плата. |
|
3300 |
1. Неисправен соединительный кабель или нарушена целостность соединения контактов;
2. неисправен датчик CIS; 3. неисправна PWB-плата. |
|
3500 |
Неисправна PWB-плата. |
|
4000 |
1. Неисправен соединительный кабель или нарушена целостность соединения контактов;
2. неисправен привод; 3. неисправна PWB-плата. |
|
4200 |
1. Неисправен соединительный кабель или нарушена целостность соединения контактов;
2. неисправна PWB-плата и отдельные компоненты. |
|
6000 |
1. Неисправен соединительный кабель или нарушена целостность соединения контактов;
2. неисправен термостат; 3. неисправен нагреватель фьюзера; 4. неисправна PWB-плата и отдельные компоненты. |
|
6020 |
1. Неисправна PWB-плата и отдельные компоненты;
2. выявлен дефект у термистора. |
|
6030 |
1. Неисправен соединительный кабель или нарушена целостность соединения контактов;
2. выявлен дефект у термистора; 3. неисправен термостат; 4. неисправна PWB-плата и отдельные компоненты. |
|
6400 |
1. Неисправен соединительный кабель или нарушена целостность соединения контактов;
2. неисправна PWB-плата и отдельные компоненты. |
|
F000 |
Неисправна PWB-плата и отдельные компоненты. |
|
F020 |
Неисправна PWB-плата. |
|
F040 |
Неисправна PWB-плата. |
|
F05D |
1. Неисправно программное обеспечение привода;
2. неисправна PWB-плата и отдельные компоненты. |
Попытались самостоятельно устранить ошибку на принтере Kyocera, но проблемы с печатью остались нерешенными? Сервисный центр МосТонер – круглосуточный бесплатный выезд мастера в пределах МКАД. Вы платите только за результат!
Она означает что переполнен бункер с отработанным тонером. Дело в том, что технология лазерной печати построена таким образом, что в процессе печати принтера неизбежно появляется “лишний” отработанный тонер. Он не подходит для повторного использования и поэтому складируется в отдельный бункер, который присутствует либо на самом печатающем картридже, либо стоит как отдельный элемент принтера.
Чтобы не допустить полное его заполнение и выход отработанного тонера наружу (а он является летучим и весьма вредным веществом, крайне не рекомендуемым для вдыхания) в большинстве лазерных принтеров реализована система слежения за его наполнением. И ошибка c7990 на принтерах kyocera как раз и есть тот самый сигнал, который говорит, что пора почистить бункер отработанного тонера.
Почему возникает
Суть лазерной печати заключается в нанесении тонера на поверхность фотовала, заряженного противоположенным током. Порошок накладывается на всю поверхность, но остается только на определенных участках. Весь лишний удаляется в специальную емкость, а оставшейся запекается на бумаге в печке.
В этом случае, нас интересует судьба только оставшегося в принтере тонера. Он автоматически помещается в бункер отходов. В дальнейшем не используется для печати. Легко догадаться, что эта емкость имеет свой ресурс. Когда он заканчивается, устройство должно предупредить пользователя, что следует предпринять определенные действия. Разные марки принтеров делают это по-своему, а Киосера выдает ошибку с7990.
Решение
Способы решения напрашиваются сами. Необходимо почистить отработанный тонер.
- Отключите принтер от электропитания. Вытяните шнур питания из розетки.
- Откройте переднюю крышку.
- Сейчас Вы увидите проявочный узел. Его вынимаем.
- Дальше идет фотобарабан, который вытягиваем за зеленные ручки, чтобы не повредить поверхность.
- Кладем его на стол, который предварительно нужно застелить старой газетой или бумагой.
- Осматриваем картридж и находим места, через которые извлекаются остатки тонера.
- Через эти отверстия нужно высыпать порошок.
Делайте это на улице или помещении, где нет сквозняка. Помните, что вещество очень вредно для человека и окружающей среды, так как изготовлено из нефти. Используйте резиновые перчатки, а если есть бытовой респиратор, его тоже можно применить, чтобы защититься от вредной пыли.
В целях профилактики дальнейшего возникновения ошибки c7990 на принтерах Kyocera следует проводить чистку отработки при каждой заправке новой порции порошка. Если пополнение не производите самостоятельно, то в сервисном центре это должны сделать, но напомнить не будет лишним.
Первый вариант сброса ошибки С7990
Этот вариант подойдет для некоторых моделей Kyocera. Делается это очень просто:
- Первое что требуется сделать это открытье переднюю крышку, как показано на рисунке:

Откройте переднюю крышку - Далее вытащите картридж с блоком проявки из МФУ. Можно отдельно, а можно и вместе.
Вытащите узел проявки из МФУ - Теперь извлеките узел фотобарабана из МФУ, удерживая за зеленые или синие рычаги обеими руками.
Извлеките узел барабана из МФУ


Инструкция: чистка бункера отработки на примере Kyocera P2235d / M2135dn / M2635dn / M2735dw
Для начала следует вынуть совместимый с МФУ Kyocera P2235d / M2135dn / M2635dn / M2735dw драм картридж DK-1150:
- откройте крышку с обратной стороны устройства;
- достаньте вал проявки;
- выньте драм-картридж.

Если у вас старая комплектация драм-картриджа DK-1150, тогда достаточно будет подковырнуть технологическое отверстие плоской отверткой и вытрясти отработку в герметичный пакет.

Новые драм-картриджи DK-1150 лишены технологического отверстия.
Проблему с чисткой можно решить полной разборкой детали (см. следующий раздел) или аккуратным сверлением бункера отработки. Получившееся отверстие затем стоит заклеить плотным скотчем, а уже при необходимости открывать.
Устранение ошибки C7990 – Шаг №1
Первое, что необходимо сделать, чтобы ошибка C7990 больше не беспокоила, это выключить печатающее устройство. Затем открыть переднюю крышку. Аккуратно, не торопясь, извлечь блок проявки. Извлекать нужно вместе с тонер-картриджем. Просто потяните его на себя, он выйдет.

Выключаем МФУ кнопкой включения/выключения питания. Открываем крышку и извлекаем блок проявки.
Шаг №2
После того как блок проявки извлечён, отложите его в сторону. Второе, что делаем, это извлекаем драм-юнит. Именно по его вине появилась на дисплее устройства ошибка C7990. Вытаскиваем драм также, как и блок проявки, потянув на себя. Тянуть нужно за специально предназначенные для этого зелёные вставки по бокам.

Извлекаем драм-юнит за специальные полукольца. Ошибка C7990 вызвана именно проблемами с драм-юнитом печатающего устройства Kyocera.
Шаг №3
Третье, на демонтированном драм-юните необходимо отщелкнуть небольшую крышку, закрывающую отверстие для чистки отсека отработки. Чтобы это сделать, поворачиваем драм зелёными вставками назад. По бокам находятся крышки. Отщелкнуть нужно одну из них, без разницы какую. Убрав закрывающую крышку высыпаем отработку.

При помощи плоской отвёртки отгибаем защёлки и снимаем крышку закрывающую бункер отработанного тонера.
После того как сняли крышку закрывающую бункер отработанного тонера в драме, высыпаем отработку через открывшуюся полость. Можно воспользоваться специальным пылесосом.
Шаг №4
Итак, отсек для отработанного тонера после проделанных манипуляций пуст. Причину вызвавшую ошибку C7990 на печатающем устройстве Kyocera устранили. Ставим крышечку на своё место. Вставляем драм-юнит, а затем блок проявки с тонер-картриджем в аппарат. Закрываем переднюю крышку устройства. Включаем МФУ и радуемся устранением проблемы.
Где находится бункер отработанного тонера?
Бункер расположен за блоком фотобарабана DK. Чтобы добраться до него необходимо вынуть блок проявки DV. Блок проявки — это блок, в который вставляется тонер-картридж.
При попытке использования картриджа – чип блокирует систему
Производители все время усложняют уровень защиты чипов в картриджах, теперь задача чипа заключается не в анализе оставшегося ресурса печати, а в блокировании возможности заправки картриджа.
Производителей можно разделить на две группы:
1. Производители, чья техника продолжает работу, когда счетчик отсчитал положенное количество копий, чип не блокирует работу заправленного картриджа.
К ним относятся: HP, Canon, Kyocera, Brother (у последнего применяются механические флажки).
В таких картриджах чип можно не менять, картридж продолжит работу и после заправки. В цветных картриджах чипы иногда требуется заменять, кроме счетчика они дополнительно хранят информацию о согласовании цветов.
2. Компании, которые устанавливают блокирующиеся чипы, которые препятствуют заправке картриджей.
К ним относятся: Lexmark, Samsung, Xerox, Pantum.
Чтобы картридж этих производителей продолжил свою работу после заправки, требуется обязательная установка нового чипа, даже полный картридж без чипа работать не будет. Либо, можно воспользоваться альтернативным путем – прошить принтер.
Прошивка принтера – это внесение изменений во внутреннее программное обеспечение самого аппарата так, чтобы принтер «забыл» о чипе и всегда думал, что картридж полный.
Причиной может послужить выход из строя датчика или платы управления. В этом случае лучше вызвать специалиста сервисного центра.
P.S. При переполненном бункера некоторые аппараты не всегда выдают ошибку С7990 на дисплее. Иногда пользователь об этом может узнать, когда принтер начинает трещать. Если вовремя не провести чистку, ломается шестерёнка. В этом случае, необходим уже ремонт или замена фотобарабана (бункера WT)
Дополнительная информация, касающаяся ошибки C7990
Если вы извлекли драм-юнит и на нём нет крышек закрывающих доступ для очистки отработки, то Вам нужно проделать отверстие самостоятельно. В некоторых моделях печатающих устройств Kyocera, отверстия на драм-юните для очистки отработки отсутствуют. После того как проделали отверстие и высыпали отработанный тонер обязательно заклейте отверстие скотчем! Далее установите драм и блок проявки на своё место, включите устройство. Ошибка C7990 больше Вас не побеспокоит, до следующего переполнения отработанным тонером.


Сброс сообщения «Замените МК» на МФУ kyocera 1035/2035/2535
Итак, делается это очень просто:
- Набираем на клавиатуре код: 10871087 и попадаем в сервисное меню
- Открываем программу u251
- Выбираете стрелочками «clear«
- Для выхода выполняете программу u001 (Не все модели поддерживают такой метод выхода из инженерного меню)
Если у Вас не получилось выйти из инженерного меню по программе u001, то просто выключите и включите Ваш аппарат.
Данным действием мы выполняем сброс счетчика обслуживания!
На этом все, надоедливая просьба исчезла. Мой совет — если МФУ начало просить заменить ему детали (по пробегу) и Вы еще ни разу в нем ничего не меняли, советую заранее прикупить новый Drum Unit DK-170 (проверьте, какой стоит у Вас!), так как это обычно первое, что выходит из строя и печать начинается с черными полосами.
Мы надеемся, что данная статья была полезна для Вас.
Расшифровка кода ошибки по индикаторам
Как расшифровать код ошибки по миганиям индикаторов?
Поле индикаторов в принтере Kyosera P2035D разделено на 8 секторов.

Информационных всего пять: пустые сектора, 1, 2, 3, 4.
Начало передачи кода – это мигание всех четырех секторов одновременно. Далее передается четырехзначный код последовательно. Каждое мигание – это цифра от 1 до 9 в двоичном формате.
Вес каждого сектора:
пустые сектора – 0
1 сектор – единица
2 сектор – двойка
3 сектор – четверка
4 сектор – восьмерка.
Например, код 7990 передается так. Мигают 1, 2, 3, 4 сектора одновременно (разделитель). Затем мигают 1, 2, 3 (1+2+4=7). После мигают 1, 4 (1+8=9). Потом повторяется 1, 4 (1+8=9). Завершает цикл миганием пустых секторов 0. Итого, 7990
Источник: http://complace.ru/remont-printerov-mfu/kyosera/remont-kyosera-p2035d/
Обновленные коды ошибок для популярной серии принтеров Kyocera
Коды ошибок для популярной серии принтеров Kyocera FS-2100DN, FS-4100DN, FS-4200DN, FS-4300DN, а также для пришедших им на смену ECOSYS P3045dn, ECOSYS P3050dn, ECOSYS P3055dn, ECOSYS P3060dn.
1.Self-diagnostic function — Функция самодиагностики
Принтеры оснащены функцией самодиагностики. Когда проблема обнаружена, устройство прекращает печать и на панели управления отображается сообщение об ошибке. Сообщение об ошибке состоит из четырехзначного кода, указывающего на тип ошибки.
| Code | Contents | Causes | Check procedures/ corrective measures |
| 0100 | Backup memory device error | Defective flash memory. | Replace the main PWB and check for correct operation (see page 1-5-22). |
| Defective main PWB. | |||
| 0120 | MAC address data error For data in which the MAC address is invalid. | Defective flash memory. | Replace the main PWB and check for correct operation (see page 1-5-22). |
| Defective main PWB. | Replace the main PWB and check for correct operation (see page 1-5-22). | ||
| 0130 | Backup memory read/write error (main PWB) | Defective flash memory. | Replace the main PWB and check for correct operation (see page 1-5-22). |
| Defective main PWB. | |||
| 0140 | Backup memory data error (main PWB) | Defective flash memory. | Replace the main PWB and check for correct operation (see page 1-5-22). |
| Defective main PWB. | |||
| 0150 | Backup memory read/write error (engine PWB) Detecting engine PWB EEPROM communication error. | Improper installation engine PWB EEPROM. | Check the installation of the EEPROM and remedy if necessary. |
| Defective engine PWB. | Replace the engine PWB and check for correct operation (see page 1-5-22). | ||
| Device damage of EEPROM. | Contact the Service Administrative Division. | ||
| 0160 | Backup memory data error (engine PWB) | Defective EEPROM. | Replace the engine PWB and check for correct operation (see page 1-5-22). |
| Defective engine PWB. | |||
| 0170 | Billing counting error A checksum error is detected in the main and engine backup memories for the billing counters. | Data damage of EEPROM. | Contact the Service Administrative Division. |
| Defective PWB. | Replace the main PWB or the engine PWB and check for correct operation (see page 15-22, 1-5-22). | ||
| 0190 | Backup memory device error (engine PWB) | Defective engine PWB. | Replace the engine PWB and check for correct operation (see page 1-5-22). |
| 0800 | Image processing error JAM010x is detected twice. | Defective connector cable or poor contact in the connector. | Reinsert the connector. Also check for continuity within the connector cable. If none, replace the cable. Fuser thermistor 1/2 and fuser thermistor connect PWB(YC1/2) Fuser thermistor connect PWB(YC3) and engine PWB (YC21) |
| Defective fuser thermistor. | Replace the fuser thermistor connect PWB . | ||
| Replace the fuser unit (see page 1-5-19). | |||
| Defective engine PWB. | Replace the engine PWB and check for correct operation (see page 1-5-22). | ||
| Defective main PWB. | Replace the main PWB and check for correct operations page 1-5-22). | ||
| 0840 | Faults of RTC Unable to communicate with the RTC device normally. The RTC data is mismatched due to dead battery or short-circuit with the metal part. | Other RTC device failure due to dead battery or short-circuit with the metal part. | Restart the main unit and set the correct time from the operation panel. Repair it if the battery comes off from the main PWB. |
| Defective main PWB. | Replace the main PWB and check for correct operation (see page 1-5-22). | ||
| 1010 | Lift motor error (60/55/50 ppm model only) After cassette 1 is inserted, lift sensor does not turn on within 10 s. This error is detected five times successively. | Defective bottom plate elevation mechanism in the cassette. | Check to see if the bottom plate can move smoothly and repair it if any problem is found. |
| Defective connector cable or poor contact in the connector. | Reinsert the connector. Also check for continuity within the connector cable. If none, replace the cable. Lift motor and engine PWB (YC13) | ||
| Defective drive transmission system of the lift motor. | Check if the gears rotate smoothly. If not, grease the bushes and gears. Check for broken gears and replace if any. | ||
| Defective lift motor. | Replace the lift motor. | ||
| Defective engine PWB. | Replace the engine PWB and check for correct operation (see page 1-5-22). | ||
| 1020 | PF lift motor 1 error (paper feeder) After cassette 2 is inserted, PF lift sensor 1 does not turn on. This error is detected four times successively. | Defective bottom plate elevation mechanism in the cassette. | Check to see if the bottom plate can move smoothly and repair it if any problem is found. |
| Defective connector cable or poor contact in the connector. | Reinsert the connector. Also check for continuity within the connector cable. If none, replace the cable. PF lift motor 1 and PF main PWB (YC7) | ||
| Defective drive transmission system of the PF lift motor. | Check if the gears rotate smoothly. If not, grease the bushes and gears. Check for broken gears and replace if any. | ||
| Defective PF lift motor. | Replace the PF lift motor 1. | ||
| Defective PF main PWB. | Replace the PF main PWB (Refer to the service manual for the paper feeder). | ||
| 1030 | PF lift motor 2 error (paper feeder) After cassette 3 is inserted, PF lift sensor 2 does not turn on. This error is detected four times successively. | Defective bottom plate elevation mechanism in the cassette. | Check to see if the bottom plate can move smoothly and repair it if any problem is found. |
| Defective connector cable or poor contact in the connector. | Reinsert the connector. Also check for continuity within the connector cable. If none, replace the cable. PF lift motor 2 and PF main PWB (YC7) | ||
| Defective drive transmission system of the PF lift motor. | Check if the gears rotate smoothly. If not, grease the bushes and gears. Check for broken gears and replace if any. | ||
| Defective PF lift motor. | Replace the PF lift motor 2. | ||
| Defective PF main PWB. | Replace the PF main PWB (Refer to the service manual for the paper feeder). | ||
| 1040 | PF lift motor 3 error (paper feeder) After cassette 4 is inserted, PF lift sensor 3 does not turn on. This error is detected four times successively. | Defective bottom plate elevation mechanism in the cassette. | Check to see if the bottom plate can move smoothly and repair it if any problem is found. |
| Defective connector cable or poor contact in the connector. | Reinsert the connector. Also check for continuity within the connector cable. If none, replace the cable. PF lift motor 3 and PF main PWB (YC7) | ||
| Defective drive transmission system of the PF lift motor. | Check if the gears rotate smoothly. If not, grease the bushes and gears. Check for broken gears and replace if any. | ||
| Defective PF lift motor. | Replace the PF lift motor 3. | ||
| Defective PF main PWB. | Replace the PF main PWB (Refer to the service manual for the paper feeder). | ||
| 1050 | PF lift motor 4 error (paper feeder) After cassette 5 is inserted, PF lift sensor 4 does not turn on. This error is detected four times successively. | Defective bottom plate elevation mechanism in the cassette. | Check to see if the bottom plate can move smoothly and repair it if any problem is found. |
| Defective connector cable or poor contact in the connector. | Reinsert the connector. Also check for continuity within the connector cable. If none, replace the cable. PF lift motor 4 and PF main PWB (YC7) | ||
| Defective drive transmission system of the PF lift motor. | Check if the gears rotate smoothly. If not, grease the bushes and gears. Check for broken gears and replace if any. | ||
| Defective PF lift motor. | Replace the PF lift motor 4. | ||
| Defective PF main PWB. | Replace the PF main PWB (Refer to the service manual for the paper feeder). | ||
| 1140 | BPF lift motor upward error (Bulk paper feeder) BPF lift maximum sensor does not turn on. The lock signal of the motor is detected continuously three times. | Defective connector cable or poor contact in the connector. | Reinsert the connector. Also check for continuity within the connector cable. If none, replace the cable. BPF lift motor and BPF main PWB (YC4) |
| Defective drive transmission system of the motor. | Check if the gears rotate smoothly. If not, grease the bushes and gears. Check for broken gears and replace if any. | ||
| Defective BPF lift motor. | Replace the BPF lift motor. | ||
| Defective BPF main PWB. | Replace the BPF main PWB (Refer to the service manual for the paper feeder). | ||
| 1150 | BPF lift motor downward error (Bulk paper feeder) BPF lift minimum sensor does not turn on. The lock signal of the motor is detected continuously three times. When detecting an overcurrent detection signal. | Defective connector cable or poor contact in the connector. | Reinsert the connector. Also check for continuity within the connector cable. If none, replace the cable. BPF lift motor and BPF main PWB (YC4) |
| Defective drive transmission system of the motor. | Check if the gears rotate smoothly. If not, grease the bushes and gears. Check for broken gears and replace if any. | ||
| Defective BPF lift motor. | Replace the BPF lift motor. | ||
| Defective BPF main PWB. | Replace the BPF main PWB (Refer to the service manual for the paper feeder). | ||
| 1800 | Paper feeder 1 communication error A communication error is detected 10 times in succession. | Improper installation paper feeder. | Follow installation instruction carefully again. |
| Defective connector cable or poor contact in the connector. | Reinsert the connector. Also check for continuity within the connector cable. If none, replace the cable. PF main PWB (YC3) and engine PWB (YC22) | ||
| Defective engine PWB. | Replace the engine PWB and check for correct operation (see page 1-5-22). | ||
| Defective PF main PWB. | Replace the PF main PWB (Refer to the service manual for the paper feeder). | ||
| 1810 | Paper feeder 2 communication error A communication error is detected 10 times in succession. | Improper installation paper feeder. | Follow installation instruction carefully again. |
| Defective connector cable or poor contact in the connector. | Reinsert the connector. Also check for continuity within the connector cable. If none, replace the cable. PF main PWB (YC3) and engine PWB (YC22) | ||
| Defective PF main PWB. | Replace the PF main PWB (Refer to the service manual for the paper feeder). | ||
| 1820 | Paper feeder 3 communication error A communication error is detected 10 times in succession. | Improper installation paper feeder. | Follow installation instruction carefully again. |
| Defective connector cable or poor contact in the connector. | Reinsert the connector. Also check for continuity within the connector cable. If none, replace the cable. PF main PWB (YC3) and engine PWB (YC22) | ||
| Defective PF main PWB. | Replace the PF main PWB (Refer to the service manual for the paper feeder). | ||
| 1830 | Paper feeder 4 communication error A communication error is detected 10 times in succession. | Improper installation paper feeder. | Follow installation instruction carefully again. |
| Defective connector cable or poor contact in the connector. | Reinsert the connector. Also check for continuity within the connector cable. If none, replace the cable. PF main PWB (YC3) and engine PWB (YC22) | ||
| Defective PF main PWB. | Replace the PF main PWB (Refer to the service manual for the paper feeder). | ||
| 1900 | Paper feeder 1/BPF paper feeder EEPROM error When writing the data, the write data and the read data is not in agreement. | Defective PF main PWB. | Replace the PF main PWB or the BPF main PWB (Refer to the service manual for the paper feeder). |
| Device damage of EEPROM. | |||
| 1910 | Paper feeder 2 EEPROM error When writing the data, the write data and the read data is not in agreement. | Defective PF main PWB. | Replace the PF main PWB (Refer to the service manual for the paper feeder). |
| Device damage of EEPROM. | |||
| 1920 | Paper feeder 3 EEPROM error When writing the data, the write data and the read data is not in agreement. | Defective PF main PWB. | Replace the PF main PWB (Refer to the service manual for the paper feeder). |
| Device damage of EEPROM. | |||
| 1930 | Paper feeder 4 EEPROM error When writing the data, the write data and the read data is not in agreement. | Defective PF main PWB. | Replace the PF main PWB (Refer to the service manual for the paper feeder). |
| Device damage of EEPROM. | |||
| 2000 | Main motor drive error The main motor is not stabilized within 2 s after driving starts. | Defective connector cable or poor contact in the connector. | Reinsert the connector. Also check for continuity within the connector cable. If none, replace the cable. Main motor and engine PWB (YC4) |
| Defective drive transmission system of the main motor. | Check if the rollers and gears rotate smoothly. If not, grease the bushes and gears. Check for broken gears and replace if any. | ||
| Defective main motor. | Replace the main motor. | ||
| Defective engine PWB. | Replace the engine PWB and check for correct operation (see page 1-5-22). | ||
| 2010 | Main motor steady-state error Stable OFF is detected for 2 s continuously after main motor stabilized. | Defective connector cable or poor contact in the connector. | Reinsert the connector. Also check for continuity within the connector cable. If none, replace the cable. Main motor and engine PWB (YC4) |
| Defective drive transmission system of the main motor. | Check if the rollers and gears rotate smoothly. If not, grease the bushes and gears. Check for broken gears and replace if any. | ||
| Defective main motor. | Replace the main motor. | ||
| Defective engine PWB. | Replace the engine PWB and check for correct operation (see page 1-5-22). | ||
| 2200 | Drum motor drive error (60/55/50 ppm model only) The drum motor is not stabilized within 2 s after driving starts. | Defective connector cable or poor contact in the connector. | Reinsert the connector. Also check for continuity within the connector cable. If none, replace the cable. Drum motor and engine PWB (YC4) |
| Defective drive transmission system of the drum motor. | Check if the rollers and gears rotate smoothly. If not, grease the bushes and gears. Check for broken gears and replace if any. | ||
| Defective drum motor. | Replace the drum motor. | ||
| Defective engine PWB. | Replace the engine PWB and check for correct operation (see page 1-5-22). | ||
| 2210 | Drum motor steady-state error (60/55/50 ppm model only) Stable OFF is detected for 2 s continuously after drum motor stabilized. | Defective connector cable or poor contact in the connector. | Reinsert the connector. Also check for continuity within the connector cable. If none, replace the cable. Drum motor and engine PWB (YC4) |
| Defective drive transmission system of the drum motor. | Check if the rollers and gears rotate smoothly. If not, grease the bushes and gears. Check for broken gears and replace if any. | ||
| Defective drum motor. | Replace the drum motor. | ||
| Defective engine PWB. | Replace the engine PWB and check for correct operation (see page 1-5-22). | ||
| 2330 | Fuser pressure release motor error (Over-current) The over-current detection signal of the motor is detected continuously twenty times. | Defective connector cable or poor contact in the connector. | Reinsert the connector. Also check for continuity within the connector cable. If none, replace the cable. Fuser pressure release motor and relay-L PWB(YC11) Relay-L PWB(YC3) and engine PWB(YC2) |
| Defective drive transmission system of the fuser pressure release motor. | Check if the gears rotate smoothly. If not, grease the bushes and gears. Check for broken gears and replace if any. | ||
| Defective fuser pressure release motor. | Replace the fuser pressure release motor. | ||
| Defective PWB. | Replace the relay-L PWB or engine PWB. (See Page 1-5-24,1-5-22) | ||
| 2340 | Fuser pressure release motor error (Timeout) The position detection sensor is not detected continuously for 30 s. | Defective connector cable or poor contact in the connector. | Reinsert the connector. Also check for continuity within the connector cable. If none, replace the cable. Fuser pressure release motor and relay-L PWB(YC11) Relay-L PWB(YC1) and engine PWB(YC2) |
| Defective drive transmission system of the fuser pressure release motor. | Check if the gears rotate smoothly. If not, grease the bushes and gears. Check for broken gears and replace if any. | ||
| Defective fuser pressure release motor. | Replace the fuser pressure release motor. | ||
| Defective PWB. | Replace the relay-L PWB or engine PWB. (See Page 1-5-24,1-5-22) | ||
| 2600 | PF drive motor 1 error (paper feeder 1) When the PF drive motor is driven, error signal is detected continuously for 2 s. | Defective connector cable or poor contact in the connector. | Reinsert the connector. Also check for continuity within the connector cable. If none, replace the cable. PF drive motor 1 and PF main PWB (YC6) |
| Defective drive transmission system of the PF drive motor. | Check if the rollers and gears rotate smoothly. If not, grease the bushes and gears. Check for broken gears and replace if any. | ||
| Defective PF drive motor. | Replace the PF drive motor 1. | ||
| Defective PF main PWB. | Replace the PF main PWB (Refer to the service manual for the paper feeder). | ||
| 2610 | PF drive motor 2 error (paper feeder 2) When the PF drive motor is driven, error signal is detected continuously for 2 s. | Defective connector cable or poor contact in the connector. | Reinsert the connector. Also check for continuity within the connector cable. If none, replace the cable. PF drive motor 2 and PF main PWB (YC6) |
| Defective drive transmission system of the PF drive motor. | Check if the rollers and gears rotate smoothly. If not, grease the bushes and gears. Check for broken gears and replace if any. | ||
| Defective PF drive motor. | Replace the PF drive motor 2. | ||
| Defective PF main PWB. | Replace the PF main PWB (Refer to the service manual for the paper feeder). | ||
| 2620 | PF drive motor 3 error (paper feeder 3) When the PF drive motor is driven, error signal is detected continuously for 2 s. | Defective connector cable or poor contact in the connector. | Reinsert the connector. Also check for continuity within the connector cable. If none, replace the cable. PF drive motor 3 and PF main PWB (YC6) |
| Defective drive transmission system of the PF drive motor. | Check if the rollers and gears rotate smoothly. If not, grease the bushes and gears. Check for broken gears and replace if any. | ||
| Defective PF drive motor. | Replace the PF drive motor 3. | ||
| Defective PF main PWB. | Replace the PF main PWB (Refer to the service manual for the paper feeder). | ||
| 2630 | PF drive motor 4 error (paper feeder 4) When the PF drive motor is driven, error signal is detected continuously for 2 s. | Defective connector cable or poor contact in the connector. | Reinsert the connector. Also check for continuity within the connector cable. If none, replace the cable. PF drive motor 4 and PF main PWB (YC6) |
| Defective drive transmission system of the PF drive motor. | Check if the rollers and gears rotate smoothly. If not, grease the bushes and gears. Check for broken gears and replace if any. | ||
| Defective PF drive motor. | Replace the PF drive motor 4. | ||
| Defective PF main PWB. | Replace the PF main PWB (Refer to the service manual for the paper feeder). | ||
| 4000 | Polygon motor synchronization error The polygon motor is not stabilized within 20 s after driving starts. | Defective connector cable or poor contact in the connector. | Reinsert the connector. Also check for continuity within the connector cable. If none, replace the cable. Polygon motor and engine PWB (YC15) |
| Defective polygon motor. | Replace the laser scanner unit (see page 15-18). | ||
| Defective engine PWB. | Replace the engine PWB and check for correct operation (see page 1-5-22). | ||
| 4201 | BD steady-state error When the value of Register BDSET is 1 after setting Register BDSET as one and pass- | Defective connector cable or poor contact in the connector. | Reinsert the connector. Also check for continuity within the connector cable. If none, replace the cable. APC PWB(YC1) and engine PWB (YC16) APC PWB(YC2) and PD PWB(YC1) |
| ing by BD1 cycle. | Defective PD PWB. | Replace the laser scanner unit (see page 15-18). | |
| Defective engine PWB. | Replace the engine PWB and check for correct operation (see page 1-5-22). | ||
| 5100 | Chager current error When the current value measured at the time of potential adjustment is less than 20 ^A. | Defective connector cable or poor contact in the connector. | Reinsert the connector. Also check for continuity within the connector cable. If none, replace the cable. Chager unit and high voltage PWB High voltage PWB (YC101) and engine PWB (YC19) |
| Defective high voltage PWB. | Replace the high voltage PWB and check for correct operation (see page 1-5-26). | ||
| Defective engine PWB. | Replace the engine PWB and check for correct operation (see page 1-5-22). | ||
| 6000 | Broken fuser heater wire The detection temperature of fuser thermistor 2 is 100 °C/ 212°F or less after the fuser heater lamp has been turned on continuously for 30 s. | Defective connector cable or poor contact in the connector. | Reinsert the connector. Also check for continuity within the connector cable. If none, replace the cable. Fuser heater and power source PWB (YC2) Fuser thermistor and Fuser thermistor connect PWB(YC1 and YC2) Fuser thermistor connect PWB(YC3) and engine PWB (YC21) |
| Deformed connector pin. | See page 1-4-19. | ||
| Defective triac. | See page 1-4-19. | ||
| Fuser thermostat triggered. | Reinsert the fuser unit (see page 1-5-19). | ||
| Broken fuser heater wire. | |||
| Defective engine PWB. | Replace the engine PWB and check for correct operation (see page 1-5-22). | ||
| 6020 | Abnormally high fuser thermistor 2 temperature | Deformed connector pin. | See page 1-4-19. |
| The detection temperature of fuser thermistor 2 is higher than 235°C/455°F. | Defective triac. | See page 1-4-19. | |
| Shorted fuser thermistor. | Replace the fuser unit (see page 1-5-19). | ||
| In a heater-off state, the detection temperature of fuser thermistor 2 is higher than 195°C/383°F after the detection temperature of fuser thermistor 2 was 155°C/311 °F or less. | Defective engine PWB. | Replace the engine PWB and check for correct operation (see page 1-5-22). | |
| 6030 | Broken fuser thermistor 2 wire A/D value of the fuser thermistor 2 exceeds 1019 bit continuously for 4 s during warming up. | Defective connector cable or poor contact in the connector. | Reinsert the connector. Also check for continuity within the connector cable. If none, replace the cable. Fuser thermistor and fuser thermistor connect PWB(YC2) Fuser thermistor connect PWB(YC3) and engine PWB (YC21) |
| Deformed connector pin. | See page 1-4-19. | ||
| Defective triac. | See page 1-4-19. | ||
| Defective fuser thermistor. | Replace the fuser unit (see page 1-5-19). | ||
| Defective engine PWB. | Replace the engine PWB and check for correct operation (see page 1-5-22). | ||
| 6000/ | Broken fuser heater wire | Deformed connec- | If the I/F connector pins of the fuser unit and |
| 6020/ | Abnormally high fuser | tor pin. | the main unit are deformed owing to foreign |
| thermistor 2 temperature | matters, replace the connectors or the units | ||
| 6030/ | Broken fuser thermistor 2 | including the connectors. | |
| 6120/ 6130/ Com- bined | wire Abnormally high fuser thermistor 1 temperature Broken fuser thermistor 1 wire | Defective triac. | Remove the power cord and check that the resistance between terminals T1 and T2 of the triac TRA31 and triac TRA41 are of several Mega-Ohms and not shorted (see figure 1-4-3). If failed, replace the power source PWB (see page 1-5-25). |
| 6120 | Abnormally high fuser thermistor 1 temperature | Deformed connector pin. | See page 1-4-19. |
| The detection temperature of fuser thermistor 1 is higher than 245°C/473°F. | Defective triac. | See page 1-4-19. | |
| Shorted fuser thermistor. | Replace the fuser unit (see page 1-5-19). | ||
| In a heater-off state, the detection temperature of fuser thermistor 1 is higher than 195°C/383°F after the detection temperature of fuser thermistor 1 was 155°C/311 °F or less. | Defective engine PWB. | Replace the engine PWB and check for correct operation (see page 1-5-22). | |
| 6130 | Broken fuser thermistor 1 wire A/D value of the fuser thermistor 1 exceeds 1019 bit continuously for 4 s during warming up. | Defective connector cable or poor contact in the connector. | Reinsert the connector. Also check for continuity within the connector cable. If none, replace the cable. Fuser thermistor and fuser thermistor connect PWB(YC1) Fuser thermistor connect PWB(YC3) and engine PWB (YC21) |
| Deformed connector pin. | See page 1-4-19. | ||
| Defective triac. | See page 1-4-19. | ||
| Defective fuser thermistor. | Replace the fuser unit (see page 1-5-19). | ||
| Defective engine PWB. | Replace the engine PWB and check for correct operation (see page 1-5-22). | ||
| 6400 | Zero-cross signal error While fuser heater control is performed, the zero-cross signal is not input within 2 s. | Defective connector cable or poor contact in the connector. | Reinsert the connector. Also check for continuity within the connector cable. If none, replace the cable. Power source PWB (YC3) and engine PWB (YC1) |
| Defective power source PWB or engine PWB. | Replace the power source PWB or the engine PWB and check for correct operation (see page 1-5-22). | ||
| 7100 | Toner sensor error Sensor output value of 930 or more continuously for 5 s. | Defective connector cable or poor contact in the connector. | Reinsert the connector. Also check for continuity within the connector cable. If none, replace the cable. Toner sensor and drum PWB (YC3) Drum connect PWB(YC2) and relay-L PWB (YC3) Relay-L PWB(YC1) and engine PWB (YC2) |
| Defective toner sensor. | Replace the developer unit. (See Page 1-5-13) | ||
| Defective engine PWB. | Replace the engine PWB and check for correct operation (see page 1-5-22). | ||
| 7400 | Developer unit non-installing error Sensor output value of 31 or less continuously for 5 s. | Defective connector cable or poor contact in the connector. | Reinsert the connector. Also check for continuity within the connector cable. If none, replace the cable. Toner sensor and drum PWB (YC3) Drum connect PWB(YC2) and relay-L PWB (YC3) Relay-L PWB(YC1) and engine PWB (YC2) |
| Defective toner sensor. | Replace the developer unit. (See Page 1-5-13) | ||
| Defective engine PWB. | Replace the engine PWB and check for correct operation (see page 1-5-22). | ||
| 7410 | Drum unit type mismatch error The drum PWB EEPROM does not communicate normally. Absence of the drum unit | Defective connector cable or poor contact in the connector. | Reinsert the connector. Also check for continuity within the connector cable. If none, replace the cable. Drum unit and drum connect PWB (YC1) Drum connect PWB(YC2) and relay-L PWB (YC3) Relay-L PWB(YC1) and engine PWB (YC2) |
| is detected. | Defective toner sensor. | Replace the drum unit. (See Page 1-5-13) | |
| Defective engine PWB. | Replace the engine PWB and check for correct operation (see page 1-5-22). | ||
| 7800 | Broken external thermistor wire The average of thermistor output value of 93 or less. | Defective connector cable or poor contact in the connector. | Reinsert the connector. Also check for continuity within the connector cable. If none, replace the cable. Operation PWB (YC1) and engine PWB (YC17) |
| Defective temperature sensor. | Replace the operation PWB. | ||
| 7810 | Short-circuited external thermistor wire The average of thermistor output value of 930 or more. | Defective connector cable or poor contact in the connector. | Reinsert the connector. Also check for continuity within the connector cable. If none, replace the cable. Operation PWB (YC1) and engine PWB (YC17) |
| Defective temperature sensor. | Replace the operation PWB. | ||
| 7900 | Drum unit EEPROM error No response is issued from the device in reading/writing for 5 ms or more and this problem is repeated five times successively. | Defective connector cable or poor contact in the connector. | Reinsert the connector. Also check for continuity within the connector cable. If none, replace the cable. Drum unit and drum connect PWB (YC1) Drum connect PWB(YC2) and relay-L PWB (YC3) Relay-L PWB(YC1) and engine PWB (YC2) |
| Mismatch of reading data from two locations occurs eight times successively. Mismatch between writing data and reading data occurs eight times successively. | Defective drum unit. | Replace the drum unit (see 1-5-15). | |
| F000 | Main PWB — operation PWB communication error | Defective connector cable or poor contact in the connector. | Reinsert the connector. Also check for continuity within the connector cable. If none, replace the cable. Operation PWB(YC1) and engine PWB (YC17) |
| Defective main PWB. | Turn the main power switch off/on to restart the machine. If the error is not resolved, replace main PWB (see page 1-5-22). | ||
| Defective operation PWB. | Replace the operation PWB and check for correct operation. | ||
| F010 | Main PWB checksum error | Defective main PWB. | Turn the main power switch off/on to restart the machine. If the error is not resolved, replace main PWB (see page 1-5-22). |
| F020 | Main PWB RAM checksum error | Defective main memory (RAM) in main PWB | Turn the main power switch off/on to restart the machine. If the error is not resolved, replace main PWB (see page 1-5-22). |
| Defective expended memory (DIMM) | Replace the expansion memory (DIMM). (See Page 1-2-12) Also in the case of the capacity besides specification, it displays. | ||
| F040 | Main PWB — print engine communication error | Defective main PWB. | Turn the main power switch off/on to restart the machine. If the error is not resolved, replace main PWB (see page 1-5-22). |
| Defective engine PWB. | Replace the engine PWB and check for correct operation (see page 1-5-22). | ||
| F050 | Print engine ROM checksum error | Defective engine PWB. | Turn the main power switch off/on to restart the machine. If the error is not resolved, replace engine PWB (see page 1-5-22). |
2. System Error (Fxxxx) Outline — Системная ошибка (Fxxxx)
| It locks on a Welcome screen.It locks on a starting logo (Taskalfa/Ecosys) screen.(Even if time passes for a definite period of time in more than * notes, a screen does not change) | (1) Check the harness, and the connection state of a connector between Panel<=>Main boards, and perform an operation check. (2) Check contact of a DDR memory (extracting) and perform an operation check. If exchangeable, it will exchange and will perform an operation check. (3) U021 Controller backup initialization is carried out and an operation check is performed. (4) Exchange a PanelMain board and perform an operation check. (5) Exchange a Main board and perform an operation check. (6) It will get, if USBLOG is obtainable, and contact service headquarters. | 1. Panel <=> Main IF (Engine PWB Relay) Main PWB: YC2 Engine PWB: YC20,YC30 Panel PWB: YC1 2. DDR memory Main PWB: YS1 | * note: 60[s] | |
| F000 | CF000 will be displayed if * notes progress is carried out for a definite period of time with a Welcome screen.The communication fault between Panel-Main boardsCommunication fault between Panel Core-Main Core Notes 2 | (1) Check the harness, and the connection state of a connector between Panel<=>Main boards, and perform an operation check. (2) Check contact of a DDR memory (extracting) and perform an operation check. If exchangeable, it will exchange and will perform an operation check. (3) U021 Controller backup initialization is carried out and an operation check is performed. (4) Exchange a Main board and perform an operation check. (5) Exchange a PanelMain board and perform an operation check. (6) It will get, if USBLOG is obtainable, and contact service headquarters. | 1. Panel <=> Main IF (Engine PWB Relay) Main PWB: YC2 Engine PWB: YC20,YC30 Panel PWB: YC1 2. DDR memory Main PWB: YS1 | * note: 60[s] |
| F15X | Abnormality detecting in an authentication device control section | (1) Check the harness between authentication device <=>Main boards, and the connection situation of a connector, and perform an operation check. (2) Carry out U021 Main backup initialization and perform an operation check. (3) Exchange a Main board and perform an operation check. (4) Get USBLOG and contact service headquarters. | ^Authentication device <=> Main IF Main PWB: YC6 Authentication device: IC card reader etc. | [Main body <=> authentication device] USB-HOST connector [Main boad <=> USB connector] Main boad: YC510 |
| F17X | Abnormality detecting in a printer data control part | (1) U021 Controller backup initialization is carried out and an operation check is performed. (2) Exchange a Main board and perform an operation check. (3) Get USBLOG and contact service headquarters. | ||
| F18X | Abnormality detecting in a Video control section | (1) Check the harness between Engine<=>Main boards, and the connection state of a connector, and perform an operation check. (2) U021 Controller backup initialization is carried out and an operation check is performed. (3) Exchange an Engine board and perform an operation check. (4) Exchange a Main board and perform an operation check. (5) Get USBLOG and contact service headquarters. | ||
| F1DX | Abnormality detecting of the image memory Management Department | (1) U021 Controller backup initialization is carried out and an operation check is performed. (2) Exchange a Main board and perform an operation check. (3) Get USBLOG and contact service headquarters. | * Poor arrangement of F1 D4:Random Access Memory(1) Confirmation of U340(2) Initialization of a set point (U021) | |
| F21X | Abnormality detecting in an image-processing part | (1) Check contact of a DDR memory and perform an operation check. (2) Carry out U021 Main backup initialization and perform an operation check. (3) Exchange a Main board and perform an operation check. (4) Get USBLOG and contact service headquarters. | ||
| F22X | ||||
| F23X | ||||
| F24X | Abnormality detecting in the system Management Department | (1) Check contact of a DDR memory and perform an operation check. (2) Carry out U021 Main backup initialization and perform an operation check. (3) Exchange a Main board and perform an operation check. (4) Get USBLOG and contact service headquarters. | * F248 is the abnormalities of a printer process.In recurring by specific printer data, please give me cooperation at acquisition of capture data and USBLOG. | [Controller failure] Turn power on and off to clear. USB log is required for investigation. [Main PWB] There is no hard components that can be checked in the field. |
| F25X | Abnormality detecting in a network management department | (1) U021 Controller backup initialization is carried out and an operation check is performed. (2) Exchange a Main board and perform an operation check. (3) Get USBLOG and contact service headquarters. | * It may occur according to a visitor’s network environment. | [Main body <=> External network] Ethernet network |
| F26X | Abnormality detecting in the system Management Department | (1) U021 Controller backup initialization is carried out and an operation check is performed. (2) Exchange a Main board and perform an operation check. (3) Get USBLOG and contact service headquarters. | ||
| F27X | ||||
| F28X | ||||
| F29X | ||||
| F2AX | ||||
| F2BX | Abnormality detecting in a network control part | (1) Carry out U021 Main backup initialization and perform an operation check. (2) Exchange a Main board and perform an operation check. (3) Get USBLOG and contact service headquarters. (Depending on an analysis result, it is packet capture acquisition) | [Main body <=> External network] Ethernet network | |
| F2CX | ||||
| F2DX | ||||
| F2EX | ||||
| F2FX | ||||
| F30X | ||||
| F31X | ||||
| F32X | ||||
| F35X | Abnormality detecting in the printing controlling Management Department | (1) U021 Controller backup initialization is carried out and an operation check is performed. (2) Exchange a Main board and perform an operation check. (3) Get USBLOG and contact service headquarters. | ||
| F38X | Abnormality detecting in the authentication authorized Management Department | (1) U021 Controller backup initialization is carried out and an operation check is performed. (2) Exchange a Main board and perform an operation check. (3) Get USBLOG and contact service headquarters. | [Main body <=> authentication device] USB-HOST connector [Main boad <=> USB connector] Main boad: YC510 | |
| F3AX | Abnormality detecting in the Entity Management Department | (1) U021 Controller backup initialization is carried out and an operation check is performed. (2) Exchange a Main board and perform an operation check. (3) Get USBLOG and contact service headquarters. | ||
| F3BX | ||||
| F3CX | ||||
| F3DX | ||||
| F3EX | ||||
| F3FX | ||||
| F40X | ||||
| F41X | ||||
| F43X | ||||
| F44X | ||||
| F45X | ||||
| F46X | Abnormality detecting of a printer rendering part | (1) Exchange boards and perform an operation check. (2) the acquisition wish of USBLOG — carry out (Depending on the (2) case, it is print capture data acquisition) | * F46F is the abnormalities of a printer process.In recurring by specific printer data, please give me cooperation at acquisition of capture data and USBLOG. | |
| F4DX F4EX | Abnormality detecting in the Entity Management Department | (1) U021 Controller backup initialization is carried out and an operation check is performed. (2) Exchange a Main board and perform an operation check. (3) Get USBLOG and contact service headquarters. | [Main PWB] There is no hard components that can be checked in the field. | |
| F4FX | Abnormality detecting in the JOB Management Department | (1) U021 Controller backup initialization is carried out and an operation check is performed. (2) Exchange a Main board and perform an operation check. (3) Get USBLOG and contact service headquarters. | Since the USB log immediately after occurrence is needed for analysis, please give me cooperation of acquisition. | |
| F52X F53X F55X F56X F57X | Abnormality detecting in a JOB execution part | «(1) U021 Controller backup initialization is carried out and an operation check is performed. (2) Exchange a Main board and perform an operation check. (3) Get USBLOG and contact service headquarters. | Since the USB log immediately after occurrence is needed for analysis, please give me cooperation of acquisition. | |
| F61X | Abnormality detecting in a report creation part | (1) U021 Controller backup initialization is carried out and an operation check is performed. (2) Exchange a Main board and perform an operation check. (3) Get USBLOG and contact service headquarters. | Since the USB log immediately after occurrence is needed for analysis, please give me cooperation of acquisition. | [Controller failure] Turn power on and off to clear. USB log is required for investigation. |
| F63X | Abnormality detecting in a device control section | (1) U021 Controller backup initialization is carried out and an operation check is performed. (2) Exchange a Main board and perform an operation check. (3) Get USBLOG and contact service headquarters. | ||
| F68X | Abnormality detecting in a storage device control section | (1) U021 Controller backup initialization is carried out and an operation check is performed. (2) Exchange a Main board and perform an operation check. (3) Get USBLOG and contact service headquarters. | * F684 is the overwrite error at the time of an HDD security kit. | |
| F90X | Abnormality detecting in the extension application service part | (1) U021 Controller backup initialization is carried out and an operation check is performed. (2) Exchange a Main board and perform an operation check. (3) Get USBLOG and contact service headquarters. | Since the USB log at the time of occurrence is needed for analysis, please give me cooperation of acquisition. | |
| F93X | Abnormality detecting in the extension application management part | (1) U021 Controller backup initialization is carried out and an operation check is performed. (2) Exchange a Main board and perform an operation check. (3) Get USBLOG and contact service headquarters. | Since the USB log at the time of occurrence is needed for analysis, please give me cooperation of acquisition. |
3.System Error (Fxxxx) Outline — Системная ошибка (Fxxxx)
| It locks on a Welcome screen.It locks on a starting logo (Taskalfa/Ecosys) screen.(Even if time passes for a definite period of time in more than * notes, a screen does not change) | (1) Check the harness, and the connection state of a connector between Panel<=>Main boards, and perform an operation check. (2) Check contact of a DDR memory (extracting) and perform an operation check. If exchangeable, it will exchange and will perform an operation check. (3) U021 Controller backup initialization is carried out and an operation check is performed. (4) Exchange a PanelMain board and perform an operation check. (5) Exchange a Main board and perform an operation check. (6) It will get, if USBLOG is obtainable, and contact service headquarters. | 1. Panel <=> Main IF (Engine PWB Relay) Main PWB: YC2 Engine PWB: YC20,YC30 Panel PWB: YC1 2. DDR memory Main PWB: YS1 | * note: 60[s] | |
| F000 | CF000 will be displayed if * notes progress is carried out for a definite period of time with a Welcome screen.The communication fault between Panel-Main boardsCommunication fault between Panel Core-Main Core Notes 2 | (1) Check the harness, and the connection state of a connector between Panel<=>Main boards, and perform an operation check. (2) Check contact of a DDR memory (extracting) and perform an operation check. If exchangeable, it will exchange and will perform an operation check. (3) U021 Controller backup initialization is carried out and an operation check is performed. (4) Exchange a Main board and perform an operation check. (5) Exchange a PanelMain board and perform an operation check. (6) It will get, if USBLOG is obtainable, and contact service headquarters. | 1. Panel <=> Main IF (Engine PWB Relay) Main PWB: YC2 Engine PWB: YC20,YC30 Panel PWB: YC1 2. DDR memory Main PWB: YS1 | * note: 60[s] |
| F15X | Abnormality detecting in an authentication device control section | (1) Check the harness between authentication device <=>Main boards, and the connection situation of a connector, and perform an operation check. (2) Carry out U021 Main backup initialization and perform an operation check. (3) Exchange a Main board and perform an operation check. (4) Get USBLOG and contact service headquarters. | ^Authentication device <=> Main IF Main PWB: YC6 Authentication device: IC card reader etc. | [Main body <=> authentication device] USB-HOST connector [Main boad <=> USB connector] Main boad: YC510 |
| F17X | Abnormality detecting in a printer data control part | (1) U021 Controller backup initialization is carried out and an operation check is performed. (2) Exchange a Main board and perform an operation check. (3) Get USBLOG and contact service headquarters. | ||
| F18X | Abnormality detecting in a Video control section | (1) Check the harness between Engine<=>Main boards, and the connection state of a connector, and perform an operation check. (2) U021 Controller backup initialization is carried out and an operation check is performed. (3) Exchange an Engine board and perform an operation check. (4) Exchange a Main board and perform an operation check. (5) Get USBLOG and contact service headquarters. | ||
| F1DX | Abnormality detecting of the image memory Management Department | (1) U021 Controller backup initialization is carried out and an operation check is performed. (2) Exchange a Main board and perform an operation check. (3) Get USBLOG and contact service headquarters. | * Poor arrangement of F1 D4:Random Access Memory(1) Confirmation of U340(2) Initialization of a set point (U021) | |
| F21X | Abnormality detecting in an image-processing part | (1) Check contact of a DDR memory and perform an operation check. (2) Carry out U021 Main backup initialization and perform an operation check. (3) Exchange a Main board and perform an operation check. (4) Get USBLOG and contact service headquarters. | ||
| F22X | ||||
| F23X | ||||
| F24X | Abnormality detecting in the system Management Department | (1) Check contact of a DDR memory and perform an operation check. (2) Carry out U021 Main backup initialization and perform an operation check. (3) Exchange a Main board and perform an operation check. (4) Get USBLOG and contact service headquarters. | * F248 is the abnormalities of a printer process.In recurring by specific printer data, please give me cooperation at acquisition of capture data and USBLOG. | [Controller failure] Turn power on and off to clear. USB log is required for investigation. [Main PWB] There is no hard components that can be checked in the field. |
| F25X | Abnormality detecting in a network management department | (1) U021 Controller backup initialization is carried out and an operation check is performed. (2) Exchange a Main board and perform an operation check. (3) Get USBLOG and contact service headquarters. | * It may occur according to a visitor’s network environment. | [Main body <=> External network] Ethernet network |
| F26X | Abnormality detecting in the system Management Department | (1) U021 Controller backup initialization is carried out and an operation check is performed. (2) Exchange a Main board and perform an operation check. (3) Get USBLOG and contact service headquarters. | ||
| F27X | ||||
| F28X | ||||
| F29X | ||||
| F2AX | ||||
| F2BX | Abnormality detecting in a network control part | (1) Carry out U021 Main backup initialization and perform an operation check. (2) Exchange a Main board and perform an operation check. (3) Get USBLOG and contact service headquarters. (Depending on an analysis result, it is packet capture acquisition) | [Main body <=> External network] Ethernet network | |
| F2CX | ||||
| F2DX | ||||
| F2EX | ||||
| F2FX | ||||
| F30X | ||||
| F31X | ||||
| F32X | ||||
| F35X | Abnormality detecting in the printing controlling Management Department | (1) U021 Controller backup initialization is carried out and an operation check is performed. (2) Exchange a Main board and perform an operation check. (3) Get USBLOG and contact service headquarters. | ||
| F38X | Abnormality detecting in the authentication authorized Management Department | (1) U021 Controller backup initialization is carried out and an operation check is performed. (2) Exchange a Main board and perform an operation check. (3) Get USBLOG and contact service headquarters. | [Main body <=> authentication device] USB-HOST connector [Main boad <=> USB connector] Main boad: YC510 | |
| F3AX | Abnormality detecting in the Entity Management Department | (1) U021 Controller backup initialization is carried out and an operation check is performed. (2) Exchange a Main board and perform an operation check. (3) Get USBLOG and contact service headquarters. | ||
| F3BX | ||||
| F3CX | ||||
| F3DX | ||||
| F3EX | ||||
| F3FX | ||||
| F40X | ||||
| F41X | ||||
| F43X | ||||
| F44X | ||||
| F45X | ||||
| F46X | Abnormality detecting of a printer rendering part | (1) Exchange boards and perform an operation check. (2) the acquisition wish of USBLOG — carry out (Depending on the (2) case, it is print capture data acquisition) | * F46F is the abnormalities of a printer process.In recurring by specific printer data, please give me cooperation at acquisition of capture data and USBLOG. | |
| F4DX F4EX | Abnormality detecting in the Entity Management Department | (1) U021 Controller backup initialization is carried out and an operation check is performed. (2) Exchange a Main board and perform an operation check. (3) Get USBLOG and contact service headquarters. | [Main PWB] There is no hard components that can be checked in the field. | |
| F4FX | Abnormality detecting in the JOB Management Department | (1) U021 Controller backup initialization is carried out and an operation check is performed. (2) Exchange a Main board and perform an operation check. (3) Get USBLOG and contact service headquarters. | Since the USB log immediately after occurrence is needed for analysis, please give me cooperation of acquisition. | |
| F52X F53X F55X F56X F57X | Abnormality detecting in a JOB execution part | «(1) U021 Controller backup initialization is carried out and an operation check is performed. (2) Exchange a Main board and perform an operation check. (3) Get USBLOG and contact service headquarters. | Since the USB log immediately after occurrence is needed for analysis, please give me cooperation of acquisition. | |
| F61X | Abnormality detecting in a report creation part | (1) U021 Controller backup initialization is carried out and an operation check is performed. (2) Exchange a Main board and perform an operation check. (3) Get USBLOG and contact service headquarters. | Since the USB log immediately after occurrence is needed for analysis, please give me cooperation of acquisition. | [Controller failure] Turn power on and off to clear. USB log is required for investigation. |
| F63X | Abnormality detecting in a device control section | (1) U021 Controller backup initialization is carried out and an operation check is performed. (2) Exchange a Main board and perform an operation check. (3) Get USBLOG and contact service headquarters. | ||
| F68X | Abnormality detecting in a storage device control section | (1) U021 Controller backup initialization is carried out and an operation check is performed. (2) Exchange a Main board and perform an operation check. (3) Get USBLOG and contact service headquarters. | * F684 is the overwrite error at the time of an HDD security kit. | |
| F90X | Abnormality detecting in the extension application service part | (1) U021 Controller backup initialization is carried out and an operation check is performed. (2) Exchange a Main board and perform an operation check. (3) Get USBLOG and contact service headquarters. | Since the USB log at the time of occurrence is needed for analysis, please give me cooperation of acquisition. | |
| F93X | Abnormality detecting in the extension application management part | (1) U021 Controller backup initialization is carried out and an operation check is performed. (2) Exchange a Main board and perform an operation check. (3) Get USBLOG and contact service headquarters. | Since the USB log at the time of occurrence is needed for analysis, please give me cooperation of acquisition. |
4.Electric problems
| Problem | Causes | Check procedures/corrective measures |
| (1) The machine does not operate when the power switch is turned on. | 1. No electricity at the power outlet. | Measure the input voltage. |
| 2. The power cord is not plugged in properly. | Check the contact between the power plug and the outlet. | |
| 3. Broken power cord. | Check for continuity. If none, replace the cord. | |
| 4. Defective power switch. | Check for continuity across the contacts. If none, replace the power switch. | |
| 5. Defective interlock switch. | Check for continuity across the contacts of interlock switch. If none, replace the power source PWB (see page 1-5-25). | |
| 6. Defective power source PWB. | Replace the power source PWB or engine PWB (see page 1-5-25,1-5-22). | |
| (2) Eject motor does not operate. | 1. Defective connector cable or poor contact in the connector. | Reinsert the connector. Also check for continuity within the connector cable. If none, replace the cable. Eject motor and relay-L PWB (YC12) Relay-L PWB and engine PWB (YC2/YC31) |
| 2. Defective drive transmission system. | Check if the rollers and gears rotate smoothly. If not, grease the bushes and gears. Check for broken gears and replace if any. | |
| 3. Defective motor. | Replace the eject motor. | |
| 4. Defective PWB. | Replace the engine PWB or the relay-L PWB and check for correct operation (see page 1-5-22, 1-5-24). | |
| (3) Power source fan motor does not operate. | 1. Defective connector cable or poor contact in the connector. | Reinsert the connector. Also check for continuity within the connector cable. If none, replace the cable. Power source fan motor and engine PWB (YC10) |
| 2. Defective motor. | Replace the power source fan motor. | |
| 3. Defective PWB. | Replace the engine PWB and check for correct operation (see page 1-5-22). | |
| (4) LSU fan motor does not operate. | 1. Defective connector cable or poor contact in the connector. | Reinsert the connector. Also check for continuity within the connector cable. If none, replace the cable. LSU fan motor and relay-L PWB (YC4) Relay-L PWB and engine PWB (YC2/YC31) |
| 2. Defective motor. | Replace the LSU fan motor. | |
| 3. Defective PWB. | Replace the engine PWB or the relay-L PWB and check for correct operation (see page 1-5-22, 1-5-24). | |
| (5) Developer fan motor does not operate. | 1. Defective connector cable or poor contact in the connector. | Reinsert the connector. Also check for continuity within the connector cable. If none, replace the cable. Developer fan motor and engine PWB (YC27) |
| 2. Defective motor. | Replace the developer fan motor. | |
| 3. Defective PWB. | Replace the engine PWB and check for correct operation (see page 1-5-22). | |
| (6) Paper feed clutch does not operate. | 1. Defective connector cable or poor contact in the connector. | Reinsert the connector. Also check for continuity within the connector cable. If none, replace the cable. Paper feed clutch and engine PWB (YC5) |
| 2. Defective clutch. | Replace the paper feed clutch. | |
| 3. Defective PWB. | Replace the engine PWB and check for correct operation (see page 1-5-22). | |
| (7) Registration clutch does not operate. | 1. Defective connector cable or poor contact in the connector. | Reinsert the connector. Also check for continuity within the connector cable. If none, replace the cable. Registration clutch and engine PWB (YC5) |
| 2. Defective clutch. | Replace the registration clutch. | |
| 3. Defective PWB. | Replace the engine PWB and check for correct operation (see page 1-5-22). | |
| (8) Duplex clutch does not operate. | 1. Defective connector cable or poor contact in the connector. | Reinsert the connector. Also check for continuity within the connector cable. If none, replace the cable. Duplex clutch and engine PWB (YC5) |
| 2. Defective clutch. | Replace the duplex clutch. | |
| 3. Defective PWB. | Replace the engine PWB and check for correct operation (see page 1-5-22). | |
| (9) Developer clutch does not operate. | 1. Defective connector cable or poor contact in the connector. | Reinsert the connector. Also check for continuity within the connector cable. If none, replace the cable. Developer clutch and engine PWB (YC5) |
| 2. Defective clutch. | Replace the developer clutch. | |
| 3. Defective PWB. | Replace the engine PWB and check for correct operation (see page 1-5-22). | |
| (10) Conveying clutch does not operate. | 1. Defective connector cable or poor contact in the connector. | Reinsert the connector. Also check for continuity within the connector cable. If none, replace the cable. Conveying clutch and engine PWB (YC5) |
| 2. Defective clutch. | Replace the Conveying clutch. | |
| 3. Defective PWB. | Replace the engine PWB and check for correct operation (see page 1-5-22). | |
| (11) MP solenoid does not operate. | 1. Defective connector cable or poor contact in the connector. | Reinsert the connector. Also check for continuity within the connector cable. If none, replace the cable. MP solenoid and engine PWB (YC8) |
| 2. Defective solenoid. | Replace the MP solenoid. | |
| 3. Defective PWB. | Replace the engine PWB and check for correct operation (see page 1-5-22). | |
| (12) Feedshift solenoid does not operate. (60/55/50 ppm model only) | 1. Defective connector cable or poor contact in the connector. | Reinsert the connector. Also check for continuity within the connector cable. If none, replace the cable. Feedshift solenoid and relay-L PWB (YC13) Relay-L PWB and engine PWB (YC2/YC31) |
| 2. Defective solenoid. | Replace the Feedshift solenoid. | |
| 3. Defective PWB. | Replace the engine PWB or the relay-L PWB and check for correct operation (see page 1-5-22, 1-5-24). | |
| (13) The message requesting paper to be loaded is shown when paper is present on the cassette. | 1. Defective connector cable or poor contact in the connector. | Reinsert the connector. Also check for continuity within the connector cable. If none, replace the cable. High voltage PWB and engine PWB (YC19) |
| 2. Deformed actuator of the paper sensor. | Check visually and replace if necessary. | |
| 3. Defective paper sensor. | Replace the engine PWB or the high voltage PWB and check for correct operation (see page 1-5-22,1-5-26). | |
| 4. Defective PWB. | ||
| (14) The message requesting paper to be loaded is shown when paper is present on the MP tray. | 1. Defective connector cable or poor contact in the connector. | Reinsert the connector. Also check for continuity within the connector cable. If none, replace the cable. MP paper sensor and relay-L PWB (YC8) Relay-L PWB and engine PWB (YC2) |
| 2. Deformed actuator of the MP paper sensor. | Check visually and replace if necessary. | |
| 3. Defective MP paper sensor. | Replace the MP paper sensor. | |
| 4. Defective PWB. | Replace the engine PWB or the relay-L PWB and check for correct operation (see page 1-5-22, 1-5-24). | |
| (15) The size of paper on the cassette is not displayed correctly. | 1. Defective connector cable or poor contact in the connector. | Reinsert the connector. Also check for continuity within the connector cable. If none, replace the cable. Cassette size switch and engine PWB (YC7) |
| 2. Defective cassette size switch. | Replace the cassette size switch. | |
| 3. Defective PWB. | Replace the engine PWB and check for correct operation (see page 1-5-22). | |
| (16) A paper jam in the paper feed, paper conveying or eject section is indicated when the main power switch is turned on. | 1. Defective connector cable or poor contact in the connector. | Reinsert the connector. Also check for continuity within the connector cable. If none, replace the cable. Regist sensor 2 and Drum PWB (YC6) DU sensor 1 and Relay-L PWB (YC9) PF feed sensor and PF main PWB Eject full sensor and engine PWB (YC12) Eject sensor and Engine PWB (YC26) |
| 2. A piece of paper torn from paper is caught around registration sensor, duplex sensor, PF feed sensor, eject full sensor or eject sensor. | Check visually and remove it, if any. | |
| 3. Defective sensor. | Replace the registration sensor, duplex sensor, PF feed sensor, eject full sensor or eject sensor. | |
| 4. Defective PWB. | Replace the engine PWB and check for correct operation (see page 1-5-22). | |
| (17) A message indicating cover open is displayed when the top cover is closed. | 1. Defective connector cable or poor contact in the connector. | Reinsert the connector. Also check for continuity within the connector cable. If none, replace the cable. Interlock switch and engine PWB (YC6) |
| 2. Defective interlock switch. | Check and replace if necessary. | |
| 3. Defective PWB. | Replace the engine PWB and check for correct operation (see page 1-5-22). | |
| (18) A message indicating cover open is displayed when the rear cover is closed. | 1. Defective connector cable or poor contact in the connector. | Reinsert the connector. Also check for continuity within the connector cable. If none, replace the cable. Rear cover switch and relay-L PWB (YC10) Relay-L PWB and engine PWB (YC2/YC31) |
| 2. Defective rear cover switch. | Check and replace if necessary. | |
| 3. Defective PWB. | Replace the engine PWB or the relay-L PWB and check for correct operation (see page 1-5-22, 1-5-24). |
5.Mechanical problems
| Problem | Causes/check procedures | Corrective measures |
| (1) No primary paper feed. | Check if the surfaces of the following rollers are dirty with paper powder. Pickup roller Paper feed roller MP paper feed pulley | Clean with isopropyl alcohol. |
| Check if the following rollers is deformed. Pickup roller Paper feed roller MP paper feed pulley | Check visually and replace any deformed (see page 1-5-8, 1-5-10). | |
| Defective paper feed clutch installation. | Check visually and remedy if necessary. | |
| (2) No secondary paper feed. | Check if the surfaces of the following rollers are dirty with paper powder. Upper registration roller Lower registration roller | Clean with isopropyl alcohol. |
| Defective registration clutch installation. | Check visually and remedy if necessary. | |
| (3) Skewed paper feed. | Paper width guide in a cassette installed incorrectly. | Check the paper width guide visually and remedy or replace if necessary. |
| (4) Multiple sheets of paper are fed. | Check if the paper is excessively curled. | Change the paper. |
| Paper is loaded incorrectly. | Load the paper correctly. | |
| Check if the retard roller is worn. | Replace the retard roller if it is worn (see page 1-5-8). | |
| (5) Paper jams. | Check if the paper is excessively curled. | Change the paper. |
| Check if the contact between the upper and lower registration rollers is correct. | Check visually and remedy if necessary. | |
| Check if the heat roller or press roller is extremely dirty or deformed. | Check visually and replace the fuser unit (see page 1-5-19). | |
| (6) Toner drops on the paper conveying path. | Check if the drum unit or developer unit is extremely dirty. | Clean the drum unit or developer unit. |
| (7) Abnormal noise is heard. | Check if the rollers, pulleys and gears operate smoothly. | Grease the bushes and gears. |
| Check if the following clutches are installed correctly. Paper feed clutch Registration clutch Duplex clutch | Check visually and remedy if necessary. |
Источники
- https://helpadmins.ru/oshibka-c7990-na-printerakh-kyocera/
- https://printeru.info/oshibki-i-problemy/c7990-kiosera
- https://kodyoshibok03.ru/kod-oshibki-c7990-kyocera-kak-ispravit/
- https://setiwik.ru/sbros-oshibki-s7990-na-apparatah-kyocera/
- https://moscowtoner.ru/oshibka-kyocera-c7990-kak-ochistit-dram-kartridzh-ot-otrabotannogo-tonera/
- https://zipzip03.ru/oshibka-c7990-na-kyocera/
- https://remtehprint.ru/oshibka-c7990-kyocera-sboj-apparata-vyzovite-servisnyj-personal
- https://univer-irk.ru/czvet/oshibka-kyocera-c7990-s-soobshheniem-sboj-apparata-vyzovite-servisnyj-personal
- https://vkspy.info/pc/oshibka-kyocera-c7990-chistka-dram-kartridzha-ot-otrabotki
- https://skolkogramm.ru/info/oshibka-kyocera-c7990-s-soobshheniem-sboj-apparata-vyzovite-servisnyj-personal
- https://kyo.com.ua/biblioteka/poleznye-stati/kody-oshibok-dlya-populyarnoy-serii-printerov-kyocera-fs-2100dn-fs-4100dn-fs-4200dn-fs-4300dn-a-takzhe-dlya-prishedshih-im-na-smenu-ecosys-p3045dn-ecosys-p3050dn-ecosys-p3055dn-ecosys-p3060dn./
[свернуть]