Today in this article I’m going to tell you how to fix the crashing freezing fatal error black screen issue with the Final Fantasy 7 reunion Crisis Core game on your Windows computer.
Step 1: Restart your PC
Now the first step is to restart a computer sometimes a simple restart takes care of the problem so restart the computer once and after the system restart, launch the game still you’re facing the problem then follow the next step.
Step 2: Delete the save game files (This will result in loss of game progress)
Now the next step is delete the save game files now before you delete the sale game file let me inform you that this will result in loss of game progress so you have to start everything from scratch so if you want you can delete the save game files now to delete the save game files open File Explorer on computer documents folder over here click on documents over here and then open my games folder and over here you can see the game folder open this folder Steam folder open this folder where you can see the save game file so go to documents and then open my games and delete this complete folder so make a right click and then click on delete now once done go to this PC open C drive now open users folder now open your username folder now open app data folder now if you don’t see app data over here on the top click on view and then put a check on the box which says hidden items and then you should be able to see app data in Windows 11 somewhere over here you will find view option click on view then select show and then put a check on hidden items you should be able to see app data folder open app data folder now open the local folder again over here you can see CC ff7 R folder so when you open this folder you will see saved all the config and the same game file might be here so you have to go ahead and open this local folder and delete this CC ff7r folder make a right click and then click on delete now once this is done Now launch the game.
Step 3: Try -dx11 or -dx12 in launch options
Now still you’re facing the problem in that case try dx11 or dx12 in the launch option go to steam maker right click on the game select properties now over here in the launch option type in dash dx11 and now launch the game if that does not work make right-click once again select properties and this time type in dash dx12 Now launch the game and check now if nothing works you can simply remove this from here from the launch option and then follow the next step.
Step 4: Try fullscreen or windowed on launch options
Now the next step is to try full screen or window in launch options so make right-click on the game once again and select properties in the launch option type in dash full screen and then launch the game if that does not work this time type in Dash Window mode so type 8dash window and then launch the game and check if nothing works you can remove everything from here and then follow the next step.
Step 5: Run the game as an administrator from the game installation folder
Now the next step is to run the game as an administrator from the game installation folder so make a right click on the game select browse manage and then click on browse local files it will straight away take you to the game installation folder make a right click on the game select properties and then go to compatibility Tab and then put a check on the box which says run this program as an administrator then click on apply click on OK and then make a double click over here and then launch the game still you are facing the problem then open this CC ff7r folder then binaries folder open win64 now select this exe file make a right click and then select properties go to the compatibility once again and then put a check on the marks which says run this program as an administrator then click on apply click on OK and then launch the game now still you’re facing the problem in that case you can go back and this time you can make a right click and then select properties and then go to compatibility put a check on the box which is run this program in compatibility mode for select Windows 8 and then check if that does not work select Windows 7 and then click on apply click on OK and then launch the game from here do the same thing with this exe file so make a right click and then select properties compatibility put a check on the box and then select Windows 7 Windows 8 and then launch the game if that does not work you can try Windows 7 then click on apply click on OK and then launch the game still you’re facing the problem then remove this compared compatibility from here still if if it’s not working remove this click on apply click on OK again go back and then do the same thing with this exe file make a right click and then select properties and then compatibility uncheck this box and then click on apply click on OK and then follow the next step.
Step 6: Allow the game exe file to your antivirus program/Windows Security and Firewall
Now the next step is to allow the game exe to antivirus program so if you have any third-party antivirus then make sure that you allow the game exe file to your antivirus program now if you are using Windows security then open Windows settings now if you have Windows 11 on the left hand side over here you will find privacy and security option in my case it’s Windows 10 so it’s not privacy it’s only privacy it’s not privacy in Security in Windows 11 it will be privacy and security over here so click on privacy and Security in Windows 11 Windows 10 click on update and security and then click on Windows security now click on virus and thread protection now scroll down and then click on manage ransomware protection and then click on allow an app through control folder access click on yes to allow and then click on add an allowed app then click on browse all apps and then go to the game installation folder if the game is installed in C drive open C drive program files x86 now open the Steam folder now open the steam apps folder now open the common folder you will find the game folder over here in my case it’s in e Drive so open Steam Library steam apps now open the common folder now open the game folder so find the game folder CC ff7r open this folder now select this exe file now click on open again click on ADD and allowed app browse all apps this time open ccff 7R folder binaries folder win64 select this exe file now click on open now once the game is added over here now type in control panel in Windows search box and then click on control panel now go to system and security now click on Windows Defender Firewall now click on allow an app or feature through Windows Defender Firewall now click on change settings on the top and then click on allow another app now click on browse go to the game installation folder once again so open the steam folders steam apps common then open this CC ff7r folder select this exe file now click on open now click on add in my case this is already added now click on browse once again and then this time opens this folder binaries folder win64 select this shipping exe and then click on open then click on ADD once the game is added over here now click on OK and then launch the game now still you’re facing the problem then follow the next step.
Step 7: Do a clean installation of the graphics driver
Now the next step is do a clean installation of your graphics driver so if you have Nvidia card go to Nvidia website if you have AMD card go to AMD website I am showing for NVIDIA so go to Nvidia website then select your graphic card make sure that you select your graphic card over here and then select the right operating system so if you have Windows 10 select Windows 10 if you have Windows 11 select Windows 11 then click on start search and then scroll down the latest one right now here you can see GeForce game ready driver the latest one is five to seven period five six this is the latest one right now so whichever is the latest click on get download and then click on download now and once the download is complete run this exe file and then you will see the screen now click on agree and continue and then put a check on the box which says custom so put a check over here and then click on next and then put a check on the box which says perform a clean installation and let the installation complete now still you’re facing the problem in that case follow the next step.
Step 8: Roll back the graphics driver
Now the next step is to roll back the Graphics drivers so you can roll back to the previous version so again go to the Nvidia website select your graphics card click on start search and then you can select the previous drivers so you can install this 527.37 or you can install this 526.98 or maybe previous versions so you can try rolling back the graphics driver to the previous version but make sure that you always put a check on the box which says perform a clean installation so put a check on perform a clean installation and then restart a computer and then launch the game.
Step 9: Verify game files
The next step is to verify the game file now for this go to the steam maker item on the game select properties and then go to the local files tab and then click on verify Integrity of game files after the verification launch the game.
Step 10: Disable Steam Overlay, close all the overlay apps (Discord, GeForce Experience, Nvidia shadow play overlay, AMD overlay), close all the overclocking applications, perform a clean boot
The next step is to disable steam overlay for this make a right click on the game select properties and uncheck the box which says enable the steam overlay while in game uncheck this box and then launch the game also close all the overlay applications so if you have Discord running close it if you have GeForce experience running close it if you have Nvidia shadow click overly turned on turn it off AMD overlay turn it off so close all the overlay application also close all the over clocking applications so if you have MSI after Banner running close MSI After Burner if you have reward unit running close remote unit so close all the overclocking application also perform plain boot for this type in system configuration in Windows search box and then click on system configuration now go to the services tab over here go to the services Tab and then put a check on the box which is hide all Microsoft Services product check over here first and then click on disable log in my case this is grayed out I already did it in your case this would be highlighted so put a check over here on High doll Microsoft Services then click on disable all now click on apply click on OK and you will see a restart option restarting computer and then launch the game.
Step 11: Run the game on the dedicated graphics card
Now the next step is to Run the game on the dedicated graphics card now for this type in graphics settings in the Windows search box and then click on Graphics settings now click on browse over here and again go to the game installation folder now open the game folder select this exe file now click on ADD now once the game is added over here click on options select high performance now click on Save again click on browse and this time open this CC ff7r folder binaries folder win64 select this exe file and then click on ADD once the game is added over here now click on options again select high performance now click on Save Now launch the game.
Step 12: Increase the Virtual Memory:
View Advanced system settings
Initial Size: 1.5 x Total Ram
Maximum Size: 3 X Total Ram
The next step is to increase the virtual memory for this type in view Advanced system settings in Windows search box and then click on view Advanced system settings now click on the first settings and then go to the advanced stat and then click on change by default automatically manage paging file would be selected over here uncheck this box and then select the drive where the game is installed and then put a check on custom size and then for me this is working initial size is 1.5 into total Ram now check the total Ram in your computer mirror so you can open Windows settings go to system and then go to about and then over here you can see the total Ram in my case it’s 8 gigabytes so it might be 16 in your case so in my case it’s 8 gigabyte now you have to convert 8 gigabyte into megabyte for this open calculator on your computer and in my case total Ram is 8 gigabyte we have to convert this to megabyte into one zero two one zero two four that is 8192 megabyte so total Ram as per 8 gigabyte in megabyte it is 8192 for me so initial size is 1.5 into total Ram that is this is the total Ram into 1.5 that is 12 to eight eight and maximum size for me it’s three into total Ram now total Ram is 8192 in megabyte into three so for me it’s two four five seven six enter the numbers over here and then click on set click on OK click on OK and then click on apply okay okay now still you’re facing the problem then follow the next step.
Step 13: Install Visual C++ Files
Now the next step is to install visual C++ file now for this copy this link the link is provided in the video description open this link in a browser it will take you to Microsoft website over here you can see Visual Studio 2015 17 19 and 22. so you have to download this x86 file click on it and then run this exe file now if you see the repair option click on repair if you see the install option click on install click on yes to allow and let the installation complete now download x64 you have to download x86 and x64 download x64 exe file again run this exe file I’m already installing X6 86 now I have to install x64 so again if you see the repair option click on repair if you see the install option we’re going to install click on yes to allow and let the installation complete make sure both x64 and x86 installation is complete now once the installation is complete you have to restart the computer so you will see a restart option so let the installation complete first and then restart the computer now over here you can see the restart option now restart a computer and then launch the game so make sure that you restart the computer after this now still you’re facing the problem then follow the next step.
Step 14: Install Media Feature Pack: If you are using N versions of Windows or switch normal Windows 10/11 editions
Now the next step is to install media feature packs so if you’re using n version of Windows then install media feature pack now for this copy this link the link is provided in the video description open this link in a browser it will take you to Microsoft website and then scroll down over you can see Windows 10 and Edition for this open Windows settings and then go to apps and then go to apps and features and then click on optional features over here then click on add a feature over here now over here type in media feature pack now I don’t have media feature pack I’m not using Windows 10 and Edition I am using Windows 10 home so I don’t see media feature pack if you have Windows 10 in addition you will see media feature pack over here put a check on the box and then click on install on the bottom and after the installation restart the computer and then launch the game similarly if you have Windows 11 and Edition then open settings go to apps optional features click on view features type in media feature pack install it restart a computer and then launch the game.
Step 15: Update your Windows
Now the next step is to update your windows to the latest version now this is important so open Windows settings go to update and security or Windows update and then click on check for an update over here you will see a check for update option click on check for an update once all the updates are installed restart your computer and then launch the game so once all the updates are installed make sure that you restart your computer so restart your computer once all the updates are installed and then launch the game.
Step 16: Disconnect multiple monitors, unplug all the USB devices, Logitech wheel, joystick, Razer Tartarus gamepad, vjoy, turn off Razer Synapse (razor lighting effects) and MSI Dragon Center, corsair software, end nahimic services & lightingservice.exe in task manager, remove the undervolt
Now the next step is to disconnect multiple monitors so try launching the game on a single monitor also unplug all the USB devices which you’re not using so disconnect these devices also if you have this software running on the computer close this software and then launch the game make sure only the Steam and the game is running rest close everything including all your browsers also remove the undervolt so if you have undervolt you can be able to remove the undervolt and then launch the game.
Step 17: Update System BIOS
Now the next step is to update your system bios go to your system manufacturer’s website if you have a Dell computer go to the Dell website if you have an HP computer go to the HP website if you have a Lenovo computer go to the Lenovo website so go to your system manufacturer website and then select your model number find the latest bios available and download and install the latest bios now before you update the BIOS in case of laptop if the make sure the charger the AC adapter is connected to the computer also make sure battery is more than 10 percent and then update your system bios and after the device update logs into your computer now during the BIOS update your system will restart and during the BIOS update do not unplug the power cable let the bias update complete log into your computer and then launch the game.
Step 18: Try Windowed mode and lower down graphics settings
Now the next step is to try Window mode and lower down Graphics settings so if you are able to launch the game and then try Window mode and then lower down Graphics settings now go to options go to Graphics settings now try Window mode so select Window mode over here and also lower down screen resolution so if this is set to 4K you can try 1920 into 1080p you can even lower down more and please ignore this error message for now if the graphics quality is set to high you can select medium or you can even try low and check the performance now also try turning off vsync off and then check now check the performance now still you’re facing the problem.
Step 19: Uninstall and reinstall the game to a different drive (Try SSD first)
Now the last step is to uninstall and reinstall the game to different drives so uninstall game after the uninstall go to the game installation folder delete the game folder then restart your computer after the system restart reinstall the game to a different drive so if you have another SSD or HDD try installing the game to a different drive and then check.
So one of the steps should help you to get rid of the error so that’ll be all thank you so much for your precious time and please appreciate our work through your valuable comment.
Contents
- 1 Fix Crisis Core Ff7 Reunion Not Launching Crashing Fatal Error
- 2 Fix Crisis Core Ff7 Reunion Not Launching, Crashing, Fatal Error, Freezing & Black Screen On Pc
- 2.1 Conclusion
- 2.1.1 Related image with fix crisis core ff7 reunion not launching crashing fatal error
- 2.1.2 Related image with fix crisis core ff7 reunion not launching crashing fatal error
- 2.1 Conclusion
Whether you’re here to learn, to share, or simply to indulge in your love for Fix Crisis Core Ff7 Reunion Not Launching Crashing Fatal Error, you’ve found a community that welcomes you with open arms. So go ahead, dive in, and let the exploration begin. Least computer reunion- final minimum If system reason your are you at the crashing getting that vii the crisis issue does is minimum- not the requirements in meet fantasy core then
Fix Crisis Core Ff7 Reunion Not Launching Crashing Fatal Error
Fix Crisis Core Ff7 Reunion Not Launching Crashing Fatal Error
Crisis core final fantasy vii reunion: fix crash to desktop (ctd), unreal engine ue4 fatal crash, black screen, stuttering & freezing on pc step 1) restart your pc crisis core:. Check system requirements first most of the time crashes happen because some hardware component in a pc is either not compatible with the game or it’s not capable enough. before diving into any pc fixes for crisis core final fantasy 7, you should at least verify whether your pc can handle the game. minimum requirements.

How To Fix Crisis Core Final Fantasy Vii Reunion Crashing On Pc The
How To Fix Crisis Core Final Fantasy Vii Reunion Crashing On Pc The
Fix #1 check system requirements the first thing you should do when you experience won’t launch issue is to check if your computer can to run crisis core final fantasy vii reunion. if. Best add a comment yowaiyou • 3 mo. ago try run it with lutris yowaiyou • 3 mo. ago otherwise try reinstall the game and dl a different version tatsu901 • 3 mo. ago right now i am reinstalling it as i verified the files many times and still nothing it fixed the first error which was different but not this one. [deleted] • 3 mo. ago [removed]. One of the common ways to fix the crisis core ff7 reunion crashing issue is by running the game as an administrator. this option provides all the privileges that the program requires to. If your computer does not meet at least the minimum system requirements then that is the reason you are getting the crashing issue in crisis core final fantasy vii reunion. minimum.

Crisis Core Reunion Beginner Tips Guide Conquer The Ff7 Prequel
Crisis Core Reunion Beginner Tips Guide Conquer The Ff7 Prequel
One of the common ways to fix the crisis core ff7 reunion crashing issue is by running the game as an administrator. this option provides all the privileges that the program requires to. If your computer does not meet at least the minimum system requirements then that is the reason you are getting the crashing issue in crisis core final fantasy vii reunion. minimum. Showing 1 1 of 1 comments peskalberto dec 13, 2022 @ 2:07pm solution: if you’re playing on a windows 10 «n» version like me, you need to install media feature pack and windows media player. #1 showing 1 1 of 1 comments per page: 15 30 50 crisis core –final fantasy vii– reunion > general discussions > topic details dec 13, 2022 @ 11:57am. To fix crisis core final fantasy vii not launching, crashing, or freezing, you can try updating your graphics card, running the game as an administrator, or allowing it in your antivirus. you can also try disabling overlays conflicting programs, repairing verifying the game files, or updating windows.
Fix Crisis Core Ff7 Reunion Not Launching, Crashing, Fatal Error, Freezing & Black Screen On Pc
Fix Crisis Core Ff7 Reunion Not Launching, Crashing, Fatal Error, Freezing & Black Screen On Pc
crisis core final fantasy vii reunion: fix crash to desktop(ctd), unreal engine ue4 fatal crash, black screen, in this video i am going to show how to fix crisis core final fantasy vii reunion crashing, not launching, freezing sometime when played this game and we want pause for open new tab or back to dekstop this game will crash and will crisis core: final fantasy vii reunion startup not launching crash\error: possiblenow.xyz ✓how to fix the crisis crisis core final fantasy vii reunion is a remaster of crisis core featuring updated graphics, combat systems and here’s how to fix crisis core ff7 reunion crashing on windows ps5 ps4 xbox. here’s how to fix crisis core final fantasy 7 reunion crash at launch issue on windows pc. run avast driver updater@ crisis core final fantasy 7 reunion how to fix xbox play station and pc game bug lag hang crash and glitches problems please share this around asap so square enix can fix this. crisis core reunion is such a great game but the pc fix crisis core ff7 reunion game settings not saving error unable to save an error has occurred,crisis core ff7r: how to fix controller on crisis core: final fantasy 7 reunion dont forget to subscribe for updates on controller fix guys will today, i’ll show you how to fix the controller xbox mapping & ue4 crashing of crisis core ff7 reunion in this video. download the
Conclusion
All things considered, there is no doubt that the post offers useful knowledge about Fix Crisis Core Ff7 Reunion Not Launching Crashing Fatal Error. Throughout the article, the author demonstrates an impressive level of expertise on the topic. Especially, the section on X stands out as a key takeaway. Thank you for this article. If you need further information, feel free to reach out via the comments. I look forward to hearing from you. Moreover, here are a few relevant posts that you may find helpful:
I thought I would write a quick post about the debug process I did to resolve my FFVIIR issue. I hope you find it interesting! 
I was gifted the game by my younger brother, he knows I played it as a kid and thought it would be fun. I got about 3 hrs in, that’s 2 sessions, before I then encountered a «Fatal Error.»
I tried the usual to fix it;
- Verify game integrity
- Reinstall the game
- Reinstall graphics drivers
- Check the log files
- Execute with
-dx11and —d3d11 - Reboot my pc
- Temporarily disable AV
- Disabled Cloud Save temporarily
- Cleared save files, temp files and shader cache
I tried all sorts and it was all to no avail.
I had finally resorted to using the Windows 11 feature Reset Windows which resulted in reinstalling my GPU drivers, steam and FFVIIR. In the end I can play again though.

If you enjoyed this and would like more content like it then please join the Discord and let me know.
- Тема: Final Fantasy VII Intergrade Remake
- Дата выпуска:
- Разработчик:
- Издатель:
С момента выхода Final Fantasy VII Remake Intergrade игроки сообщали о нескольких проблемах. Некоторые из этих проблем — сбой Final Fantasy VII Remake Intergrade и, что еще хуже, игра вылетает во время запуска. Это делает Final Fantasy VII Remake Intergrade совершенно неиграбельной. К счастью, в Final Fantasy VII Remake Intergrade все еще есть способ исправить эти сбои. Ниже вы найдете наиболее эффективные способы решения этих проблем.
Прежде чем мы приступим к устранению неполадок, убедитесь, что ваш компьютер соответствует минимальным требованиям Final Fantasy VII Remake Intergrade. Если вы не выполнили хотя бы минимальные системные требования Final Fantasy VII Remake Intergrade, неудивительно, что Final Fantasy VII Remake Intergrade дает сбой на вашем ПК. Модернизация вашего оборудования — лучший способ сделать Final Fantasy VII Remake Intergrade играбельной.
Обновите свои драйверы
Предполагая, что ваш компьютер соответствует системным требованиям Final Fantasy VII Remake Intergrade, еще одна причина сбоя игры связана с устаревшими драйверами.
Устаревший графический драйвер, DirectX и некоторые неконтролируемые драйверы являются причинами сбоя Final Fantasy VII Remake Intergrade. Настоятельно рекомендуется загрузить последние обновления драйверов для вашего ПК. Если у вас недостаточно времени, терпения или навыков для обновления драйверов вручную, вы можете сделать это автоматически с помощью Driver Booster.
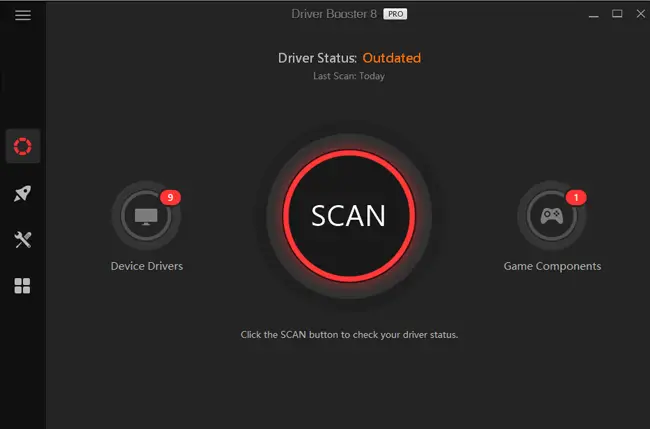
Driver Booster автоматически распознает систему вашего компьютера и найдет для нее правильные драйверы. Вам не нужно точно знать, что работает в вашей системе, поскольку Driver Booster справится со всеми техническими задачами. Проверьте шаги ниже, чтобы узнать, как использовать этот инструмент обновления драйверов.
Шаг 1: Скачать и установить Driver Booster
Шаг 2: Запустите Driver Booster и нажмите кнопку «Сканировать» кнопка. Затем Driver Booster просканирует и обнаружит любые проблемы, связанные с драйверами.
Шаг 3: Нажмите кнопку «Обновить Сейчас», чтобы автоматически загрузить и установить правильные драйверы для вашего компьютера.
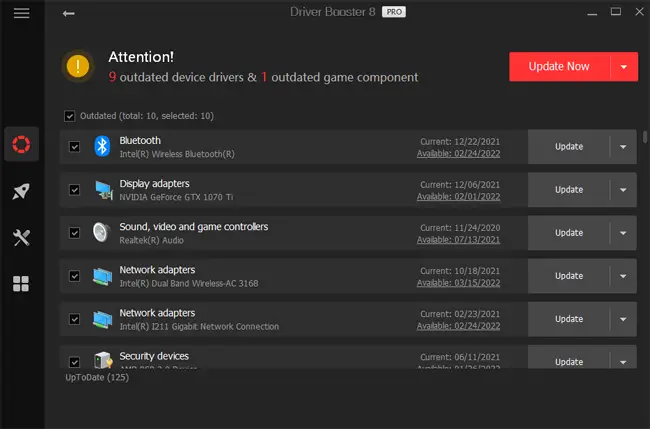
Шаг 4: Перезагрузите компьютер, чтобы изменения обновления вступили в силу.
Шаг 5: Запустите Final Fantasy VII Remake Intergrade и проверьте, решены ли эти проблемы с вылетом.
Если проблема сбоя Final Fantasy VII Remake Intergrade не устранена, попробуйте следующий шаг.
Проверка целостности игры в Steam
В Steam есть встроенная функция, которая позволит вам проверить целостность игры. После выполнения Steam проверит, совпадают ли файлы на вашем локальном компьютере с файлами на серверах Steam. Если что-то не синхронизировано, Steam загрузит и устранит любые проблемы, связанные с файлами.
Вот как вы можете выполнить этот метод:
- Открытые Steam и перейти в Библиотека
- Щелкните правой кнопкой мыши Final Fantasy VII Remake Intergrade и выберите Объекты
- Перейдите в Локальные файлы вариант, затем нажмите Проверить целостность файлов игры…
- Подождите, пока Steam проверит файлы Final Fantasy VII Remake Intergrade.
- Перезапустите Final Fantasy VII Remake Intergrade, чтобы проверить, сможете ли вы играть в нее правильно.
Выполнить чистую загрузку
Есть вероятность, что другая программа, например ваш антивирус, вызывает эти сбои. Вы можете попробовать выполнить чистую загрузку, чтобы убедиться, что никакие другие программы не работают в фоновом режиме. Чтобы выполнить чистую загрузку, вы можете выполнить следующие шаги.
- Откройте инструмент «Выполнить», нажав клавишу Windows + R.
- Тип MSCONFIG и нажмите Enter.
- Перейдите в раздел вкладки «Услуги»
- Установите флажок Скрыть все службы Microsoft.
- Нажмите кнопку Отключить все
- Нажмите «Применить» и перезагрузите компьютер.
Запустите игру после перезагрузки и проверьте, не исчезла ли проблема с вылетом.
Загрузите и установите последний патч
Сбой Final Fantasy VII Remake Intergrade, вероятно, является ошибкой, связанной с ранее выпущенным патчем. Установка последнего патча может решить эти проблемы. Вы можете загрузить новейшее обновление Final Fantasy VII Remake Intergrade, просто запустив игру в Steam.
Переустановите Final Fantasy VII Remake Intergrade и Steam
Если вы уже попробовали все рекомендуемые выше исправления, но проблема все еще не устранена, вероятно, текущая версия Final Fantasy VII Remake Intergrade или Steam, установленная на вашем ПК, является основным виновником. Вам может подойти метод удаления-переустановки.
Этот сайт содержит партнерские ссылки на продукты. Мы можем получать комиссию за покупки, сделанные по этим ссылкам.
Having issues with crashes, freezing, error codes, or launching problems in FINAL FANTASY VII REMAKE INTERGRADE? This can be very annoying, we all want to play normally in FINAL FANTASY VII REMAKE INTERGRADE no matter the situation. If your game becomes unplayable due to crash issues or worse, problems with launching the game and you get an error code, you should follow the steps outlined below. Sometimes it can be the fault of bad optimization or game code – if the steps below don’t help, check if more players aren’t having similar problems as you (e.g. in the FINAL FANTASY VII REMAKE INTERGRADE Steam community forum).
Download update / patch
Make sure you have the latest version of FINAL FANTASY VII REMAKE INTERGRADE. If the problem is in the optimization of the game or its code – you will not do anything about it except make sure that you have the latest version of the game. If you are sure that you have the latest version of the game, check the next steps below to fix your FINAL FANTASY VII REMAKE INTERGRADE problem.
You can download updates by simply launching FINAL FANTASY VII REMAKE INTERGRADE if you have it on platforms such as Steam. If you have a physical copy of the game or an installer copy of the game, check the FINAL FANTASY VII REMAKE INTERGRADE publisher/developer website for a patch.
Verify Integrity of Game Files
If you own the game on Steam, you should verify the integrity of the game files that you have on your computer against the files that are available on the Steam server. Most problems are solved by using the built-in Steam tool.
-
- Open Steam and go to Library
- Right-click on FINAL FANTASY VII REMAKE INTERGRADE and select Properties
- Go to the Local Files option then click Verify integrity of game files
- Wait for Steam to validate all files
- Launch the game to see if you can play it properly
Drivers update
An important element in your PC are the drivers for specific components that are responsible for the correct operation of your computer parts – for example, outdated graphic drivers may not be able to cope with newer technologies used by game developers and therefore your FINAL FANTASY VII REMAKE INTERGRADE freezes.
Don’t worry, if you can’t update drivers manually or don’t know where to find such drivers, you can use a program that will scan your computer and download the latest drivers and install them – it’s a free tool that millions of people around the world have chosen.
See our recommended program for automatic driver installation – click here
Set game to High Priority
This method causes your operating system to allocate more resources to FINAL FANTASY VII REMAKE INTERGRADE that are marked as High Priority. If the game needs more resources to run, this operation may cause resolve your problem with FINAL FANTASY VII REMAKE INTERGRADE. Follow the steps below if you can run the game.
To set the game to high priority:
-
- Open FINAL FANTASY VII REMAKE INTERGRADE
- While in-game, open Task Manager (press CTRL + SHIFT + ESC at the same time)
- Go to the Details tab and find the main process of the game.
- Right-click on FINAL FANTASY VII REMAKE INTERGRADE and hover your mouse to Set Priority then choose High.
Restart the game and see if the issues persist.
Reinstall the game
This is the final step you should take. If all of the above tips didn’t work, reinstalling FINAL FANTASY VII REMAKE INTERGRADE may solve your problems – remember to manually remove all files that may have been left over from FINAL FANTASY VII REMAKE INTERGRADE (e.g. mods, additional textures, or programs).