Oki Data CONFIDENTIAL
(4-1) Jam occurs immediately after the power is turned on.
Check item
(4-1-1) Check condition of paper running path
Paper running path
Open the front cover check if paper is not
of the front unit
jammed in the paper running path.
(4-1-2) Check condition of the mechanical parts
Write sensor
Does the write sensor lever work normally?
(It moves freely by touching.)
Clean a sensor.
44871001TH Rev.6
Check operation
Actions for NG
results
Remove the
paper
Replace the
paper sensor
plate.
Replace the main
board.
(4-2) Jam occurs immediately after the paper feed is started.
Check item
(4-2-1) Check condition of paper running path
Paper running path
Open the front cover check if paper is not
of the front unit
jammed in the paper running path.
(4-2-2) Check condition of the mechanical parts
Write sensor
Does the paper reach the write sensor lever?
Does the ejection sensor lever work normally?
(It moves freely by touching.)
Is theIN_WR connector of the main board
connected properly?
Clean the write sensor
Paper feed roller
Does the paper feed roller rotate?
Is the image drum cartridge appropriately set?
8. TROUBLESHOOTING PROCEDURES
Check operation
Actions for NG
results
Remove the
paper
YES:
Go next question.
NO:
Go Check paper
feed roller.
Replace the write
sensor lever.
Connect the
IN_WR connector
properly.
Replace the main
board.
Replace Paper
Feed Roller or
Paper Feed
Clutch.
Set the image
drum cartridge
appropriately.
8-55
hp-concentra-wrapper-portlet
![]()
Actions
Issue
During printing, the paper becomes stuck in the product and the error message ‘Paper jam or misfeed’ displays on the control panel.
 Experiencing frequent or recurring paper jams?
If you are looking for information on preventing a paper jam from recurring, you can skip to the prevention and cause sections in this document.
How to use the solutions in this document
To resolve the issue, try each solution in this document, and then use the steps in this section to print a self-test report. This step determines if the product hardware functions correctly. When you have resolved the issue, and the product successfully prints a self-test report, there is no need to continue troubleshooting.
Print a self-test report
Use the following steps to print a self-test report.
-
Load plain white paper in the input tray.
-
Press the Power button (
 ) to turn on the product.
 -
Press the Setup button (
). -
Press the down arrow (
) to select Print Report, and then press OK. -
Press the down arrow (
) to select Self-Test Report, and then press OK. The self-test report prints.
 ) to turn on the product.
  ).
). ) to select
  IMPORTANT! Try to print a self-test report after every solution even if the solution resolves the issue.
note:
Paper jams can be real or false. The product might report a paper jam even when there is no jammed paper. The following solutions apply to both real and false paper jams.
Solution one: Clear the jam from the product
Follow these steps to check for and clear a paper jam from the product.
Step one: Remove any loose paper
Remove any loose sheets of paper from the input tray and the output tray.
caution:Do not remove jammed paper at this stage. Trying to clear jammed paper from the front of the product can damage theprint mechanism.
|
Remove any loose paper |
Do not pull jammed paper |
|
|
|

Step two: Clear the jam from the rear of the product
caution:Never pull jammed paper from the front of the product. If you can pull it from the rear of the product or the tray, always try the rear first. Pulling paper from inside the front cover can cause mechanical damage to the product.
Video of clearing the jam from the rear of the product
Click here to view a demonstration of clearing the paper jam from the rear of the product.
-
Disconnect the USB cable from the rear of the product.
-
Press the Power button (
) to turn off the product. -
Press in the buttons on the sides of the two-sided printing accessory (duplexer), and then remove the duplexer by pulling it away from the product.
note:
Your product might not look exactly like the one in the figure, but the steps are the same.
-
Press the buttons on the sides of the duplexer
-
Pull the duplexer out of the product
Figure : Remove the duplexer
-
-
Gently remove any jammed paper or bits of torn paper from the rollers inside the product. Use both hands to pull out any whole sheets of paper to avoid tearing them.
Figure : Remove the jammed paper
caution:Use a flashlight to thoroughly check the rollers and wheels for torn pieces of paper that might remain inside the product. If any torn pieces of paper remain inside the product, more jams are likely to occur.
Figure : Remove scraps of paper
-
Remove any paper from the top zone of the paper path.
Figure : Paper path top zone
-
Press in the buttons on the latch on the back of the duplexer, and then lower the cover.
-
Latch on the back of the duplexer
-
Duplexer cover
Figure : Open the duplexer
-
-
Gently pull any jammed paper out of the duplexer.
-
Close the door of the duplexer.
-
Gently push the duplexer into the product until it snaps firmly into place. Do not press the buttons on the end of the accessory while you are reattaching it.


Step three: Clear the jam from the front of the product
-
Without opening the cartridge access door, check the output tray for jammed paper.
-
If you see jammed paper, gently pull it out.
caution:Carefully remove paper from the front of the product. Pulling too hard on jammed paper can damage the print mechanism.
-
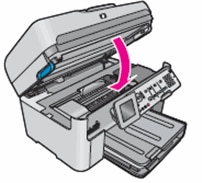
Open the cartridge access door.
Figure : Open the cartridge access door
note:
The carriage might try to move into the access area. If it does, allow it to move to that position.
-
Check for any jammed paper inside the product.
caution:Remove paper from the front of the product as carefully as possible. If any torn pieces of paper remain inside the product, more paper jams are likely to occur, and this could damage the print mechanism. Use a flashlight to make sure that you find all traces of paper.
-
Close the cartridge access door.
Figure : Close the cartridge access door
-
Reconnect the power cord to the rear of the product.
-
Press the Power button (
) to turn on the product.

Step four: Print a self-test report
Print a self-test report. See the section on how to use these solutions at the beginning of this document.
-
If these steps resolved the issue, and the test page prints, there is no need to continue troubleshooting.
-
If the issue persists, continue with the next solution.
-
If the test page does not print, continue with the next solution.
Solution two: Make sure that the carriage moves freely
Use the following steps to make sure that the carriage moves freely.
Step one: Check the paper path
-
If the product is not turned on, press the Power button (
) to turn it on. -
Open the cartridge access door.
Figure : Open the cartridge access door
note:
The carriage might try to move into the access area. If it does, allow it to move to that position.
-
With the product turned on, disconnect the power cord from the rear of the product.
-
Unplug the power cord from the power source or electrical outlet.
warning:You must unplug the power cord to move the carriage by hand and reset the paper feed mechanism without the risk of electrical shock.
-
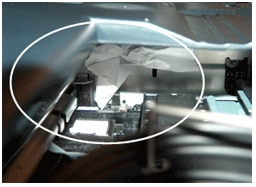
Check for any paper or objects that might be restricting the carriage.
Figure : Example of paper that might restrict the carriage
-
Remove any paper or objects you find.
note:
If the paper tears when you remove it from the rollers, check the rollers and wheels for torn pieces of paper that might remain inside the product. If pieces of paper remain in the product, more paper jams might occur.
-
Reach inside the product through the cartridge access door, and then manually move the carriage.
-
If the carriage is stuck on the right side, move the carriage to the left side of the product.
-
If the carriage is stuck on the left side, move the carriage to the right side of the product.
-
If the carriage is stuck in the middle, move the carriage to the right.
-
-
Make sure that the carriage can move freely across the width of the product by gently pushing the carriage to the left, and then to the right.
-
Close the cartridge access door.
Figure : Close the cartridge access door
-
Reconnect the power cord to the rear of the product.
-
Plug the power cord back into the power source or electrical outlet.
-
Press the Power button (
) to turn on the product.
Step two: Print a self-test report
Print a self-test report. See the section on how to use these solutions at the beginning of this document.
-
If these steps resolved the issue, and the test page prints, there is no need to continue troubleshooting.
-
If the issue persists, continue with the next solution.
-
If the test page does not print, continue with the next solution.
Solution three: Clean the rollers
Dust, paper fiber, and other debris might accumulate on the paper feed rollers and cause paper jams and paper feed issues. Follow these steps to clean the paper feed rollers.
Step one: Clean the rollers in the rear access area
-
Gather the following materials:
-
A clean, lint-free cloth, or any cloth that will not come apart or leave fibers
-
Distilled, filtered, or bottled water (tap water might damage the product)
-
-
Press the Power button (
) to turn off the product. -
Disconnect the power cord from the rear of the product.
-
Press in the buttons on the sides of the two-sided printing accessory (duplexer), and then remove the duplexer by pulling it away from the product.
note:
Your product might not look exactly like the one in the figure, but the steps are the same.
-
Press the buttons on the sides of the duplexer
-
Pull the duplexer out of product
Figure : Remove the duplexer
-
-
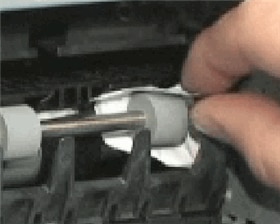
Lightly dampen a clean, lint-free cloth with bottled or distilled water, and then squeeze any excess liquid from the cloth.
-
Press the cloth against the rollers in the product, and then rotate them upwards with your fingers. Apply a moderate amount of pressure to remove any dust or dirt buildup.
Figure : Clean the rollers in the product
-
Allow the rollers to dry for 10 or 15 minutes.
Step two: Check the rollers in the duplexer
-
Press in the buttons on the latch on the back of the duplexer, and then lower the cover.
-
Latch on the back of the duplexer
-
Duplexer cover
Figure : Open the duplexer
-
-
Check the paper feed rollers on the duplexer to make sure that they are clean, free of paper bits, and rotate freely.
Figure : Check the rollers on the duplexer
-
Clean the surface and the rollers of the duplexer the same way you cleaned the large rollers inside the product.
-
Allow the rollers of the duplexer to dry for 10 or 15 minutes.
-
Gently push the duplexer into the product until it snaps firmly into place.
-
Reconnect the power cord to the rear of the product.
-
Press the Power button (
) to turn on the product.
Step three: Print a self-test report
Print a self-test report. See the section on how to use these solutions at the beginning of this document.
-
If these steps resolved the issue, and the test page prints, there is no need to continue troubleshooting.
-
If the issue persists, continue with the next solution.
-
If the test page does not print, continue with the next solution.
Solution four: Reset the product
Follow these steps to reset the product.
Step one: Perform a power reset
-
Press the Power button (
) to turn on the product. -
With the product turned on, disconnect the power cord from the rear of the product.
-
Unplug the power cord from the wall outlet.
-
Wait at least 15 seconds.
-
Plug the power cord back into the wall outlet.
-
Reconnect the power cord to the rear of the product.
-
If the product does not turn on by itself, press the Power button (
) to turn it on.
Step two: Print a self-test report
Print a self-test report. See the section on how to use these solutions at the beginning of this document.
-
If these steps resolved the issue, and the self-test report prints, there is no need to continue troubleshooting. Connect the USB cable to continue the print job.
-
If the issue persists, continue to the next step.
-
If the self-test report does not print, skip to the next solution.
Step three: Search for more information
If you are still experiencing issues, see the HP Product Support Home Page, and then search for another document that relates to the symptoms you are experiencing.
note:
If the page displays in the wrong country/region or language, click the Region — Language link in the upper right corner of your browser. Then you can select the correct country/region and language.
Solution five: Service the product
Service or replace your HP product if the issue persists after completing all the preceding steps.
Go to Contact HP Customer Support to schedule a product repair or replacement. If you are in Asia Pacific, you will be directed to a local service center in your area.
To confirm your warranty status, go to HP Product Warranty Check. Repair fees might apply for out-of-warranty products.
Preventing paper jams
Use the following suggestions to prevent paper jams.
The following recommendations can help prevent recurring paper jams in your HP product.
-
Before loading paper in the tray, hold the stack of paper, and then tap the bottom edge on a flat surface so that the stack is even on all sides.
-
Make sure that the length and width adjusters on the tray are correctly positioned, and then push the stack of paper forward until it stops in the tray.
caution:Do not force the paper to move too far forward in the tray.
-
Do not overload the tray with paper.
-
Only add paper to the tray when the product is not printing.
-
Make sure the HP product supports the paper type. See the documentation that came with the HP product for more information.
-
Do not print on paper with paper clips or staples attached.
-
Do not use paper that is bent, torn, dusty, damp, wrinkled, curled, or paper that does not lie flat.
-
Use only one type of paper at a time. Do not mix different types, weights, or sizes of paper.
-
Do not use paper that is too thin, too thick, or too glossy for the product.
Causes
The following factors can cause paper jams:
-
Paper loaded incorrectly in the paper tray.
-
Damaged or dirty paper rollers.
-
Torn, wrinkled, or damp paper loaded in the paper tray.
-
The rear access door or two-sided printing accessory (duplexer) might not be closed or is not locked into place.
-
Paper was added to a stack already in the tray while the HP product was printing.
-
The tray contains more than one type of paper.
-
The paper is jammed inside the HP product where you cannot see it.
-
An obstruction is blocking the paper path.
-
Torn pieces of paper from a previous jam are stuck in the product.
-
The tray is too full.
-
If printing on an envelope, the edges of the envelope are bent.
Model discontinued. This page is no longer updated.
If the Optional Tray Module is not installed, follow the procedure below to remove paper jammed in the paper tray.
If the Optional Tray Module is installed, look for the jammed paper sequentially, starting with the lowest tray. To see how to clear the jam, click here.
-
Slowly, completely remove the paper tray from the printer.
-
Remove all the jammed and/or creased paper from the tray.
-
If there is jammed paper remaining inside the printer, pull it out carefully to avoid tearing it.
-
Push up button A (1) and fully open the front cover (2). Confirm that there are no scraps of paper remaining inside the printer.
-
Close the front cover.
-
Hold the paper tray with both hands, align it with the opening in the printer and gently push it back in the printer.
-
Push the paper tray completely back into the printer.
Do not use excessive force on the paper tray. Doing so could damage the paper tray or the inside of the printer.
Related Models
HL-4000CN, HL-4200CN
Content Feedback
To help us improve our support, please provide your feedback below.
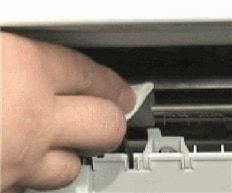
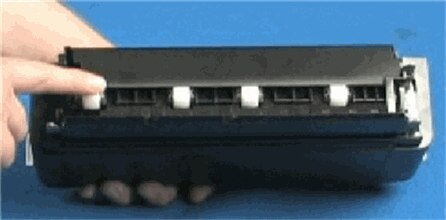
I’m gonna show you how to solve ONE of commons problem of printer . paper feed error or paper jam error. even there is no paper jam but printer appears an error message in LCD.
we gonna work on epson L550, the problem caused by » PE Sensor Lever » that is not in the right position , this caused by use unsupported paper size or unsupported paper weight or by paper jam. start by DISASSEMBLE the printer, it is easy just unscrew . … Now you need to look for the lever, it is located in the mother board; as you can see the lever it is not in the right position , we will solve the problem , now the lever in the right position and works fine, REASSEMBLe your printer and every thing works fine , see the test sheet at the end of video
———————-
translate by google
Je vais vous montrer comment résoudre l’une des communes problème de l’imprimante. papier erreur d’alimentation ou erreur de bourrage papier. même il n’y a pas de bourrage papier, mais l’imprimante apparaît un message d’erreur sur l’écran LCD.
on va travailler sur epson L550, le problème causé par «PE Sensor levier» qui ne sont pas dans la bonne position, cela a causé par l’utilisation non pris en charge le format de papier ou le grammage du papier non pris en charge ou par bourrage papier. commencez par démonter l’imprimante, il est facile suffit de dévisser. … Maintenant, vous devez rechercher le levier, il est situé dans la carte mère; comme vous pouvez voir le levier, il est pas dans la bonne position, nous allons résoudre le problème, maintenant le levier dans la bonne position et fonctionne très bien, remontez votre imprimante et tout fonctionne très bien, voir la feuille de test à la fin de la vidéo
Artisan 50
Artisan 700
Artisan 710
Artisan 725
Artisan 730
Artisan 800
Artisan 810
Artisan 835
Artisan 837
DS-560_40(All)
Epson L800
Epson Perfection V19/V39
Epson Stylus N10/N11
Epson Stylus NX100/NX105
Epson Stylus NX110/NX115
Epson Stylus NX125/NX127
Epson Stylus NX130
Epson Stylus NX215
Epson Stylus NX230
Epson Stylus NX300/NX305
Epson Stylus NX330_NX430
Epson Stylus NX415
Epson Stylus NX420
Epson Stylus NX510/NX515
Epson Stylus NX530
Epson Stylus NX625
Epson Stylus Office T1110
Epson Stylus Office TX300F
Epson Stylus Office TX320F
Epson Stylus Office TX515FN
Epson Stylus Office TX620FWD
Epson Stylus OfficeTX525FW
Epson Stylus Photo 1430W
Epson Stylus Photo R2000
Epson Stylus Photo R2000(Latin)
Epson Stylus Photo R2880
Epson Stylus Photo R3000
Epson Stylus Photo R3000(Latin)
Epson Stylus Photo T50
Epson Stylus Photo TX700W
Epson Stylus Photo TX720WD
Epson Stylus Photo TX730WD
Epson Stylus T21/T24
Epson Stylus T22/T25
Epson Stylus TX100/TX105
Epson Stylus TX110/TX115
Epson Stylus TX120/TX123/TX125
Epson Stylus TX130/TX133/TX135
Epson Stylus TX210
Epson Stylus TX220
Epson Stylus TX235W
Epson Stylus TX410
Epson Stylus TX420W
Epson Stylus TX430W
Epson Stylus TX550W
Epson Stylus TX560WD
ET-2500_2550
ET-4500
ET-4550
L120
L130_L220_L310_L360
L1300
L1800
L200
L220_310_365
L300_L555_L355_L350_L210_L110
L375_475
L455
L565
L575
L655_656
L805
L850_810
M200_M100_M205_M105
PictureMate PM 225 (Canada/Latin)
PictureMate PM 225 (US)
PictureMate PM 300
PM-400
Scanner
SC-P400
SC-P600
SC-P608
Stylus Office T40W
Stylus Office TX600FW
Stylus Photo 1400
Stylus Photo 1410
Stylus Photo R1900
WF-100
WF-100(Latin)
WF-2532
WF-2540_2530_2520
WF-2630
WF-2650_2660
WF-3012
WF-3540_3530_3520
WF-3620_3640
WF-5620_4630_4640_5690_5110_5190
WF-6090_6530_6590
WF-7510_7520_7010
WF-7610_7620_7110
WF-8590_8090
WF-M1560_M1030
WF-R4640_R5690_R5190
WF-R8590
WorkForce 1100
WorkForce 310/315
WorkForce 320
WorkForce 325/323
WorkForce 40
WorkForce 435
WorkForce 520
WorkForce 545/645
WorkForce 60
WorkForce 600
WorkForce 610/615
WorkForce 630/633/635
WorkForce 840
WorkForce 845
WorkForce K101
WorkForce K301
WorkForce T42WD
WP-4020_4010_4090_4023
WP-4022_4092
WP-4532_4592
WP-4540_4530_4533_4520_4590
XP-101_201_204_401
XP-200_300_400
XP-211_214_411
XP225_XP322_XP325_XP323_XP422_XP423_XP425
XP-231_431
XP-310_410
XP-320_420_424
XP-330_430_434
XP-520_620_820_860
XP520_XP620_XP625_XP720_XP760_XP820_XP860
XP-530_630_830
XP-610_810
XP-802_702
XP-850_800_600
XP-950
XP-960
Beverly Hills Millionaire Exposes How To Climb
Whether you’re printing important documents or family photos, your HP printer shouldn’t get jammed. A jammed paper feed is a surefire way to ruin your half-printed papers and pictures, and it can also cause significant mechanical issues if left unfixed.
HP printers can become jammed or experience paper feed problems when the fill tray is overloaded, dust gets caught in the feed rollers, or if the printer paper is too thick. You can fix paper jams and feed problems by reducing the amount of paper below the feed and cleaning the rollers.
Fortunately, HP printer paper jams and feed problems are some of the most manageable printer problems to troubleshoot and fix. Use this guide to help you determine the precise cause of your printer feed problems and select the best possible solution.
HP Printer Keeps Getting Jammed

Paper jams can be frustrating, especially if they happen consistently. If your HP printer paper continually gets jammed inside the feed during printing, there could be several things going wrong. From too much paper in the feed to faulty rollers, let’s explore the many reasons why your HP printer keeps getting jammed.
Causes
HP printers can jam from time to time, but a printer that consistently stops during printing is likely suffering from one (or several) common problems. These issues include:
- An overfilled feed tray that’s causing the printer to latch onto multiple sheets at a time
- Debris caught inside of the paper rollers
- A broken ribbon that’s ripping the paper as it travels through the printer
- Too-thick printer paper that’s too heavy for the rollers
You’ll need to do some quick troubleshooting to discover which of these issues is causing your endless paper jams. If you’ve been careful to insert a single sheet of paper into your printer, you can immediately discount the first potential cause.
Additionally, if your printer is brand-new and fresh out of the box, there likely isn’t any dust, hair, or dirt caught inside the printer. After checking that your printer’s ribbon is in excellent shape, you may want to consider your chosen printer paper’s thickness. Most HP printers cannot print on heavy cardstock or thick paper.
Solutions
If the problem is an overfilled feed tray, then the solution is simple: Remove all of the paper from your feed tray and begin using single sheets at a time (or fill the tray with a small stack of printer paper). However, if the problem is debris, you might struggle.
Many of the small components inside of an HP printer are challenging to reach and clean. Still, you can use a small electronics vacuum or pressurized air canister to dislodge any debris around the rollers.
Hair might be the most challenging type of debris to remove, as it often ends up wound around internal gears and metal parts. A small pair of sewing scissors could help you cut through any hairy areas, but you’ll want to use them carefully. A wrong move could result in a clipped wire, and as a result, a non-functioning HP printer.
You can replace a broken ribbon, though in some cases, it might be more affordable (and straightforward) to replace the entire printer! This is especially true of printer owners that aren’t comfortable with the idea of performing at-home printer maintenance and repair. Still, you may be able to contact a local electronics repair technician to help you replace your printer ribbon.
Finally, if you’re using heavy cardstock or thick printer paper, switch to a thinner and lighter paper variety. Most printers list their minimum and maximum paper width range within the owner’s manual. The information you need should be in the Paper Handling subsection of your manual.
HP Printer Won’t Stop Saying Paper Jam

Household printers used to be single-purpose machines that could only handle perforated sheets of lined printer paper. Nowadays, they’re multipurpose devices capable of faxing, scanning, printing, and photocopying documents and photos.
However, this technological advancement does come with a few potential downsides, including the occasional glitch. What on earth do you do when your HP printer doesn’t stop telling you that there’s a paper jam?
Causes
If your HP printer won’t stop saying paper jam, there’s one of two things happening. You might be:
- Experiencing a legitimate paper jam, or
- Seeing an unfortunate software glitch
Luckily, fixing this issue is often pretty simple. You might be able to solve this message error in as little as one minute.
Potential Solutions
The first thing you’ll want to do after seeing this message is to see if there’s a paper jam. If there is, you’ll want to go ahead and troubleshoot the jam to find a proper solution.
However, if you’ve gotten the paper jam message for no apparent reason, you can simply unplug or shut-down your printer and count to thirty. Plugging it back in should be enough to reset your printer, and the message should immediately disappear.
If it doesn’t, you’re likely dealing with a mechanical issue that’s triggering your printer’s feed sensors. In this case, you’ll need to take a closer look at your paper feed and feed rollers.
HP Printer Paper Jam Error But No Paper Jam
If your HP printer keeps telling you that there’s a paper jam error, but you can’t see any such paper jam, you might be dealing with a software glitch. However, you may also be seeing signs of a much graver (and physical) issue.
Causes
Why would your printer tell you that there’s a paper jam error if there’s no paper jam? Well, the most straightforward reason is a glitch. Even the most hi-tech printers can experience technical issues from time to time, and an incorrect error message isn’t the rarest HP printer issue.
However, if this message persists after a printer reset, you’re more likely dealing with internal debris. When hair, dirt, and dust get caught inside your printer, they can cause the rollers to stall and stick. This, in turn, triggers the printer’s sensors to declare a paper jam error.
Copyright protected content owner: ReadyToDIY.com and was initially posted on 2021-04-01.
Potential Solutions
The easiest solution to this problem is a simple printer reset. However, unplugging your printer, waiting for several seconds, then plugging it back in doesn’t always fix this issue. In some cases, you may need to clean your printer.
Be sure to unplug your printer before cleaning your printer feed rollers. Additionally, do not use cleaning chemicals when removing dirt or dust. A dry cleaning cloth (preferably microfiber) is a far safer and more effective solution.
HP Printer Paper Jam Won’t Clear
There might not be a more frustrating problem than having an HP printer paper jam that just won’t go away. Still, even the most brutal jams have clear-cut solutions.
Causes
Paper jams that don’t go away with gentle pulling or prodding can be challenging to resolve, but they’re not impossible. In most cases, tough paper jams result after users ignore multiple warning signs.
Printers that consistently jam or malfunction are more likely to suffer from severe and difficult-to-clear paper jams. As such, poor user maintenance and cleaning may be one of the most significant causes behind nasty printer paper jams.
Potential Solutions
To get rid of tough paper jams, you’ll want to unplug your printer. After that, try pulling at the paper that’s stuck within the printer. If possible, pull it toward you in the direction that it would naturally move during printing.
If the paper is torn and you cannot easily access it, you may need to disassemble your printer and access the underside of the paper rollers, where bits of paper might be gunking up the works. Naturally, you can also choose to hire an electrical device repair technician to help you repair serious paper jam problems.
HP Printer Not Recognizing/Detecting Paper
Is your HP printer not recognizing or detecting the paper you’ve put in the feed? Sadly, this issue is relatively common, and it seems to stem from a combination of factors.
Causes
Paper quality is one of the most significant reasons you might experience paper detection problems, though printer mechanical issues may also be to blame. A wrinkled or torn paper might not trigger the printer feed mechanism, causing your printer to signal that it’s out of paper.
However, a faulty or broken paper feed can also contribute to a printer’s failure to detect paper. Troubleshooting this issue is relatively straightforward.
Potential Solutions
Be sure only to use clean, flat, smooth printer paper to avoid this problem. If you are using brand-new, unwrinkled printer paper but you’re still struggling to get your printer to recognize that it has access to paper, you may need to clean your printer’s rollers, feed system, or ribbon.
HP Printer Not Taking/Loading Photo Paper
HP printers are often designed to handle multiple types of printing projects. It’s not uncommon to find HP printers that produce simple black-and-white documents alongside bright, photo-finish pictures. But occasionally, HP printer paper feeds can struggle with photo paper.
Causes
The first thing you’ll want to do when experiencing this problem is to confirm that your HP printer can take photo paper. Some HP printers are explicitly designed for basic document printing. The ribbon and guide bar’s width may be far too small to run photo paper, causing significant user issues.
If you’re using an HP printer that can print high-quality photos, you’ll want to check that your photo paper is the correct size and thickness for your printer. You can find this information in the Paper Handling section of your printer’s user manual.
Potential Solutions
When an HP printer refuses to take or load photo paper, the most common culprit is a sizing problem. To fix this, you’ll simply need to ensure that the photo paper you’ve chosen is the correct size and type for your printer.
Copyright article owner is ReadyToDiy.com for this article. This post was first published on 2021-04-01.
HP Printer Not Feeding Paper Properly
HP printers can jam when the paper feeding fails to catch paper, or it catches too many sheets at once. If you’re handling printer feed problems, you’re not alone. Fortunately, you’re also not without solutions.
Causes
The primary cause of HP printer feeding problems is an overfilled paper tray. If you’ve overloaded your printer’s paper tray, the feed may pick up multiple sheets at once, causing unwanted bunching and jamming at the ribbon.
Potential Solutions
Always read your HP printer’s user manual before stocking it with paper or ink. Most HP printers have clearly labeled paper stocking limits, and it’s crucial to pay attention to these limits.
Larger printers may have an internal, drawer-like paper feed tray with a small sticker or mark to show the fill line. Smaller, compact models typically only handle a sheet or two at a time.
Final Thoughts
There are several reasons why you might experience an HP printer paper jam or feed problems. Common culprits include an overfilled feed tray, thick printer paper, and small debris caught in the feed rollers. The best way to solve a jammed paper feed depends on the precise source of the problem.
Paper that is too thick will consistently cause jams and feeding problems. Small bits of dirt, dust, or lint that get trapped within the printer may also lead to blockages. Be sure to keep feed rollers clean and your paper feed tray at an adequate level.
Related Articles
HP Printer Won’t Boot Up
HP Printer Won’t Wake Up
HP Laserjet Not Working
HP DeskJet Not Working
ReadyToDIY is the owner of this article. This post was published on 2021-04-01.
HP Printer Not Printing