If you receive the VirtualBox error «FATAL: INT18: BOOT FAILURE» when starting a guest machine with Windows 10/11 OS, continue reading below to fix the problem.
Problem in details. After converting the physical disk of a Windows 10//11 UEFI computer to a Virtual Hard disk (VHD or VHDX) and attaching the VHD/VHDX file to a new VirtualBox machine, the VM couldn’t start with fatal error: INT18: BOOT FAILURE or the guest Windows 10 OS couldn’t start with error code: 0x0000225.

This tutorial contains detailed instructions to troubleshoot the «INT18: BOOT FAILURE” error in VirtualBox.
How to FIX: INT18 BOOT FAILURE & Windows 10 Error Code 0x0000225 in VirtualBox.
Method 1. Enable I/O APIC & UEFI in VirtualBox.
The fatal error «INT18 BOOT FAILURE» in VirtualBox, commonly appears when you attaching a VHD/VHDX/VMDK file which contains an UEFI operating system. To fix this problem just proceed and enable UEFI on the VirtualBox machine’s settings. To do that:
1. Press the X button to close the VM machine window and Power Off the machine.

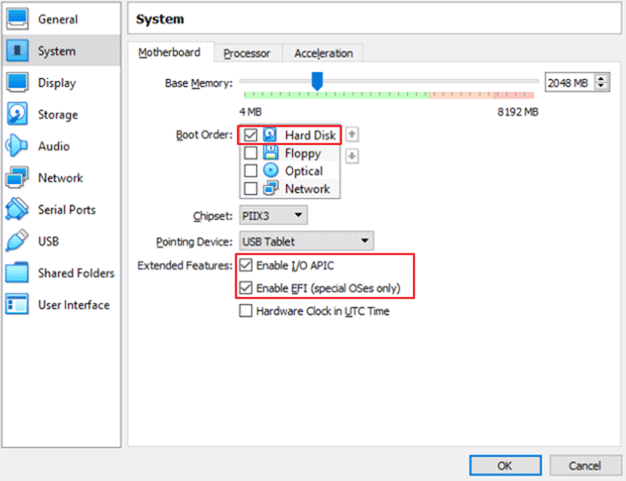
2. Open the VM Settings and go to System > Motherboard.
3. Here ensure that the Hard Disk is checked and is the first boot device, and at Extended features check the following two (2) options and click OK:
-
Enable I/O APIC
-
Enable EFI (special OSes only)

4. Try to start the Virtual Machine now. Hopefully it will start without error now.
Method 2. Disable Hyper-V on Host machine.
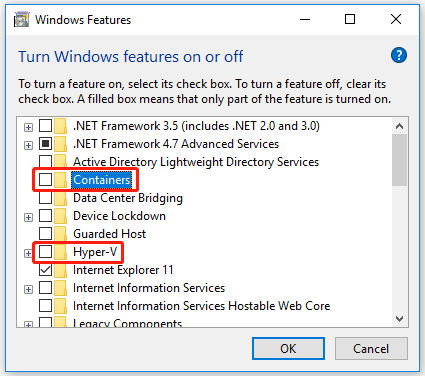
1. Navigate to Control Panel > Programs and Features > Turn Windows features on or off

2. Uncheck the following features and click OK to apply the change:
- Containers *
- Hyper-V *
- Virtual Machine Platform
- Windows Hypervisor Platform
- Windows Sandbox
* Note: The ‘Containers’ and the ‘Hyper-V’ features exists only in Windows 10 PRO.

3. Restart the computer after uninstall.
4. Open Command Prompt as Administrator.
5. Type the following command and press Enter:
- bcdedit /set hypervisorlaunchtype off

6. Reboot your PC again.
7. After reboot, start the VirtualBox VM machine and see if the problem is fixed.
Method 3. Fix Boot Problems.
The final method to solve VirtualBox error «FATAL: INT18: BOOT FAILURE» is to fix the boot problems on the Guest machine, by starting the guest machine from a bootable Windows 10 ISO file.*
* Note: If you don’t own a Windows 10 ISO file, you can download one directly from Microsoft, by using the Media Creation Tool.
1. Open the Settings of the VirtualBox machine and go to Storage.
2. Click the 1st plus (+) button next to Controller to add optical drive.

3. Click Add and find and open the Windows.iso file.

4. Then select the Windows.iso file and click Choose.
![image_thumb[5]](https://www.wintips.org/wp-content/uploads/2022/06/image_thumb5_thumb.png "image_thumb[5]")
5. After attaching the Windows.iso file in Storage devices…
![image_thumb[6]](https://www.wintips.org/wp-content/uploads/2022/06/image_thumb6_thumb.png "image_thumb[6]")
6. … go to System and drag Optical to the top in order to boot the VM from the attached Windows.iso.
Also, make sure that the «Enable EFI» option is unchecked, otherwise you will not be able to boot from the ISO file. When done, click OK.

7. Start the Virtual Machine and click Next > Repair Your computer.
8. Then select Troubleshoot > Startup Repair.

9. Allow the Startup Repair to run and depending on the result do the following actions:
a. If the Startup Repair can fix the problem, shutdown the virtual machine, set the hard disk as first boot device and try to start again the virtual machine.
b. If the Startup Repair cannot fix the problem, continue to next step.
10. Click Advanced Options and go to Troubleshoot > Command Prompt.

11. In Command prompt give the following commands in order (press enter after each command)
- diskpart
- select disk 0
- list partition
13. Now notice the size of the System partition (e.g. 100MB in this example).
12. Then type the following command and find out the volume number of the System partition by using its size as a reference. *
- list volume
* e.g. As you can see in the screenshot below, in this example, the System partition (100MB) is the volume 2.

13. Now give the following commands to select the system partition (using its volume number), and to assign the drive letter Z: to it. Then exit DISKPART:
- select volume 2 *
- assign letter=Z
- exit
* Note: Change the Volume number «2» according your case.

14. Finally, in command prompt give this command to repair the boot files:
- bcdboot C:\windows /s Z: /f ALL
![image_thumb[9]](https://www.wintips.org/wp-content/uploads/2022/06/image_thumb9_thumb.png "image_thumb[9]")
15. Close all windows, shutdown the virtual machine, set the hard disk as first boot device and start the virtual machine.
That’s it! Which method worked for you?
Let me know if this guide has helped you by leaving your comment about your experience. Please like and share this guide to help others.
Если вы получаете сообщение об ошибке VirtualBox «FATAL: INT18: BOOT FAILURE» при запуске гостевой машины с ОС Windows 10/11, продолжайте читать ниже, чтобы решить проблему.
Проблема в деталях. После преобразования физического диска компьютера Windows 10//11 UEFI в виртуальный жесткий диск (VHD или VHDX) и прикрепив файл VHD/VHDX к новой машине VirtualBox, виртуальная машина не смогла запуститься с фатальным ошибка: INT18: ОШИБКА ЗАГРУЗКИ или гостевая ОС Windows 10 не смогла запуститься с кодом ошибки: 0x0000225.

Это руководство содержит подробные инструкции по устранению ошибки «INT18: BOOT FAILURE» в VirtualBox.
Как исправить: INT18 BOOT FAILURE и код ошибки Windows 10 0x0000225 в VirtualBox.
Способ 1. Включите I/O APIC и UEFI в VirtualBox.
Неустранимая ошибка «INT18 BOOT FAILURE» в VirtualBox обычно появляется при присоединении файла VHD/VHDX/VMDK, который содержит операционную систему UEFI. Чтобы решить эту проблему, просто продолжайте и включить UEFI в настройках машины VirtualBox. Для этого:
1. нажмите Икс кнопку, чтобы закрыть окно виртуальной машины и Выключите машину.

2. Откройте настройки виртуальной машины и перейдите к Система > Системная плата.
3. Здесь убедитесь, что Жесткий диск проверяется и является первичное загрузочное устройство, а в расширенных функциях отметьте следующие два (2) параметра и нажмите ХОРОШО:
-
Включить APIC ввода/вывода
-
Включить EFI (только для специальных ОС)

4. Попробуйте запустить виртуальную машину сейчас. Надеюсь теперь запустится без ошибок.
Способ 2. Отключите Hyper-V на хост-компьютере.
1. Перейдите к Панель управления > Программы и особенности > Включение или отключение функций Windows

2.Снимите флажок следующие функции и нажмите ХОРОШО чтобы применить изменение:
- Контейнеры *
- Гипер-V *
- Платформа виртуальной машины
- Платформа гипервизора Windows
- Песочница Windows
* Примечание: Функции «Контейнеры» и «Hyper-V» существуют только в Windows 10 PRO.

3. Запустить снова компьютер после удаления.
4. Открытым Командная строка от имени администратора.
5. Введите следующую команду и нажмите Войти:
- bcdedit/установить тип запуска гипервизора выключенным

6. Перезагрузить ваш компьютер снова.
7. После перезагрузки запустите виртуальную машину VirtualBox и посмотрите, устранена ли проблема.
Способ 3. Устранение проблем с загрузкой.
Последний способ устранения ошибки VirtualBox «FATAL: INT18: BOOT FAILURE» — исправить проблемы с загрузкой на гостевой машине, запустив гостевую машину из загрузочного ISO-файла Windows 10.*
* Примечание: Если у вас нет ISO-файла Windows 10, вы можете загрузить его непосредственно с сайта Microsoft, используя Инструмент для создания медиа.
1. Открой Настройки машины VirtualBox и перейдите к Хранилище.
2. Нажмите 1-й плюс (+) рядом с контроллером, чтобы добавить оптический привод.

3. Нажмите Добавлять найти и открыть Windows.iso файл.

4. Затем выберите Windows.iso файл и нажмите Выбирать.
![image_thumb[5]](https://reviensmedia.com/f/02dc681e1e94cdbc3875da88d296bacd.png "image_thumb[5]")
5. После прикрепления файла Windows.iso на устройствах хранения…
![image_thumb[6]](https://reviensmedia.com/f/07bd953ce5a0bf1916e933694cba5c78.png "image_thumb[6]")
6. … перейти к Система и перетащите оптический наверх, чтобы загрузить виртуальную машину из прикрепленного файла Windows.iso.
Также убедитесь, что «Включить ЭФИ» вариант непроверенный, иначе вы не сможете загрузиться с ISO-файла. Когда закончите, нажмите ХОРОШО.

7. Запустите виртуальную машину и нажмите Далее > Ремонт компьютера.
8. Затем выберите Устранение неполадок > Восстановление при загрузке.

9. Разрешите запуск восстановления при загрузке и в зависимости от результата выполните следующие действия:
а. Если Startup Repair может решить проблему, выключите виртуальную машину, установите жесткий диск в качестве первого загрузочного устройства и попробуйте снова запустить виртуальную машину.
б. Если средство восстановления при загрузке не может решить проблему, перейдите к следующему шагу.
10. Нажмите Расширенные опции и иди к Устранение неполадок > Командная строка.

11. В командной строке введите следующие команды по порядку (нажмите ввод после каждой команды)
- дискпарт
- выберите диск 0
- список разделов
13. В настоящее время уведомление в размер принадлежащий Система раздел (например, 100 МБ в этом примере).
12. Затем введите следующую команду и выяснить в номер тома системного раздела, используя его размер в качестве эталона. *
- список томов
* напр. Как вы можете видеть на снимке экрана ниже, в этом примере системный раздел (100 МБ) является том 2.

13. Теперь дайте следующие команды, чтобы выбрать системный раздел (используя его номер тома) и назначить букву диска. Я: к этому. Затем выйдите из DISKPART:
- выберите громкость 2*
- назначить букву = Z
- выход
* Примечание: Измените номер тома «2» в соответствии с вашим случаем.

14. Наконец, в командной строке введите эту команду для восстановления загрузочных файлов:
- bcdboot C:\windows /s Z: /f ВСЕ
![image_thumb[9]](https://reviensmedia.com/f/73657ec0bb07849d31451addf578cff2.png "image_thumb[9]")
15. Закройте все окна, выключите виртуальную машину, установите жесткий диск в качестве первого загрузочного устройства и запустите виртуальную машину.
Вот и все! Какой метод сработал для вас?
Дайте мне знать, помогло ли вам это руководство, оставив свой комментарий о своем опыте. Поставьте лайк и поделитесь этим руководством, чтобы помочь другим.
Вы можете получить сообщение об ошибке VirtualBox FATAL: INT18: BOOT FAILURE при попытке запустить гостевую машину Windows на хост-компьютере с Windows 11 или Windows 10. Этот пост предлагает наиболее применимые решения, которые вы можете попробовать, чтобы успешно исправить ошибку в вашей системе.

Вы можете столкнуться с этой проблемой по одной или нескольким из следующих причин.
- это признак того, что файл виртуальной машины поврежден.
- Часть загрузочного сектора неактивна.
- Операционная система (ОС) не может загрузиться из-за того, что раздел, содержащий хранилище данных конфигурации загрузки (BCD), неактивен.
- ОС не может загрузиться из-за повреждения BCD.
- ОС не может загрузиться из-за того, что не найден загрузочный сектор.
Затронутые пользователи сообщали, что гостевая операционная система, работающая на виртуальной машине, не запускалась после преобразования физического диска компьютера UEFI с Windows 11/10 в виртуальный жесткий диск (VHD или VHDX) и присоединения файла VHD/VHDX к новой машине VirtualBox. Ошибка иногда может выдать код ошибки 0x0000225.
Читать: VirtualBox не удалось зарегистрироваться и открыть файл образа жесткого диска
Если вы столкнулись с FATAL: INT18: ОШИБКА ЗАГРУЗКИ ошибка при запуске гостевой ОС Windows в VirtualBox на хост-компьютере с Windows 11/10, вы можете применить наши рекомендуемые ниже исправления, чтобы быстро и легко решить проблему в вашей системе.
- Начальный контрольный список
- Включить I/O APIC и EFI в VirtualBox
- Отключить Hyper-V на хост-компьютере
- Восстановить гостевую ОС
Давайте посмотрим на эти перечисленные предложения в деталях.
Читать: виртуальная машина VirtualBox не открывается или не запускается в Windows
1]Начальный контрольный список
Прежде чем приступить к решениям, приведенным ниже, сначала необходимо убедиться, что раздел гостевой ОС активен. Это относится только к виртуальным машинам поколения 1. Виртуальные машины поколения 2 (с использованием UEFI) не используют активный раздел. Чтобы убедиться, что раздел ОС, содержащий хранилище BCD для диска, помечен как активный, выполните следующие действия.
- Откройте командную строку в повышенном режиме.
- Откройте инструмент DISKPART.
- В DISKPART введите команду ниже и нажмите Enter, чтобы вывести список дисков в системе:
список дисков
- В выводе найдите добавленные диски и введите команду ниже, чтобы выбрать новый диск. В этом примере новым диском является Диск 1.
сел диск 1
- Затем введите команду ниже и нажмите Enter, чтобы вывести список всех разделов на диске:
список разделов
- В выводе введите команду ниже и нажмите Enter, чтобы выбрать раздел, который вы хотите проверить. Обычно разделы, управляемые системой, меньше по размеру и составляют около 350 МБ. В этом примере это Раздел 1.
выбрать раздел 1
- Затем, чтобы проверить состояние раздела, введите команду ниже и нажмите Enter:
детальный раздел
- Теперь, если раздел не активен, введите приведенную ниже команду и нажмите Enter, чтобы установить флаг «Активно», а затем еще раз проверьте правильность внесения изменений с помощью приведенной выше команды.
активный
После того, как вы настроили гостевую ОС в качестве активного раздела, проверьте, сможете ли вы без проблем запустить виртуальную машину. Если FATAL: INT18: ОШИБКА ЗАГРУЗКИ ошибка повторяется, или это не относится к вам, поскольку вы уже установили раздел как активный, вы можете перейти к следующему решению.
Читать: DiskPart обнаружил ошибку: Доступ запрещен
2]Включить I/O APIC и EFI в VirtualBox
Обычно вы сталкиваетесь с этой ошибкой при присоединении или открытии файла VHD/VHDX/VMDK, содержащего операционную систему UEFI. В этом случае, чтобы решить проблему, вам нужно просто включить EFI в настройках машины VirtualBox. Для выполнения этой задачи выполните следующие действия:
- Нажмите кнопку X, чтобы закрыть окно виртуальной машины, и выключите машину.
- Затем откройте настройки виртуальной машины.
- Перейдите в Система > Материнская плата.
- в Порядок загрузки раздел, убедитесь, что Жесткий диск выбран и является первым загрузочным устройством.
- в Расширенные функции выберите оба параметра: Enable I/O APIC и Enable EFI (только для специальных ОС).
- Нажмите «ОК».
Чтение: ошибка 0x80370102 Не удалось запустить виртуальную машину, так как не установлена необходимая функция.
3]Отключите Hyper-V на хост-компьютере.
Если в вашей системе включена функция Hyper-V, она может мешать правильному запуску виртуальной машины VirtualBox. Hyper-V блокирует все другие Hyper Visors, такие как VirtualBox, от вызова оборудования VT, поэтому его необходимо отключить. Таким образом, чтобы использовать другое программное обеспечение для виртуализации на хост-компьютере с Windows 11/10, вы должны отключить Hyper-V Hypervisor, Device Guard и Credential Guard.
Чтобы отключить Hyper-V на хост-компьютере, сделайте следующее:
- Нажмите клавишу Windows + R, чтобы вызвать диалоговое окно «Выполнить».
- В диалоговом окне «Выполнить» введите appwiz.cpl и нажмите Enter, чтобы открыть апплет «Программы и компоненты».
- В окне с левой стороны нажмите на ссылку Включение или отключение компонентов Windows.
- Подождите, пока апплет заполнится, затем прокрутите и снимите/снимите отметку со следующих функций:
- Контейнеры
- Гипер-V
- Платформа виртуальной машины
- Платформа гипервизора Windows
- Песочница Windows
- Нажмите «ОК».
- Перезагрузите компьютер после удаления.
- При загрузке откройте командную строку от имени администратора.
- В командной строке CMD введите или скопируйте и вставьте приведенную ниже команду и нажмите Enter:
bcdedit/установить тип запуска гипервизора выключенным
- Выйдите из подсказки CMD после выполнения операции.
- Перезапустить компьютер.
Читайте: как включить или отключить вложенную виртуализацию для виртуальных машин в Hyper-V
4]Восстановите гостевую ОС
Поскольку гостевая ОС не запускается, возможно, мы имеем дело с проблемами загрузки, как указывает ошибка. В этом случае мы можем попытаться исправить проблемы с загрузкой на гостевой машине, запустив гостевую машину с помощью ISO-файла Windows 11/10, а затем приступить к восстановлению гостевой ОС. Для выполнения этой задачи выполните следующие действия:
- Загрузите ISO-образ Windows.
- Откройте настройки машины VirtualBox.
- Перейдите в хранилище.
- Нажмите 1-ю кнопку плюс (+) рядом с контроллером, чтобы добавить оптический привод.
- Нажмите Добавить в Селектор оптических дисков окно.
- Найдите и откройте файл Windows.iso.
- Затем выберите файл Windows.iso.
- Щелкните Выбрать.
- После прикрепления файла Windows.iso в Устройства хранения данныхперейдите в System и перетащите Optical наверх, чтобы загрузить виртуальную машину из прикрепленного Windows.iso.
- Далее убедитесь, что Включить EFI опция не выбрана, иначе вы не сможете загрузиться с ISO-файла.
- Нажмите OK, когда закончите.
- Далее запустите виртуальную машину.
- Нажмите «Далее» > «Восстановить компьютер».
- Выберите «Устранение неполадок» > «Восстановление запуска».
- Разрешите запуск восстановления при загрузке и в зависимости от результата выполните следующие действия:
- Если восстановление при загрузке завершилось успешно, выключите виртуальную машину, установите жесткий диск в качестве первого загрузочного устройства и попробуйте снова запустить виртуальную машину.
- Если программе восстановления при загрузке не удалось завершить восстановление, перейдите к следующему шагу.
- Щелкните Дополнительные параметры > Устранение неполадок > Командная строка.
- В командной строке введите следующую команду и нажмите Enter после каждой строки:
diskpartselect диск 0list раздел
- Из вывода запишите размер системного раздела.
- Затем введите команду ниже и нажмите Enter, чтобы узнать номер тома системного раздела, используя его размер в качестве эталона.
список томов
- Затем выполните следующие команды, чтобы выбрать системный раздел (используя его номер тома) и назначить букву диска. Я: в него, а затем выйдите из DISKPART. Где заполнитель X — это номер тома вашего системного раздела.
выбрать громкость Xназначить букву=Zexit
- Наконец, выполните приведенную ниже команду в командной строке CMD, чтобы восстановить загрузочные файлы:
bcdboot C:\windows /s Z: /f ВСЕ
- Выйдите из командной строки CMD после выполнения команды.
- Закройте все окна и выключите виртуальную машину.
- Установите жесткий диск в качестве первого загрузочного устройства и запустите виртуальную машину.
Читайте: Как загрузить или восстановить компьютер с Windows с помощью установочного носителя
Надеюсь, этот пост поможет вам!
Сообщение по теме: FATAL: загрузочный носитель не найден! Ошибка остановки системы в VirtualBox
Как исправить фатальную остановку системы без загрузочного носителя в VirtualBox?
Чтобы решить эту проблему в вашей системе, выполните следующие действия:
- Щелкните правой кнопкой мыши виртуальную машину, которая не находится в состоянии загрузки, и выберите настройки.
- Когда меню настроек открыто, перейдите в «Хранилище»> «Контроллер: IDE»> «Выбрать загрузочный образ».
- Нажмите «ОК».
- Запустите виртуальную машину, и вы сможете нормально загрузиться с смонтированного iso.
Как исправить отсутствие загрузочных устройств?
Чтобы исправить ошибку «Загрузочное устройство не найдено» в Windows 11/10, выполните следующие действия:
- Перезагрузите компьютер и нажмите Esc, чтобы войти в интерфейс BIOS.
- Нажимайте клавишу со стрелкой вправо на клавиатуре, пока не откроется вкладка «Загрузка».
- Переместите «Жесткий диск» в начало списка загрузки, нажав «+» или «-».
- Нажмите F10, чтобы сохранить изменения и перезагрузить компьютер.
Читать: исправить ошибку «Операционная система не была загружена» в Hyper-V
Как запустить Windows 11 на VirtualBox?
Запустите Oracle Virtualbox со своего рабочего стола или из меню «Пуск». Нажмите синюю новую кнопку. Назовите вашу виртуальную машину «Windows 11». Затем вы можете выбрать Microsoft Windows в разделе «Тип», а затем выбрать Windows 11 в разделе «Версия». Шаги для запуска/установки Windows 11 в VirtualBox следующие:
- Загрузите ISO-файл Windows 11.
- Установите Oracle VM Virtual Box, если вы еще этого не сделали.
- Инициализируйте новую виртуальную машину и выберите ISO-файл Windows 11.
- Выделите системные ресурсы и установите ISO.
Читайте: Как создать общую папку VirtualBox в Windows.
You may get the VirtualBox error FATAL: INT18: BOOT FAILURE when you attempt to start a Windows guest machine on your Windows 11 or Windows 10 host computer. This post offers the most applicable solutions you can try to successfully fix the error on your system.

You may encounter this issue due to one or more of the following reasons.
- it’s an indication the VM file is corrupt.
- Part of the boot sector is inactive.
- The operating system (OS) is unable to boot due to the partition holding the Boot Configuration Data (BCD) Store being inactive.
- The OS is unable to boot due to BCD Corruption.
- The OS is unable to boot due to the boot sector not being found.
Affected users reported the guest operating system running on the VM failed to start after converting the physical disk of a Windows 11/10 UEFI computer to a Virtual Hard disk (VHD or VHDX) and attaching the VHD/VHDX file to a new VirtualBox machine. The error sometimes may throw the error code 0x0000225.
Read: VirtualBox failed to register and open Hard Disk image file
If you have encountered the FATAL: INT18: BOOT FAILURE error when you start a Windows Guest OS in VirtualBox on your host Windows 11/10 machine, you can apply our recommended fixes below to quickly and easily resolve the issue on your system.
- Initial checklist
- Enable I/O APIC & EFI in VirtualBox
- Disable Hyper-V on the Host machine
- Repair the Guest OS
Let’s see these listed suggestions in detail.
Read: VirtualBox VM is not opening or starting in Windows
1] Initial checklist
Before you proceed with the solutions proper below, you first need to verify that the Guest OS partition is Active. This applies only to Generation 1 VMs. Generation 2 VMs (using UEFI) does not use an active partition. To verify the OS partition that holds the BCD store for the disk is marked as active, do the following:
- Open command prompt in elevated mode.
- Open the DISKPART tool.
- In DISKPART, type the command below and hit Enter to list the disks on the system:
list disk
- From the output, look for added disks and input the command below to select the new disk. In this example, the new disk is Disk 1.
sel disk 1
- Next, input the command below and hit Enter to list all of the partitions on the disk:
list partition
- From the output, input the command below and hit Enter to select the partition you want to check. Usually, System Managed partitions are smaller and around 350 Mb in size. In this example, the partition is Partition 1.
sel partition 1
- Next, to check the status of the partition, input the command below and hit Enter:
detail partition
- Now, if the partition isn’t active, input the command below and hit Enter to set the Active flag, and then recheck that the change was done properly with the command above.
active
- Exit the DISKPART tool.
After you have set the guest OS as an active partition, see if you can start the VM without issues. If the FATAL: INT18: BOOT FAILURE error reoccurs, or this isn’t the case for you as you already have the partition set as active, you can proceed with the next solution.
Read: DiskPart has encountered an error: Access is denied
2] Enable I/O APIC & EFI in VirtualBox

You will encounter this error usually when you are attaching or opening a VHD/VHDX/VMDK file that contains a UEFI operating system. In this case, to resolve the issue, you need to simply enable EFI on the VirtualBox machine’s settings. To perform this task, do the following:
- Press the X button to close the VM machine window and Power Off the machine.
- Next, open the VM Settings.
- Go to System > Motherboard.
- In the Boot Order section, make sure that the Hard Disk is selected and is the first boot device.
- In the Extended Features section, select both the Enable I/O APIC and Enable EFI (special OSes only) options.
- Click OK.
Read: Error 0x80370102 The Virtual machine could not be started because a required feature is not installed
3] Disable Hyper-V on the Host machine

If you have the Hyper-V feature enabled on your system, it could be interfering with the VirtualBox VM starting properly. Hyper-V blocks all other Hyper Visors like VirtualBox from calling VT hardware, therefore it’s required for it to be disabled. So basically, to use other virtualization software on Windows 11/10 host machine, you must disable Hyper-V Hypervisor, Device Guard, and Credential Guard.
To disable Hyper-V on the Host machine, do the following:
- Press the Windows key + R to invoke the Run dialog.
- In the Run dialog box, type
appwiz.cpland hit Enter to open the Programs and Features applet. - In the window, on the left side, click the Turn Windows features on or off link.
- Wait for the applet to populate, then scroll and clear/uncheck the following features:
- Containers
- Hyper-V
- Virtual Machine Platform
- Windows Hypervisor Platform
- Windows Sandbox
- Click OK.
- Restart the computer after uninstalling.
- On boot, open Command Prompt as Administrator.
- In the CMD prompt, type or copy and paste the command below and hit Enter:
bcdedit /set hypervisorlaunchtype off
- Exit CMD prompt once the operation executes.
- Restart computer.
Read: How to enable or disable Nested Virtualization for VMs in Hyper-V
4] Repair the Guest OS
As the guest OS is failing to start, it could be we are dealing with boot problems as the error indicates. In this case, we can attempt to fix boot problems on the Guest machine, by starting the guest machine using Windows 11/10 ISO file and then proceed to run a repair of the guest OS. To perform this task, do the following:
- Download Windows ISO.
- Open the VirtualBox machine Settings.
- Go to Storage.
- Click the 1st plus (+) button next to Controller to add the optical drive.
- Click Add in the Optical Disk Selector window.
- Find and open the Windows.iso file.
- Next, select the Windows.iso file.
- Click Choose.
- After attaching the Windows.iso file in Storage devices, go to System and drag Optical to the top to boot the VM from the attached Windows.iso.
- Next, make sure that the Enable EFI option is not selected, otherwise, you will not be able to boot from the ISO file.
- Click OK when done.
- Next, start the Virtual Machine.
- Click Next > Repair Your computer.
- Select Troubleshoot > Startup Repair.
- Allow the Startup Repair to run and depending on the result do the following actions:
- If Startup Repair completes successfully, shut down the virtual machine, set the hard disk as a first boot device, and try to start again the virtual machine.
- If Startup Repair couldn’t complete the repair, continue to the next step.
- Click Advanced Options > Troubleshoot > Command Prompt.
- In Command prompt, input the following command and hit Enter after each line:
diskpart
select disk 0
list partition
- From the output, make a note of the size of the System partition.
- Next, type the command below and hit Enter to find out the volume number of the System Partition by using its size as a reference.
list volume
- Next, run the following commands to select the system partition (using its volume number), and assign the drive letter Z: to it, and then exit DISKPART. Where X placeholder is the volume number of your system partition.
select volume X
assign letter=Z
exit
- Lastly, run the command below in CMD prompt to repair the boot files:
bcdboot C:\windows /s Z: /f ALL
- Exit CMD prompt once the command executes.
- Close all windows and shutdown the virtual machine
- Set the hard disk as the first boot device and start the virtual machine.
Read: How to Boot or Repair Windows computer using the Installation Media
Hopefully, this post helps you!
Related post: FATAL: No bootable medium found! System halted error in VirtualBox
How do I fix the fatal no bootable medium found system halted in VirtualBox?
To resolve this issue on your system, follow these steps:
- Right-click on the virtual machine that isn’t in a bootable state and click on settings.
- Once the settings menu is open, go to Storage > Controller:IDE > Choose the bootable iso.
- Click OK.
- Start your virtual machine and you should be able to boot normally from the mounted iso.
Read: VirtualBox Aborted: The VM session was aborted
How do I fix no bootable devices found?
To fix the No Boot device found error on Windows 11/10, do the following:
- Restart the computer and tap Esc to enter the BIOS interface.
- Press the right arrow key on your keyboard until the Boot tab is opened.
- Move “Hard Drive” to the top of the boot order list by pressing “+” or “-”.
- Press F10 to save the changes and restart the computer.
Read: Fix No operating system was loaded error in Hyper-V
How do I run Windows 11 on VirtualBox?
Launch Oracle Virtualbox from your desktop or Start Menu. Click the blue new button. Name your virtual machine “Windows 11”. You can then choose Microsoft Windows under Type and then choose Windows 11 under Version. The steps to run/install Windows 11 in VirtualBox are as follows:
- Download the Windows 11 ISO file.
- Install Oracle VM Virtual Box if you haven’t already.
- Initialize a new Virtual Machine and select the Windows 11 ISO file.
- Allocate system resources and install the ISO.
Read: How to create a VirtualBox shared folder in Windows.
-
Home
-
News
- [Solved] FATAL: INT18: BOOT FAILURE in VirtualBox
By Vega | Follow |
Last Updated
When you try to start a Windows guest on a Windows 10/11 host, you may receive the error FATAL INT18 BOOT FAILURE VirtualBox. This post from MiniTool Partition Wizard provides the most applicable solutions that you can try to fix this error successfully.
Some users reported: “After converting a Windows 10//11 UEFI machine’s physical disk to a virtual hard disk (VHD or VHDX) and attaching the VHD/VHDX file to a new VirtualBox machine, the VM fails to boot with a fatal error: INT18: BOOT failed or guest operating system failed to start with error code: 0x0000225.”
Why Is My VirtualBox Failing to Boot
This problem may be caused by the following reasons.
- The VM file is corrupted.
- Part of the boot sector is inactive.
- The Operating System (OS) fails to boot due to an inactive partition containing Boot Configuration Data (BCD) storage.
- The operating system cannot boot due to a corrupted BCD.
- The operating system cannot start because the boot sector was not found.
How to Fix FATAL INT18 BOOT FAILURE in VirtualBox
Here we summarize several feasible ways for you to solve the fatal int18 boot failure VirtualBox issue.
# 1. Enable I/O APIC and UEFI in VirtualBox
The FATAL INT18 BOOT FAILURE error in VirtualBox usually appears when you attach a VHD/VHDX/VMDK file containing a UEFI operating system. To fix this, just go ahead and enable UEFI on the VirtualBox machine’s settings. The steps are as follows:
Step 1: Close the VM machine window and Power Off the machine.
Step 2: Open the VM settings. Then go to System > Motherboard.
Step 3: In the Boot Order section, make sure that the Hard Disk is selected and is the first boot device.
Step 4: In the Extend Features section, select both the Enable I/O APIC and Enable EFI (special OSes only) options. Then click OK.
# 2. Disable Hyper-V on the Host Machine
If the Hyper-V feature is enabled on your system, it may interfere with the normal startup of the VirtualBox VM. So, you need to disable Hyper-V on the Host machine.
Step 1: Press Win + R to open the Run dialog box. Then type appwiz.cpl in it and press Enter.
Step 2: In the Program and Features window, click Turn Windows features on or off.
Step 3: Uncheck the following features and click OK to apply the changes.
- Containers
- Hyper-V
- Virtual Machine Platform
- Windows Hypervisor Platform
- Windows Sandbox
Step 4: Restart the computer after disabling it.
Step 5: Open Command Prompt as administrator. Then type the following command and press Enter.
bcdedit /set hypervisorlaunchtype off
Step 6: Restart your PC again. Then start the VirtualBox and see if the FATAL INT18 BOOT FAILURE VirtualBox problem is fixed.
# 3. Fix Boot Problems
The ultimate way to resolve FATAL: INT18: BOOT FAILURE VirtualBox error is to fix the booting issue on the guest machine by booting it from a bootable Windows 10 ISO file.
Note: If you don’t have a Windows 10 ISO file, you can use the Media Creation Tool to download one directly from Microsoft.
Step 1: Open the Settings of the VirtualBox machine and go to Storage.
Step 2: Click the 1st plus (+) button next to Controller to add optical Storage.
Step 3: in the Optical Disk Selector window, click Add. Then find and open the Windows.iso file.
Step 4: Then select the Windows.iso file and click Choose.
Step 5: After attaching the Windows.iso file to the Storage devices, go to System and drag Optical to the top to boot the VM from the attached Windows.iso. Also, make sure that the Enable EFI option is unchecked, otherwise, you will not be able to boot from the ISO file. When done, click OK.
Step 6: Start Virtual Machine and click Next > Repair Your computer. Then select Troubleshoot > Startup Repair.
Step 7: Allow the Startup Repair to run and depending on the result do the following actions:
- If Startup Repair completes successfully, shut down the virtual machine, set the hard disk as a first boot device, and try to start the virtual machine again.
- If Startup Repair can’t complete the repair, continue to the next step.
Step 8: Click Advanced Options > Troubleshoot > Command Prompt.
Step 9: In Command Prompt, type the following commands in order and press Enter after each command.
- diskpart
- select disk 0
- list partition
Step 10: Now notice the size of the System partition. Then type the following command and find out the volume number of the System partition by using its size as a reference.
list volume
Step 11: Type the following commands to select the system partition (using its volume number), and to assign the drive letter Z: to it. Then exit DISKPART:
- select volume 2
- assign letter=Z
- exit
Note:
Change the Volume number «2» according to your case.
Step 12: In Command Prompt, type this command to repair the boot files:
bcdboot C:\windows /s Z: /f ALL
Close all windows, shut down the virtual machine, set the hard disk as the first boot device, and start the virtual machine.
About The Author

Position: Columnist
Vega joined MiniTool as an editor after graduation. She enjoys helping people with computer problems, including disk management, data recovery, and more. She is constantly expanding her knowledge in related fields. And she will continue to bring more easy-to-understand professional articles to help people solve various problems on the PC. In her daily life, Vega enjoys hanging out with friends, shopping online and listening to music. She is someone who knows how to enjoy life.