Ошибка «failed to launch exe. error 5» может возникнуть при попытке запустить пиратскую игру на компьютере. Это сообщение об ошибке указывает на то, что операционная система не может запустить исполняемый файл игры.
Данная ошибка может возникать по нескольким причинам:
- Ошибка прав доступа.
При запуске пиратской игры, которая требует прав администратора на компьютере, возможно, что вам не хватает прав входа в систему. В этом случае, решить проблему можно попытавшись запустить игру с правами администратора. Для этого на файл игры нужно нажать правой кнопкой мыши и выбрать «Запустить от имени администратора».
- Ошибка в антивирусе.
Часто антивирусные программы могут помешать нормальному запуску игры, считая ее пиратской или содержащей вирусы. Чтобы решить эту проблему, необходимо добавить файл игры в список исключений антивирусной программы. Также можно попробовать временно отключить антивирус и запустить игру.
- Ошибка в настройках защиты Windows.
Если включена опция «User Account Control» в настройках безопасности Windows, это также может вызвать ошибку при запуске игры. Для решения этой проблемы можно попробовать временно выключить эту опцию в настройках безопасности Windows.
- Ошибка в файловой системе.
Проблема с файловой системой может вызвать ошибку «failed to launch exe. error 5», если файл игры поврежден или отсутствует. В этом случае, необходимо проверить целостность файлов игры и, при необходимости, переустановить игру с другого источника.
В любом случае, решить проблему с запуском пиратской игры может быть не так просто. Но если вы попытаетесь исправить ошибку, используя указанные выше способы, вы должны справиться с проблемой, и наслаждаться любимой игрой, даже если она была получена пиратским путем.
Do you receive the error message “Failed to launch Lunar Client: Java launch failed” when launching the Minecraft Lunar Client? Inadequate RAM allocation in the settings of Lunar Client or a missing or damaged Java Runtime Environment (JRE) is the main cause of this problem.
Stacks of cache folders or your antivirus program preventing the client’s processing are some additional potential culprits. This article reviews various methods to remedy the problem and successfully start Lunar Client.
How To Fix The “Failed To Launch Lunar Client” Error On Windows

Carry Out A Few Preliminary Inspections
Do the following basic examinations first:
- After closing the Lunar Client, reopen it.
- Close any applications that are already running in resemblance with Lunar Client to prevent interference.
- Make sure the device is online and that the network connection is strong.
- Apply the remaining fixes if the aforementioned checks fail to resolve the issue.
Method 1: Launch The Lunar Client In Administrator Mode
In the event that Lunar Client is denied access to specific system files, you can experience the mentioned error. Run the client as an administrator to make sure that the problem isn’t being caused by restricted access. To execute Lunar Client as an administrator, adhere to the following steps:
Step 1: Go to the directory where Lunar Client is set up.
Step 2: The main file that you use to start the client may be found here.
Step 3: Click the context menu when you right-click the EXE file for Lunar Client and choose Run as administrator.
Step 4: If the issue is resolved by running Lunar Client in administrator mode, this suggests that the operating system limitations are at blame.

Also Read: How To Fix Run as Administrator Option not Showing up on Windows 11
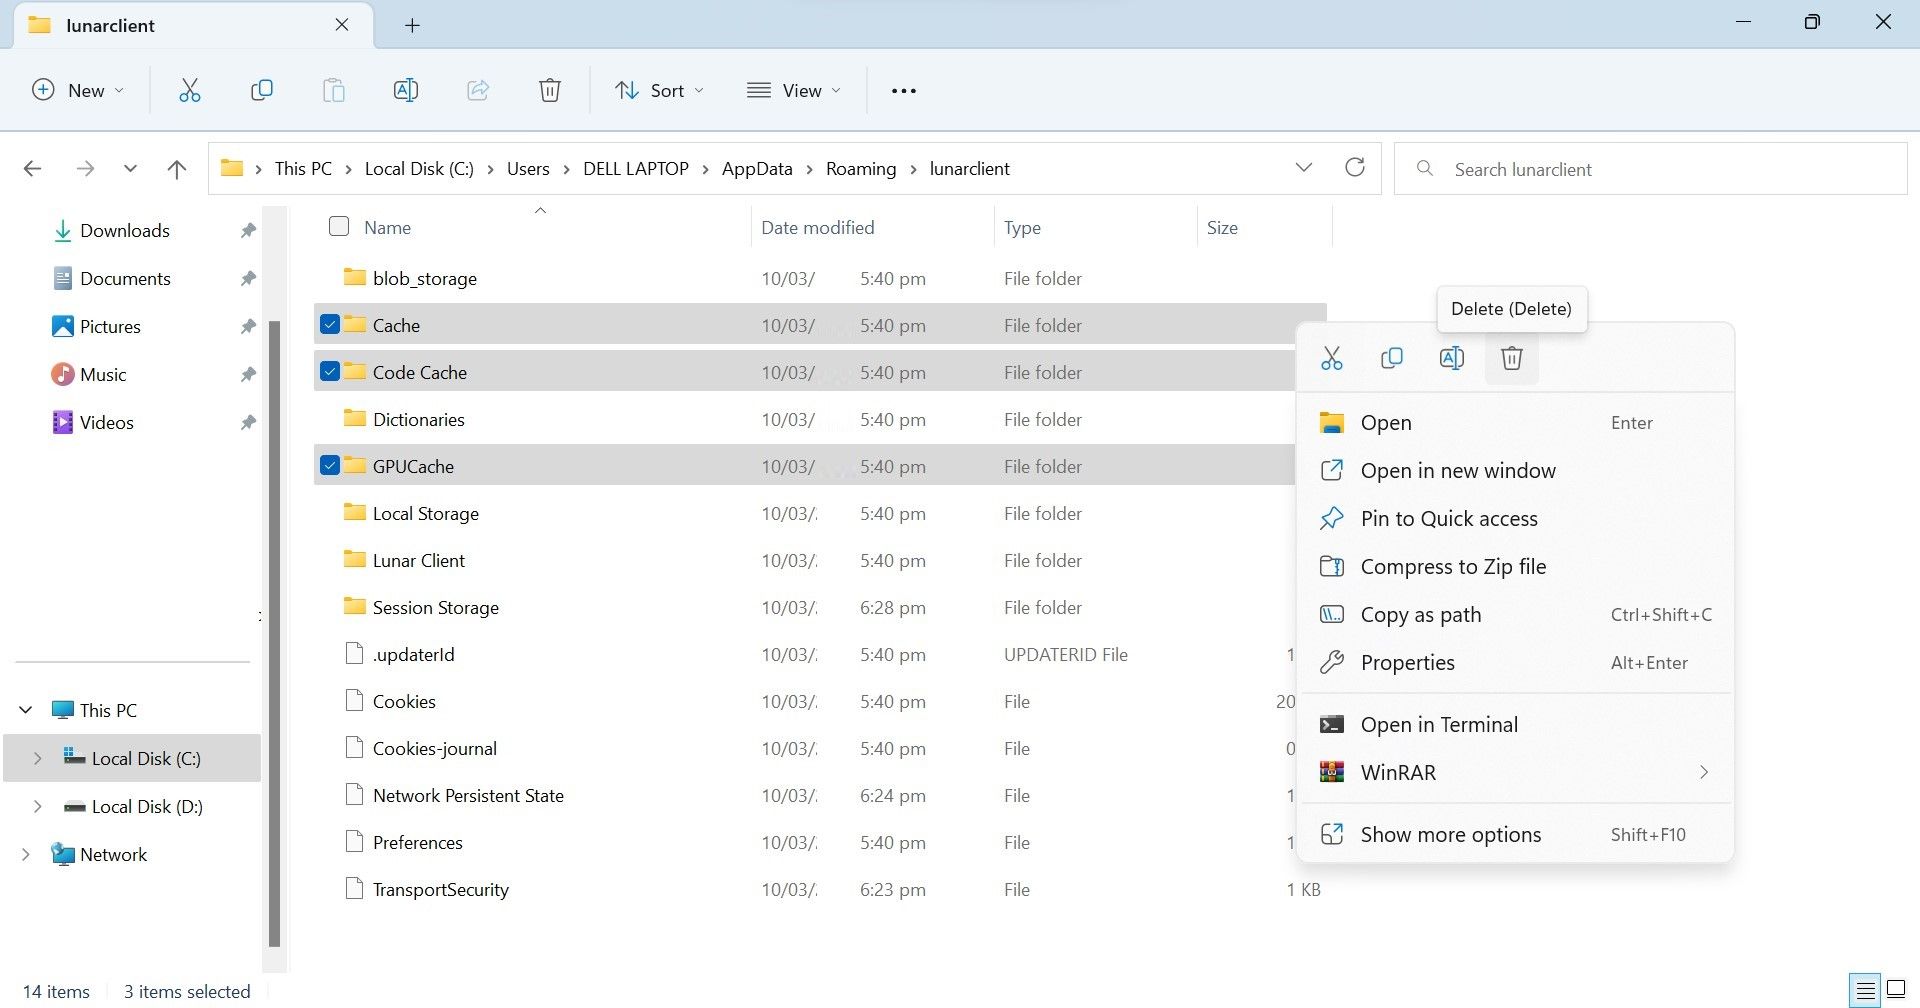
Method 2: Remove The Cache Folders For The Lunar Client
Lunar Client maintains caches of game data in cache folders like the majority of gaming launchers do. As a result, the client’s performance is enhanced by retrieving the needed data from various places more quickly. Unfortunately, occasionally the accumulated cache obstructs the client’s processing, resulting in unforeseen problems. You should clear all cache folders to make sure that cache interference isn’t the source of the current problem. Adhere to the following steps:
Step 1: Get to the following location by navigation
C:\Users\<username>\AppData\Roaming
Step 2: Locate and open the lunarclient folder.
Step 3: Remove three folders from this location namely Cache, Code Cache, and GPUCache.

Step 4: Right-click on the chosen folders and choose Delete.
Step 5: After erasing the cache directories, restart the Lunar Client.
Also Read: How to Clear Cache in Windows 11?
Method 3: Modify The Lunar Client’s Settings To ModifyThe Allocated Memory
Thanks to Lunar Client, users have complete control over the amount of memory the client must have. It eases the load on the user’s hardware and aids in efficient resource management. The problem we’re talking about is probably going to happen if you assign less RAM in the client’s settings, that isn’t enough to meet the client’s needs. Follow these procedures to modify the RAM allocation for the Lunar Client:
Step 1: Activate Lunar Client.
Step 2: At the top, select the Settings menu.
Step 3: Drag the slider under Allocated Memory to alter the memory allocation.
Also Read: How to Fix Reallocated Sector Count Warning
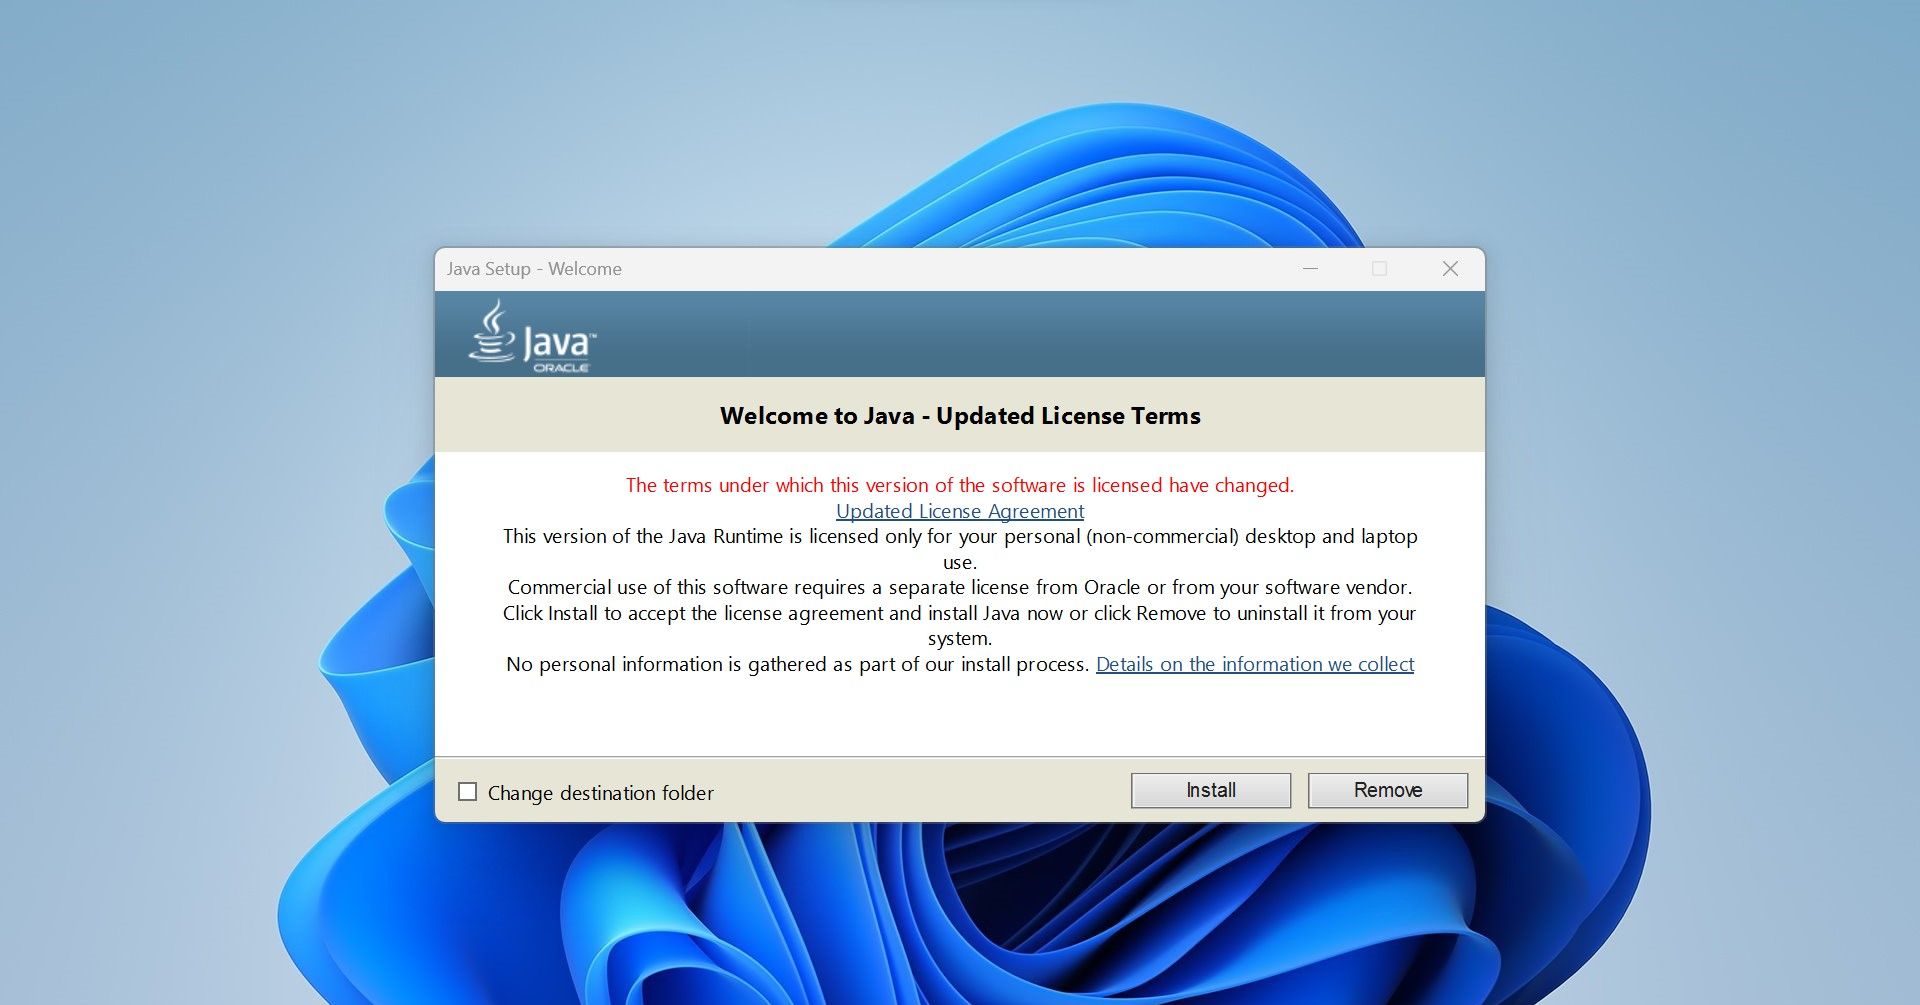
Method 4: Activate Java Runtime Environment Again
Java Runtime Environment is necessary for Lunar Client to operate correctly. You might get Java-related problems like the one described in this article when it is not installed correctly, when some files become corrupted. To install it, stick to these steps:
Step 1: Visit the Java web page.
Step 2: Click on Java Download.
Step 3: On the following page, click on Download Java again.

Step 4: After downloading the file, run it and select Yes on the UAC(User Account Control) box.
Step 5: Next, select Install button.
Note: If by any chance, the installation process detects an outdated Java version, click Uninstall to remove it.

Also Read: Ways to Protect Against JavaScript Ransomware
The Final Word On How To Fix The “Failed To Launch Lunar Client” Error On Windows
It can be annoying to launch Lunar Client only to experience unexpected issues. The changes mentioned above ought to assist you in identifying and resolving the “Failed to launch Lunar Client: Java launch failed” error. You might need to delete Lunar Client and reinstall it if neither of the fixes works to address the problem.
Please let us know in the comments below if you have any questions or recommendations. We would be delighted to provide you with a resolution. We frequently publish advice, tricks, and solutions to common tech-related problems. You can also find us on Facebook, Twitter, YouTube, Instagram, Flipboard, and Pinterest.
Get back into Minecraft with these tips to fix the Lunar Client on Windows.

When launching Lunar Client for Minecraft, do you encounter an error message that says «Failed to launch Lunar Client: Java launch failed»? This error occurs primarily because of missing or corrupt Java Runtime Environment (JRE) or insufficient RAM allocation in Lunar Client’s settings.
Other possible causes include piled-up cache folders, interference from other gaming clients, or your antivirus software blocking the client’s processing. This article will discuss different fixes you can apply to resolve the issue and launch Lunar Client successfully.
1. Apply Some Preliminary Checks
First off, carry out the following preliminary checks:
- Relaunch Lunar Client after closing it.
- Close other apps running in parallel with Lunar Client so they won’t interfere with it.
- Ensure that your device is connected to the internet and the network connection is stable.
If the above checks do not solve the problem, apply the remaining fixes.
2. Run Lunar Client as an Administrator
You may encounter the error under discussion if Lunar Client doesn’t have access to some system files. To ensure that the restricted access isn’t causing the problem, run the client as an administrator. Doing so will allow Lunar Client to access files or resources that would otherwise be inaccessible.
Follow these steps to run Lunar Client as an administrator:
- Navigate to the folder where Lunar Client is installed.
- Find the executable file that you use to launch the client.
- Right-click on Lunar Client’s EXE file and select Run as administrator from the context menu.

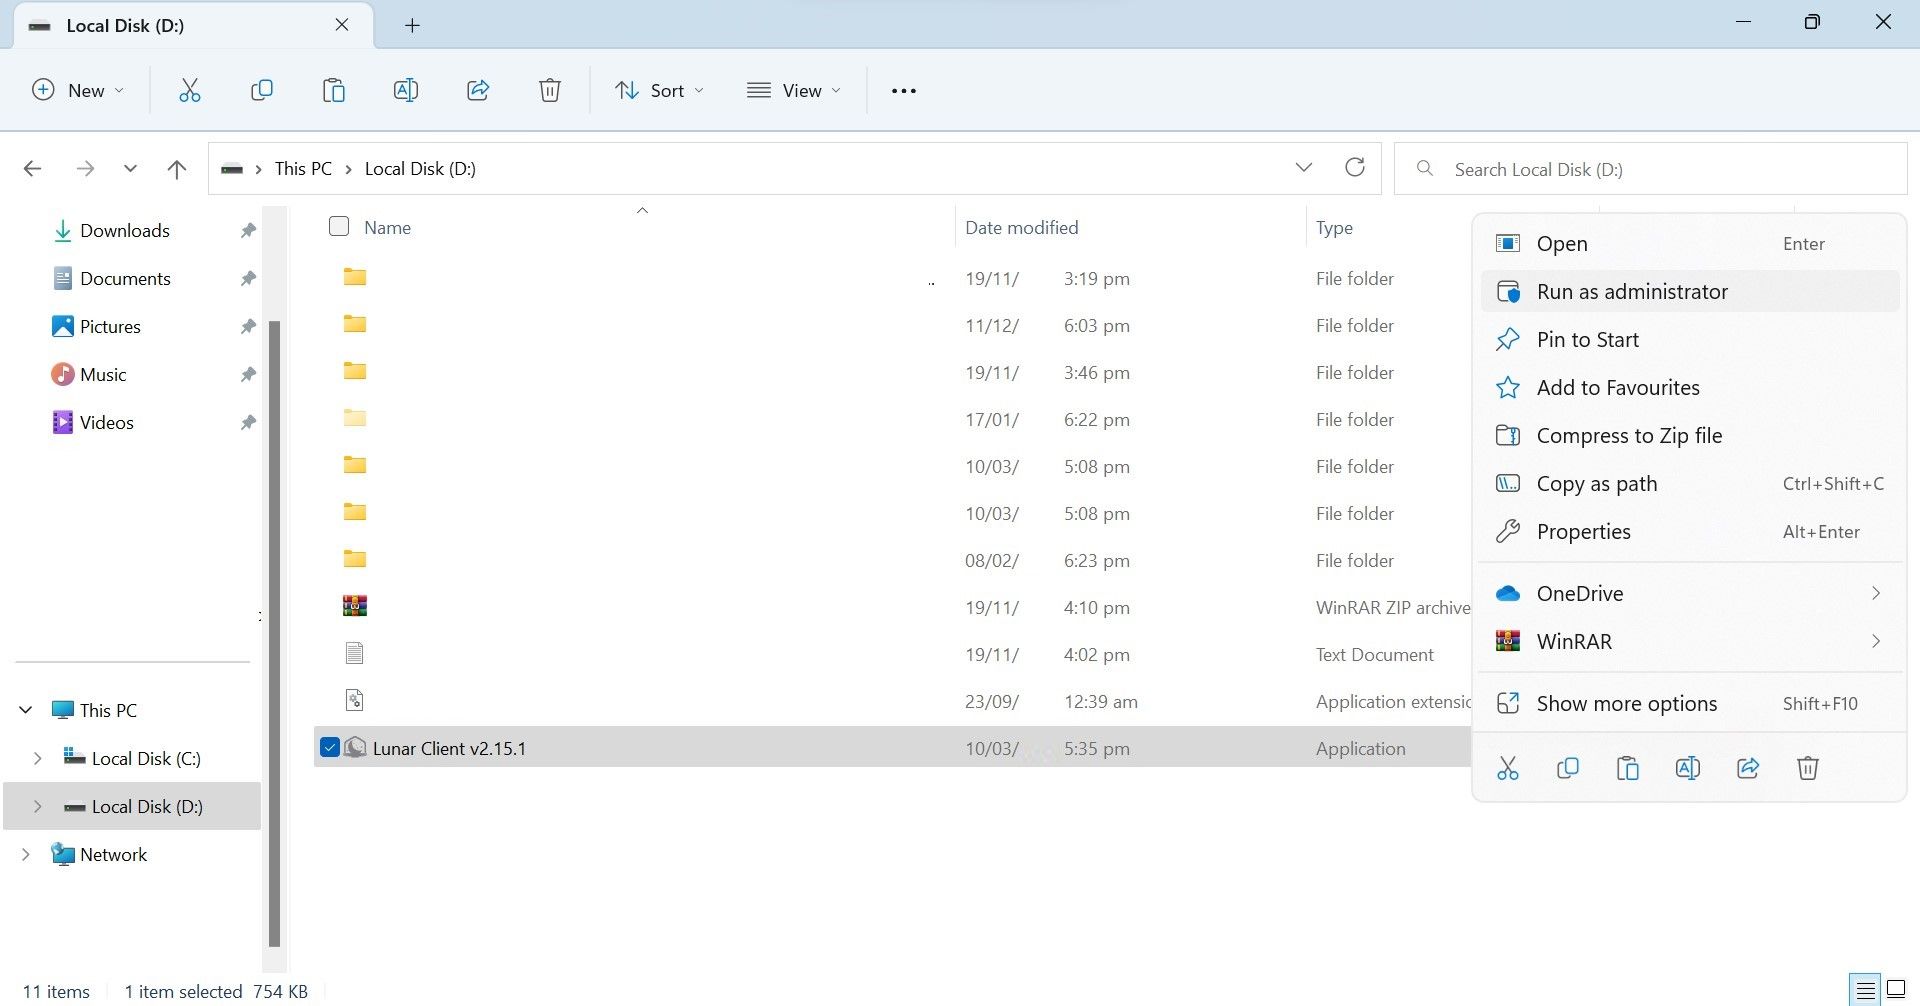
If launching Lunar Client as an administrator fixes the problem, this indicates that operating system restrictions are causing this error. So, you should configure the application to always run as an administrator.
3. Delete Lunar Client’s Cache Folders
Like most gaming launchers, lunar Client caches some game data in its cache folders. This helps the client to fetch the required information faster from these locations, which ultimately improves the client’s performance.
However, sometimes the piled-up cache interferes with the client’s processing, giving birth to unexpected issues. To ensure that cache interference isn’t causing the error under discussion, you should clean all cache folders. Follow these steps to do that:
- Navigate to the following location:
C:\Users\<username>\AppData\Roaming
- Find the lunarclient folder and open it.
- Here, you have to delete three folders: Cache, Code Cache, and GPUCache.
- Select the folders, right-click on them, and hit Delete.

Run Lunar Client again after deleting the cache folders. If you encounter the same error again, proceed to the next step.
4. Change the Allocated Memory in Lunar Client’s Settings
Lunar Client gives users the freedom to choose how much memory the client should have access to. It helps users manage their system resources effectively and reduces the burden on their hardware.
Although having such flexibility is a godsend, don’t be stingy when allocating memory. If you allocate too little memory in the client’s settings, which is insufficient to satisfy the client’s needs, you will likely encounter the error we are discussing.
To change Lunar Client’s memory allocation, follow these steps:
- Launch Lunar Client.
- Click on the Settings menu at the top.
- To change the memory allocation, drag the slider under Allocated Memory.


How much memory you should allocate depends entirely on the amount of memory you have on your computer. If you have 16GB of RAM installed, allocating 5GB would be a better decision. If the overall memory is less than that, you can allocate it accordingly.
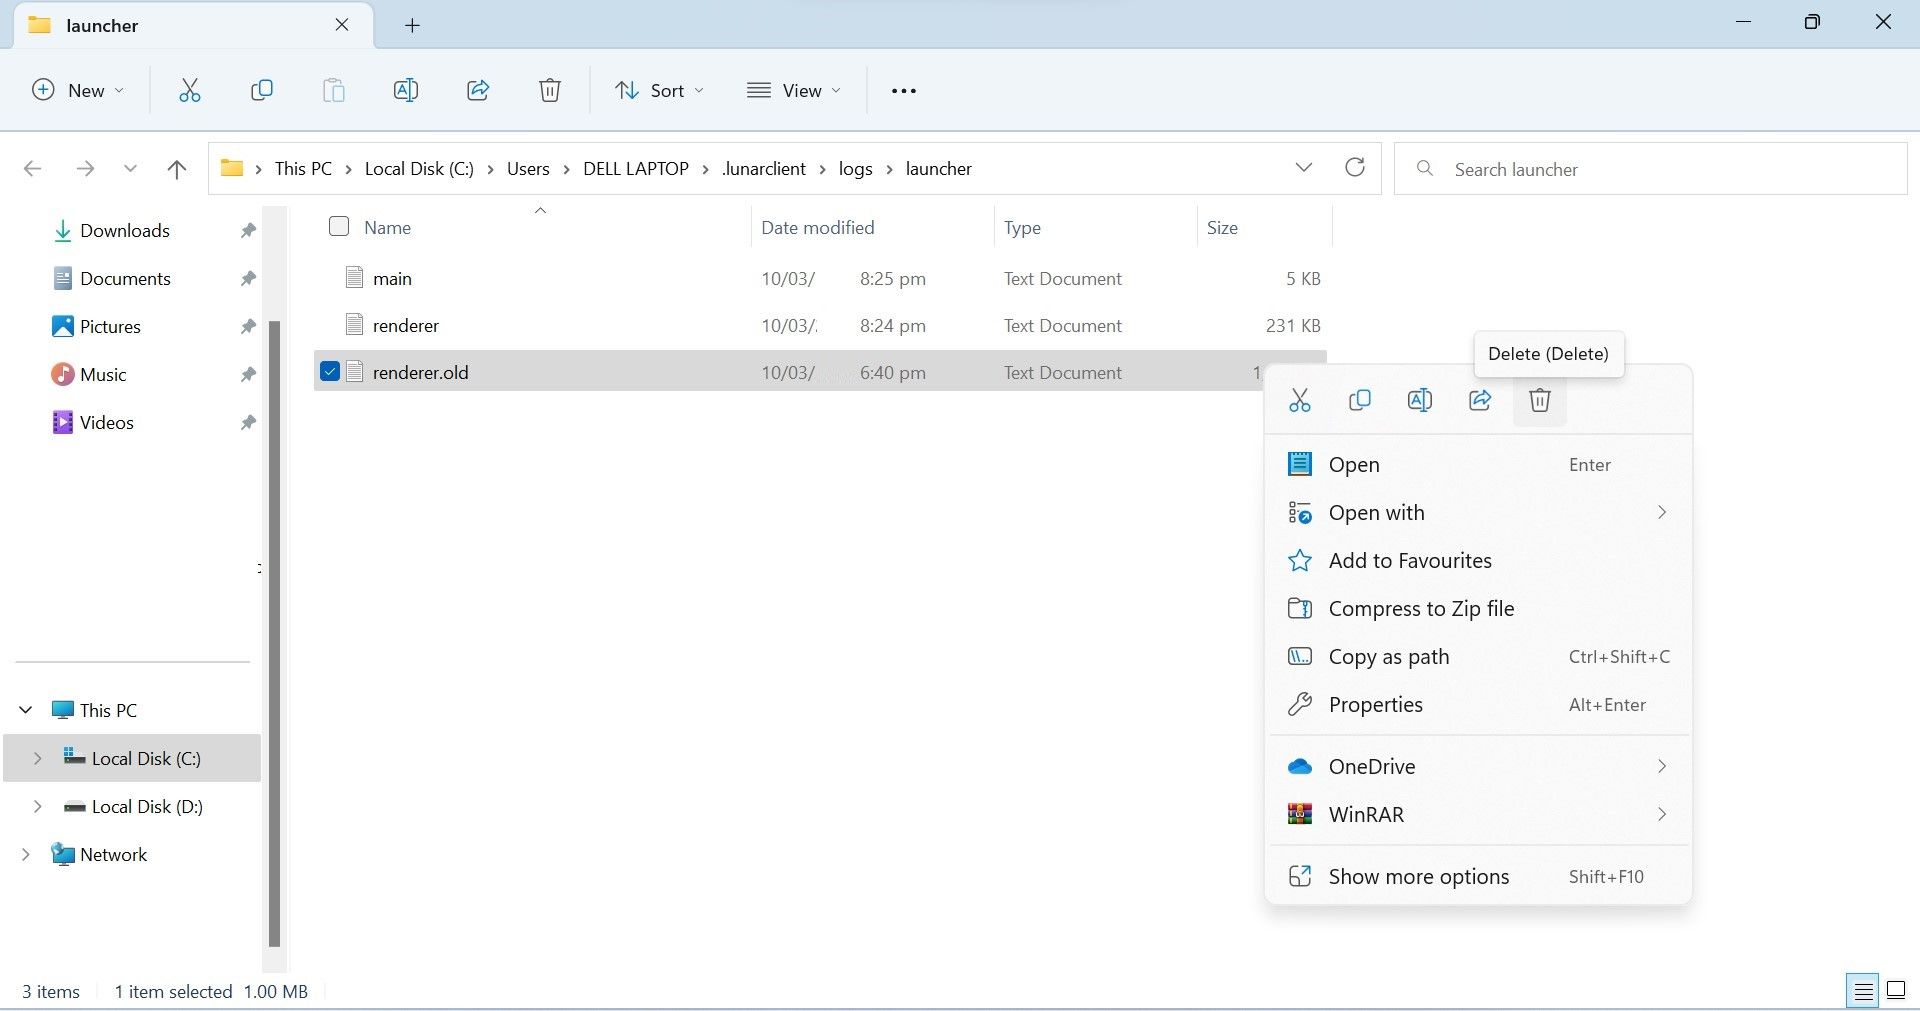
5. Delete the Old Renderer Log File
Besides stating that the Java launch has failed, the error message says that a report was unable to be submitted. Lunar Client might fail to submit the error report due to an issue with the old renderer log file, which contains data about previously reported errors and game settings.
Some Reddit users say deleting this file fixes the issue under discussion. So, if no fixes have been successful in resolving the problem, you should delete the renderer.old file from the Logs folder. Follow these steps to do that:
- Launch Lunar Client.
- Go to the About menu from the top.
- Click on Logs under Folders. Clicking this will take you to the Logs folder.
- Right-click on the Renderer.old file and click on the Delete icon.

6. Whitelist Lunar Client in Windows Defender and Your Antivirus
Lunar Client is a third-party software application. So, Windows Defender and other antivirus programs installed on your device can interfere with the client’s processing. To prevent this, whitelisting the lunar client from security software is necessary.
Our guide on how to allow apps through Windows Defender describes the steps to whitelist apps from Windows’ built-in security suite. If you use a third-party antivirus as an extra layer of protection, you can find instructions about whitelisting apps through it on its official website.
7. Reinstall Java Runtime Environment
Lunar Client requires Java Runtime Environment to function correctly. When it’s not installed properly, some of its files get corrupted, or one of its files goes missing, you could encounter Java-related errors like the one discussed in this article. To ensure that’s not the case, you should reinstall it.
As the newer version automatically updates and fixes missing or corrupt files, you don’t need to remove the earlier version before reinstalling it. Follow these steps to install it:
- Go to the Java website.
- Click on Download Java.
- Click on Download Java once more on the next page.

- Run the file once it has been downloaded and click Yes in the UAC window.
- Then click on the Install button.

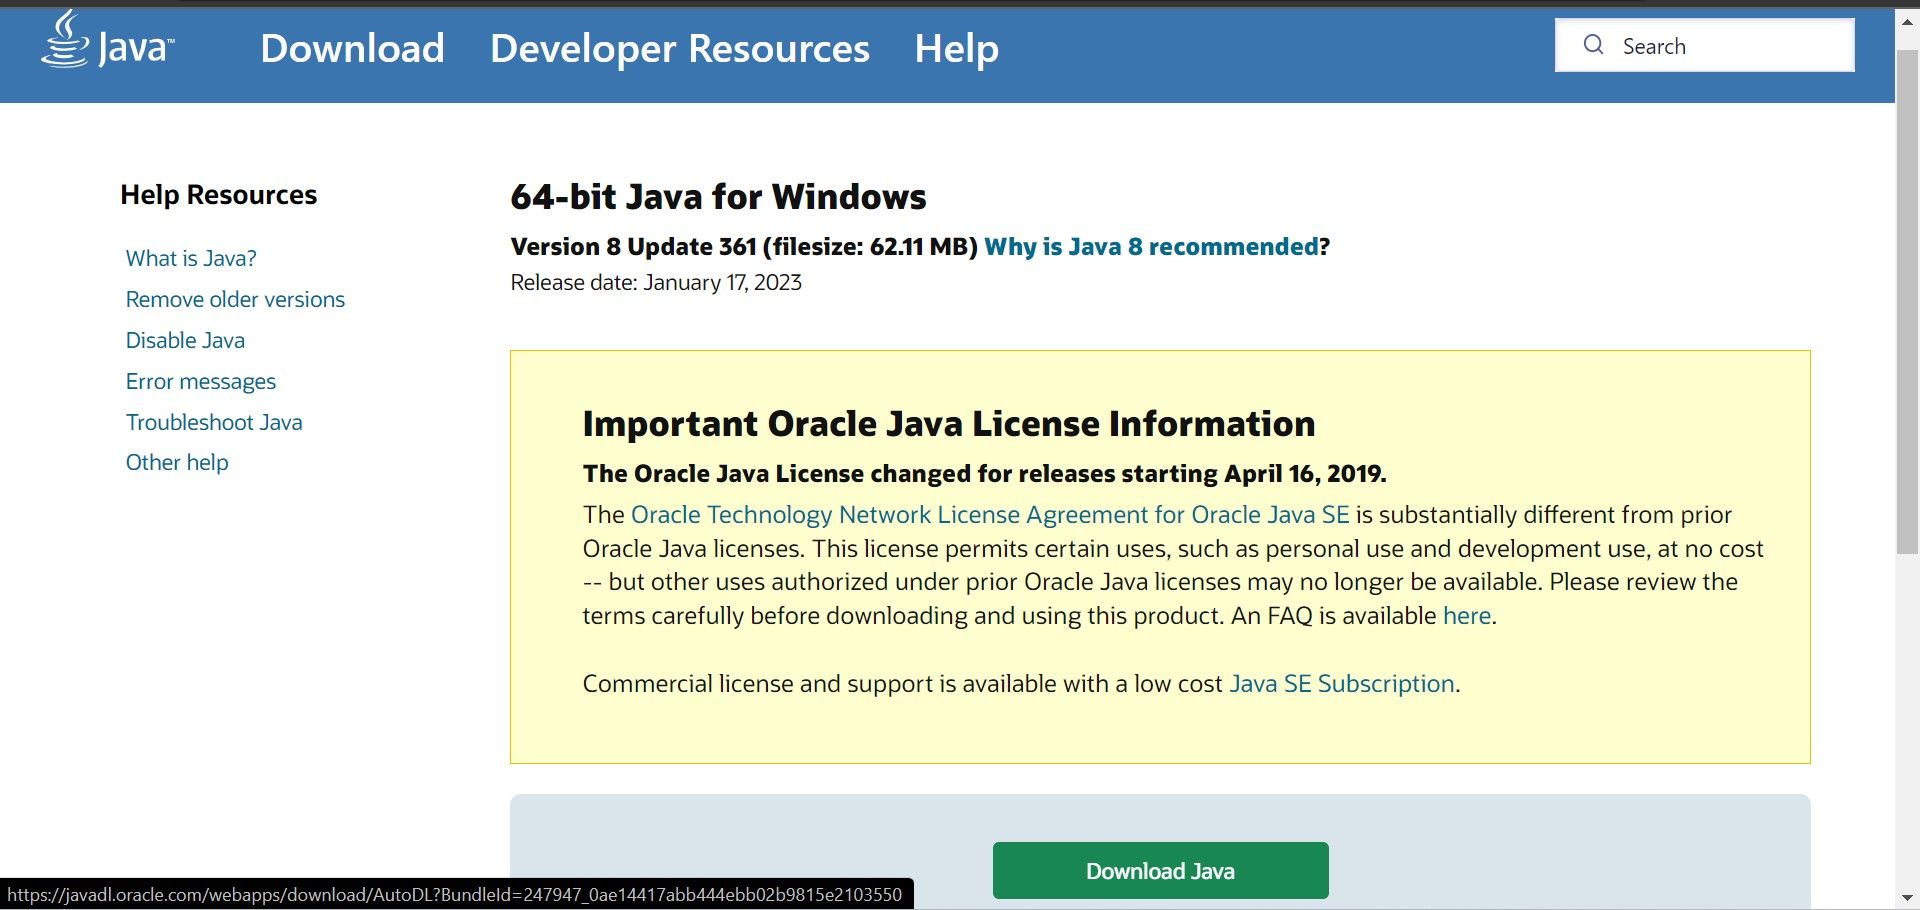
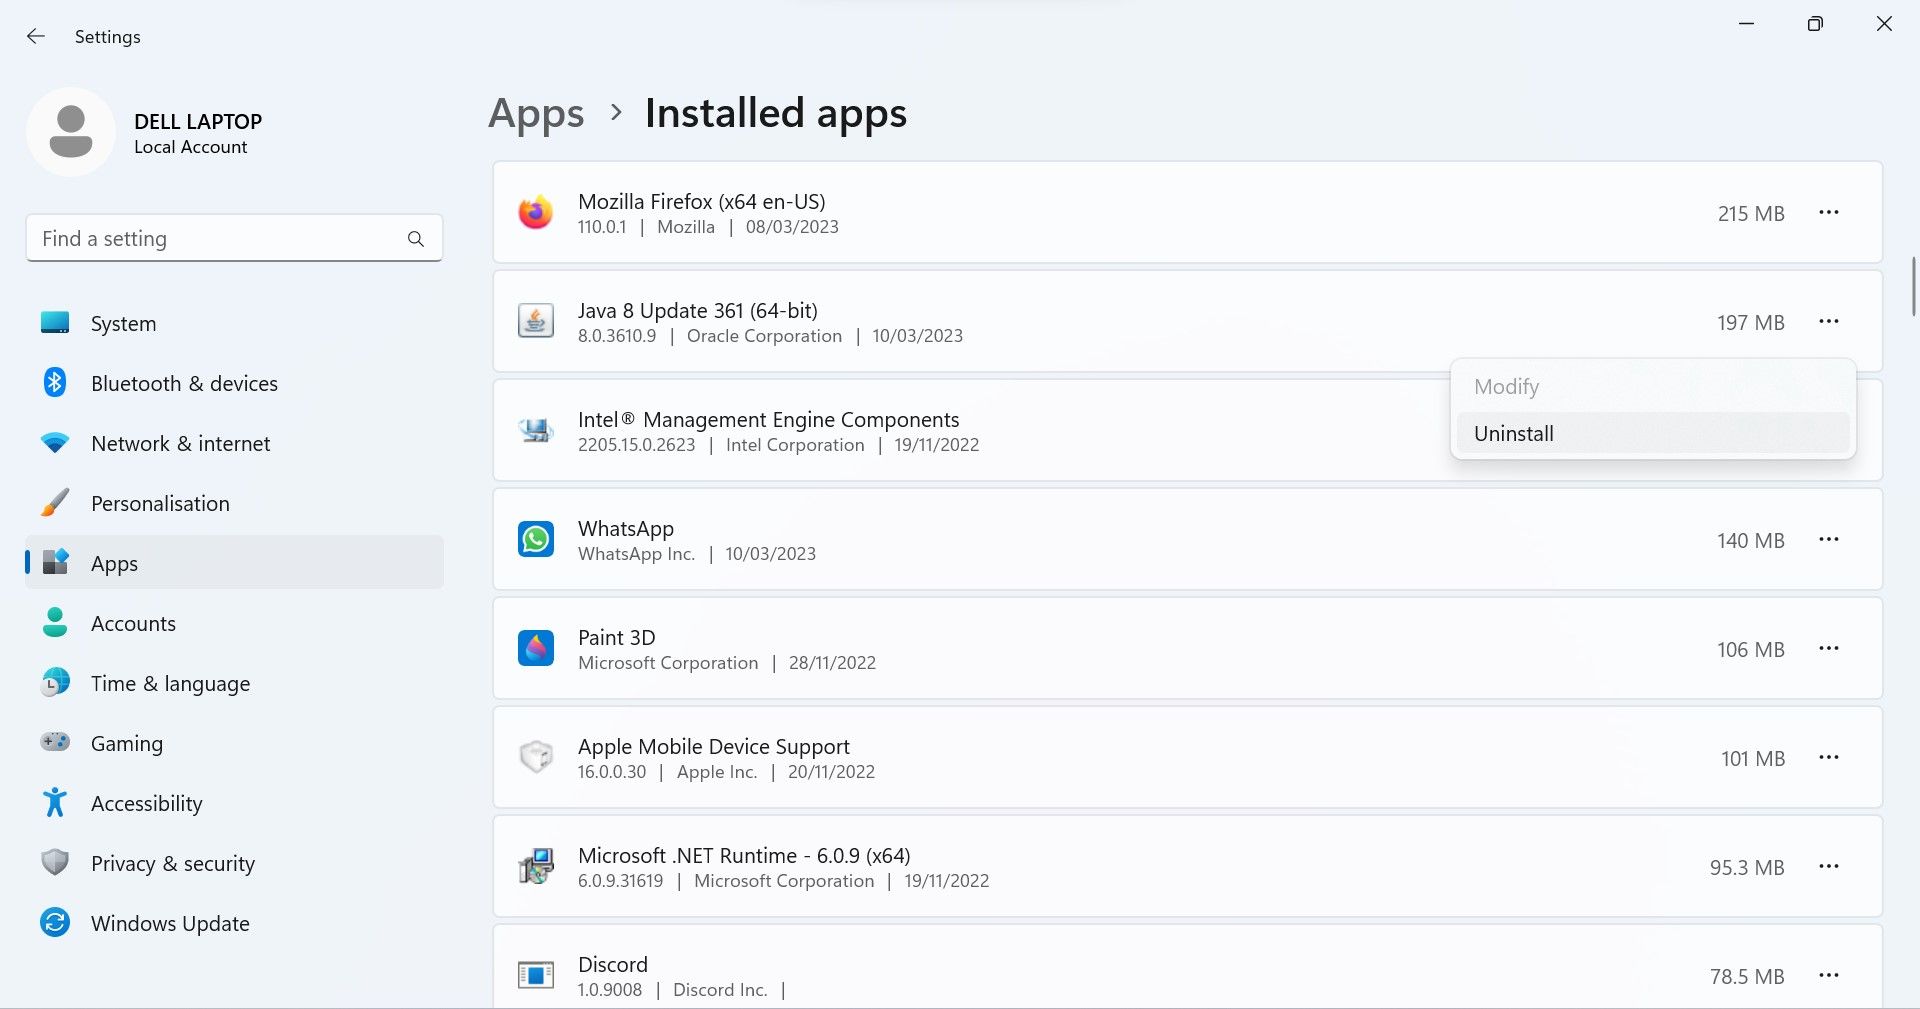
If you encounter any problems during installation, uninstall the existing installation. To do that, open the Settings app and go to the Apps tab on the left. Then, find the Java package from the list of installed programs, click on the three horizontal dots next to it, and click Uninstall.
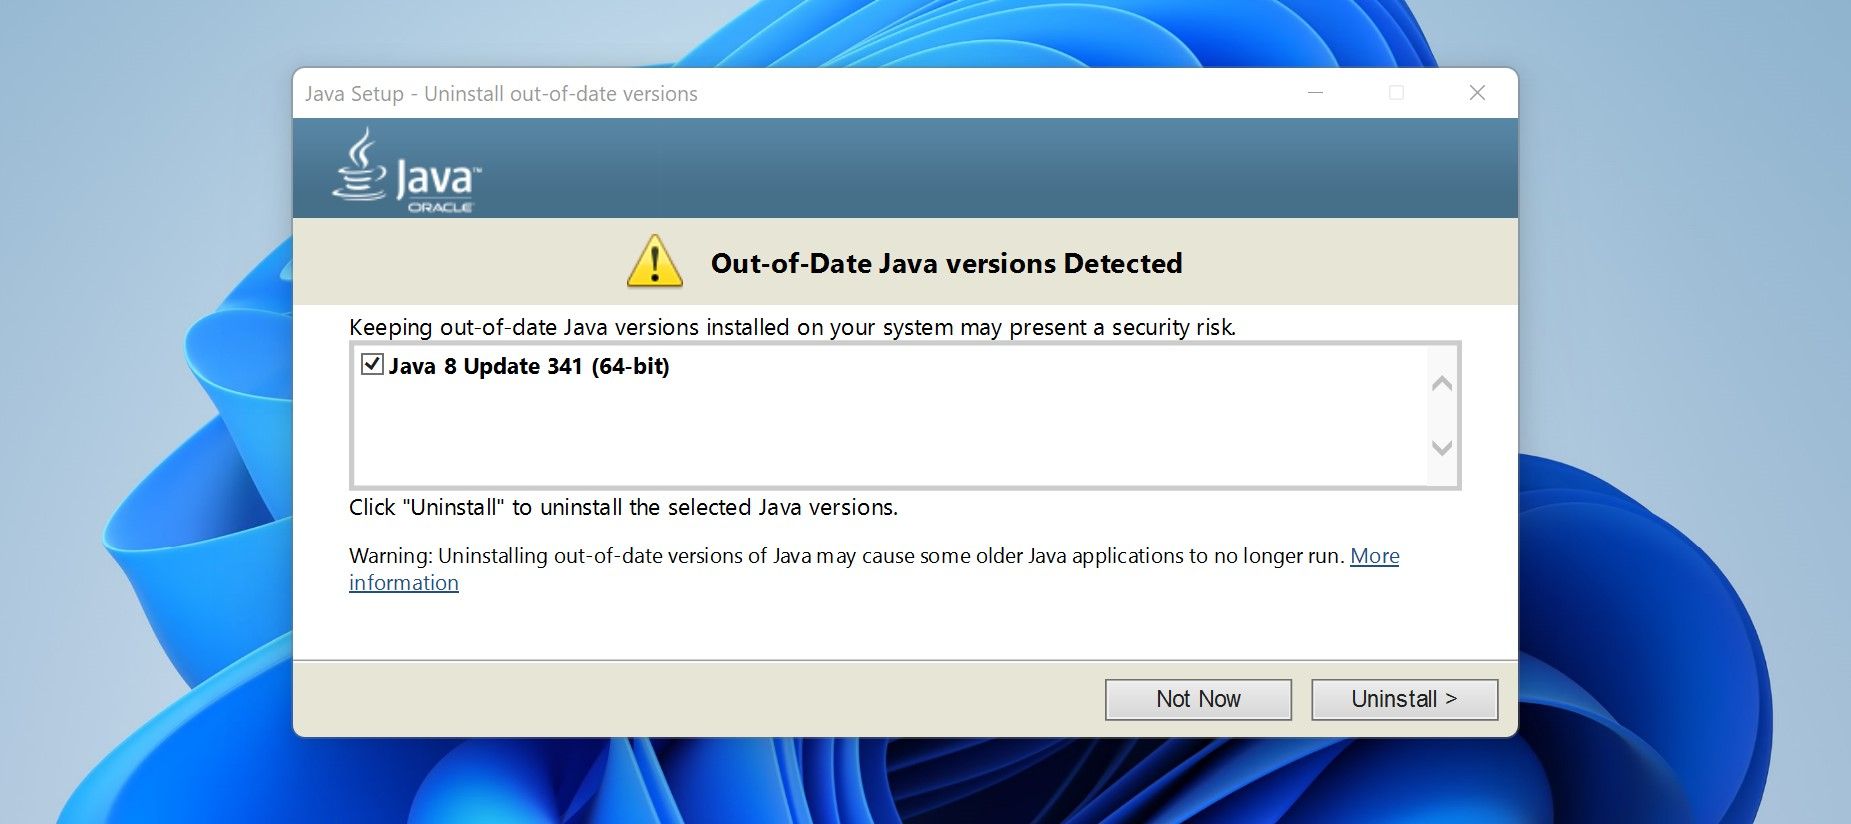
If the installation window automatically detects an old Java version, uninstall it by clicking Uninstall.
Play Minecraft Smoothly Again on Windows
Launching Lunar Client and encountering unexpected errors can be frustrating. Hopefully, the above fixes will help you pinpoint the root cause of the «Failed to launch Lunar Client: Java launch failed» error and resolve it. If none of the fixes resolve the issue, you may have to uninstall Lunar Client and reinstall it.
Download Windows Speedup Tool to fix errors and make PC run faster
Some PC gamers may get the error prompt stating Your game failed to launch when trying to start a game via the EA app on their Windows 11 or Windows 10 gaming PC. This post provides the most suitable solutions to the issue.

Your game failed to launch
An error on our end caused your launch to fail. Try again a little later.
If you get the Your game failed to launch error message when you start a game via the EA app on your Windows 11/10 gaming rig, then the following suggestions we have provided below in no particular order should help you resolve the issue on your system.
- Check EA servers
- Allow the game executable file via the Firewall
- Repair the game in the EA Desktop app
- Clear the EA app cache
Let’s look at the description of the process as it relates to each of the listed solutions.
1] Check EA servers
As indicated on the error prompt an error on our end has caused your launch to fail, to begin troubleshooting the Your game failed to launch error that occurred on your Windows 11/10 gaming rig, you can check if the EA servers are down or not at DownDetector. If the EA servers are up and running and there are no outage reports but you keep getting the same error, then you can continue with the next solution.
If however, the servers are indeed down or offline, possibly for maintenance (you can contact EA support to confirm), then there’s nothing much you can do but wait it out for the game servers to be back online.
2] Allow the game executable file via the Firewall

If you are running Windows Defender Firewall, then you can follow the steps in the post on how to allow or block a program in Windows Firewall of Windows 11/10 to allow the game that is failing to launch on your gaming rig its executable (.exe) file through the Firewall.
If you have third-party security software with its native firewall or a dedicated firewall installed and running on your gaming rig, then you can refer to the product/user manual for how to perform similar tasks.
Read: FIFA 21 won’t launch EA Desktop on PC
3] Repair the game in the EA Desktop app

The default launcher for EA games is EA Desktop. Use the Repair tool of the EA Desktop software to fix any EA game, including The Sims 4. The Repair feature is comparable to Steam’s Verify game file integrity feature. Corrupt game files are found and fixed.
Do the following:
- Open the EA Desktop app.
- Click My Collection.
- Click on the three dots on the problematic game and choose the Repair option.
Alternatively, you can verify the integrity of the game files for the game that has failed to launch on Steam by following these steps:
- Open Steam.
- Go to Library.
- Right-click on your game.
- Select the Properties option.
- Move to the LOCAL FILES tab.
- Press the VERIFY INTEGRITY OF GAME FILES button.
Wait until the repair process is complete. After that, restart the EA Desktop app, and you’ll notice that you are no longer facing any problems with the game. Otherwise, proceed with the next solution.
4] Clear the EA app cache

The EA app cache can be cleared to resolve common problems. Those issues include, but aren’t limited to:
- The EA app being stuck in offline mode or not updating itself
- Games not downloading
- Game downloads or updates are stuck on a certain percentage or on “Waiting for download”
- Games that seem to be “missing” from your EA app Library.
To perform this task, follow these steps:
On the hamburger menu in the far-left corner of the EA app, select Help > App recovery > CLEAR CACHE. If you can’t open the EA app, click Start > EA > App Recovery > CLEAR CACHE.
Hopefully, this helps!
Related: Your files need repairing EA app error
Why couldn’t I launch my game EA app?
The following possibilities may apply if the EA app won’t let you start games: a faulty EA app – It’s possible that you won’t be able to start anything from this platform if the EA app somehow becomes corrupted. Having issues with the game files – another possibility is that the items you’re trying to launch have some problems.
Do I have to use the EA app instead of Origin?
No. The EA app should be able to launch the games you’ve downloaded through Origin. You can contact EA Support if you discover that any of your games, DLC, or other content is missing from the EA app so you can be assisted in fixing the problem.
Read next: Fix The Sims 4 not opening or launching on Windows PC.
Obinna has completed B.Tech in Information & Communication Technology. He has worked as a System Support Engineer, primarily on User Endpoint Administration, as well as a Technical Analyst, primarily on Server/System Administration. He also has experience as a Network and Communications Officer. He has been a Windows Insider MVP (2020) and currently owns and runs a Computer Clinic.
Примечание. Следующая статья поможет вам: 6 хитростей, чтобы решить проблему Smite Failed to Launch

Смайт не удалось запустить является распространенной проблемой, о которой сообщают различные игроки. По словам геймеров, при запуске игра вылетала и перестала отвечать на их устройствах.
Итак, в этом уроке вы узнаете, как исправить проблему с запуском Smite.
Чтобы Smite не запускался в Windows, мы рекомендуем инструмент Advanced System Repair:
Это программное обеспечение — универсальное решение для исправления ошибок Windows, защиты от вредоносных программ, очистки от нежелательной почты и оптимизации вашего ПК для достижения максимальной производительности за 3 простых шага:
- Скачать расширенный инструмент восстановления системы получил оценку «Отлично» на TrustPilot.
- Нажмите Установить и сканировать сейчас для установки и сканирования проблем, вызывающих проблемы с ПК.
- Далее нажмите на Нажмите здесь, чтобы исправить все проблемы сейчас для эффективного исправления, очистки, защиты и оптимизации вашего ПК.
Smite — бесплатная игра, выпущенная для всех ведущих платформ, таких как ПК, Playstation, Xbox и Nintendo Switch и является очень популярной игрой в сообществе MOBA.
Но недавно многие игроки сообщили, что сталкиваются с проблемами при запуске на своих устройствах, таких как Steam и Windows 10 и 11, поэтому ниже вы найдете возможные решения, чтобы обойти проблему с запуском Smite.
Прежде чем перейти непосредственно к исправлениям, важно проверить возможные причины, по которым Smite дает сбой и не запускается на вашем устройстве.
Итак, без дальнейших церемоний, давайте начнем ..!
Итак, это общие виновники проблемы, теперь следуйте приведенным ниже решениям по устранению неполадок, чтобы решить проблему.
Как исправить проблему с запуском Smite?
Решение 1. Проверьте системные требования
Smite — довольно тяжелая игра, и для ее запуска требуется хороший компьютер, поэтому сверьтесь со спецификациями вашей системы с минимальными системными требованиями игры. Системные требования игры указаны ниже:
Теперь, если все выглядит хорошо, но по-прежнему не удается запустить, проблема должна быть в чем-то другом, поэтому попробуйте следующее решение.
Решение 2. Обновите графический драйвер
Производители видеокарт часто обновляют драйверы, чтобы их карты были совместимы с последними играми. А если вы используете устаревшие графические драйверы, то это конфликтует с файлами игры и не позволяет им установить соединение с игровым сервером. Поэтому рекомендуется обновить графические драйверы. Чтобы обновить графические драйверы, следуйте приведенным ниже инструкциям:


Вы также можете легко обновить графические драйверы с помощью Средство обновления драйверовэто автоматический инструмент, который при однократном сканировании обнаруживает и обновляет целые системные драйверы, не выполняя никаких трудоемких ручных действий.
Получите инструмент Driver Updater для автоматического обновления драйверов графического процессора.
Решение 3. Проверьте целостность файлов игры.
Эта проблема может возникнуть, если файлы игры повреждены или отсутствуют. Так что рекомендуется проверять целостность файлов игры через клиент Steam. Для проверки целостности файлов игры следуйте приведенным ниже инструкциям:

Решение 4. Отключите Защитник Windows и сторонний антивирус, а также добавьте игру и Steam в белый список.
Часто Защитник Windows и сторонние антивирусы блокируют игры и приложения, считая их угрозами. Поэтому рекомендуется отключить антивирус и Защитник Windows и проверить, решена ли проблема с запуском игры Smite.
Следующий белый список игра и клиент Steam так что ваш компьютер может быть в безопасности, и вы можете наслаждаться игрой. Чтобы отключить Защитник Windows, следуйте инструкциям, приведенным ниже:


Отключить сторонний антивирус и добавить игру в исключение


Если этот метод не работает для вас, попробуйте следующий метод.
Решение 5. Удалите обновления Microsoft Visual C++.
Некоторые игроки сообщали на игровых форумах, что последнее обновление Microsoft Visual C++ вызывает эту проблему. Таким образом, вы можете удалить обновления и попробовать. Чтобы удалить обновления, следуйте приведенным ниже инструкциям:

Теперь запустите игру и проверьте, не удалось ли запустить Smite, проблема с игрой решена или нет.
Если этот метод не работает для вас, перейдите к следующему.
Решение 6. Переустановите игру.
Если ни один из способов, упомянутых выше, не помог вам, рекомендуется переустановить игру через Steam (на этот раз убедитесь, что вы устанавливаете ее на SSD, чтобы повысить производительность). Чтобы переустановить игру, следуйте приведенным ниже инструкциям:

Теперь проверьте, не удалось ли запустить Smite, проблема с игрой решена или нет.
Лучший способ оптимизировать производительность игры на ПК с Windows
Многие игроки сталкиваются с такими проблемами, как сбой игры, зависание или заикание во время игры, а затем оптимизируют игровую производительность, запустив Ускоритель игры.
Это ускоряет игру за счет оптимизации системных ресурсов и предлагает лучший игровой процесс. Не только это, но и решение общих игровых проблем, таких как лаги и проблемы с низким FPS.
Получите Game Booster, чтобы оптимизировать производительность игры
Вывод:
Вот и все, что касается нашей проблемы с запуском Smite.
Здесь я изо всех сил старался перечислить все возможные решения для устранения проблемы с запуском Smite.
Попробуйте упомянутые решения одно за другим и решите проблему в вашем случае. Я надеюсь, что одному из наших решений удалось решить проблему в вашем случае.
Кроме того, иногда из-за внутренних ошибок и проблем ПК вы начинаете сталкиваться с проблемами при запуске любой игры, поэтому здесь предлагается просканировать ваш ПК с помощью Инструмент для ремонта ПК. Этот многофункциональный инструмент сканирует весь ваш ПК, обнаруживает проблему и устраняет различные проблемы с ПК.
Не стесняйтесь поделиться своими мыслями об этом посте на нашем Фейсбук а также Твиттер страницы. Не забудьте поставить лайк и поделиться статьей.
Удачи..!