bleskin

Загрузка
27.12.2018
1591
Доброго времени суток!
Принтер стал выдавать ошибку
‘Extruder heat fail.
System stop.
Please restart machine.’
При печати модели примерно на одном и том же уровне.
Пожалуйста, помогите найти решение этой проблемы!
Ответы на вопросы
The only place in the firmware (current marlin 1.1.0_rc3) that I find that message is in temperature.cpp in the function manage_heater() and only in one part of that function:
    #if ENABLED(THERMAL_PROTECTION_HOTENDS)

      // Is it time to check this extruder's heater?
      if (watch_heater_next_ms[e] && ms > watch_heater_next_ms[e]) {
        // Has it failed to increase enough?
        if (degHotend(e) < watch_target_temp[e]) {
          // Stop!
          _temp_error(e, PSTR(MSG_T_HEATING_FAILED), PSTR(MSG_HEATING_FAILED_LCD));
        }
        else {
          // Start again if the target is still far off
          start_watching_heater(e);
        }
      }

    #endif // THERMAL_PROTECTION_HOTENDS
The start_watching_heater(e) function resets watch_target_temp[e] and watch_heater_next_ms[e] to the next interval using the current time in milliseconds plus WATCH_TEMP_PERIOD and current temperature plus WATCH_TEMP_INCREASE so it’s pretty straight forward: while the heater is warming up, it must see at least WATCH_TEMP_INCREASE degrees in WATCH_TEMP_PERIOD time or it shuts it all down.
I’ve only encountered this when my extruder is mostly warmed up from say a manual heatup, then I start a print job and it since I’m close to the setpoint already, id doesn’t see WATCH_TEMP_INCREASE rise in temperature. This probably has to do with the hysteresis and residency time being a little off when your near the setpoint already.
Loading
If you’re a regular 3D printing user, you’ve probably encountered the E1 Heating Failed error at least once while printing. It can sometimes be a bit difficult to troubleshoot this issue. That is why I decided to write this article to help you know some of the best fixes.
To fix E1 Heating Failed on a 3D printer, ensure enough power is delivered to your printer, insulate the heat block, and set the correct voltage for the power supply. Repair and replace loose, damaged wires in the hotend; if that doesn’t work, PID-tune your printer.
This is an overview of some of the possible fixes to this problem. I am going to go into more details, so please continue reading to find out more.
The E1 Heating Failed error normally occurs when your printer’s extruder cannot reach the desired temperature. You will experience it when heating up your nozzle or before you start printing.
Here are some of the best ways to fix E1 Heating Failed on a 3D printer:
- Ensure enough power is delivered to your printer
- Set the voltage switch correctly
- Tighten, repair, or replace loose or broken wires at the hot end or mainboard
- Put the silicone sock/ heat block cover back on
- PID tuning
- Replace the thermistor and heater cartridge
- Update the firmware or install a different one
- Clean the heat block with a metal toothbrush
1. Ensure Enough Power is Delivered to Your Printer
The first thing you should do to fix E1 Heating Failed issues is to ensure enough power is delivered to your printer from the power outlet. If the power being delivered is not enough, it will trigger the E1 Heating Failed error.
Ensure your power cable is connected securely to the printer and power outlet. If your 3D printer is sharing the power outlet with other devices that consume much power, unplug them temporarily or connect the printer to a different power outlet.
One user said they got a Heating Failed Print Failed error in the middle of their print. He noticed the printer was not receiving enough power from the outlet since his power cord was too thin.
Furthermore, he has too many electronics connected to the power outlet. To fix the issue, he tried a different outlet dedicated to the 3D printer only, and it worked fine since then.
Another user said they got an E1 Heating Failed error on his printer. After troubleshooting, he discovered there wasn’t enough power going into his heating cartridge. He used a tiny Allen key to turn the screw that increases the voltage the power supply sends to the printer, and that fixed it.
He cautioned that if you’re not using a multimeter when turning the screw, you should only turn the screw a tiny amount, or you could overload the printer. He linked a video explaining where the screw is located and how to turn it.
2. Set the Voltage Switch Correctly
Another way you can fix E1 Heating Failed is to set the voltage switch correctly. If your printer’s Power Supply Unit (PSU) has a voltage switch, try to adjust it to match the voltage requirements of your printer.
If the voltage switch is not set correctly, your 3D printer will receive the wrong amount of power, leading to heating problems and the E1 Heating Failed error. Also, double-check that your printer’s voltage matches your region’s power supply.
This is usually indicated as a range, for example, 110-220V AC for the Ender 3. If they don’t match, carefully adjust the voltage switch to the required setting based on your region’s power supply.
One user said they ran into a Heating Failure issue while printing with a new Ender 3 Pro, only to realize that they had set the voltage switch on the power supply to 230V instead of 115V.
After switching it back to 115V, the printer ran smoothly at 215°C for the nozzle and 60°C for the bed. This fix worked for several other Creality users facing the same problem.
Another user said his Ender 3 Pro had an E1 Heating Failed, E1 Printer Halted error even after PID tuning and switching to a new board. He found out that his power supply was set to 230V instead of 115V. Returning it to 115V was the solution.
3. Tighten, Repair, or Replace Loose or Broken Wires at the Hot End or Mainboard
A fairly straightforward method of fixing the E1 Heating Failed error is carefully inspecting the wiring connections at the hotend and mainboard. Look for any visibly loose, disconnected, or damaged wires.
Reseat any loose wires and ensure that they are securely connected. If you find any damaged wires, you could repair them and cover them using electrical tape. However, if they’re too damaged, just replace them with new ones.
Route the wires properly so they are not strained. Proper wiring ensures that all the heating elements function correctly and the printer reaches the targeted temperature for successful printing.
One user said that his Ender 3 Max started to show the E1 error, followed by a non-ending beep. He also noticed that the hot end temperatures on his display could not stabilize. Turns out one of the wires to the thermistor on the hot end had dislodged.
He opened the two screws on the hotend and lightly tugged around the wires. After that, he soldered the loose wires back to the thermistor, and his problem was solved.
Another user said you must always ensure that your hotend wires are firmly connected to the board if you want to fix E1 Heating Failed problems.
A user advised checking if the heat block wires are loose or broken if you have E1 Heating Failed errors. Additionally, he said that you should only hand-tighten the glass filament wires and avoid overtightening them. If any wire was broken, you could use electrical tape to fix it.
4. Put the Silicone Sock/Heat Block Cover Back On
Sometimes the silicone sock may slip off or become damaged, exposing the heat block. This can increase the heat loss rate, making it more difficult for the hotend to reach the desired printing temperature.
An exposed heat block makes it difficult to maintain stable temperatures in the hotend since external drafts can easily affect the temperature readings. This causes E1 Heating Failed errors. Cover the heat block with the silicone sock/ heat block cover to fix this issue.
Check out this 3D Printer Silicone Sock for Creality Ender 3 on Amazon.

Prices pulled from the Amazon Product Advertising API on:
Product prices and availability are accurate as of the date/time indicated and are subject to change. Any price and availability information displayed on [relevant Amazon Site(s), as applicable] at the time of purchase will apply to the purchase of this product.
A user with an E1 Heating Failed, Printer Halted issue fixed it by carefully putting the silicone heat block cover back on after realizing it was off.
Someone else commented that without the silicone sock, the hotend fan cools down the heat block too fast for the heater cartridge to keep up. This prevents the temperature from rising, causing the E1 Heating Failed error.
5. PID Tuning
PID tuning your printer can help keep the temperature steady during printing and ensure that the extruder maintains the desired temperature consistently. This helps to reduce the likelihood of an E1 Heating Failed error occurring during printing.
Nowadays, many printers come with an option to perform PID autotuning. When you PID-tune your printer, it calculates and sets the right PID values, which helps to stabilize the printing temperatures better.
One user said they ran into E1 Heating Failed errors when printing PETG at 230°C+. They fixed it by running a PID tune using Octoprint and could print without issue afterward.
Another user got an E1 Heating Failed error multiple times after updating his firmware and preheating his hotend up to 240°C.
After doing a PID AUTOTUNE from Pronterface, he found that the numbers were way off. So, he saved the new numbers in the EEPROM and updated them in the firmware to fix his issue.
A user said that PID tuning using Marlin firmware helped stop his E1 Heating Failed error. He used the M303 E0 C8 S210 command. Here is a link that he provided for the Marlin M303 command.
Check out Thomas Sanladerer’s video that explains how to use Marlin’s PID autotune.
6. Replace the Thermistor and Heater Cartridge
The thermistor and heater cartridge is responsible for measuring the temperature at the hot end and generating heat, respectively. You should replace them as soon as they become faulty or damaged to get rid of E1 Heating Failed problems.
If the thermistor is damaged, it can prevent the printer from accurately sensing the temperature to maintain a stable and consistent heat level.
On the other hand, if the heater cartridge is worn out, it may not produce enough heat to enable the hot end to reach the desired printing temperature. Replacing these components will enable you to print without heat-related interruptions.
One user said that you will need to check your thermistor or heat cartridge if you keep seeing the E1 error and, if need be, replace them. This is because they are very inexpensive and simple enough to swap out.
I’d recommend something like the 5 Pcs Creality 3D Printer NTC Thermistor from Amazon.
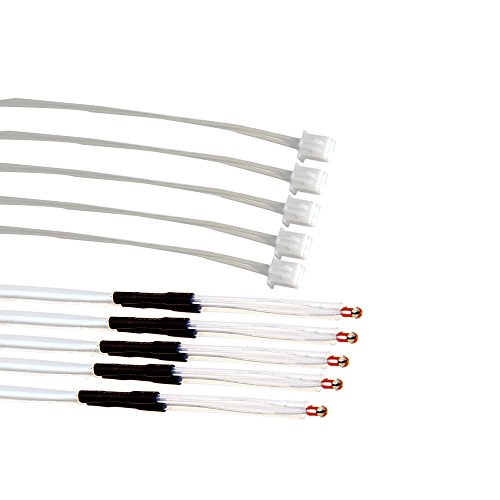
Prices pulled from the Amazon Product Advertising API on:
Product prices and availability are accurate as of the date/time indicated and are subject to change. Any price and availability information displayed on [relevant Amazon Site(s), as applicable] at the time of purchase will apply to the purchase of this product.
Check out this video explaining how to replace the thermistor for an Ender 3 3D printer.
Here is a separate video that provides a step-by-step guide on replacing the Ender 5 Plus heater cartridge. Many users got great results using the 12V 60W Heater Cartridge from Amazon.
7. Update the Firmware or Install a Different One
Updating or installing a different firmware can help to address software-related issues that may be causing the E1 Heating Failed problems.
Some older or outdated firmware versions may not have the right features to help you fine-tune your printer’s heating behavior.
Your printer may also be more compatible with a different firmware version. Installing it may enable the mainboard and heating components to communicate effectively to ensure a more controlled heating performance.
Ruiraptor shows how you can update the firmware of an Ender 3 printer in the video below.
One user said he got an “E1 Heating Failed, Printer Halted” problem when using the Creality firmware that came with the printer. However, after compiling and installing his firmware, the heating problem disappeared.
Here is a video explaining how to compile your custom firmware for the SKR Mini E3 V2.0 mainboard for Ender 3 printers.
Another user said that his Ender 3 had an issue where his temperature almost reached the target before fluctuating and beeping obnoxiously. However, the E1 Heating Failed error message stopped appearing, and things worked normally again after he downgraded from Marlin 2.0.6 to 2.0.1.
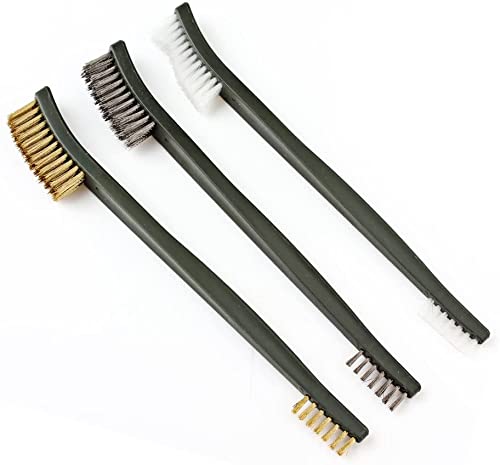
8. Clean the Heat Block with a Metal Brush
Use a clean metal brush to gently scrub the heat block to remove any buildup of dirt, filament residue, or any other debris. This is because dirt or other debris may affect heat transfer in the hot end, causing E1 Heating Failed issues.
Always ensure the printer is turned off and cooled down before cleaning the heat block. Additionally, be cautious not to damage any delicate components in the process.
A fairly simple method one user used to fix E1 Heating Failed issues on his Ender 5 Plus was by cleaning the whole heat block with a metal brush.
This Mini Wire Brush Set you can find on Amazon will do the trick.
Prices pulled from the Amazon Product Advertising API on:
Product prices and availability are accurate as of the date/time indicated and are subject to change. Any price and availability information displayed on [relevant Amazon Site(s), as applicable] at the time of purchase will apply to the purchase of this product.
-
01-31-2016, 10:29 AM
#1
- Join Date
- Jan 2006
- Posts
- 33
 Extruder error echo:heating failed
I have just finished 3D printer and trying to calibrate extruder,when I turn on extruder in Pronterface error comes up echo : heating failed, any ideas where to start. Extruder will heat up manually through LCD control panel. Is there any way I can calibrate the extruder motor without having to heat it up? Heat bed heats up using pronterface.