Оглавление
- Как устранить распространенные ошибки и неисправности на дронах DJI Mavic, Phantom или Phantom 4 PRO?
- Ошибка: «Недостаточно силы/ESC» и «Максимальная достигнутая нагрузка»
- Ошибка DJI Mavic: RTH (Return-To-Home) возвращение домой работает неправильно
- Что такое Home Point?
- Советы по полетам на квадрокоптере
- Ошибка: квадрокоптер DJI отключается и теряет связь с пультом управления
- Ошибки управления дроном вызванные смартфоном
- Дрон отключается после обновления прошивки
- Что делать теряется связь квадрокоптером во время полета?
- Приложение DJI Fly отключается при полете
- Пульт дистанционного управления отключается при полете
Квадрокоптеры от DJI — потрясающие дроны. Будь это серия Phantom, Phantom 4 PRO или Mavic и эти беспилотники будут летать годами без каких-либо проблем. Тем не менее в процессе эксплуатации могут возникать разного рода ошибки и неисправности. Среди которых встречаются разъединение, беспорядочный полет, проблемы с приложением, функция возврата (RTH) не работает или получает предупреждения и ошибки.
Всэ эти проблемы с дронами DJI требуют устранения неполадок но для этого необходимо выяснить, что произошло.
Некоторые из наиболее распространенных проблем например с Mavic Mini — это ошибка «Недостаточно силы / ESC» и «Максимальная достигнутая нагрузка». Другие проблемы включают в себя отключение от пульта дистанционного управления или приложения Fly, отлет или неправильная работа функции возврата дрона домой.
Мы рассмотрим возможные ошибки и пути к их исправлению. Некоторые из этих проблем могут быть вызваны многими переменными и зачастую их вполне устранить своими силами. Тогда как другие неисправности могут потребовать ремонта вашего дрона.
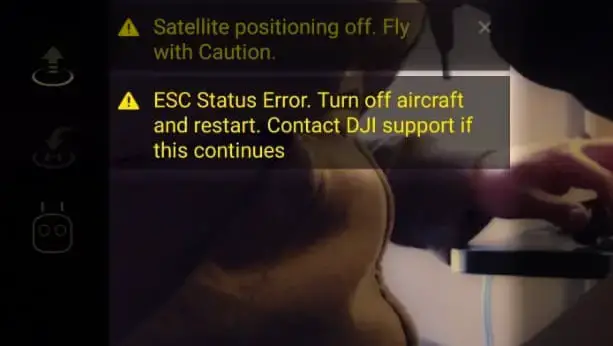
Ошибка DJI Mavic: Power Load Reched и Not Enough Force/ESC error или Недостаточно Force/ESC предупреждение или ошибка о максимальной мощности нагрузки может быть довольно опасной.
Mavic Mini может даже сбросить высоту и даже разбиться. Во многих случаях дрон будет падать и восстанавливать свою позицию. Однако если вы летите очень близко от земли, Mavic может резко упасть. Это довольно страшно и вам повезет если ваш дрон не окажется поврежден.
Есть много причин которые могут вызвать эту проблему и на момент написания у DJI не было однозначного ответа или решения на это.
Однако многие владельцы сами решили эту проблему или поняли что может являться причиной.
Предупреждение заключается в том, что дрон не получает достаточного питания и на электронных контроллерах (ESC) генерируется сообщение об ошибке.
Это сообщение указывает на проблему с ESC (электронными регуляторами скорости) и двигателями.
Проблемы с питанием могут также указывать на неисправный аккумулятор. Тем не менее от DJI по этому поводу не получилось узнать ничего определенного.
Эта проблема может быть исправлена различными способами.
Рассмотрим на примере DJI Mavic Mini.
Максимальное сопротивление ветру — это проблема возникающая из-за того что квадрокоптер летает при ветре, превышающем 28,8 км/ч, что является максимальной скоростью ветра для дрона.
28,8 км/ч — это уровень 4 по шкале Бофорта, что означает умеренный ветер. Многие из этих предупреждений недостаточной силы/ESC происходят на приличной высоте. Несмотря на то, что на земле может быть спокойно, на высоте может быть ветер который может стать серьезной помехой для полета.
Читайте: Как летать на квадрокоптере при сильном ветре: Советы
Полет на полной скорости — если вы летите на полной скорости и если есть небольшой встречный ветер, это также может привести к ошибке. Двигатели при такой ситуации работают в максимальных режимах. Ослабьте газ и посмотрите, исчезнет ли предупреждение.

Очень быстрый подъем в P-режиме. Возникает ли проблема при быстром подъеме. Если это так, то это потому, что во время полета вверх дрон сталкивается с высоким сопротивлением и контроллер полета обнаруживает это выдавая всплывающее сообщение ESC о недостаточной мощности.
Максимальная высота полета — полет на максимальной высоте или близко к ней для. По мере набора высоты воздух становиться менее плотным (это связано с тем что гравитация притягивает к себе молекулы воздуха к земле). И на большой высоте двигатели беспилотников должны работать в более интенсивном режиме чтобы удерживать беспилотник в воздухе.
Читайте: На какую максимальную высоту может подняться квадрокоптер?
Защита винтов может вызывать проблему — Снимите защитные кожухи винтов, если они прикреплены. Некоторые пилоты решили эту проблему сняв защитные винты.
Читайте: Может ли квадрокоптер долететь до космоса и прилететь обратно?
Неисправные пропеллеры. Многие дроны Mavic Mini, получившие предупреждение «Недостаточно силы / ESC» и «Достигнута максимальная мощность нагрузки» были исправлены простой заменой пропеллеров. На рынке представлено много разных пропеллеров Mavic Mini.
Изучите пропеллеры. Даже если вы не видите какой-либо ошибки, идите вперед и измените их. Они могут быть небольшим дефектом одного или нескольких пропеллеров, что даже не заметно на глаз. Эта проблема была исправлена для многих владельцев путем перехода на новый комплект пропеллеров.
Некоторые пилоты замечали что лопасть пропеллера слегка трется о дрон. Поэтому, когда Mavic Mini выключен, раскрутите винты и посмотрите, происходит ли это.
Кроме того DJI рекомендует заменять полный набор а не только 1 пропел.
Неисправная батарея — Если у вас есть запасные батареи замените и посмотрите, появляется ли предупреждение Not Enough Force или Not Enough Power / ESC. Если ошибка пропадет то это может указывать на проблемы с аккумулятором.
Полет в режиме S или P — предупреждение появляется только в режиме S или P. Это один из вопросов, который всегда задает служба поддержки DJI и может указывать на то где по их мнению существует проблема. Если это происходит только в одном из режимов это может указывать на проблему с программным обеспечением, а не с оборудованием. Выполните обновление программы.
Обновите приложение DJI Fly — убедитесь, что у вас установлена последняя версия приложения DJI Fly. Как правило с новой прошивкой многие ошибки в программном обеспечении устраняются.
Понижение/обновление прошивки — предупреждение Not Enough Force/ESC неоднократно исправлялось, сначала понижая версию прошивки а затем обновляя ее снова.
Вы можете понизить версию прошивки с помощью приложения DJI Assistant 2 на своем компьютере. Если это устраняет проблему то проблема изначально была в поврежденной прошивке.
Ошибка DJI Mavic: RTH (Return-To-Home) возвращение домой работает неправильно
Существуют различные причины неправильной работы функции Mavic Mini Return-To-Home. Например вместо возвращения в исходную точку дрон совершает аварийную посадку. Вот некоторые из причин по которым это может происходить
Что такое Home Point?
Домашняя точка по умолчанию является первым местом, где дрон получил сильные сигналы GNSS (данные о местоположении). В приложении DJI Fly App белый значок GNSS будет содержать не менее 4 белых полос. Индикатор состояния Mavic Mini быстро мигает зеленым после того, как Home Point была записана.
Домашняя точка может быть записана неправильно — с версиями прошивки, предшествующими v01.00.0400, можно было взлетать и летать со слабым сигналом GPS или при плохом освещении. Если у вас слабый сигнал GPS на взлете, то домашняя точка будет записана неправильно.
Домашняя точка будет записана, когда дрон обнаружит сильный сигнал GPS это будет означать то, что дрон вернется в другую домашнюю точку, чем в ту которую вы хотели.
В версии встроенного ПО v01.00.0400 была добавлена функция отключения взлета при слабом сигнале GPS (GPS <8) и недостаточном освещении окружающей среды. Эту функцию можно отключить вручную (требуется приложение DJI Fly v1.0.4 или новее).
Слабый или недоступный GPS. Несмотря на то что у вас может быть записана домашняя точка при взлете, ваш дрон не сможет вернуться в исходную точку, если сигнал GPS станет слабым или недоступным. Очень важно летать в местах, где сигнал GPS сильный.
Заряд батареи — Батарея разрядилась до уровня, при котором она не может позволить вернуться квадрокоптеру в исходную точку и вместо этого он будет вынужден совершить аварийную посадку.
Полет против ветра — может сильно замедлить работу любого дрона и довольно быстро разрядить аккумулятор.
Откалибруйте компас и IMU — если ваш дрон не возвращается в исходную точку, возможно он не знает своего точного местоположения из-за электромагнитных помех или у него возникают проблемы с правильным поиском глобальных спутников.
Откалибруйте компас. Несмотря на то, что IMU касается позиционирования калибровка IMU (инерциальный измерительный блок)также не является плохой идеей.
Читайте: Как правильно делать калибровку квадрокоптера?
Потерянное соединение с пультом дистанционного управления — Функция отказоустойчивого RTH автоматически активируется на многих моделях после потери сигнала пульта дистанционного управления в течение более 11 секунд. Тем не менее, это зависит от того, была ли домашняя точка была успешно записана в первую очередь.
Сильный ветер — Если дрон летит обратно в исходную точку с определенной скоростью. Если ветрено, дрон не сможет достичь конечной точки вовремя и совершит аварийную посадку.
Читайте: Как не потерять свой квадрокоптер и что делать если это случилось?
Высота над уровнем моря — если вы не летаете на открытой местности, может быть важно установить другую высоту, чем высота по умолчанию 20 метров (65,61). Полеты в местах, где есть деревья, канавы, высокие кусты и т. Д. Вы можете установить другую высоту RTH в приложении DJI Fly.
Советы по полетам на квадрокоптере
Откалибруйте компас — особенно если вы летите в новой области, которая находится на большом расстоянии от последнего места, где вы летали. Также выполните калибровку, если вы получили сообщение в приложении DJI Fly для калибровки. Обязательно откалибруйте компас после жесткой посадки и где нет физического повреждения дрону.
Не летайте — пока у вас слабый сигнал GPS.
Обновление прошивки — проверьте и обновите прошивку для дрона и пульта дистанционного управления. Кроме того, установите последнее приложение DJI Fly, когда оно станет доступным.
Электромагнитные помехи. Многие электромагнитные помехи могут вызвать проблемы с компасом квадрокоптера и возможностями полета, в том числе его точное местоположение в небе. Следите за электромагнитными помехами в той области, где вы будете летать.
Читайте: Как запускать квадрокоптер в городе с электромагнитными помехами?
ЭМП — это помехи, создаваемые одним электрическим устройством другому электромагнитными полями. Электромагнитные помехи (EMI), также называемые радиочастотными помехами (RFI) в радиочастотном спектре, представляют собой помехи, создаваемые внешним источником, который воздействует на другую электрическую цепь.
Примерами EMI являются линии электропередач, мачты сотовых телефонов, здания из армированной стали, электрические кабели, мосты, железнодорожные линии, автомобили и электрические устройства.
Ошибка: квадрокоптер DJI отключается и теряет связь с пультом управления
Существует множество причин, по которым дрон отключается и теряет связь с пультом дистанционного управления или приложением Fly.
Эти разъединения и отлет могут быть вызваны различными источниками такими как: сам квадрокоптер, пульт дистанционного управления, смартфон, планшет или EMI. Поэтому для устранения проблем с полетом необходимо рассмотреть ряд действий:
Вы не вошли в приложение DJI Fly
Когда вы устанавливаете приложение DJI Fly на свой смартфон вам будет предложено войти или зарегистрироваться. Если вы не вошли в систему дальность полета будет ограничена как по высоте, так и по дальности, пока вы не активируете свой логин. Проверьте, возможно вы просто всего вы не вошли в систему.

Если вы пропустили этот шаг после установки приложения DJI Fly, то вы можете войти в систему, нажав на профиль и затем нажав «Войти».
Заполнение Кэш приложения DJI Fly
Файлы кэша могут заполнить память и даже стать причиной ошибки. В приложении DJI Fly есть 2 настройки для настроек кеша.
- Кэш при записи
- Максимальная емкость кеша видео
При отключении полезно отключить функцию «Кэширование при записи». Вы можете найти это в Настройки> Камера> Расширенные настройки камеры. Переместите ползунок влево и выключите его.
В приложении DJI Fly есть 4 кеша, которые можно очистить;
- Видео кеш
- Фото кеш
- Музыкальный кеш
- Авиационный кэш
Вы можете очистить кэш в приложении DJI Fly, нажав «Профиль»> «Настройки»> «Очистить кэш».
Нажмите на каждый, а затем нажмите «подтвердить», чтобы очистить кэш.
Ошибки управления дроном вызванные смартфоном
Многие из проблемы с отключением дронов вызваны смартфоном или планшетом, на котором установлено приложение DJI Fly.
На смартфонах установлено множество приложений, и они постоянно работают, даже когда мы ими не пользуемся. Они постоянно подключены к Интернету, провайдеру сотовых телефонов, извлекают данные, уведомляют и пингуют сеть.
Чтобы летать на дроне без проблем, вы должны убедиться, что ваш смартфон или планшет работает оптимально.
В отношении смартфонов и планшетов рекомендуется оптимизировать использование уведомлений от различных приложений (Facebook, Twitter, Instagram, WhatsApp и т. Д.) Во время полета. Отключите обновления приложений во время полета. Удалите неиспользуемые приложения, так как они занимают пространство, память и мощность процессора.
Существуют программы для оптимизации вашего смартфона и планшета. Используйте их для оптимальной работы смартфона или планшета.
Если ваш смартфон работает неоптимально, то открытие приложения DJI Fly и запись видео во время полета может привести к большей нагрузке на процессор или заполнить его память. Если смартфон работает медленно, он может легко разорвать соединение.
Карты памяти могут быть проблемой потери связи
Отключении дрона от пульта дистанционного управления или приложения DJI Fly может возникнуть от проблем, вызванных картой памяти micro SD.
Эти карты micro SD могут быть повреждены физически или файловая система может быть повреждена на карте. Даже видео или фотография могут испортиться на микро SD-карте.
Читайте: Обзор лучших карт памяти: SD, microSD, XQD и CF как выбрать?
Если вы используете карту памяти micro SD для чего-то другого или на ней есть другие файлы и папки то при установки ее в дрон это может вызвать проблему при попытке записи на нее. Карта micro SD все еще может работать, но ее работа будет не идеальна и может вызывать помехи в работе квадрокоптера.
Выньте карту micro SD и попробуйте летать без нее.
Если вы не отсоединились, значит, проблема в карте памяти micro SD. В настройках камеры приложения DJI Fly вы можете отформатировать карту micro SD.
Перед форматированием карты памяти может потребоваться скопировать существующую информацию (файлы, фотографии и видео) с карты на компьютер.
Если по-прежнему происходят разрывы после форматирования карты SD просто замените ее.
Пульт управления вызывает ошибку соединения
Проверьте свой пульт дистанционного управления. Убедитесь, что порты и кабели чистые. Грязь или пыль могут очень легко попасть в порты.
Один из самых простых способов отключить дрон от пульта дистанционного управления — удерживать его и антенну в неправильном направлении.
Чтобы получить самый сильный сигнал передачи, держите пульт там где дрон находится в небе. Ваша антенна дистанционного управления должна быть направлена правильно.
Слабый сигнал или электромагнитные помехи, приводящие к отключению дрона
Если вы летите на большое расстояние, сигнал передачи будет слабее. Когда сигнал становится слабее, становится вероятным отключение вашего квадрокоптера от приложения DJI Fly или пульта дистанционного управления.
Тем не менее никогда не стоит доводить дальность полета или высоту до предельных значений.
Кроме того, полет в тумане, при дожде, очень пасмурной погоде или плохом освещении может вызвать нарушения связи и проблемы с полетом.
Дрон отключается после обновления прошивки
Проблема так же может быть вызвана неправильной установкой новой прошивки или ошибкой в ней.
Используя приложение DJI Assistant 2, установленное на компьютере подключаете дрон и возвращаетесь к более ранней версии прошивки.
После понижения версии прошивки вы должны запустить свой квадрокоптер, чтобы увидеть, решены ли проблемы с полетом. Если это так, вы можете попробовать обновить еще раз или подождать до нового обновления прошивки.

Все дроны DJI содержат регистратор полета. Информация о полетных данных, включая телеметрию, статус самолета и другие параметры, автоматически сохраняется во внутреннем регистраторе на вашем дроне DJI.
К этим данным можно получить доступ с помощью программного обеспечения DJI Assistant 2. Эта информация также может быть отправлена в DJI для устранения проблем с полетом.
Что делать теряется связь квадрокоптером во время полета?
Если пульт дистанционного управления все еще подключен и это просто приложение DJI Fly которое потеряло сигнал, выполните следующие действия;
Закройте и снова откройте приложение DJI Fly — уберите руки с пульта и дайте вашему квадрокоптеру зависнуть. Закройте приложение DJI Fly и вернитесь к нему. Существует большая вероятность, что приложение Fly снова подключится к дрону.
Приложение DJI Fly отключается при полете
Если дрон находится на достаточном расстоянии, вы можете предпринять некоторые действия для повторного подключения, пока он находится в режиме RTH. Вы можете попробовать следующее:
- Попробуйте приблизиться в направлении Mavic Mini.
- Закройте приложение DJI Fly и снова войдите.
- Остановите и запустите WiFi на вашем смартфоне.
- Перезагрузите телефон или планшет.
Пульт дистанционного управления отключается при полете
Если у вас нет управления вы не сможете управлять своим дроном, даже если сможете его увидеть. Ваш дрон должен запустить режим точки возврата Failsafe Return-To-Home, который он установил сразу после взлета.
Если дрон улетел на большое расстояние, вы можете помочь пульту дистанционного управления подключиться. Вот несколько советов.
Двигайтесь к своему квадрокоптеру, сокращая расстояние между пультом и дроном. Если вы находитесь рядом с работающим двигателем, генератором, линиями электропередачи и т. д., Это может ослабить сигнал, приводящий к отключению. Поэтому отойдите от любых помех в направлении дрона, и он может просто переподключиться.
Проверьте направление антенны пульта дистанционного управления. Направлена ли антенна в правильном направлении. Если дрон находится довольно высоко в воздухе, вам нужно изменить угол наклона пульта дистанционного управления, чтобы антенна была направлена прямо на него. Вам также необходимо изменить угол, на котором вы держите пульт дистанционного управления, если вы стоите на возвышенности и летите на дроне вниз.
Выключите и снова включите пульт — стоит попробовать, так как это займет всего несколько секунд.
Возврат к домашнему безотказному режиму — если вы летите в широком открытом пространстве без каких-либо препятствий на пути. Режим RTH вернет квадрокоптер обратно в исходную точку. Это очень полезная функция особенность.
![]() Загрузка…
Загрузка…


Содержание
- 1 Введение
- 2 Коды ошибок DJI Mini 2 и пути их решения
- 3 DJI Mini 2: Код ошибки 10001
- 4 DJI Mini 2: Код ошибки 10016
- 5 DJI Mini 2: Код ошибки 10022
- 6 DJI Mini 2: Код ошибки 10023
- 7 DJI Mini 2: Код ошибки 30007 и 30008
- 8 DJI Mini 2: Код ошибки 30047
- 9 DJI Mini 2: Код ошибки 30049
- 10 DJI Mini 2: Код ошибки 30050
- 11 DJI Mini 2: Код ошибки 30055
- 12 DJI Mini 2: Код ошибки 30060
- 13 DJI Mini 2: Код ошибки 30064
- 14 DJI Mini 2: Код ошибки 30085
- 15 DJI Mini 2: Код ошибки 30105
- 16 DJI Mini 2: Код ошибки 30168
- 17 DJI Mini 2: Код ошибки 30210
- 18 DJI Mini 2: Код ошибки 30224
- 19 DJI Mini 2: Код ошибки 30226
- 20 DJI Mini 2: Код ошибки 40002
- 21 DJI Mini 2: Код ошибки 40011
- 22 DJI Mini 2: Код ошибки 40012
- 23 DJI Mini 2: Код ошибки 40021
- 24 DJI Mini 2: Код ошибки 180016, 180030 и 180031
Введение
Ничто так быстро не выводит пилота дрона из себя, как плохая погода и коды ошибок дрона. И, если, нелётную погоду можно просто переждать, то коды ошибок могут быть чем-то большим, чем просто пережидание проблемы или надежда на то, что она разрешится сама собой. Отсутствие возможности летать из-за возникших ошибок может стать неприятностью, но когда эти коды расшифровываются, объясняются, и на первый план выходят предложения по их устранению, всё становится оптимистичнее и проще. В представленной статье мы рассмотрим возможные коды ошибок DJI Mini 2, их значение и шаги по их устранению. Для удобства поиска нужного вам кода мы расположили в содержании все коды в цифровом порядке.
Коды ошибок DJI Mini 2 и пути их решения
В процессе ознакомления с представленным перечнем кодов ошибок вы сможете заметить, что большая часть этих кодов приводит владельца к обращению в службу поддержки DJI, и как бы банально это не звучало, но таков единственный путь решения проблемы.
![]()
DJI Mini 2: Код ошибки 10001
Описание
Неисправность камеры. Требуется ремонт. Обратитесь в службу поддержки DJI за помощью.
Возможные пути решения
Единственный шаг, который можно предпринять для быстрого устранения этой ошибки, — выключить дрон и пульт дистанционного управления, затем снова запустить их и посмотреть, исчезла ли ошибка. Если нет, то обратитесь в службу поддержки DJI, где вам будет предложено отремонтировать либо заменить камеру.
DJI Mini 2: Код ошибки 10016
Описание
Камера не откалибрована. Качество изображения может быть ухудшено. Обратитесь в службу поддержки DJI за помощью.
Возможные пути решения
Для исключения данной ошибки вы можете попробовать откалибровать подвес камеры. Шаги для этого приведены ниже:
- Убедитесь, что ваш дрон находится на ровной поверхности.
- Зайдите в приложение DJI Fly.
- Найдите в правом верхнем углу 3 точки и тапните по ним, чтобы войти в системное меню.
- Коснитесь иконки камеры в левой части экрана. Это приведет вас к «Настройкам подвеса/Gimbal Settings».
- В разделе «Расширенные настройки стабилизатора камеры/Camera Gimbal Advanced Settings» выберите «Автокалибровка стабилизатора/Auto Calibrate Gimbal», затем нажмите «ОК».
- Процесс начнётся и завершится автоматически.
Если это не поможет устранить ошибку, то вам будет необходимо обратится в службу поддержки DJI, где скорее всего будет предложено отремонтировать или заменить камеру.
DJI Mini 2: Код ошибки 10022
Описание
Нет SD-карты. Вставьте SD карту.
Возможные пути решения
Это простая ошибка. Всё, что нужно сделать, это вставить SD-карту. Требуемая SD-карта должна соответствовать таким требованиям как: UHS-I Speed Class 3 или выше. О том, какая SD-карта лучше подходит для вашего дрона вы можете прочитать здесь.
DJI Mini 2: Код ошибки 10023
Описание
Неисправность SD-карты. Замените карту.
Возможные пути решения
Самый быстрый способ устранить эту ошибку — просто извлечь SD-карту, подождать минуту и снова установить её обратно. Если это не помогло, смените карту на другую. Поскольку SD-карты очень хрупкие и привередливые в работе устройства, не помешает иметь под рукой сразу несколько карт, что позволит исключить проблемы такого рода.
DJI Mini 2: Код ошибки 30007 и 30008
Описание
Нет сигнала GPS. Невозможно удерживать позицию. Летайте осторожно.
Возможные пути решения
В этом случае лучшим вариантом действий будет вернуть дрон к месту взлёта, посадить его и провести ремонт. Для решения данной проблемы потребуется ремонт или вероятнее всего замена GPS-модуля. Здесь сразу хочется напомнить о требовании разработчика всегда держать дрон в пределах прямой видимости (VLOS), так как со сломанным GPS-модулем он не только теряет возможность удерживать свою позицию в автоматическом режиме, но также может плохо отображаться на карте.
DJI Mini 2: Код ошибки 30047
Описание
Сбой инициализации барометра. Перезапустите дрон.
Возможные пути решения
Единственное, что можно сделать в данном случае, это перезапустить Mini 2 и следовать инструкциям приложения DJI Fly на экране.
DJI Mini 2: Код ошибки 30049
Описание
Ошибка модуля GPS. Перезапустите дрон.
Возможные пути решения
Выключите Mini 2 и пульт дистанционного управления, а затем запустите их снова. Если это не устранит проблему, то потребуется ремонт или замена GPS-модуля.
DJI Mini 2: Код ошибки 30050
Описание
Требуется калибровка IMU. Откалибруйте IMU.
Возможные пути решения
Вам может быть предложено откалибровать IMU. Как правило это происходит после жёсткой посадки/падения дрона, некорректного полёта и множества других причин, не указанных в коде ошибки 30050.
Примечание: Если система дрона выводит на экран код ошибки 30050, в большинстве случаев, если не во всех, при перезапуске дрона появится диалоговое окно с предложением провести автоматическую калибровку EMU модуля, в этом случае стоит согласится с подсказками и провести калибровку.
Вы можете вручную откалибровать IMU, выполнив следующие шаги:
- Зайдите в приложение DJI Fly.
- Найдите в правом верхнем углу 3 точки и тапните по ним, чтобы войти в системное меню.
- Прокрутите вниз до раздела «Датчики/Sensors».
- Выберите и тапните по иконке IMU.
- Процесс запустится автоматически и проинструктирует вас, где и когда нужно расположить Mini 2, чтобы правильно откалибровать IMU.
- Процесс займет примерно одну минуту, система дрона предупредит вас о его завершении.
DJI Mini 2: Код ошибки 30055
Описание
IMU не откалиброван. Откалибруйте IMU.
Возможные пути решения
Выполните те же действия, что и для кода ошибки 30050 (см. код выше).
DJI Mini 2: Код ошибки 30060
Описание
Ошибка компаса. Убедитесь, что рядом с дроном нет металлических или магнитных конструкций/предметов, и откалибруйте его перед использованием.
Возможные пути решения
Эта ошибка обычно возникает, если вы запускаете свой дрон дома, в непосредственной близости от крышки люка, скамейки в парке, в гараже или рядом с другими металлическими конструкциями/предметами. Если вы получили это сообщение, попробуйте переместить Mini 2 в другое место поблизости, где нет металла. Если ошибка не исчезнет, возможно, потребуется ремонт или замена подвеса камеры.
DJI Mini 2: Код ошибки 30064
Описание
Невозможно взлететь.
Возможные пути решения
Прежде всего, убедитесь, что для осуществления взлёта Mini 2 ничего не препятствует, и вы не находитесь в зоне ограничения полётов (в геозоне No Fly; например в воздушном пространстве аэропорта).
Если всё в порядке, то просто перезапустите Mini 2 и Пульт управления. Если ошибка сохраняется, проверьте наличие обновления прошивки (как это сделать — см. ниже), и если это также не устраняет проблему, то скорее всего, потребуется ремонт дрона. Зачастую при этой проблеме требуется ремонт или замена ESC модуля.
Для проверки наличия новой прошивки проделайте следующие шаги:
- Зайдите в приложение DJI Fly.
- Найдите в правом верхнем углу 3 точки и тапните по ним.
- Перейдите на вкладку ABOUT.
- Слева вы увидите Прошивка дрона/Aircraft Firmware.
- Справа от неё будет опция «Проверить обновление/Check for Update».
- Тапните по ней и следуйте подсказкам системы дрона.
DJI Mini 2: Код ошибки 30085
Описание
Ошибка подключения ESC. Требуется ремонт. Обратитесь в службу поддержки DJI за помощью.
Возможные пути решения
Эта ошибка возникает из-за проблем с самой платой ESC. Для устранения ошибки необходимо отремонтировать или заменить плату ESC, либо обратиться в службу поддержки DJI для её устранения.
DJI Mini 2: Код ошибки 30105
Описание
Ошибка навигационной системы. Перезапустите дрон.
Возможные пути решения
Простой перезапуск Mini 2 в этом случае может не сработать. Служба поддержки DJI предлагает отодвинуть дрон от любых металлических конструкций/предметов, а затем откалибровать IMU. Если проблема не исчезнет, необходимо обратиться в службу поддержки DJI.
Примечание: Если вы получили это сообщение об ошибке на новом Mini 2, прямо из коробки, это может считаться гарантийным случаем, и вам необходимо связаться со службой поддержки DJI, чтобы осуществить бесплатный обмен.
Для ручной калибровки IMU проделайте следующие шаги:
- Зайдите в приложение DJI Fly.
- Найдите в правом верхнем углу 3 точки и тапните по ним, чтобы войти в системное меню.
- Тапните по иконке IMU.
- Процесс начнется автоматически и проинструктирует вас, где и когда расположить Mini 2 для правильной калибровки IMU.
- Процесс занимает около одной минуты, система дрона сообщит вам, когда он будет завершен.
DJI Mini 2: Код ошибки 30168
Описание
Мощности дрона недостаточно. Летайте осторожно.
Возможные пути решения
Если в районе вашего полёта избыточно сильный ветер, чем обычно, это будет появляться многократно. Если это тихий день без порывов ветра, эта ошибка может указывать на что-то более проблематичное. Например это сообщение может быть связано с тем, что срок службы батареи приближается к концу, а также это может свидетельствовать о неисправном ESC.
DJI Mini 2: Код ошибки 30210
Описание
Оборудование системы питания. Перезапустите дрон.
Возможные пути решения
Для исправления этой ошибки попробуйте перезапустить дрон и пульт управления. Если это не сработает, то следующим предлагаемым шагом будет проверка и установка обновленной прошивки (для дрона, аккумулятора и пульта). Разработчик рекомендует делать это там, где есть подключение к интернету.
DJI Mini 2: Код ошибки 30224
Описание
Несовместимая версия прошивки.
Возможные пути решения
Чтобы локально устранить это сообщение об ошибке, необходимо предпринять несколько шагов:
- Убедитесь, что на Mini 2 установлена последняя версия прошивки (Подробно об этом в коде ошибки выше 30064).
- Убедитесь, что все запасные батареи также имеют актуальную прошивку.
- Очистите кэш прошивки в приложении DJI, выполнив следующие действия: Перейдите в ПРОФИЛЬ/PROFILE ⇒ нажмите Настройки/Settings ⇒ затем Очистить кэш/Clear Cache.
- После этого перезапустите дрон и приложение DJI Fly.
- Если это было сделано, но вы всё ещё получаете ошибку: Переустановите приложение DJI Fly.
Если эти шаги не помогли, то вам необходимо отправить дрон в DJI для обслуживания.
DJI Mini 2: Код ошибки 30226
Описание
Запуск не удался. Перезапустите дрон и приложение DJI Fly.
Возможные пути решения
Это ещё одна из тех ошибок, когда требуется полный перезапуск дрона, пульта и приложения DJI Fly, после чего приложение проведёт вас по шагам, необходимым для исправления ситуации.
DJI Mini 2: Код ошибки 40002
Описание
Подвес заклинило. Проверьте, снят ли транспортировочный чехол подвеса и может ли он свободно вращаться.
Возможные пути решения
Эта ошибка обычно возникает, если не снять транспортировочный чехол подвеса перед запуском дрона. Дело всё в том, что когда мы запускает дрон, система дрона запускает самокалибровку подвеса, которая подразумевает его движение в различных направлениях. Соответственно, если не снять чехол, то он будет препятствовать этому процессу. На более ранних DJI моделях (в частности у Mavic Pro), такого системного предупреждения не было, что в конечном итоге зачастую приводило к выгоранию моторов подвеса и дорогому ремонту.
Тем не менее, даже с учётом системного уведомления, такая многократная блокировка подвеса может привести к аналогичному выгоранию приводов, что в последствии сделает дрон бесполезным. Поэтому лучшее решение в данном случае — выработать привычку снимать транспортировочный чехол перед каждым полётом.
DJI Mini 2: Код ошибки 40011
Описание
Ошибка калибровки подвеса. Перезапустите дрон.
Возможные пути решения
Несмотря на то, что первым вашим желанием может быть перезапуск дрона, правильным способом устранения этой ошибки является калибровка подвеса. Если калибровка подвеса не помогла и вы по-прежнему получаете ошибку, попробуйте перезапустить дрон. Если и это не помогло, вам потребуется замена подвеса.
Для калибровки подвеса проделайте следующие шаги:
- Убедитесь, что ваш дрон находится на ровной поверхности.
- Зайдите в приложение DJI Fly.
- Найдите в правом верхнем углу 3 точки и тапните по ним, чтобы войти в системное меню.
- Коснитесь иконки камеры в левой части экрана. Это приведет вас к «Настройкам подвеса/Gimbal Settings».
- В разделе «Расширенные настройки стабилизатора камеры/Camera Gimbal Advanced Settings» выберите «Автокалибровка стабилизатора/Auto Calibrate Gimbal», затем нажмите «ОК».
- Процесс начнётся и завершится автоматически.
DJI Mini 2: Код ошибки 40012
Описание
Не удаётся подключиться к подвесу камеры. Требуется ремонт. Обратитесь за помощью в службу поддержки DJI.
Возможные пути решения
В этом случае вам потребуется замена подвеса. Первостепенно вы можете обратиться в службу поддержки DJI (рекомендуется). Либо вы можете отнести свой дрон в местную мастерскую по ремонту дронов. Последним вариантом выступает самостоятельная замена подвеса, благо на YouTube есть наглядные видеоинструкции, в которых рассказывается и показывается как проводится такого рода ремонт.
DJI Mini 2: Код ошибки 40021
Описание
Ошибка данных IMU подвеса камеры. Обратитесь в службу поддержки DJI за помощью.
Возможные пути решения
Необходимо отремонтировать или заменить GPS модуль. Первостепенно вы можете обратиться в службу поддержки DJI (рекомендуется). Либо вы можете отнести свой дрон в местную мастерскую по ремонту дронов. Последним вариантом выступает самостоятельная замена GPS-модуля, благо на YouTube есть наглядные видеоинструкции, в которых рассказывается и показывается как проводится такого рода ремонт.
DJI Mini 2: Код ошибки 180016, 180030 и 180031
Описание
Ошибка сенсора. Обратитесь в службу поддержки DJI за помощью.
Возможные пути решения
Первым шагом, который может устранить ошибки, будет перезапуск дрона и пульта. Если это не поможет, значит, сенсоры сломаны и их необходимо заменить. Обратитесь в службу поддержки DJI (рекомендуется), либо стороннюю мастерскую БЛА.
Надеемся, что вы не столкнетесь ни с одной из этих ошибок. Однако, если вы всё же с ними столкнетесь, то согласно этой статье у вас всегда есть возможность решить проблему их возникновения без серьёзного и дорогостоящего ремонта. Всем добра! Летайте безопасно!

Ошибка Код 10001:
Неисправность камеры. Требуется ремонт, обратитесь в службу поддержки DJI за помощью.
При появлении этой ошибки — перезагрузите квадрокоптер. Если после перезагрузки ошибка осталась, быстрей всего проблема в аппаратной части дрона и необходима замена камеры или шлейфа камеры. Смотрите пошаговую видео инструкцию — как заменить камеру в mavic mini.
Ошибка Код 10016:
Камера не откалибрована. Качество изображения может быть хуже, обратитесь в службу поддержки DJI.
Произведите калибровку камеры согласно инструкции приложения dji, если ошибка не пропала — необходим ремонт или замена подвеса камеры. Инструкцию по замене можно найти в разделе «ремонт квадрокоптеров»
Ошибка Код 10022:
Нет SD карты. Вставьте SD карту
Проверьте SD карту, при необходимости, продуйте слот SD карты в самом квадрокоптере.
Ошибка Код 10023:
Неисправность SD карты. Замените карту.
Проверьте SD карту на другом устройстве и полностью отформатируйте, либо поменяйте SD карту.
Ошибка Код 30007 / 30008:
Нет сигнала GPS. Невозможно парить. Летайте с осторожность.
Ошибка может быть вызвана из-за находящегося по близости аэропорта или вы можете находиться в зоне взлета самолетов, в этом случае лучше вообще не взлетать. Если по близости нет объектов вызывающих помехи GPS, а ошибка по прежнему появляется, тогда необходим ремонт или замена GPS модуля. Смотрите пошаговую инструкцию как заменить gps модуль.
Ошибка Код 30047:
Барометру не удалось подготовиться к работе. Перезагрузите летательный аппарат.
Перезагрузите квадрокоптер
Ошибка Код 30049:
Ошибка модуля GPS. Перезапустите летательный аппарат.
Пере запускаем квадрокоптер, если ошибка снова появляется — замена gps модуля.
Ошибка Код 30050:
Требуется калибровка IMU. Откалибруйте IMU.
В настройках приложения dji найдите калибровку IMU и откалибруйте устройство. Если откалибровать IMU не удается, ошибка по прежнему появляется, тогда необходима замена GPS модуля, потому как IMU это часть модуля GPS.
Ошибка Код 30055:
IMU не откалиброван. Откалибруйте IMU.
Повторям все действия согласно рекомендациям к ошибке 30050.
Ошибка Код 30060:
Ошибка компаса. Убедитесь, что рядом с летательным аппаратом нет металлических или магнитных предметов, и откалибруйте его перед использованием.
Откалибруйте квадрокоптер и поменяйте место взлета, подальше от металлических конструкций или сооружений создающих магнитное поле.
Ошибка Код 30064:
Невозможно взлететь.
Убедитесь, что вы находитесь в зоне где разрешены полеты, для этого перейдите в раздел «рекомендуемые зоны» в самом приложении dji. Если вы находитесь в разрешенной зоне полета, а ошибка по прежнему осталась, попробуйте перезагрузить квадрокоптер и обновить прошивку. Если после обновления прошивки, ошибка опять появляется, стоит обратить внимание на ESC модуль который отвечает за управление всеми четырьмя моторами.
Ошибка Код 30074:
Ошибка аккумуляторной батареи. Посадите летательный аппарат и замените батарею.
Лучше всего немедленно посадить квадрокоптер и заменить батарею. При сильно изношенной батареи, ошибка может снова появляться.
Ошибка Код 30168:
Мощности летательного аппарата недостаточно. Летайте с осторожностью.
Причин возникновения этой ошибки может быть несколько:
- Чаще всего, ошибка появляться во время сильного ветра, попробуйте перевести квадрокоптер в спортивный режим.
- Может не хватать остаточного заряда батареи при попытке сопротивления дрона с сильным ветром.
- Изношенный аккумулятор. Попробуйте заменить аккумулятор и проверить, будет ли появляться ошибка снова.
- Неисправная работа ESC модуля.
Ошибка Код 30210:
Ошибка программного обеспечения. Перезапустите летательный аппарат.
Чаще всего, шибка решается банальной перезагрузкой дрона, в противном случае — обновите прошивку.
Ошибка Код 30226:
Ошибка при запуске. Перезагрузите летательный аппарат и приложение DJI Fly.
Действуйте согласно инструкции приложения DJI Fly.
Ошибка Код 30238:
Полёт на большой высоте, время торможения увеличено, время полета сокращено. Летайте с осторожностью.
Превышена допустимая дальность полета квадрокоптера, лучше вернуться обратно к пульту управления.
Ошибка Код 30239:
Низкий сигнал GPS. Летательный аппарат не может автоматически зависать и взлет ограничен. Переместитесь в окружающую среду с достаточным освещением. Разблокировка ограничений на взлет не рекомендуется.
При возникновении этой ошибки, рекомендуется поменять локацию для полета. Для поиска новой местности воспользуйтесь разделом «рекомендуемые зоны» в самом приложении DJI Fly.
Ошибка Код 40002:
Застревание подвеса. Проверьте, снята ли защитная крышка подвеса, и убедитесь, что подвес вращается свободно
Снимите защитную крышку камеры. Если ошибка появляется снова, убедитесь, что все четыре фиксатора подвеса камеры зафиксированы на корпусе квадрокоптера. Если же один из фиксаторов подвеса выпал, установите его обратно в специальное место на корпусе, как это сделать — смотрите эту видео инструкцию.
Ошибка Код 40011:
Ошибка калибровки подвеса. Перезагрузите летательный аппарат.
Пере запустите квадрокоптер и откалибруйте подвес камеры в приложении DJI Fly.
Ошибка Код 40012:
Не удается подключиться к подвесу. Требуется ремонт. Обратитесь в службу поддержки DJI за помощью
В данном случае, вероятней всего, проблема в аппаратной части подвеса. Ошибка может быть вызвана поломкой самого подвеса камеры, либо надрывом шлейфа соединяющего подвес камеры и основную плату. Для решения этой поломки необходимо разобрать квадрокоптер и проверить целостность шлейфа, а также подвес камеры на наличие повреждений. Смотрите пошаговую инструкцию — как разобрать Mavic Mini.
Ошибка Код 40021:
Ошибка данных IMU подвеса. Обратитесь в службу поддержки DJI за помощью.
Модуль IMU является частью модуля GPS, при возникновении это ошибки, быстрей всего, придется заменить модуль GPS — как заменить модуль IMU/GPS.
Ошибка Код 180016 / 180030 / 180031:
Ошибка нижнего сенсора. Ошибка сенсора. Обратитесь в службу поддержки DJI за помощью.
Для начала просто перезагрузите квадрокоптер. Если ошибка вновь появилась, высока вероятность, что сенсоры на основной плате квадрокоптера вышли из строя и нуждаются в замене.
К сожалению, вызванные ошибки не всегда являются программными. При выявлении неисправности дрона в аппаратной составляющей, пользуйтесь нашими видео инструкциями по ремонту в разделе «ремонт дронов»
Если у вас остались вопросы касательно ошибок и ремонта квадрокоптера Mavic Mini, задавайте их в комментариях. Также, если у вас есть свой опыт в ремонте и решения проблем, пожалуйста, делитесь своим опытом в комментариях ниже.


Let us diagnose. Let us repair. Let Us Drone. Flying your Phantom 4 Pro or Spark is a blast…until you start ignoring the error or warning messages, then the platonic fun turns into a rush of adrenaline fueled by rebellion because you’re choosing to fly a drone that could drop from the sky at any moment.
Okay, maybe that was a bit dramatic and over the top, but still, I hope that you don’t ignore warning messages, especially ESC warnings. Let’s go ahead and talk about DJI drone ESC’s, how they work, why they are so important, and some of the common problems and solutions we have with the ESC’s.
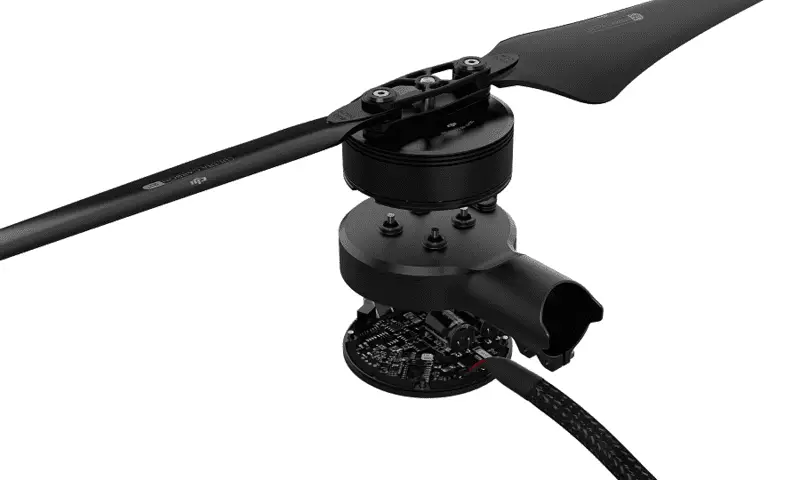
What is the ESC?
ESC stands for Electronic Speed Controller. Multi-rotor aircraft rely on speed changes of the motors for directional movements. The ESC’s are responsible for telling the motors to speed up or slow down depending on the commands given by the pilot.

Each of the four drone motors has an ESC assigned to it. When a pilot provides a stick adjustment, the command is received by the flight controller onboard the drone, which transmits the information to the electronic speed controllers which then tells the motors to speed up or slow down.
For example, if the pilot increases the height of the drone by pressing up on the left stick, more voltage is evenly sent through each of the four ESC’s which in turn speeds up the motors, increasing the height of the drone.
Another example is if the pilot presses the right stick up the nose of the drone drops down and the drone proceeds to move forward. This is because more voltage was passed through the two rear ESC’s which sped them up.

What causes ESC errors?
When you receive a ESC status error in the DJI GO 4 app it can be difficult to ascertain why it is present. To better know how to fix the problem, we need to figure out if it was a hardware or software issue that caused it in the first place.
Hardware problems
If you recently had a crash then there is a good chance that this is the cause of the ESC status error. You may not think that the crash you had three weeks ago was the reason for the ESC status error that just appeared on the app, but you may be wrong.
Problems after a crash don’t always immediately present themselves. It may take time for that wiring that was jarred loose during the crash to finally tear, or for the motor to be affected by that small piece of broken off plastic that has been rattling around.
A hard landing will be enough to sometimes jar things loose. People have often also experienced ESC errors after replacing or repairing damaged parts on their DJI drones themselves. Before ever attempting to repair or replace a damaged part on your DJI drone it is very important to first check your warranty status as taking apart your drone will void the warranty. I will talk more about the limited warranty and Care Refresh below.
Software problems
It seems like there is always some kind of update available. If it’s not a Precise Fly Safe Database Update, then it’s a firmware update for the AC or RC, or it’s an app update.
It is not unheard of for people to receive an ESC status error after updating their drone’s firmware. If you received an ESC status error after updating your firmware, try refreshing your firmware. If refreshing the firmware, try rolling it back to the previous version.
Alternatively, if there is an update available and you currently have the ESC status error message, try updating the firmware.
There have been reports of people receiving ESC status errors with their brand new DJI drone right out of the box. This may be due to a software issue or it could be a hardware problem from poor handling while in transit.
There have been reports of people receiving ESC status errors with their brand new DJI drone right out of the box.
How to fix the ESC status error
Often times you will get a “cannot takeoff” message in the status bar at the top of the screen. Tapping on that will bring up the aircraft status menu where you can view the ESC status.
![]()
Click on “ESC status” to bring up the error message. This will usually tell you which motor(s) has the ESC problem, and the message may give you guidance on what to do next. Usually, the message tells you something vague like “Restart the aircraft. If problems persist contact DJI support”.

If after restarting the drone the error message persists, try updating the firmware on your drone. If a firmware update is not available then just refresh the current firmware version. Updating or refreshing the firmware will usually eradicate the ESC status error if it’s a software issue, but hardware damage will not simply mend itself with a firmware update.
You may have luck getting rid of the ESC error by performing a firmware update, but when you place a new battery in the drone the error may come back. This is because the firmware on the new battery needs to also be flashed with the new firmware. There is no procedure to solely update the battery firmware so go ahead an perform the aircraft firmware update once more.

If the ESC board is damaged, there really isn’t a way of going around it…you’ll need a new one. Although I have yet to complete an ESC repair or replacement myself, I have seen videos and the soldering alone is enough to scare away most people.
I repaired about 1,000 iPhones and iPads during my time as a repair technician, and although I wouldn’t shy away from the chance to replace an ESC board, I certainly wouldn’t take the job lightly due to its complexity.
Unless you have soldering experience and the required tools for the job, I’d strongly suggest sending your drone in to DJI for the ESC repair.

Is your drone under warranty?
Before you think about attempting to take apart your expensive drone to diagnose what is causing the ESC status error, you should check your warranty status. Taking apart the drone will void the limited warranty that comes with the drone.
Taking apart the drone will void the limited warranty that comes with the drone.
Every DJI product comes with a limited warranty that essentially covers you against manufacturer defects, and components of the drone are warrantied for different lengths of periods. Read more about how to find out if your drone is covered by the limited in a post I wrote here.
If the ESC status error is caused by a software issue that isn’t rectified by a firmware update, I would think that DJI would replace your drone under the limited warranty program. If, on the other hand, you crash your drone into a tree and physical damage is what caused the error, your drone will not be covered under the limited warranty.
Care Refresh is an extended warranty available for purchase that covers pilots against user inflicted damage. If you have Care Refresh, you may as well send the drone to DJI and have them repair it since this is the type of thing you likely purchased the extended warranty in the first place for anyway.
Related post: DJI Care Refresh: The Ultimate Guide – DJI’s Care Refresh is a comprehensive warranty. If you chose to purchase Care Refresh when you buy a new drone, DJI will replace it with a new or like-new one up to two times in the event of your drone getting damaged.
More resources
To learn more about what DJI has to say about their ESC’s, check out this article written by DJI that is helpful and informative.
Someone spent a serious amount of time reverse engineering a DJI ESC and proceeded to make a “Handyman’s Guide to the ESC”, which he posted in a forum. The guide is incredibly detailed! Here is the link to that forum.
FAQ
What does ESC stand for?
Electronic Speed Controller.
What does the ESC do?
The ESC controls the speed of the motors which directly alters the in-flight aircraft directional changes.
Why am I receiving an ESC status error?
Hardware can be damaged during a hard landing or crash, or software glitches may be the reason for the errors.
How do I get rid of the ESC errors?
Sometimes a simple restart of the aircraft will clear the errors, and other times a firmware update/refresh will do the trick. If the ESC board is damaged, you will need to send your drone into a repair center, unless you have experience soldering and repairing electronics.
How to see which motor has the ESC error?
In the DJI Go 4 app tap on the aircraft status bar, and scroll down until you see “ESC status”. Tap on that to get a description of the error and which motor has it.
Trevor’s Take
I have not yet had the opportunity to repair or replace a motor or ESC board on a drone before, but I am tempted. When I look at instructional videos and/or guides out there on how to repair components on DJI drones I am a bit hesitant to follow them. I am by no means bashing on anyone who has put content out there in an effort to show the rest of us how to repair our drones, but it takes a whole lot of time and experience to produce quality guides on this type of thing. Not to mention the financial side of having a camera that shows the micro detail necessary to make a helpful guide.
I’m thinking about producing clear and concise instructional videos on how to perform some of the more common drone repairs. Would this be something that you guys would find helpful or would I be better off investing my time into something else? Thanks in advance for the feedback!
“ESC status error” has been an issue on DJI drones especially on the older models such as phantom 3 and spark but can happen on the newer models such as Mavic 2 pro and such, nonetheless, DJI doesn’t seem to come up with a solution.
And this error is not something you can ignore or say I will come back to it later because it can be very dangerous.
I had this problem with my spark a couple of weeks ago, few minutes into flying the drone automatically went crazy, lucky I was able to catch it, but refused to liftoff later on.
After contacting DJI, reading a bunch of forums, hours of frustration, and trying different things, I fixed it and saved myself hundreds of dollars, and so I thought I could do the same for others.
So what causes ESC status error and how do you fix it?
ESC status error can be caused by a faulty electronic speed controller or corrupted software, to fix this problem restart the drone multiple times, or refresh the firmware in DJI Assistant 2, if the error persists, try changing the ESC or send the drone to DJI for service.
When you receive an “ESC status error” it can be difficult to ascertain if it is a hardware or software issue.
However, if it is a hardware issue it is not safe to fly, because if the ESC stops sending signal to the motor while up in the sky the drone can fall down like a brick and can cause a lot of trouble! including property damage and/or cause harm to people.
And that is if the drone allows you to lift off in the first place.
However, if it is a software issue it is safer and can be resolved with a firmware refresh or a factory reset
Hardware problems
If you had a crash then there is a good chance that this is the cause of the ESC status error.
ESC status error don’t appear spontaneously after a crash, It may take time for a wire that was jarred during the crash to finally break.
after a crash wires become loosy connected, and when you land the drone after, the loose wires become detached completely.
- ESC errors can also happen after replacing or repairing damaged parts on your drone, if you had replaced a part on your drone by yourself you might have broken one fine wire which can be causing this error, so open the cover and check if there is a faulty wire.
- you can also get ESC status error on a brand new DJI drone right out of the box. This may be due to poor handling while in transit, which causes wires to get detached, in this case, DJI will get it fixed without any cost to you
Software problems
It is also common to receive an ESC status error after upgrading a drone’s firmware.
If you received an ESC status error after updating your firmware, try refreshing your firmware. If refreshing the firmware, try rolling it back to the previous version.
Alternatively, if there is an update available and you currently have the ESC status error message, try updating the firmware.
So let me explain how you can do these step by step-
1. Refresh the drones firmware in DJI assistant 2
In the best-case scenario, this problem is resolved by refreshing the drone’s firmware.
To do that-
- Power on the drone
- Connect it to your computer using the USB cable DJI provides
- Open the DJI Assistant 2 software on your laptop
- Log in to the DJI Assistant 2 app and select your drone
- Next, you will see the firmware version
- Tap update and choose the latest version
- If it is already the latest version click refresh
- Repeat process with every battery you own
you can also refresh the firmware in DJI go 4 app.
2. Update/refresh Controller Firmware
The Drone’s and the controller’s firmware must match so after refreshing or updating your drone’s firmware you should do the same for the controller.
So, to update/refresh your RC’s firmware-
- Power on the remote controller
- Connect it to your computer using a USB cable provided
- Open and log into the DJI Assistant 2 software on your laptop
- Select your drone’s remote controller
- Next, you will see the firmware version
- Tap update if you have an older version or tap refresh if it is up to date
- Click on “Start Update”
- On the next screen, you will see the firmware being downloaded, then transmitted and updating the remote controller
- At 100%, you will see the message, “Update Complete”
- After the firmware is complete, the controller will restart automatically
3. Downgrade firmware
If refreshing the current firmware doesn’t seem to work, you can downgrade the firmware till the next update comes out.
You can downgrade your firmware both in DJI assistant and DJI go 4.
To downgrade firmware in DJI assistant–
- Power on the drone
- Connect it to your computer using the USB cable
- Open the DJI Assistant 2 software on your laptop
- Log in to the DJI Assistant 2 app and select your drone
- Next, you will see the firmware version and older versions lined up
- Choose the version one below the current version you have
- Then click install
- Then the drone will automatically restart
To downgrade firmware in DJI go 4
Press and hold the menu icon (three horizontal lines in the top right corner) for five seconds and a special firmware menu appears. You can now select which previous firmware version you would like to downgrade to. Check it out.
4. Factory reset your drone and controller
Before changing the ESC to make sure it is not a software problem you are having try factory resetting the drone.
- First, Install the DJI Assistant 2 Program on your device, make sure you download the proper one.
- Connect your drone to your laptop using the USB cable provided, and wait for the software till it detects your drone
- You’ll be able to see your drone on the Connected Devices screen. Select your drone and then click on confirm.
- Click on Firmware Update. After that, you’ll be able to see the “Restore factory defaults” button.
- Click on the factory reset button and then confirm when you are asked to confirm the reset. A progress bar will pop up showing the progress of the reset. You’ll be notified when the reset is complete.
Note: After a factory reset you have to calibrate everything again.
You can also hard reset the controller
To reset the RC: Turn on the controller, the aircraft should be off. * Press C1, C2, and shutter (top right button nearest antenna) on the controller and hold for about 2 seconds or so until it beeps, then turn the controller off.”
5. Change the ESC
If none of the previous method work it mean it is not a software problem and the ESC should get replaced.
Note: by attempting to repair or replace a damaged part on your DJI drone it is very important to understand that you will void your warrenty!
Changing the ESC needs a little knowledge, and every drone is different that is why i recommend sending it to a professional to get it replaced
Final choice
If none of the methods fix it, you need to send it to a professional.
DJI care does include battery problems, so If you have DJI care there is a good chance you can get it fixed without any cost.
DJI can ask you to send the drone even if it is a battery problem
If you don’t have DJI care you might have to pay from $80 up to $200 depending on the situation
After you hand it to DJI it can take up to 15 days till they fix it and send it back to you, and it can take longer if you don’t live in the united states
If you are located in Armenia, you may contact the local dealer or DJI’s support via email to start a case and send the unit back.

#1
![]()
OFFLINE
Fixxxer
- Город:Екатеринбург
- Коптер:Mavic Pro
Отправлено 21 Февраль 2017 — 04:53
Запустил сегодня приложение DJI GO 4, оно сообщило что вышла новая прошивка и предложило обновиться не через шнур а по воздуху, ну я согласился.
Обновлялся очень долго, минут 15, в конце концов вентиляторы охлаждения отключились, а обновление остановилось на 81%. Коптер так нагрелся что кука не терпела. Я его выключил, подождал пока остынет и включил заново.
Сейчас после включения каждые секунд один из двигателей дергается и издает звук. В приложении висят 2 ошибки — надо обновить прошивку и esc status error. Двигатели заблокированы, летать нельзя.
Пытался обновить через шнур, через приложение, откатить прошивку на прошлую, ничего не получается — зависает в процессе.
Вчера еще летал отлично и проблем не было, да и до попытки прошивки ошибок никаких не было.
Что делать? Как жить дальше? Кто-то сталкивался с подобным?(
Прикрепленные изображения
-
0
#2
![]()
Отправлено 21 Февраль 2017 — 05:54
Варианта два: либо ошибка одного из регуляторов оборотов, либо один двигатель не видит.
-
0
#3
![]()
Fixxxer
- Город:Екатеринбург
- Коптер:Mavic Pro
Отправлено 21 Февраль 2017 — 06:25
Двигатель вроде видит — он при включении чуть поворачивается как все остальные. И пока непонятно проблема программная или аппаратная.
Может там расплавилось что-то когда он перегрелся пытаясь прошиться, странно просто что до прошивки все работало.
Только разбирать смотреть?
-
0
#4
![]()
Отправлено 21 Февраль 2017 — 06:43
Fixxxer, делайте обновление через компьютер а не по воздуху. попробуйте загрузить предыдущую прошивку.
о чем говорит ошибка esc error я вам сказал. если там что то и расплавилось то насквозь естественно не увидите
-
0
#5
![]()
Laleniko
-

- Пользователи
-
- 7 сообщений
Начинающий летчик
- Город:Москва
- Коптер:Dji mavic
Отправлено 21 Февраль 2017 — 08:28
А зачем отключили коптер в процессе обновления? Последняя прошивка прошивается долго — 20-25 минут на вскидку. Висит процесс прошивки как раз на 81% с отключённым вентилятором. Видно калибрует что-то.
-
0
#6
![]()
N00B
- Город:Moscow
- Коптер:Небесный Нубас
Отправлено 22 Февраль 2017 — 01:05
Попробуйте с другой картой памяти, предварительно форматируйте её на ПК. У меня такое в автомобиле было, флэшка нагревалась в процессе чтения и переставала читаться, как выяснилось
-
0
#7
![]()
Fixxxer
- Город:Екатеринбург
- Коптер:Mavic Pro
Отправлено 22 Февраль 2017 — 08:03
выключил, потому что он нагрелся до такой температуры, что пластиком начал пахнуть, и я имел ввиду что 15 минут он висел на 81% а с начала обновления уже прошло минут 30, да и пульт его перестал видеть.
флешку другую не пробовал, но родную пробовал форматировать и заново прошивать
Добавлено позже (22 Февраль 2017 — 17:03)
либо ошибка одного из регуляторов оборотов, либо один двигатель не видит.
двигатель вроде видит: он двигается при начальной диагностике — на видео виден процесс, ругается он на правый.
Сообщение отредактировал Fixxxer: 22 Февраль 2017 — 03:45
-
0
#8
![]()
ВОЕВОДА
-
- Пользователи
-
- 33 сообщений
Начинающий летчик

- Город:Губкинский, ЯНАО
- Коптер:MAVIC PRO
Отправлено 07 Март 2017 — 08:01
У меня после падения тоже выдает ошибку третьего двигателя…
Но при запуске дрона все движки тоже дергаются…или плата управления или одна из обмоток прогорела, их там две…
Решил проблему покупкой второго мавика….а с ошибкой на запчасти….
-
0
#9
![]()
Отправлено 07 Март 2017 — 10:08
Fixxxer, вы включаете коптер с фиксатором на подвесе? не понимаю для кого вообще пишут инструкции. скоро помимо двигателей останетесь и без моторчиков подвеса, если уже не остались
-
0
#10
![]()
НиколаичСПб
- Город:Кировск
- Коптер:MavikcPro, Samsung Galaxy Note 5
Отправлено 09 Июнь 2017 — 11:18
Люди, ау! Обновляю сегодня купленный Мавик. Асистент остановился с надписью загрузка 100%. И в такой позиции уже с полчаса находится! Теперь и дрон отключить боюсь, и приложение остановить! Что делать?
-
0
#11
![]()
olegnsk
-
- Модераторы
-
- 7 702 сообщений
Опытный летчик АС

- Город:Москва, исторически Новосибирск и Камчатка
- Коптер:младшенький Mavic и ещё небольшая эскадрилья
Отправлено 09 Июнь 2017 — 11:33
НиколаичСПб, Отключайте, вариантов нет. Вероятно всё будет нормально. Только ЗАЧЕМ вы сразу после покупки начали обновлять??!!
Изучить всю мат часть, полетать а далее почитав форум (т.к. далеко не все сразу стремятся вставить самую верхнюю прошивку) решать надо или нет.
-
1
#12
![]()
НиколаичСПб
- Город:Кировск
- Коптер:MavikcPro, Samsung Galaxy Note 5
Отправлено 09 Июнь 2017 — 11:39
olegnsk, Я как раз не собирался ставить верхнюю. Сейчас стоИт 1.3.4, хотел поставить следующую. Обновляю, т.к. дрон требует. Там для моего уже штук пять предлагается! Выключил, и правда, ничего не случилось. Может следующую попробовать?
Попробовал. Тоже самое, нихрена не вышло с прошивкой. Но по крайней мере Мавик не превратился в кирпич, и это радует!
Сообщение отредактировал НиколаичСПб: 09 Июнь 2017 — 11:55
-
0
#13
![]()
olegnsk
-
- Модераторы
-
- 7 702 сообщений
Опытный летчик АС
- Город:Москва, исторически Новосибирск и Камчатка
- Коптер:младшенький Mavic и ещё небольшая эскадрилья
Отправлено 10 Июнь 2017 — 12:01
НиколаичСПб, дрон не требует, а просит, принудительных обновлений на моей скромной памяти было всего 2-3 раза на продукцию DJI.
400-я нормальная прошивка летайте и радуйтесь. Хотя это личное дело каждого, также как обновлять операционную систему на ПК или нет. У меня один из ноутов до сих пор сидит на Винде ХР и свои функции отлично выполняет.
-
2
#14
![]()
vladsvs
-
- Пользователи
-
- 49 сообщений
Начинающий летчик

- Город:Россия
- Коптер:Mavic Pro
Отправлено 15 Октябрь 2017 — 03:38
Супер дрон с конченным обновлением. Обновлял два раза и два раза в ужасе. Он тупо не обновляется, потом приходится колдовать чтобы это дерьмо обновилось. Тут где то обсуждали. Чтобы корректно обновить его в момент обновления, когда он типо сам пытается перезагрузиться надо принудительно выключать и самому включать. Во второй раз только это помогло обновиться. Жесть короче. Китай есть Китай
-
0
#15
![]()
yurikss
-
- Модераторы
-
- 1 615 сообщений
Опытный летчик АС

- Город:Москва
- Коптер:Мэвик 1,2
Отправлено 15 Октябрь 2017 — 04:04
Супер дрон с конченным обновлением.
Просто с каждым новым коптером от джидайцев надо знать когда остановиться.
Первые прошивки исправляют косяки,последующие добавляют гемороя.
-
0
#16
![]()
RomanSimfer
- Город:Симферополь
- Коптер:MINI2
Отправлено 26 Август 2018 — 11:05
Возможно, кому-то поможет.
Если Мавик превратился в кирпич. Не шьётся, комп не видит.
Откатил на V01.03.0900 с помощью DUMLdoreV3, снял ограничения, всё работало ОК. Имейте ввиду, как мне показалось, DUMLdoreV3 в коптер зальёт что угодно, хоть текстовый файл, хоть фото тёщи, и дрон станет кирпичём.
Была проблема, что коптер плюхался при посадке, точная посадка не работала.
Заливаю с пом. DUMLdoreV3, чисто для интереса, V01.03.0900 и V01.04.0100 без модулей 305 и 306. Просто проверить, может типа там лучше 
Что-то пошло не так, возможно скачался архив с ошибкой или х.з.
Обновление прошло быстро, на 100%, но коптер сам не перезагрузился. Подождал минут 5. Программу DUMLdoreV3 закрыл. Коптер выключил.
Затем при включении, камеру крутит (как обычно), но мелодии нет, огни красным, не мигают, пульт не видит. Вентилятор не включается, греется как утюг. При подключении к компу — каждые 2 секунды звук Винды, то есть коннект, то нет. DJI Assistant 2 — коптер не видит. DUMLdoreV3 — коптер не видит.
Капец!
Запасаемся БОЛЬШИМ терпением.
Подключаем по USB.
Запускаем DUMLdoreV3, на готове держим проверенную рабочую прошивку.
Коптер стоит, подключенным и греется. Далее шаманство. Включаем его, выключаем, не доводим до того, чтобы начал плавится пластик, даём остыть, снова включаем, вытаскиваем-вставляем USB, снимаем батарею, снова включаем. Всё хаотично. Логики никакой! Рано или поздно происходит чудо. У меня чудо произошло примерно через полчаса — час шаманства. На коптере загудит вентилятор и DUMLdoreV3 его увидит. Кричим — Аминь! И как можно быстрее, заливаем софт.
Я залил предыдущую V01.03.0900. Пульт увидел, всё заработало как и всегда.
Снимаю батарею с коптера, заряжаю, через час включаю — опять не коптер, а горячий кирпич. Комп не видит!
Снова тот же Капец!
Полчаса шаманства и опять — есть коннект!
Снова заливаю V01.03.0900 с пом. DUMLdoreV3. Затем, тут же, пока всё работает, залил через DJI Assistant 2 последнюю V01.04.0400. Два раза! Пульт также обновил. Уже месяц, как всё работает как новое.
-
2
#17
![]()
DozorSPb
- Город:Санкт-Петербург
- Коптер:Mavic Pro / Spark / Diatone M530 / Walkera Runner
Отправлено 27 Август 2018 — 11:52
Полчаса шаманства и опять — есть коннект!
Вот это выдержка! 
Из замечаний к сотой версии на которой сейчас летаю: садиться в точку взлета через раз. Промахивается на метр или более. На 300 и 400 такого не было. НО там и плюшки в виде конфигов недоступны 
-
0
#18
![]()
Micha
- Город:Саратов
- Коптер:MAVICи
Отправлено 27 Август 2018 — 03:26
RomanSimfer, может совпадение… но на V3, похожая фигня была… Я не стал выключать дрон при нагреве… Остужал ветродуйкой, которой листья разгоняют в саду… В итоге прошивал модуль 900/300 прогой V2.12… https://github.com/j…eases/tag/v2.12 работает без нареканий… Правда режимы не проверял… Да и не пользуюсь ими…
Добавлено позже (27 Август 2018 — 16:26)
DozorSPb
, перепрошивал, как раз под конфиги, которые мы в личке обсуждали…
Сообщение отредактировал Micha: 27 Август 2018 — 03:23
-
0
#19
![]()
Gmung
- Город:Москва
- Коптер:разные
Отправлено 27 Август 2018 — 03:35
С прошивкой аналогичная проблема: что по воздуху, что по проводу-доходит до 100 проц, и выдаёт ошибку. Процесс очень долгий, коптер сильно нагревается. думаю, очередной косяк от джедаев…
-
0
#20
![]()
RomanSimfer
- Город:Симферополь
- Коптер:MINI2
Отправлено 27 Август 2018 — 04:08
В итоге прошивал модуль 900/300
Миша, я ещё не сразу вдупляю 900 это V01.03.0900, а 300 это пульт V01.04.0300?
-
0
проблема с квадрокоптером DJI / Мурманск
Дрон выдает ошибку подключения ESC. Требуется ремонт. Обратитесь в службу поддержки DJI.
Люди с такой же проблемой (1)
Видео с YouTube на эту тему
Знаете, как решить эту проблему?
Поделитесь своим знанием!
Ваш способ решения:
Наиболее похожие проблемы из этого раздела
![]()
Добрый день . Дрон не включается. Причем при зарядке огонек мигает медленно синим, заряжаю уже весь день. Как только отключаю от зарядки, при …
Здравствуйте, проблема с дроном tello edu.
Какая-то проблема с камерой. То есть, фото снимает отлично, на смартфон передает нормальную, цветную …
![]()
Первый дрон я разбил, потому что он при 9% заряда начал снижаться, я не видел его визуально, еще и видео отключилось, в результате сел он на …
![]()
Дрон новый. При включении у дрона не запускаются моторы. После подключения пульта и нажатии на кнопку запуска ничего не происходит, моторы не …
![]()
Как переключить из учебного режима в профессиональный, чтобы скорость дрона была больше?
The new DJI Mavic Mini is a terrific drone and for almost everyone, their drone will fly for years without any issues. However, there are some Mavic Mini’s, which have disconnects, erratic flying, fly away issues, RTH not working or receive warnings and errors.
These Mavic Mini issues require some troubleshooting to find out what has happened and then to fix the Mavic Mini flight problems.
Some of the most common issues with the Mavic Mini are the “Not Enough Force / ESC warning” and “Max Power Load Reached” error. Other Mavic Mini issues include disconnecting from the remote controller or Fly app, fly away or the Mavic Mini return to home feature not working correctly.
Here we look at these issues and possible fixes. Some of these issues could be caused by many variables and other Mavic Mini problems may require your drone to be returned to be fixed.
If you are having issues straight out of the box or within a few days of buying your Mavic Mini, then it is important that you troubleshoot the issue as quickly as possible. Your Mavic Mini will have a returns policy or money back guarantee, which you can use to get a replacement.
Now, lets look at these Mavic Mini drone issues and fixes.
DJI Mavic Mini Not Enough Force ESC Warning And Max Power Load Reached
Receiving the DJI Mavic Mini Not Enough Force/ESC warning or Max Power Load Reached error can be quite scary.
The Mavic Mini may even drop altitude and can even crash. On many occasions the Mavic Mini will drop and recover it’s position. However, if you are flying very close the the ground, the Mavic Mini may bounce off the ground. This is pretty scary and you will be lucky if your drone is not damaged.
There are many reasons, which can cause this issue and at the time of writing DJI don’t have a definitive answer or solution to receiving the Mavic Mini Max Power Load Reached and Not Enough Force/ESC error.
However, quite a few Mavic Mini owners have solved this issue themselves or recognized what is causing the problem.
Here is our information, tips and troubleshooting in dealing with the Not Enough Force/ESC warning and Max Power Load Reached error.
Not Enough Force/ESC Warning And Max Power Load Reached
The warning is that the Mavic Mini is not getting enough power and the error message is being generated on the Electronic Stability Controllers (ESC).
So, this message points the issue being with the ESC (Electronic Speed Controllers) and motors. You can read further on ESC, IMU, motors and propellers in our article How A Quadcopter Flies.
Now, power issues could also point to a faulty Mavic Mini battery. However, nothing definitive has come back from DJI on the cause.
This “Not Enough Force ESC warning” issue has been fixed by various methods, which we discuss here.
We will start looking at whether the Mavic Mini is being pushed above it’s recommended flying recommendations, which is causing the warnings or to actual real problems with the Mavic Mini quadcopter.
Maximum Wind Resistance Flying – Is the problem occurring because the Mavic Mini is flying in winds stronger than 17.9 mph (28.8 km/h), which is the maximum wind resistance speed for the drone.
17.9 mph (28.8 km/h) is level 4 on the Beaufort scale, meaning a moderate breeze. Many of these not enough force/ESC warnings are happening at a good height. While it may be calm on the ground, at a small height above, there could be a slight wind or more than a moderate breeze, meaning the Mavic Mini will find it difficult to fly against.
Flying at full speed – If you are flying at full speed and if their is a slight headwind, then this may also cause the error. The motors are being pushed to the limit. Ease back on the throttle and see if the warning goes away.
Ascending very quickly in P-Mode – Does the problem occur when you are ascending quickly. If it does, then it is also because the drone encounters a high resistance during flying upwards and the flight controller detects this and the Not Enough Power ESC warning message will pop up.
Max Ceiling Service – Is the Mavic Mini been flown at or close to the max height for flying of 1.86 mile (3 km) above sea level. Basically the air is thinner, the higher you are up. In thin air, the drone motors have to work a lot harder to keep the drone in the air.
Propeller guards causing the issue – Remove the propellers guards if they are attached. A few Mavic Mini pilots have resolved the issue by just taking off the propeller guards. If this is causing the issue, then replace for new Mavic Mini propeller guards.
Faulty propellers – Quite a few of the Mavic Mini drone receiving the “Not Enough Force / ESC warning” and “Max Power Load Reached” have been fixed by simply replacing the props. There are many different Mavic Mini propellers on the market.
Examine the propellers. Even if you don’t see any fault, go ahead and change them. Their might be a slight defect in one of more of the propellers, which isn’t even noticeable to the eye. The issue has been fixed for quite a few owners by changing to a new Mavic Mini propeller set.

Helistar 16Pcs 4726F Propellers Foldable Low Noise Blades Compatible with DJI Mavic Mini Drone, Golden
- 4726F Low noise propellers specially designed compatible with DJI Mavic Mini drone. This is not original propellers.
- Small size, lightweight, portable, low noise quiet flight.
- Light flying durable flexible.
- Easy to mount, secure, durable, and well-balanced propellers.
- Package include: 16pcs propellers (8 CW + 8 CCW), 24pcs screws, 2pcs screwdriver, drone and accessories are not included.
A few Mavic Mini pilots have noticed that a propeller blade is ever so slightly rubbing against the drone. So with the Mavic Mini turned off, spin the propellers and see if this is happening.
Also, DJI recommend that you replace the full set together rather than just 1 prop at a time.

Faulty Battery – If you have purchased spare batteries, swap the battery and see if the Not Enough Force warning or Not Enough Power/ESC warning reoccurs. If you have a faulty battery, you should be able to have it replaced if the Mavic Mini is still under warranty.
Calibrate IMU & Compass – This simple procedure fixes all sorts of issues, especially flying erratically, having flyaways and disconnects. If you have a crash and your Mavic Mini isn’t damaged, you will need to do the Mavic Mini IMU and compass calibration. Here are the instructions with videos on how to calibrate the Mavic Mini.
Flying In S or P Mode – Does the warning happen only in S Mode or P Mode. It is one of the questions that DJI Support always ask and could be an indication on where they believe the problem to be. If it happens in only one of the modes, this might indicate a software issue rather than a hardware issues. Proceed with updating the Mavic Mini firmware or if at the latest firmware, then downgrade the firmware and then update it again.
Update the DJI Fly App – Make sure you have the latest version of the DJI Fly App. Generally with a new firmware, their is also a new version of the Fly app. The latest version is version V 1.0.8 and it will contain new features and fix any bugs in the software.
Update the Mavic Mini firmware – The Mavic Mini, which you purchased may have been on the shelf for a few weeks and doesn’t have the latest firmware. You can update the drone easily using these DJI Mavic Mini firmware update instructions. The latest Mavic Mini firmware v01.100.0500 was released on 2020.04.23. This is the 4th firmware update since the Mavic Mini was released. Each Mavic Mini update contains new features and also fixes bugs and issues.
Downgrade / Upgrade Mavic Mini firmware – The Mavic Mini Not Enough Force/ESC warning has been fixed on quite a few occasions by first downgrading the Mavic Mini firmware and then upgrading it again.
You can downgrade the Mavic Mini firmware using the DJI Assistant 2 app on your computer. If this fixes the issue, then the problem was originally with a corrupted firmware or it didn’t install completing on the Mavic Mini in the first instance.
Mavic Mini RTH Not Working Correctly
There are various reasons for the Mavic Mini Return-To-Home feature not working correctly. Or instead of returning to the home point, the Mavic Mini does an emergency landing. Here are some of the reasons we have found to have caused the Mavic Mini not to return to the home point.
What Is The Mavic Mini Home Point – Answered
The default Home Point is the first location where the Mavic Mini received a strong GNSS signals. In the DJI Fly App the white GNSS icon will have at least 4 white bars. The Mavic Mini status indicator blinks green quickly after the Home Point has been recorded.
Mavic Mini Return To Home Issues
Unsuccessful Home Point Recorded – With firmware versions previous to v01.00.0400, it was possible to takeoff and fly with a weak GPS signal or in bad light. If you have a weak GPS signal at takeoff, then the Home Point will not be recorded correctly.
The Home Point will be recorded when the Mavic Mini picks up a strong GPS signal, which means the Mavic Mini will return to an different Home Point than what you wanted.
With firmware version v01.00.0400, the feature to disable takeoff when the GPS signal is weak (GPS <8) and the environment light is not sufficient was added. This feature can be disabled manually (requires DJI Fly app v1.0.4 or later).
Weak Or Unavailable GPS – While you may have an home point recorded at takeoff, the Mavic Mini will not be able to return to the Home Point if the GPS signal becomes weak or unavailable. It is very important to fly in areas where the GPS signal is strong.
Battery power – The DJI Mavic Mini battery has depleted to a level where it can’t make it back to the home point and instead has to do an emergency landing.
Flying against the wind – can slow any drone down dramatically and drain the battery pretty quickly. The Mavic Mini wind resistant speed is 17.9 mph (28.8 km/h) which really is only a moderate breeze equivalent to level 4 on the Beaufort scale.
Flying into authorization GEO zones – flying in to a no fly or blue zone where you need authorization to fly will initiate an automatic landing. This will happen at 100 seconds into flying in an Authorization zone.
You won’t be able to cancel out of the Automatic landing. We have seen occasions when someone was flying just outside an Authorization zone, then drifted into the zone because of wind. The automatic landing was initiated even through the RTH button was pressed.
Many Mavic Mini owners live inside Authorization zones and were unable to fly their drone in their garden or even inside their house leaving them pretty annoyed.
Now, if your drone is on firmware version v01.00.0300 or earlier, there is no GEO zone unlock feature.
However, the Mavic Mini feature to unlock GEO zones starts at firmware version v01.00.0400 which also requires DJI Fly v1.0.4 or later. This firmware version was released on December 31st, 2019.
Calibrate The Compass And IMU – If your Mavic Mini is not returning to it’s home point, then it could be that it doesn’t know its exact location because of electromagnetic interference or it is having issues with picking up the global satellites correctly.
Fly the Mavic Mini back in and calibrate the Compass. While the IMU is about the positioning of the Mavic Mini keeping it stable in the sky, it is never a bad idea to also calibrate the IMU.
Lost Connection With Remote Controller – The Failsafe RTH function automatically activates after the remote controller signal is lost for more than 11 seconds. However, this depends on whether the Home Point was successfully recorded in the first place.
Leg Extensions – The antenna for the Mavic Mini are in the front legs of the quadcopter. If you have leg extensions on the Mavic Mini for landing in grass, then the leg extensions could be stopping be the cause of losing the Mini losing connection with the Remote Controller.
Mavic Mini Lands Immediately – If the Mavic Mini drone is less than 20 meters (65.61 feet) from the Home Point when the RTH procedure begins, it lands immediately. This is confirmed on page 13 of the Mavic Mini user guide. 20 meters is quite a distance away. It is probably not a good idea for the Mavic Mini takeoff and Home Point to be recorded where their is water close by.
Strong Winds – The Mavic Mini flies back to the Home Point at a speed of 8 meters (26 feet) per second. If it is windy, the drone will not be able to fly at this speed and it may not reach the home point in time and will do an emergency landing.
RTH Altitude – If you are not flying in an open area, then it might be important to set a different altitude than the default 20 meters (65.61) altitude. Flying in areas where there are trees, ditches, tall bushes etc. You can set the a different RTH altitude in the DJI Fly app.
Mavic Mini Return To Home Best Practices
Mavic Mini RTH Knowledge – Know everything about the Mavic Mini Return To Home feature. Read the Mavic Mini User Guide, which covers the RTH feature on Page 12, 13 and 14.
Keep the Mavic Mini clean – use wipes and check the Mavic Mini physically.
Home Point Success – make sure when you take off that the Home Point is successfully recorded.
Calibrate the Compass – especially if you are flying in a new area, which is a good distance from the last place you flew. Also, calibrate if you receive a message in the DJI Fly app to calibrate. Definitely calibrate the compass after a crash even after a small one where there is no physical damage to the drone.
Don’t Fly – if you have bad light or weak GPS signal.
Keeping the Mavic Mini updated – Check and update both the firmware for the Mavic Mini drone and remote controller. Also, install the latest DJI Fly app when it becomes available.
Electromagnetic Interference – A lot of EMI will cause issues with your Mavic Mini compass and flight capabilities including knowing where it is in the sky. Understand and watch out for EMI in the area you will be flying your Mavic Mini.
EMI is the interference caused by one electrical or electronic device to another by their electromagnetic fields. Electromagnetic interference (EMI), also called radio-frequency interference (RFI) when in the radio frequency spectrum, is a disturbance generated by an external source that affects another electrical circuit.
Examples of EMI include power lines, cellphone masts, building with reinforced steel, electric cables, bridges, railway lines, cars and electrical gadgets.
Note: You can find a terrific variety of Mavic Mini parts, upgrades and accessories here.
Here is a great video with explains electromagnetic interference.
DJI Mavic Mini Disconnects, Fly Aways And Flight Issues
There are many reasons for Mavic Mini disconnecting and losing connection with the remote controller or Fly app. It’s the same for fly aways.
These Mavic Mini disconnects and fly aways can be caused by various sources from the quadcopter, remote controller, smartphone, tablet or EMI. So it may take quite a few of the below steps to fix the Mavic Mini flying issues.
Here are some top tips you can try to resolve or prevent Mavic Mini disconnects and fly aways.
Have You Logged Into DJI Fly App
When you install the DJI Fly app on your Smartphone, you will be asked to log in or register. If you are not logged in, then your flight range will be limited in both altitude and range until you activate your login. You will more than likely have disconnected issues without logging in.
If you have skipped this step after installing the DJI Fly app, then you can login by tapping into the profile and then click on “Log In”.
Mavic Mini Cables Causing Disconnected Issue
Check the cable going from your Smartphone or tablet to the RC. The cable could have come loose at either end. Also, try a replacement cable as they can break or become frayed over time. They can even be faulty from the factory.
Damaged Ports Causing Mavic Mini Disconnects
It is possible for the ports on the Mavic Mini remote controller or Smartphone to become damaged over time. So if you are having disconnects using a Smartphone like a Samsung or Apple, then fly with another device, which use a different port and cable.
DJI Fly App Cache Causing Disconnects
Cache files can fill up the memory and even become corrupt. There are 2 setting in the DJI Fly app for cache settings.
- Cache When Recording
- Max Video Cache Capacity
With disconnects, it is a good to turn off the “Cache When Recording” function. You can find this in the Settings > Camera > Advanced Camera Settings. Move the slider to the left and turn it off.
There are 4 caches stored in the DJI Fly App which can be cleared;
- Video Cache
- Photo Cache
- Music Cache
- Aircraft Flight Record Cache
You can clear the cache in the DJI Fly App by clicking on Profile > Settings > Clear Cache
Click on each and then tap “confirm” to clear the cache.
Smartphone Causing Mavic Mini Disconnect Issues
With disconnect issues, it is very easy to view the DJI Mavic Mini drone or the remote controller to be the cause.
However, many of the drone disconnects are caused by the smartphone or tablet, which have the DJI Fly app installed.
Smartphones have a lot of applications installed and they are constantly working, even when we are not using them. They are constantly connected to the Internet, the cellphone provider, pulling in data, notification and pinging the network.
To fly your Mavic Mini without issues, you should ensure your smartphone or tablet is running optimally.
Some best practice regarding smartphones and tablets would be to greatly reduce notifications from the various apps (Facebook, Twitter, Instagram, WhatsApp etc) while flying. Turn off app updates while flying. Remove unused apps, as these use up both space, memory and processor power.
When you are flying your Mavic Mini with your Smartphone in the Remote Controller, you can turn off your phones WiFi. Also switch off Bluetooth or personal hotspots etc.
You can also fly your Mavic Mini in Airplane Mode, which will stop other apps from updating etc.
There are programs for optimizing your Smartphone and tablet. Use these to have your smartphone or tablet running optimally.
If your smartphone is not running optimally, then opening the DJI Fly app and video recording while flying, might place a heavier load on the processor or fill up it’s memory. If the smartphone is running slow, then it could easily drop the connection.
Micro SD Card Causing Mavic Mini Disconnect Problems
There has been a number of issues with the Mavic Mini disconnecting from the remote controller or DJI Fly app caused by the micro SD card.
These micro SD cards can become damaged physically or the file system can become corrupt on the card. Even a video or photograph can become corrupt on the micro SD card.
If the Mavic Mini micro SD card has been used for something else or has other files and folders on it, then when it is back in the Mavic, it can cause an issue when you try to record to it. The micro SD card may still work but it is not perfect and will cause an interference in the Mavic Mini.
Take out the micro SD card and try flying without it and see if you still get disconnects.
If you don’t get a disconnect, then the issue is with the micro SD card. Place the micro SD card in the Mavic Mini while it is on the ground. In the DJI Fly app camera settings, you can format the micro SD card.
Before you format the micro SD card, you might want to copy the existing information (files, photos and videos) on the card over to your computer.
If the Mavic Mini is still causing disconnects after the micro SD format, then replace the card with the DJI recommended micro SD cards which are as follows;
- 16 GB: SanDisk Extreme, Lexar 633x.
- 32 GB: Samsung Pro Endurance, Samsung Evo Plus, SanDisk Industrial, SanDisk Extreme V30 A1, SanDisk Extreme Pro V30 A1, Lexar 633x, Lexar 667x.
- 64 GB: Samsung Pro Endurance, Samsung Evo Plus, SanDisk Extreme V30 A1, Lexar 633x, Lexar 667x, Lexar 1000x, Toshiba EXCERIA M303 V30 A1, Netac Pro V30 A1.
- 128 GB: Samsung Pro Plus, Samsung Evo Plus, SanDisk Extreme V30 A1, SanDisk Extreme Plus V30 A1, Lexar 633x, Lexar 667x, Lexar 1000x, Toshiba EXCERIA M303 V30 A1, Netac Pro V30 A1.
- 256 GB: SanDisk Extreme V30 A1.
Mavic Mini Remote Controller Causing Connection Error
Check your remote controller. Make sure the ports and cables are clean. Bits of dirt or fluff can get into ports very easily.
It is also easy to get carried away with enthusiasm to get the Mavic Mini up the air as quickly as possible. Flying and filming with the Mavic Mini is great fun.
However, it is always good advice to do your pre-flight checks ,which include having the Mavic Mini remote controller antenna pointing correctly.
One of the simplest ways to have the Mavic Mini disconnect from the remote controller is by holding the remote controller and antenna in the wrong direction.
To have the strongest transmission signal, make sure you are holding the Mavic Mini remote controller towards where the Mavic is in the sky. Your Mavic Mini remote control antenna should be pointing correctly as in the below image.
This is very important and especially if you are flying the Mavic Mini further out.
Weak Signal Or EMI Causing Mavic Mini To Disconnect
If you are flying a good distance out, then the transmission signal is going to get weaker. Now, as the signal gets weaker, the chances of the Mavic Mini disconnecting either from the DJI Fly app or the remote controller becomes a real possibility.
The Mavic Mini max transmission distance is 2.48 mile (4 km), unobstructed and in line of sight using the Remote Controller with the DJI Fly app connected. The transmission uses enhanced WiFi.
However, it is never a great idea to push the flight range or altitude to its limit.
Also flying in fog, rain, very dull weather or bad light will cause disconnects and flights issues.
How To Strengthen The Transmitter Signal Your Mavic Mini
If you are receiving a weak signal and disconnects at moderate to long distance out, then it could have something to do with the surroundings (trees, buildings etc) or with electromagnetic radiation (power lines, cellphone transmitters etc).
It could also be an issue with your Mavic Mini drone or the remote controller. If you have tried everything in this article and the problem still exists but you don’t necessarily want to send your Mavic Mini back as the Mavic disconnects are only on long distance, then the best option to strengthen the transmission signal is to add a Parabolic Antenna Range Booster to the Mavic Mini remote controller.
Calibrate the Mavic Compass / IMU To Fix Disconnected Or Flying Erratically Issues
Calibrating the Mavic Mini Compass and IMU will help fix disconnects and erratic flying. If the compass and IMU are not functioning correctly, then your quadcopter will fly erratically and send incorrect information to the flight controller and remote controller. It is important that all aspects of your Mavic Mini is functioning correctly, which will reduce the chances of disconnects.
The Mavic Mini calibration is very easy. You can find a tremendous instructional video on how to calibrate the Mavic Mini compass and IMU here.
Here are 2 excellent article to further your knowledge on how drones work and fly.
Drone Gyro Stabilization, IMU And Flight Controllers Explained
How A Quadcopter Works With Propellers And Motors Explained
Firmware Update Fixes Mavic Mini Disconnect Issues
DJI release firmware updates for the Mavic Mini and their other quadcopters, gimbals and cameras on a regular basis. If you are having disconnects, then it is always recommended to update the Mavic Mini firmware.
If you read down through the Mavic Mini firmware update release notes, you can see where certain updates fix issues, which could have been causing the Mavic Mini disconnects.
Some pilots never update the firmware on their quadcopter. However it is essential to update the firmware as it contains fixes for most issues. Firmware updates will also add new features to the quadcopter.
DJI Mini Care Refresh
It is always a good idea to invest in the DJI Mavic Mini Care Refresh program. It provides two replacement units for a small additional charge in one year and covers a wide variety of accidents.
Here are some of the bugs and issues fixed by the DJI Mavic Mini firmware updates, which could fix disconnect, fly away and RTH issues.
Firmware Release v01.100.0400
- Added feature to unlock GEO zones (requires DJI Fly app v1.0.4 or later).
- Added feature to disable takeoff when the GPS signal is weak (GPS <8) and the environment light is not sufficient. Feature can be disabled manually in DJI Fly v1.0.4 or later.
- Fixed issue: linking was abnormal in some regions.
- Added requirement for compass calibration before takeoff when the environment light is not sufficient and the compass experiences interference.
- Adjusted flight altitude and distance in payload mode.
Firmware Release v01.100.0300
- Increased flight stability in some scenarios.
- Optimized performance when taking off in areas of high elevation.
- Optimized aircraft orientation control.
Firmware Release v01.100.0200
- Increased the speed of GPS signal searching.
- Optimized the aircraft’s performance in high altitude environments.
Mavic Mini Disconnects After Firmware Update
Now, if you have completed a firmware update and your Mavic Mini starts disconnecting, then try all the above. However, more than likely the issue was caused by the new firmware not installing correctly or a bug in the new firmware.
Using the DJI Assistant 2 application installed on a computer, you connect your Mavic Mini drone. Then, you can roll back to an earlier Mavic Mini firmware version.
After downgrading the Mavic Mini firmware, you should then fly your Mavic Mini to see if the flight issues are resolved. If they are, you can try the upgrade again or wait a few days to see if DJI release another firmware update.
Here is a terrific article, which shows you around the DJI Mavic Assistant 2 software. While the article was originally written for the Mavic Pro, it shows you how the DJI Assistant 2 application can be used to troubleshoot flight issues, upgrade, downgrade firmware and much more.
The Mavic Mini and all DJI drones contain a flight recorder. Flight data information including telemetry, aircraft status and other parameters are automatically saved to the internal date recorder on your DJI drone.
This data can be accessed using the DJI Assistant 2 software. This information can also be sent to DJI to troubleshoot flight issues.
What To Do When Mavic Mini Disconnects During Flight
DJI Fly App Video Disconnects When Flying
If the remote controller is still connected and it is just the DJI Fly app which has lost signal, then do the following;
Check Cables – from your RC to the smartphone or tablet. It may be loose or have fallen out.
Close and re-open DJI Fly app – Take your hands off the sticks and let the Mavic Mini hover. Close out of the DJI Fly app and then go back into it. There is a good chance that the Fly app will reconnect again.
DJI Fly App Disconnects When Flying
If you are flying using the DJI Fly app only and not using the RC, then if the Fly app disconnects you won’t be able to fly the Mavic Mini. By default the Mavic Mini will initialize the failsafe Return-To-Home after 11 seconds.
Again, if the Mavic Mini is a good distance out, you may be able to take some action to reconnect while it is in RTH mode. You could try the following;
- Try moving closer in the direction the Mavic Mini is.
- Close out of the DJI Fly app and go back in.
- Stop and start the WiFi on your Smartphone.
- Restart your phone or tablet.
Mavic Mini Remote Controller Disconnects When Flying
This is quite series. As you don’t have any stick control or video then you can’t fly the Mavic Mini even if you can see it. Now the Mavic Mini should initiate the Failsafe Return-To-Home point mode, which it had set just after take off.
If the Mavic Mini has flown a good distance away, then you may be able to help the Remote Controller to reconnect to the Mavic Mini. Here are some tips.
Move Towards The Mavic – Walk towards your Mavic Mini quadcopter which shortens the transmission distance between RC and drone. If you are close to a running motor, generator or power lines etc, this might have weakened the signal to cause the disconnect. So move away from any interference in the direction of the Mavic Mini and it just might reconnect.
Check Remote Controller Antenna Direction – Are the antenna facing in the correct direction. If the Mavic is pretty high in the air you will need to change the angle you are holding the remote controller so that the antenna are pointing directly towards the Mavic. You also need to change the angle you are holding the remote controller if you are standing on a cliff and flying the Mavic lower than the area you are standing in.
Switch Off and Back On The Remote – It’s worth trying as it only takes a few seconds.
Return To Home Failsafe Mode – If you are flying in a wide open space with no obstacles in the way, then let the RTH failsafe mode bring the Mavic quadcopter back to it’s home point. It’s a great feature. Then do your checks and troubleshooting using the tips in this article as a guide.
DJI Mavic Mini Forum
If you are still having difficulties with your Mavic Mini, you can also read the DJI Mavic Mini Forum and post questions.
Mavic Mini Videos For Better Flying And Troubleshooting
This first videos explains how the Mavic Mini communicates with the quadcopter remote controller and your smartphone or tablet. It also explains that you don’t need have your smartphone WiFi turned on when you are flying the Mavic Mini with your smartphone connected to the RC.
This next video gives you some terrific Mavic Mini tips and tricks.
#1
![]()
OFFLINE
Fixxxer
- Город:Екатеринбург
- Коптер:Mavic Pro
Отправлено 21 Февраль 2017 — 04:53
Запустил сегодня приложение DJI GO 4, оно сообщило что вышла новая прошивка и предложило обновиться не через шнур а по воздуху, ну я согласился.
Обновлялся очень долго, минут 15, в конце концов вентиляторы охлаждения отключились, а обновление остановилось на 81%. Коптер так нагрелся что кука не терпела. Я его выключил, подождал пока остынет и включил заново.
Сейчас после включения каждые секунд один из двигателей дергается и издает звук. В приложении висят 2 ошибки — надо обновить прошивку и esc status error. Двигатели заблокированы, летать нельзя.
Пытался обновить через шнур, через приложение, откатить прошивку на прошлую, ничего не получается — зависает в процессе.
Вчера еще летал отлично и проблем не было, да и до попытки прошивки ошибок никаких не было.
Что делать? Как жить дальше? Кто-то сталкивался с подобным?(
Прикрепленные изображения
-
0
#2
![]()
Отправлено 21 Февраль 2017 — 05:54
Варианта два: либо ошибка одного из регуляторов оборотов, либо один двигатель не видит.
-
0
#3
![]()
Fixxxer
- Город:Екатеринбург
- Коптер:Mavic Pro
Отправлено 21 Февраль 2017 — 06:25
Двигатель вроде видит — он при включении чуть поворачивается как все остальные. И пока непонятно проблема программная или аппаратная.
Может там расплавилось что-то когда он перегрелся пытаясь прошиться, странно просто что до прошивки все работало.
Только разбирать смотреть?
-
0
#4
![]()
Отправлено 21 Февраль 2017 — 06:43
Fixxxer, делайте обновление через компьютер а не по воздуху. попробуйте загрузить предыдущую прошивку.
о чем говорит ошибка esc error я вам сказал. если там что то и расплавилось то насквозь естественно не увидите
-
0
#5
![]()
Laleniko
-
- Пользователи
-
- 7 сообщений
Начинающий летчик
- Город:Москва
- Коптер:Dji mavic
Отправлено 21 Февраль 2017 — 08:28
А зачем отключили коптер в процессе обновления? Последняя прошивка прошивается долго — 20-25 минут на вскидку. Висит процесс прошивки как раз на 81% с отключённым вентилятором. Видно калибрует что-то.
-
0
#6
![]()
N00B
- Город:Moscow
- Коптер:Небесный Нубас
Отправлено 22 Февраль 2017 — 01:05
Попробуйте с другой картой памяти, предварительно форматируйте её на ПК. У меня такое в автомобиле было, флэшка нагревалась в процессе чтения и переставала читаться, как выяснилось
-
0
#7
![]()
Fixxxer
- Город:Екатеринбург
- Коптер:Mavic Pro
Отправлено 22 Февраль 2017 — 08:03
выключил, потому что он нагрелся до такой температуры, что пластиком начал пахнуть, и я имел ввиду что 15 минут он висел на 81% а с начала обновления уже прошло минут 30, да и пульт его перестал видеть.
флешку другую не пробовал, но родную пробовал форматировать и заново прошивать
Добавлено позже (22 Февраль 2017 — 17:03)
либо ошибка одного из регуляторов оборотов, либо один двигатель не видит.
двигатель вроде видит: он двигается при начальной диагностике — на видео виден процесс, ругается он на правый.
Сообщение отредактировал Fixxxer: 22 Февраль 2017 — 03:45
-
0
#8
![]()
ВОЕВОДА
-
- Пользователи
-
- 33 сообщений
Начинающий летчик
- Город:Губкинский, ЯНАО
- Коптер:MAVIC PRO
Отправлено 07 Март 2017 — 08:01
У меня после падения тоже выдает ошибку третьего двигателя…
Но при запуске дрона все движки тоже дергаются…или плата управления или одна из обмоток прогорела, их там две…
Решил проблему покупкой второго мавика….а с ошибкой на запчасти….
-
0
#9
![]()
Отправлено 07 Март 2017 — 10:08
Fixxxer, вы включаете коптер с фиксатором на подвесе? не понимаю для кого вообще пишут инструкции. скоро помимо двигателей останетесь и без моторчиков подвеса, если уже не остались
-
0
#10
![]()
НиколаичСПб
- Город:Кировск
- Коптер:MavikcPro, Samsung Galaxy Note 5
Отправлено 09 Июнь 2017 — 11:18
Люди, ау! Обновляю сегодня купленный Мавик. Асистент остановился с надписью загрузка 100%. И в такой позиции уже с полчаса находится! Теперь и дрон отключить боюсь, и приложение остановить! Что делать?
-
0
#11
![]()
olegnsk
-
- Модераторы
-
- 7 702 сообщений
Опытный летчик АС
- Город:Москва, исторически Новосибирск и Камчатка
- Коптер:младшенький Mavic и ещё небольшая эскадрилья
Отправлено 09 Июнь 2017 — 11:33
НиколаичСПб, Отключайте, вариантов нет. Вероятно всё будет нормально. Только ЗАЧЕМ вы сразу после покупки начали обновлять??!!
Изучить всю мат часть, полетать а далее почитав форум (т.к. далеко не все сразу стремятся вставить самую верхнюю прошивку) решать надо или нет.
-
1
#12
![]()
НиколаичСПб
- Город:Кировск
- Коптер:MavikcPro, Samsung Galaxy Note 5
Отправлено 09 Июнь 2017 — 11:39
olegnsk, Я как раз не собирался ставить верхнюю. Сейчас стоИт 1.3.4, хотел поставить следующую. Обновляю, т.к. дрон требует. Там для моего уже штук пять предлагается! Выключил, и правда, ничего не случилось. Может следующую попробовать?
Попробовал. Тоже самое, нихрена не вышло с прошивкой. Но по крайней мере Мавик не превратился в кирпич, и это радует!
Сообщение отредактировал НиколаичСПб: 09 Июнь 2017 — 11:55
-
0
#13
![]()
olegnsk
-
- Модераторы
-
- 7 702 сообщений
Опытный летчик АС
- Город:Москва, исторически Новосибирск и Камчатка
- Коптер:младшенький Mavic и ещё небольшая эскадрилья
Отправлено 10 Июнь 2017 — 12:01
НиколаичСПб, дрон не требует, а просит, принудительных обновлений на моей скромной памяти было всего 2-3 раза на продукцию DJI.
400-я нормальная прошивка летайте и радуйтесь. Хотя это личное дело каждого, также как обновлять операционную систему на ПК или нет. У меня один из ноутов до сих пор сидит на Винде ХР и свои функции отлично выполняет.
-
2
#14
![]()
vladsvs
-
- Пользователи
-
- 49 сообщений
Начинающий летчик
- Город:Россия
- Коптер:Mavic Pro
Отправлено 15 Октябрь 2017 — 03:38
Супер дрон с конченным обновлением. Обновлял два раза и два раза в ужасе. Он тупо не обновляется, потом приходится колдовать чтобы это дерьмо обновилось. Тут где то обсуждали. Чтобы корректно обновить его в момент обновления, когда он типо сам пытается перезагрузиться надо принудительно выключать и самому включать. Во второй раз только это помогло обновиться. Жесть короче. Китай есть Китай
-
0
#15
![]()
yurikss
-
- Модераторы
-
- 1 615 сообщений
Опытный летчик АС
- Город:Москва
- Коптер:Мэвик 1,2
Отправлено 15 Октябрь 2017 — 04:04
Супер дрон с конченным обновлением.
Просто с каждым новым коптером от джидайцев надо знать когда остановиться.
Первые прошивки исправляют косяки,последующие добавляют гемороя.
-
0
#16
![]()
RomanSimfer
- Город:Симферополь
- Коптер:MINI2
Отправлено 26 Август 2018 — 11:05
Возможно, кому-то поможет.
Если Мавик превратился в кирпич. Не шьётся, комп не видит.
Откатил на V01.03.0900 с помощью DUMLdoreV3, снял ограничения, всё работало ОК. Имейте ввиду, как мне показалось, DUMLdoreV3 в коптер зальёт что угодно, хоть текстовый файл, хоть фото тёщи, и дрон станет кирпичём.
Была проблема, что коптер плюхался при посадке, точная посадка не работала.
Заливаю с пом. DUMLdoreV3, чисто для интереса, V01.03.0900 и V01.04.0100 без модулей 305 и 306. Просто проверить, может типа там лучше
Что-то пошло не так, возможно скачался архив с ошибкой или х.з.
Обновление прошло быстро, на 100%, но коптер сам не перезагрузился. Подождал минут 5. Программу DUMLdoreV3 закрыл. Коптер выключил.
Затем при включении, камеру крутит (как обычно), но мелодии нет, огни красным, не мигают, пульт не видит. Вентилятор не включается, греется как утюг. При подключении к компу — каждые 2 секунды звук Винды, то есть коннект, то нет. DJI Assistant 2 — коптер не видит. DUMLdoreV3 — коптер не видит.
Капец!
Запасаемся БОЛЬШИМ терпением.
Подключаем по USB.
Запускаем DUMLdoreV3, на готове держим проверенную рабочую прошивку.
Коптер стоит, подключенным и греется. Далее шаманство. Включаем его, выключаем, не доводим до того, чтобы начал плавится пластик, даём остыть, снова включаем, вытаскиваем-вставляем USB, снимаем батарею, снова включаем. Всё хаотично. Логики никакой! Рано или поздно происходит чудо. У меня чудо произошло примерно через полчаса — час шаманства. На коптере загудит вентилятор и DUMLdoreV3 его увидит. Кричим — Аминь! И как можно быстрее, заливаем софт.
Я залил предыдущую V01.03.0900. Пульт увидел, всё заработало как и всегда.
Снимаю батарею с коптера, заряжаю, через час включаю — опять не коптер, а горячий кирпич. Комп не видит!
Снова тот же Капец!
Полчаса шаманства и опять — есть коннект!
Снова заливаю V01.03.0900 с пом. DUMLdoreV3. Затем, тут же, пока всё работает, залил через DJI Assistant 2 последнюю V01.04.0400. Два раза! Пульт также обновил. Уже месяц, как всё работает как новое.
-
2
#17
![]()
DozorSPb
- Город:Санкт-Петербург
- Коптер:Mavic Pro / Spark / Diatone M530 / Walkera Runner
Отправлено 27 Август 2018 — 11:52
Полчаса шаманства и опять — есть коннект!
Вот это выдержка!
Из замечаний к сотой версии на которой сейчас летаю: садиться в точку взлета через раз. Промахивается на метр или более. На 300 и 400 такого не было. НО там и плюшки в виде конфигов недоступны
-
0
#18
![]()
Micha
- Город:Саратов
- Коптер:MAVICи
Отправлено 27 Август 2018 — 03:26
RomanSimfer, может совпадение… но на V3, похожая фигня была… Я не стал выключать дрон при нагреве… Остужал ветродуйкой, которой листья разгоняют в саду… В итоге прошивал модуль 900/300 прогой V2.12… https://github.com/j…eases/tag/v2.12 работает без нареканий… Правда режимы не проверял… Да и не пользуюсь ими…
Добавлено позже (27 Август 2018 — 16:26)
DozorSPb
, перепрошивал, как раз под конфиги, которые мы в личке обсуждали…
Сообщение отредактировал Micha: 27 Август 2018 — 03:23
-
0
#19
![]()
Gmung
- Город:Москва
- Коптер:разные
Отправлено 27 Август 2018 — 03:35
С прошивкой аналогичная проблема: что по воздуху, что по проводу-доходит до 100 проц, и выдаёт ошибку. Процесс очень долгий, коптер сильно нагревается. думаю, очередной косяк от джедаев…
-
0
#20
![]()
RomanSimfer
- Город:Симферополь
- Коптер:MINI2
Отправлено 27 Август 2018 — 04:08
В итоге прошивал модуль 900/300
Миша, я ещё не сразу вдупляю 900 это V01.03.0900, а 300 это пульт V01.04.0300?
-
0
Оглавление
- Как устранить распространенные ошибки и неисправности на дронах DJI Mavic, Phantom или Phantom 4 PRO?
- Ошибка: «Недостаточно силы/ESC» и «Максимальная достигнутая нагрузка»
- Ошибка DJI Mavic: RTH (Return-To-Home) возвращение домой работает неправильно
- Что такое Home Point?
- Советы по полетам на квадрокоптере
- Ошибка: квадрокоптер DJI отключается и теряет связь с пультом управления
- Ошибки управления дроном вызванные смартфоном
- Дрон отключается после обновления прошивки
- Что делать теряется связь квадрокоптером во время полета?
- Приложение DJI Fly отключается при полете
- Пульт дистанционного управления отключается при полете
Квадрокоптеры от DJI — потрясающие дроны. Будь это серия Phantom, Phantom 4 PRO или Mavic и эти беспилотники будут летать годами без каких-либо проблем. Тем не менее в процессе эксплуатации могут возникать разного рода ошибки и неисправности. Среди которых встречаются разъединение, беспорядочный полет, проблемы с приложением, функция возврата (RTH) не работает или получает предупреждения и ошибки.
Всэ эти проблемы с дронами DJI требуют устранения неполадок но для этого необходимо выяснить, что произошло.
Некоторые из наиболее распространенных проблем например с Mavic Mini — это ошибка «Недостаточно силы / ESC» и «Максимальная достигнутая нагрузка». Другие проблемы включают в себя отключение от пульта дистанционного управления или приложения Fly, отлет или неправильная работа функции возврата дрона домой.
Мы рассмотрим возможные ошибки и пути к их исправлению. Некоторые из этих проблем могут быть вызваны многими переменными и зачастую их вполне устранить своими силами. Тогда как другие неисправности могут потребовать ремонта вашего дрона.
Ошибка DJI Mavic: Power Load Reched и Not Enough Force/ESC error или Недостаточно Force/ESC предупреждение или ошибка о максимальной мощности нагрузки может быть довольно опасной.
Mavic Mini может даже сбросить высоту и даже разбиться. Во многих случаях дрон будет падать и восстанавливать свою позицию. Однако если вы летите очень близко от земли, Mavic может резко упасть. Это довольно страшно и вам повезет если ваш дрон не окажется поврежден.
Есть много причин которые могут вызвать эту проблему и на момент написания у DJI не было однозначного ответа или решения на это.
Однако многие владельцы сами решили эту проблему или поняли что может являться причиной.
Предупреждение заключается в том, что дрон не получает достаточного питания и на электронных контроллерах (ESC) генерируется сообщение об ошибке.
Это сообщение указывает на проблему с ESC (электронными регуляторами скорости) и двигателями.
Проблемы с питанием могут также указывать на неисправный аккумулятор. Тем не менее от DJI по этому поводу не получилось узнать ничего определенного.
Эта проблема может быть исправлена различными способами.
Рассмотрим на примере DJI Mavic Mini.
Максимальное сопротивление ветру — это проблема возникающая из-за того что квадрокоптер летает при ветре, превышающем 28,8 км/ч, что является максимальной скоростью ветра для дрона.
28,8 км/ч — это уровень 4 по шкале Бофорта, что означает умеренный ветер. Многие из этих предупреждений недостаточной силы/ESC происходят на приличной высоте. Несмотря на то, что на земле может быть спокойно, на высоте может быть ветер который может стать серьезной помехой для полета.
Читайте: Как летать на квадрокоптере при сильном ветре: Советы
Полет на полной скорости — если вы летите на полной скорости и если есть небольшой встречный ветер, это также может привести к ошибке. Двигатели при такой ситуации работают в максимальных режимах. Ослабьте газ и посмотрите, исчезнет ли предупреждение.
Очень быстрый подъем в P-режиме. Возникает ли проблема при быстром подъеме. Если это так, то это потому, что во время полета вверх дрон сталкивается с высоким сопротивлением и контроллер полета обнаруживает это выдавая всплывающее сообщение ESC о недостаточной мощности.
Максимальная высота полета — полет на максимальной высоте или близко к ней для. По мере набора высоты воздух становиться менее плотным (это связано с тем что гравитация притягивает к себе молекулы воздуха к земле). И на большой высоте двигатели беспилотников должны работать в более интенсивном режиме чтобы удерживать беспилотник в воздухе.
Читайте: На какую максимальную высоту может подняться квадрокоптер?
Защита винтов может вызывать проблему — Снимите защитные кожухи винтов, если они прикреплены. Некоторые пилоты решили эту проблему сняв защитные винты.
Читайте: Может ли квадрокоптер долететь до космоса и прилететь обратно?
Неисправные пропеллеры. Многие дроны Mavic Mini, получившие предупреждение «Недостаточно силы / ESC» и «Достигнута максимальная мощность нагрузки» были исправлены простой заменой пропеллеров. На рынке представлено много разных пропеллеров Mavic Mini.
Изучите пропеллеры. Даже если вы не видите какой-либо ошибки, идите вперед и измените их. Они могут быть небольшим дефектом одного или нескольких пропеллеров, что даже не заметно на глаз. Эта проблема была исправлена для многих владельцев путем перехода на новый комплект пропеллеров.
Некоторые пилоты замечали что лопасть пропеллера слегка трется о дрон. Поэтому, когда Mavic Mini выключен, раскрутите винты и посмотрите, происходит ли это.
Кроме того DJI рекомендует заменять полный набор а не только 1 пропел.
Неисправная батарея — Если у вас есть запасные батареи замените и посмотрите, появляется ли предупреждение Not Enough Force или Not Enough Power / ESC. Если ошибка пропадет то это может указывать на проблемы с аккумулятором.
Полет в режиме S или P — предупреждение появляется только в режиме S или P. Это один из вопросов, который всегда задает служба поддержки DJI и может указывать на то где по их мнению существует проблема. Если это происходит только в одном из режимов это может указывать на проблему с программным обеспечением, а не с оборудованием. Выполните обновление программы.
Обновите приложение DJI Fly — убедитесь, что у вас установлена последняя версия приложения DJI Fly. Как правило с новой прошивкой многие ошибки в программном обеспечении устраняются.
Понижение/обновление прошивки — предупреждение Not Enough Force/ESC неоднократно исправлялось, сначала понижая версию прошивки а затем обновляя ее снова.
Вы можете понизить версию прошивки с помощью приложения DJI Assistant 2 на своем компьютере. Если это устраняет проблему то проблема изначально была в поврежденной прошивке.
Ошибка DJI Mavic: RTH (Return-To-Home) возвращение домой работает неправильно
Существуют различные причины неправильной работы функции Mavic Mini Return-To-Home. Например вместо возвращения в исходную точку дрон совершает аварийную посадку. Вот некоторые из причин по которым это может происходить
Что такое Home Point?
Домашняя точка по умолчанию является первым местом, где дрон получил сильные сигналы GNSS (данные о местоположении). В приложении DJI Fly App белый значок GNSS будет содержать не менее 4 белых полос. Индикатор состояния Mavic Mini быстро мигает зеленым после того, как Home Point была записана.
Домашняя точка может быть записана неправильно — с версиями прошивки, предшествующими v01.00.0400, можно было взлетать и летать со слабым сигналом GPS или при плохом освещении. Если у вас слабый сигнал GPS на взлете, то домашняя точка будет записана неправильно.
Домашняя точка будет записана, когда дрон обнаружит сильный сигнал GPS это будет означать то, что дрон вернется в другую домашнюю точку, чем в ту которую вы хотели.
В версии встроенного ПО v01.00.0400 была добавлена функция отключения взлета при слабом сигнале GPS (GPS <8) и недостаточном освещении окружающей среды. Эту функцию можно отключить вручную (требуется приложение DJI Fly v1.0.4 или новее).
Слабый или недоступный GPS. Несмотря на то что у вас может быть записана домашняя точка при взлете, ваш дрон не сможет вернуться в исходную точку, если сигнал GPS станет слабым или недоступным. Очень важно летать в местах, где сигнал GPS сильный.
Заряд батареи — Батарея разрядилась до уровня, при котором она не может позволить вернуться квадрокоптеру в исходную точку и вместо этого он будет вынужден совершить аварийную посадку.
Полет против ветра — может сильно замедлить работу любого дрона и довольно быстро разрядить аккумулятор.
Откалибруйте компас и IMU — если ваш дрон не возвращается в исходную точку, возможно он не знает своего точного местоположения из-за электромагнитных помех или у него возникают проблемы с правильным поиском глобальных спутников.
Откалибруйте компас. Несмотря на то, что IMU касается позиционирования калибровка IMU (инерциальный измерительный блок)также не является плохой идеей.
Читайте: Как правильно делать калибровку квадрокоптера?
Потерянное соединение с пультом дистанционного управления — Функция отказоустойчивого RTH автоматически активируется на многих моделях после потери сигнала пульта дистанционного управления в течение более 11 секунд. Тем не менее, это зависит от того, была ли домашняя точка была успешно записана в первую очередь.
Сильный ветер — Если дрон летит обратно в исходную точку с определенной скоростью. Если ветрено, дрон не сможет достичь конечной точки вовремя и совершит аварийную посадку.
Читайте: Как не потерять свой квадрокоптер и что делать если это случилось?
Высота над уровнем моря — если вы не летаете на открытой местности, может быть важно установить другую высоту, чем высота по умолчанию 20 метров (65,61). Полеты в местах, где есть деревья, канавы, высокие кусты и т. Д. Вы можете установить другую высоту RTH в приложении DJI Fly.
Советы по полетам на квадрокоптере
Откалибруйте компас — особенно если вы летите в новой области, которая находится на большом расстоянии от последнего места, где вы летали. Также выполните калибровку, если вы получили сообщение в приложении DJI Fly для калибровки. Обязательно откалибруйте компас после жесткой посадки и где нет физического повреждения дрону.
Не летайте — пока у вас слабый сигнал GPS.
Обновление прошивки — проверьте и обновите прошивку для дрона и пульта дистанционного управления. Кроме того, установите последнее приложение DJI Fly, когда оно станет доступным.
Электромагнитные помехи. Многие электромагнитные помехи могут вызвать проблемы с компасом квадрокоптера и возможностями полета, в том числе его точное местоположение в небе. Следите за электромагнитными помехами в той области, где вы будете летать.
Читайте: Как запускать квадрокоптер в городе с электромагнитными помехами?
ЭМП — это помехи, создаваемые одним электрическим устройством другому электромагнитными полями. Электромагнитные помехи (EMI), также называемые радиочастотными помехами (RFI) в радиочастотном спектре, представляют собой помехи, создаваемые внешним источником, который воздействует на другую электрическую цепь.
Примерами EMI являются линии электропередач, мачты сотовых телефонов, здания из армированной стали, электрические кабели, мосты, железнодорожные линии, автомобили и электрические устройства.
Ошибка: квадрокоптер DJI отключается и теряет связь с пультом управления
Существует множество причин, по которым дрон отключается и теряет связь с пультом дистанционного управления или приложением Fly.
Эти разъединения и отлет могут быть вызваны различными источниками такими как: сам квадрокоптер, пульт дистанционного управления, смартфон, планшет или EMI. Поэтому для устранения проблем с полетом необходимо рассмотреть ряд действий:
Вы не вошли в приложение DJI Fly
Когда вы устанавливаете приложение DJI Fly на свой смартфон вам будет предложено войти или зарегистрироваться. Если вы не вошли в систему дальность полета будет ограничена как по высоте, так и по дальности, пока вы не активируете свой логин. Проверьте, возможно вы просто всего вы не вошли в систему.
Если вы пропустили этот шаг после установки приложения DJI Fly, то вы можете войти в систему, нажав на профиль и затем нажав «Войти».
Заполнение Кэш приложения DJI Fly
Файлы кэша могут заполнить память и даже стать причиной ошибки. В приложении DJI Fly есть 2 настройки для настроек кеша.
- Кэш при записи
- Максимальная емкость кеша видео
При отключении полезно отключить функцию «Кэширование при записи». Вы можете найти это в Настройки> Камера> Расширенные настройки камеры. Переместите ползунок влево и выключите его.
В приложении DJI Fly есть 4 кеша, которые можно очистить;
- Видео кеш
- Фото кеш
- Музыкальный кеш
- Авиационный кэш
Вы можете очистить кэш в приложении DJI Fly, нажав «Профиль»> «Настройки»> «Очистить кэш».
Нажмите на каждый, а затем нажмите «подтвердить», чтобы очистить кэш.
Ошибки управления дроном вызванные смартфоном
Многие из проблемы с отключением дронов вызваны смартфоном или планшетом, на котором установлено приложение DJI Fly.
На смартфонах установлено множество приложений, и они постоянно работают, даже когда мы ими не пользуемся. Они постоянно подключены к Интернету, провайдеру сотовых телефонов, извлекают данные, уведомляют и пингуют сеть.
Чтобы летать на дроне без проблем, вы должны убедиться, что ваш смартфон или планшет работает оптимально.
В отношении смартфонов и планшетов рекомендуется оптимизировать использование уведомлений от различных приложений (Facebook, Twitter, Instagram, WhatsApp и т. Д.) Во время полета. Отключите обновления приложений во время полета. Удалите неиспользуемые приложения, так как они занимают пространство, память и мощность процессора.
Существуют программы для оптимизации вашего смартфона и планшета. Используйте их для оптимальной работы смартфона или планшета.
Если ваш смартфон работает неоптимально, то открытие приложения DJI Fly и запись видео во время полета может привести к большей нагрузке на процессор или заполнить его память. Если смартфон работает медленно, он может легко разорвать соединение.
Карты памяти могут быть проблемой потери связи
Отключении дрона от пульта дистанционного управления или приложения DJI Fly может возникнуть от проблем, вызванных картой памяти micro SD.
Эти карты micro SD могут быть повреждены физически или файловая система может быть повреждена на карте. Даже видео или фотография могут испортиться на микро SD-карте.
Читайте: Обзор лучших карт памяти: SD, microSD, XQD и CF как выбрать?
Если вы используете карту памяти micro SD для чего-то другого или на ней есть другие файлы и папки то при установки ее в дрон это может вызвать проблему при попытке записи на нее. Карта micro SD все еще может работать, но ее работа будет не идеальна и может вызывать помехи в работе квадрокоптера.
Выньте карту micro SD и попробуйте летать без нее.
Если вы не отсоединились, значит, проблема в карте памяти micro SD. В настройках камеры приложения DJI Fly вы можете отформатировать карту micro SD.
Перед форматированием карты памяти может потребоваться скопировать существующую информацию (файлы, фотографии и видео) с карты на компьютер.
Если по-прежнему происходят разрывы после форматирования карты SD просто замените ее.
Пульт управления вызывает ошибку соединения
Проверьте свой пульт дистанционного управления. Убедитесь, что порты и кабели чистые. Грязь или пыль могут очень легко попасть в порты.
Один из самых простых способов отключить дрон от пульта дистанционного управления — удерживать его и антенну в неправильном направлении.
Чтобы получить самый сильный сигнал передачи, держите пульт там где дрон находится в небе. Ваша антенна дистанционного управления должна быть направлена правильно.
Слабый сигнал или электромагнитные помехи, приводящие к отключению дрона
Если вы летите на большое расстояние, сигнал передачи будет слабее. Когда сигнал становится слабее, становится вероятным отключение вашего квадрокоптера от приложения DJI Fly или пульта дистанционного управления.
Тем не менее никогда не стоит доводить дальность полета или высоту до предельных значений.
Кроме того, полет в тумане, при дожде, очень пасмурной погоде или плохом освещении может вызвать нарушения связи и проблемы с полетом.
Дрон отключается после обновления прошивки
Проблема так же может быть вызвана неправильной установкой новой прошивки или ошибкой в ней.
Используя приложение DJI Assistant 2, установленное на компьютере подключаете дрон и возвращаетесь к более ранней версии прошивки.
После понижения версии прошивки вы должны запустить свой квадрокоптер, чтобы увидеть, решены ли проблемы с полетом. Если это так, вы можете попробовать обновить еще раз или подождать до нового обновления прошивки.
Все дроны DJI содержат регистратор полета. Информация о полетных данных, включая телеметрию, статус самолета и другие параметры, автоматически сохраняется во внутреннем регистраторе на вашем дроне DJI.
К этим данным можно получить доступ с помощью программного обеспечения DJI Assistant 2. Эта информация также может быть отправлена в DJI для устранения проблем с полетом.
Что делать теряется связь квадрокоптером во время полета?
Если пульт дистанционного управления все еще подключен и это просто приложение DJI Fly которое потеряло сигнал, выполните следующие действия;
Закройте и снова откройте приложение DJI Fly — уберите руки с пульта и дайте вашему квадрокоптеру зависнуть. Закройте приложение DJI Fly и вернитесь к нему. Существует большая вероятность, что приложение Fly снова подключится к дрону.
Приложение DJI Fly отключается при полете
Если дрон находится на достаточном расстоянии, вы можете предпринять некоторые действия для повторного подключения, пока он находится в режиме RTH. Вы можете попробовать следующее:
- Попробуйте приблизиться в направлении Mavic Mini.
- Закройте приложение DJI Fly и снова войдите.
- Остановите и запустите WiFi на вашем смартфоне.
- Перезагрузите телефон или планшет.
Пульт дистанционного управления отключается при полете
Если у вас нет управления вы не сможете управлять своим дроном, даже если сможете его увидеть. Ваш дрон должен запустить режим точки возврата Failsafe Return-To-Home, который он установил сразу после взлета.
Если дрон улетел на большое расстояние, вы можете помочь пульту дистанционного управления подключиться. Вот несколько советов.
Двигайтесь к своему квадрокоптеру, сокращая расстояние между пультом и дроном. Если вы находитесь рядом с работающим двигателем, генератором, линиями электропередачи и т. д., Это может ослабить сигнал, приводящий к отключению. Поэтому отойдите от любых помех в направлении дрона, и он может просто переподключиться.
Проверьте направление антенны пульта дистанционного управления. Направлена ли антенна в правильном направлении. Если дрон находится довольно высоко в воздухе, вам нужно изменить угол наклона пульта дистанционного управления, чтобы антенна была направлена прямо на него. Вам также необходимо изменить угол, на котором вы держите пульт дистанционного управления, если вы стоите на возвышенности и летите на дроне вниз.
Выключите и снова включите пульт — стоит попробовать, так как это займет всего несколько секунд.
Возврат к домашнему безотказному режиму — если вы летите в широком открытом пространстве без каких-либо препятствий на пути. Режим RTH вернет квадрокоптер обратно в исходную точку. Это очень полезная функция особенность.
![]() Загрузка…
Загрузка…
“ESC connection error” has been a common issue on DJI drones especially on Mavic air 2, nonetheless, DJI doesn’t seem to come up with a solution.
And this error is not something you can ignore or say I will come back to it later because it can be very dangerous.
I had this problem a couple of weeks ago, few minutes into flying the drone went crazy, lucky I was able to catch it but refused to liftoff later on.
After contacting DJI, reading a bunch of forums, hours of frustration, and trying different things, I fixed it and saved myself hundreds of dollars, and so I thought I could do the same for others.
So what is causing “ESC connection error” and how do you fix it?
Mavic air 2’s ESC connection error is usually caused by a faulty electronic speed controller or a faulty wire, but it can also be caused by a corrupted software. To fix this problem you can try refreshing the firmware in DJI Assistant 2, if the error persists, you might have to send the drone to DJI for service.
When you receive an “ECS connection Error” it can be hard to ascertain if it is a hardware or software issue.
If it is a hardware issue it is not safe to fly, because if the ESC stops sending signal to the motor while up in the sky the drone can fall down like a brick, and can cause a lot of trouble! including property damage and/or cause harm to people.
And that is if the drone allows you to lift off in the first place.
However, if it is a software issue it is safer and can be resolved with a firmware refresh or a factory reset.
Hardware problems
If you had a crash then there is a high chance that this is the cause of the ECS connection Error.
ECS connection Error error might not appear spontaneously after a crash, It may take time for a wire that was jarred during the crash to finally break.
After a crash wires become loosely connected, and when you land the drone after, the loose wires become detached completely.
- ECS connection Error can also happen after replacing or repairing damaged parts on your drone, if you had replaced a part on your drone by yourself you might have broken one fine wire which can be causing this error, so open the cover and check if there is a faulty wire.
- You can also get ECS connection Error on a brand new DJI drone right out of the box. This may be due to poor handling while in transit, which causes wires to get detached, in this case, DJI will get it fixed without any cost to you
Software problems
It is also common to receive an ECS connection Error after upgrading a drone’s firmware.
If you received an ECS connection Error after updating your firmware, try refreshing your firmware. If refreshing the firmware, try rolling it back to the previous version.
Alternatively, if there is an update available and you currently have the ECS connection Error message, try updating the firmware.
So let me explain how you can do these step by step-
1. Refresh the drones firmware in DJI assistant 2
In the best-case scenario, this problem will be resolved just by refreshing the drone’s firmware.
To do that-
- Power on the drone
- Download the proper dji assistant for mavic air 2 here
- Connect it to your computer using the USB cable DJI provides
- Open the software on your laptop
- Log in to the DJI Assistant 2 app and select your drone
- Next, you will see the firmware version
- Tap update and choose the latest version
- If it is already the latest version click refresh
- Repeat process with every battery you own
you can also refresh the firmware in DJI go 4 app.
2. Update/refresh Controller Firmware
The Drone’s and the controller’s firmware must match so after refreshing or updating your drone’s firmware you should do the same for the controller separately.
So, to update/refresh your RC’s firmware-
- Power on the remote controller
- Connect it to your computer using a USB cable provided
- Open and log into the DJI Assistant 2 software on your laptop
- Select your drone’s remote controller
- Next, you will see the firmware version
- Tap update if you have an older version or tap refresh if it is up to date
- Click on “Start Update”
- On the next screen, you will see the firmware being downloaded, then transmitted and updating the remote controller
- At 100%, you will see the message, “Update Complete”
- After the firmware is complete, the controller will restart automatically
3. Downgrade firmware
If refreshing the current firmware doesn’t seem to work, you can downgrade the firmware till the next update comes out.
You can downgrade your firmware both in DJI assistant and DJI go 4.
To downgrade firmware in DJI assistant–
- Power on the drone
- Connect it to your computer using the USB cable
- Open the DJI Assistant 2 software on your laptop
- Log in to the DJI Assistant 2 app and select your drone
- Next, you will see the firmware version and older versions lined up
- Choose the version one below the current version you have
- Then click install
- Then the drone will automatically restart
To downgrade firmware in DJI go 4
Press and hold the menu icon (three horizontal lines in the top right corner) for five seconds and a special firmware menu appears. You can now select which previous firmware version you would like to downgrade to. Check it out.
4. Factory reset your drone and controller
Before changing the ESC just to make sure it is not a software problem you are having try factory resetting the drone.
- First, Install the DJI Assistant 2 Program on your device, make sure you download the proper one.
- Connect your drone to your laptop using the USB cable provided, and wait for the software till it detects your drone
- You’ll be able to see your drone on the Connected Devices screen. Select your drone and then click on confirm.
- Click on Firmware Update. After that, you’ll be able to see the “Restore factory defaults” button.
- Click on the factory reset button and then confirm when you are asked to confirm the reset. A progress bar will pop up showing the progress of the reset. You’ll be notified when the reset is complete.
Note: After a factory reset you have to calibrate everything again.
You can also hard reset the controller
To reset the RC: Turn on the controller, the aircraft should be off. * Press C1, C2, and shutter (top right button nearest antenna) on the controller and hold for about 2 seconds or so until it beeps, then turn the controller off.”
5. Change the ESC
If none of the previous method work it mean it is not a software problem and the ESC should get replaced.
Note: by attempting to repair or replace a damaged part on your DJI drone it is very important to understand that you will void your warrenty!
in the video down below I will show you how you can change the ESC
However, changing the ESC needs a little experience, and every drone is different that is why I recommend sending it to a professional to get it replaced
Final choice
If none of the methods fix it, you need to send it to a professional.
DJI care does include battery problems, so If you have DJI care there is a good chance you can get it fixed without any cost.
DJI can ask you to send the drone even if it is a battery problem
If you don’t have DJI care you might have to pay from fifty dollars for a power management replacement up to hundreds of dollars if the battery needs a replacement
After you hand it to DJI it can take up to 15 days till they fix it and send it back to you, and it can take longer if you don’t live in the united states
If you are located in Armenia, you may contact the local dealer or DJI’s support via email to start a case and send the unit back.
проблема с квадрокоптером DJI / Мурманск
Дрон выдает ошибку подключения ESC. Требуется ремонт. Обратитесь в службу поддержки DJI.
Люди с такой же проблемой (1)
Видео с YouTube на эту тему
Знаете, как решить эту проблему?
Поделитесь своим знанием!
Ваш способ решения:
Наиболее похожие проблемы из этого раздела
![]()
Добрый день . Дрон не включается. Причем при зарядке огонек мигает медленно синим, заряжаю уже весь день. Как только отключаю от зарядки, при …
Здравствуйте, проблема с дроном tello edu.
Какая-то проблема с камерой. То есть, фото снимает отлично, на смартфон передает нормальную, цветную …
![]()
Первый дрон я разбил, потому что он при 9% заряда начал снижаться, я не видел его визуально, еще и видео отключилось, в результате сел он на …
![]()
Дрон новый. При включении у дрона не запускаются моторы. После подключения пульта и нажатии на кнопку запуска ничего не происходит, моторы не …
![]()
Как переключить из учебного режима в профессиональный, чтобы скорость дрона была больше?
Let us diagnose. Let us repair. Let Us Drone. Flying your Phantom 4 Pro or Spark is a blast…until you start ignoring the error or warning messages, then the platonic fun turns into a rush of adrenaline fueled by rebellion because you’re choosing to fly a drone that could drop from the sky at any moment.
Okay, maybe that was a bit dramatic and over the top, but still, I hope that you don’t ignore warning messages, especially ESC warnings. Let’s go ahead and talk about DJI drone ESC’s, how they work, why they are so important, and some of the common problems and solutions we have with the ESC’s.
What is the ESC?
ESC stands for Electronic Speed Controller. Multi-rotor aircraft rely on speed changes of the motors for directional movements. The ESC’s are responsible for telling the motors to speed up or slow down depending on the commands given by the pilot.
Each of the four drone motors has an ESC assigned to it. When a pilot provides a stick adjustment, the command is received by the flight controller onboard the drone, which transmits the information to the electronic speed controllers which then tells the motors to speed up or slow down.
For example, if the pilot increases the height of the drone by pressing up on the left stick, more voltage is evenly sent through each of the four ESC’s which in turn speeds up the motors, increasing the height of the drone.
Another example is if the pilot presses the right stick up the nose of the drone drops down and the drone proceeds to move forward. This is because more voltage was passed through the two rear ESC’s which sped them up.
What causes ESC errors?
When you receive a ESC status error in the DJI GO 4 app it can be difficult to ascertain why it is present. To better know how to fix the problem, we need to figure out if it was a hardware or software issue that caused it in the first place.
Hardware problems
If you recently had a crash then there is a good chance that this is the cause of the ESC status error. You may not think that the crash you had three weeks ago was the reason for the ESC status error that just appeared on the app, but you may be wrong.
Problems after a crash don’t always immediately present themselves. It may take time for that wiring that was jarred loose during the crash to finally tear, or for the motor to be affected by that small piece of broken off plastic that has been rattling around.
A hard landing will be enough to sometimes jar things loose. People have often also experienced ESC errors after replacing or repairing damaged parts on their DJI drones themselves. Before ever attempting to repair or replace a damaged part on your DJI drone it is very important to first check your warranty status as taking apart your drone will void the warranty. I will talk more about the limited warranty and Care Refresh below.
Software problems
It seems like there is always some kind of update available. If it’s not a Precise Fly Safe Database Update, then it’s a firmware update for the AC or RC, or it’s an app update.
It is not unheard of for people to receive an ESC status error after updating their drone’s firmware. If you received an ESC status error after updating your firmware, try refreshing your firmware. If refreshing the firmware, try rolling it back to the previous version.
Alternatively, if there is an update available and you currently have the ESC status error message, try updating the firmware.
There have been reports of people receiving ESC status errors with their brand new DJI drone right out of the box. This may be due to a software issue or it could be a hardware problem from poor handling while in transit.
There have been reports of people receiving ESC status errors with their brand new DJI drone right out of the box.
How to fix the ESC status error
Often times you will get a “cannot takeoff” message in the status bar at the top of the screen. Tapping on that will bring up the aircraft status menu where you can view the ESC status.
![]()
Click on “ESC status” to bring up the error message. This will usually tell you which motor(s) has the ESC problem, and the message may give you guidance on what to do next. Usually, the message tells you something vague like “Restart the aircraft. If problems persist contact DJI support”.
If after restarting the drone the error message persists, try updating the firmware on your drone. If a firmware update is not available then just refresh the current firmware version. Updating or refreshing the firmware will usually eradicate the ESC status error if it’s a software issue, but hardware damage will not simply mend itself with a firmware update.
You may have luck getting rid of the ESC error by performing a firmware update, but when you place a new battery in the drone the error may come back. This is because the firmware on the new battery needs to also be flashed with the new firmware. There is no procedure to solely update the battery firmware so go ahead an perform the aircraft firmware update once more.
If the ESC board is damaged, there really isn’t a way of going around it…you’ll need a new one. Although I have yet to complete an ESC repair or replacement myself, I have seen videos and the soldering alone is enough to scare away most people.
I repaired about 1,000 iPhones and iPads during my time as a repair technician, and although I wouldn’t shy away from the chance to replace an ESC board, I certainly wouldn’t take the job lightly due to its complexity.
Unless you have soldering experience and the required tools for the job, I’d strongly suggest sending your drone in to DJI for the ESC repair.
Is your drone under warranty?
Before you think about attempting to take apart your expensive drone to diagnose what is causing the ESC status error, you should check your warranty status. Taking apart the drone will void the limited warranty that comes with the drone.
Taking apart the drone will void the limited warranty that comes with the drone.
Every DJI product comes with a limited warranty that essentially covers you against manufacturer defects, and components of the drone are warrantied for different lengths of periods. Read more about how to find out if your drone is covered by the limited in a post I wrote here.
If the ESC status error is caused by a software issue that isn’t rectified by a firmware update, I would think that DJI would replace your drone under the limited warranty program. If, on the other hand, you crash your drone into a tree and physical damage is what caused the error, your drone will not be covered under the limited warranty.
Care Refresh is an extended warranty available for purchase that covers pilots against user inflicted damage. If you have Care Refresh, you may as well send the drone to DJI and have them repair it since this is the type of thing you likely purchased the extended warranty in the first place for anyway.
Related post: DJI Care Refresh: The Ultimate Guide – DJI’s Care Refresh is a comprehensive warranty. If you chose to purchase Care Refresh when you buy a new drone, DJI will replace it with a new or like-new one up to two times in the event of your drone getting damaged.
More resources
To learn more about what DJI has to say about their ESC’s, check out this article written by DJI that is helpful and informative.
Someone spent a serious amount of time reverse engineering a DJI ESC and proceeded to make a “Handyman’s Guide to the ESC”, which he posted in a forum. The guide is incredibly detailed! Here is the link to that forum.
FAQ
What does ESC stand for?
Electronic Speed Controller.
What does the ESC do?
The ESC controls the speed of the motors which directly alters the in-flight aircraft directional changes.
Why am I receiving an ESC status error?
Hardware can be damaged during a hard landing or crash, or software glitches may be the reason for the errors.
How do I get rid of the ESC errors?
Sometimes a simple restart of the aircraft will clear the errors, and other times a firmware update/refresh will do the trick. If the ESC board is damaged, you will need to send your drone into a repair center, unless you have experience soldering and repairing electronics.
How to see which motor has the ESC error?
In the DJI Go 4 app tap on the aircraft status bar, and scroll down until you see “ESC status”. Tap on that to get a description of the error and which motor has it.
Trevor’s Take
I have not yet had the opportunity to repair or replace a motor or ESC board on a drone before, but I am tempted. When I look at instructional videos and/or guides out there on how to repair components on DJI drones I am a bit hesitant to follow them. I am by no means bashing on anyone who has put content out there in an effort to show the rest of us how to repair our drones, but it takes a whole lot of time and experience to produce quality guides on this type of thing. Not to mention the financial side of having a camera that shows the micro detail necessary to make a helpful guide.
I’m thinking about producing clear and concise instructional videos on how to perform some of the more common drone repairs. Would this be something that you guys would find helpful or would I be better off investing my time into something else? Thanks in advance for the feedback!
Mavic Pro ошибка ESC

Liman , значит все таки существует проблема с регулятором, больше там вариантов нет
- Авторизуйтесь для ответа в теме
#1 OFFLINE Liman


- Город: Уфа
В общем ситуация такая: упал мавик, из корпуса выдрало два левых мотора. Поменял лучи и корпус, все запаял, включаю после ремонта — все работает. Включаю перед полетом, выдает ошибку ESC no.1, передний правый мотор. Ну, думаю, пропаял плохо, опять разобрал пропаял контакты, опять включаю — все работает. Выхожу на улицу, включаю, опять ошибка регулятора. При замене, осмотр платы показал, что все в порядке с регулями, нигде нет ни намека на прогар, запаха гари тоже нет. Не знаю, что думать. Прошу помощи.
#2 OFFLINE Poster1
- Город: Москва
- Ремонт коптеров Запчасти
другой луч подпаяйте, возможно с мотором проблема
Источник
Не обновляется прошивка Mavic Pro + esc status error
#1 OFFLINE Fixxxer
Летчик со стажем

- Город: Екатеринбург
- Коптер: Mavic Pro
Запустил сегодня приложение DJI GO 4, оно сообщило что вышла новая прошивка и предложило обновиться не через шнур а по воздуху, ну я согласился.
Обновлялся очень долго, минут 15, в конце концов вентиляторы охлаждения отключились, а обновление остановилось на 81%. Коптер так нагрелся что кука не терпела. Я его выключил, подождал пока остынет и включил заново.
Сейчас после включения каждые секунд один из двигателей дергается и издает звук. В приложении висят 2 ошибки — надо обновить прошивку и esc status error. Двигатели заблокированы, летать нельзя.
Пытался обновить через шнур, через приложение, откатить прошивку на прошлую, ничего не получается — зависает в процессе.
Вчера еще летал отлично и проблем не было, да и до попытки прошивки ошибок никаких не было.
Что делать? Как жить дальше? Кто-то сталкивался с подобным?(
Прикрепленные изображения
#2 OFFLINE Poster1
- Город: Москва
- Ремонт коптеров Запчасти
Варианта два: либо ошибка одного из регуляторов оборотов, либо один двигатель не видит.
#3 OFFLINE Fixxxer
Летчик со стажем
- Город: Екатеринбург
- Коптер: Mavic Pro
Двигатель вроде видит — он при включении чуть поворачивается как все остальные. И пока непонятно проблема программная или аппаратная.
Может там расплавилось что-то когда он перегрелся пытаясь прошиться, странно просто что до прошивки все работало.
Только разбирать смотреть?
#4 OFFLINE Poster1
- Город: Москва
- Ремонт коптеров Запчасти
Fixxxer , делайте обновление через компьютер а не по воздуху. попробуйте загрузить предыдущую прошивку.
о чем говорит ошибка esc error я вам сказал. если там что то и расплавилось то насквозь естественно не увидите
#5 OFFLINE Laleniko
- Город: Москва
- Коптер: Dji mavic
#6 OFFLINE N00B
Опытный летчик АС
- Город: Moscow
- Коптер: Небесный Нубас
Попробуйте с другой картой памяти, предварительно форматируйте её на ПК. У меня такое в автомобиле было, флэшка нагревалась в процессе чтения и переставала читаться, как выяснилось
#7 OFFLINE Fixxxer
Летчик со стажем
- Город: Екатеринбург
- Коптер: Mavic Pro
выключил, потому что он нагрелся до такой температуры, что пластиком начал пахнуть, и я имел ввиду что 15 минут он висел на 81% а с начала обновления уже прошло минут 30, да и пульт его перестал видеть.
флешку другую не пробовал, но родную пробовал форматировать и заново прошивать
либо ошибка одного из регуляторов оборотов, либо один двигатель не видит.
двигатель вроде видит: он двигается при начальной диагностике — на видео виден процесс, ругается он на правый.
Сообщение отредактировал Fixxxer: 22 Февраль 2017 — 03:45
#8 OFFLINE ВОЕВОДА

- Город: Губкинский, ЯНАО
- Коптер: MAVIC PRO
У меня после падения тоже выдает ошибку третьего двигателя.
Но при запуске дрона все движки тоже дергаются. или плата управления или одна из обмоток прогорела, их там две.
Решил проблему покупкой второго мавика. а с ошибкой на запчасти.
#9 OFFLINE Poster1
- Город: Москва
- Ремонт коптеров Запчасти
Fixxxer , вы включаете коптер с фиксатором на подвесе? не понимаю для кого вообще пишут инструкции. скоро помимо двигателей останетесь и без моторчиков подвеса, если уже не остались
#10 OFFLINE НиколаичСПб
Летчик со стажем
- Город: Кировск
- Коптер: MavikcPro, Samsung Galaxy Note 5
Люди, ау! Обновляю сегодня купленный Мавик. Асистент остановился с надписью загрузка 100%. И в такой позиции уже с полчаса находится! Теперь и дрон отключить боюсь, и приложение остановить! Что делать?
#11 OFFLINE olegnsk
Опытный летчик АС

- Город: Москва, исторически Новосибирск и Камчатка
- Коптер: младшенький Mavic и ещё небольшая эскадрилья
НиколаичСПб , Отключайте, вариантов нет. Вероятно всё будет нормально. Только ЗАЧЕМ вы сразу после покупки начали обновлять.
Изучить всю мат часть, полетать а далее почитав форум (т.к. далеко не все сразу стремятся вставить самую верхнюю прошивку) решать надо или нет.
#12 OFFLINE НиколаичСПб
Летчик со стажем
- Город: Кировск
- Коптер: MavikcPro, Samsung Galaxy Note 5
olegnsk , Я как раз не собирался ставить верхнюю. Сейчас стоИт 1.3.4, хотел поставить следующую. Обновляю, т.к. дрон требует. Там для моего уже штук пять предлагается! Выключил, и правда, ничего не случилось. Может следующую попробовать?
Попробовал. Тоже самое, нихрена не вышло с прошивкой. Но по крайней мере Мавик не превратился в кирпич, и это радует!
Сообщение отредактировал НиколаичСПб: 09 Июнь 2017 — 11:55
#13 OFFLINE olegnsk
Опытный летчик АС
- Город: Москва, исторически Новосибирск и Камчатка
- Коптер: младшенький Mavic и ещё небольшая эскадрилья
НиколаичСПб , дрон не требует, а просит, принудительных обновлений на моей скромной памяти было всего 2-3 раза на продукцию DJI.
400-я нормальная прошивка летайте и радуйтесь. Хотя это личное дело каждого, также как обновлять операционную систему на ПК или нет. У меня один из ноутов до сих пор сидит на Винде ХР и свои функции отлично выполняет.
#14 OFFLINE vladsvs

- Город: Россия
- Коптер: Mavic Pro
#15 OFFLINE yurikss
Опытный летчик АС

- Город: Москва
- Коптер: Мэвик 1,2
Просто с каждым новым коптером от джидайцев надо знать когда остановиться.
Первые прошивки исправляют косяки,последующие добавляют гемороя.
#16 OFFLINE RomanSimfer
Летчик со стажем

- Город: Симферополь
- Коптер: MINI2
Возможно, кому-то поможет.
Если Мавик превратился в кирпич. Не шьётся, комп не видит.
Откатил на V01.03.0900 с помощью DUMLdoreV3, снял ограничения, всё работало ОК. Имейте ввиду, как мне показалось, DUMLdoreV3 в коптер зальёт что угодно, хоть текстовый файл, хоть фото тёщи, и дрон станет кирпичём.
Была проблема, что коптер плюхался при посадке, точная посадка не работала.
Заливаю с пом. DUMLdoreV3, чисто для интереса, V01.03.0900 и V01.04.0100 без модулей 305 и 306. Просто проверить, может типа там лучше
Что-то пошло не так, возможно скачался архив с ошибкой или х.з.
Обновление прошло быстро, на 100%, но коптер сам не перезагрузился. Подождал минут 5. Программу DUMLdoreV3 закрыл. Коптер выключил.
Затем при включении, камеру крутит (как обычно), но мелодии нет, огни красным, не мигают, пульт не видит. Вентилятор не включается, греется как утюг. При подключении к компу — каждые 2 секунды звук Винды, то есть коннект, то нет. DJI Assistant 2 — коптер не видит. DUMLdoreV3 — коптер не видит.
Запасаемся БОЛЬШИМ терпением.
Подключаем по USB.
Запускаем DUMLdoreV3, на готове держим проверенную рабочую прошивку.
Коптер стоит, подключенным и греется. Далее шаманство. Включаем его, выключаем, не доводим до того, чтобы начал плавится пластик, даём остыть, снова включаем, вытаскиваем-вставляем USB, снимаем батарею, снова включаем. Всё хаотично. Логики никакой! Рано или поздно происходит чудо. У меня чудо произошло примерно через полчаса — час шаманства. На коптере загудит вентилятор и DUMLdoreV3 его увидит. Кричим — Аминь! И как можно быстрее, заливаем софт.
Я залил предыдущую V01.03.0900. Пульт увидел, всё заработало как и всегда.
Снимаю батарею с коптера, заряжаю, через час включаю — опять не коптер, а горячий кирпич. Комп не видит!
Снова тот же Капец!
Полчаса шаманства и опять — есть коннект!
Снова заливаю V01.03.0900 с пом. DUMLdoreV3. Затем, тут же, пока всё работает, залил через DJI Assistant 2 последнюю V01.04.0400. Два раза! Пульт также обновил. Уже месяц, как всё работает как новое.
Источник
Содержание
- 1 Введение
- 2 Коды ошибок DJI Mini 2 и пути их решения
- 3 DJI Mini 2: Код ошибки 10001
- 4 DJI Mini 2: Код ошибки 10016
- 5 DJI Mini 2: Код ошибки 10022
- 6 DJI Mini 2: Код ошибки 10023
- 7 DJI Mini 2: Код ошибки 30007 и 30008
- 8 DJI Mini 2: Код ошибки 30047
- 9 DJI Mini 2: Код ошибки 30049
- 10 DJI Mini 2: Код ошибки 30050
- 11 DJI Mini 2: Код ошибки 30055
- 12 DJI Mini 2: Код ошибки 30060
- 13 DJI Mini 2: Код ошибки 30064
- 14 DJI Mini 2: Код ошибки 30085
- 15 DJI Mini 2: Код ошибки 30105
- 16 DJI Mini 2: Код ошибки 30168
- 17 DJI Mini 2: Код ошибки 30210
- 18 DJI Mini 2: Код ошибки 30224
- 19 DJI Mini 2: Код ошибки 30226
- 20 DJI Mini 2: Код ошибки 40002
- 21 DJI Mini 2: Код ошибки 40011
- 22 DJI Mini 2: Код ошибки 40012
- 23 DJI Mini 2: Код ошибки 40021
- 24 DJI Mini 2: Код ошибки 180016, 180030 и 180031
Введение
Ничто так быстро не выводит пилота дрона из себя, как плохая погода и коды ошибок дрона. И, если, нелётную погоду можно просто переждать, то коды ошибок могут быть чем-то большим, чем просто пережидание проблемы или надежда на то, что она разрешится сама собой. Отсутствие возможности летать из-за возникших ошибок может стать неприятностью, но когда эти коды расшифровываются, объясняются, и на первый план выходят предложения по их устранению, всё становится оптимистичнее и проще. В представленной статье мы рассмотрим возможные коды ошибок DJI Mini 2, их значение и шаги по их устранению. Для удобства поиска нужного вам кода мы расположили в содержании все коды в цифровом порядке.
Коды ошибок DJI Mini 2 и пути их решения
В процессе ознакомления с представленным перечнем кодов ошибок вы сможете заметить, что большая часть этих кодов приводит владельца к обращению в службу поддержки DJI, и как бы банально это не звучало, но таков единственный путь решения проблемы.
![]()
DJI Mini 2: Код ошибки 10001
Описание
Неисправность камеры. Требуется ремонт. Обратитесь в службу поддержки DJI за помощью.
Возможные пути решения
Единственный шаг, который можно предпринять для быстрого устранения этой ошибки, — выключить дрон и пульт дистанционного управления, затем снова запустить их и посмотреть, исчезла ли ошибка. Если нет, то обратитесь в службу поддержки DJI, где вам будет предложено отремонтировать либо заменить камеру.
DJI Mini 2: Код ошибки 10016
Описание
Камера не откалибрована. Качество изображения может быть ухудшено. Обратитесь в службу поддержки DJI за помощью.
Возможные пути решения
Для исключения данной ошибки вы можете попробовать откалибровать подвес камеры. Шаги для этого приведены ниже:
- Убедитесь, что ваш дрон находится на ровной поверхности.
- Зайдите в приложение DJI Fly.
- Найдите в правом верхнем углу 3 точки и тапните по ним, чтобы войти в системное меню.
- Коснитесь иконки камеры в левой части экрана. Это приведет вас к «Настройкам подвеса/Gimbal Settings».
- В разделе «Расширенные настройки стабилизатора камеры/Camera Gimbal Advanced Settings» выберите «Автокалибровка стабилизатора/Auto Calibrate Gimbal», затем нажмите «ОК».
- Процесс начнётся и завершится автоматически.
Если это не поможет устранить ошибку, то вам будет необходимо обратится в службу поддержки DJI, где скорее всего будет предложено отремонтировать или заменить камеру.
DJI Mini 2: Код ошибки 10022
Описание
Нет SD-карты. Вставьте SD карту.
Возможные пути решения
Это простая ошибка. Всё, что нужно сделать, это вставить SD-карту. Требуемая SD-карта должна соответствовать таким требованиям как: UHS-I Speed Class 3 или выше. О том, какая SD-карта лучше подходит для вашего дрона вы можете прочитать здесь.
DJI Mini 2: Код ошибки 10023
Описание
Неисправность SD-карты. Замените карту.
Возможные пути решения
Самый быстрый способ устранить эту ошибку — просто извлечь SD-карту, подождать минуту и снова установить её обратно. Если это не помогло, смените карту на другую. Поскольку SD-карты очень хрупкие и привередливые в работе устройства, не помешает иметь под рукой сразу несколько карт, что позволит исключить проблемы такого рода.
DJI Mini 2: Код ошибки 30007 и 30008
Описание
Нет сигнала GPS. Невозможно удерживать позицию. Летайте осторожно.
Возможные пути решения
В этом случае лучшим вариантом действий будет вернуть дрон к месту взлёта, посадить его и провести ремонт. Для решения данной проблемы потребуется ремонт или вероятнее всего замена GPS-модуля. Здесь сразу хочется напомнить о требовании разработчика всегда держать дрон в пределах прямой видимости (VLOS), так как со сломанным GPS-модулем он не только теряет возможность удерживать свою позицию в автоматическом режиме, но также может плохо отображаться на карте.
DJI Mini 2: Код ошибки 30047
Описание
Сбой инициализации барометра. Перезапустите дрон.
Возможные пути решения
Единственное, что можно сделать в данном случае, это перезапустить Mini 2 и следовать инструкциям приложения DJI Fly на экране.
DJI Mini 2: Код ошибки 30049
Описание
Ошибка модуля GPS. Перезапустите дрон.
Возможные пути решения
Выключите Mini 2 и пульт дистанционного управления, а затем запустите их снова. Если это не устранит проблему, то потребуется ремонт или замена GPS-модуля.
DJI Mini 2: Код ошибки 30050
Описание
Требуется калибровка IMU. Откалибруйте IMU.
Возможные пути решения
Вам может быть предложено откалибровать IMU. Как правило это происходит после жёсткой посадки/падения дрона, некорректного полёта и множества других причин, не указанных в коде ошибки 30050.
Примечание: Если система дрона выводит на экран код ошибки 30050, в большинстве случаев, если не во всех, при перезапуске дрона появится диалоговое окно с предложением провести автоматическую калибровку EMU модуля, в этом случае стоит согласится с подсказками и провести калибровку.
Вы можете вручную откалибровать IMU, выполнив следующие шаги:
- Зайдите в приложение DJI Fly.
- Найдите в правом верхнем углу 3 точки и тапните по ним, чтобы войти в системное меню.
- Прокрутите вниз до раздела «Датчики/Sensors».
- Выберите и тапните по иконке IMU.
- Процесс запустится автоматически и проинструктирует вас, где и когда нужно расположить Mini 2, чтобы правильно откалибровать IMU.
- Процесс займет примерно одну минуту, система дрона предупредит вас о его завершении.
DJI Mini 2: Код ошибки 30055
Описание
IMU не откалиброван. Откалибруйте IMU.
Возможные пути решения
Выполните те же действия, что и для кода ошибки 30050 (см. код выше).
DJI Mini 2: Код ошибки 30060
Описание
Ошибка компаса. Убедитесь, что рядом с дроном нет металлических или магнитных конструкций/предметов, и откалибруйте его перед использованием.
Возможные пути решения
Эта ошибка обычно возникает, если вы запускаете свой дрон дома, в непосредственной близости от крышки люка, скамейки в парке, в гараже или рядом с другими металлическими конструкциями/предметами. Если вы получили это сообщение, попробуйте переместить Mini 2 в другое место поблизости, где нет металла. Если ошибка не исчезнет, возможно, потребуется ремонт или замена подвеса камеры.
DJI Mini 2: Код ошибки 30064
Описание
Невозможно взлететь.
Возможные пути решения
Прежде всего, убедитесь, что для осуществления взлёта Mini 2 ничего не препятствует, и вы не находитесь в зоне ограничения полётов (в геозоне No Fly; например в воздушном пространстве аэропорта).
Если всё в порядке, то просто перезапустите Mini 2 и Пульт управления. Если ошибка сохраняется, проверьте наличие обновления прошивки (как это сделать — см. ниже), и если это также не устраняет проблему, то скорее всего, потребуется ремонт дрона. Зачастую при этой проблеме требуется ремонт или замена ESC модуля.
Для проверки наличия новой прошивки проделайте следующие шаги:
- Зайдите в приложение DJI Fly.
- Найдите в правом верхнем углу 3 точки и тапните по ним.
- Перейдите на вкладку ABOUT.
- Слева вы увидите Прошивка дрона/Aircraft Firmware.
- Справа от неё будет опция «Проверить обновление/Check for Update».
- Тапните по ней и следуйте подсказкам системы дрона.
DJI Mini 2: Код ошибки 30085
Описание
Ошибка подключения ESC. Требуется ремонт. Обратитесь в службу поддержки DJI за помощью.
Возможные пути решения
Эта ошибка возникает из-за проблем с самой платой ESC. Для устранения ошибки необходимо отремонтировать или заменить плату ESC, либо обратиться в службу поддержки DJI для её устранения.
DJI Mini 2: Код ошибки 30105
Описание
Ошибка навигационной системы. Перезапустите дрон.
Возможные пути решения
Простой перезапуск Mini 2 в этом случае может не сработать. Служба поддержки DJI предлагает отодвинуть дрон от любых металлических конструкций/предметов, а затем откалибровать IMU. Если проблема не исчезнет, необходимо обратиться в службу поддержки DJI.
Примечание: Если вы получили это сообщение об ошибке на новом Mini 2, прямо из коробки, это может считаться гарантийным случаем, и вам необходимо связаться со службой поддержки DJI, чтобы осуществить бесплатный обмен.
Для ручной калибровки IMU проделайте следующие шаги:
- Зайдите в приложение DJI Fly.
- Найдите в правом верхнем углу 3 точки и тапните по ним, чтобы войти в системное меню.
- Тапните по иконке IMU.
- Процесс начнется автоматически и проинструктирует вас, где и когда расположить Mini 2 для правильной калибровки IMU.
- Процесс занимает около одной минуты, система дрона сообщит вам, когда он будет завершен.
DJI Mini 2: Код ошибки 30168
Описание
Мощности дрона недостаточно. Летайте осторожно.
Возможные пути решения
Если в районе вашего полёта избыточно сильный ветер, чем обычно, это будет появляться многократно. Если это тихий день без порывов ветра, эта ошибка может указывать на что-то более проблематичное. Например это сообщение может быть связано с тем, что срок службы батареи приближается к концу, а также это может свидетельствовать о неисправном ESC.
DJI Mini 2: Код ошибки 30210
Описание
Оборудование системы питания. Перезапустите дрон.
Возможные пути решения
Для исправления этой ошибки попробуйте перезапустить дрон и пульт управления. Если это не сработает, то следующим предлагаемым шагом будет проверка и установка обновленной прошивки (для дрона, аккумулятора и пульта). Разработчик рекомендует делать это там, где есть подключение к интернету.
DJI Mini 2: Код ошибки 30224
Описание
Несовместимая версия прошивки.
Возможные пути решения
Чтобы локально устранить это сообщение об ошибке, необходимо предпринять несколько шагов:
- Убедитесь, что на Mini 2 установлена последняя версия прошивки (Подробно об этом в коде ошибки выше 30064).
- Убедитесь, что все запасные батареи также имеют актуальную прошивку.
- Очистите кэш прошивки в приложении DJI, выполнив следующие действия: Перейдите в ПРОФИЛЬ/PROFILE ⇒ нажмите Настройки/Settings ⇒ затем Очистить кэш/Clear Cache.
- После этого перезапустите дрон и приложение DJI Fly.
- Если это было сделано, но вы всё ещё получаете ошибку: Переустановите приложение DJI Fly.
Если эти шаги не помогли, то вам необходимо отправить дрон в DJI для обслуживания.
DJI Mini 2: Код ошибки 30226
Описание
Запуск не удался. Перезапустите дрон и приложение DJI Fly.
Возможные пути решения
Это ещё одна из тех ошибок, когда требуется полный перезапуск дрона, пульта и приложения DJI Fly, после чего приложение проведёт вас по шагам, необходимым для исправления ситуации.
DJI Mini 2: Код ошибки 40002
Описание
Подвес заклинило. Проверьте, снят ли транспортировочный чехол подвеса и может ли он свободно вращаться.
Возможные пути решения
Эта ошибка обычно возникает, если не снять транспортировочный чехол подвеса перед запуском дрона. Дело всё в том, что когда мы запускает дрон, система дрона запускает самокалибровку подвеса, которая подразумевает его движение в различных направлениях. Соответственно, если не снять чехол, то он будет препятствовать этому процессу. На более ранних DJI моделях (в частности у Mavic Pro), такого системного предупреждения не было, что в конечном итоге зачастую приводило к выгоранию моторов подвеса и дорогому ремонту.
Тем не менее, даже с учётом системного уведомления, такая многократная блокировка подвеса может привести к аналогичному выгоранию приводов, что в последствии сделает дрон бесполезным. Поэтому лучшее решение в данном случае — выработать привычку снимать транспортировочный чехол перед каждым полётом.
DJI Mini 2: Код ошибки 40011
Описание
Ошибка калибровки подвеса. Перезапустите дрон.
Возможные пути решения
Несмотря на то, что первым вашим желанием может быть перезапуск дрона, правильным способом устранения этой ошибки является калибровка подвеса. Если калибровка подвеса не помогла и вы по-прежнему получаете ошибку, попробуйте перезапустить дрон. Если и это не помогло, вам потребуется замена подвеса.
Для калибровки подвеса проделайте следующие шаги:
- Убедитесь, что ваш дрон находится на ровной поверхности.
- Зайдите в приложение DJI Fly.
- Найдите в правом верхнем углу 3 точки и тапните по ним, чтобы войти в системное меню.
- Коснитесь иконки камеры в левой части экрана. Это приведет вас к «Настройкам подвеса/Gimbal Settings».
- В разделе «Расширенные настройки стабилизатора камеры/Camera Gimbal Advanced Settings» выберите «Автокалибровка стабилизатора/Auto Calibrate Gimbal», затем нажмите «ОК».
- Процесс начнётся и завершится автоматически.
DJI Mini 2: Код ошибки 40012
Описание
Не удаётся подключиться к подвесу камеры. Требуется ремонт. Обратитесь за помощью в службу поддержки DJI.
Возможные пути решения
В этом случае вам потребуется замена подвеса. Первостепенно вы можете обратиться в службу поддержки DJI (рекомендуется). Либо вы можете отнести свой дрон в местную мастерскую по ремонту дронов. Последним вариантом выступает самостоятельная замена подвеса, благо на YouTube есть наглядные видеоинструкции, в которых рассказывается и показывается как проводится такого рода ремонт.
DJI Mini 2: Код ошибки 40021
Описание
Ошибка данных IMU подвеса камеры. Обратитесь в службу поддержки DJI за помощью.
Возможные пути решения
Необходимо отремонтировать или заменить GPS модуль. Первостепенно вы можете обратиться в службу поддержки DJI (рекомендуется). Либо вы можете отнести свой дрон в местную мастерскую по ремонту дронов. Последним вариантом выступает самостоятельная замена GPS-модуля, благо на YouTube есть наглядные видеоинструкции, в которых рассказывается и показывается как проводится такого рода ремонт.
DJI Mini 2: Код ошибки 180016, 180030 и 180031
Описание
Ошибка сенсора. Обратитесь в службу поддержки DJI за помощью.
Возможные пути решения
Первым шагом, который может устранить ошибки, будет перезапуск дрона и пульта. Если это не поможет, значит, сенсоры сломаны и их необходимо заменить. Обратитесь в службу поддержки DJI (рекомендуется), либо стороннюю мастерскую БЛА.
Надеемся, что вы не столкнетесь ни с одной из этих ошибок. Однако, если вы всё же с ними столкнетесь, то согласно этой статье у вас всегда есть возможность решить проблему их возникновения без серьёзного и дорогостоящего ремонта. Всем добра! Летайте безопасно!
DJI Mavic Air 2 ESC Connection Error Code: 30085 problem

Good
day everyone. It is a very sad day for me because I couldn’t fly my DJI MavicAir 2 because of this error that I am getting during take-off. First, I will
explain to you what happened. On the afternoon of August 14, 2020, I used my 1st
battery marked as 1 because it still has 70% juice on it. I did a fly around my
house and tried the dolly zoom and it was all going well. After doing so, I
tried to do a short hyperlapse on Mt. Panamao because I saw a few clouds
covering it. After doing so, the battery went to 30% so I decided to land the
drone so I could do the next hyperlapse around the town which was saved on my
waypoints. I landed the drone properly with no problem and swapped the second
battery marked as 2. But when I tried to take off, I have now the error message
that says “ESC Error” and when you click on it, it says ESC Connection error.Repairs required. Contact DJI Support for assistance (Code: 30085). It was
really frustrating.

I tried the 3rd battery since I purchased the Fly
more Combo and still the error was there. I tried researching online and asked
some help from different Facebook groups that focuses on DJI Mavic Air 2. Some
advised me to refresh the firmware thru the DJI Assistant 2 for Mavic app on my
PC and I did that but still no avail. The error was still there. So, what I did
is I contacted my dealer and asked some help. At this time, I am really decided
to just send the drone back to them for repair. I emailed DJI Support but
replied to me that they couldn’t help me right now because of some problem with
the customs. I emailed the dealer for help also until I was instructed to send
an email directly to the Service Center here in the Philippines. I have the
number of the service center and called them. I was advised to send them the drone
together with the whole package and email them all the details needed for the
repair. And on the morning of August 16, 2020, I tried to turn on the drone
again because I forgot to screen record my phone that shows the error message because
that is one of the requirements needed for the repair. I was shocked that the
error message is now gone after I took it out of the box. I snapped in the
propellers and tried to hover the drone just to check if it still gonna get the
ESC Connection error message.
After I hovered it for a few seconds, I landed it
and restarted the drone to check for the error message and voila, the problem
is back. I got the ESC Error message again. At least I have its screen recorded
so I could get to send them the video. I packed everything again and went
immediately to LBC.

Right now, it is on its way to Manila since I am in Visayas
region, that’s gonna take 1 or 2 weeks to reach them since all courier service
are on land trip right now due to this pandemic.

I just hope that they could
fix it or maybe replace it so that I could enjoy my Mavic Air 2 again. Fortunately, Jean from the DJI Service Center Philippines is very much willing to help.
Introduction: How to Fix DJI Spark ESC Status Error! | Replacement
One of my friends came to me with his DJI a spark drone and said it was not working as it was supposed to be so after powering it on one of the motors started to heat up an LED won’t blink and after connecting the drone to DJI app it says cannot take off and when I tried to take off it says ESC status error which means ESC is broken so in this video tutorial I will show you how you can fix this ESC status error only for 14 US dollars so let’s fix it this!
Huge Thanks to JLCPCB.com for Sponsoring this project, You can order 2 layer PCB (10cm*10cm) only for $2 from their website. Built time for 2 layers PCB is only 24Hr with any color solder mask. Check them out and once again Thanks JLCPCB.com for Sponsoring this project.
Step 1: Watch the Video!
You can watch the Video Tutorial if you don’t want to read all the stuff
Step 2: Disconnect the Battery!
The first step before performing any kind of repair is powering off the drone and for that click and hold the power button of DJI spark and then we need to disconnect the battery which is very straight forward.
Step 3: Get to the ESC!
Since we only have a problem with our ESC we don’t need to open the entire drone to reveal the ESC inside take a flat head screwdriver and open this lid be careful and don’t use much pressure.
ESC is held in its place with two screws which are normal Phillips head while removing the screws make sure not to use an oversized screwdriver else it will damage the screw head after removing the bracket which held the ESC I reconnected the battery and power the drone an entire ESC started to heat up now instead of wasting time trying to find which component of ESC was broken I went on ebay and found this replacement ESC which was only 14 US dollars
Step 4: Desoldering and Replacing the ESC!
First I used my soldering iron to heat up the solder and then used a soldering wick to remove all the excess
solder and disconnected the wires from the ESC
Once old ESC was removed I soldered the new one for that I highly recommend using a helping hand and a tweezer as it is not possible for one person to do this job
Step 5: Testing!
Once ESC was replaced before putting everything back together I tested the drone by powering it on and all the LEDs this time turned on as it was supposed to be just to make sure I tried to fly this drone inside and it worked flawlessly but I don’t recommend flying a drone inside the house as it can be dangerous and you can easily crash it after the test I powered of the drone remove the battery put everything back together and this drone was fixed so why not let’s take it outside and test it
Step 6: Done!
So that’s How you can fix and DJI Spark ESC status error!
If you like my work
Feel free to check out my YouTube channel for more awesome stuff: https://www.youtube.com/c/Nematics_lab
You can also follow me on Facebook, Twitter etc for upcoming projects
https://www.facebook.com/NematicsLab/
https://www.instagram.com/nematic_yt/
https://twitter.com/Nematic_YT
Be the First to Share
Recommendations
“ESC status error” has been an issue on DJI drones especially on the older models such as phantom 3 and spark but can happen on the newer models such as Mavic 2 pro and such, nonetheless, DJI doesn’t seem to come up with a solution.
And this error is not something you can ignore or say I will come back to it later because it can be very dangerous.
I had this problem with my spark a couple of weeks ago, few minutes into flying the drone automatically went crazy, lucky I was able to catch it, but refused to liftoff later on.
After contacting DJI, reading a bunch of forums, hours of frustration, and trying different things, I fixed it and saved myself hundreds of dollars, and so I thought I could do the same for others.
So what causes ESC status error and how do you fix it?
ESC status error can be caused by a faulty electronic speed controller or corrupted software, to fix this problem restart the drone multiple times, or refresh the firmware in DJI Assistant 2, if the error persists, try changing the ESC or send the drone to DJI for service.
When you receive an “ESC status error” it can be difficult to ascertain if it is a hardware or software issue.
However, if it is a hardware issue it is not safe to fly, because if the ESC stops sending signal to the motor while up in the sky the drone can fall down like a brick and can cause a lot of trouble! including property damage and/or cause harm to people.
And that is if the drone allows you to lift off in the first place.
However, if it is a software issue it is safer and can be resolved with a firmware refresh or a factory reset
Hardware problems
If you had a crash then there is a good chance that this is the cause of the ESC status error.
ESC status error don’t appear spontaneously after a crash, It may take time for a wire that was jarred during the crash to finally break.
after a crash wires become loosy connected, and when you land the drone after, the loose wires become detached completely.
- ESC errors can also happen after replacing or repairing damaged parts on your drone, if you had replaced a part on your drone by yourself you might have broken one fine wire which can be causing this error, so open the cover and check if there is a faulty wire.
- you can also get ESC status error on a brand new DJI drone right out of the box. This may be due to poor handling while in transit, which causes wires to get detached, in this case, DJI will get it fixed without any cost to you
Software problems
It is also common to receive an ESC status error after upgrading a drone’s firmware.
If you received an ESC status error after updating your firmware, try refreshing your firmware. If refreshing the firmware, try rolling it back to the previous version.
Alternatively, if there is an update available and you currently have the ESC status error message, try updating the firmware.
So let me explain how you can do these step by step-
1. Refresh the drones firmware in DJI assistant 2
In the best-case scenario, this problem is resolved by refreshing the drone’s firmware.
To do that-
- Power on the drone
- Connect it to your computer using the USB cable DJI provides
- Open the DJI Assistant 2 software on your laptop
- Log in to the DJI Assistant 2 app and select your drone
- Next, you will see the firmware version
- Tap update and choose the latest version
- If it is already the latest version click refresh
- Repeat process with every battery you own
you can also refresh the firmware in DJI go 4 app.
2. Update/refresh Controller Firmware
The Drone’s and the controller’s firmware must match so after refreshing or updating your drone’s firmware you should do the same for the controller.
So, to update/refresh your RC’s firmware-
- Power on the remote controller
- Connect it to your computer using a USB cable provided
- Open and log into the DJI Assistant 2 software on your laptop
- Select your drone’s remote controller
- Next, you will see the firmware version
- Tap update if you have an older version or tap refresh if it is up to date
- Click on “Start Update”
- On the next screen, you will see the firmware being downloaded, then transmitted and updating the remote controller
- At 100%, you will see the message, “Update Complete”
- After the firmware is complete, the controller will restart automatically
3. Downgrade firmware
If refreshing the current firmware doesn’t seem to work, you can downgrade the firmware till the next update comes out.
You can downgrade your firmware both in DJI assistant and DJI go 4.
To downgrade firmware in DJI assistant–
- Power on the drone
- Connect it to your computer using the USB cable
- Open the DJI Assistant 2 software on your laptop
- Log in to the DJI Assistant 2 app and select your drone
- Next, you will see the firmware version and older versions lined up
- Choose the version one below the current version you have
- Then click install
- Then the drone will automatically restart
To downgrade firmware in DJI go 4
Press and hold the menu icon (three horizontal lines in the top right corner) for five seconds and a special firmware menu appears. You can now select which previous firmware version you would like to downgrade to. Check it out.
4. Factory reset your drone and controller
Before changing the ESC to make sure it is not a software problem you are having try factory resetting the drone.
- First, Install the DJI Assistant 2 Program on your device, make sure you download the proper one.
- Connect your drone to your laptop using the USB cable provided, and wait for the software till it detects your drone
- You’ll be able to see your drone on the Connected Devices screen. Select your drone and then click on confirm.
- Click on Firmware Update. After that, you’ll be able to see the “Restore factory defaults” button.
- Click on the factory reset button and then confirm when you are asked to confirm the reset. A progress bar will pop up showing the progress of the reset. You’ll be notified when the reset is complete.
Note: After a factory reset you have to calibrate everything again.
You can also hard reset the controller
To reset the RC: Turn on the controller, the aircraft should be off. * Press C1, C2, and shutter (top right button nearest antenna) on the controller and hold for about 2 seconds or so until it beeps, then turn the controller off.”
5. Change the ESC
If none of the previous method work it mean it is not a software problem and the ESC should get replaced.
Note: by attempting to repair or replace a damaged part on your DJI drone it is very important to understand that you will void your warrenty!
Changing the ESC needs a little knowledge, and every drone is different that is why i recommend sending it to a professional to get it replaced
Final choice
If none of the methods fix it, you need to send it to a professional.
DJI care does include battery problems, so If you have DJI care there is a good chance you can get it fixed without any cost.
DJI can ask you to send the drone even if it is a battery problem
If you don’t have DJI care you might have to pay from $80 up to $200 depending on the situation
After you hand it to DJI it can take up to 15 days till they fix it and send it back to you, and it can take longer if you don’t live in the united states
If you are located in Armenia, you may contact the local dealer or DJI’s support via email to start a case and send the unit back.
The new DJI Mavic Mini is a terrific drone and for almost everyone, their drone will fly for years without any issues. However, there are some Mavic Mini’s, which have disconnects, erratic flying, fly away issues, RTH not working or receive warnings and errors.
These Mavic Mini issues require some troubleshooting to find out what has happened and then to fix the Mavic Mini flight problems.
Some of the most common issues with the Mavic Mini are the “Not Enough Force / ESC warning” and “Max Power Load Reached” error. Other Mavic Mini issues include disconnecting from the remote controller or Fly app, fly away or the Mavic Mini return to home feature not working correctly.
Here we look at these issues and possible fixes. Some of these issues could be caused by many variables and other Mavic Mini problems may require your drone to be returned to be fixed.
If you are having issues straight out of the box or within a few days of buying your Mavic Mini, then it is important that you troubleshoot the issue as quickly as possible. Your Mavic Mini will have a returns policy or money back guarantee, which you can use to get a replacement.
Now, lets look at these Mavic Mini drone issues and fixes.
DJI Mavic Mini Not Enough Force ESC Warning And Max Power Load Reached
Receiving the DJI Mavic Mini Not Enough Force/ESC warning or Max Power Load Reached error can be quite scary.
The Mavic Mini may even drop altitude and can even crash. On many occasions the Mavic Mini will drop and recover it’s position. However, if you are flying very close the the ground, the Mavic Mini may bounce off the ground. This is pretty scary and you will be lucky if your drone is not damaged.
There are many reasons, which can cause this issue and at the time of writing DJI don’t have a definitive answer or solution to receiving the Mavic Mini Max Power Load Reached and Not Enough Force/ESC error.
However, quite a few Mavic Mini owners have solved this issue themselves or recognized what is causing the problem.
Here is our information, tips and troubleshooting in dealing with the Not Enough Force/ESC warning and Max Power Load Reached error.
Not Enough Force/ESC Warning And Max Power Load Reached
The warning is that the Mavic Mini is not getting enough power and the error message is being generated on the Electronic Stability Controllers (ESC).
So, this message points the issue being with the ESC (Electronic Speed Controllers) and motors. You can read further on ESC, IMU, motors and propellers in our article How A Quadcopter Flies.
Now, power issues could also point to a faulty Mavic Mini battery. However, nothing definitive has come back from DJI on the cause.
This “Not Enough Force ESC warning” issue has been fixed by various methods, which we discuss here.
We will start looking at whether the Mavic Mini is being pushed above it’s recommended flying recommendations, which is causing the warnings or to actual real problems with the Mavic Mini quadcopter.
Maximum Wind Resistance Flying – Is the problem occurring because the Mavic Mini is flying in winds stronger than 17.9 mph (28.8 km/h), which is the maximum wind resistance speed for the drone.
17.9 mph (28.8 km/h) is level 4 on the Beaufort scale, meaning a moderate breeze. Many of these not enough force/ESC warnings are happening at a good height. While it may be calm on the ground, at a small height above, there could be a slight wind or more than a moderate breeze, meaning the Mavic Mini will find it difficult to fly against.
Flying at full speed – If you are flying at full speed and if their is a slight headwind, then this may also cause the error. The motors are being pushed to the limit. Ease back on the throttle and see if the warning goes away.
Ascending very quickly in P-Mode – Does the problem occur when you are ascending quickly. If it does, then it is also because the drone encounters a high resistance during flying upwards and the flight controller detects this and the Not Enough Power ESC warning message will pop up.
Max Ceiling Service – Is the Mavic Mini been flown at or close to the max height for flying of 1.86 mile (3 km) above sea level. Basically the air is thinner, the higher you are up. In thin air, the drone motors have to work a lot harder to keep the drone in the air.
Propeller guards causing the issue – Remove the propellers guards if they are attached. A few Mavic Mini pilots have resolved the issue by just taking off the propeller guards. If this is causing the issue, then replace for new Mavic Mini propeller guards.
Faulty propellers – Quite a few of the Mavic Mini drone receiving the “Not Enough Force / ESC warning” and “Max Power Load Reached” have been fixed by simply replacing the props. There are many different Mavic Mini propellers on the market.
Examine the propellers. Even if you don’t see any fault, go ahead and change them. Their might be a slight defect in one of more of the propellers, which isn’t even noticeable to the eye. The issue has been fixed for quite a few owners by changing to a new Mavic Mini propeller set.
Helistar 16Pcs 4726F Propellers Foldable Low Noise Blades Compatible with DJI Mavic Mini Drone, Golden
- 4726F Low noise propellers specially designed compatible with DJI Mavic Mini drone. This is not original propellers.
- Small size, lightweight, portable, low noise quiet flight.
- Light flying durable flexible.
- Easy to mount, secure, durable, and well-balanced propellers.
- Package include: 16pcs propellers (8 CW + 8 CCW), 24pcs screws, 2pcs screwdriver, drone and accessories are not included.
A few Mavic Mini pilots have noticed that a propeller blade is ever so slightly rubbing against the drone. So with the Mavic Mini turned off, spin the propellers and see if this is happening.
Also, DJI recommend that you replace the full set together rather than just 1 prop at a time.
Faulty Battery – If you have purchased spare batteries, swap the battery and see if the Not Enough Force warning or Not Enough Power/ESC warning reoccurs. If you have a faulty battery, you should be able to have it replaced if the Mavic Mini is still under warranty.
Calibrate IMU & Compass – This simple procedure fixes all sorts of issues, especially flying erratically, having flyaways and disconnects. If you have a crash and your Mavic Mini isn’t damaged, you will need to do the Mavic Mini IMU and compass calibration. Here are the instructions with videos on how to calibrate the Mavic Mini.
Flying In S or P Mode – Does the warning happen only in S Mode or P Mode. It is one of the questions that DJI Support always ask and could be an indication on where they believe the problem to be. If it happens in only one of the modes, this might indicate a software issue rather than a hardware issues. Proceed with updating the Mavic Mini firmware or if at the latest firmware, then downgrade the firmware and then update it again.
Update the DJI Fly App – Make sure you have the latest version of the DJI Fly App. Generally with a new firmware, their is also a new version of the Fly app. The latest version is version V 1.0.8 and it will contain new features and fix any bugs in the software.
Update the Mavic Mini firmware – The Mavic Mini, which you purchased may have been on the shelf for a few weeks and doesn’t have the latest firmware. You can update the drone easily using these DJI Mavic Mini firmware update instructions. The latest Mavic Mini firmware v01.100.0500 was released on 2020.04.23. This is the 4th firmware update since the Mavic Mini was released. Each Mavic Mini update contains new features and also fixes bugs and issues.
Downgrade / Upgrade Mavic Mini firmware – The Mavic Mini Not Enough Force/ESC warning has been fixed on quite a few occasions by first downgrading the Mavic Mini firmware and then upgrading it again.
You can downgrade the Mavic Mini firmware using the DJI Assistant 2 app on your computer. If this fixes the issue, then the problem was originally with a corrupted firmware or it didn’t install completing on the Mavic Mini in the first instance.
Mavic Mini RTH Not Working Correctly
There are various reasons for the Mavic Mini Return-To-Home feature not working correctly. Or instead of returning to the home point, the Mavic Mini does an emergency landing. Here are some of the reasons we have found to have caused the Mavic Mini not to return to the home point.
What Is The Mavic Mini Home Point – Answered
The default Home Point is the first location where the Mavic Mini received a strong GNSS signals. In the DJI Fly App the white GNSS icon will have at least 4 white bars. The Mavic Mini status indicator blinks green quickly after the Home Point has been recorded.
Mavic Mini Return To Home Issues
Unsuccessful Home Point Recorded – With firmware versions previous to v01.00.0400, it was possible to takeoff and fly with a weak GPS signal or in bad light. If you have a weak GPS signal at takeoff, then the Home Point will not be recorded correctly.
The Home Point will be recorded when the Mavic Mini picks up a strong GPS signal, which means the Mavic Mini will return to an different Home Point than what you wanted.
With firmware version v01.00.0400, the feature to disable takeoff when the GPS signal is weak (GPS <8) and the environment light is not sufficient was added. This feature can be disabled manually (requires DJI Fly app v1.0.4 or later).
Weak Or Unavailable GPS – While you may have an home point recorded at takeoff, the Mavic Mini will not be able to return to the Home Point if the GPS signal becomes weak or unavailable. It is very important to fly in areas where the GPS signal is strong.
Battery power – The DJI Mavic Mini battery has depleted to a level where it can’t make it back to the home point and instead has to do an emergency landing.
Flying against the wind – can slow any drone down dramatically and drain the battery pretty quickly. The Mavic Mini wind resistant speed is 17.9 mph (28.8 km/h) which really is only a moderate breeze equivalent to level 4 on the Beaufort scale.
Flying into authorization GEO zones – flying in to a no fly or blue zone where you need authorization to fly will initiate an automatic landing. This will happen at 100 seconds into flying in an Authorization zone.
You won’t be able to cancel out of the Automatic landing. We have seen occasions when someone was flying just outside an Authorization zone, then drifted into the zone because of wind. The automatic landing was initiated even through the RTH button was pressed.
Many Mavic Mini owners live inside Authorization zones and were unable to fly their drone in their garden or even inside their house leaving them pretty annoyed.
Now, if your drone is on firmware version v01.00.0300 or earlier, there is no GEO zone unlock feature.
However, the Mavic Mini feature to unlock GEO zones starts at firmware version v01.00.0400 which also requires DJI Fly v1.0.4 or later. This firmware version was released on December 31st, 2019.
Calibrate The Compass And IMU – If your Mavic Mini is not returning to it’s home point, then it could be that it doesn’t know its exact location because of electromagnetic interference or it is having issues with picking up the global satellites correctly.
Fly the Mavic Mini back in and calibrate the Compass. While the IMU is about the positioning of the Mavic Mini keeping it stable in the sky, it is never a bad idea to also calibrate the IMU.
Lost Connection With Remote Controller – The Failsafe RTH function automatically activates after the remote controller signal is lost for more than 11 seconds. However, this depends on whether the Home Point was successfully recorded in the first place.
Leg Extensions – The antenna for the Mavic Mini are in the front legs of the quadcopter. If you have leg extensions on the Mavic Mini for landing in grass, then the leg extensions could be stopping be the cause of losing the Mini losing connection with the Remote Controller.
Mavic Mini Lands Immediately – If the Mavic Mini drone is less than 20 meters (65.61 feet) from the Home Point when the RTH procedure begins, it lands immediately. This is confirmed on page 13 of the Mavic Mini user guide. 20 meters is quite a distance away. It is probably not a good idea for the Mavic Mini takeoff and Home Point to be recorded where their is water close by.
Strong Winds – The Mavic Mini flies back to the Home Point at a speed of 8 meters (26 feet) per second. If it is windy, the drone will not be able to fly at this speed and it may not reach the home point in time and will do an emergency landing.
RTH Altitude – If you are not flying in an open area, then it might be important to set a different altitude than the default 20 meters (65.61) altitude. Flying in areas where there are trees, ditches, tall bushes etc. You can set the a different RTH altitude in the DJI Fly app.
Mavic Mini Return To Home Best Practices
Mavic Mini RTH Knowledge – Know everything about the Mavic Mini Return To Home feature. Read the Mavic Mini User Guide, which covers the RTH feature on Page 12, 13 and 14.
Keep the Mavic Mini clean – use wipes and check the Mavic Mini physically.
Home Point Success – make sure when you take off that the Home Point is successfully recorded.
Calibrate the Compass – especially if you are flying in a new area, which is a good distance from the last place you flew. Also, calibrate if you receive a message in the DJI Fly app to calibrate. Definitely calibrate the compass after a crash even after a small one where there is no physical damage to the drone.
Don’t Fly – if you have bad light or weak GPS signal.
Keeping the Mavic Mini updated – Check and update both the firmware for the Mavic Mini drone and remote controller. Also, install the latest DJI Fly app when it becomes available.
Electromagnetic Interference – A lot of EMI will cause issues with your Mavic Mini compass and flight capabilities including knowing where it is in the sky. Understand and watch out for EMI in the area you will be flying your Mavic Mini.
EMI is the interference caused by one electrical or electronic device to another by their electromagnetic fields. Electromagnetic interference (EMI), also called radio-frequency interference (RFI) when in the radio frequency spectrum, is a disturbance generated by an external source that affects another electrical circuit.
Examples of EMI include power lines, cellphone masts, building with reinforced steel, electric cables, bridges, railway lines, cars and electrical gadgets.
Note: You can find a terrific variety of Mavic Mini parts, upgrades and accessories here.
Here is a great video with explains electromagnetic interference.
DJI Mavic Mini Disconnects, Fly Aways And Flight Issues
There are many reasons for Mavic Mini disconnecting and losing connection with the remote controller or Fly app. It’s the same for fly aways.
These Mavic Mini disconnects and fly aways can be caused by various sources from the quadcopter, remote controller, smartphone, tablet or EMI. So it may take quite a few of the below steps to fix the Mavic Mini flying issues.
Here are some top tips you can try to resolve or prevent Mavic Mini disconnects and fly aways.
Have You Logged Into DJI Fly App
When you install the DJI Fly app on your Smartphone, you will be asked to log in or register. If you are not logged in, then your flight range will be limited in both altitude and range until you activate your login. You will more than likely have disconnected issues without logging in.
If you have skipped this step after installing the DJI Fly app, then you can login by tapping into the profile and then click on “Log In”.
Mavic Mini Cables Causing Disconnected Issue
Check the cable going from your Smartphone or tablet to the RC. The cable could have come loose at either end. Also, try a replacement cable as they can break or become frayed over time. They can even be faulty from the factory.
Damaged Ports Causing Mavic Mini Disconnects
It is possible for the ports on the Mavic Mini remote controller or Smartphone to become damaged over time. So if you are having disconnects using a Smartphone like a Samsung or Apple, then fly with another device, which use a different port and cable.
DJI Fly App Cache Causing Disconnects
Cache files can fill up the memory and even become corrupt. There are 2 setting in the DJI Fly app for cache settings.
- Cache When Recording
- Max Video Cache Capacity
With disconnects, it is a good to turn off the “Cache When Recording” function. You can find this in the Settings > Camera > Advanced Camera Settings. Move the slider to the left and turn it off.
There are 4 caches stored in the DJI Fly App which can be cleared;
- Video Cache
- Photo Cache
- Music Cache
- Aircraft Flight Record Cache
You can clear the cache in the DJI Fly App by clicking on Profile > Settings > Clear Cache
Click on each and then tap “confirm” to clear the cache.
Smartphone Causing Mavic Mini Disconnect Issues
With disconnect issues, it is very easy to view the DJI Mavic Mini drone or the remote controller to be the cause.
However, many of the drone disconnects are caused by the smartphone or tablet, which have the DJI Fly app installed.
Smartphones have a lot of applications installed and they are constantly working, even when we are not using them. They are constantly connected to the Internet, the cellphone provider, pulling in data, notification and pinging the network.
To fly your Mavic Mini without issues, you should ensure your smartphone or tablet is running optimally.
Some best practice regarding smartphones and tablets would be to greatly reduce notifications from the various apps (Facebook, Twitter, Instagram, WhatsApp etc) while flying. Turn off app updates while flying. Remove unused apps, as these use up both space, memory and processor power.
When you are flying your Mavic Mini with your Smartphone in the Remote Controller, you can turn off your phones WiFi. Also switch off Bluetooth or personal hotspots etc.
You can also fly your Mavic Mini in Airplane Mode, which will stop other apps from updating etc.
There are programs for optimizing your Smartphone and tablet. Use these to have your smartphone or tablet running optimally.
If your smartphone is not running optimally, then opening the DJI Fly app and video recording while flying, might place a heavier load on the processor or fill up it’s memory. If the smartphone is running slow, then it could easily drop the connection.
Micro SD Card Causing Mavic Mini Disconnect Problems
There has been a number of issues with the Mavic Mini disconnecting from the remote controller or DJI Fly app caused by the micro SD card.
These micro SD cards can become damaged physically or the file system can become corrupt on the card. Even a video or photograph can become corrupt on the micro SD card.
If the Mavic Mini micro SD card has been used for something else or has other files and folders on it, then when it is back in the Mavic, it can cause an issue when you try to record to it. The micro SD card may still work but it is not perfect and will cause an interference in the Mavic Mini.
Take out the micro SD card and try flying without it and see if you still get disconnects.
If you don’t get a disconnect, then the issue is with the micro SD card. Place the micro SD card in the Mavic Mini while it is on the ground. In the DJI Fly app camera settings, you can format the micro SD card.
Before you format the micro SD card, you might want to copy the existing information (files, photos and videos) on the card over to your computer.
If the Mavic Mini is still causing disconnects after the micro SD format, then replace the card with the DJI recommended micro SD cards which are as follows;
- 16 GB: SanDisk Extreme, Lexar 633x.
- 32 GB: Samsung Pro Endurance, Samsung Evo Plus, SanDisk Industrial, SanDisk Extreme V30 A1, SanDisk Extreme Pro V30 A1, Lexar 633x, Lexar 667x.
- 64 GB: Samsung Pro Endurance, Samsung Evo Plus, SanDisk Extreme V30 A1, Lexar 633x, Lexar 667x, Lexar 1000x, Toshiba EXCERIA M303 V30 A1, Netac Pro V30 A1.
- 128 GB: Samsung Pro Plus, Samsung Evo Plus, SanDisk Extreme V30 A1, SanDisk Extreme Plus V30 A1, Lexar 633x, Lexar 667x, Lexar 1000x, Toshiba EXCERIA M303 V30 A1, Netac Pro V30 A1.
- 256 GB: SanDisk Extreme V30 A1.
Mavic Mini Remote Controller Causing Connection Error
Check your remote controller. Make sure the ports and cables are clean. Bits of dirt or fluff can get into ports very easily.
It is also easy to get carried away with enthusiasm to get the Mavic Mini up the air as quickly as possible. Flying and filming with the Mavic Mini is great fun.
However, it is always good advice to do your pre-flight checks ,which include having the Mavic Mini remote controller antenna pointing correctly.
One of the simplest ways to have the Mavic Mini disconnect from the remote controller is by holding the remote controller and antenna in the wrong direction.
To have the strongest transmission signal, make sure you are holding the Mavic Mini remote controller towards where the Mavic is in the sky. Your Mavic Mini remote control antenna should be pointing correctly as in the below image.
This is very important and especially if you are flying the Mavic Mini further out.
Weak Signal Or EMI Causing Mavic Mini To Disconnect
If you are flying a good distance out, then the transmission signal is going to get weaker. Now, as the signal gets weaker, the chances of the Mavic Mini disconnecting either from the DJI Fly app or the remote controller becomes a real possibility.
The Mavic Mini max transmission distance is 2.48 mile (4 km), unobstructed and in line of sight using the Remote Controller with the DJI Fly app connected. The transmission uses enhanced WiFi.
However, it is never a great idea to push the flight range or altitude to its limit.
Also flying in fog, rain, very dull weather or bad light will cause disconnects and flights issues.
How To Strengthen The Transmitter Signal Your Mavic Mini
If you are receiving a weak signal and disconnects at moderate to long distance out, then it could have something to do with the surroundings (trees, buildings etc) or with electromagnetic radiation (power lines, cellphone transmitters etc).
It could also be an issue with your Mavic Mini drone or the remote controller. If you have tried everything in this article and the problem still exists but you don’t necessarily want to send your Mavic Mini back as the Mavic disconnects are only on long distance, then the best option to strengthen the transmission signal is to add a Parabolic Antenna Range Booster to the Mavic Mini remote controller.

TOZO Foldable Antenna Signal Booster Range Extender for DJI Mini SE/Air 2S/Mini 3 Pro/Mavic 3 Classic/3/3 Pro/2 Pro/2 Zoom/Air/Mini Parabolic Controller Transmitter Easy to Use for Beginner Silver
- [Powerful compatibility] This Remote Controller Signal Booster compatibility for DJI Mini SE/Air 2S/Mini 3 Pro/Mavic 3 Classic/Mavic 3/Mavic 3 Pro/Mavic Pro/Mavic Pro Platinum/Mavic 2 Pro/Mavic 2 Zoom/Mavic Air/Mini/Spark. Supports multiple types of drones, which makes you no longer worry about compatibility and gives you a more intimate flight experience.
- [High Quality Material & Ultra Stable Signal] TOZO signal booster is made of mirror aluminum plate and high quality plastic shell, which can protect it from harsh environment. Meanwhile, the combination of ray reflection and parabolic design principle can accurately reflect the signal to the antenna of the remote controller, thereby improving the stability, extending the flight distance and effectively reducing accidents such as collisions and damages during long-distance flight.
- [Simple Operation] Just insert the TOZO Signal Booster directly into the antenna of the remote controller and then push it to the bottom to fit tightly with the antenna without any tools. When properly installed, they should be firmly seated on the antenna bases with the tips of the antennas. Moreover, there is no need to worry about the remote controller being damaged due to wrong installation, which makes it actually helpful for beginners.
- [Portable and Secure Design] Adopt a folding design, which is beneficial for protecting the mirror surface and will not add any extra burden to the control of your drone. Greatly portable that you can take it with you wherever you go. In addition, the TOZO Signal Booster is covered with a thin film that protects the mirror surface from fingerprints, dust, and scratches. And tearing off the film when in use can help you achieve a high intensity signal and outstanding effect.
- [About Our Test] We conducted a test in an open area, the drone without a signal booster will lose its direction or return automatically when the signal is lost. After installing the antenna combination, the signal is enhanced and the flight distance is significantly extended. Based on these, it allows you to fly with confidence and enjoy a fantastic experience. Therefore, you can be confident that this is the best option for you.
Calibrate the Mavic Compass / IMU To Fix Disconnected Or Flying Erratically Issues
Calibrating the Mavic Mini Compass and IMU will help fix disconnects and erratic flying. If the compass and IMU are not functioning correctly, then your quadcopter will fly erratically and send incorrect information to the flight controller and remote controller. It is important that all aspects of your Mavic Mini is functioning correctly, which will reduce the chances of disconnects.
The Mavic Mini calibration is very easy. You can find a tremendous instructional video on how to calibrate the Mavic Mini compass and IMU here.
Here are 2 excellent article to further your knowledge on how drones work and fly.
Drone Gyro Stabilization, IMU And Flight Controllers Explained
How A Quadcopter Works With Propellers And Motors Explained
Firmware Update Fixes Mavic Mini Disconnect Issues
DJI release firmware updates for the Mavic Mini and their other quadcopters, gimbals and cameras on a regular basis. If you are having disconnects, then it is always recommended to update the Mavic Mini firmware.
If you read down through the Mavic Mini firmware update release notes, you can see where certain updates fix issues, which could have been causing the Mavic Mini disconnects.
Some pilots never update the firmware on their quadcopter. However it is essential to update the firmware as it contains fixes for most issues. Firmware updates will also add new features to the quadcopter.
DJI Mini Care Refresh
It is always a good idea to invest in the DJI Mavic Mini Care Refresh program. It provides two replacement units for a small additional charge in one year and covers a wide variety of accidents.
Here are some of the bugs and issues fixed by the DJI Mavic Mini firmware updates, which could fix disconnect, fly away and RTH issues.
Firmware Release v01.100.0400
- Added feature to unlock GEO zones (requires DJI Fly app v1.0.4 or later).
- Added feature to disable takeoff when the GPS signal is weak (GPS <8) and the environment light is not sufficient. Feature can be disabled manually in DJI Fly v1.0.4 or later.
- Fixed issue: linking was abnormal in some regions.
- Added requirement for compass calibration before takeoff when the environment light is not sufficient and the compass experiences interference.
- Adjusted flight altitude and distance in payload mode.
Firmware Release v01.100.0300
- Increased flight stability in some scenarios.
- Optimized performance when taking off in areas of high elevation.
- Optimized aircraft orientation control.
Firmware Release v01.100.0200
- Increased the speed of GPS signal searching.
- Optimized the aircraft’s performance in high altitude environments.
Mavic Mini Disconnects After Firmware Update
Now, if you have completed a firmware update and your Mavic Mini starts disconnecting, then try all the above. However, more than likely the issue was caused by the new firmware not installing correctly or a bug in the new firmware.
Using the DJI Assistant 2 application installed on a computer, you connect your Mavic Mini drone. Then, you can roll back to an earlier Mavic Mini firmware version.
After downgrading the Mavic Mini firmware, you should then fly your Mavic Mini to see if the flight issues are resolved. If they are, you can try the upgrade again or wait a few days to see if DJI release another firmware update.
Here is a terrific article, which shows you around the DJI Mavic Assistant 2 software. While the article was originally written for the Mavic Pro, it shows you how the DJI Assistant 2 application can be used to troubleshoot flight issues, upgrade, downgrade firmware and much more.
The Mavic Mini and all DJI drones contain a flight recorder. Flight data information including telemetry, aircraft status and other parameters are automatically saved to the internal date recorder on your DJI drone.
This data can be accessed using the DJI Assistant 2 software. This information can also be sent to DJI to troubleshoot flight issues.
What To Do When Mavic Mini Disconnects During Flight
DJI Fly App Video Disconnects When Flying
If the remote controller is still connected and it is just the DJI Fly app which has lost signal, then do the following;
Check Cables – from your RC to the smartphone or tablet. It may be loose or have fallen out.
Close and re-open DJI Fly app – Take your hands off the sticks and let the Mavic Mini hover. Close out of the DJI Fly app and then go back into it. There is a good chance that the Fly app will reconnect again.
DJI Fly App Disconnects When Flying
If you are flying using the DJI Fly app only and not using the RC, then if the Fly app disconnects you won’t be able to fly the Mavic Mini. By default the Mavic Mini will initialize the failsafe Return-To-Home after 11 seconds.
Again, if the Mavic Mini is a good distance out, you may be able to take some action to reconnect while it is in RTH mode. You could try the following;
- Try moving closer in the direction the Mavic Mini is.
- Close out of the DJI Fly app and go back in.
- Stop and start the WiFi on your Smartphone.
- Restart your phone or tablet.
Mavic Mini Remote Controller Disconnects When Flying
This is quite series. As you don’t have any stick control or video then you can’t fly the Mavic Mini even if you can see it. Now the Mavic Mini should initiate the Failsafe Return-To-Home point mode, which it had set just after take off.
If the Mavic Mini has flown a good distance away, then you may be able to help the Remote Controller to reconnect to the Mavic Mini. Here are some tips.
Move Towards The Mavic – Walk towards your Mavic Mini quadcopter which shortens the transmission distance between RC and drone. If you are close to a running motor, generator or power lines etc, this might have weakened the signal to cause the disconnect. So move away from any interference in the direction of the Mavic Mini and it just might reconnect.
Check Remote Controller Antenna Direction – Are the antenna facing in the correct direction. If the Mavic is pretty high in the air you will need to change the angle you are holding the remote controller so that the antenna are pointing directly towards the Mavic. You also need to change the angle you are holding the remote controller if you are standing on a cliff and flying the Mavic lower than the area you are standing in.
Switch Off and Back On The Remote – It’s worth trying as it only takes a few seconds.
Return To Home Failsafe Mode – If you are flying in a wide open space with no obstacles in the way, then let the RTH failsafe mode bring the Mavic quadcopter back to it’s home point. It’s a great feature. Then do your checks and troubleshooting using the tips in this article as a guide.
DJI Mavic Mini Forum
If you are still having difficulties with your Mavic Mini, you can also read the DJI Mavic Mini Forum and post questions.
Mavic Mini Videos For Better Flying And Troubleshooting
This first videos explains how the Mavic Mini communicates with the quadcopter remote controller and your smartphone or tablet. It also explains that you don’t need have your smartphone WiFi turned on when you are flying the Mavic Mini with your smartphone connected to the RC.
This next video gives you some terrific Mavic Mini tips and tricks.
Let us diagnose. Let us repair. Let Us Drone. Flying your Phantom 4 Pro or Spark is a blast…until you start ignoring the error or warning messages, then the platonic fun turns into a rush of adrenaline fueled by rebellion because you’re choosing to fly a drone that could drop from the sky at any moment.
Okay, maybe that was a bit dramatic and over the top, but still, I hope that you don’t ignore warning messages, especially ESC warnings. Let’s go ahead and talk about DJI drone ESC’s, how they work, why they are so important, and some of the common problems and solutions we have with the ESC’s.
What is the ESC?
ESC stands for Electronic Speed Controller. Multi-rotor aircraft rely on speed changes of the motors for directional movements. The ESC’s are responsible for telling the motors to speed up or slow down depending on the commands given by the pilot.
Each of the four drone motors has an ESC assigned to it. When a pilot provides a stick adjustment, the command is received by the flight controller onboard the drone, which transmits the information to the electronic speed controllers which then tells the motors to speed up or slow down.
For example, if the pilot increases the height of the drone by pressing up on the left stick, more voltage is evenly sent through each of the four ESC’s which in turn speeds up the motors, increasing the height of the drone.
Another example is if the pilot presses the right stick up the nose of the drone drops down and the drone proceeds to move forward. This is because more voltage was passed through the two rear ESC’s which sped them up.
What causes ESC errors?
When you receive a ESC status error in the DJI GO 4 app it can be difficult to ascertain why it is present. To better know how to fix the problem, we need to figure out if it was a hardware or software issue that caused it in the first place.
Hardware problems
If you recently had a crash then there is a good chance that this is the cause of the ESC status error. You may not think that the crash you had three weeks ago was the reason for the ESC status error that just appeared on the app, but you may be wrong.
Problems after a crash don’t always immediately present themselves. It may take time for that wiring that was jarred loose during the crash to finally tear, or for the motor to be affected by that small piece of broken off plastic that has been rattling around.
A hard landing will be enough to sometimes jar things loose. People have often also experienced ESC errors after replacing or repairing damaged parts on their DJI drones themselves. Before ever attempting to repair or replace a damaged part on your DJI drone it is very important to first check your warranty status as taking apart your drone will void the warranty. I will talk more about the limited warranty and Care Refresh below.
Software problems
It seems like there is always some kind of update available. If it’s not a Precise Fly Safe Database Update, then it’s a firmware update for the AC or RC, or it’s an app update.
It is not unheard of for people to receive an ESC status error after updating their drone’s firmware. If you received an ESC status error after updating your firmware, try refreshing your firmware. If refreshing the firmware, try rolling it back to the previous version.
Alternatively, if there is an update available and you currently have the ESC status error message, try updating the firmware.
There have been reports of people receiving ESC status errors with their brand new DJI drone right out of the box. This may be due to a software issue or it could be a hardware problem from poor handling while in transit.
There have been reports of people receiving ESC status errors with their brand new DJI drone right out of the box.
How to fix the ESC status error
Often times you will get a “cannot takeoff” message in the status bar at the top of the screen. Tapping on that will bring up the aircraft status menu where you can view the ESC status.
Click on “ESC status” to bring up the error message. This will usually tell you which motor(s) has the ESC problem, and the message may give you guidance on what to do next. Usually, the message tells you something vague like “Restart the aircraft. If problems persist contact DJI support”.
If after restarting the drone the error message persists, try updating the firmware on your drone. If a firmware update is not available then just refresh the current firmware version. Updating or refreshing the firmware will usually eradicate the ESC status error if it’s a software issue, but hardware damage will not simply mend itself with a firmware update.
You may have luck getting rid of the ESC error by performing a firmware update, but when you place a new battery in the drone the error may come back. This is because the firmware on the new battery needs to also be flashed with the new firmware. There is no procedure to solely update the battery firmware so go ahead an perform the aircraft firmware update once more.
If the ESC board is damaged, there really isn’t a way of going around it…you’ll need a new one. Although I have yet to complete an ESC repair or replacement myself, I have seen videos and the soldering alone is enough to scare away most people.
I repaired about 1,000 iPhones and iPads during my time as a repair technician, and although I wouldn’t shy away from the chance to replace an ESC board, I certainly wouldn’t take the job lightly due to its complexity.
Unless you have soldering experience and the required tools for the job, I’d strongly suggest sending your drone in to DJI for the ESC repair.
Is your drone under warranty?
Before you think about attempting to take apart your expensive drone to diagnose what is causing the ESC status error, you should check your warranty status. Taking apart the drone will void the limited warranty that comes with the drone.
Taking apart the drone will void the limited warranty that comes with the drone.
Every DJI product comes with a limited warranty that essentially covers you against manufacturer defects, and components of the drone are warrantied for different lengths of periods. Read more about how to find out if your drone is covered by the limited in a post I wrote here.
If the ESC status error is caused by a software issue that isn’t rectified by a firmware update, I would think that DJI would replace your drone under the limited warranty program. If, on the other hand, you crash your drone into a tree and physical damage is what caused the error, your drone will not be covered under the limited warranty.
Care Refresh is an extended warranty available for purchase that covers pilots against user inflicted damage. If you have Care Refresh, you may as well send the drone to DJI and have them repair it since this is the type of thing you likely purchased the extended warranty in the first place for anyway.
Related post: DJI Care Refresh: The Ultimate Guide – DJI’s Care Refresh is a comprehensive warranty. If you chose to purchase Care Refresh when you buy a new drone, DJI will replace it with a new or like-new one up to two times in the event of your drone getting damaged.
More resources
To learn more about what DJI has to say about their ESC’s, check out this article written by DJI that is helpful and informative.
Someone spent a serious amount of time reverse engineering a DJI ESC and proceeded to make a “Handyman’s Guide to the ESC”, which he posted in a forum. The guide is incredibly detailed! Here is the link to that forum.
FAQ
What does ESC stand for?
Electronic Speed Controller.
What does the ESC do?
The ESC controls the speed of the motors which directly alters the in-flight aircraft directional changes.
Why am I receiving an ESC status error?
Hardware can be damaged during a hard landing or crash, or software glitches may be the reason for the errors.
How do I get rid of the ESC errors?
Sometimes a simple restart of the aircraft will clear the errors, and other times a firmware update/refresh will do the trick. If the ESC board is damaged, you will need to send your drone into a repair center, unless you have experience soldering and repairing electronics.
How to see which motor has the ESC error?
In the DJI Go 4 app tap on the aircraft status bar, and scroll down until you see “ESC status”. Tap on that to get a description of the error and which motor has it.
Trevor’s Take
I have not yet had the opportunity to repair or replace a motor or ESC board on a drone before, but I am tempted. When I look at instructional videos and/or guides out there on how to repair components on DJI drones I am a bit hesitant to follow them. I am by no means bashing on anyone who has put content out there in an effort to show the rest of us how to repair our drones, but it takes a whole lot of time and experience to produce quality guides on this type of thing. Not to mention the financial side of having a camera that shows the micro detail necessary to make a helpful guide.
I’m thinking about producing clear and concise instructional videos on how to perform some of the more common drone repairs. Would this be something that you guys would find helpful or would I be better off investing my time into something else? Thanks in advance for the feedback!