На чтение 16 мин Просмотров 4.1к. Опубликовано 28.09.2021
Содержание
- Почему возникает ошибка
- Что такое памперс
- Почему заполняется
- Что будет, если памперс заполниться?
- Что делать, если памперс заполнен?
- Способы обхода блокировки печати
- Когда нужно делать сброс?
- Способы сброса
- Ручная промывка
- Избавляемся от ошибки программно
- Вход в сервисное меню
- ServiceTool
- Adjustment program for Epson
- PrintHelp
- SSC Service Utility
- INKCHIP WIC
- Выход из сервисного режима
- Ответственность за сброс
Почему возникает ошибка
Принтер «приглушенный» — это небольшой внутренний контейнер, в котором содержатся отработанные чернила, например, при печати без полей или при очистке сопел. Принтер не может определить фактическое физическое наполнение «объятий» чернилами, поэтому ориентируется на цифровой счетчик: после подсчета определенного количества подкладка считается заполненной, и печать останавливается до тех пор, пока проблема не будет устранена в NS.
Epson предполагает, что пользователь принтера не будет рисковать пролить чернила и забить контейнер для отходов «до краев», ожидая завершения работы. Это также НЕ означает, что «объятия» могут быть удалены и очищены самостоятельно или что система слива чернил может быть адаптирована к этому.
Что такое памперс
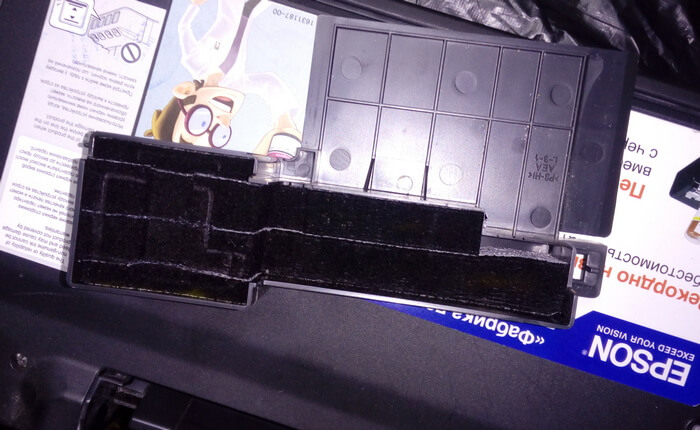
Чтобы предотвратить попадание чернил внутрь, в принтере есть часть, которая собирает лишнюю жидкость: подгузник. Это контейнер с пористым, хорошо впитывающим материалом, установленный в нижней части прибора. Этот элемент съемный; когда ресурс исчерпан, его заменяют новым.

Почему заполняется
Избыток чернил впитывается бутылкой с чернилами во время очистки сопел головки или печати без полей. Чернила не обладают достаточной летучестью, они постепенно накапливаются. Отдельный датчик следит за состоянием объятий, считая количество обработанных страниц. Когда предел достигнут, печать останавливается, и пользователю отправляется уведомление об ошибке.

Что будет, если памперс заполниться?
Тампон имеет довольно высокую впитывающую способность. Но при интенсивном использовании оргтехники она постепенно заполняется, и продолжительность ее эксплуатации сокращается. Но когда достигается определенный уровень отработанных чернил, который подсчитывается с помощью системы виртуального счетчика, на дисплее печатающего устройства или на экране компьютера появляется соответствующее предупреждение.
Следовательно, если подгузник заполнен, существует вероятность того, что красящее вещество вытечет наружу, что отрицательно скажется на работе принтера. Если срок службы абсорбирующей чернила прокладки подошел к концу, возможно, ее необходимо переустановить или заменить. Но в целом принтеры не имеют встроенных датчиков, которые могут контролировать уровень заполнения этих абсорбентов, поэтому их критическое значение определяется исключительно программным методом.
При достижении порога устройство автоматически перестает работать. Струйные принтеры, производимые Epson, сигнализируют о преждевременном превышении порогового значения.
Но надо сказать, что выключение принтера в некоторых ситуациях неактуально. Дело в том, что в местах с сухим воздухом этот уплотнитель заполнен всего на 50 процентов. Следовательно, в этом случае он мог бы отсидеть столько же времени.
Что делать, если памперс заполнен?
Принтер не работает, что мне делать? Для решения этой проблемы потребуется тщательная очистка абсорбера. Конечно, можно взять и заменить старую впитывающую подушку на новую, но не всегда удается найти подходящий кусок фетра. Причем в большинстве случаев они доставляются исключительно на заказ, а потому неизвестно, сколько времени придется ждать новый подгузник. Поэтому лучше взять полный абсорбер и полностью очистить его от чернил. К тому же с такой задачей справится даже рядовой пользователь оргтехники.
Во-первых, вам нужно вынуть подгузник из принтера, предварительно надев резиновые хозяйственные перчатки и старую одежду, которую вы не прочь испачкать. Чтобы получить к нему доступ, сначала открутите болты, расположенные на задней части печатающего устройства. Затем снимаем часть устройства с правой стороны и откручиваем еще пару болтов.
Далее следует снять кожух, собрав в нижней панели специальные защелки, которые нужно будет аккуратно отклеить. Обойдите по всему периметру и поднимите эту подкладку, чтобы она полностью оторвалась. Полностью поднимите верхнюю часть принтера, осторожно приподняв его. Далее вы увидите, что идет поезд — постарайтесь выйти из него предельно осторожно.
Затем вы попадете внутрь принтера, после чего вам нужно будет вытащить трубку из помпы и взять сам подгузник.
Затем поместите впитывающий материал в емкость, наполненную теплой водой. Выждав некоторое время, сожмите его несколько раз, чтобы большая часть краски на водной основе осталась в воде. Поэтому он будет постепенно смываться, пока не вернется в исходную форму. В этом случае может возникнуть вопрос, как постирать этот кусок фетра? Как правило, для этой задачи подойдет обычная вода, но в некоторых случаях можно использовать очиститель хорошего качества.
В конце концов, вам просто нужно аккуратно выдавить влагу из подгузника и высушить его. Благодаря такой простой процедуре можно сэкономить на покупке нового впитывающего материала. Правда, в этом случае его объем немного уменьшится, а абсорбционные свойства ухудшатся.
Способы обхода блокировки печати
Есть два основных способа «заставить» принтер продолжить свою работу: заменить (хотя бы? Очистить) использованный впитывающий материал или сбросить счетчик полного заполнения подгузника. Первый способ предполагает полную разборку принтера, поскольку в большинстве случаев абсорбирующая камера несъемная. Поэтому эту задачу обычно поручают специалистам.
Чтобы обойти блокировку при невозможности обратиться в сервисный центр, воспользуйтесь вторым способом. Сброс счетчика полного заполнения подгузника позволит вам продолжить работу с принтером в обычном режиме, но здесь следует учесть несколько моментов:
- Чтобы слить чернила в абсорбционную камеру, печатающая головка после каждого цикла печати отправляется в специальный отсек, который всегда должен оставаться сухим. Если подгузник заполнен, чернила не будут удалены из этого отсека, а это означает, что головка не будет очищена. Это может привести к значительному снижению качества печати — нет возможности избежать полос на бумаге и других дефектов.
- Если подгузник переполнен, чернила могут вытекать или накапливаться внутри футляра. Во втором случае может возникнуть опасность попадания чернил в электронный компонент принтера, что приведет к короткому замыканию и выходу устройства из строя.
Это говорит о том, что сброс показаний датчика не является эффективным решением для обхода блокировки принтера из-за переполнения подгузника. Однако это может помочь, если вам нужно срочно распечатать документы. Как показывает практика, впитывающее покрытие обычно хорошо работает до второго раза срабатывания счетчика. После этого его необходимо заменить.
Когда нужно делать сброс?
Абсолютно все модели принтеров Epson, независимо от возраста, поставляются со встроенным программным обеспечением, контролирующим работу устройства в режиме онлайн. В новых моделях все ошибки и предупреждения отображаются на дисплее печатающего устройства. А старый Epson сообщает о проблемах только индикаторами. Если на экране появляется четкое сообщение, например, «Заменить абсорбер», то с индикаторами сложнее. О такой неисправности можно «сказать» по попеременному миганию лампочек, обозначенных изображениями «Бумага» и «Капля». Эта комбинация типична для 90% принтеров Epson.
Для принтеров, подключенных к компьютеру или ноутбуку, независимо от способа подключения, при попытке распечатать любой документ или изображение появится небольшое окно с ошибкой. Он не всегда дает текстовое описание проблемы. Часто это специальный служебный код. Для более новых моделей принтеров Epson это «E-11», для более старых моделей — «E-10». По инструкции к технике в таких ситуациях следует немедленно отнести в сервисный центр для замены поглотителя. Но это не всегда целесообразно с экономической точки зрения.
Способы сброса
Есть два варианта продолжения печати на струйном принтере Epson. Первый требует прямого вмешательства, а второй является программным и выполняется с помощью специального программного обеспечения.
Ручная промывка
Суть этого варианта — физическая очистка поролона (поглотителя), который находится в специальном пластиковом отсеке. В совокупности такая конструкция называется «приманкой» принтера. Этот физический «сброс» помогает, а в некоторых случаях просто необходим. Но не на всех моделях Epson легко и просто снять это «полотенце». Иногда могут потребоваться специальные знания, чтобы помочь в этой ситуации. Также может потребоваться разобрать принтер, чтобы снять его. Но лучше с такой процедурой обратиться к специалистам сервисного центра.
Избавляемся от ошибки программно
Если вы уверены, что «объятия» не слишком полны и вам просто нужно обойти блокировку печати, воспользуйтесь программой PrintHelp.
- Скачайте программу с официального сайта и установите на свой компьютер.
- Выберите свой принтер в меню слева.
- Во вкладке «Контроль» используйте опцию «Счетчики работы — Сбросить рабочее время».
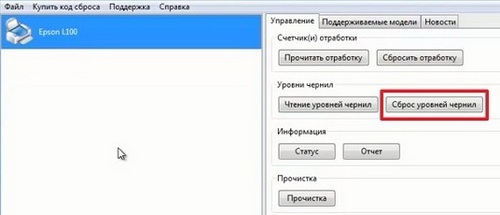
Обнуление счетчика «баловства» в PrintHelp для L100
Для многих популярных моделей вы можете сбросить счетчик бесплатно, а для некоторых вам нужно будет приобрести код сброса у разработчиков. Вы можете найти дополнительное бесплатное программное обеспечение для очень старых струйных принтеров.
Вход в сервисное меню
Это самый сложный этап для обычного пользователя, так как мы не можем предоставить всю необходимую информацию по этому поводу. Вход в сервисное меню на разных моделях разных компаний осуществляется по уникальному алгоритму, а в некоторых из них это сделать вообще не удастся, а потому нет никаких гарантий, что можно будет реализовать следующее шаги. Поэтому мы приведем только пример активации сервисного меню, и вам нужно будет найти информацию о вашей модели в официальной документации или на форумах пользователей.
- Сначала подключите печатающее устройство к сети и компьютеру, но не запускайте его. Если подключение уже выполнено, просто выключите прибор, нажав кнопку питания.
- В случае с рассматриваемой моделью Canon MG2440 вам нужно будет удерживать оранжевую кнопку «Отмена», которая имеет форму треугольника в круге.
- Затем кнопка включения блокируется, не отпуская уже заблокированную кнопку «Отмена».

- Подождите, пока оборудование включится, затем шесть раз нажмите Отмена, удерживая кнопку питания. Об успешном входе в сервисное меню будет сигнализировать изменение цвета индикатора с зеленого на желтый и наоборот.
- В этом случае отпустите обе кнопки и дождитесь, пока индикатор перестанет мигать.
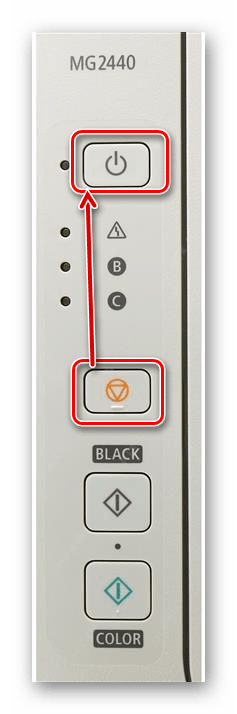
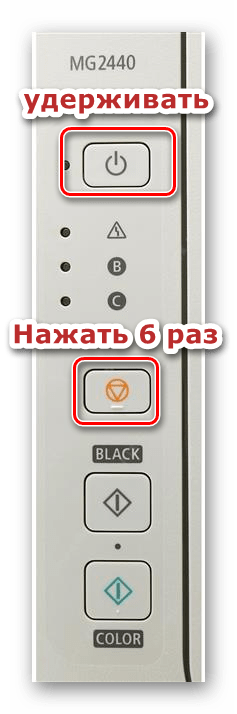
Индикатор должен гореть постоянным зеленым цветом, что будет указывать на правильную работу устройства в сервисном режиме. Как и в случае с другими моделями принтеров Canon, разработчики часто используют тот же алгоритм, только изменяя количество нажатий кнопки «Отмена» на восемь или девять. Владельцам других моделей еще предстоит найти эту информацию самостоятельно в открытых источниках.
ServiceTool
ServiceTool — самая популярная сервисная программа для взаимодействия с принтерами и многофункциональными устройствами различных производителей. Его главный недостаток — отсутствие официального сайта и прекращение поддержки со стороны разработчика. Это вызывает необходимость поиска приложения на сторонних ресурсах, посвященных ремонту принтеров. Мы рекомендуем загружать такие исполняемые файлы только на свой страх и риск и после проверки их на вирусы.
Кроме того, мы предлагаем вам использовать онлайн-сервис VirusTotal, который поможет вам проверить файл непосредственно перед загрузкой, чтобы убедиться, что он безопасен. Вы можете сделать это, перейдя по следующей ссылке.
Существует огромное количество версий ServiceTool, подходящих только для определенных моделей устройств, поэтому учитывайте это перед загрузкой, обращая внимание на описания на сайтах. После загрузки установка не требуется, просто запустите файл и выполните следующие действия:
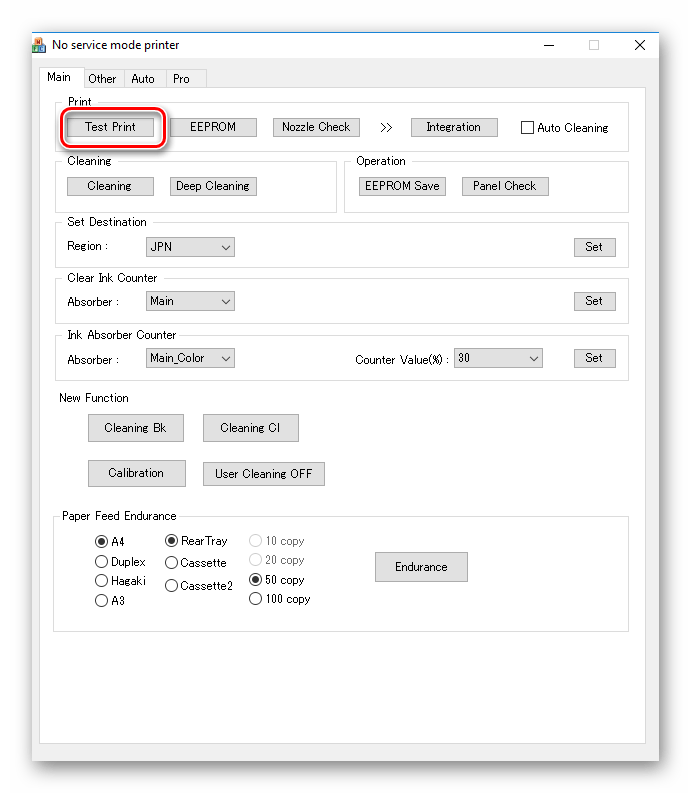
- Теперь принтер уже находится в сервисном режиме, а это значит, что ServiceTool правильно его обнаружит и все кнопки будут активными. Однако вам нужно будет проверить его еще раз, нажав кнопку «Тестовая печать».

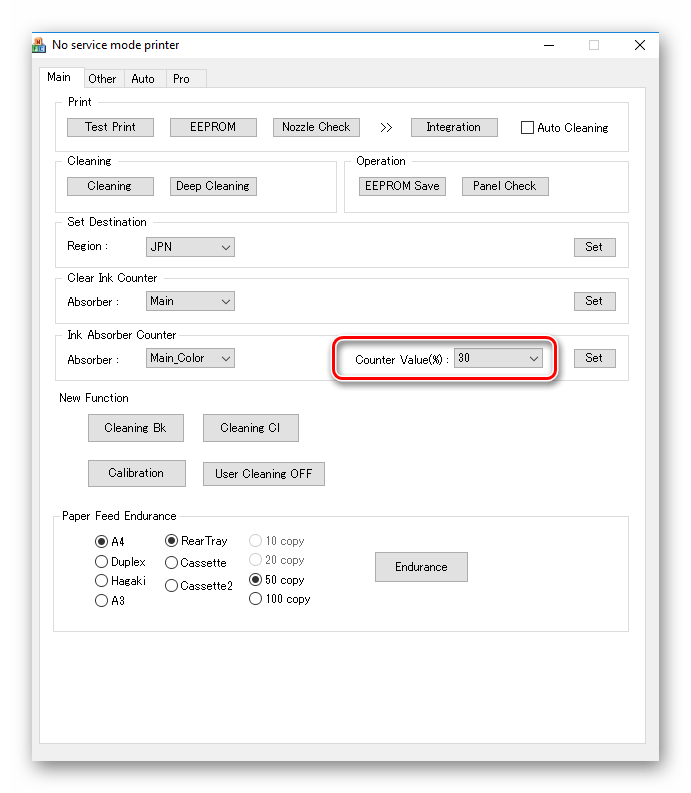
- Затем найдите строку «Значение счетчика», которая находится в разделе «Счетчик абсорбера чернил». Он позволяет определить, на какой процент подгузник теперь наполняется согласно расчетам программы.
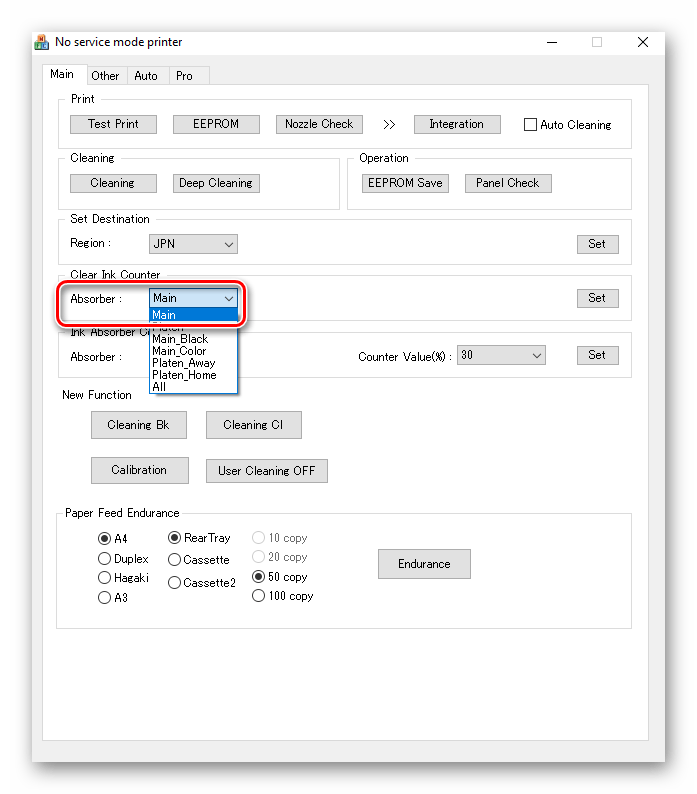
- это значение необходимо сбросить. В разделе «Очистить счетчик чернил» выберите значение из всплывающего списка «Абсорбер», заменив стандартную строку на «Основная», затем проверьте наличие изменений в строке «Значение счетчика». После таких действий состояние счетчика должно быть сброшено.

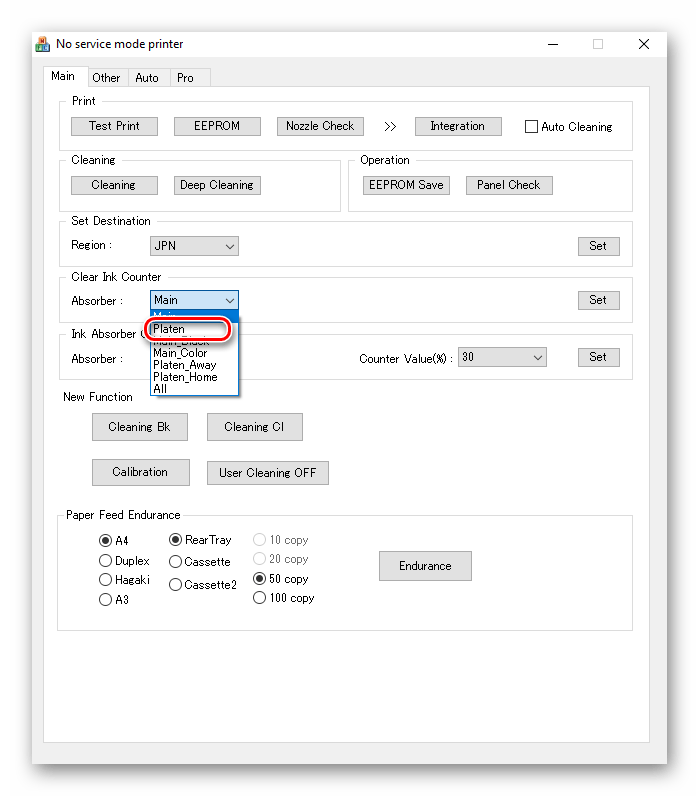
- Если этот метод не эффективен, выберите значение «Platen» вместо описанного выше и дважды проверьте наполненность подгузника.

Если после всех этих настроек желаемый результат был достигнут, немедленно переходите к следующему шагу, чтобы выйти из сервисного меню и начать нормальное взаимодействие с принтером. В противном случае переходите к следующему варианту.
Adjustment program for Epson
Существует множество версий этих утилит. Каждая отдельная версия предназначена для одного или нескольких конкретных принтеров Epson. При загрузке стоит обратить на это внимание (поддерживаемые модели всегда указываются в описании ссылок для скачивания).
Чтобы сбросить счетчик прокладок с помощью программы настройки Epson Utility:
- Нажмите кнопку «Проверить», программа определит показания датчика.
- Счетчик подгузников будет сброшен после выключения и последующего включения принтера, об этом программа отобразит сообщение на экране.
- Если ошибок не последовало, нажмите кнопку «Инициализация», затем нажмите «ОК» в диалоговом окне.
- После запуска утилиты обратите внимание на слово «Шаблон» вверху окна. Это должно указывать на модель вашего принтера. Если он отсутствует, нажмите кнопку «Выбрать». Выберите модель вашего принтера в раскрывающемся меню «Название модели», затем нажмите «ОК»
- Затем нажмите кнопку «Режим особой настройки», расположенную в правой части окна.
- В новом окне установите флажки рядом с «Счетчик основной площадки» и «Счетчик стола».
- Откроется новое окно. Прокрутите список программных функций с помощью ползунка и найдите либо «Счетчик расходных материалов», либо «Счетчик расходных чернил» (название функции зависит от версии программы). Дважды щелкните имя функции.
- Загрузите программу с одного из множества сайтов в Интернете.

PrintHelp
это универсальная программа, которая работает с принтерами различных производителей. Утилита PrintHelp также поддерживает многие печатные машины Epson. С помощью этого приложения очень легко сбросить счетчик абсорбирующей прокладки:
- Нажмите кнопку «Сбросить операцию», расположенную в разделе «Хорошие счетчики».
- Миссия выполнена.
- В центральной части окна перейдите на вкладку «Управление».
- Перейдите на http://printhelp.info/, чтобы загрузить утилиту.
- Запустите программу, затем щелкните в левой части окна на имени принтера Epson, подключенного к компьютеру в этот момент.
К сожалению, некоторые принтеры Epson требуют покупки ключа для сброса счетчиков. Однако вы можете найти множество бесплатных ключей, которыми пользуются владельцы продуктов Epson по всему миру в Интернете.
SSC Service Utility
Эту утилиту можно считать классической, поскольку она предназначена для работы с устаревшими принтерами и МФУ Epson. Однако последние версии служебной программы SSC способны очищать показания даже на самых последних моделях печатных машин. Программа в основном работает с принтерами Epson Stylus.
Чтобы сбросить подгузник с помощью этой утилиты, сделайте следующее:
- После этого на панели задач (нижний правый угол монитора) появится значок программы — щелкните по нему правой кнопкой мыши.
- В открывшемся диалоговом окне нажмите кнопку «Да». Счетчик будет сброшен.
- Появится выпадающее меню, в котором нужно выбрать пункт «Счетчик моточасов», затем — «Сбросить счетчик моточасов».
- Запускаем программу и переходим во вкладку «Настройки».
- В меню «Установленные принтеры» выберите модель принтера Epson, подключенного к вашему компьютеру, или выберите ее в меню «Модель принтера».
- Закройте окно программы, нажав на крестик.
- Скачайте программу с сайта разработчика — http://www.ssclg.com/epson.shtml (ссылка для скачивания внизу страницы).
Выключите и снова включите принтер, а затем повторите попытку печати.

INKCHIP WIC
INKCHIP Adjustment WIC — одна из лучших программ, предназначенных для обнуления счетчика поглотителя принтеров Epson. Его неоспоримые преимущества в том, что он всегда работает четко и практически без сбоев (чаще всего выходит из строя только из-за поражения ПК вирусами). Кроме того, он поддерживает огромное количество принтеров и МФУ Epson. Однако наряду с этим у программы INKCHIP есть один существенный недостаток — она платная. Точнее, само программное обеспечение можно скачать бесплатно, но для восстановления подгузника вам понадобится одноразовый ключ, который можно приобрести только у официального производителя. Процесс сброса подгузника с помощью INKCHIP WIC состоит из следующих этапов:

- выбор модели принтера Epson, для которой необходимо обнулить счетчик подгузников;
- подтверждение действия и перезапуск принтера кнопкой «Вкл».
- нажатие кнопки «Сброс счетчика» и ввод купленного кода, позволяющего сбросить абсорбер принтера Epson;
- приобретение ключа для обнуления счетчика поглотителя Epson для соответствующей модели;
- скачать, установить и запустить программу настройки INKCHIP;
- нажатие кнопки «Счетчик заданий» в открытом окне программы;
Загрузите программу INKCHIP WIC — размер 28,6 МБ, формат .ZIP, совместимую с любой 64-битной версией Windows.
INKCHIP Adjustment WIC совместим со следующими моделями принтеров и МФУ Epson:
- Epson K100 / 101/200/201/300 / K301.
- Epson M100 / 105/200/205.
- Epson ET-1110 / 14.000 / 2500/2550/2600/2610/2650/2700/2710/2720/2750/2760/3600/4500/4550/4700.
- Epson Stylus Office B30 / 40W / 42WD / 1100; Epson Stylus Office BX300F / 305/305 plus / 310FN / 320FW / 525WD / 535WD / 600FW / 610FW / 620FWD / 625FWD / 630FW / 635FWD / 925 / 935FWD; Epson Stylus Office T30 / 33 / 40w / 1100; Epson Stylus Office TX300F / 320F / 510FN / 515FN / 525FW / 600FW / 610FW / 620FWD.
- Epson Artisan 50/700/710/720/730/800/810/830/837/1430.
- Epson EP-10VA / 301/302/306/4004 / 702A / 703A / 705A / 706A / 707A / 708A / 709A / 774A / 775A / 776A / 777A / 801A / 802A / 803A / 804A / 805A / 806A / 807A / 808A / 901A / 901F / 902A / 902F / 903A / 903F / 904A / 904F / 905A / 905F / 906A / 906F / 907A / 907F / 976A3 / 977A3 / 978A3 / 979A3 / M570T.
- Epson PM-D800 / D870 / G4500 / G850 / G860 / T960 / PF-71 / 3500C / 3700C / 400 / 4000PX / A820 / A840 / A840S / A890 / A920 / A940.
- Epson Workforce 30/40/60/310/320/435/500/520/545/600/610/620/630/645/840/845/1100/2010/2510/2520/2530/2540/2630/2650 / 2660/2750/2760/3720/3730/7010/7011/7012/7015/7018/7510/7511/7515/7520/7521/7525; Epson Work Force M1030 / M1560; Epson Work Force T42WD.
- Epson PX-045A / 046 A / 047 A / 048 A / 049 A / 1001/1004/101/105/1200 / 1600 F / 1700 F / 201/203/204 / 404 A / 405 A / 434 A / 435 A / 436 A / 437 A / 501 A / 502 A / 503 A / 504A / 505F / 535F / 5600 / 5V / 601F / 602F / 603F / 673F / 7V / A640 / A720 / A740 / FA700 / G5300 / K100 / K150 / M650A / M650F / M680F / V700 / V780.
- Фабрика печати Epson L120 / 130/132/210/220/222/300/310/312/350/355/360/362/364/365/366/375/380/382/385/386/395/396/405 / 455/456/475/485/486/495/550/555/565/566/575/605/655/800/805/810/850/1110/1118/1119/1300/1800/3050/3060/3070 / 3100/3104/3106/3108/3110/3114/3116/3118/3150/3152/3156/3160/4150/4160/5190.
- Epson E-300/330/340/350/360/500/520/600/700.
- Epson ME Office 650FN / 82WD / 85ND / 900WD / 940FW / 960FWD / 1100/510/520/530 / 560W / 570 / 620F.
- Epson Sure Color SC-P400 / 407/408/600/607/608.
- Epson XP-30/33/55/100/102/103/200/201/202/203/204/205/206/207/208/210/211/212 213/214/215/216/217/220 / 225/230/235/240/243/245/247/255/257/300/302/303/305/306/310/312/313/315/320/322/323/325/330/332/335 / 340/342/343/345/352/355/400/402/403/405/406/410/412/413/415/420/422/423/425/430/432/435/440/442/445 / 452/455/510/520/530/540/600/610/620/630/640/700/710/720/750/760/800/810/820/830/850/860/900/950/960 / 2100/2101/2105.
- Epson Stylus Photo 785 / 820U / 825 / 830U / 890/895/900/915/925/935/950/960/1280/1290/1390/1400/410/1430/1500/2100/2200; Epson Stylus Photo P50; Epson Stylus Photo T50 / 60; Epson Stylus Photo TX650 / 700W / 710W / 720WD / 730 / 800FW / 810FW / 820FWD / 830; Epson Stylus Photo R240 / 250/260/265/270/280/285/290/330/340/350/360/380/390/1900/2000/2400/2880/3000; Epson Stylus Photo PX650 / 660 / 700W / 710W / 720WD / 730 / 800FW / 810FW / 820FWD / 830; Epson Stylus Photo RX520 / 530/560/580/585/590/595/610/640/650/680/685/690.
- Epson Stylus C60 / 61/62/70/80/82/110/760/860/1150/1160; Epson Stylus D120; Epson Stylus DX3800 / 4000/4200/4800/5000/6000/7400/8400 / 9400F; Epson Stylus CX2800 / 2900/3100/3200/3300/3400/3700/3800/3900/4000/4100/4200/4700/4800/4900/5000/5900/6000/7300/7400/7700/7800/8300/8400 / 9300F / 9400 Факс; Epson Stylus SX200 / 210/218/230/235/400/410 / 420W / 430/440 / 510W / 525WD / 535WD / 610FW / 620FW / 600FW; Epson Stylus TX200 / 210/220/230/235/320/400/410/420 / 420W / 430/435 / 550W / 560WD / 720/820/830; Epson Stylus NX200 / 210/220/230/300/330/400/410/420/430/510/530/620/635.
Если вы сомневаетесь, поможет ли эта программа сбросить счетчик поглотителя, используйте ключ, чтобы проверить его возможности. Для этого вместо кода сброса подгузника введите команду «попробовать» и программа бесплатно сбросит счетчик 5%. Таким образом, вы убедитесь, подходит ли данная утилита к принтеру.
Выход из сервисного режима
Многие принтеры полностью отказываются печатать в сервисном режиме, поэтому после завершения сброса подгузников вам нужно выйти из него. Делается это радикальным методом: удаляя устройство, но не пугайтесь, потому что драйверы сохранены, а сам принтер будет добавлен в операционную систему при следующем подключении.
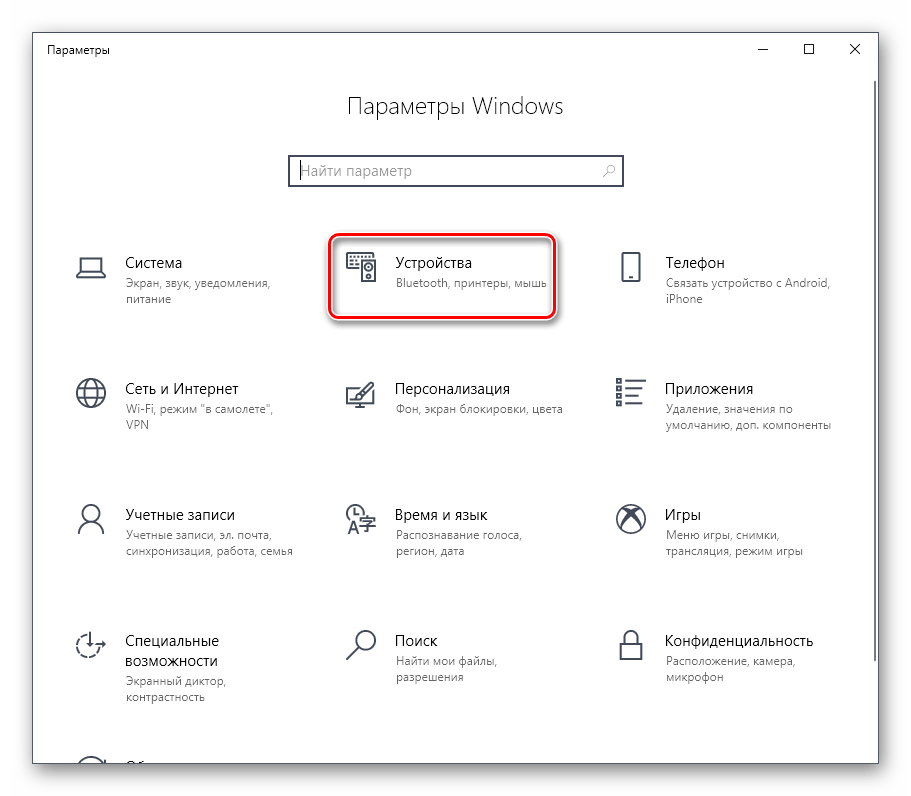
- Откройте «Пуск» и перейдите в «Настройки».

- Там найдите раздел «Устройства» и щелкните по нему левой кнопкой мыши.

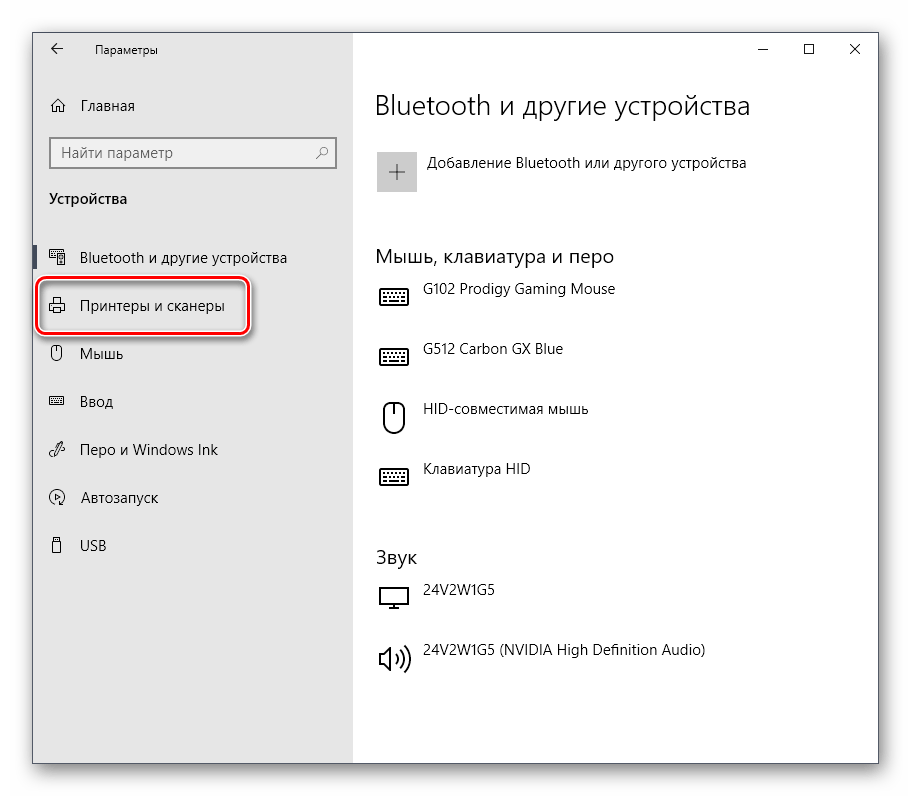
- Перейдите на левой панели в категорию «Принтеры и сканеры».
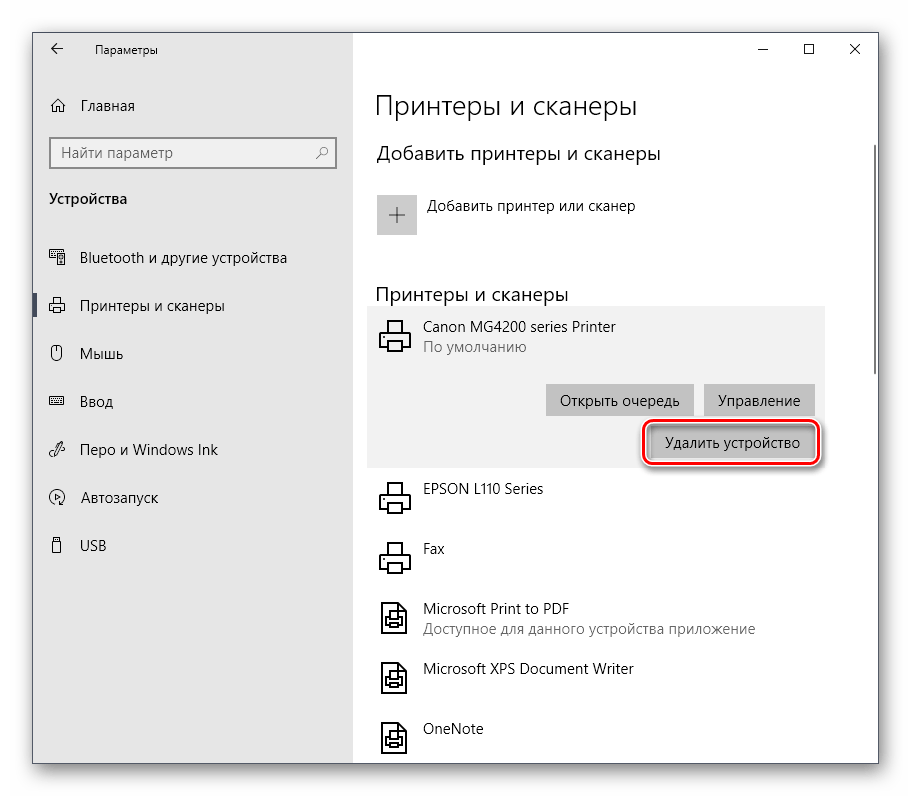
- Здесь выберите нужный принтер, щелкнув по нему, и в открывшемся меню нажмите «Удалить устройство».
- После появления окна с предупреждением подтвердите свои намерения.


теперь вы можете выключить и перезапустить принтер, чтобы вернуть его к нормальной работе и подключиться к компьютеру.
После успешного выполнения всех вышеперечисленных шагов ошибка «Срок службы впитывающих чернила прокладок принтера приближается» не будет появляться в течение некоторого времени, но если прокладки снова заполнятся, вам необходимо будет их заменить. Для этого лучше обратиться в специализированные службы, ведь ручное вмешательство часто приводит к непоправимым проблемам.
Ответственность за сброс
Прежде чем перейти к описанию процедуры сброса, помните, что вмешательство в работу принтера на уровне прошивки приведет к аннулированию гарантии. Поэтому для вновь приобретенного оборудования разумнее обращаться в сервисный центр. Во избежание поломки устройства в результате некорректных действий не рекомендуется восстанавливать тех, у кого мало опыта работы с цифровой техникой.
-
Contents
-
Table of Contents
-
Bookmarks
Quick Links
Operator’s Guide
CMP0117-00 EN
Related Manuals for Epson SC-F2100
Summary of Contents for Epson SC-F2100
-
Page 1
Operator’s Guide CMP0117-00 EN… -
Page 2
(excluding the U.S.) failure to strictly comply with Seiko Epson Corporation’s operating and maintenance instructions. Seiko Epson Corporation shall not be liable for any damages or problems arising from the use of any options or any consumable products other than those designated as Original Epson Products or Epson Approved Products by Seiko Epson Corporation. -
Page 3: Table Of Contents
SC-F2100 Series Operator’s Guide Contents Contents Other maintenance….. . 29 Copyrights and Trademarks Preparation……30 Cautions when operating.
-
Page 4: Viewing The Manuals
Manuals icon is created on the desktop of the computer being used. The illustrations may differ slightly from the model you Double-click the EPSON Manuals icon on your are using. Please be aware of this when using the manual. desktop.
-
Page 5
Click on the manual or item you want to view. Viewing video manuals The video manuals have been uploaded to YouTube. Click Epson Video Manuals from the top page of Online Manuals, or click the following blue text to view the manuals. -
Page 6
SC-F2100 Series Operator’s Guide Introduction You can input and search for keywords, such as the names of items you want to confirm. For Windows Right click on a page in the PDF manual and select Find in the menu that is displayed to open the search toolbar. -
Page 7: Part Names
SC-F2100 Series Operator’s Guide Introduction Part Names Front section Printer cover Platen gap adjustment lever Tweezer holder Cartridge cover (left) Fixing lever Ink cartridges Platen Spacer b Control panel Movable base Spacer a Platen installation plate Cartridge cover (right)
-
Page 8: Interior
SC-F2100 Series Operator’s Guide Introduction Interior Scale Air filter Suction cap Carriage shaft Print head Wiper unit Flushing pad Anti-drying caps Rear section AC inlet Waste ink bottle USB port Tube clamp Waste ink tube Air inlet Waste ink bottle holder…
-
Page 9: Basic Printing
SC-F2100 Series Operator’s Guide Basic Printing Grip Pad Tool Basic Printing This is used when loading a T-shirt on a grip pad covered platen. We recommend using the grip pad tool supplied to remove slack and creases from the T-shirt you loaded.
-
Page 10
SC-F2100 Series Operator’s Guide Basic Printing ❏ Improves the color development on the White ink. Pre-treatment liquid (consumable) Apply the diluted pre-treatment liquid to the T-shirt with a roller or spray bottle before printing. Pure water (commercially available) Dilutes the pre-treatment liquid. -
Page 11: Overview
SC-F2100 Series Operator’s Guide Basic Printing Overview This section explains the basic workflow from preparing a T-shirt before printing to post-treatment after printing. The following shows the procedure for sending a job from the Garment Creator supplied to the printer and then printing on a T-shirt.
-
Page 12
SC-F2100 Series Operator’s Guide Basic Printing Removing the T-shirt (media) Remove the T-shirt from the printer. Post-treatment Fixate the ink to the T-shirt. “Fixating the Ink” on page 26… -
Page 13: Before Printing
SC-F2100 Series Operator’s Guide Basic Printing Before Printing Creating and Sending Jobs To maintain good print quality, perform the following inspection before starting printing operations each day. You cannot print directly from commercially available software. Check the amount of ink remaining:…
-
Page 14: Notes On Receiving Jobs
SC-F2100 Series Operator’s Guide Basic Printing Preparing the Platen Notes on Receiving Jobs Only the following operations are possible while This section explains how to prepare the L, M, S, and XS receiving jobs. If buttons do not respond when size platens.
-
Page 15: Attaching/Removing A Grip Pad
SC-F2100 Series Operator’s Guide Basic Printing Depending on the thickness of the fabric being printed Gently hold the section that was peeled off the on, you also need to attach/remove the spacers in pad, and then stick the grip pad.
-
Page 16: Removing The Sheet
SC-F2100 Series Operator’s Guide Basic Printing Fold over the long edges of the grip pad and stick Place the platen on a flat surface with the back them to the back of the platen without allowing side facing up. the pad to loosen or sag.
-
Page 17: Replacing Platens And Removing/Attaching Spacers
SC-F2100 Series Operator’s Guide Basic Printing Peel off the grip pad from back to front. Turn off the printer. Grip the left and right of the platen, and lift it straight up to remove it. Check the condition of the spacers.
-
Page 18
SC-F2100 Series Operator’s Guide Basic Printing When using L, M, S, and XS size platens Loosen the fixing lever. For T-shirts or sweatshirts with a thickness up to 7.0 mm Attach spacers a and b. For fabric with a thickness of 5.0 to 13.0 Attach spacer a only. -
Page 19
SC-F2100 Series Operator’s Guide Basic Printing There is no particular stacking order when installing both spacers. Remove the platen gap adjustment lever. Install the platen gap adjustment lever in the direction shown below. Change the status of the spacer in step 4 according to the installed platen and the thickness of the fabric to be printed on. -
Page 20: Load The T-Shirt (Media)
SC-F2100 Series Operator’s Guide Basic Printing Tighten the fixing lever to secure the platen gap Load the T-shirt (media) adjustment lever. This section explains how to install the L, M, S, and XS size platens. See the User’s Guide for details on installing the sleeve and medium grooved platens.
-
Page 21
SC-F2100 Series Operator’s Guide Basic Printing Load the T-shirt so that the shoulders are at the Remove any slack or creases from the printing front. surface and make it flat. When using a grip pad covered platen, we recommend that you use the grip pad tool supplied to flatten the printing surface. -
Page 22: Adjusting The Platen Gap
SC-F2100 Series Operator’s Guide Basic Printing When Using the Grip Pad Tool Important: Press the T-shirt lightly with the grip pad tool and The printer detects the highest part of the print move it vertically and horizontally from the surface and adjusts the height. If there are any edges as shown in the following illustration.
-
Page 23
SC-F2100 Series Operator’s Guide Basic Printing Loosen the fixing lever under the platen. Adjust the gap to the narrowest point The platen gap is gradually narrowed by slowly changing from the guided scale to the smaller scale one step at a time. -
Page 24
SC-F2100 Series Operator’s Guide Basic Printing Check if Platen Height Error is displayed on the If you have worked up to step 6 and then return to control panel. step 1 to re-adjust the platen gap, move the platen When the error is displayed gap adjustment lever by one scale to the smaller values. -
Page 25: Starting And Canceling Printing
SC-F2100 Series Operator’s Guide Basic Printing Starting and Canceling Canceling Printing Use this when you want to cancel printing, or to cancel a job that is being received by the printer. Starting Press the + button. When receiving the job is complete, the message Place shirt and press to start printing.
-
Page 26: Fixating The Ink
SC-F2100 Series Operator’s Guide Basic Printing *1 The optimum conditions vary depending on the Fixating the Ink type of heat press such as the manual adjustment type. Be sure to test the ink fixation result in advance to find the right pressure.
-
Page 27: Maintenance
SC-F2100 Series Operator’s Guide Maintenance Maintenance When to Perform Various Maintenance Operations To maintain the print quality of the printer, you need to perform cleaning and replace consumables. If maintenance is not performed, print quality may decline, the printer’s service life may be reduced, or you may be liable for the cost of any repairs.
-
Page 28: Locations Of Consumables And Replacement Timing
Clean edges of the metal even after head cleaning U User’s Guide (Online Manual) * If this message is displayed frequently, contact your dealer or Epson support. Locations of Consumables and Replacement Timing When to perform Component to be replaced…
-
Page 29: Other Maintenance
SC-F2100 Series Operator’s Guide Maintenance When to perform Component to be replaced See manual to clean scale and change DAir filter air filter. is displayed “Cleaning the scale and replacing the filter” on page 36 You can check the procedure in a video on YouTube.
-
Page 30: Preparation
SC-F2100 Series Operator’s Guide Maintenance Air filter (consumable) Preparation When cleaning the scale, use the cleaning cloth supplied with the air filter. Ready the following items before beginning cleaning and replacement. Soft cloth When the supplied parts have been completely used, This is used to clean the edges of the metal and to clean purchase new consumables.
-
Page 31: Cautions When Operating
SC-F2100 Series Operator’s Guide Maintenance ❏ Touch a metal object before starting operations to Cautions when operating disperse any static electricity. Caution: ❏ Always wear protective eyewear, gloves, and a mask when working. Should any waste ink or ink cleaner come into contact with your skin or enter your eyes or mouth, immediately take the following actions.
-
Page 32: Using Ink Cleaner
SC-F2100 Series Operator’s Guide Maintenance Pour an appropriate amount of ink cleaner into Using ink cleaner the cup supplied with the maintenance kit. The ink cleaner is used to clean the following parts. Do not use it on any other parts as this could damage the parts.
-
Page 33: Disposal Of Used Consumables
In such cases, submit the “Safety data sheet” to the industrial waste disposal company. You can download it at your local Epson Web site. Confirm that the printer is on, and then press the — button. The Maintenance menu is displayed.
-
Page 34
SC-F2100 Series Operator’s Guide Maintenance Note: After 10 minutes from the start of cleaning the suction caps, a screen will be displayed and a buzzer sounds informing you that 10 minutes have elapsed. Press the Z button to continue the cleaning process. -
Page 35
SC-F2100 Series Operator’s Guide Maintenance After removing ink from the cap as shown below, Wipe the outside of the suction cap with a wide go to the next step. cleaning stick. When wiping the outside of the suction cap, remember to also wipe the top edge. -
Page 36: Cleaning The Scale And Replacing The Filter
SC-F2100 Series Operator’s Guide Maintenance Use the cleaning cloth soaked in ink cleaner to Cleaning the scale and wipe away ink that has stuck to the scale. replacing the filter Important: Do not touch the carriage shaft inside the When cleaning the scale and replacing the air filter, the printer.
-
Page 37
SC-F2100 Series Operator’s Guide Maintenance Grip the tab on the air filter and remove it. Important: ❏ Do not pull the scale with excessive force. If it is pulled with too much force, the right section may detach. Put the old air filter into the bag of the new air filter. -
Page 38: Checking For Clogged Nozzles
SC-F2100 Series Operator’s Guide Maintenance Checking for clogged Disposing of Used Consumables U “Disposal” on nozzles page 33 This section explains how to check nozzles when using the L, M, S, and XS size platens. See the User’s Guide for details on checking nozzles for the sleeve platen and the medium grooved platen.
-
Page 39: Printing A Nozzle Check Pattern
SC-F2100 Series Operator’s Guide Maintenance ❏ When a platen without fabric is installed: P Check that the platen is installed, and install the spacers in the following status. L, M, S, and XS size platens Attach spacers a and b.
-
Page 40: Cleaning The Print Head
SC-F2100 Series Operator’s Guide Maintenance Press the Z button. Cleaning the print head Check that media is loaded, and then press the If the printed result is faint or has gaps, cleaning the Z button again. print head may clear the clogged nozzles.
-
Page 41
SC-F2100 Series Operator’s Guide Maintenance Nozzles are still clogged after performing head Buttons that are used in the following operations cleaning several times The edge of the metal may be soiled. Perform the following. Clean edges of the metal U User’s Guide (Online Manual) Press the — button. -
Page 42: Shaking And Replacing Ink Cartridges
SC-F2100 Series Operator’s Guide Maintenance Shaking method Shaking and Replacing Ink Cartridges Make sure the printer is on, and then remove the ink cartridge. When replacing a cartridge, remove the new one Shaking from the bag. Shake the cartridge horizontally thoroughly in 5 Timing and frequency of shaking cm movements.
-
Page 43
Do not touch the IC chip on the top of the ink cartridge. The cartridge may not be Important: recognized, or the printer may become unable Epson recommends the use of genuine Epson ink to print properly. cartridges. Epson cannot guarantee the quality or reliability of non-genuine ink. The use of… -
Page 44: Disposing Of Waste Ink
SC-F2100 Series Operator’s Guide Maintenance Close the cartridge cover. Disposing of Waste Ink Preparing and Replacement Timing When Prepare empty waste ink bottle. is displayed Prepare a new Waste Ink Bottle as soon as possible. When you want to replace the Waste Ink Bottle at this…
-
Page 45: Replacing The Waste Ink Bottle
SC-F2100 Series Operator’s Guide Maintenance If you need to replace the waste ink bottle before the Remove the waste ink tube from the used waste message is displayed, select Waste Ink Counter from the ink bottle, and insert it into the new waste ink maintenance menu.
-
Page 46: Replacing The Head Cleaning Set
SC-F2100 Series Operator’s Guide Maintenance Replacing the Head Cleaning Set Preparing and Replacement Timing When Head cleaning set is nearing end of life. is displayed Prepare a new head cleaning set as soon as possible. When you want to replace the parts at this stage, implement Head Cleaning Set from the setup menu, and then replace the parts.
-
Page 47: How To Replace The Head Cleaning Set
SC-F2100 Series Operator’s Guide Maintenance ❏ Flushing pad (x1) Place your fingers in the groove on the back of the wiper unit, and tilt it forward a little. Always choose a replacement head cleaning set that is specified for this printer.
-
Page 48
SC-F2100 Series Operator’s Guide Maintenance Insert the new wiper unit. Press the lever forwards, and then place the holes in the anti-drying cap over the two poles on the Place on the attachment point and press down printer. until you hear a click. -
Page 49
SC-F2100 Series Operator’s Guide Maintenance Hold it at an angle and wait until the waste ink Place the removed flushing pad in the packaging stops dripping from the flushing pad. Remove that contained the new flushing pad. and place it on the metal tray. -
Page 50: Options And Consumable Products
* Epson recommends the use of genuine Epson ink cartridges. Epson cannot guarantee the quality or reliability of non-genuine ink. The use of non-genuine ink may cause damage that is not covered by Epson’s warranties, and under certain circumstances, may cause erratic printer behavior. Information about non-genuine ink levels may not be displayed, and use of non-genuine ink is recorded for possible use in service support.
-
Page 51
SC-F2100 Series Operator’s Guide Options and Consumable Products Others Product name Product Explanation number Cleaning cartridge T7360 For washing the print head and washing the tubes. Pre-treatment Liquid T7361 20 liters. Dilute before use. U User’s Guide (Online Manual) Maintenance Kit T7362 The same as the maintenance kit supplied with the printer. -
Page 52
SC-F2100 Series Operator’s Guide Options and Consumable Products Product name Product Explanation number Platen Grip Pad — L C13S210075 A grip pad for using the L-size platen as a grip pad covered (except for SC-F2180) platen. Platen Grip Pad — L…
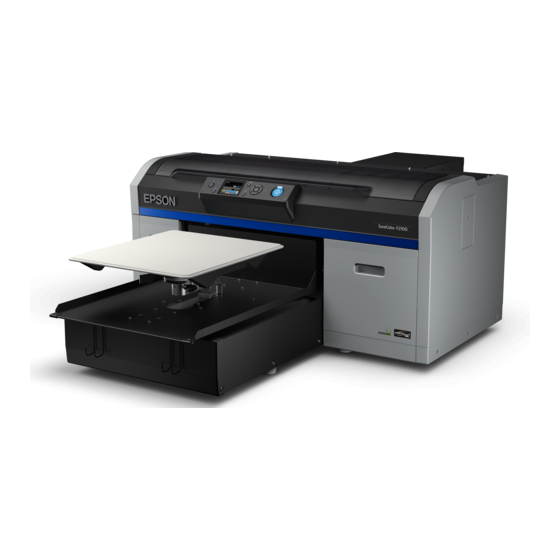
– Compatible Printer model: Epson SureColor F2100
– Epson SureColor F2100 Error Codes with quick guides:
- Code: 1101
- Description: Ink Tube End Of Life Error
- Causes: The Carriage has made enough passes to wear out the Ink Tubes.
- Troubleshooting Guides: Inspect and replace the Ink Tubes if necessary, and reset the counter (CR Motor Counter)
- Code: 1125
- Description: Carriage Home Position Detection Error
- Causes: The Carriage Home Position Sensor does not detect the Carriage properly.
- Troubleshooting Guides: 1. Check the Carriage Home Position Sensor.
2. Check for mechanical issues that would restrict the Carriage Mechanism from going “home”.
- Code: 1138
- Description: CR Over Current Error
- Causes: The Carriage Motor Driver Circuit detects abnormal current draw.
- Troubleshooting Guides: 1. Check for proper Carriage movement (defective Carriage Bearings, etc.).
2. Check for proper Carriage Belt Tension.
3. Check the Carriage Motor.
- Code: 113A
- Description: CR Over Current Error
- Causes: The Carriage Motor Driver Circuit detects abnormal current draw.
- Troubleshooting Guides: 1. Check for proper Carriage movement (defective Carriage Bearings, etc.).
2. Check for proper Carriage Belt Tension.
3. Check the Carriage Motor.
- Code: 113B
- Description: Carriage Over Speed Error
- Causes: The Carriage Encoder signal does not look right to the Main Board.
- Troubleshooting Guides: 1. Check the CR Encoder Strip.
2. Check the CR Encoder.
3. Check the Carriage Motor.
- Code: 113C
- Description: Carriage Encoder Reversing Error
- Causes: The Carriage Encoder reports that the Carriage is moving in the wrong direction.
- Troubleshooting Guides: 1. Check the CR Encoder.
2. Check the Main Board.
- Code: 113D
- Description: Carriage Encoder Movement Error
- Causes: The Carriage Encoder
reports that the Carriage is
not moving or moving slow. - Troubleshooting Guides: 1. Check the CR Encoder.
2. Check the CR Encoder Strip.
3. Check the Main Board.
- Code: 113E
- Description: Carriage Encoder Velocity Error
- Causes: The Carriage Encoder reports that the Carriage is moving at an irregular speed.
- Troubleshooting Guides: 1. Check the CR Encoder Strip.
2. Check the CR Encoder.
3. Check the Carriage Motor.
4. Check the Main Board.
- Code: 113F
- Description: Carriage Encoder Velocity Error
- Causes: The Carriage Encoder reports that the Carriage is moving at an irregular speed.
- Troubleshooting Guides: 1. Check Carriage Movement.
2. Check the CR Encoder Strip.
3. Check the CR Encoder.
4. Check the Carriage Motor.
5. Check the Main Board.
- Code: 1228
- Description: TF Motor Overcurrent Error
- Causes: The TF Motor Driver has an overcurrent condition.
- Troubleshooting Guides: 1. Check the TF Motor for binding
2. Replace the TF Encoder Board.
3. Replace the TF Motor.
- Code: 122A
- Description: Table Feed Motor Overload Error
- Causes: The Table Feed Motor Driver Circuit detects abnormal current draw.
- Troubleshooting Guides: 1. Check for proper Table (look for binding).
2. Check for proper Table Feed Belt Tension.
3. Check the Table Feed Encoder.
4. Check the Table Feed Encoder Disk.
5. Check the Table Feed Motor
- Code: 122B
- Description: Table Feed Motor Speed Error
- Causes: Speed Error during Deceleration
- Troubleshooting Guides: 1. Check the Table Feed Encoder.
2. Check the SUB Board
3. Check the Main Board
- Code: 122C
- Description: Table Feed Motor Reversing Error
- Causes: Speed Error during Reversing direction.
- Troubleshooting Guides: 1. Check PF Timing Belt Tension.
2. Check PF Encoder.
3. Check Table Feed Motor.
- Code: 122D
- Description: Table Feed Motor Time Out Error
- Causes: The Table Feed Encoder reports that the Table does not move properly.
- Troubleshooting Guides: 1. Check for proper Table movement.
2. Check for proper Table Feed Belt tension.
3. Check the Table Feed Encoder.
4. Check the Table Feed Encoder Disk.
5. Check the Table Feed Motor
- Code: 122E
- Description: Table Feed Motor Velocity error.
- Causes: The Table Feed Encoder reports that the Table Feed Roller is moving at and irregular speed.
- Troubleshooting Guides: 1. Check for proper Table Feed Belt Tension.
2. Check the Table Feed Encoder.
3. Check the Table Feed Encoder Disk.
4. Check the Table Feed Motor
- Code: 122F
- Description: Table Feed Motor Velocity error.
- Causes: The Table Feed Encoder reports that the Table is moving at and irregular speed.
- Troubleshooting Guides: 1. Check for proper Table Feed Belt Tension.
2. Check the Table Feed Encoder.
3. Check the Table Feed Encoder Disk.
4. Check the Table Feed Motor
- Code: 131B
- Description: Print Head Temperature Error
- Causes: The Thermistor in the Print Head reports an over temperature condition
- Troubleshooting Guides: 1. Re-seat the Print Head Cables on the Main Board side.
2. Re-seat the Print Head Cables on the Print Head side.
3. Replace the Print Head.
4. Replace the Main Board.
- Code: 1410
- Description: Maintenance Unit Error
- Causes: Check Maintenance Unit Operation
- Troubleshooting Guides: 1. Replace Pump Cap assembly.
- Code: 1412
- Description: Cloth Wiper error.
- Causes: Cloth Wiper undetermined error.
- Troubleshooting Guides: 1. Check the Cloth Wiper Unit.
2. Re-Seat the Cloth Wiper Unit.
3. Replace the Cloth Wiper Unit.
- Code: 141A
- Description: Pump Motor Over Current Error
- Causes: The Cleaning Pump Motor draws too much current
- Troubleshooting Guides: 1. Check the Pump Cap Unit operation.
2. Replace the Pump Cap Unit.
- Code: 141B
- Description: Pump Motor Over Speed Error
- Causes: The Cleaning Pump Motor spins too fast.
- Troubleshooting Guides: 1. Check the Pump Cap Unit operation.
2. Replace the Pump Cap Unit.
- Code: 141C
- Description: Rotation Direction Error
- Causes: The Cleaning Pump Motor spins in the wrong direction.
- Troubleshooting Guides: 1. Check the Pump Cap Unit operation.
2. Replace the Pump Cap Unit.
- Code: 141D
- Description: Driving Time Out Error
- Causes: The Cleaning Pump Motor does not spin, or spins too long.
- Troubleshooting Guides: 1. Check the Pump Cap Unit operation.
2. Replace the Pump Cap Unit.
- Code: 141E
- Description: Velocity Deviation Error
- Causes: The Cleaning Pump Motor spins at irregular speeds.
- Troubleshooting Guides: 1. Check the Pump Cap Unit operation.
2. Replace the Pump Cap Unit.
- Code: 141F
- Description: Under Speed Error
- Causes: The Cleaning Pump Motor spins too slow.
- Troubleshooting Guides: 1. Check the Pump Cap Unit operation.
2. Replace the Pump Cap Unit.
- Code: 1429
- Description: Circulation Motor Error
- Causes: Circulation Motor or driver error.
- Troubleshooting Guides: 1. Replace Circulation Motor.
2. Replace Main Board.
- Code: 142A
- Description: Circulation Motor Over Current
- Causes: Circulation Motor Over Current
- Troubleshooting Guides: 1. Inspect the circulation motor assembly for binding.
2. Check the circulation encoder.
3. Replace the circulation motor and encoder assembly.
- Code: 142B
- Description: Circulation Motor Over Speed
- Causes: Circulation Motor Over Speed
- Troubleshooting Guides: 1. Inspect the circulation motor assembly and encoder.
2. Check the circulation encoder.
3. Replace the circulation motor and encoder
assembly.
- Code: 142C
- Description: Circulation Motor reverse current
- Causes: Circulation Motor Over current in reverse direction
- Troubleshooting Guides: 1. Inspect the circulation motor assembly and encoder.
2. Check the circulation encoder.
3. Replace the circulation motor and encoder
assembly.
- Code: 142D
- Description: Circulation Motor drive current
- Causes: Circulation Motor drive current in reverse direction
- Troubleshooting Guides: 1. Inspect the circulation motor assembly and encoder.
2. Check the circulation encoder.
3. Replace the circulation motor and encoder assembly.
4. Replace the Main Board
- Code: 142E
- Description: Circulation Motor drive speed
- Causes: Circulation Motor drive speed error
- Troubleshooting Guides: 1. Inspect the circulation motor assembly and encoder.
2. Check the circulation encoder.
3. Replace the circulation motor and encoder assembly.
4. Replace the Main Board
- Code: 142F
- Description: Circulation Motor drive speed too slow
- Causes: Circulation Motor drive speed too low error
- Troubleshooting Guides: 1. Inspect the circulation motor assembly and encoder.
2. Check the circulation encoder.
3. Replace the circulation motor and encoder assembly.
4. Replace the Main Board
- Code: 1431
- Description: Pump Cap End Of Life
- Causes: Pump Cap End of Life
- Troubleshooting Guides: 1. Check the Pump Cap Unit operation.
2. Replace the Pump Cap Unit.
- Code: 1432
- Description: Right Ink Holder End of Life
- Causes: Right Ink Holder End of Life
- Troubleshooting Guides: 1. Replace Right Ink Holder
- Code: 1433
- Description: Left Ink Holder End of Life
- Causes: Left Ink Holder End of Life
- Troubleshooting Guides: 1. Replace Left Ink Holder
- Code: 1435
- Description: Buffer Assembly End Of Life
- Causes: Buffer Assembly End Of Life
- Troubleshooting Guides: 1. Replace the Buffer Assembly.
- Code: 1436
- Description: Circulation Pump End of Life
- Causes: Circulation Pump End of Life
- Troubleshooting Guides: 1. Replace the Circulation Pump.
- Code: 1459
- Description: CWIP (Cloth Wiper) Oscillation Error
- Causes:
- Troubleshooting Guides: 1. Re-Seat the Cloth Wiper unit
2. Replace the Cloth Wiper unit.
- Code: 145A
- Description: CWIP (Cloth Wiper) Overload Error
- Causes: Is the wiper expended, can it be wound easily, is it seated properly.
- Troubleshooting Guides: 1. Check for proper installation.
2. Check for binding.
3. Replace the Wiper Unit.
- Code: 145B
- Description: CWIP (Cloth Wiper) Over Speed Error
- Causes: Encoder damaged, Encoder Cable
- Troubleshooting Guides: 1. Replace the relay cable
2. Replace the Wiper Unit
- Code: 145C
- Description: CWIP (Cloth Wiper) Reversing Error
- Causes: Encoder damaged, Encoder Cable
- Troubleshooting Guides: 1. Replace the relay cable 2. Replace the Wiper Unit
- Code: 145D
- Description: CWIP (Cloth Wiper) Drive Time-out Error
- Causes:
- Troubleshooting Guides: 1. Replace Main Board

Solve Epson SureColor F2100 Error codes
- Code: 145E
- Description: CWIP (Cloth Wiper) velocity Error
- Causes:
- Troubleshooting Guides: 1. Check Encoder
2. Check Encoder Cable.
3. Check Motor Cable
4. Replace Motor
5. Replace Wiper Unit.
- Code: 145F
- Description: CWIP (Cloth Wiper) Bound Up Error
- Causes:
- Troubleshooting Guides: 1. Check Encoder
2. Check Encoder Cable.
3. Check Motor Cable
4. Replace Motor
5. Replace Wiper Unit
- Code: 1503
- Description: Table position error
- Causes: Table Front or Rear sensor not detected.
- Troubleshooting Guides: 1.Check Table Front sensor.
2. Check Table Rear sensor.
3. Replace defective sensor.
- Code: 1504
- Description: Table Stuck Error
- Causes: Table is not moving
- Troubleshooting Guides: 1. Check for obstruction of Table
2. Check Table Belt and tension.
- Code: 1505
- Description: Obstacle Sensor Error
- Causes: Obstacle sensor detected an obstruction in the carriage path.
- Troubleshooting Guides: 1. Check Obstacle sensor operation.
2. Remove obstruction in carriage path.
3. Lower the table height.
4. Replace the Obstacle sensor.
- Code: 1620
- Description: Pressure Motor Error
- Causes: Pressure Motor Initialization Error.
- Troubleshooting Guides: 1. Check IC Holder connections.
2. Replace Left Ink Holder.
3. Replace Right Ink Holder.
- Code: 1621
- Description: Pressure Motor Position Error
- Causes: Pressure Motor Position Sensor Error
- Troubleshooting Guides: 1. Check IC Holder connections.
2. Replace Left Ink Holder.
3. Replace Right Ink Holder.
- Code: 1622
- Description: Pressure motor operation Time Out
- Causes: Pressure motor runs longer then expected.
- Troubleshooting Guides: 1. check for obstructions at the rear of the ink holder.
2. Replace Ink Holder.
3. Main Board exchange.
- Code: 1623
- Description: Pressure motor runs continously.
- Causes: Pressure motor runs continously.
- Troubleshooting Guides: 1. check for obstructions at the rear of the ink holder.
2. Replace Ink Holder.
3. Main Board exchange.
- Code: 1A23
- Description: RTC Error
- Causes: Real Time Clock error
- Troubleshooting Guides: 1. Reset the Date and Time with the service program.
2. Replace the RTC Battery.
3. Replace the Main Board
- Code: 1A26
- Description: RTC Error
- Causes: Time and Date error
- Troubleshooting Guides: 1. Replace the RTC Battery.
2. Reset the Time and Date with the Service Utility.
3. Replace the main Board.
- Code: 1A37
- Description: PH Thermistor Error
- Causes: PH Temperature detected as out of range.
- Troubleshooting Guides: 1. Check PH FFC Cables.
2. Replace the Print Head
3. Replace the PH FFC Cables
- Code: 1A38
- Description: PH Thermistor Error
- Causes: Thermistor Failure
- Troubleshooting Guides: 1. Replace the Print Head
- Code: 1A39
- Description: PH Error
- Causes: FFC Connection, Head BD., Main Board connections
- Troubleshooting Guides: 1. Check PH FFC Cables.
2. Check Head Board.
3. Replace the Main Board.
3. Replace the PH FFC Cables
- Code: 1A41
- Description: PH Rank ID Error
- Causes: Invalid Head Rank written to Main Board.
- Troubleshooting Guides: 1. Rewite the PH ID to the Main Board with the Service Program.
- Code: 1A50
- Description: ASIC communication Error on Main Board
- Causes: Main Board Error
- Troubleshooting Guides: 1. Replace Main Board.
- Code: 1A51
- Description: Main Board communication Error to SUB-B Board Error
- Causes: Main Board Error
- Troubleshooting Guides: 1. Replace Main Board
- Code: 1A54
- Description: USB Flash drive Error
- Causes: USB Flash drive removed during communication
- Troubleshooting Guides: 1. Try another Flash Drive.
2. Check Connection to USB Flash Drive connection.
3. Replace Main Board.
- Code: 1A55
- Description: USB Flash drive Error
- Causes: USB Flash drive removed during communication
- Troubleshooting Guides: 1. Try another Flash Drive.
2. Check Connection to USB Flash Drive connection.
3. Replace Main Board.
- Code: 1F80
- Description: IES Error (Ink End Sensor)
- Causes: Check IES Sensor on Ink Holder
- Troubleshooting Guides: 1. Try New IC’s
2. Replace IC Holders L&R
3. Replace Main Board.
- Code: 1FB8
- Description: IES Error (Ink End Sensor)
- Causes: Check IES Sensor on Ink Holder
- Troubleshooting Guides: 1. Try New IC’s
2. Replace IC Holders L&R
3. Replace Main Board
- Code: 1FB9
- Description: CSIC Error
- Causes: Connection or NVRAM Error
- Troubleshooting Guides: 1. Replace Main Board
- Code: 1FBE
- Description: CSIC Error
- Causes: Check IC and connections on Ink Holder
- Troubleshooting Guides: 1. Check Ink Holder FFC connection.
2. Replace Ink Holder L or R
3. Replace Main Board.
- Code: 1FBF
- Description: CSIC Error
- Causes: Check IC and connections on Ink Holder
- Troubleshooting Guides: 1. Check Ink Holder FFC connection.
2. Replace Ink Holder L or R
3. Replace Main Board.
- Code: 1FC0
- Description: CSIC Error
- Causes: Check IC and connections on Ink Holder
- Troubleshooting Guides: 1. Check Ink Holder FFC connection.
2. Replace Ink Holder L or R
3. Replace Main Board.
- Code: 1FC1
- Description: CSIC Error
- Causes: Check IC and connections on Ink Holder
- Troubleshooting Guides: 1. Check Ink Holder FFC connection.
2. Replace Ink Holder L or R
3. Replace Main Board.
- Code: 1FC2
- Description: CSIC Error
- Causes: Check IC and connections on Ink Holder
- Troubleshooting Guides: 1. Check Ink Holder FFC connection.
2. Replace Ink Holder L or R
3. Replace Main Board.
- Code: 2000
- Description: NVRAM Error
- Causes:
- Troubleshooting Guides: 1. Replace Main Board
- Code: 2002
- Description: SDRAM Error
- Causes:
- Troubleshooting Guides: 1. Replace Main Board
- Code: 2003
- Description: Flash ROM Error
- Causes:
- Troubleshooting Guides: 1. Install Firmware
2. Replace Main Board
– Get more error code list with quick guide to fix printer product, click here
– About get help with reseting Epson inkpad or others, click here
- Code: 2008
- Description: Wrong Flash Device
- Causes:
- Troubleshooting Guides: 1. Try restarting the printer
2. Replace Main Board.
- Code: 200A
- Description: F/W Load Error
- Causes:
- Troubleshooting Guides: 1. Re-Install the Firmware
2. Replace the Main Board
- Code: 200D
- Description: Main Bd. Watch Dog Timer interrupt Error
- Causes:
- Troubleshooting Guides: 1. Replace Main Board
- Code: 200F
- Description: 42V Overload Error
- Causes:
- Troubleshooting Guides: 1. Try to isolate by disconnecting motors etc. attached to the 42V power.
2. Try restarting the printer
3 Replace Main Board.
4. Replace Power Supply
- Code: 3000
- Description: AC Power Error
- Causes: AC Power Shut Off
- Troubleshooting Guides: 1. Turn Power OFF and Back ON
2. Check AC Power connection
3. Replace Power Supply
4. Replace Main Board
– Get more information about Epson XP 15000 troubleshooting, click here
– Shop on my shop, click here
Contact us to get support with Epson SureColor F2100 Error case
Telegram: https://t.me/hyperaktiv
Facebook: https://www.facebook.com/dngnm/
Or click here to get more ways.
r/dtgprinting
All stuff that has to do with printing t shirts with direct to garment printers. Topics include, but not limited to: tips, tricks, DIY, horror stories, lessons learned, awesome designs and things you have learned. Also post questions about: Direct to garment printing, the dtg business, equipment and inks.
Members
Online
-
#1
Hello to everyone. Here is problem with printer. it stay offline few mounth. Not working now. when start printhead moving 1-2 times and then get error.
You can see on panel message: Call to service. Error inks system 14D5.
I cant find this number of error in manuals also googling many times. this error not in list of errors.
Maybe you can explain how to enter the Maintenace or Secret menu before printer starting.
Because when get this error only turning off is possible and all other buttons not working.
Want to reply to this thread or ask your own question?
You’ll need to choose a username for the site, which only take a couple of moments. After that, you can post your question and our members will help you out.
Ask a Question