Содержание этого документа относится к многофункциональным принтерам HP Color LaserJet Pro M176n, M177fw, HP LaserJet Pro M125nw, M125rnw, M126nw, M127fn, M127fw, M127fs, M128fn, M128fp и M128fw.
После 1 сентября 2016 г. сервис HP ePrint не работает для принтеров с устаревшей версией микропрограммы. На принтере или в окне встроенного веб-сервера (EWS) отображается сообщение Ошибка подключения, и не выполняется печать заданий HP ePrint. Чтобы устранит проблему с HP ePrint, обновите микропрограмму принтера, получите новый код заявки для принтера, затем при необходимости зарегистрируйте принтер в своей учетной записи HP Smart (ранее HP Connected).
До 1 сентября 2016 г.
Во избежание перебоев в работе сервиса HP ePrint скачайте и установите последнюю версию микропрограммы с веб-сайта HP.
Windows
Обновите микропрограмму принтеров, подключенных к компьютеру, работающему под управлением ОС Windows.
-
Включите принтер и подключите его к компьютеру, используя кабель локальной сети или кабель USB.
-
При появлении сообщения Определите ваш продукт, чтобы начать работу, выберите Принтер.
-
Введите номер модели принтера и нажмите Отправить.
Отображается страница результатов программного обеспечения для вашего принтера с выбранной операционной системой по умолчанию.
-
Если необходимо изменить версию Windows, нажмите Изменить, выберите установленную версию и нажмите Изменить.
-
Выберите Микропрограмма, а затем Загрузить.
Если раздел «Микропрограмма» отсутствует, обновление для вашего принтера в данный момент недоступно.
-
Сохраните файл на компьютере.
-
Найдите и откройте файл, чтобы запустить процесс установки.
-
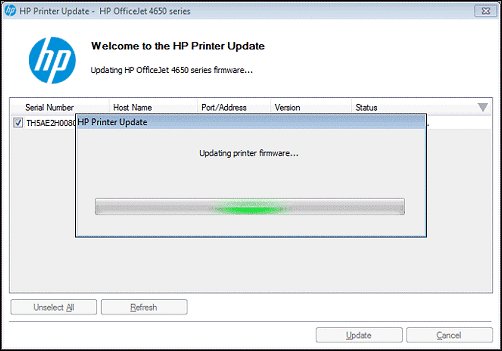
При открытии окна «Обновление принтера HP» убедитесь, что отображается серийный номер принтера или запрос на ввод его модели.
-
Если серийный номер отображается, установите рядом с ним флажок, затем нажмите Обновить.
-
Если серийный номер отображается, но состояние флажка показано как «не применимо» (недоступно для выбора), обновление микропрограммы не требуется. Нажмите кнопку Отмена.
-
Если серийный номер не отображается, а принтер использует подключение к сети, подключите кабель USB к принтеру и компьютеру. Подождите 20 секунд, а затем нажмите Обновить. Если серийный номер отображается, установите рядом с ним флажок, затем нажмите Обновить.

-
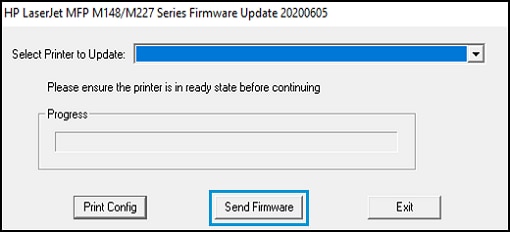
Если отображается запрос о необходимости выбрать модель принтера для обновления микропрограммы, выберите модель своего принтера и нажмите Отправить микропрограмму.
-
-
После завершения обновления нажмите кнопку OK.
-
Если был подключен кабель USB для обновления сетевого принтера, удалите драйвер USB, установленный Windows.
-
Выполните в Windows поиск по ключевым словам панель управления и выберите Панель управления в списке результатов.
-
Выберите Просмотр устройств и принтеров.
-
Щелкните правой кнопкой мыши устройство USB, соответствующее вашей модели принтера, затем выберите Удалить устройство.
-
Отсоедините кабель USB от принтера и компьютера, затем перезагрузите компьютер.
-
Mac
Обновите микропрограмму принтеров, подключенных к компьютеру Mac.
-
Включите принтер и подключите его к компьютеру, используя кабель локальной сети или кабель USB.
-
При появлении сообщения Определите ваш продукт, чтобы начать работу, выберите Принтер.
-
Введите номер модели принтера и нажмите Отправить.
Отображается страница результатов программного обеспечения для вашего принтера с выбранной операционной системой по умолчанию.
-
Если необходимо изменить версию macOS или OS X, нажмите Изменить, выберите установленную версию и нажмите Изменить.
-
Выберите Микропрограмма, а затем Загрузить.
Если раздел «Микропрограмма» отсутствует, обновление для вашего принтера в данный момент недоступно.
-
После завершения загрузки откройте файл [имя_принтера].dmg.
-
Дважды щелкните HP Firmware Updater.
-
Выберите имя принтера, затем нажмите Продолжить.
-
Средство обновления проверяет версию микропрограммы, которая установлена на принтере, после чего результаты отображаются в окне «Сведения об обновлении».
-
Если появляется сообщение Устройство готово к перепрошивке, нажмите Продолжить, чтобы обновить микропрограмму.
После завершения обновления нажмите кнопку Готово.
-
Если появляется сообщение Это средство обновления микропрограммы не содержит обновлений для вашего устройства, микропрограмма принтера уже обновлена до самой актуальной версии. Нажмите Отмена для выхода из средства обновления микропрограммы.
-

После 1 сентября 2016 г.
Чтобы использовать сервис HP ePrint, обновите микропрограмму принтера, получите новый код заявки для принтера, затем зарегистрируйте принтер в своей учетной записи HP, если необходимо.
Шаг 1. Обновление микропрограммы принтера
Скачайте и установите последнюю версию микропрограммы с веб-сайта HP.
Windows
Обновите микропрограмму принтеров, подключенных к компьютеру, работающему под управлением ОС Windows.
-
Включите принтер и подключите его к компьютеру, используя кабель локальной сети или кабель USB.
-
При появлении сообщения Определите ваш продукт, чтобы начать работу, выберите Принтер.
-
Введите номер модели принтера и нажмите Отправить.
Отображается страница результатов программного обеспечения для вашего принтера с выбранной операционной системой по умолчанию.
-
Если необходимо изменить версию Windows, нажмите Изменить, выберите установленную версию и нажмите Изменить.
-
Выберите Микропрограмма, а затем Загрузить.
Если раздел «Микропрограмма» отсутствует, обновление для вашего принтера в данный момент недоступно.
-
Сохраните файл на компьютере.
-
Найдите и откройте файл, чтобы запустить процесс установки.
-
При открытии окна «Обновление принтера HP» убедитесь, что отображается серийный номер принтера или запрос на ввод его модели.
-
Если серийный номер отображается, установите рядом с ним флажок, затем нажмите Обновить.
-
Если серийный номер отображается, но состояние флажка показано как «не применимо» (недоступно для выбора), обновление микропрограммы не требуется. Нажмите кнопку Отмена.
-
Если серийный номер не отображается, а принтер использует подключение к сети, подключите кабель USB к принтеру и компьютеру. Подождите 20 секунд, а затем нажмите Обновить. Если серийный номер отображается, установите рядом с ним флажок, затем нажмите Обновить.
-
Если отображается запрос о необходимости выбрать модель принтера для обновления микропрограммы, выберите модель своего принтера и нажмите Отправить микропрограмму.
-
-
После завершения обновления нажмите кнопку OK.
-
Если был подключен кабель USB для обновления сетевого принтера, удалите драйвер USB, установленный Windows.
-
Выполните в Windows поиск по ключевым словам панель управления и выберите Панель управления в списке результатов.
-
Выберите Просмотр устройств и принтеров.
-
Щелкните правой кнопкой мыши устройство USB, соответствующее вашей модели принтера, затем выберите Удалить устройство.
-
Отсоедините кабель USB от принтера и компьютера, затем перезагрузите компьютер.
-
Mac
Обновите микропрограмму принтеров, подключенных к компьютеру Mac.
-
Включите принтер и подключите его к компьютеру, используя кабель локальной сети или кабель USB.
-
При появлении сообщения Определите ваш продукт, чтобы начать работу, выберите Принтер.
-
Введите номер модели принтера и нажмите Отправить.
Отображается страница результатов программного обеспечения для вашего принтера с выбранной операционной системой по умолчанию.
-
Если необходимо изменить версию macOS или OS X, нажмите Изменить, выберите установленную версию и нажмите Изменить.
-
Выберите Микропрограмма, а затем Загрузить.
Если раздел «Микропрограмма» отсутствует, обновление для вашего принтера в данный момент недоступно.
-
После завершения загрузки откройте файл [имя_принтера].dmg.
-
Дважды щелкните HP Firmware Updater.
-
Выберите имя принтера, затем нажмите Продолжить.
-
Средство обновления проверяет версию микропрограммы, которая установлена на принтере, после чего результаты отображаются в окне «Сведения об обновлении».
-
Если появляется сообщение Устройство готово к перепрошивке, нажмите Продолжить, чтобы обновить микропрограмму.
После завершения обновления нажмите кнопку Готово.
-
Если появляется сообщение Это средство обновления микропрограммы не содержит обновлений для вашего устройства, микропрограмма принтера уже обновлена до самой актуальной версии. Нажмите Отмена для выхода из средства обновления микропрограммы.
-
Шаг 2. Выключите веб-службы
Выключите веб-службы через встроенный веб-сервер (EWS).
-
Выполните печать конфигурации сети или страницы самопроверки, чтобы получить IP-адрес принтера, необходимый для просмотра веб-страницы EWS.
Для получения инструкций по печати конфигурации сети или страницы самопроверки перейдите к Служба поддержки клиентов HP. Введите номер модели принтера, а затем найдите документ по запросу «печать страницы конфигурации» или «печать страницы самопроверки» в зависимости от модели принтера.
-
Найдите IP-адрес принтера на странице конфигурации сети или на странице самопроверки.
-
Откройте веб-браузер на компьютере.
-
В адресной строке веб-браузера введите IP-адрес принтера и нажмите клавишу Ввод.
Примечание.
Убедитесь, что вводите IP-адрес в адресную строку Интернет-браузера. Если ввести адрес в поле поиска на панели инструментов или в строку поиска поисковой системы, встроенный веб-сервер (EWS) не откроется.
-
При отображении в Интернет-браузере сертификата безопасности щелкните Продолжить.
Откроется информационная страница EWS для этого принтера.
-
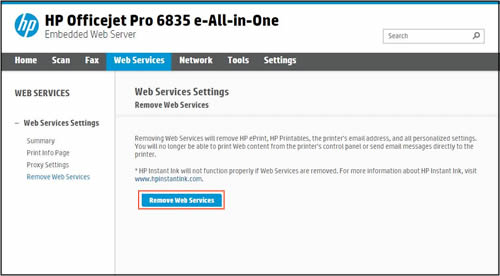
На странице EWS нажмите вкладку Веб-службы и выберите пункт Удалить веб-службы из списка Параметры веб-служб.
-
Нажмите Удалить веб-службы, а затем следуйте инструкциям на экране, чтобы убрать веб-службы.
-
Выберите вкладку Главная, чтобы вернуться на начальную страницу EWS.

Шаг 3. Включите веб-службы
Включите веб-службы через встроенный веб-сервер (EWS).
Примечание.
Для работы с веб-услугами печати требуется обязательно включить веб-службы и периодически обновлять микропрограмму.
-
В открытом на предыдущем шаге окне EWS выберите вкладку Веб-службы.
-
Нажмите Продолжить, Включить или Активировать, затем следуйте инструкциям на экране, чтобы включить веб-службы.

Шаг 4. Получение кода заявки на принтер
После включения веб-служб дождитесь, пока принтер не напечатает информационную страницу с кодом заявки на принтер. Код заявки на принтер действителен 48 часа. Если срок действия кода истек, повторите эти действия, чтобы получить новый код.
Примечание.
Иногда при печати информационной страницы возникают задержки. Если включены веб-службы, но страница не распечатывается, подождите 5-10 минут. Если все равно не распечатывается, отключите, а затем снова включите веб-службы, чтобы получить новую информационную страницу.
Найдите код заявки на принтер и перейдите к следующему шагу.
|
Образцы кода заявки для принтера |
|
|
|
|


Примечание.
Если на информационной странице отображается адрес электронной почты, например abc234vbn3434@hpeprint.com, кодом заявки на принтер является число и символы перед @hpeprint.com. Например, в приведенном выше случае кодом заявки на принтер является abc234vbn3434.
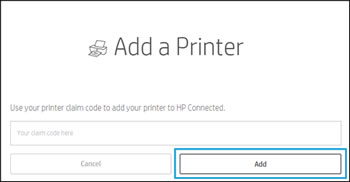
Шаг 5. Используйте код заявки для добавления вашего принтера
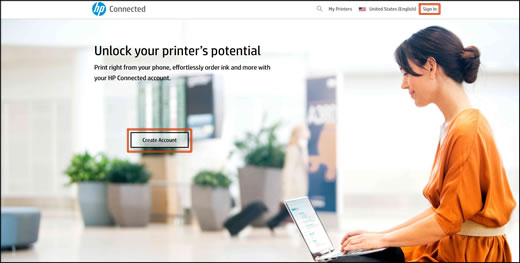
Зарегистрируйтесь или выполните вход в свою учетную запись HP и добавьте принтер с помощью код заявки на принтер.
-
Перейдите на веб-сайт HP Smart, щелкните Создать учетную запись для создания новой учетной записи или Вход для существующих учетных записей.
При создании новой учетной записи HP Smart отправит вам сообщение с приветствием по электронной почте.
-
Нажмите Добавить принтер.
-
Введите код заявки для принтера с информационной страницы, а затем нажмите Добавить.
Примечание.
Проверьте, что код заявки на принтер введен в точности как показано, в противном случае принтер не будет добавлен.
Ответы на часто задаваемые вопросы
Просмотрите ответы на наиболее часто задаваемые вопросы о сервисе HP ePrint.
Почему я не могу использовать прежний адрес электронной почты HP ePrint?
Пользовательский адрес электронной почты HP ePrint может быть по-прежнему назначен принтеру в другой учетной записи HP.
-
Если у вас есть доступ к другой учетной записи, удалите принтер в той учетной записи и добавьте его в свою учетную запись. Не отключайте веб-службы во время переноса, иначе пользовательский адрес невозможно будет повторно использовать в течение шести месяцев.
-
Если у вас нет доступа к другой учетной записи, создайте новый пользовательский адрес эл. почты. Вы можете использовать прежний адрес электронной почты в течение полугода.
Нужно ли добавить принтер в учетную запись HP для печати?
Нет, но, зарегистрировавшись на веб-сайте HP Smart (ранее HP Connected), вы сможете получить доступ к дополнительным функциям. Можно настроить адрес эл. почты принтера, управлять, кто может печатать на вашем принтере, а также определить настройки печати HP ePrint. Кроме того, в зависимости от модели принтера могут быть доступны функции HP Instant Ink и печать с любого устройства.
При попытке ввода кода заявки на принтер система выдает сообщение «Недопустимый код», «Непредвиденная ошибка» или «Срок действия истек код». Что делать?
При попытке добавления принтера в учетную запись HP Smart может отобразиться одно из следующих сообщений:
-
Недопустимый код
-
Неожиданная ошибка
-
Истекший код
Для устранения этой неполадки выполните следующие действия.
-
Подождите 5-10 минут, а затем попробуйте повторно ввести код принтера. Иногда при активации возникает задержка.
-
Введите код принтера именно так, как он отображается на информационной странице, без добавления каких-либо дополнительных символов или тире.
-
Отключите и снова включите веб-службы, чтобы распечатать новую информационную страницу с новым кодом.
Если предыдущие действия не сработали, обратитесь за помощью в службу поддержки HP.
Я потерял код заявки на принтер. Могу ли я каким-то образом зарегистрироваться в HP Smart?
Да. Можно распечатать новую информационную страницу с код заявки принтера.
-
Принтеры с сенсорным или ЖК-экраном: Нажмите или коснитесь значка HP ePrint
и следуйте инструкциям на экране.Если на панели управления принтера нет значка или кнопки HP ePrint, перейдите в меню Настройка веб-служб, Настройка сети или Настройки беспроводной сети и откройте пункт меню «Веб-службы» (в зависимости от модели принтера).
-
Принтеры без сенсорного или ЖК-экрана: Распечатайте страницу конфигурации сети или страницу самопроверки, чтобы узнать IP-адрес принтера, откройте веб-браузер на компьютере, в адресную строку браузера введите IP-адрес принтера и нажмите клавишу Ввод, чтобы открыть встроенный веб-сервера (EWS). На странице EWS откройте вкладку Веб-службы, затем в разделе Параметры веб-служб нажмите Печать информационной страницы и следуйте инструкциям на экране.
 и следуйте инструкциям на экране.
Найдите код заявки принтера:
-
Если на информационной странице приведена строка, состоящая из букв и цифр, например abc234vbn3434, это и есть код заявки.
-
Если на информационной странице отображается адрес электронной почты, например abc234vbn3434@hpeprint.com, кодом заявки на принтер является число и символы перед @hpeprint.com. Например, в приведенном выше случае кодом заявки на принтер является abc234vbn3434.
-
Если на информационной странице указан ваш текущий адрес электронной почты HP ePrint, например myeprint@hpeprint.com, ваша учетная запись HP Connected уже настроена и привязана к вашему принтеру.
|
Образцы кода заявки для принтера |
|
|
|
|

ePrint & Print Apps Connectivity Troubleshooting Steps – Please Review before posting
This information below is provided to help you to resolve web services connectivity problems to enable your printer to print with ePrint, launch/use Print Apps, enable web services, print your web services info sheet, or add your printer to your account on the HP ePrintCenter. Only items that have actually been shown to resolve customer issues have been included in the list.
For best results review and apply the applicable steps below in the order presented before posting a request for help in the forum, so that forum members who respond to your post can provide the best possible assistance.
Also see this post (http://h30434.www3.hp.com/t5/ePrint-Print-Apps-Mobile/Start-here-Web-Services-How-To-and-Troubleshoo…) for additional “how-to” and links to important web services information, FAQs, and Help content.
Before applying the troubleshooting information below:
If you receive an “Invalid code” message when you try to add your printer to your HPePrintCenter account, but aren’t having any other problems using ePrint and Print Apps, you most likely only need to reprint your web services info sheet from your printer. Your printer’s claiming code that is printed on the info sheet can only be used to add your printer to your ePC account for 24 hours after printing the info sheet. Reprinting the info sheet doesn’t change your claiming code, it just re-enables your printer to be added to your ePC account for another 24 hours. See here for the steps to re-print your web services info sheet.
If you enabled Web Services on your printer but the Web Services info sheet containing your printer’s claiming code did not print, your printer has not fully completed its web services registration and will not print ePrint emails or print app content. In this case you will not receive any error messages on the printer and you can view your printer’s email address on the printer front panel display. If your web services info sheet does not print within five minutes of enabling web services, try removing and enabling web services again. If your Web Services info sheet still does not print after re-enabling web services, you will need to wait and try again later. If you do receive error messages when trying to enable web services, continue to the web services connectivity troubleshooting steps below.
If you have ePrint emails that aren’t printing, please first ensure you confirm your emails meet ePrint format/attachment requirements. Review the ePrint email requirements in the ePrint FAQ/Help on HP ePrintCenter at www.hpeprintcenter.com. You can also check your printer’s connectivity status and ePrint job list on HP ePrintCenter if you have created an account there and added your printer. (Always use the “Refresh” button on the ePC page, not your browser refresh button, to view updated printer connection status on the HP ePrintCenter.)
A. Easy steps that can be surprisingly helpful – try these first:
- Verify your network’s internet access is working – on a computer connected to your network, use a web browser like Internet Explorer or Firefox to view a web page. If you can’t access the internet your internet service provider may be having a service issue that is affecting ePrint/Print Apps.
- Go to HP ePrintCenter and look in the News section (http://h30495.www3.hp.com/news/ ) to see if there are any service status updates. In some cases, you might just need to wait a little while and try again.
- Turn wifi off and then on again on your printer and wait for a minute for your printer to reconnect to your network
- Reboot your printer — turn power off and then on) and wait for a minute for it to reconnect to your network
- Reboot your router — remove the power cord from the back of the router, wait a minute, and then plug it in again and wait for at least a minute for the router to power up and all your devices to reconnect.
B. Check your printer’s IP address to confirm it is connected to your network.
Verify that your printer has a valid IP address (for example, typically 192.168.x.x on a home wireless network) by viewing the network settings screen in the Networking or Wireless menu on your device’s front panel display, or by printing a Printer Status Report (usually found on the Tools menu). If your printer does not have a valid IP address re-run the network setup process for your printer. For more help with setting up or troubleshooting your HP printer’s connection to a wireless network, go to http://www.hp.com/go/wirelessprinting
C. Confirm that both your printer and router have up-to-date firmware:
Having up-to-date firmware on your printer or router is important to use web services.
- Check to ensure you have the latest firmware (FW) for your printer by checking for product updates, usually found under the “Web” or “Preferences” options on your printer’s menu. If your printer finds an update but is unable to complete downloading/installing it, ensure your router FW is up to date and try again. If your printer continues to fail to complete the download of an available FW update, continue to “E. Set a Manual IP/DNS Server” below.
- Check to ensure that you have the latest firmware for your router – review your router documentation/help (or the router manufacturer’s web site) for information on how to check for and install firmware updates.
Resolve temporary connection failure after printer firmware upgrade
Some printers may experience connection failure after firmware upgrade. This is because the printer reboots itself after firmware updates and needs to re-establish network connection.
- Check to ensure the printer has been given a valid local IP by your router (eg. 192.168.x.x if DHCP is used) before trying to access print apps or using ePrint. You can see your printer’s IP address by going to the printer’s Wireless or Network setup menu.
- If you don’t see an IP, you may have to restart the printer. In some cases, you may have to remove and re-enable web services to re-establish your connection.
- Refer to the FAQ & Help section on HP ePrintCenter for more information on how to remove and re-enable web services from your printer.
Allow your printer enough time to reconnect to your network after you try any of the steps above, before you try ePrint or Print Apps again.
D. Remove and Re-enable Web Services and Restore Factory Defaults
- Remove and then re-enable web services on your printer. If the web services info sheet does not automatically print within a few minutes of re-enabling web services, web services has not been fully enabled on your printer. You may need to wait and remove and re-enable web services again in few hours to allow the issues affecting your printer’s communication with the cloud servers to clear up. Until a web services info sheet prints out your web services registration is not complete. Complete the steps below while your printer is connected to the Internet.
Photosmart: The Remove Web Services option is available either under the Setup>Wireless>Web Services menu option, or the Setup>Web option, or via the ePrint icon on the printer front panel.
On the eStation select the Menu button on the eStation display (to the right of the Home and Back buttons at the top left when the display is docked on the printer); Select Settings; Select «Web Services”; Select the “Web Services” checkbox.
Officejet: Use Setup > Web Services Setup > Restore Factory Settings to remove Web Services from the printer.
LaserJet: Print a configuration page from your printer to locate the IP address. Open a Web browser and type the product IP address into the address line. The HP-embedded Web Server will open. Click the HP Web Services tab. Select the option to remove Web Services.
2. Restore Factory Defaults on your device. If removing and re-enabling web services does not resolve the problem, restore factory defaults on your printer and try again. The factory default option is usually found in the Setup>Tools menu on your printer. Do the following on your device:
- Remove/Disable Web Services
- Restore factory defaults/settings (depending on the printer this is found under the Setup>Tools menu, or the Setup>Web Services menus, but varies by printer)
- If prompted, re-do initial setup of your device and add it to your network
- Re-enable Web Services
- Once the Web Services information sheet is printed, use the printer claiming code to add your printer to your account on ePrintCenter
E. Set a Manual IP/DNS Server settings on your printer
Setting a manual IP address/DNS Server on your printer will resolve web services connectivity issues that can occur on some networks with some routers. Note: Setting a manual IP/DNS Server may be particularly helpful on networks using DSL/VIOS routers.
Please read the instructions below completely before applying them. You should not attempt these on your own if you don’t understand networking basics. Most of us have a «techie» buddy/friend/family member…if you’re not comfortable this might be a good time to call him/her, or contact HP support to assist you.
Before you begin, first remove Web Services from your printer if it has been enabled. (See section D. 1. above.) Removing web services will remove your printer from your HPePrintCenter.com account (if you have previously set up an account and added it). When you re-enable web services after completing these steps you will have a new ePrint email address and need to add your printer to your ePC account again.
How to set a manual IP address/DNS Server on your web-connected printer:
- Print a Network Configuration Page from the printer front panel. On some printers this will be under Wireless>Wireless Settings, and on other models use the “Print Report” option from the Wireless status screen accessed from the wireless icon on the printer home screen. Note the printer’s IP address that is listed in the IPv4 section of the report. On most printers you can also see the printer’s IP address from the Wireless menu, or on the Wireless status screen.
- Type that IP address into your browser address bar (where you would normally type a web page URL) and hit enter — this will load the printer’s internal settings page (also known as an Embedded Web Server, or EWS)
- Select the “Network” or “Networking” tab (the label varies depending on printer model) from the tabs along the top of the screen in the EWS
Depending on your printer model, the next step(s) will vary:
- Select the “IPv4” option from along the left side of the Networking screen
or - Select the “Networking” option from the left side of the screen
- Then select the “Network Address (IP)” option from the left side of the screen
The screen you end up on should be the “IP Address Configuration” screen. That screen allows you to choose an Automatic or Manual (i.e., fixed) IP address for your printer, as well as Subnet Mask and Default Gateway values. You will use this screen to set a Manual IP address and DNS Server for your printer.
To continue:
- Select the radio button next to “Manual IP”
- Select the “Suggest a Manual IP Address” option below the IP address fields. The Manual IP address fields will automatically populate with suggested values after a few moments.
- Select the “Manual DNS Server” radio button in the DNS Address Configuration section
- Enter the address just entered in the “Manual Default Gateway” into the “Manual Preferred DNS Server” field. Leave the “Manual Alternate DNS Server” entry blank.
- Carefully double-check the values you entered to make sure they are all correct.
- Click ‘Apply’
- Save any open documents and close any web browsers on any computers
- Turn off the printer and unplug the router.
- Plug in the router, wait for it to start up and for status lights to settle down (approximately a minute at least), then turn on the printer.
After the printer has connected to your network, enable web services on your device, accept any firmware updates that may be offered, and add your printer to your account on HPePrintCenter.
In some cases you might need to add the printer to your computer’s Printer/My Printers folder again, after you set the new manual IP address. If you have problems printing to your printer, simply use the option to add a printer, select the Networked printer type, and complete the add printer wizard. You will not need to reinstall any printer software on your computer.
F. Check for port/proxy issues
Note: These issues are not commonly experienced, and primarily affect users in business environments.
- ePrint and Print Apps require access to establish connections out to HP servers via ports 80, 443, 5222 and 5223. Primarily in some business environments, network administrators may block devices initiating communication from within the firewall on some of these ports. Please check with your network administrator or Internet Service Provider to make sure those ports are not blocked on your router/firewall for outward-bound communication initiated by your printer.
Important Note: We are not suggesting that you set up port forwarding on your router to open these ports for connections initiated from outside your network to your printer. That is not required and could be a security risk for your network.
2. In some business environments the local network which the printer is connected to may require a proxy setting to access the Internet. Check with your IT Administrator or Internet Service Provider (ISP) for proxy setting if necessary. Most ISP for home users do not require proxy configuration for Internet access. (Note: HP web connect printers currently do not support secure proxy servers)
To set a proxy on an Officejet All-in-One, see this document: http://support.hp.com/us-en/document/c02524629
If the steps above have not resolved your ability to use ePrint/Print Apps, please submit a question in the here in this support forum, confirming you have completed this connectivity troubleshooting and identifying the error/problem you are experiencing. Thank you.
I am an HP employee.
Troubleshooting HP ePrint Setup and Connectivity Issues: A Comprehensive Guide

In today’s digital age, efficient and hassle-free printing is a necessity. With the advent of wireless technology, HP ePrint has emerged as a game-changer, revolutionizing the way we print. In this article, we will delve into the world of HP ePrint, exploring its significance in modern printing technology and uncovering the convenience and advantages it offers. However, as with any technology, setup and connectivity issues may arise, affecting the seamless printing experience.
Therefore, we will also emphasize the importance of troubleshooting these common issues to ensure uninterrupted printing operations. So, let’s embark on a journey to troubleshoot HP ePrint setup and connectivity issues and optimize your printing experience.
Understanding HP ePrint
HP ePrint is a cutting-edge technology developed by HP (Hewlett-Packard) that enables wireless printing from various devices, such as computers, smartphones, and tablets. It simplifies the printing process by eliminating the need for cables or direct connections to the printer.
At its core, HP ePrint utilizes the power of the internet to transmit print jobs to compatible HP printers. This technology enables users to send print requests remotely, regardless of their physical location. Whether you’re in the same room or halfway across the world, HP ePrint allows you to print effortlessly.
Key Features of HP ePrint
- Wireless Convenience: With HP ePrint, you can print documents and photos wirelessly, providing flexibility and freedom in your printing tasks.
- Broad Device Compatibility: HP ePrint supports a wide range of devices, including laptops, desktop computers, smartphones, and tablets, making it accessible and convenient for various users.
- Email Printing: One of the standout features of HP ePrint is the ability to print documents by simply sending an email to the printer’s unique email address. This means you can print from anywhere with an internet connection, even if you’re not physically near the printer.
- Cloud Printing: HP ePrint seamlessly integrates with cloud storage services like Google Drive, Dropbox, and Microsoft OneDrive. This allows you to access and print files stored in the cloud directly from your printer, saving time and effort.
- Remote Print Management: With HP ePrint, you can remotely monitor and manage your printer’s status, ink levels, and print jobs. This ensures optimal performance and efficiency.
Benefits of Using HP ePrint
- Convenience: HP ePrint eliminates the need for cables and direct connections, providing a hassle-free printing experience.
- Flexibility: With wireless printing capabilities, you can print from any compatible device, regardless of your location.
- Time-Saving: The ability to print remotely and access cloud storage simplifies the printing process, saving valuable time.
- Enhanced Productivity: HP ePrint allows for seamless integration with various devices and cloud services, streamlining your workflow.
- Eco-Friendly: By reducing the reliance on physical media and enabling digital printing, HP ePrint promotes sustainability.
Understanding the concept and features of HP ePrint sets the foundation for troubleshooting setup and connectivity issues, ensuring that you can make the most of this innovative technology.
HP ePrint Initial Setup and Configuration
Setting up HP ePrint allows you to enjoy the convenience of wireless printing from various devices. Follow these step-by-step instructions to successfully set up HP ePrint:
Prerequisites
- Compatible Printer: Ensure that you have an HP printer that supports HP ePrint. Refer to your printer’s user manual or the HP website to confirm compatibility.
- Stable Internet Connection: Ensure that your printer is connected to a stable internet connection for seamless communication with HP ePrint.
- HP Connected Account: Create an HP Connected account, which will be used to register your printer and manage your ePrint settings. Visit the HP Connected website to create an account if you don’t have one.
Step-by-Step Instructions
- Connect the Printer: Power on your HP printer and connect it to your network using either a wired or wireless connection, depending on the capabilities of your printer model. Follow the instructions provided with your printer to establish the network connection.
- Print a Network Configuration Page: Print a network configuration page from your printer’s control panel or using the appropriate button combination. This page will provide essential information, such as the printer’s IP address, which will be required during the setup process.
- Register the Printer with HP Connected: Using a computer or mobile device, open a web browser and go to the HP Connected website. Sign in with your HP Connected account or create a new account if you haven’t already.
- Add your Printer: In the HP Connected account dashboard, click on “Add Printer” or a similar option. Enter the required information, such as the printer’s unique email address (which is usually displayed on the printer’s control panel or network configuration page) and the printer model. Follow the on-screen prompts to complete the registration process.
- Test the Setup: After registering the printer, send a test email or document to the printer’s unique email address. Ensure that the printer receives the print job successfully and prints it out.
Troubleshooting Common Issues during Initial Configuration
Printer Not Connecting to the Network: Ensure that your printer is within range of the Wi-Fi signal and that the correct network password is entered during the setup. Restart your printer and router, and try the setup process again. If the issue persists, consult the printer’s user manual or contact HP support for further assistance.
- Email Registration Failure: If you encounter issues during the email registration process, double-check that the printer’s unique email address is correctly entered. Ensure that you have a stable internet connection and that the email address is not already associated with another HP Connected account.
- Print Job Not Received: If the test print job is not received or printed by the printer, verify that the printer is connected to the internet and that the printer’s email address is correct. Check the printer’s email settings to ensure it is set to receive print jobs.
If you encounter other specific issues or error messages during the setup process, refer to the printer’s user manual or visit the HP support website for troubleshooting guidance specific to your printer model.
HP ePrint Network Connectivity Issues
Network connectivity plays a crucial role in the functionality of HP ePrint. Various issues can arise that may disrupt the connection between your device and the HP printer. Let’s explore some common network connectivity problems and provide troubleshooting steps to resolve them.
Common Network Connectivity Issues
- Weak Wi-Fi Signal: A weak Wi-Fi signal can lead to intermittent connectivity or complete disconnection between your device and the printer. It can be caused by distance from the router, physical barriers, or interference from other electronic devices.
- Incorrect Wi-Fi Password: If you’ve recently changed your Wi-Fi password or entered it incorrectly during the setup process, your device may fail to connect to the network and consequently disrupt HP ePrint functionality.
- Router Configuration: Misconfigured router settings can hinder the communication between your device and the printer. Issues such as incorrect security settings, IP address conflicts, or incompatible network protocols can disrupt the connection.
- Firewall Restrictions: Sometimes, strict firewall settings can block the necessary communication ports used by HP ePrint. This can prevent your device from establishing a connection with the printer, resulting in connectivity issues.
Troubleshooting Steps
Check Wi-Fi Signal Strength: Ensure that your device and the printer are within the range of a strong Wi-Fi signal. Reposition the router or consider using Wi-Fi extenders to improve coverage if needed.
- Verify Wi-Fi Password
Double-check the Wi-Fi password entered on your device and ensure it matches the correct one. If necessary, update the Wi-Fi password on your device to match the router’s configuration. - Restart Devices
Power cycle your device, router, and printer. Turn them off, wait for a few seconds, and then turn them back on. This can help refresh the network connections and resolve temporary issues. - Verify Router Configuration
Access your router’s settings interface and ensure that the security settings, such as encryption type and password, match the settings on your device. Resolve any IP address conflicts and ensure the router’s firmware is up to date. - Check Firewall Settings
Temporarily disable the firewall on your device or configure it to allow communication with the printer. Consult your firewall software’s documentation for specific instructions on allowing printer connectivity. - Reset Network Settings
If all else fails, reset the network settings on your device and reconfigure the Wi-Fi connection. This can help eliminate any incorrect or conflicting network settings.
By addressing Wi-Fi connectivity, router configuration, and firewall issues, you can troubleshoot and resolve network connectivity problems affecting your HP ePrint functionality. Ensure that your device and printer are seamlessly connected, allowing you to print effortlessly.
HP Printer Connectivity Issues
Printer connectivity problems can disrupt the smooth operation of HP ePrint. Let’s explore potential printer connectivity issues and provide troubleshooting methods to resolve them, ensuring a seamless printing experience.
Potential Printer Connectivity Issues:
- USB Connection Problems: If you’re using a USB connection between your device and the printer, issues like loose cables, faulty USB ports, or outdated USB drivers can hinder the connection.
- Wireless Communication Interference: Wireless communication issues can occur due to interference from nearby devices, such as cordless phones, microwave ovens, or other electronic devices operating on similar frequencies.
- Outdated Firmware: Outdated printer firmware can lead to compatibility issues and hinder the communication between your device and the printer. It’s essential to keep the printer’s firmware up to date.
Troubleshooting Methods:
- Check USB Connection: Ensure that the USB cable is securely connected to both your device and the printer. Try using a different USB port on your device or a different USB cable if available. Update the USB drivers on your device if necessary.
- Resolve Wireless Communication Interference: Minimize potential interference by placing the printer and the Wi-Fi router away from devices that emit wireless signals. Additionally, avoid placing the printer near physical obstacles or metal objects that can weaken the wireless signal strength.
- Update Printer Firmware: Visit the manufacturer’s website and check for firmware updates for your printer model. Follow the provided instructions to download and install the latest firmware version. Updated firmware can improve compatibility and resolve connectivity issues.
- Restart the Printer: Power off the printer, wait for a few seconds, and then power it back on. This can help refresh the printer’s internal settings and establish a stable connection.
- Reset Network Settings: If you’re using wireless connectivity, perform a network settings reset on your printer. Refer to the printer’s user manual for specific instructions on how to reset network settings. After the reset, reconnect the printer to your Wi-Fi network.
- Check Firewall and Antivirus Settings: Ensure that your firewall or antivirus software is not blocking the communication between your device and the printer. Adjust the settings to allow the necessary printer connections.
By troubleshooting potential printer connectivity issues such as USB connections, wireless communication interference, and firmware updates, you can ensure a stable and reliable connection for your HP ePrint. Enjoy uninterrupted printing and maximize the benefits of wireless printing technology.
HP ePrint App and Software Problems
While HP ePrint offers convenient wireless printing, users may encounter issues related to the HP ePrint mobile app and software. Let’s identify common problems and provide troubleshooting techniques to resolve app and software-related issues, ensuring a smooth printing experience.
Common Issues Related to HP ePrint App and Software
- Compatibility Issues: Incompatibility between the HP ePrint app or software and your device’s operating system can result in functionality problems and connectivity issues.
- App Crashes: The HP ePrint app may occasionally crash or freeze, preventing you from accessing its features and printing functionalities.
- Software Updates: Outdated HP ePrint software can lead to compatibility issues, performance glitches, and reduced functionality. Keeping the software up to date is crucial for optimal performance.
Troubleshooting Techniques:
- Check Compatibility: Ensure that your device’s operating system is compatible with the latest version of the HP ePrint app or software. Visit the official HP website or app store to verify compatibility and download the appropriate version.
- Update the App or Software: Check for updates within the HP ePrint app or software. Install any available updates to address bugs, security vulnerabilities, and compatibility issues. Regularly updating the app or software is essential for optimal performance.
- Restart the App or Software: If the HP ePrint app or software becomes unresponsive or encounters glitches, try closing the app completely and relaunching it. This can resolve temporary software conflicts and restore functionality.
- Clear App Cache (Mobile Devices): On mobile devices, if you experience persistent issues with the HP ePrint app, try clearing the app’s cache. Go to the device’s settings, locate the app settings, and select “Clear Cache.” This can help resolve performance-related issues.
- Reinstall the App or Software: If all else fails, uninstall the HP ePrint app or software from your device and reinstall it. This can fix any corrupt files or configuration issues that may be causing the problem.
- Contact HP Support: If the issues persist or require advanced troubleshooting, reach out to HP support. Visit the official HP website for support options, including live chat, forums, or phone support. HP support technicians can provide specific guidance tailored to your situation.
By following these troubleshooting techniques, you can address common issues related to the HP ePrint app and software. Ensure compatibility, keep the app or software updated, and take appropriate measures to resolve any glitches or crashes. This will help you fully utilize the capabilities of HP ePrint and enjoy seamless wireless printing. See also Customizing Print Preferences on the HP ENVY 4520
HP Printer Offline or Not Responding
One of the common issues faced by printer users, including HP ePrint users, is the printer going offline or becoming unresponsive. This can disrupt the printing process and cause frustration. Let’s address this problem and provide troubleshooting steps to bring the printer back online.
Common Causes of Printer Offline or Not Responding
- Printer Status Notifications: Printers may go offline if they encounter certain error conditions, such as paper jams, low ink levels, or other issues. These conditions trigger status notifications that cause the printer to temporarily disconnect from the network.
- Power Supply Issues: Insufficient power supply or power fluctuations can lead to printer connectivity problems. Power-related issues can cause the printer to go offline or become unresponsive.
- Printer Driver Conflicts: Outdated or incompatible printer drivers can interfere with the communication between your device and the printer. This can result in the printer going offline or not responding to print commands.
Troubleshooting Steps to Bring the Printer Back Online
- Check Printer Status: Verify the printer’s status by checking the printer’s control panel or display. Address any error messages or notifications displayed, such as paper jams or low ink levels. Clear the error conditions and ensure the printer is ready to print.
- Restart Printer: Power off the printer, disconnect the power cord, wait for a few seconds, and then reconnect the power cord. Power on the printer and allow it to go through the initialization process. This can resolve temporary issues and bring the printer back online.
- Verify Network Connectivity: Ensure that the printer is connected to the same network as your device. Check the Wi-Fi or network status on the printer to confirm the connection. Reconnect the printer to the network if necessary.
- Update Printer Drivers: Visit the manufacturer’s website and download the latest printer drivers compatible with your operating system. Install the updated drivers on your device to ensure compatibility and optimal performance.
- Check Power Supply: Ensure that the printer is connected to a stable power source. Check the power cord and connections for any damage or loose connections. Plug the printer into a different power outlet to rule out power-related issues.
- Restart Your Device: If the printer remains unresponsive, restart your device, whether it’s a computer, smartphone, or tablet. Restarting your device can resolve any temporary software conflicts that may be affecting the printer connection.
- Reset Printer Settings: As a last resort, if all else fails, perform a factory reset on the printer. Refer to the printer’s user manual for instructions on how to reset the printer to its default settings. Note that this will remove any custom settings and configurations.
By following these troubleshooting steps, you can address the issue of the printer going offline or not responding. Ensure that the printer is online and ready to print, allowing you to utilize the full potential of HP ePrint and enjoy seamless printing.
Print Quality and Paper Jam Issues
Print quality problems and paper jams can significantly impact the printing experience with HP ePrint. Let’s discuss common print quality issues like faded prints, streaks, or smudges, and offer troubleshooting tips to improve print quality. Additionally, we’ll address paper jam issues and provide step-by-step instructions for clearing paper jams.
Print Quality Issues:
- Faded Prints: If your prints appear faded or lack vibrancy, it could indicate low ink levels or incorrect print settings.
- Streaks or Lines: Streaks or lines on the prints may be caused by clogged printheads, dirty print rollers, or damaged ink cartridges.
- Smudges or Blurry Prints: Smudges or blurry prints may result from excess ink, incorrect paper type, or printhead alignment issues.
Troubleshooting Tips for Print Quality:
- Check Ink Levels: Ensure that the ink cartridges have sufficient ink. Replace any low or empty cartridges to improve print quality.
- Clean Printheads: Use the printer’s built-in maintenance functions or software to clean the printheads. This can remove clogs and improve print quality.
- Clean Print Rollers: Clean the print rollers using a lint-free cloth lightly dampened with water. This can remove dust or debris that may cause streaks.
- Adjust Print Settings: Review the print settings in the HP ePrint app or software. Ensure that the correct paper type, print quality, and color settings are selected for optimal results.
- Align Printheads: If your printer has an alignment function, perform a printhead alignment to ensure accurate print placement.
Paper Jam Issues and Clearing Jams:
- Identify the Jammed Paper: Determine the location of the paper jam. Check the printer’s display or control panel for any error messages indicating the specific area of the jam.
- Power Off the Printer: Turn off the printer using the power button. This ensures safety and prevents any damage to the printer.
- Open the Printer Access Doors: Carefully open the printer access doors based on the printer model. Refer to the printer’s user manual for specific instructions.
- Remove Jammed Paper: Gently and slowly pull out the jammed paper from the printer. Take care not to tear the paper. If necessary, follow any additional instructions provided by the printer’s manual.
- Inspect for Remaining Paper: After removing the jammed paper, thoroughly check for any remaining scraps or torn pieces. Remove them carefully to prevent future jams.
- Close the Printer Access Doors: Close all printer access doors securely. Ensure that they are properly aligned and latched.
By following these troubleshooting tips, you can improve print quality by addressing issues like faded prints, streaks, or smudges. Additionally, the step-by-step instructions for clearing paper jams will help you handle any paper jam issues efficiently, ensuring smooth printing operations with HP ePrint.
HP ePrint Security Concerns
Security is a critical aspect to consider when using HP ePrint and wireless printing. Let’s discuss common security concerns related to HP ePrint and provide recommendations for enhancing the security of your HP ePrint setup.
Security Concerns Related to HP ePrint and Wireless Printing
- Unauthorized Access: Wireless printing introduces the possibility of unauthorized users accessing your printer or intercepting print jobs, potentially compromising sensitive information.
- Network Vulnerabilities: Wireless networks can be vulnerable to hacking attempts, putting your HP ePrint setup at risk.
- Print Job Privacy: Print jobs transmitted over the internet may pass through various networks, raising concerns about privacy and the confidentiality of printed materials.
Recommendations for Enhancing HP ePrint Security
- Secure Network Connection: Ensure that your wireless network is secure by enabling Wi-Fi encryption, such as WPA2. This encrypts the data transmitted between your device and the printer, reducing the risk of unauthorized access.
- Network Access Control: Implement measures to control access to your wireless network. Utilize strong passwords for your Wi-Fi network and consider enabling MAC address filtering to allow only authorized devices to connect.
- Secure Printer Configuration: Change the default administrator password on your printer to prevent unauthorized access to printer settings. Enable security features offered by your printer, such as user authentication and PIN-based printing.
- Printer Firmware Updates: Regularly check for and install firmware updates provided by HP. These updates often include security patches that address known vulnerabilities and enhance the overall security of your printer.
- Secure Print Release: Consider implementing secure print release features, such as HP JetAdvantage Private Print or HP Access Control, which require users to authenticate themselves at the printer before the print job is released. This ensures print job privacy and prevents unauthorized access to printed documents.
- Data Encryption: If printing sensitive information, utilize encryption methods for the documents themselves. Encrypt the files before sending them to the printer to ensure that only authorized individuals can access the printed content.
- Secure Print Management: If using cloud-based printing services with HP ePrint, ensure that the service provider implements robust security measures to protect your print jobs and data.
By implementing these recommendations, you can enhance the security of your HP ePrint setup and mitigate potential risks associated with wireless printing. Protect your network, printer, and print jobs to ensure the privacy and security of your printing activities.
Optimizing HP ePrint Performance
To ensure the optimal performance of your HP ePrint setup, it’s essential to implement various strategies and practices. Let’s share some tips for optimizing the performance of HP ePrint, covering printer maintenance, firmware updates, network optimization, and solutions for common performance-related issues.
Tips for Optimizing HP ePrint Performance:
- Regular Printer Maintenance: Perform regular maintenance tasks such as cleaning the printer heads, printhead alignment, and calibration. Consult the printer’s user manual for specific instructions.
- Keep Firmware Up to Date: Check for firmware updates provided by HP and install them promptly. Firmware updates often include bug fixes, performance improvements, and compatibility enhancements.
- Network Optimization: Ensure that your network is optimized for HP ePrint. Place your printer within the range of a strong and stable Wi-Fi signal. Minimize interference by keeping the printer away from other wireless devices or sources of electromagnetic interference.
- Use Quality Printing Materials: Utilize high-quality paper and ink cartridges recommended for your printer model. This helps maintain print quality and prevents issues like paper jams or clogged printheads.
- Print in Draft Mode: For non-critical documents, consider printing in draft mode to conserve ink and speed up the printing process. Draft mode prints faster and uses less ink, making it ideal for documents that don’t require high-quality output.
- Manage Print Queue: Regularly monitor and manage the print queue to avoid unnecessary delays. Remove any pending print jobs that are no longer needed to keep the queue streamlined.
Common Performance-Related Issues and Solutions:
- Slow Printing Speed: If you experience slow printing speeds, ensure that your printer is not set to a high-quality print mode unnecessarily. You can also try optimizing network connectivity or updating printer drivers to improve performance.
- Print Job Errors: If you encounter errors while sending print jobs through HP ePrint, ensure that the printer is properly connected to the network and that the correct printer driver is installed. Check for any firmware updates that may address compatibility issues.
- Print Quality Issues: If you notice print quality problems, ensure that the ink cartridges are not running low. Clean the printheads and check the print settings to ensure they are appropriate for the document type.
- Paper Jams: To prevent paper jams, use the correct paper size and type specified for your printer. Ensure that the paper is properly loaded and not crumpled. Clear any paper debris from the input tray or paper path to prevent jams.
By implementing these tips and solutions, you can optimize the performance of your HP ePrint setup. Regular maintenance, firmware updates, network optimization, and addressing common performance-related issues will help you achieve efficient and high-quality printing results. Enjoy a seamless printing experience with HP ePrint.
Troubleshooting Beyond Basics
In some cases, basic troubleshooting steps may not resolve persistent issues with your HP ePrint setup. Let’s explore advanced troubleshooting techniques, discuss resources for further assistance, and highlight the importance of staying updated with HP ePrint software and firmware releases.
Advanced Troubleshooting Techniques
- Reset Printer to Factory Settings: If you’re facing complex issues that persist despite other troubleshooting attempts, you may consider resetting the printer to its factory settings. This can help resolve deep-seated configuration or software issues. Refer to the printer’s user manual for instructions on performing a factory reset.
- Check for Firmware and Software Conflicts: Incompatibilities between the printer’s firmware and the installed software on your device can cause issues. Ensure that both the printer firmware and HP ePrint app or software are updated to their latest versions to minimize compatibility conflicts.
- Verify Network Security Settings: If you experience intermittent connectivity or other network-related issues, check your network’s security settings. Ensure that MAC address filtering or other network security features are properly configured and not interfering with the printer’s connection.
Resources for Further Assistance
- HP Support Website: Visit the official HP support website for resources such as troubleshooting guides, FAQs, and user forums. The support website provides valuable information and solutions for various HP printer models, including specific support for HP ePrint.
- HP Support Forums: Engage with the HP support community on forums where users and experts share experiences and solutions for common and complex issues. Participating in the forums can provide insights and guidance from fellow HP ePrint users.
- Contact HP Customer Support: If you require personalized assistance or have exhausted other troubleshooting options, reach out to HP customer support. Contact options may include phone support, email support, or live chat. HP customer support agents can provide expert guidance tailored to your specific situation.
Importance of Software and Firmware Updates
Staying updated with the latest HP ePrint software and firmware releases is crucial for maintaining optimal performance and resolving potential issues. These updates often include bug fixes, security enhancements, and compatibility improvements. Regularly check for updates on the official HP website and install them to ensure a smooth and secure printing experience.
By utilizing advanced troubleshooting techniques, seeking assistance from HP support resources, and staying updated with software and firmware releases, you can effectively address persistent issues with your HP ePrint setup. Troubleshooting beyond the basics allows you to maximize the functionality of your HP ePrint and ensure a seamless printing experience.
Conclusion
In conclusion, troubleshooting HP ePrint setup and connectivity issues is crucial for ensuring a seamless printing experience with this innovative technology. By understanding the fundamentals of HP ePrint, addressing common network and printer connectivity issues, resolving app and software problems, optimizing print quality, and enhancing security measures, users can overcome challenges and maximize the benefits of wireless printing.
As a printer expert, Carl Abel has shared comprehensive insights and practical tips to troubleshoot HP ePrint issues. With his vast expertise in printer technology and optimization techniques, Carl aims to empower users to overcome common obstacles and optimize their HP ePrint setup for efficient and reliable printing.
Remember, regular printer maintenance, keeping firmware and software up to date, optimizing network settings, and implementing security measures are essential practices to ensure the smooth functioning of your HP ePrint system. By following the guidelines provided in this article, users can troubleshoot issues, enhance performance, and enjoy a hassle-free printing experience.
To conclude, it is recommended to perform a printer test page to verify the successful implementation of the troubleshooting steps. A printer test page helps in evaluating print quality, checking ink levels, and ensuring that the printer is functioning optimally. Follow the instructions provided in your printer’s user manual to perform a test page and confirm the effectiveness of the troubleshooting measures taken.
By implementing the troubleshooting techniques discussed throughout this article, seeking support from HP resources, and staying updated with the latest software and firmware releases, users can overcome challenges and enjoy the full potential of HP ePrint for efficient, convenient, and high-quality wireless printing.
Frequently Asked Questions (FAQs)
Here are answers to some frequently asked questions about troubleshooting HP ePrint setup and connectivity issues:
How do I set up HP ePrint on my printer?
To set up HP ePrint on your printer, ensure that your printer is connected to a network with internet access. Enable HP ePrint in your printer’s settings, and follow the on-screen prompts to register your printer with an HP Connected account. Once registered, your printer will be assigned a unique email address, allowing you to send print jobs remotely.
Why is my HP ePrint not connecting to the network?
If your HP ePrint is not connecting to the network, check the Wi-Fi signal strength and ensure that your printer is within range. Verify that the network password entered during setup is correct. Restart your printer and router, and try reconnecting your printer to the network. If the issue persists, consult the HP support resources for further assistance.
Why does my HP ePrint app keep crashing?
If your HP ePrint app keeps crashing, ensure that you have the latest version of the app installed. Clear the app cache or reinstall the app to resolve any temporary issues. Restart your device and ensure that it meets the app’s system requirements. If the problem persists, contact HP customer support for guidance.
How do I improve the print quality of my HP ePrint prints?
To improve print quality, ensure that your ink cartridges are not low or empty. Clean the printheads and print rollers to remove any debris or buildup. Use high-quality paper suitable for your printer model. Adjust the print settings to the appropriate quality and paper type. If print quality issues persist, consider replacing old or damaged ink cartridges.
What should I do if my printer constantly goes offline?
If your printer constantly goes offline, check the network connectivity and ensure that your printer is connected to a stable Wi-Fi signal. Restart your printer and device, and verify that the printer’s firmware is up to date. Check the network settings and firewall configurations to ensure they are not blocking the printer’s connection. If the problem continues, consult the HP support resources for further assistance.
About Author

-
I am a printing expert with years of experience in various printing techniques. My expertise includes offset printing, digital printing, and screen printing. I am known for my attention to detail, problem-solving skills, and commitment to delivering outstanding results. I am dedicated to staying up-to-date with the latest developments in printing technology to provide cutting-edge solutions. I am passionate about collaborating with clients to transform their ideas into stunning prints. Read more about us
konsul777
Senior MemberАвтор темы

5877
#
16 июля 2011 00:05
Подключил принтер HP Officejet 6500A к компьютеру по Ethernet через адсл-модем, все, что связано с печатью с компьютера, сканирование, все работает как надо. Но существует видимо какая-то проблема подключения принтера к интернету, как я понял из инструкции и технического описания, интернет должен «подхватываться» принтером по ethernet, модем настроен в режим роутера и раздает инет. Принтер поддерживает фирменную опцию HP ePrint, позволяющую давать принтеру задания на распечатки доков удаленно через электронную почту, хотел опробовать данный сервис, но тут и возникла проблема — для того, чтобы им воспользоваться, нужно чтобы принтер подключился к серверу HP и получил уникальный адрес электронной почты, через который будет работать этот сервис. Но вот нажимаю в настройках принтера «адрес электронной почты», на дисплее висит картинка, что идет подключение и все. Распечатываю страницу конфигурации сети, все вроде бы правильно работает и определятеся, ip-адрес, назначаемый модемом. Кто пользовался данной фнкцией, что тут может быть еще, где капать?
GooDMooD
Фото-юзер года

6982
#
27 апреля 2015 18:55
подыму тему
есть МФУ HP M176n
мфу подключено в сетку. Работает. Печатает. Сканирует.
но при попытке включить веб-службы HP выдает ошибку: «Ошибка подключения. Проверьте подключение к Интернету.»
инет есть.
ByFly
сетевые настройки в принтере такие:
IP-адрес: 192.168.1.20
Маска подсети IP: 255.255.255.0
Шлюз по умолчанию: 192.168.1.1
IP-адрес настроен: Вручную
Сервер DHCP/BOOTP: 0.0.0.0
Сервер WINS: 0.0.0.0
Предпочтительный DNS-адрес: 0.0.0.0
Альтернативный DNS-адрес: 0.0.0.0
может кто сталкивался?
Профессиональная фотосъемка с хорошим настроением. +375296269635
Aleks_2
Member

425
#
27 апреля 2015 19:06
GooDMooD, модем в режиме роутера настроен (сам интернет поднимает, или с компа подключаетесь)? В настройках LAN модема указанны DNS-серверы?
GooDMooD
Фото-юзер года
6982
#
28 апреля 2015 08:40
Редактировалось GooDMooD, 1 раз.
Aleks_2:
GooDMooD, модем в режиме роутера настроен (сам интернет поднимает, или с компа подключаетесь)?
модем в режиме роутера
В настройках LAN модема указанны DNS-серверы?
где, точнее в каком пункте, это можно проверить?

Профессиональная фотосъемка с хорошим настроением. +375296269635
Pose1don
Senior Member

3441
#
28 апреля 2015 08:52
GooDMooD:
Предпочтительный DNS-адрес: 0.0.0.0
днсы пропишите, в вашем случае 192.168.1.1
GooDMooD
Фото-юзер года
6982
#
28 апреля 2015 08:57
Proxopotamus:
днсы пропишите, в вашем случае 192.168.1.1
не помогло
так же как и не сработало при прописывании, в настройках МФУ, рекомендованных DNS на сайте ByFly
предпочитаемый: 82.209.240.241
альтернативный: 82.209.243.241
Профессиональная фотосъемка с хорошим настроением. +375296269635
Pose1don
Senior Member
3441
#
28 апреля 2015 09:11
GooDMooD:
не помогло
а эти 77.88.8.88
если и эти не помогут, то проблема не в принтере. всё, что нужно для eprint, это указать адрес, маску, шлюз и днс.
GooDMooD
Фото-юзер года
6982
#
28 апреля 2015 09:47
Proxopotamus:
а эти 77.88.8.88
![]()
всё, что нужно для eprint, это указать адрес, маску, шлюз и днс.
вот это и не понятно, по идее все должно работать
Например, все три компа работают в автоматическом режиме подключения к инету, т.е. дополнительно нигде ничего не прописывалось.
В любом случае спасибо за помощь, буду дальше разбираться.
Профессиональная фотосъемка с хорошим настроением. +375296269635
Pose1don
Senior Member
3441
#
28 апреля 2015 09:59
GooDMooD:
Например, все три компа работают в автоматическом режиме подключения к инету, т.е. дополнительно нигде ничего не прописывалось.
так может у вас сеть ниразу не 192.168.1.0/24?
и почему не хотите тогда включить dhcp на принтере?
вообще посмотрите на сайте hp, может прошивка есть поновее (ищите там микропрограмму).
GooDMooD
Фото-юзер года
6982
#
28 апреля 2015 11:30
Proxopotamus, я не шибко силен в сетевых настройках
доступ к модему 192.168.1.1
Proxopotamus:
и почему не хотите тогда включить dhcp на принтере?
dhcp доступно только при автонастройках сети на принтере.
ПО принтера стоит последнее из того что есть на оф. сайте.

Профессиональная фотосъемка с хорошим настроением. +375296269635
Pose1don
Senior Member
3441
#
28 апреля 2015 12:25
GooDMooD, возможно 192.168.1.20 уже занят? попробуйте включить «ip-автоматически». если у вас в сети работает dhcp, а судя по всему так и есть, то этого должно быть достаточно для настройки сетевого интерфейса принтера — модем сам выдаст ему все необходимые настройки. если всё правильно, то в полях «ip-адрес», «маска» и т.д. на принтере вы должны увидеть полученные адреса:

если всё-таки не работает dhcp — в любом случае пропишите dns 192.168.1.1 и не перепутайте с wins.
возможно, как вариант, принтер пытается сходить в интернеты по ipv6. зайдите на вкладку «дополнительно» и уберите там галочки «DHCPv6» и «IPv6»
Добавлено спустя 21 минута 19 секунд
заранее — если не поможет ничего, выполните пожалуйте команду в консоли (cmd):
ipconfig /all > %userprofile%\desktop\ipconfig.txt
на рабочем столе у вас появится файл ipconfig.txt, сбросьте сюда спойлером его содержимое, чтобы понять, как у вас настроена сеть.
GooDMooD
Фото-юзер года
6982
#
28 апреля 2015 13:40
Proxopotamus, в том то и дело, что в автоматическом режиме выдает другие значения
переключил в авто режим, отключил IPv6

Настройка протокола IP для Windows
Имя компьютера . . . . . . . . . : DIMA
Основной DNS-суффикс . . . . . . :
Тип узла. . . . . . . . . . . . . : Гибридный
IP-маршрутизация включена . . . . : Нет
WINS-прокси включен . . . . . . . : Нет
Ethernet adapter Подключение по локальной сети:
DNS-суффикс подключения . . . . . :
Описание. . . . . . . . . . . . . : Сетевая карта Realtek RTL8168C(P)/8111C(P) Family PCI-E Gigabit Ethernet NIC (NDIS 6.20)
Физический адрес. . . . . . . . . : 00-E0-4D-9C-AD-05
DHCP включен. . . . . . . . . . . : Да
Автонастройка включена. . . . . . : Да
IPv6-адрес. . . . . . . . . . . . : fd70:723c:1d47:2d00:512e:790a:26e5:765b(Основной)
Временный IPv6-адрес. . . . . . . : fd70:723c:1d47:2d00:46c:b7f9:d07d:14f1(Основной)
Локальный IPv6-адрес канала . . . : fe80::512e:790a:26e5:765b%14(Основной)
IPv4-адрес. . . . . . . . . . . . : 192.168.1.3(Основной)
Маска подсети . . . . . . . . . . : 255.255.255.0
Аренда получена. . . . . . . . . . : 27 апреля 2015 г. 13:44:47
Срок аренды истекает. . . . . . . . . . : 29 апреля 2015 г. 1:44:47
Основной шлюз. . . . . . . . . : 192.168.1.1
DHCP-сервер. . . . . . . . . . . : 192.168.1.1
DNS-серверы. . . . . . . . . . . : 192.168.1.1
0.0.0.0
NetBios через TCP/IP. . . . . . . . : Включен
Туннельный адаптер isatap.{1B451446-B7EA-4537-ADD6-6F53101A0979}:
Состояние среды. . . . . . . . : Среда передачи недоступна.
DNS-суффикс подключения . . . . . :
Описание. . . . . . . . . . . . . : Адаптер Microsoft ISATAP
Физический адрес. . . . . . . . . : 00-00-00-00-00-00-00-E0
DHCP включен. . . . . . . . . . . : Нет
Автонастройка включена. . . . . . : Да
Туннельный адаптер Teredo Tunneling Pseudo-Interface:
DNS-суффикс подключения . . . . . :
Описание. . . . . . . . . . . . . : Teredo Tunneling Pseudo-Interface
Физический адрес. . . . . . . . . : 00-00-00-00-00-00-00-E0
DHCP включен. . . . . . . . . . . : Нет
Автонастройка включена. . . . . . : Да
IPv6-адрес. . . . . . . . . . . . : 2001:0:9d38:6abd:82e:c099:a2ab:f521(Основной)
Локальный IPv6-адрес канала . . . : fe80::82e:c099:a2ab:f521%12(Основной)
Основной шлюз. . . . . . . . . :
NetBios через TCP/IP. . . . . . . . : Отключен
Профессиональная фотосъемка с хорошим настроением. +375296269635
Pose1don
Senior Member
3441
#
28 апреля 2015 14:01
GooDMooD, у вас в сети работает dhcp-сервер на модеме, компьютеры получают настройки с него. а вот принтер этот сервис по какой-то причине не видит и включает автонастройку. это же подтверждается и ручной настройкой без результата. поэтому, смотрите свитч, куда подключён принтер, возможно порт на нём тупит, воткните в другой порт. кстати, принтер случайно не в модем воткнут?
GooDMooD
Фото-юзер года
6982
#
28 апреля 2015 14:38
Proxopotamus:
кстати, принтер случайно не в модем воткнут?
Воткнут в один из портов на модеме Huawei HG532e
Добавлено спустя 2 минуты 45 секунд
Proxopotamus:
возможно порт на нём тупит
Алиллуя!!! А ларчик просто открывался!
Посылаю вам лучи благодарностей!
Профессиональная фотосъемка с хорошим настроением. +375296269635
Pose1don
Senior Member
3441
#
28 апреля 2015 17:30
GooDMooD, использовать модемы от буфлу в качестве свитча — изначально плохая идея, в них малопонятным образом сконфигурированы порты. купите нормальный свитч и подключите всё железо к нему,. это избавит от подобных проблем в будущем.
Aleks_2
Member
425
#
28 апреля 2015 20:11
GooDMooD:
Алиллуя!!! А ларчик просто открывался!
В четвертый порт, небось, воткнут был? ![]()
HP ePrint Not Working
Having an issue that HP ePrint not working? Are you looking for a solution to fix HP ePrint problems? If the answer is Yes, then you will find this article useful as it described the reasons for the occurrence of the issue with HP ePrint and the steps to fix it. HP ePrint is an amazing technology with which you can print photos and documents from any place in just one click from your computer, laptop, or smartphone. Although, you can also print the documents by using this app by sending the email to HP printer. Here, you will learn the simple steps for troubleshooting HP ePrint problems.
Troubleshooting HP ePrint Problems
Sometimes, there can be instances that HP ePrint is not working and is unable to print the documents. It happened due to a network issue or wrong printing settings. Look at the below-mentioned instructions to troubleshoot HP ePrint not working issue.
Method 1: Check the Printer Status
If HP ePrint is not working then the first step is to check the status of your HP printer. It may happen because your printer is not getting the proper internet connection. Ensure that your Hp printer is turned on and connect with the high-speed internet connection. Follow the below steps to check the printer status:
Step 1: Turn off your HP printer.
Step 2: Test your printer by printing the document using the local network.
Step 3: After that, make sure that the web services should be enabled on the HP printer.
Step 4: If your printer has a touchscreen then you have to click on the HP ePrint option and tap on Settings. The alternative way is to tap on the web services under the network setup or wireless settings.
Step 5: If your printer has not touchscreen then print the document to get the IP address. Enter the IP address in the web browser and open the “Embedded Web Server”. Enable the web services.
Method 2: Resolve the Network Connection Issue
Due to the network connection issue, there may be a possibility that HP ePrint not working. In case, you find any problem with the signal then you can fix it. Follow the below steps to do so:
Step 1: Check that your HP printer is turned on.
Step 2: Make sure that your printer and computer are connected to the same network.
Step 3: In case, your HP printer has a wifi icon with a blue LED light on the control panel then ensure that the wireless icon is turned on and not in the flashing mode.
Step 4: If your printer has the option of the wireless setup in the control panel then you can utilize this wizard. It will assist you in connecting your HP printer to the wireless network.
Step 5: If you are receiving poor or weak WiFi signals then make sure that you have placed the computer and printer nearer to the wireless router.
Step 6: Reboot your router and check whether the issue gets resolved or not.
Step 7: Check the settings of your router band and ensure that the HP printer supports the frequency bands 2.4 GHz and 5.0 GHz.
Step 8: Next, you need to check the firewall software which prevents your HP printer from accessing the computer system.