Многие новички могут по тем или иным причинам столкнуться с ошибками пакетного менеджера dpkg. Они могут возникнуть в случае прерывания установки (к примеру, завис компьютер), или при любой другой нештатной ситуации.
Пакетный менеджер dpkg позволяет устанавливать, удалять и получать информацию по пакетам. Он представляет собой основу системы управления пакетами в Ubuntu и других основанных на Debian дистрибутивах.
Базовый синтаксис dpkg следующий:
dpkg [опции] действие
Примеры использования dpkg
Установка пакета:
dpkg -i package-name.deb
Само собой, команда должна выполняться через sudo или от имени root.
Просмотр всех установленных пакетов в системе:
dpkg -l
Узнать детали по конкретному пакету:
dpkg -c packagename.deb
Удалить установленный ранее пакет:
dpkg -r package-name
Как исправить ошибку dpkg?
При появлении ошибок, связанных с менеджером пакетов, следует в первую очередь выполнить команду:
dpkg --configure -a
Команда производит настройку всех распакованных, но ненастроенных пакетов.
Однако бывает, что возникает ошибка «Не удалось получить доступ к файлу блокировки» («Unable to acquire the dpkg frontend lock»). В общем случае такое происходит, когда происходит установка пакетов в разных приложениях одновременно. Однако чаще такое случается при аварийной остановке установки приложения. В таком случае стоит удалить lock-файлы при помощи команд:
sudo rm /var/lib/apt/lists/lock

	sudo rm /var/cache/apt/archives/lock
В случае, если ошибки менеджера пакетов все равно возникают, можно попробовать воспользоваться следующими командами:
cd /var/lib/dpkg/updates

	sudo rm *

	sudo apt-get update
Linux package managers, like Apt and DNF, are extremely powerful and intuitive, but that doesn’t mean things can’t go wrong. Occasionally, a package install goes wrong, and you’re left to pick up the pieces. Package managers have the ability to fix broken packages and skip broken updates to get your system working again and avoid troubles in the future.
This article covers how to fix broken packages in Linux. These fixes should help you get unstuck in most instances.
Content
- Fixing Broken Packages in Ubuntu/Mint/Debian
- Fixing Broken Packages in Fedora/CentOS/RHEL
- Fixing Broken Packages in Arch
- Frequently Asked Questions
Fixing Broken Packages in Ubuntu/Mint/Debian
Apt has a couple of flags to fix missing dependencies or packages that broke for one reason or another during install. A common use here would be installing a third-party .deb and finding that it had dependencies you didn’t know about. Those dependencies probably won’t be pulled in on their own, and dpkg will complain that it can’t resolve dependencies. In any case, you can try the following steps:
Note: learn how Apt works before attempting any of the fixes below.

- Run an update to make sure there aren’t newer versions of the required packages:
sudo apt --fix-missing update
- Force Apt to look for and correct any missing dependencies or broken packages when you attempt to install the offending package again. This will install any missing dependencies and repair existing installs:
Fixing DPKG Configuration Issues
Another place where an error can pop up in package installations is the configuration process. Behind the scenes, dpkg takes care of this part, so when a package fails during configuration, dpkg is the tool to fix it.

- Start by trying to force dpkg to reconfigure any broken or partially configured packages:
- If that doesn’t solve the problem, take a more forceful approach. Start by listing any packages that dpkg marked as requiring a reinstall:
The above command will show you the packages that cause problems. For this next step, check and make sure that the packages marked for reinstall are really broken. Do a sudo apt reinstall and pay attention to which packages fail to reinstall.
- For each package that fails to reinstall, get the name and forcibly remove the broken package:
sudo dpkg --remove --force-remove-reinstreq [package name]
- Dpkg should now be clean. Do a cleanup with Apt:
sudo apt clean && sudo apt update
With any luck, that’ll get you back to where you started. It won’t get you the broken packages that you tried to install, but at least Apt will be functional again, and you can go back to using it to attempt to install the package you were originally trying to install and its dependencies.
Permanent DPKG Lock
There’s a less common issue with dpkg locks preventing you from doing anything. Every time you try to use Apt or dpkg, you get an error saying another application is already using it … when it isn’t.
It’s easy to delete the lock file preventing you from using Apt and getting back to doing what you need to. Sometimes these lock files remain in place after an install error or power outage, derailing the process and preventing the file from being removed automatically. In this case, you’ll need to do it yourself.
sudo rm /var/lib/apt/lists/lock
For good measure, delete the lock in the cache.
sudo rm /var/cache/apt/archives/lock
Warning: Before removing this lock, make sure that it’s not being used. In Ubuntu, there’s an updater that starts up together with the system that locks DPKG/APT when it’s searching for updates. If you’re unsure whether the updater is running, press your Win key to bring up the Activity Center and type «Software Updater,» then press Enter to open it.

If the updater says that it can’t run, and you have no terminals open with package managers running in the background, go ahead with the above instructions.
If instead of the broken packages issue you are facing an issue with the Software Center not working, we have the fixes.
Fixing Broken Packages in Fedora/CentOS/RHEL
Fixing broken packages in Fedora/CentOS/RHEL is a less common affair. dnf does really great work making sure packages are installed correctly. That said, it’s still not perfect, and things will sometimes get mixed up in package management.
Note: learn the differences between Fedora, CentOS and RHEL.
1. List Troublesome Packages
The command to sort this out on RHEL-based systems like Fedora is:

The -V option is to verify, meaning it will go through and compare information on the installed files with the information stored in the rpm database. Attaching -a to this just verifies all core packages. This is slightly unhelpful, as it will usually give you a long list of files, but it can give you somewhere to start if you’re having issues with a particular application.
For example, seeing something marked as «missing» in your terminal will tell you that there are missing files in that particular package.
2. Attempt a Reinstall
Run a dnf reinstall on any packages you see in that list that might be giving you trouble.
sudo dnf --refresh reinstall [package name]
That will set all metadata as expired, so it will crawl through every repository you have enabled and look for a new version of that package. If you find that there are broken dependencies with that package, DNF will probably complain and tell you to use the --skip-broken flag. This will just skip that package entirely and let you update your system normally.
3. The Last Resort — Remove Packages
If you’ve reached the point where you have to use --skip-broken to complete your updates, it’s more hygienic for your system to remove it entirely.
Remembering the name of the package you failed to properly reinstall, uninstall it:
sudo dnf remove [package name]
The worst that could happen here is that you end up removing a core part of your daily flow, such as your browser, forcing you to find an alternative.
Tip: learn how to use flatpak in Fedora to better manage your packages.
Fixing Broken Packages in Arch
Although Arch’s package manager has some similarities to the others listed here (i.e, it has a database lock file and pulls dependencies in a similar way), it’s an entirely different beast of its own when it comes to how its logic is structured. The first step in diagnosing your issue is to make sure that the repositories are up to date and attempt a full upgrade:
If your attempts to install your package or do a system upgrade are still ending in failure, we have to isolate the cause according to what the terminal told you:
Note: learn how pacman works before you attempt to fix it.
«Invalid or Corrupted Package»
Making changes to «pacman.conf» in any manner can cause issues that cause pacman to incorrectly label packages as corrupt. The most likely culprit here is a partial («.part») file in the package manager cache, and your solution is to remove it:
sudo find /var/cache/pacman/pkg/ -iname "*.part" -delete
There’s always a chance that the package you’re trying to install is indeed corrupt and doesn’t provide valid metadata to Arch’s package manager. In that case, you’ll have to wait for the package maintainer to update it. If the package is installed on your system and causing problems during an upgrade, remove it with:
sudo pacman -Rns [package name]
«Unable to Lock Database»
Like Debian’s apt, Arch’s package manager makes a lock file during operations. If you experienced a power outage or pacman experienced a hard interrupt and couldn’t remove the lock, it’s very likely to leave behind a lock file.
First, find out if some process on your computer is still using the file:
sudo fuser /var/lib/pacman/db.lck

In the image above, a process with ID 121497 is using the file lock. If you’re curious about the process and want more information, use ps:

In my case, another pacman instance owns the lock file. The safest way to remove the lock is to first kill that process:
Now that the process is dead, remove the lock file:
sudo rm /var/lib/pacman/db.lck
You’re good to go now!
«Conflicting Files/File Exists in Filesystem»
This happens during upgrades where pacman detects a conflict of ownership. Before fixing anything, pay attention to the path to the file that the package manager is complaining about.
To find out who owns the file:
pacman -Qo [path to the file]
If it’s owned by a user and not another package, just remove it:
sudo rm [path to the file]
If it’s owned by another package, the safest thing to do is wait for the package’s maintainer to fix this conflict themselves. Sometimes that’s not an option, though, and you want to get things done now.
The simplest way to accomplish this is using the --overwrite flag in pacman. Just know that this is generally unsafe and could lead to some applications not working correctly in your system. I suggest making a backup prior to running this.
The --overwrite flag allows Arch’s package manager to ignore ownership rules for a particular file and just steamroll through the update. Example:
sudo pacman -Syu --overwrite [file name]
If the above command doesn’t work, replace the file name with its absolute path. Some users have reported that removing the leading slash («/») in front of the path makes the command work when it’s being stubborn.
Alternatively, you could also just tell pacman to overwrite everything it needs to:
sudo pacman -Syu --overwrite='*'
«Invalid or Corrupted Package (PGP Signature)»

In some packages that are poorly maintained, the developer may not have the time or willingness to properly update the digital signature that certifies their package. This will eventually result in a message in your terminal while trying to install it, such as, «signature from [someone] is marginal trust,» followed by the package manager asking if you’d like to delete the file.
Because signature updates depend entirely on the maintainer, there’s nothing you can realistically do to fix the situation from your terminal. If you’re doing an update and want to keep the package, use the --ignore flag for that package in particular:
sudo pacman -Syu --ignore [package name]
If you get this for many packages, your keyring might be out of date. Update it with:
sudo pacman -S archlinux-keyring
Frequently Asked Questions
Can I apply the Arch Fixes with an AUR helper?
Generally, yes. Replace «pacman» with your AUR helper in the commands in this guide. Example: yay -Qo /path/to/file
What should I do if I interrupt an update?
Breaking an update process either by pressing Ctrl + C , killing the package manager’s process, or closing the terminal prematurely will result in some level of corruption in your package database that could complicate things when you try to install something else. To fix this, clear the cache and repeat the update.
Image credit: Flickr. All screenshots by Miguel Leiva-Gomez.

Miguel Leiva-Gomez
Miguel has been a business growth and technology expert for more than a decade and has written software for even longer. From his little castle in Romania, he presents cold and analytical perspectives to things that affect the tech world.
Subscribe to our newsletter!
Our latest tutorials delivered straight to your inbox
Introduction
Linux packages are compressed archives containing programs and files necessary to run them. The package distribution system is designed to be robust and simplify the application installation process.
However, a bad internet connection or misconfigured third-party installers can corrupt packages and cause problems on your system.
This article will show you how to troubleshoot and fix broken packages on Ubuntu using the available APT and DPKG tools.
Prerequisites
- An account with sudo privileges
- An Ubuntu system
Check for Updates
Start troubleshooting by rebuilding the list of dependencies. The --fix-missing option tells APT to ignore missing packages. The option ensures the update process is performed without APT returning an error.
sudo apt update --fix-missing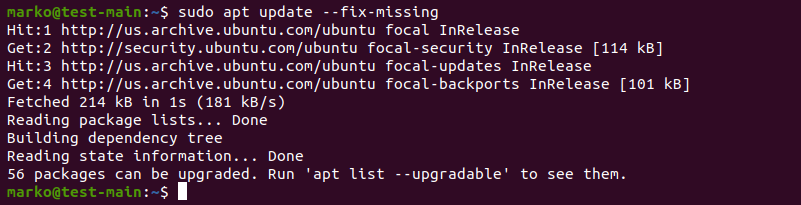
Force APT to Correct Missing Dependencies or Broken Packages
Missing package dependencies are a common reason for package-related errors.
1. Use apt install with the -f flag to tell APT to locate the missing packages and install them.
sudo apt install -fAPT lists the missing packages on your system.
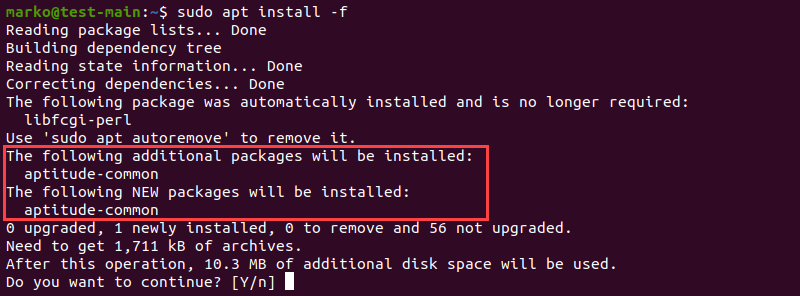
2. Press ENTER to start the installation.
Note: If troubleshooting has led to Ubuntu needing to be reinstalled, please refer to our reinstallation guide How to Reinstall Ubuntu.
Force Reconfigure or Remove Broken Packages with DPKG
Broken packages may cause package manager configuration problems.
1. Reconfigure DPKG, the base package management system, with the following command:
sudo dpkg --configure -a2. Check if DPKG marked some packages as needing a reinstall.
sudo dpkg -l | grep ^..R
3. If the command above returns a list of one or more packages, try removing the packages by typing:
sudo dpkg --purge --force-all [package-name]The example below shows how to remove the corrupted vlc-plugin-base package.

Warning: The dpkg --purge --force-all command removes a package even if the removal causes further dependency issues. Use the command with care.
4. After you finish troubleshooting, run the following command to clean up the system:
sudo apt clean5. Then update the repositories again:
sudo apt updateResolve DPKG Lock Issue
The DPKG lock error appears when trying to install a package while another process is using DPKG.

However, sometimes the error occurs even if no other processes are using the package management system.
1. To fix the problem, remove the lock file manually:
sudo rm /var/lib/apt/lists/lock2. Also, remove the lock in cache:
sudo rm /var/cache/apt/archives/lockDeleting the lock enables you to use APT and DPKG again.
Conclusion
The article provided common ways of resolving problems caused by broken packages on Ubuntu.
For more information related to package management on Ubuntu, read:
- How to List Installed Packages on Ubuntu
- A Comprehensive Guide to Using Snap Packages on Ubuntu
- How to Install Deb Files (Packages) on Ubuntu

У меня очень старенький винт, потихоньку сыплется. Поэтому часто бывают всякие «неожиданности». Но это не всё. Часто при обновлениях случается чт-то от вас не зависящее, и не всегда этому виной кривые руки. Бывает, что dpkg спотыкается обо что-либо, и дальше всё.. ничего обновить в системе, установить или удалить вы через aptitude (apt-get) вы не сможете… Как вариант, можно посмотреть список зависимостей, и удалять всё ручками, но я считаю что это не айс — удалять каждый файлик, править конфиги… Может это и true linux way, но увы, сейчас уже третье тысячелетие, и я отказался от такого извращения. Поэтому мы просто попытаемся починить dpkg.
Итак, приступим:
dpkg — это программное обеспечение, являющееся основой системы управления пакетами в Debian. dpkg используется для установки, удаления, и получения информации о .deb пакетах.
Подробнее смотрите в Wiki, я лишь опишу некоторые проблемы, встречающиеся при обработке пакетов.
1) Что поможет в 80% случаев:
Зачастую достаточно просто запросить из хранилища(репозитория) новый список пакетов:
sudo aptitude update
sudo aptitude install -f
И установить обновления:
sudo aptitude safe-upgrade
Бывает что проблема — это плохо сконфигурированный пакет. Поэтому мы просто её ещё раз переконфигурируем:
sudo dpkg --configure -a
2) Остальные «сложные» случаи:
Для остальных случаев придётся переконфигурировать всё:
sudo dpkg-reconfigure -a
Осторожно, может занять много времени 
Или именно этот пакет:
sudo dpkg-reconfigure --default-priority %pack_name%
Ну бывает что нужно переконфигурировать его, даже если он поломан или неисправен:
sudo dpkg-reconfigure --force %pack_name%
!ВНИМАНИЕ! Использовать осторожно!
Если и это не помогает, то смотрим что именно произошло, не боимся гуглить и так далее, например у меня было вот что:
3) Конкретные случаи:
1) Падение dpkg - /var/lib/dpkg/available: Input/output error.
E: Sub-process /usr/bin/dpkg returned an error code (2)
dpkg: при работе функции buffer_read(fd) произошла ошибка: копирование файла информации /var/lib/dpkg/available: Input/output error
Дааааа… Как всегда косяки, ну ничего, где-то мы такое видали. Минутный поиск по форуму сообщества и на глаза вылазит лекарство:
sudo dpkg --configure -a
либо
sudo apt-get install -f && sudo dpkg --configure -a
К сожалению никаких результатов в моем случае это не дало.
Ищем дальше. Гугл толком ничего не даёт, найдены пару вариантов с англоязычного форума линукс. К сожалению не помогает. Ну ладно значит будем думать головой…
Идём по адресу /var/lib/dpkg/ находим файл available, пытаемся открыть — filed. Осматриваемся в папке,и видим интересный файл под названием available_old.
Значит, при обновлении пакетов была сделана резервная копия этого файла со старым содержимым. Открываем, копируем содержимое , удаляем available и создаём на его месте новый файл с тем же названием. Вставляем содержимое из available_old.
Проверяем обновления
sudo apt-get update
есть. Запускаем
sudo apt-get upgrade
и о чудо, всё работает. Теперь можно и продолжать настройку системы. Также возможен другой вариант лечения dpkg.
sudo dpkg --clear-avail #удалить информацию о доступных пакетах.
далее
sudo apt-get update #обновление информации о пакетах.
но это при условии, что ваш файл не окажется битым, как в моём случае.
Да, чуть не забыл при внесении данного сообщения начал меня раздражать SCIM Method? он так и норовил подсунуть мне какой-нибудь арабско-еврейско-хрензнает какой шрифт. Пришлось избавится
apt-get remove scim
Взято с тыц’а
2) Удалил пакет руками — теперь aptitude ругается, что делать?
dpkg: не удалось обработать параметр %pack_name% (--configure):
подпроцесс post-installation script возвратил код ошибки 1
При обработке следующих пакетов произошли ошибки:
%pack_name%
E: Sub-process /usr/bin/dpkg returned an error code (1)
В таком случае можно удалить пакет через dpkg:
dpkg --purge %pack_name% #удалит всё что о нём было известно вместе с ним
3) в списке файлов пакета %pack_name% отсутствует завершающий символ новой строки
aptitude install -f
Чтение списков пакетов... Готово
Построение дерева зависимостей
Чтение информации о состоянии... Готово
Чтение информации о расширенных состояниях
Инициализация состояний пакетов... Готово
(Чтение базы данных ... dpkg: невосстановимая ошибка, прекращение работы:
 в списке файлов пакета %pack_name% отсутствует завершающий символ новой строки
E: Sub-process /usr/bin/dpkg returned an error code (2)
Не удалось установить пакет.  Попытка восстановить:
Чтение списков пакетов... Готово
Построение дерева зависимостей
Чтение информации о состоянии... Готово
Чтение информации о расширенных состояниях
Инициализация состояний пакетов... Готово
Я гуглил много, оказалось решение очень простое:
sudo kate /var/lib/dpkg/status
После чего Ctrl+F — вводим в поиск %pack_name% и удаляем всё что с ним связано, после чего делаем пункт 1) и вуаля, dpkg вернулся из мёртвых, Ressurect III lvl окрыляет!
ПОДРОБНАЯ ИНФОРМАЦИЯ о dpkg на русском можно глянуть тут: тыц
Если нада, можно сюда скопипастить, но не думаю что нужно…
Проапгрейдил, исправил бОльшинство орфографических ошибок, привёл всё к единому формату. Любые дополнения приветствуются. В данный момент ищутся любые другие ошибки в dpkg, которые решаются способами, которых тут ещё нет.
Ну и спасибо баламутику за баламутивание
In this article, I will take you through the steps to fix broken packages in Debian 10/11. Sometimes you might have noticed that whenever you try to run any update or try to install a new package then you always encountering broken package error. While this error could occur due to various number of reasons depending on server to server but here we will cover all the possible solutions that can help you solve this error with the current set of utilities you will have in your Debian based systems. So without any further delay, Let’s dive in !!
Also Read: How to Install curl on Debian 10/11 in 6 Easy Steps
In a typical Debian System, you will always find package managers like apt, apt-get and dpkg. So it is important that we try to use these tools only to solve our error. It is because even if you want to use any other utility to find and fix the broken package issue then you cannot do it as this error stops you to install any new package.
Method 1: Using apt or apt-get command
In this method first you can use apt utility to install any missing update using apt --fix-missing update command and ensure that there are no further update remains to be installed.
root@debian:~# apt --fix-missing update
Hit:1 http://deb.debian.org/debian bullseye InRelease
Get:2 http://security.debian.org/debian-security bullseye-security InRelease [44.1 kB]
Get:3 http://deb.debian.org/debian bullseye-updates InRelease [39.4 kB]
Get:4 http://security.debian.org/debian-security bullseye-security/main Sources [38.9 kB]
Get:5 http://security.debian.org/debian-security bullseye-security/main amd64 Packages [48.0 kB]
Fetched 170 kB in 2s (90.5 kB/s)
Reading package lists... Done
Building dependency tree... Done
Reading state information... Done
Now you can simply run apt update command to see if it works.
root@debian:~# apt update
Hit:1 http://security.debian.org/debian-security bullseye-security InRelease
Hit:2 http://deb.debian.org/debian bullseye InRelease
Hit:3 http://deb.debian.org/debian bullseye-updates InRelease
Reading package lists... Done
Building dependency tree... Done
Reading state information... Done
If it does not work then you can attempt fixing all broken packages by using apt install -f command as shown below.
root@debian:~# apt install -f
Reading package lists... Done
Building dependency tree... Done
Reading state information... Done
The following packages were automatically installed and are no longer required:
libjq1 libonig5
Use 'apt autoremove' to remove them.
0 upgraded, 0 newly installed, 0 to remove and 1 not upgraded.
As you can see from above output, there are few packages installed which are no longer required in the System. So to remove those packages you need to run apt autoremove -y command as shown below.
root@debian:~# apt autoremove -y
Reading package lists... Done
Building dependency tree... Done
Reading state information... Done
The following packages will be REMOVED:
libjq1 libonig5
0 upgraded, 0 newly installed, 2 to remove and 1 not upgraded.
After this operation, 1,035 kB disk space will be freed.
(Reading database ... 141510 files and directories currently installed.)
Removing libjq1:amd64 (1.6-2.1) ...
Removing libonig5:amd64 (6.9.6-1.1) ...
Processing triggers for libc-bin (2.31-13) ...
If you find any packages that needs to be upgraded then you can upgrade it by using apt upgrade -y command as shown below.
root@debian:~# apt upgrade -y
Reading package lists... Done
Building dependency tree... Done
Reading state information... Done
Calculating upgrade... Done
The following NEW packages will be installed:
linux-image-5.10.0-9-amd64
The following packages will be upgraded:
base-files gir1.2-mutter-7 gnome-maps gnome-shell gnome-shell-common gnome-shell-extension-prefs krb5-locales libapr1 libatk-wrapper-java
libatk-wrapper-java-jni libbluray2 libc-bin libc-dev-bin libc-devtools libc-l10n libc6 libc6-dev libflatpak0 libgssapi-krb5-2 libk5crypto3 libkrb5-3
libkrb5support0 libmutter-7-0 libnautilus-extension1a libpam-modules libpam-modules-bin libpam-runtime libpam0g libperl5.32 libspeechd2 linux-image-amd64
linux-libc-dev locales mutter-common nautilus nautilus-data perl perl-base perl-modules-5.32 python3-reportbug python3-speechd reportbug
speech-dispatcher speech-dispatcher-audio-plugins speech-dispatcher-espeak-ng
45 upgraded, 1 newly installed, 0 to remove and 0 not upgraded.
If you are still facing the same error then you can try doing some cleanups using below mentioned commands.
root@debian:~# rm -rf /var/lib/apt/lists/*
root@debian:~# rm /var/cache/apt/*.bin
root@debian:~# apt clean
Method 2: Using dpkg command
Another method that you can use is through dpkg command. In this method first you need reconfigure all the partially installed packages by using dpkg --configure -a command as shown in the below output.
root@debian:~# dpkg --configure -a
If the above command does not solve your problem then in the next step first you need to find all the broken packages using dpkg -l | grep ^..r command as shown below.
root@debian:~# dpkg -l | grep ^..r
If you see any broken packages then you can remove it by using dpkg --force-all --remove package-name command.
root@debian:~# dpkg --force-all --remove package-name
You can also remove all the files from /var/lib/dpkg/updates directory using rm -rf /var/lib/dpkg/updates/* command as shown below. More about dpkg command.
root@debian:~# rm -rf /var/lib/dpkg/updates/*
You can also use both apt and dpkg command together to fix broken package issues. Hopefully all the above shown steps are enough to solve your error.