- Remove From My Forums
-
Question
-
Здравствуйте, не получается создать полную архивацию сервера 2012 r2. Проблема в томе на 300 mb. Ошибка подключенный том архивации недоступен. Подскажите для чего этот том нужен и важен ли он для полной архивации? Если важен
как избавиться от ошибки?
Answers
-
Все получилось, проблема была похоже из-за сетевого расположения папки для архива. Спасибо за помощь.
-
Proposed as answer by
Friday, July 22, 2016 11:30 AM
-
Marked as answer by
Petko KrushevMicrosoft contingent staff, Moderator
Monday, July 25, 2016 11:02 AM
-
Proposed as answer by
Windows 10: [PROCESS] \Device\HarddiskVolume2\Windows\System32\MoUsoCoreWorker.exe USO Worker
Discus and support [PROCESS] \Device\HarddiskVolume2\Windows\System32\MoUsoCoreWorker.exe USO Worker in Windows 10 Performance & Maintenance to solve the problem; [PROCESS] \Device\HarddiskVolume2\Windows\System32\MoUsoCoreWorker.exeUSO Worker has been returning to powercfg -requests daily, requiring a run of…
Discussion in ‘Windows 10 Performance & Maintenance’ started by RobertRoach3, May 4, 2021.
-
[PROCESS] \Device\HarddiskVolume2\Windows\System32\MoUsoCoreWorker.exe USO Worker
[PROCESS] \Device\HarddiskVolume2\Windows\System32\MoUsoCoreWorker.exeUSO Worker has been returning to powercfg -requests daily, requiring a run of «windows update» that may or may not find any available updates to install. There often is a security update that presents in the evening that may or may not satisfy MoUsoCoreWorker. exe and it drops off. Value Windows 10 Pro, Version 10.0.19042 Build 19042. Is there a fix for this that is not already posted?

-
USO Core Worker Process
HI any bdy know what is and what for is USO Core Worker Process? is in the Task Manager ,i just notice this and I wonder what for is,
-
Constantly getting this warning: The application \Device\HarddiskVolume2\Windows\System32\ibmpmsvc.exe with process id 1152 stopped the removal or ejection for the device ACPI\LEN0068\5&2890d699&0.
Original Title: Kernel-Pnp Event ID 225
The System is:
Lenovo ThinkPad T430
8Gb Ram, Intel 240GB SSD+ 2nd HDD Hitachi (replaced cdrom)
Windows 10 Pro
Constantly getting this warning:
The application \Device\HarddiskVolume2\Windows\System32\ibmpmsvc.exe with process id 1152 stopped the removal or ejection for the device ACPI\LEN0068\5&2890d699&0.
or
The application \Device\HarddiskVolume2\Windows\System32\SearchProtocolHost.exe with process id 4764 stopped the removal or ejection for the device IDE\DiskHGST_HTS721010A9E630
Second HDD have «Safely remove» option in the taskbar
-
[PROCESS] \Device\HarddiskVolume2\Windows\System32\MoUsoCoreWorker.exe USO Worker
Should MoUsoCoreWorker.exe preventing sleep be ignored?
I have seen several threads here complaining about this
Code:I don’t take that as something to get rid of but a warning that there is a problem with Windows updates
I just got that and then went into Windows Update
All seemed OK but based on past experience I knew there was something wrong with Windows Updates
I then restarted the Windows Update serviceI then retried Windows Update again
That showed there actually was a problem with Windows Update.
If we configured Windows so that MoUsoCoreWorker.exe no longer prevented sleep how are we to know when there is a problem with Windows Update?
In other words shouldn’t we take this more seriously and listen to what Windows is telling us instead of trying to hide it?

![[PROCESS] \Device\HarddiskVolume2\Windows\System32\MoUsoCoreWorker.exe USO Worker [IMG]](https://www.windowsphoneinfo.com/threads/process-device-harddiskvolume2-windows-system32-mousocoreworker-exe-uso-worker.548996/proxy.php?image=https%3A%2F%2Fwww.tenforums.com%2Fattachments%2Fwindows-updates-activation%2F322382d1615584990t-should-mousocoreworker-exe-preventing-sleep-ignored-2021_03_12_21_36_291.jpg&hash=c27a221aa45226449184825ffb1a9f81 "[PROCESS] \Device\HarddiskVolume2\Windows\System32\MoUsoCoreWorker.exe USO Worker")
![[PROCESS] \Device\HarddiskVolume2\Windows\System32\MoUsoCoreWorker.exe USO Worker [IMG]](https://www.windowsphoneinfo.com/threads/process-device-harddiskvolume2-windows-system32-mousocoreworker-exe-uso-worker.548996/proxy.php?image=https%3A%2F%2Fwww.tenforums.com%2Fattachments%2Fwindows-updates-activation%2F322383d1615585012t-should-mousocoreworker-exe-preventing-sleep-ignored-2021_03_12_21_36_523.jpg&hash=6d417d96a8b0ffa7ddba5a9333d0d477 "[PROCESS] \Device\HarddiskVolume2\Windows\System32\MoUsoCoreWorker.exe USO Worker")
![[PROCESS] \Device\HarddiskVolume2\Windows\System32\MoUsoCoreWorker.exe USO Worker [IMG]](https://www.windowsphoneinfo.com/threads/process-device-harddiskvolume2-windows-system32-mousocoreworker-exe-uso-worker.548996/proxy.php?image=https%3A%2F%2Fwww.tenforums.com%2Fattachments%2Fwindows-updates-activation%2F322384d1615585020t-should-mousocoreworker-exe-preventing-sleep-ignored-2021_03_12_21_37_004.jpg&hash=5dd3bed7d08bbad802767a3d2200617e "[PROCESS] \Device\HarddiskVolume2\Windows\System32\MoUsoCoreWorker.exe USO Worker")
![[PROCESS] \Device\HarddiskVolume2\Windows\System32\MoUsoCoreWorker.exe USO Worker [IMG]](https://www.windowsphoneinfo.com/threads/process-device-harddiskvolume2-windows-system32-mousocoreworker-exe-uso-worker.548996/proxy.php?image=https%3A%2F%2Fwww.tenforums.com%2Fattachments%2Fwindows-updates-activation%2F322386d1615585208t-should-mousocoreworker-exe-preventing-sleep-ignored-2021_03_12_21_40_071.jpg&hash=fb2d615698b9d73cb5ad4f2ac4ca7586 "[PROCESS] \Device\HarddiskVolume2\Windows\System32\MoUsoCoreWorker.exe USO Worker")
![[PROCESS] \Device\HarddiskVolume2\Windows\System32\MoUsoCoreWorker.exe USO Worker [IMG]](https://www.windowsphoneinfo.com/threads/process-device-harddiskvolume2-windows-system32-mousocoreworker-exe-uso-worker.548996/proxy.php?image=https%3A%2F%2Fwww.tenforums.com%2Fattachments%2Fwindows-updates-activation%2F322387d1615585322t-should-mousocoreworker-exe-preventing-sleep-ignored-2021_03_12_21_42_021.jpg&hash=88f6a44627a924184d5f4f05f067286b "[PROCESS] \Device\HarddiskVolume2\Windows\System32\MoUsoCoreWorker.exe USO Worker")
![[PROCESS] \Device\HarddiskVolume2\Windows\System32\MoUsoCoreWorker.exe USO Worker [IMG]](https://www.windowsphoneinfo.com/threads/process-device-harddiskvolume2-windows-system32-mousocoreworker-exe-uso-worker.548996/proxy.php?image=https%3A%2F%2Fwww.tenforums.com%2Fattachments%2Fwindows-updates-activation%2F322388d1615585339t-should-mousocoreworker-exe-preventing-sleep-ignored-2021_03_12_21_42_192.jpg&hash=d3c9f8979a3aaf84e7dea9ef4aea7fe9 "[PROCESS] \Device\HarddiskVolume2\Windows\System32\MoUsoCoreWorker.exe USO Worker")
![[PROCESS] \Device\HarddiskVolume2\Windows\System32\MoUsoCoreWorker.exe USO Worker [IMG]](https://www.windowsphoneinfo.com/threads/process-device-harddiskvolume2-windows-system32-mousocoreworker-exe-uso-worker.548996/proxy.php?image=https%3A%2F%2Fwww.tenforums.com%2Fattachments%2Fwindows-updates-activation%2F322389d1615585346t-should-mousocoreworker-exe-preventing-sleep-ignored-2021_03_12_21_42_253.jpg&hash=6af977a5d4a98b3fecd757740c9784d9 "[PROCESS] \Device\HarddiskVolume2\Windows\System32\MoUsoCoreWorker.exe USO Worker")
![[PROCESS] \Device\HarddiskVolume2\Windows\System32\MoUsoCoreWorker.exe USO Worker [IMG]](https://www.windowsphoneinfo.com/threads/process-device-harddiskvolume2-windows-system32-mousocoreworker-exe-uso-worker.548996/proxy.php?image=https%3A%2F%2Fwww.tenforums.com%2Fattachments%2Fwindows-updates-activation%2F322390d1615585356t-should-mousocoreworker-exe-preventing-sleep-ignored-2021_03_12_21_42_354.jpg&hash=4828998e60b7d109d823ac898ab502dd "[PROCESS] \Device\HarddiskVolume2\Windows\System32\MoUsoCoreWorker.exe USO Worker")
[PROCESS] \Device\HarddiskVolume2\Windows\System32\MoUsoCoreWorker.exe USO Worker
-
[PROCESS] \Device\HarddiskVolume2\Windows\System32\MoUsoCoreWorker.exe USO Worker — Similar Threads — PROCESS DeviceHarddiskVolume2WindowsSystem32MoUsoCoreWorker exe
-
[PROCESS] \Device\HarddiskVolume7\Windows\System32\MoUsoCore Worker.exe USO Worker
in Windows 10 Gaming
[PROCESS] \Device\HarddiskVolume7\Windows\System32\MoUsoCore Worker.exe USO Worker: PS A:\WINDOWS\system32> powercfg /requests DISPLAY: SYSTEM: AWAYMODE: : [PROCESS] \Device\HarddiskVolume7\Windows\System32\MoUsoCoreWorker.exe USO Worker PERFBOOST: ACTIVELOCKSCREEN: KB4568831… -
[PROCESS] \Device\HarddiskVolume7\Windows\System32\MoUsoCore Worker.exe USO Worker
in Windows 10 Software and Apps
[PROCESS] \Device\HarddiskVolume7\Windows\System32\MoUsoCore Worker.exe USO Worker: PS A:\WINDOWS\system32> powercfg /requests DISPLAY: SYSTEM: AWAYMODE: : [PROCESS] \Device\HarddiskVolume7\Windows\System32\MoUsoCoreWorker.exe USO Worker PERFBOOST: ACTIVELOCKSCREEN: KB4568831… -
[PROCESS] \Device\HarddiskVolume7\Windows\System32\MoUsoCore Worker.exe USO Worker
in Windows 10 BSOD Crashes and Debugging
[PROCESS] \Device\HarddiskVolume7\Windows\System32\MoUsoCore Worker.exe USO Worker: PS A:\WINDOWS\system32> powercfg /requests DISPLAY: SYSTEM: AWAYMODE: : [PROCESS] \Device\HarddiskVolume7\Windows\System32\MoUsoCoreWorker.exe USO Worker PERFBOOST: ACTIVELOCKSCREEN: KB4568831… -
MoUSO Core Worker Process
in Windows 10 Installation and Upgrade
MoUSO Core Worker Process: Hello dear friends, I recently noticed the MoUSO Core Worker Process remains active in the background even after the updates have been installed, which is something that usually didn’t happen before. Is that standard behaviour, or there may be something wrong with my… -
WaasMedic Agent Exe: 100% uso di disco
in Windows 10 BSOD Crashes and Debugging
WaasMedic Agent Exe: 100% uso di disco: Ciao a tutti,oggi mentre usavo il mio pc windows 10, mi si è bloccato: guardando da gestione attività vedo che l’uso del disco è pari al 100%, per via di un processo, che si chiama WaasMedic Agent Exe.
Come posso risolvere?
grazie…
-
Ti worker exe.
in Windows 10 BSOD Crashes and Debugging
Ti worker exe.: How do I download Ti worker exe. after he has been deleted by mistake?https://answers.microsoft.com/en-us/windows/forum/all/ti-worker-exe/02043609-b0a2-4aff-a1bc-1ff7b4716f5e
-
MoUsoCoreWorker.exe MoUSO Core Worker Process
in Windows 10 Ask Insider
MoUsoCoreWorker.exe MoUSO Core Worker Process: While searching through the Microsoft index of information by clicking on the product MoUSOCoreWorker.exe, and clicking «Search for Information» pops up Bing; not what I expected — and never what I expected since upgrading from Vista — this is an OLD complaint where I’m… -
USO Core Worker Process
in Windows 10 Installation and Upgrade
USO Core Worker Process: HI any bdy know what is and what for is USO Core Worker Process? is in the Task Manager ,i just notice this and I wonder what for is,https://answers.microsoft.com/en-us/windows/forum/all/uso-core-worker-process/956f8e16-ec43-40f7-a77b-59240f449bc5
-
IIS Worker Process Stops Working Randomly
in Windows 10 BSOD Crashes and Debugging
IIS Worker Process Stops Working Randomly: I get the following warning log randomly under Event Viewer -> System. My web application app pool is restarted after this warning log and so causes web application session timeout randomly.===============================================================
A process serving…
When working with Windows operating systems, it’s common to encounter error messages that reference specific hard disk volumes, such as \Device\HarddiskVolume3. These references may seem confusing at first, but they’re actually quite simple to understand and use.
In this article, we’ll explain what these references mean and provide a comprehensive guide on how to tell which drive each hard disk volume refers to in Windows 11 or Windows 10. The step-by-step instructions will enable you to locate the specific device or volume path needed to resolve any file access events issues.
Understanding Hard Disk Volume References
Before we dive into how to find hard disk volume references in Windows, it’s important to understand what they are and why they’re used.
Also see: How to Hide a Drive in Windows 11
In Windows, hard disk volumes are used to organize data on physical hard drives. Each volume is assigned a unique reference, such as:
- \Device\HarddiskVolume3
- \Device\HarddiskVolume4
- \Device\HarddiskVolume5
- \Device\HarddiskVolume1
- \Device\HarddiskVolume2
- \Device\HarddiskVolume6
This reference is used to identify the volume and access its contents.
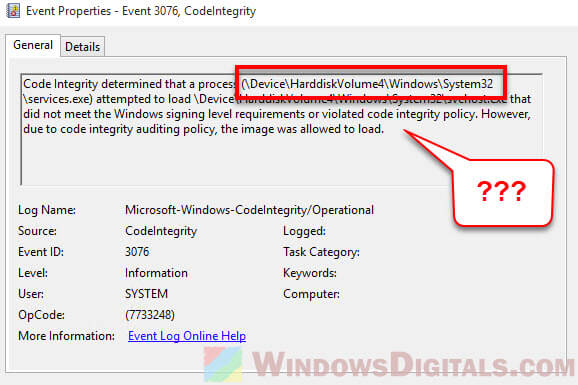
When troubleshooting issues with Windows, you may encounter error messages that reference a specific hard disk volume. For example, you might see an error message like this:
\Device\HarddiskVolume3\Windows\System32\svchost.exe is missing or corrupted
This error message is telling you that the Windows operating system can’t find the svchost.exe file on the third hard disk volume. To fix the issue, you’ll need to locate the volume and the file.
Related issue: Service Host Local System (svchost.exe) High CPU, Disk or Memory Usage
How to tell which drive is \Device\HarddiskVolume3 or other volumes?
Now that we understand what hard disk volume references are, let’s take a look at how to find the hard disk volume number and tell which drive each volume is referring to in Windows 11/10.
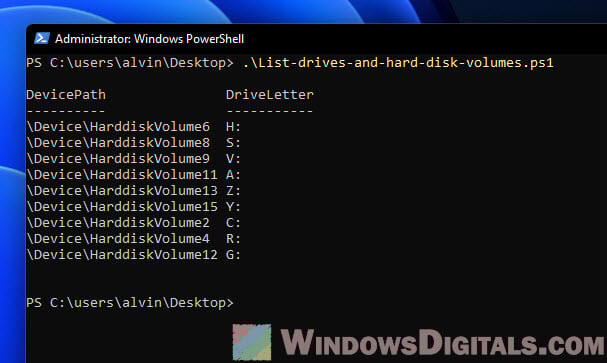
Method 1: Listing all drive letters and hard disk volume numbers using PowerShell
This method provides you with a comprehensive list of all device names and their corresponding volume paths on your local machine. It leverages PowerShell to query the Windows Management Instrumentation (WMI) class Win32_Volume for the drive letter and then uses the QueryDosDevice function from the Kernel32 module to obtain the device path.
To list all the drive letters and their corresponding hard disk volume numbers on your Windows system, follow these steps:
- Open Notepad and paste the following PowerShell script:
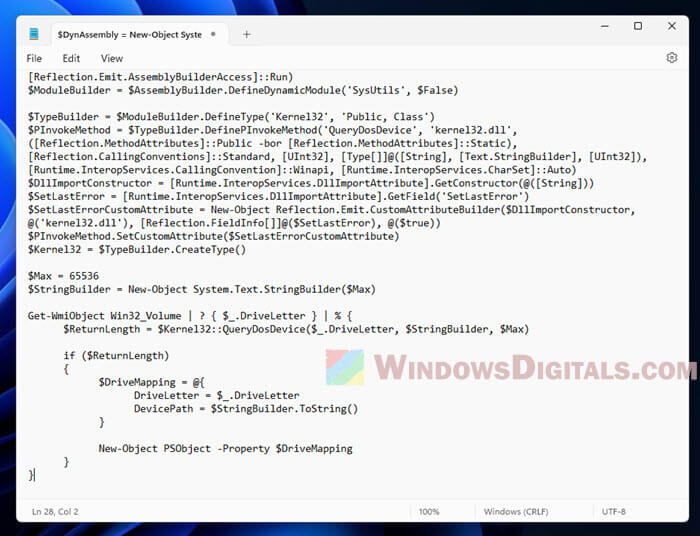
$DynAssembly = New-Object System.Reflection.AssemblyName('SysUtils')
$AssemblyBuilder = [AppDomain]::CurrentDomain.DefineDynamicAssembly($DynAssembly, [Reflection.Emit.AssemblyBuilderAccess]::Run)
$ModuleBuilder = $AssemblyBuilder.DefineDynamicModule('SysUtils', $False)

$TypeBuilder = $ModuleBuilder.DefineType('Kernel32', 'Public, Class')
$PInvokeMethod = $TypeBuilder.DefinePInvokeMethod('QueryDosDevice', 'kernel32.dll', ([Reflection.MethodAttributes]::Public -bor [Reflection.MethodAttributes]::Static), [Reflection.CallingConventions]::Standard, [UInt32], [Type[]]@([String], [Text.StringBuilder], [UInt32]), [Runtime.InteropServices.CallingConvention]::Winapi, [Runtime.InteropServices.CharSet]::Auto)
$DllImportConstructor = [Runtime.InteropServices.DllImportAttribute].GetConstructor(@([String]))
$SetLastError = [Runtime.InteropServices.DllImportAttribute].GetField('SetLastError')
$SetLastErrorCustomAttribute = New-Object Reflection.Emit.CustomAttributeBuilder($DllImportConstructor, @('kernel32.dll'), [Reflection.FieldInfo[]]@($SetLastError), @($true))
$PInvokeMethod.SetCustomAttribute($SetLastErrorCustomAttribute)
$Kernel32 = $TypeBuilder.CreateType()

$Max = 65536
$StringBuilder = New-Object System.Text.StringBuilder($Max)

Get-WmiObject Win32_Volume | ? { $_.DriveLetter } | % {
	$ReturnLength = $Kernel32::QueryDosDevice($_.DriveLetter, $StringBuilder, $Max)

	if ($ReturnLength)
	{
		$DriveMapping = @{
			DriveLetter = $_.DriveLetter
			DevicePath = $StringBuilder.ToString()
		}

		New-Object PSObject -Property $DriveMapping
	}
}
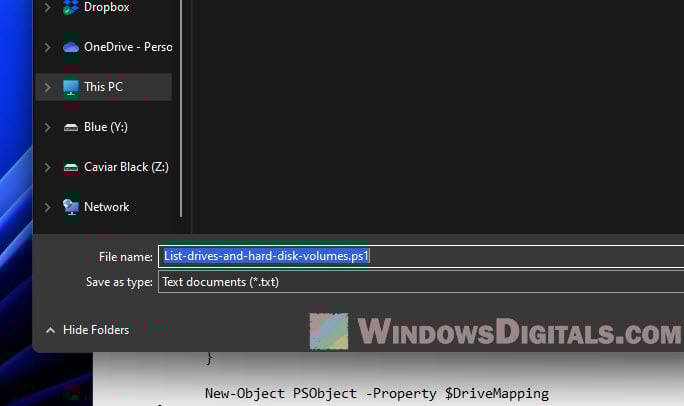
- Save the Notepad file with a .ps1 extension, such as List-drives-and-hard-disk-volumes.ps1.

- Run the
List-drives-and-hard-disk-volumes.ps1script from PowerShell to list all drive letters and their corresponding hard disk volume paths on your Windows 11 or Windows 10 system.
Recommended resource: Run CMD, PowerShell or Regedit as SYSTEM in Windows 11
To run the List-drives-and-hard-disk-volumes.ps1 script from PowerShell, follow these steps:
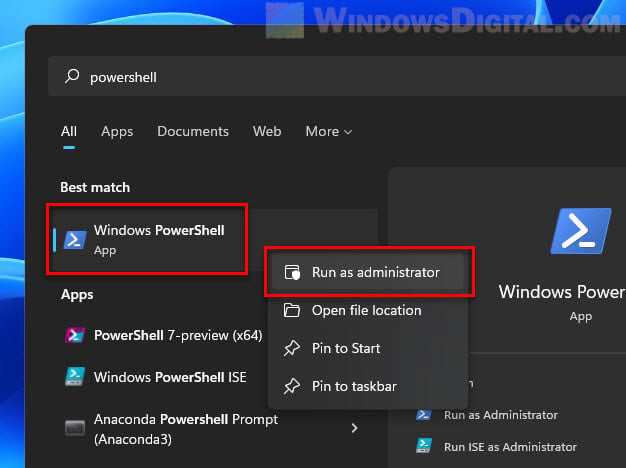
- Open PowerShell with administrative privileges: Right-click on the Start button or press
Win + Xand then click on “Windows PowerShell (Admin)” or “Windows Terminal (Admin)” if you are using Windows Terminal. Click “Yes” on the User Account Control (UAC) prompt to grant administrative access.
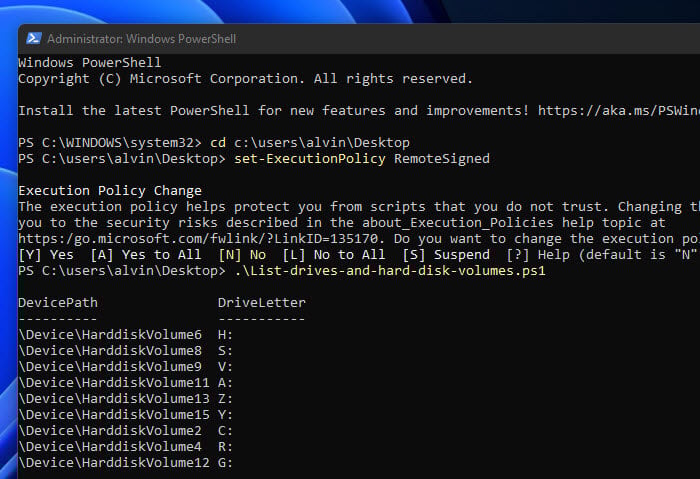
- Change the execution policy (if needed): By default, PowerShell may not allow you to run scripts due to its restrictive execution policy. To change the execution policy, type the following command and press Enter:
Set-ExecutionPolicy RemoteSigned
When prompted, type
Yand press Enter to confirm the change. This command allows you to run scripts that you created or downloaded from the internet, as long as they are signed by a trusted publisher. - Navigate to the script’s location: Use the
cdcommand to navigate to the directory where you saved the “List-drives-and-hard-disk-volumes.ps1” script. For example, if you saved the script in the Desktop directory, type the following command and press Enter:cd C:\Users\username\Desktop
Replace the username with your actual user name in your Windows system.
- Run the script: Type the following command and press Enter to run the
List-drives-and-hard-disk-volumes.ps1script:.\List-drives-and-hard-disk-volumes.ps1
The script will execute and display the device names and their corresponding volume paths for all the drives on your local machine.

- Set the execution policy back to its default value: After running the script, it’s recommended to set the execution policy back to its default value. To do this, type the following command and press Enter:
Set-ExecutionPolicy Restricted

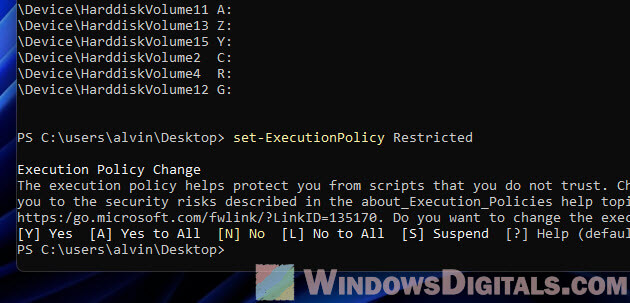
Remember, you need to have administrative privileges to run the script, as it accesses system-level information.
Useful tip: How to Merge Two Drives in Windows 11
Here’s a more detailed explanation of what the script does:
- The script first creates a dynamic assembly called ‘SysUtils’ and defines a P/Invoke method for calling the
QueryDosDevicefunction from the Kernel32 module. - It sets the maximum length of the
StringBuilderobject to 65536, which allows it to store the device path information. - The script then uses
Get-WmiObjectto query theWin32_Volumeclass for drive letter information. It filters the results to include only objects with a drive letter. - For each drive letter, the script calls the
QueryDosDevicefunction with the drive letter as the input. The function returns the length of the device path string, which is then used to create an object containing the drive letter and device path. - Finally, the script outputs the device letter and device path for each drive.
Similar problem: Hard Drive Doesn’t Show Up After Clone in Windows 11
Method 2: Getting the hard disk volume number from a specific drive letter using PowerShell
This method allows you to find the device path for a specific drive letter by using a similar approach as Method 1. However, instead of listing all the device names and their corresponding volume paths, this method prompts you for a single drive letter and returns its device path.
To display the device path for a given device name (drive letter), use the following PowerShell script:
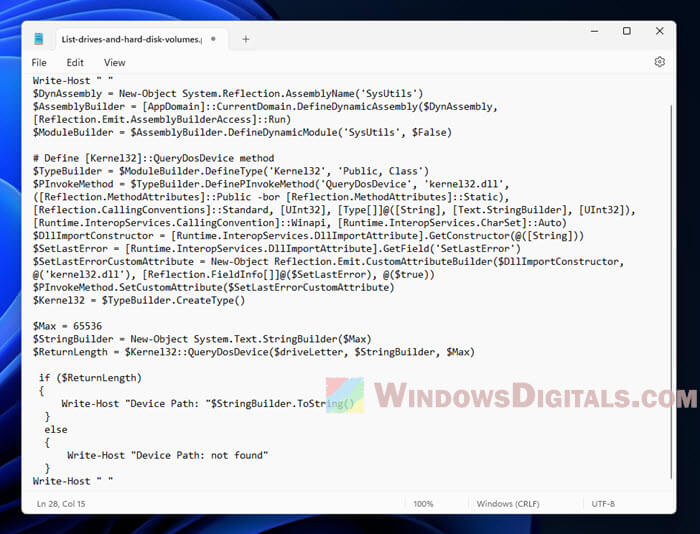
- Open Notepad and paste the following PowerShell script:
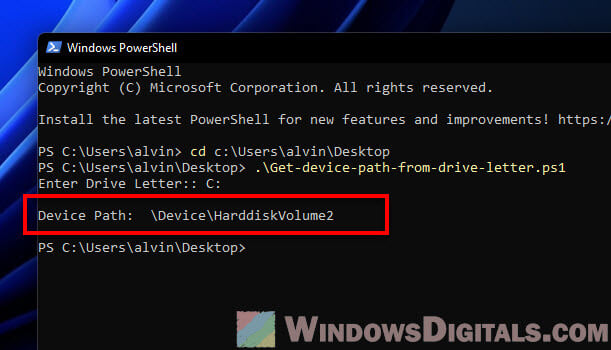
$driveLetter = Read-Host "Enter Drive Letter:"
Write-Host " "
$DynAssembly = New-Object System.Reflection.AssemblyName('SysUtils')
$AssemblyBuilder = [AppDomain]::CurrentDomain.DefineDynamicAssembly($DynAssembly, [Reflection.Emit.AssemblyBuilderAccess]::Run)
$ModuleBuilder = $AssemblyBuilder.DefineDynamicModule('SysUtils', $False)

$TypeBuilder = $ModuleBuilder.DefineType('Kernel32', 'Public, Class')
$PInvokeMethod = $TypeBuilder.DefinePInvokeMethod('QueryDosDevice', 'kernel32.dll', ([Reflection.MethodAttributes]::Public -bor [Reflection.MethodAttributes]::Static), [Reflection.CallingConventions]::Standard, [UInt32], [Type[]]@([String], [Text.StringBuilder], [UInt32]), [Runtime.InteropServices.CallingConvention]::Winapi, [Runtime.InteropServices.CharSet]::Auto)
$DllImportConstructor = [Runtime.InteropServices.DllImportAttribute].GetConstructor(@([String]))
$SetLastError = [Runtime.InteropServices.DllImportAttribute].GetField('SetLastError')
$SetLastErrorCustomAttribute = New-Object Reflection.Emit.CustomAttributeBuilder($DllImportConstructor, @('kernel32.dll'), [Reflection.FieldInfo[]]@($SetLastError), @($true))
$PInvokeMethod.SetCustomAttribute($SetLastErrorCustomAttribute)
$Kernel32 = $TypeBuilder.CreateType()

$Max = 65536
$StringBuilder = New-Object System.Text.StringBuilder($Max)
$ReturnLength = $Kernel32::QueryDosDevice($driveLetter, $StringBuilder, $Max)

 if ($ReturnLength)
 {
     Write-Host "Device Path: "$StringBuilder.ToString()
  }
  else
  {
      Write-Host "Device Path: not found"
  }
Write-Host " "
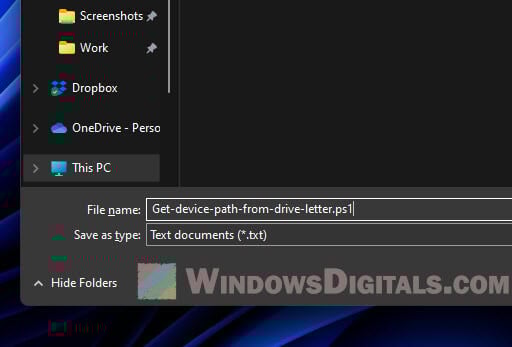
- Save the Notepad file with a .ps1 extension, such as Get-device-path-from-drive-letter.ps1.

- Run the
Get-device-path-from-drive-letter.ps1script from PowerShell. When prompted, enter the drive letter for which you want to retrieve the device path.
To learn how to run the .ps1 PowerShell script you’ve created, follow the instructions as stated in the previous method.
Here’s an overview of what the script does:
- As in Method 1, the script creates a dynamic assembly called ‘SysUtils’ and defines a P/Invoke method for calling the
QueryDosDevicefunction from the Kernel32 module. - The script prompts you to enter a drive letter by using the
Read-Hostcommand. Make sure to enter the drive letter without a trailing backslash (e.g., “C:”, not “C:\”). - It sets the maximum length of the
StringBuilderobject to 65536, allowing it to store the device path information. - The script calls the
QueryDosDevicefunction with the input drive letter. If the function is successful, it returns the length of the device path string. - If the
QueryDosDevicefunction is successful, the script outputs the device path for the input drive letter. Otherwise, it displays a message indicating that the device path was not found.
Summary
These two methods provide flexible options for obtaining the hard disk volumes information in Windows 11 or 10. Method 1 is useful when you need a comprehensive list of all drive letters and their corresponding volume paths, while Method 2 is more targeted, allowing you to retrieve the hard disk volume path for a specific drive letter. Both methods use PowerShell scripts, making it easy to integrate them into your system management or troubleshooting workflows.
Назвать точную причину, из-за которой возникает данная ошибка невозможно. В официальной документации от Microsoft по данной ошибке весьма внушительный список вероятных ошибок и неисправностей. Одно понятно: есть проблема с загрузчиком Windows 10. Предположим, что структура разделов диска не пострадала и доступна, файловая система так же доступна. Как это узнать? Загрузиться с установочного диска Windows 10 или среды восстановления Windows PE и получить доступ к разделам на диске.
Предположим, что загрузились с установочного диска (флешки) Windows 10. Запускаем командную строку сочетанием клавиш Shift+F10. Убедимся, что диск исправен.
chkdsk.exe <N>: /F /R /X — <N> буква диска, на который установлен WindowsПроверка может занять продолжительное время. Для обладателей SSD/nvme накопителей существенно меньше. Если всё исправно, то ответ должен быть приблизительно следующим.

Хорошо, значит кроме загрузчика данные не повреждены. Т.е. нет надобности переустанавливать Windows. Следующим шагом надо посмотреть структуру разделов (томов) на диске. Делается это с помощью команды diskpart.exe. Всё в той же, ранее открытой, командной строке выполним следующие команды.
diskpart
list disk
sel disk N - где N номер вашего диска
list vol
Последняя команда отобразит список разделов (томов) на диске. Из этого списка необходимо выбрать раздел (том), на котором находится загрузчик. Как? Относительно просто. Согласно документации от Microsoft, в статье UEFI/GPT-based hard drive partitions, раздел System partition, загрузчик (EFI System Partition или ESP) будет лежать на разделе с файловой системой FAT32, а размер такого раздела (тома) вряд ли будет превышать 500 мегабайт. Например, на моём диске раздел занимает всего лишь 260 мегабайт.

Хорошо бы посмотреть, что осталось от загрузчика и остался ли он вообще. Для этого необходимо выполнить следующие команды.
diskpart
list disk
sel disk N - где N номер вашего диска
list vol
sel vol N - где N номер вашего вашего EFI раздела
list vol - проверка, что выбран нужный раздел, будет помечен *
assign letter=N - назначаете букву диска отличимую от используемых. Например, D
remove letter=N - если потребуется удалить букву диска
Чтобы выйти из diskpart наберите команду exit. Теперь, чтобы попасть на диск D, необходимо выполнить следующую команду.
DISKPART> exit
C:\ D:
В корне раздела (тома) должен находиться только каталог EFI. Внутри него будут находиться директории Boot и Microsoft, возможно, будут находиться ещё какие-то. Нас интересует только директория Microsoft и всё содержащееся внутри неё. Для этого можно прибегнуть к паре способов. Лично я выбираю самый простой.
D:\dir EFI\Microsoft\BootНас интересует наличие 2 файлов: BCD и bootmgfw.efi. Плохая новость в том, что записи в них могут быть нарушены или сами файлы могут быть повреждены. Проверить это можно выполнив соответствующую команду.
C:\bcdedit /enumОтвет должен быть приблизительно следующим.

Нас интересуют только поля device partition и path в Диспетчере загрузки Windows. Данные поля являются посредниками между BIOS и основным загрузчиком Windows.
- device partition отвечает за раздел (том), на котором лежит загрузчик.
- path отвечает за путь до загрузчика.
Как уже выше было написано файлы могут повреждены или отсутствовать вовсе. В данной ситуации я не рекомендую погружаться в дебри редактирования полей BCD файла. Предлагаю пойти по пути наименьшего сопротивления, а именно. Загрузим в данную директорию новый загрузчик, пересоздадим файл BCD и загрузимся в Windows, из которого в свою очередь можно редактировать файл BCD графическими утилитами навроде Visual BCD Editor, EasyBCD, BootICE. В данной статье я не буду рассматривать как редактировать приведёнными программами файл BCD.
Прежде чем копировать новый загрузчик и файл BCD я рекомендую удалить всё содержимое. Дабы избежать в будущем ошибок навроде 0x00000001, которая даст понять, что основной загрузчик Windows не найден.

Выполнить удаление можно с помощью следующих команд.
D:\erase /f /s /q EFI # удаляет все файлы
D:\rmdir /s /q EFI # удаляет все каталоги
Ранее скрытому разделу EFI была присвоена буква D, но после перезагрузки эта связь пропадёт и загрузчик не будет знать с какого раздела производить загрузку. Поэтому в поле device partition необходимо указать запись в виде \Device\HarddiskVolumeN — вместо N номер раздела (тома). Возможно вы уже обратили внимание на то, что N раздела (тома) совпадает с N раздела (тома) отображаемого в diskpart. Запомните это значение. Копируем новый загрузчик.
bcdboot C:\Windows /l ru-ru /s D: /f UEFIРедактируем вновь созданное хранилище данных конфигурации системы (файл BCD).
bcdedit /vВ выводе команды нас интересует только раздел {bootmgr} и его значения идентификатор, device partition и path. Скопируйте GUID идентификатор.
идентификатор {9dea862c-5cdd-4e70-acc1-f32b344d4795} <----- GUID
device partition=\Device\HarddiskVolume2
path \EFI\Microsoft\Boot\bootmgfw.efi
Редактируем файл BCD указав раздел (том). Не забудьте изменить цифру в конце HarddiskVolume, которую я рекомендовал запомнить выше.
bcdedit /set {9dea862c-5cdd-4e70-acc1-f32b344d4795} device partition=\Device\HarddiskVolume2Проверяем, что изменения применились.
bcdedit /enumВ поле device partition должен быть указан \Device\HarddiskVolume2. Теперь можно перезагружать компьютер и пробовать загружаться в установленную Windows. Если вы сделали всё правильно, то Windows успешно загрузится.
Если у вас отсутствует раздел EFI, то не беда, загрузчик можно положить в корень диска с установленной системой. Ниже приведён пример такой команды.
bcdboot C:\Windows /l ru-ru /s C: /f UEFIВ случае успеха в корне диска C у вас появится папка EFI. После этого следует изменить хранилище данных конфигурации системы (файл BCD), где теперь лежит загрузчик ОС.
Получаем идентификатор {bootmgr}, раздел, в который будет вноситься изменение.
bcdedit /vВ моём примере вывод будет следующим, GUID идентификатор уникален и будет отличаться.
идентификатор {9dea862c-5cdd-4e70-acc1-f32b344d4795} <----- GUID
device partition=\Device\HarddiskVolume2
path \EFI\Microsoft\Boot\bootmgfw.efi
Параметр идентификатор то, что нам нужно. Копируем GUID значение. Далее редактируем раздел (том) в файле BCD указав, что корнем раздела будет являться диск C.
bcdedit /set {9dea862c-5cdd-4e70-acc1-f32b344d4795} device partition=C:В случае успеха появится сообщение: операция успешно завершена. Чтобы убедиться, что изменения применились выполните следующую команду.
bcdedit /enumВ выводе команды обратите внимание на секцию {bootmgr} device partition, значением должно быть C:
Теперь можно перезагружать компьютер и пробовать загружаться в установленную Windows. Если вы сделали всё правильно, то Windows успешно загрузится.
Дополнительные команды, которые могут быть полезны в процессе восстановления загрузчика.
diskpart create partition EFI size=N — создать раздел EFI на диске
bootrec.exe ключи /RebuildBcd, /ScanOs, /FixBoot
mountvol.exe ключ /S представляет интерес
DriveLetterView показывает \Device\HarddiskVolumeN, удобна только при использовании в LiveCD.
Метки: bcd, bootloader, efi, Windows 10
This entry was posted on 2022/01/07 at 12:00:00 and is filed under Software. You can follow any responses to this entry through the RSS 2.0 feed.
You can leave a response, or trackback from your own site.
Я получаю следующие ошибки в журнале событий безопасности на компьютере с Windows 7 x32.
Есть несколько из них, и я беспокоюсь, что это может указывать на предстоящий сбой диска.
Правильно ли я беспокоиться? Событие ниже:
Log Name:      Security
Source:        Microsoft-Windows-Security-Auditing
Date:          12/16/2010 9:12:33 AM
Event ID:      5038
Task Category: System Integrity
Level:         Information
Keywords:      Audit Failure
User:          N/A
Computer:      ThisMachineName
Description:
Code integrity determined that the image hash of a file is not valid.  The file could be corrupt due to unauthorized modification or the invalid hash could indicate a potential disk device error.

File Name:  \Device\HarddiskVolume2\Windows\System32\drivers\DGIVECP.SYS
Event Xml:
<Event xmlns="http://schemas.microsoft.com/win/2004/08/events/event">
  <System>
    <Provider Name="Microsoft-Windows-Security-Auditing" Guid="{54849625-5478-4994-A5BA-3E3B0328C30D}" />
    <EventID>5038</EventID>
    <Version>0</Version>
    <Level>0</Level>
    <Task>12290</Task>
    <Opcode>0</Opcode>
    <Keywords>0x8010000000000000</Keywords>
    <TimeCreated SystemTime="2010-12-16T15:12:33.026367100Z" />
    <EventRecordID>32974</EventRecordID>
    <Correlation />
    <Execution ProcessID="4" ThreadID="44" />
    <Channel>Security</Channel>
    <Computer>ThisMachineName</Computer>
    <Security />
  </System>
  <EventData>
    <Data Name="param1">\Device\HarddiskVolume2\Windows\System32\drivers\DGIVECP.SYS</Data>
  </EventData>
</Event>
РЕДАКТИРОВАТЬ
Было несколько разных с одной и той же проблемой: Имя файла: \Device \HarddiskVolume2 \Windows \System32 \drivers \SSPORT.SYS Имя файла: \Device \HarddiskVolume2 \Windows \System32 \drivers \CVPNDRVA.sys
CVPNDRVA относится к программному обеспечению Cisco VPN. Я полагаю, что и DGIVECP, и SSPORT связаны с принтером Samsung.
Я посмотрел дольше, и похоже, что только эти три драйвера упоминаются.