Код ошибки Marmot в Destiny 2 появляется только тогда, когда вы играете в версию игры для ПК. Обычно это тесно связано с большими обновлениями и расширениями. Это связано с тем, что всякий раз, когда вы обновляете Destiny 2, некоторые файлы перезаписываются, а другие устаревают, но остаются нетронутыми. И это может вызвать конфликты.
Вот почему самый безопасный способ избежать ошибки Marmot Error в Destiny 2 — всегда выполнять новую установку Destiny 2 на свой компьютер всякий раз, когда появляется большое обновление, которое может испортить ваши локальные файлы. Очистка реестра Windows также является хорошей практикой, если вы хотите избежать конфликтов.
Тем не менее, как бы вы ни были осторожны, иногда ваши файлы Destiny 2 просто повреждаются, и именно тогда вы обычно получаете ошибку Marmot Error. Когда это происходит, это означает, что вам необходимо восстановить и/или проверить игровые файлы Destiny 2 . Вот что вам нужно сделать:
- Закрыть Судьба 2
- Щелкните правой кнопкой мыши Destiny 2 в вашей библиотеке Steam.
- Выберите «Свойства»
- Перейдите в «Локальные файлы»
- Выберите «Проверить целостность файлов игры» и дождитесь окончания.
- Перезагрузите компьютер
- Откройте Destiny 2 и посмотрите, сохраняется ли ошибка.
Если это не помогает и Destiny 2 по-прежнему получает ту же ошибку, проблема может быть серьезнее, чем может решить проверка целостности файлов Steam. В этом случае лучшее, что вы можете сделать, это полностью отключить Destiny 2, удалить все записи реестра о Destiny 2 (используя что-то вроде CCleaner) и перезагрузить компьютер. После этого установите новую копию Destiny 2, и проблем быть не должно. Если даже этого было недостаточно, чтобы исправить ошибку, то мы советуем вам обратиться в службу поддержки Bungie и объяснить проблему.
With Destiny 2 being an always-online game, there’s a good chance that you’re going to run into an error code — like Boar, Arugula, and Guitar — at some point. The Destiny 2 MARMOT Error Code is one that’s, unfortunately, a little trickier to resolve than some of the others that pop up. In this guide, we’ll run you through what causes the error to appear, and how you can fix it on PC, PS4, PS5, Xbox One and Xbox Series X|S.
MARMOT Error Code Explained
This Destiny 2 error code is a result of the game files having been corrupted either when on your system, or during the download process.
To fix this, you’ll need to repair or verify the game files themselves to restore them properly and ensure they function to boot Destiny 2. Each platform has a slightly different way of going about this, so let’s go through them one by one.
Fixing Destiny 2 MARMOT Error Code on Steam
- Close Destiny 2
- Right-click on Destiny 2 in Steam’s Library
- Select “Properties” then “Local Files”
- Select “Verify Integrity of Game Files”
- Restart Destiny 2
If the error still occurs, Bungie advises that you uninstall and reinstall Destiny 2.
Fixing MARMOT on Microsoft Store
- Close Destiny 2
- Open “Apps & Features” in Windows Settings
- Select Destiny 2
- Select “Advanced Options” and run “Repair”
- Restart Destiny 2
Fixing the Error on PS4 & PS5
- Hold down the power button on your console to turn it off entirely.
- Once the console is off, press and hold down the power button for seven seconds until it beeps twice. Release the power button.
- Connect your controller with a USB cable to the console.
- When the console is in ‘Safe Mode,’ select ‘Rebuild Database.’
Fixing Destiny 2 MARMOT Error on Xbox One & Xbox Series X|S
- Go to the Xbox home screen.
- Press the Xbox button on the controller and open Settings.
- Go to ‘Devices & Connections’ and select the Blu-Ray option.
- Then select Persistent Storage.
- Hit the Clear Persistent Storage option.
- Restart Destiny 2
If the above steps don’t work on any platform, it’s advised that you uninstall and reinstall the game.
That’s everything on how to fix the Destiny 2 MARMOT Error. For more on Destiny 2, be sure to search for Twinfinite or check out more of our handy game guides below.

Chris Jecks
Chris is the Managing Editor of Twinfinite. Chris has been with the site and covering the games media industry for eight years. He typically covers new releases, FIFA, Fortnite and any good shooters for the site, and loves nothing more than a good Pro Clubs session with the lads. Chris has a History degree from the University of Central Lancashire. He spends his days eagerly awaiting the release of BioShock 4.
More Stories by Chris Jecks
Players of Destiny 2 are currently encountering an error that is preventing them from accessing the game or logging in. Some players are experiencing this issue and have been unable to resolve it.
Many players are frustrated with the current error in Destiny 2, which is causing difficulty in accessing the game or logging in. Despite seeking help on Reddit, some players have been unable to find a solution for the error.
Don’t worry about it!
The CPU Guide brings you the best working solution to solve Destiny 2 Error Code Marmot.
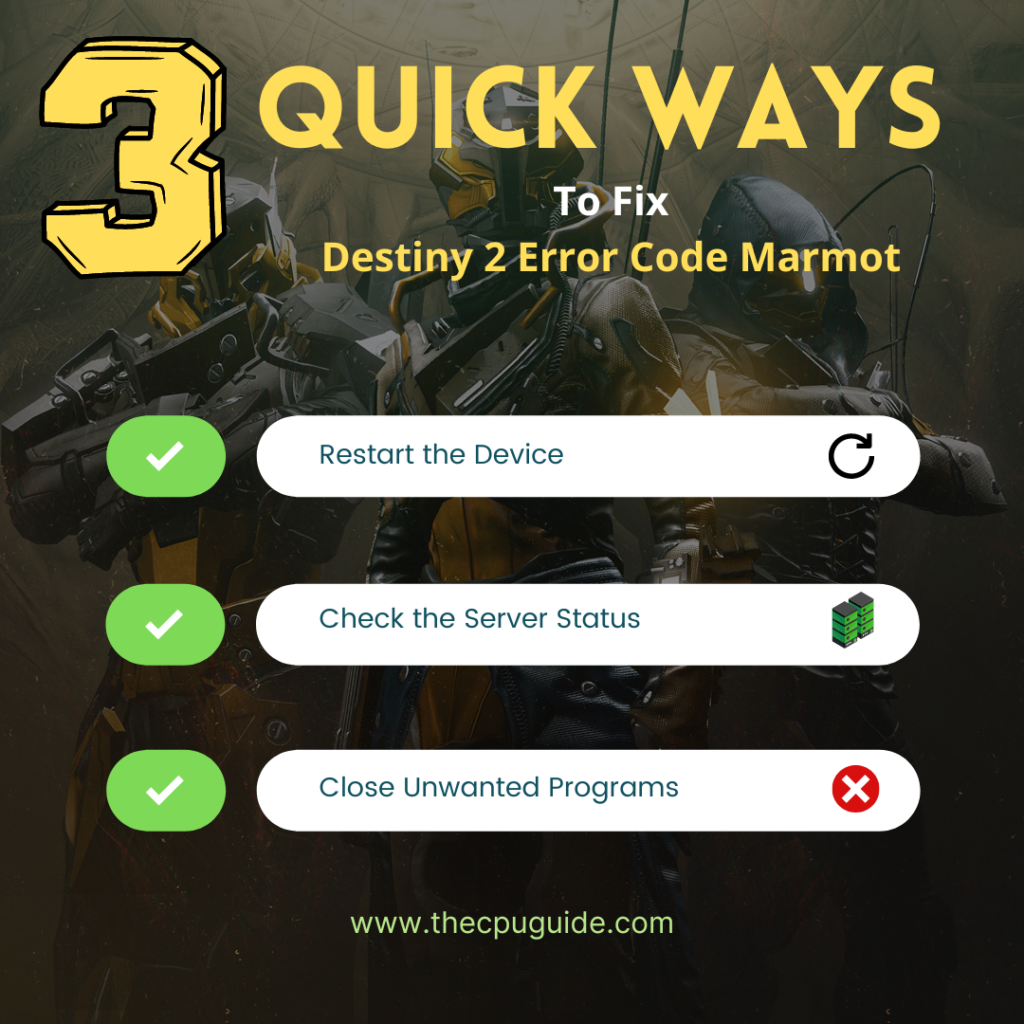
Solution 1: Restart the Game
Whenever you encounter Destiny 2 Error Code Marmot and any game bug, you should restart the game before trying any further solutions.
Restarting the game will eliminate any temporary error occurring because of the old cookies and cache or the system’s other software clashing with your gaming software.
All of these errors will be eradicated after a simple restart of the game/PC or any other platform you use.
Read More: Destiny 2 Keeps Crashing? Freezing PC
Solution 2: Check the Server Status
Sometimes the Destiny servers are down for maintenance or having technical issues and this leads to Destiny 2 Error Code Marmot.
So, it is better to check the server status before applying any further solutions.
To check the server status of the Destiny 2 game, follow the steps mentioned down below:
- Go to the help.bungie.net
- Here you can check the server status if the server is down for maintenance they will let you know on this page.
- Similarly when the server is down from the technical issue here the server status will be updated.

Now if the Destiny 2 server is working fine then most probably there is an issue from your side.
Follow the upcoming solutions to troubleshoot your PC to Fix Bungie Error Code Marmot.
Read More: Top Games You Should Play If You Like Destiny 2
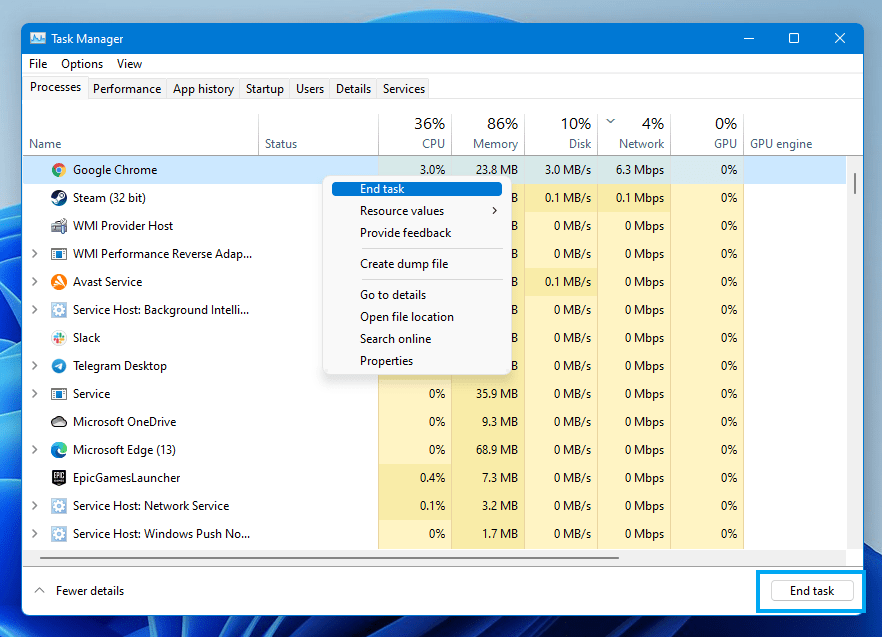
Solution 3: Close Unwanted Programs on Windows 11/10
If there are too many programs running in the background, using too much internet/RAM/Disk can cause the “Error code Marmot Destiny 2” on Windows 11.
Closing unwanted programs will help you eliminate the Destiny 2 Error Code Marmot.
So, let’s close unwanted programs:
- Press Ctrl + Shift + ESC keys to open Task Manager
- Now check which program is using more Network
- Right-click on that program and select End task

- And check if the “Destiny 2 Error Code Marmot” is solved or not.
Read More: The Guide to Quick Leveling in Destiny 2
Solution 4: Power Cycle Your Router
If the above solution didn’t work then this solution will work and provide a better internet connection which will help you solve the Destiny 2 Error code Marmot.
All you need to do is follow these steps:
- Turn off your router completely by taking out the power cable from the power switch.
- Now leave it for 5 to 10 minutes and then plug it back in.
- And check if the Wi-Fi is visible to you or not.
Make sure you restart those devices which are affected in the process for an accurate fix.
Best Routers To Buy
Budget Router
TP-Link WiFi 6 AX3000 Smart WiFi Router

Super Router
TP-Link Archer AX11000 Tri-Band Wi-Fi 6 Router

After power cycling your router it is better to Update your Wi-Fi drivers to avoid any error code Marmot Destiny 2.
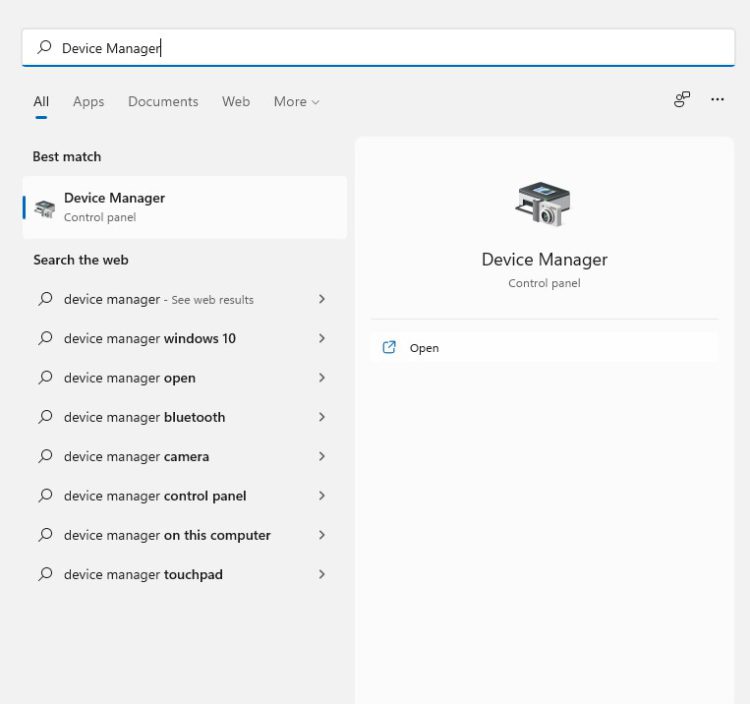
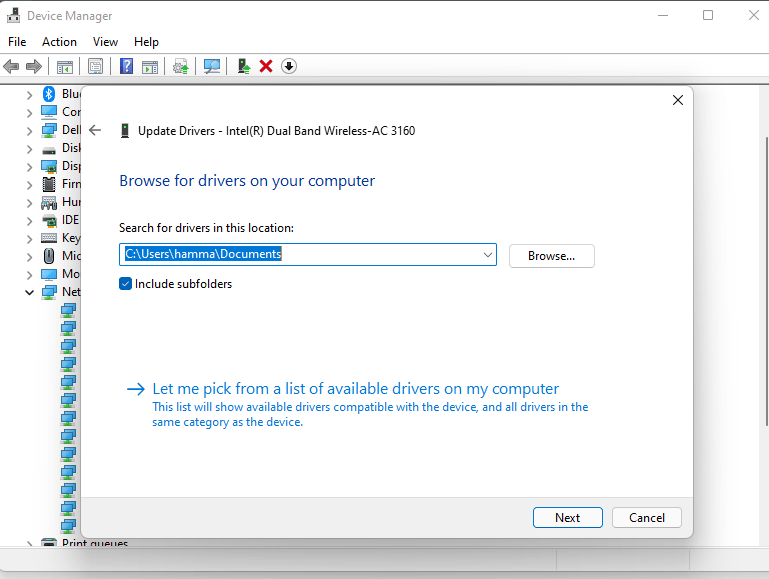
Solution 5: Update Wi-Fi Drivers through Device Manager
If you use the Wi-Fi Modem and you don’t update the Wi-Fi drivers in a long time then it’s time to update the Wi-Fi drivers to have uninterrupted internet to avoid error code Marmot Destiny 2.
- Click on the Search icon
- Type Device Manager

- Click to open the device manager
- Then select the Network adapter
- A further menu will open
- Find your Wi-Fi drivers
- Click right on the Wi-Fi card name
- Click on the updated driver
- Now a new window will open
- Select “Search automatically for drivers“

- If you want to install some other driver on your Wi-Fi then
- Select “Browse my computer for drivers“

- And then go to the path where you download the new drivers.
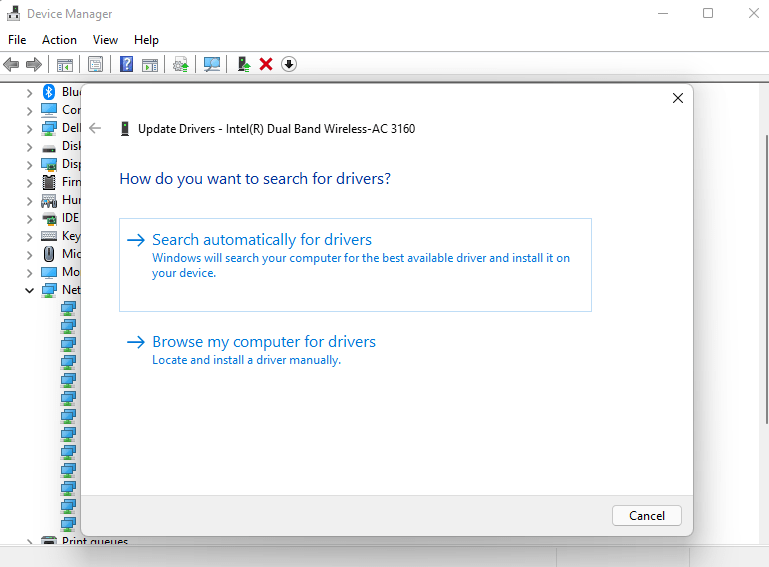
After updating the drivers let’s verify the game files on steam.
Solution 6: Verify the Game Files
Sometimes the game file will get corrupted or get deleted, which eventually causes the Error Code Marmot.
Verify the Game File in Steam
Follow the steps to verify the game file on steam software:
- Launch the Steam Software
- Now login in the steam
- Navigate to the library
- Select the game and right-click on the game
- Now select properties
- Now click on the “Local file” Option
- A further menu will open
- Click on the “Verify Integrity of the Game Cache“

- Now the software is verifying the files, and this will take some time.
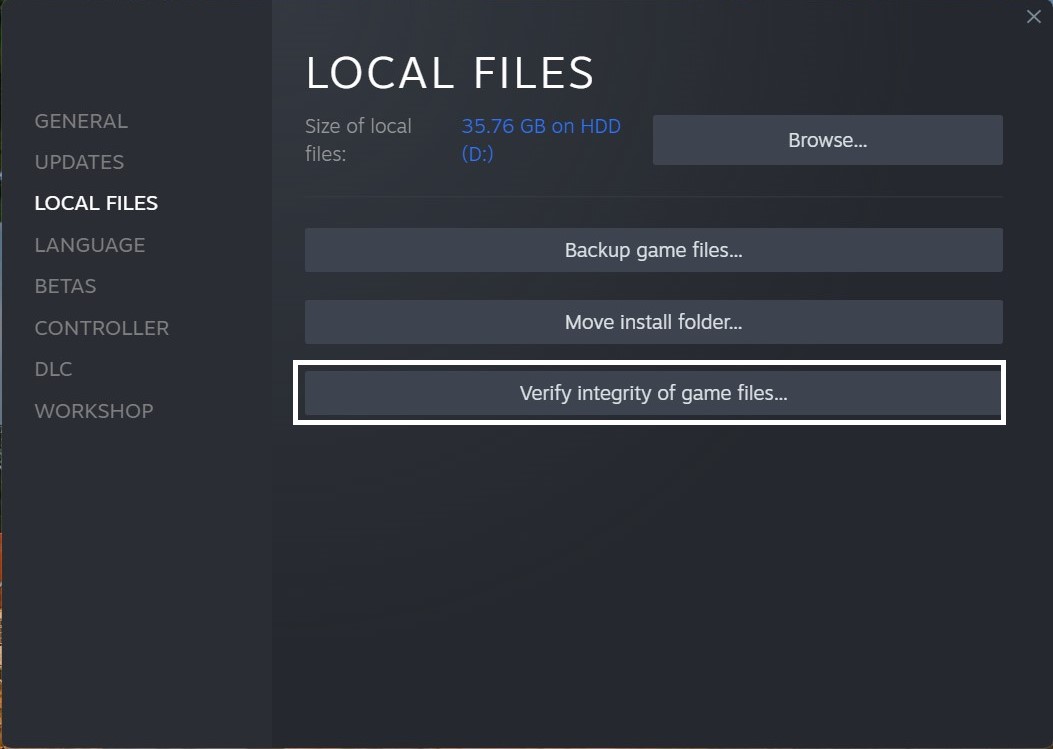
Sometimes the game file will get corrupted or get deleted which eventually causes the Error Code Marmot on PC.
After updating the drivers sometimes the inappropriate DNS cache is causing errors while you gaming to fix this follow the next solution.
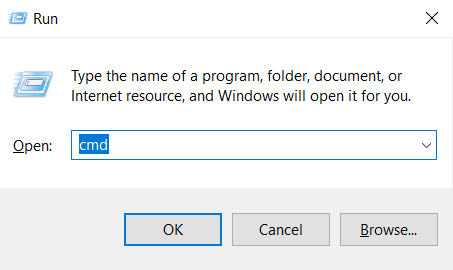
Solution 7: Clear DNS Cache and Data
Is it OK to clear the DNS cache?
Clearing the DNS cache removes all the entries and forces your computer to repopulate those addresses the next time you try accessing those websites. This won’t affect performance and eliminate Error Code Marmot on Destiny 2.
How do I reset my DNS settings? How do I clear my DNS cache?
- Click on the Windows start icon in the bottom left corner.
- Then press Windows key + R.
- The Run box will appear.
- Type cmd, and click on OK.

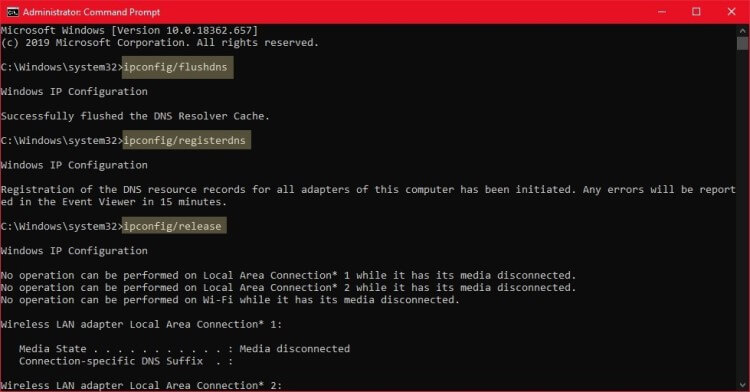
- Then on the cmd window, enter the following commands: (Note: Type the following commands, and hit Enter after every command)
- “ipconfig/flushdns”
- “ipconfig/registerdns”
- “ipconfig/release”
- “ipconfig/renew”

Now after clearing the DNS Cache and Data it’s time to set your DNS settings automatically on your PC/laptop to fix the Error code Marmot Destiny 2.
Solution 8: Setting your DNS to Automatic on Windows
To fix “Destiny 2 Error Code Marmot”, we suggest setting your DNS automatically.
Here is you can set DNS on Automatic:
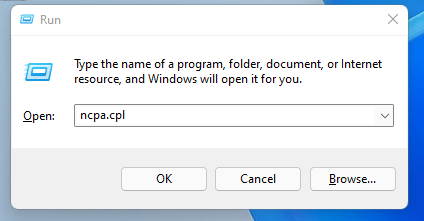
- Press Windows key + R.
- Then type ncpa.cpl and click OK.

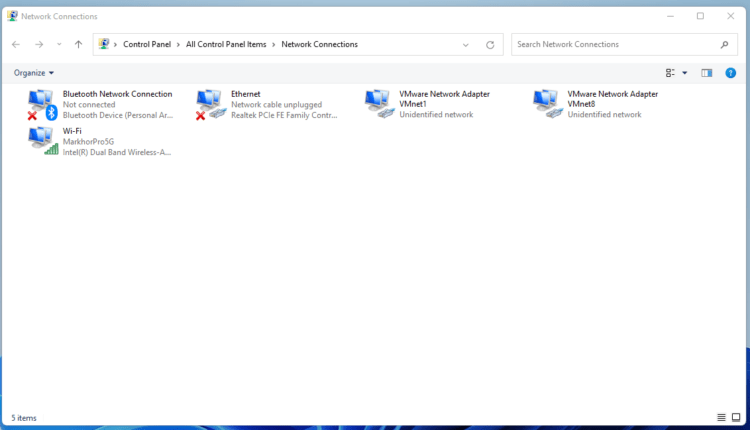
- In the internet connection, right-click on Ethernet and choose properties.

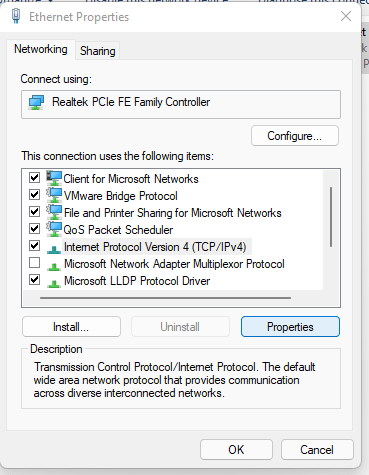
- In the properties window, choose Internet Protocol Version 4 (TCP/IPv4) or Internet Protocol Version 6 (TCP/IPv6)

- Click the Properties button
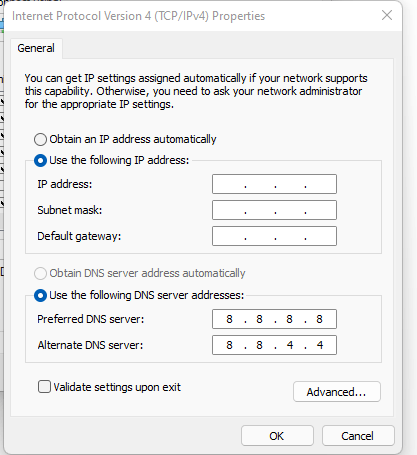
- Now choose the options “Obtain IP address automatically” and “Obtain DNS server automatically”
- Click OK.
If you already using the automatic DNS settings, then you should try the Google DNS manually.
Solution 9: Use DNS manually or Google’s DNS
Here is how you can set Google’s DNS in Windows 11:
- Press Windows key + R.
- Then type ncpa.cpl and click OK.
- In an internet connection, right-click on Ethernet and choose properties.
- In the properties, the window chooses Internet Protocol Version 4 (TCP/IPv4) or Internet Protocol Version 6 (TCP/IPv6)
- Click the Properties button.
- Now write 8.8.8.8 in the box next to ‘Preferred DNS server
- And then write 8.8.4.4 next to the ‘Alternative DNS server

Hope this will help you to fix the Bungie Error code Marmot if not then move on to the next solution.
Solution 10: Switch to a More Reliable VPN
Free VPN did not allow you to stream at full speed they set a limit to the free version which is not a very useful speed for working or gaming.
The premium VPN helps the players to achieve an uninterrupted gaming experience and will not compromise the FPS and ping of the game.
For your convince, I am listing down some most reliable plus they are working with other users without having any Destiny 2 Error code Marmot.
DISCOUNTED VPNS FOR THE CPU GUIDE READERS
- Nord VPN

- Vpyrvpn

- Express VPN

- Avast Secure Line

- Zenmate


Hope the above Solutions help you eradicate the Destiny 2 Error code Marmot.
If you have any queries or suggestions, feel free to share your experience with us in the comments section down below or you can reach us on our social handles.
FAQs
How do I fix error code Marmot Destiny 2?
Here is how you can fix Error Code Marmot Destiny following the upcoming solutions.
1. Restart the Game
2. Check the Server Status
3. Close Unwanted Programs on Windows 11/10
4. Power Cycle Your Router
5. Update Wi-Fi Drivers through Device Manager
Why do I keep getting Destiny error 2?
This might happen due to multiple factors but most of the players experience errors on Destiny 2 due to bad connectivity.

С участием Destiny 2 поскольку игра всегда находится в сети, есть большая вероятность, что в какой-то момент вы столкнетесь с кодом ошибки — например, с Кабаном, Рукколой и Гитарой. То Destiny 2 Код ошибки СУРК это тот, который, к сожалению, немного сложнее решить, чем некоторые другие, которые всплывают. В этом руководстве мы расскажем вам о причинах появления ошибки и о том, как ее исправить на ПК, PS4, PS5, Xbox One и Xbox Series X|S.
Этот Destiny 2 код ошибки является результатом повреждения файлов игры либо в вашей системе, либо в процессе загрузки.
Чтобы это исправить, вам нужно восстановить или проверить сами файлы игры.
Фиксация Destiny 2 Код ошибки MARMOT в Steam
Закрывать Destiny 2Щелкните правой кнопкой мыши Destiny 2 в библиотеке SteamВыберите «Свойства», затем «Локальные файлы»Выберите «Проверить целостность файлов игры»Перезапустите Destiny 2
Если ошибка все еще возникает, Bungie рекомендует удалить и переустановить Destiny 2.
Исправление MARMOT в Microsoft Store
Закройте Destiny 2. Откройте «Приложения и функции» в настройках Windows. Выберите «Destiny 2». Выберите «Дополнительные параметры» и запустите «Восстановить». Destiny 2
Исправление ошибки на PS4 и PS5
Удерживайте нажатой кнопку питания на консоли, чтобы полностью выключить ее. После выключения консоли нажмите и удерживайте кнопку питания в течение семи секунд, пока она не издаст двойной звуковой сигнал. Отпустите кнопку питания. Подключите контроллер с помощью USB-кабеля к консоли. Когда консоль находится в «Безопасном режиме», выберите «Восстановить базу данных».
Фиксация Destiny 2 Ошибка MARMOT на Xbox One и Xbox Series X|S
Перейдите на главный экран Xbox. Нажмите кнопку Xbox на контроллере и откройте «Настройки». Перейдите в «Устройства и подключения» и выберите параметр Blu-Ray. Затем выберите «Постоянное хранилище». Нажмите «Очистить постоянное хранилище». Перезагрузите Destiny 2
Если описанные выше шаги не работают на какой-либо платформе, рекомендуется удалить и переустановить игру.
Подробнее о Destiny 2обязательно поищите . или ознакомьтесь с другими полезными руководствами по играм ниже.
Relacionados:
- Коды Roblox Southwest Florida (апрель 2022 г.)
- 30 марта Ответ Wordle: советы и решение для Wordle 284
- Как создать древнюю голограмму в Core Keeper
- Есть ли у Coromon режим Nuzlocke?
- Годовая стоимость подписки PlayStation Plus — это «потрясающе выгодное предложение», говорит генеральный директор Sony
- Лучшие бесплатные маунты в FFXIV: самые простые маунты для сбора и езды
- Когда выйдет «Дом дракона» на HBO?
- Как долго длится «Страна чудес крошечной Тины»?
- Полный список рецептов химии в Rune Factory 5
- Как привлечь Снуп Догга Warzone а также COD Мобильный