Destiny 2 is a multiplayer game that is developed by Bungie and has a plethora of loyal players that absolutely adore its gameplay. However, a lot of people have been getting the Destiny 2 Anteater error while trying to play the game or log into the servers.

This error is caused by various problems just like not having stable Network Connections due to which Packet losses occur, Ping Spikes, and many more issues are born. It also may be due to a poor connection with the server.
What Causes the Destiny 2 Anteater Error on your PC?
After going through a lot of troubleshooting guides, we concluded that the following must be the paramount reasons due to which this error message is seen.
- Firewall: It is entirely possible that the firewall installed on your computer is preventing the Destiny 2 game from being able to establish a proper connection with its servers because it is raising a false flag against it. Therefore, we recommend that you try and disable the Firewall temporarily or allow Destiny 2 through it to fix the Destiny 2 Anteater Error.
- UPnP: The UPnP option is used by games nowadays to bypass certain security measures taken by routers to increase security and this can cause the Destiny 2 Anteater Error if this option is disabled. Therefore, we recommend you to follow the guide below and enable the UPnP option on your computer.
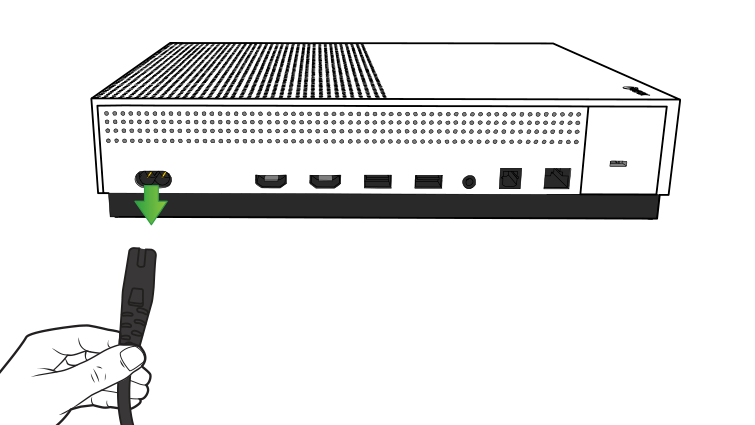
- Wired Connection: Sometimes using a Wired connection might be a good idea if you want to rid yourself of the Destiny 2 Anteater Error. Therefore, we recommend that you use a wired connection because it is less susceptible to interference from other electronic devices, unlike a Wi-Fi connection.
- Router Issue: The router being that you are using to receive the ISP connection might be causing the Destiny 2 Anteater Error because it might not be properly equipped to handle the bandwidth. Therefore, we recommend that if you see this issue with a lot of games, you should try and upgrade your router to a better one.
- Corrupted Cache: In certain cases, the cache being used by the application or by the internet connection might have been corrupted due to which the Destiny 2 Anteater Error is being triggered. Therefore, we recommend that you try and clear this out as it is automatically regenerated after a while.
Now that you have been taken through almost all the important reasons behind its occurrence, we can finally move on towards implementing the fixes.
Before You Start:
One of the simplest troubleshooting tips before proceeding on with the detailed solutions is that try to restart both of your devices i.e. your PC and the router/network modem. First, disconnect all of the wires of the ethernet connection from your PC/console and then proceed to restart it. But you should always keep in mind that it is not a permanent solution rather it’s only a temporary fix for your error. Moreover, if this does not work for you then try to reinstall the game from scratch. Reinstallation would help in installing the missing files that may have caused this particular error. If the error continues to exist move on with implementing some of the advanced solutions listed below.
How to fix the destiny 2 anteater error:
Solution 1: Disable Firewall (PC Users)
The major purpose of the Firewall is to protect the system against any malicious entities but sometimes it can give rise to certain problems too. Therefore it’s better that you disable the Firewall temporarily and then proceed to perform the specific task again. But it is risky, and there are two things that you can opt to choose from:
1. Add your Destiny 2 in the Exception list in the Firewall
2. Disable Firewall for the whole system
The first option is recommended as it is a bit safe in terms of safety and security. To add Destiny 2 to the exception list of the Firewall follow the below-mentioned steps:
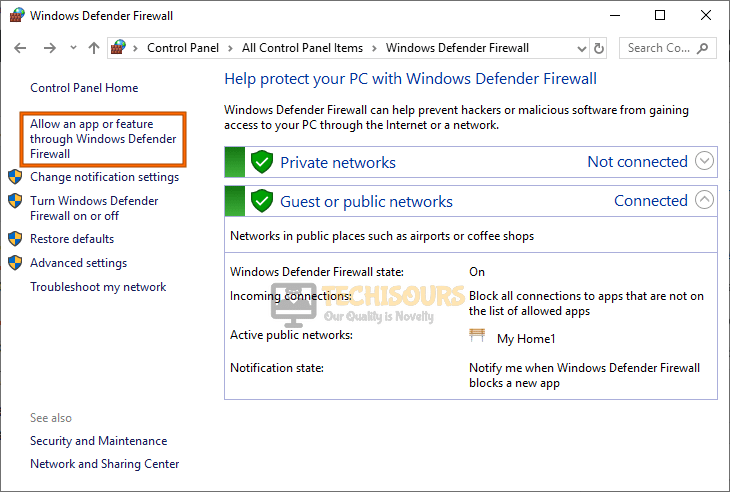
- Navigate to the Start menu and search for “Allow an App through Windows Firewall” and then click to open it up.

Allow an app or feature through Windows Defender Firewall - A window will pop up on your screen and you will see a list of softwares.
- Click on “Change Settings” in order to add Destiny 2 to the exception list.
- Once you click on Change settings uncheck the “Public” and “Private” options for Destiny 2.
- Finally, click on “OK” to save the changes made and check to see if the error got resolved now.
Solution 2: Disable Windows Defender Firewall
Windows defender is a crucial anti-viral component for the windows, but it can cause this specific error too. So you should try to disable Windows Defender while playing Destiny 2. In order to do so follow the below-mentioned steps:
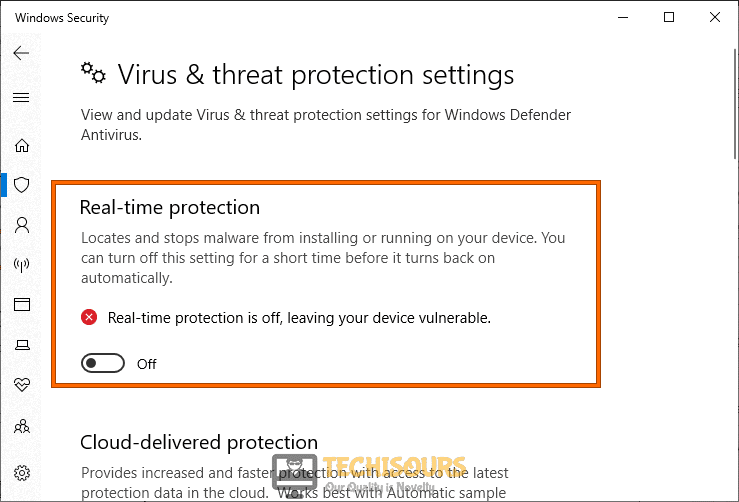
- Open your PC, navigate to the Start menu and select “Settings”.
- In the Settings window select and open “Update & Security”.

Choose Update and Security - In here click on “Windows Defender” that is on the left side below the Windows Update option.
- Once you open Windows Defender turn OFF the “Real-Time Protection” and finally check to see if the issue still persists or not.

Disable Real-time protection

Solution 3: Enable Universal Plug and Play Option (UPnP)
As you know Anteater error is due to poor connection and in order to improve the quality of the connection you should directly connect your console to Destiny 2 by enabling Universal Plug and Play (UPnP). UPnP allows other devices such as printers, internet gateways to interfere and consume a required portion of the network. Once you enable UPnP it will automatically forward ports to your router directly hence it will increase the performance of the network while you are playing online games. To do this you need to create a new firewall. It is a few steps process which is mentioned below:
- To open your router Settings type in “ipconfig” in the Command Prompt window and hit Enter.
- Scroll down to locate the option of “Settings” for default gateway under Ethernet or WiFi.
- From here locate your router’s IP address and afterward put it in your browser’s search bar and then press Enter.

Note down Default Gateway - Once you are directed to the homepage of your router open “Toolbox” and here find and select the option of “Firewall”. Next select “New Firewall”.
- You can edit the level of your Firewall through the Firewall settings. Once you set a custom level to your Firewall, edit and change its name to “Destiny 2”. So, when you play Destiny 2 you should know which Firewall you should use.
- Once you are done with Firewall, go back to the “Toolbox” page and open “Game and Application Sharing”.
- Here you will find an option for “UPnP”. Enable it and disable other options like “Extended Security” and the options under “Assigned Games and Application”.

Enable UPnP - Finally, press the “Save” button in order to save the new settings and then check to see if the issue still persists or not.


Solution 4: Use A Wired Internet Connection
Anteater error in Destiny 2 is greatly linked to the speed of your internet connection. It is so because, in Wi-Fi, packet losses occur which in most cases cause anteater error and the player gets disconnected every now and then. In a wireless connection sometimes the wireless signals are strong and sometimes they become weak which reduces the number of packets transferred and hence results in a slow speed of the internet connection. In such a case users are recommended to install a wired network connection particularly an Ethernet cable to have sufficient bandwidth for their network connection.
Solution 5: Get Your Network Bandwidth Increased
If you have already installed ethernet wire but the issue still exists, then you should contact your network provider and ask them to increase your network bandwidth. Higher bandwidth will result in a greater internet speed hence higher download and Upload Speed. Having good download and upload speed results in smooth gaming due to less ping and fewer packet losses. A minimum bandwidth of “4mbps” is recommended for playing Destiny 2 and also it requires relatively more bandwidth as compared to other games.
Solution 6: Upgrade Your Router
If you are using an old router or wire, then you must try to upgrade it. Also, make sure that your ISP is using optical fiber which is better for the high performance of the network. If your router is quite old it might be the cause of a slow network connection. Try upgrading your router for better wireless signals and for better speed of the internet. Also, check whether the ethernet wire is damaged or not.
Solution 7: Fix Packet Losses Using Command Prompt (PC Users)
Packet losses can also be fixed through the Command Prompt directly. Packet losses generally mean that during a network connection packets are transferred from the router to PC/Console whatever you are using. During packet loss, few data packets are not transferred which results in a jerk or a lag hence not a game-friendly environment. Packet Losses can also be due to an old router, low bandwidth, damaged ethernet cable, or poor wireless connection. If all of the mentioned causes are fine, then follow the below-mentioned steps to avoid packet losses.
- Search for the “Command Prompt” window in the search bar located near the Start menu.
- Then right-click on it to select “Run as Administrator”.

Run command Prompt - Type in “ipconfig /release” in the dialog box and hit Enter. It will disconnect your network access because your current IP configuration will be released.
- Then type “ipconfig /flushdns” and again hit Enter. This command will assign a new IP address to your connection.
- Finally, type the “ipconfig /renew” command and hit Enter This command will update the status and information about the connection to the server.
- Afterward, close the Command Prompt window. Next up type and then open “Control Panel” from the search bar near the Start menu.

Type Control Panel - In here search for “Network and Sharing Center” and click to open it.
- Once in the Network and Sharing Center window click on your “Adapter”.
- A new tab will open up on your window. Here in the bottom left corner click to select the “Properties”.
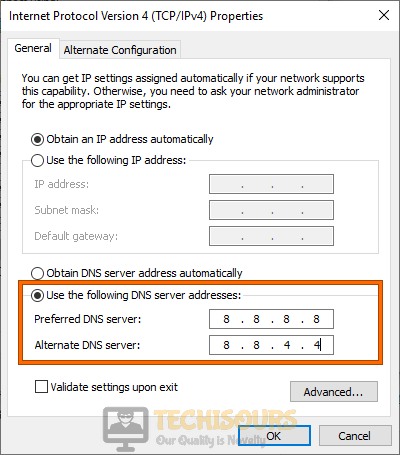
- In the Properties tab, look for “Internet Protocol Version 4 (TCP/IPv4)”.

Internet Protocol Version 4 (TCP/IPv4) - Click on “Internet Protocol Version 4 (TCP/IPv4)” and then click on “Properties” to open a new tab.
- Here click to select the option of “Use the Following DNS Server Addresses:”
- Type in “8.8.8.8” in the Preferred DNS server and “8.8.4.4” in the Alternate DNS server.

Use the following DNS server addresses - Finally hit the OK button and check to see if the error gets removed now.


Solution 8: Clear Faulty Cache on Your PC/Console
A cache is irrelevant memory data that is stored or hidden and clearing cache can help improve the performance by eliminating several bugs and also helps in resolving different errors. Follow the below-mentioned steps to clear cache:
For PC Users:
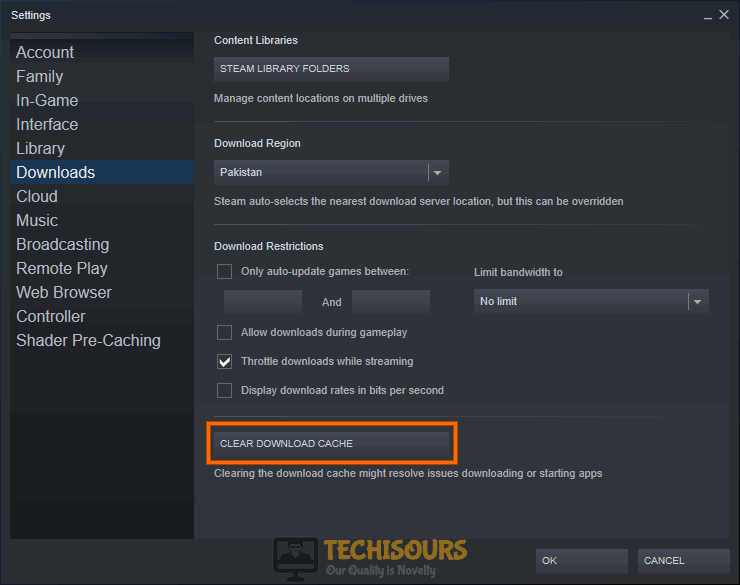
- Open up Steam on your PC and click on “Settings”.
- Once you open Settings on the left side there will be a “Download” icon, click to open Download.
- In the Download section on the bottom left corner, there will be an option of “Clear Download Cache”. Click to select it and it will clear all the download cache from your PC.

Clear Download cache
For Xbox Users:
- Go to the “Settings” option by pressing the guide button and select “System Settings”.
- In the System Settings window select to open “Storage”.
- Here highlight “Destiny 2” and press “Y” on your controller in order to open up the device options.
- Once you open device options select “Clear System Cache”.
- Lastly, a message will pop up to confirm storage device maintenance. Click to select “YES”.
- Check to see if doing this has fixed the Destiny 2 Anteater Error.
For Console (PlayStation) Users:
- Start with switching off your PlayStation completely. Take out the power cable in order to drain out the power from your PlayStation.
- Press the Power button a few times in order to fully drain the left power in your PlayStation.
- Now plug in the Power cable and restart your PlayStation again.
Note: This method works for Xbox too.

Clear Xbox Cache - Check to see if doing so fixes the Destiny 2 Anteater Error.
Solution 9: Switch Your ISP
If none of the aforementioned methods work, it is recommended to change your ISP. Try switching your ISP to a better one in case the bandwidth is not up to your expectations. Many ISP’s are the reason for the high ping. Not all ISP’s are good enough for gaming purposes, try and look for reviews before going for another ISP. Having high ping most of the time ruins the gamer’s motivation especially those who play games professionally and is not a good thing for gamers who especially play on online servers.
Solution 10: Contact Support
Despite carrying on all of the above-listed fixes if the issue is still there then you must contact Bungie Customer Support. Document your complete problem here and preferably also do attach the error screenshots to give a better insight. Afterward, wait for some time until the Support team gets back in touch with you and resolves the Destiny 2 Anteater Error positively.
Follow all of the above-listed fixes respectively in order to get rid of this issue but if the error still persists you may Contact Us here and we will further look into the issue for you.
-
Home
-
Partition Magic
- How to Fix Destiny 2 Error Code Anteater Easily
By Irene |
Last Updated
Have you ever encountered Destiny 2 Anteater error? This post from MiniTool will show you how to fix Destiny 2 error code Anteater. If you get the same error, you can check out this post for effective solutions now.
Destiny 2 is a free-to-play online-only multiplayer first-person shooter video game developed by Bungie. It is available on PlayStation 4, Xbox One and Microsoft Window. Recently, many users reported they got the error code Anteater on Destiny 2.

How to fix it? After analyzing several posts on how to fix Destiny 2 error code Anteater, here I have summarized some top solutions to remove the error. If you don’t know how to remove error code Anteater on Destiny 2, try the following solutions one by one.
Solution 1. Use a Wired Internet Connection
The Destiny 2 Anteater error usually indicates that there is a network error occurred. If you are using WiFi or a mobile data connection, it is recommended that you try using a wired Internet connection. Some users who played the game via WiFi connection reported that after switching to a wired connection, the error code Anteater disappeared.
So, you can try this solution first and check to see if this fixes Destiny 2 error code Anteater.
As mentioned before, the Destiny 2 Anteater error can be caused by the problem with ISP (Internet Service Provider). So when you get the Anteater error code, it’s always a good idea to contact them and find out what’s wrong. You can ask your ISP to run a test to check the connection speed.
If there is no connection problem from the Internet service provider side, you may need to consider other reasons such as a faulty cable.
Solution 3. Clear Cache on Your Console
If you get Destiny 2 error Anteater on your Xbox One or PS4 console, you can try clearing the cache. Faulty cache memory can give rise to Destiny 2 Anteater error.
Many users reported that after rebooting and clearing the cache on their game console, they fixed the Destiny 2 Anteater error.
If you want to have a try, here are detailed steps:
For Xbox One:
Step 1. Press and hold the power button of the Xbox one console until the console shuts down completely.
Step 2. Remove the power cord from the Xbox and press the power button a few more times to drain the remaining power. This is to clear the cache memory.
Step 3. Plug-in the power cable to the Xbox One console and restart the Xbox one.
For Play Station 4:
Step 1. Turn off the PS4 console completely and remove the power cord.
Step 2. Wait for a few minutes. And then insert the power cord again.
Step 3. Reboot the PS4 and check to see if the Destiny 2 Anteater error disappears on the gaming console.
However, if the issue persists after rebooting and clearing cache on your device, try installing the latest system and game updates.
Conclusion
How to fix error code Anteater Destiny 2? After reading this post, now you should know how to fix Destiny 2 error code Anteater. Which method works for you? Do you have any better solution? We are glad to have you share it with us.
About The Author
Position: Columnist
Irene joined MiniTool in 2018 and has since become a professional in the areas of disk management and Windows tricks. Irene’s expertise allows her to assist clients with managing their hard drives, optimizing their Windows operating system, and troubleshooting any technical issues that arise.
Allow Destiny 2 in the Firewall, run internet troubleshooter to fix the error code Anteater ✅
If you are constantly getting the Destiny 2 error code Anteater on your PC, you are not alone. A lot of gamers have been experiencing the same problem.
This free-to-play Open World multiplayer game has gained immense popularity after its release. But it doesn’t mean gamers don’t face any problems with this title. The error code Anteater and other multiplayer issues are not very uncommon in this game.
What is an error code Anteater?
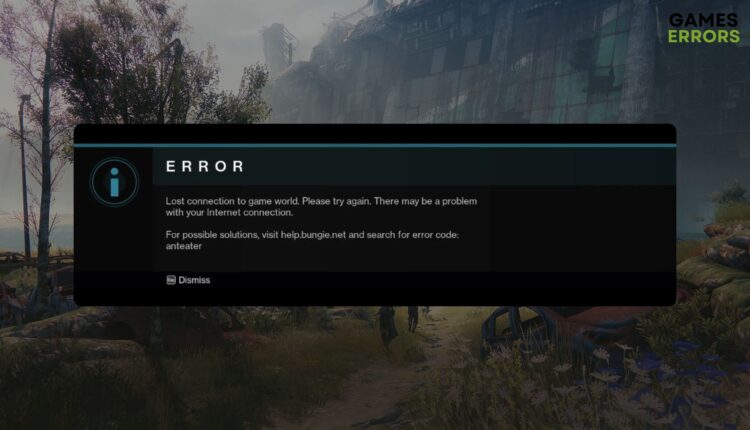
Destiny 2 Error Code Anteater is a network connectivity error. This problem occurs suddenly and disconnects you from the game. When it appears, you will see a similar message like the following:
Lost connection to game world. Please try again. There may be a problem with your internet connection.
For possible solutions, visit help.bungie.net and search for error code: anteater
Usually, it occurs due to your antivirus and firewall, connection problems, configuration issues, etc. Even though Bungie is actively working to reduce this type of network error, you can still try some effective solutions to get rid of it.
How to fix Destiny 2 error code Anteater?
We strongly suggest you take the following steps before trying out the main troubleshooting methods:
- Visit the Bungie server and update status page to know if there is something wrong on their part.
- Power-cycle your internet router.
- If you use a wireless connection, we suggest you use the wired one, like ethernet, instead.
If the problem still exists even after taking the above-mentioned quick steps, follow these methods to fix the error code Anteater on Destiny 2:
- Whitelist Destiny 2in the firewall
- Change your DNS
- Disable proxy and VPN
- Reset network
- Run the internet troubleshooter
- Clear cache
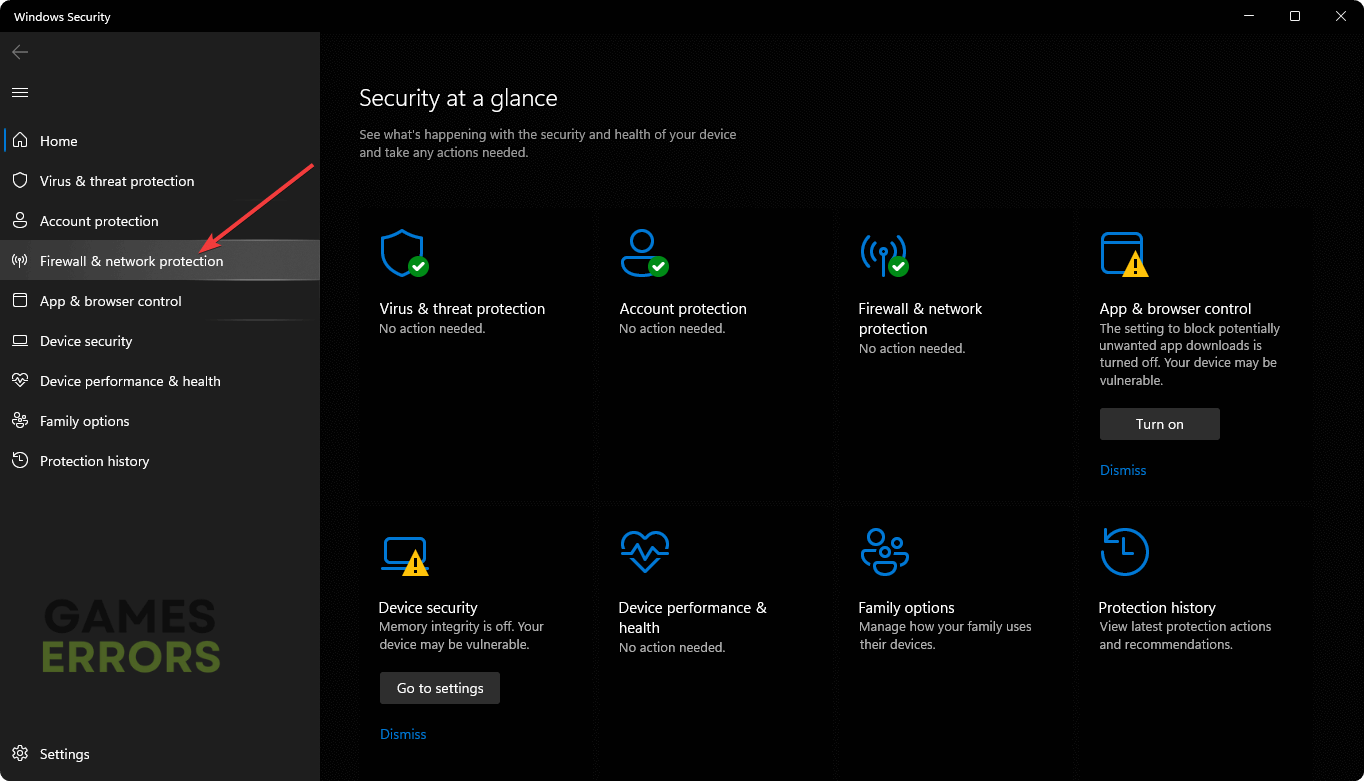
1. Whitelist Destiny 2 in the Firewall
- In the Start Menu, type Windows Security and press Enter.
- Go to Firewall & network protection.

- Click on Allow an app through the Firewall.
- Click on Change settings.
- Check the boxes in the Private and Public columns for Destiny 2.
- Save the settings.
- Restart your PC.
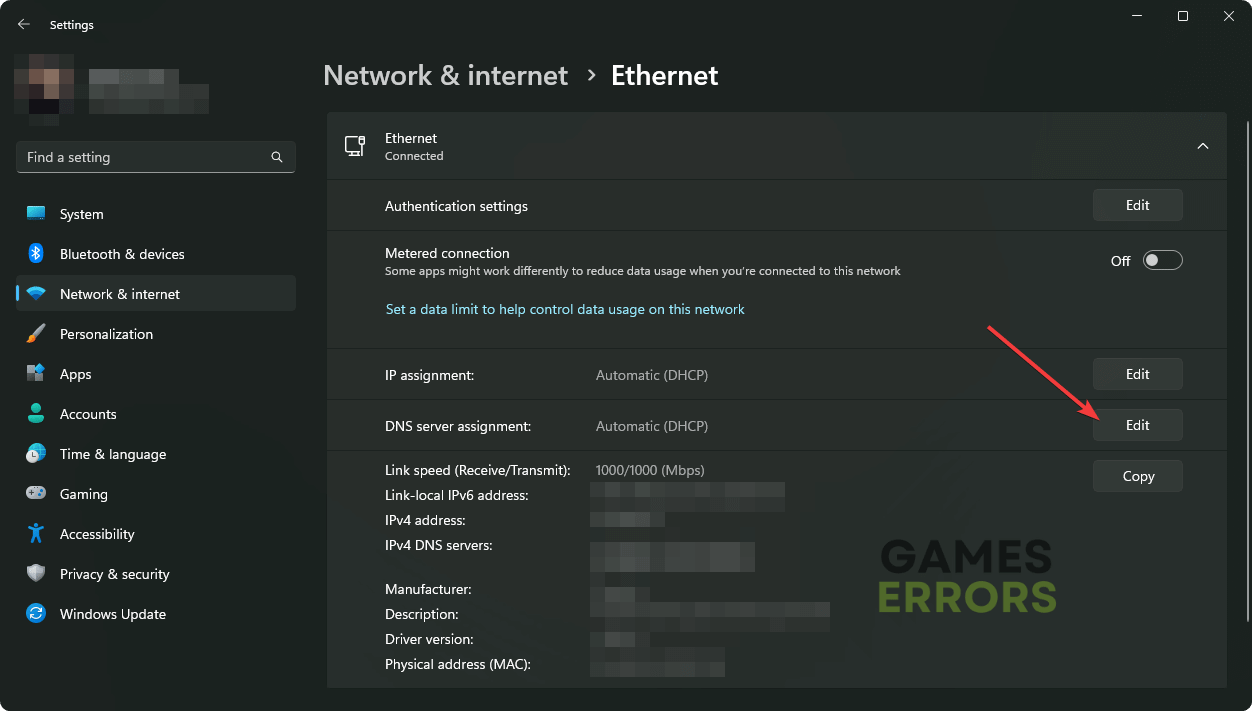
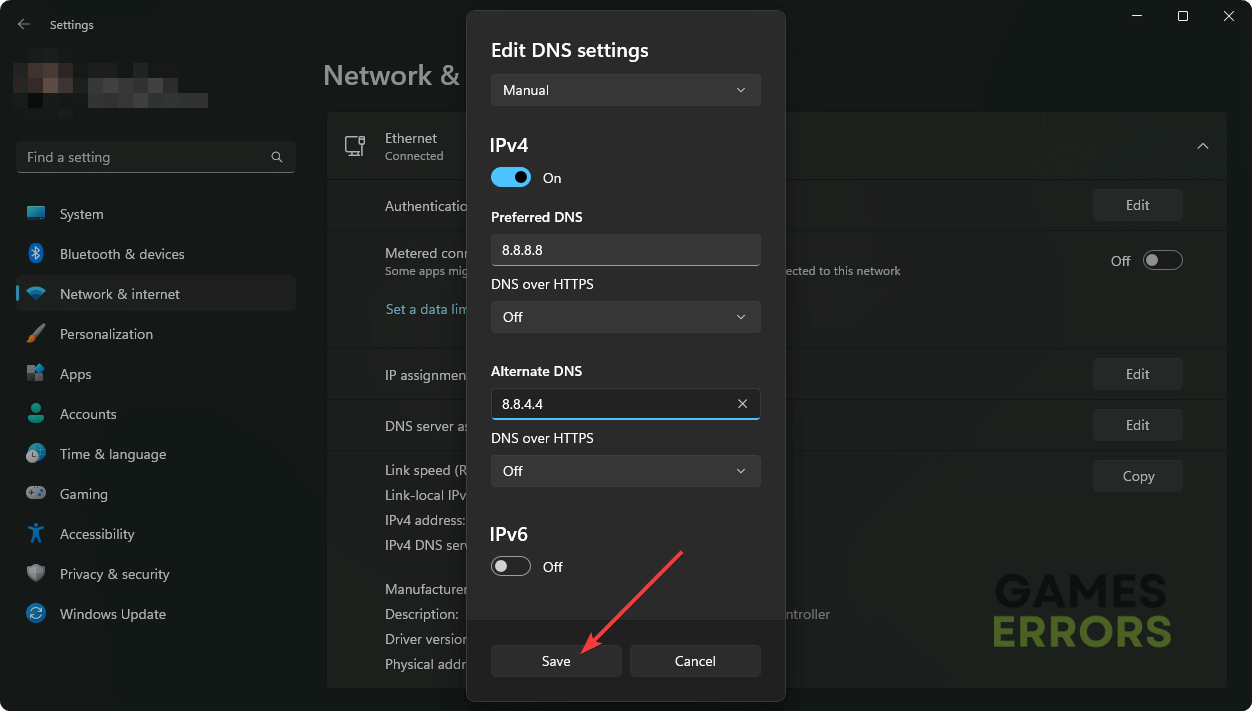
2. Change your DNS
- Press Win + I to open Windows Settings.
- Go to Network & internet and click on Wi-Fi or Ethernet, depending on your connection.
- Click on Edit next to the DNS server assignment.

- Choose Manual.
- Enable IPv4.
- Set the DNS as 8.8.8.8 and 8.8.4.4 and click on Save.
- Restart your PC.
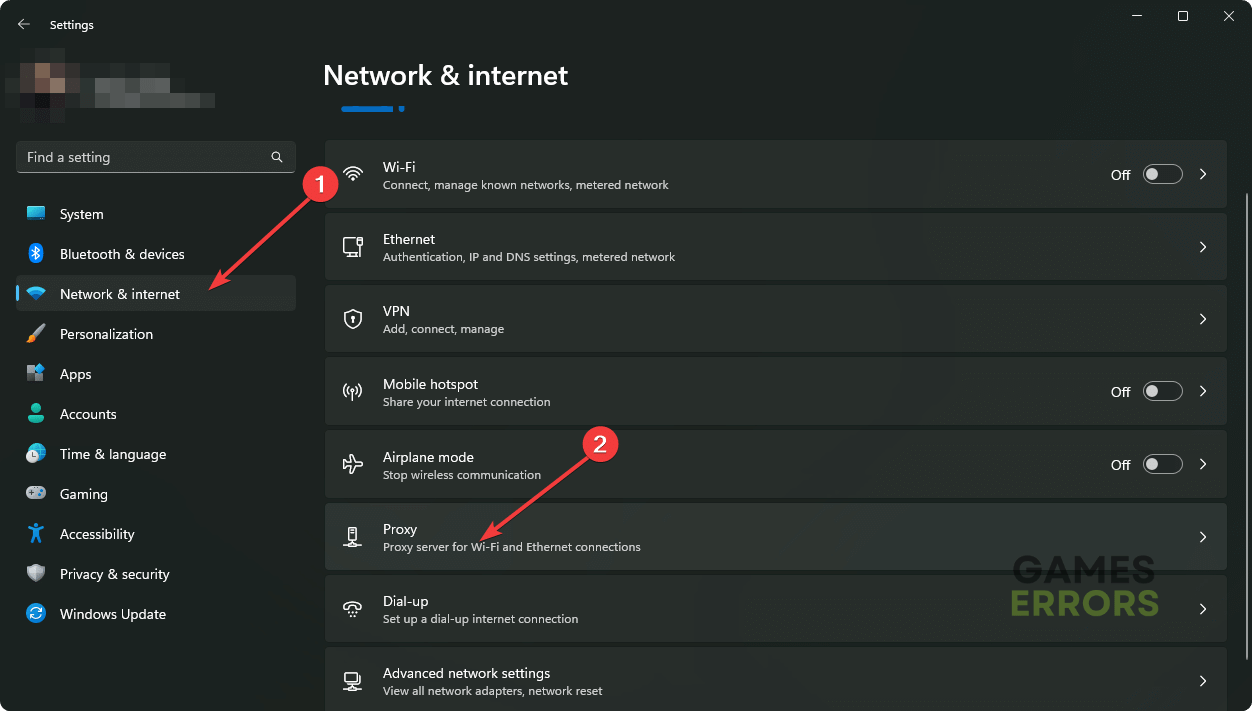
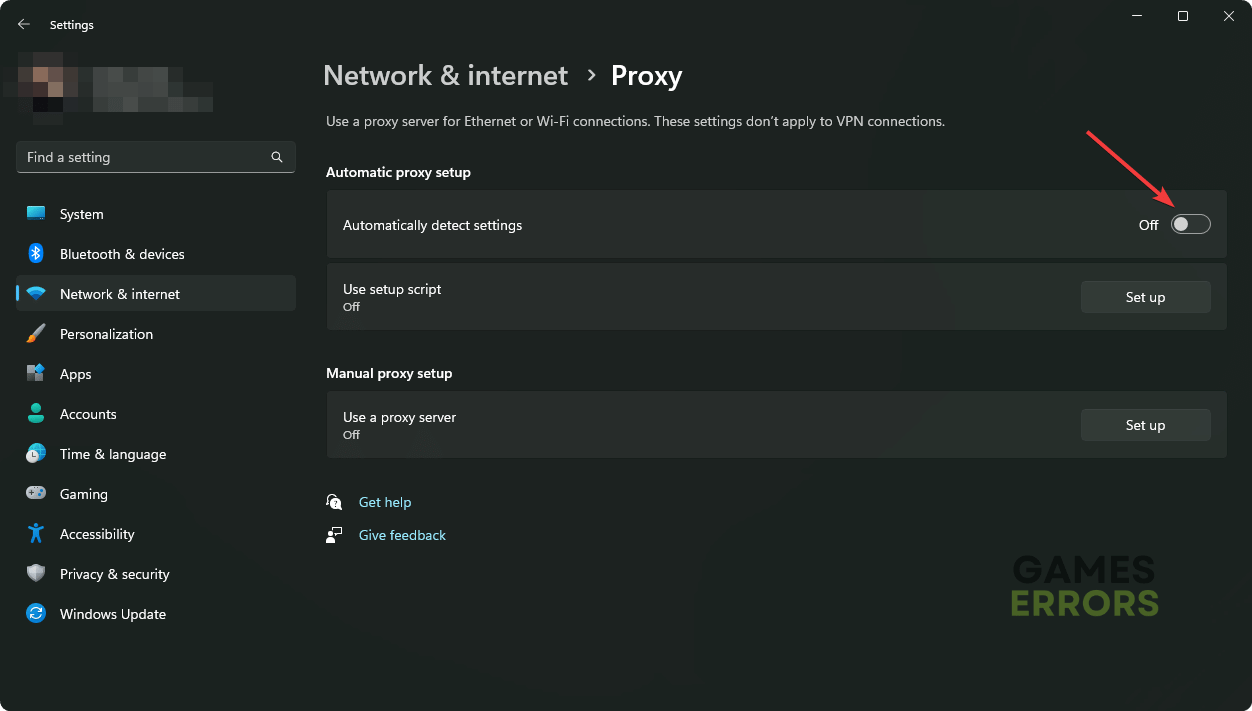
3. Disable proxy and VPN
- Open the Windows Settings again.
- Go to Network & Internet and click on Proxy.
- Toggle off Automatically detect settings.
- Delete any other proxy profiles.
- Restart Windows.
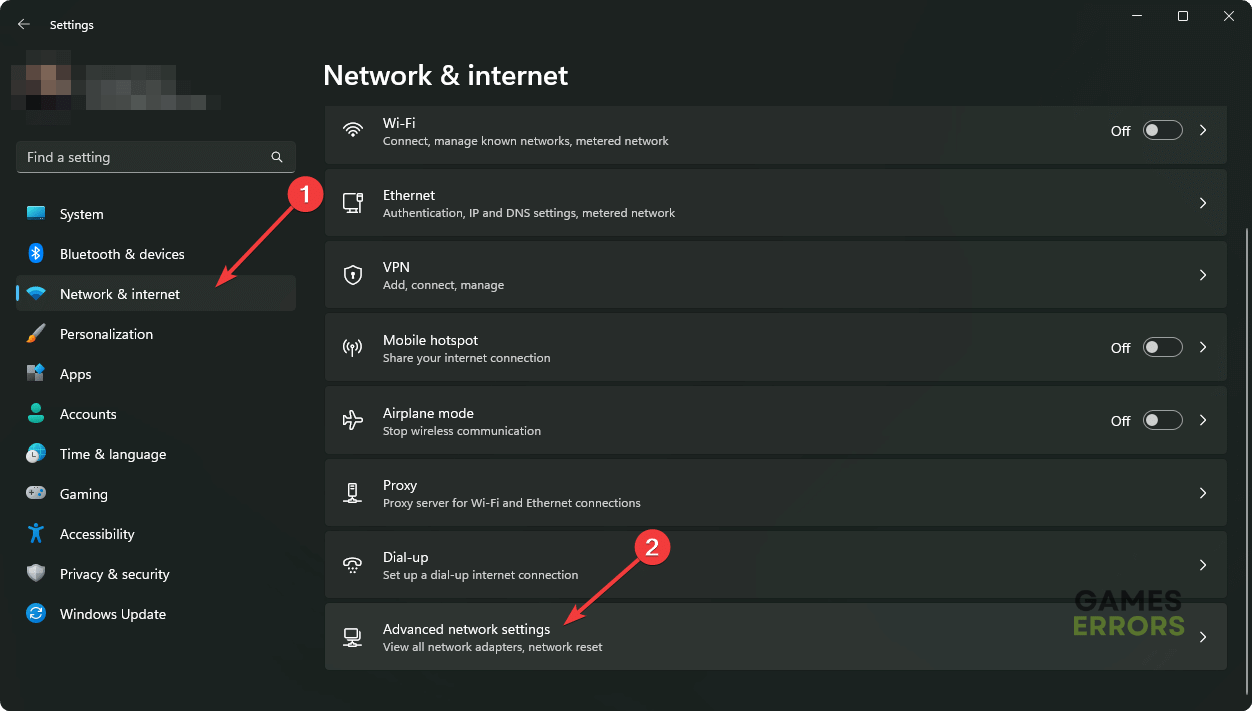
4. Reset the network
- Open Windows Settings like before.
- Go to the Network & Internet and then Advanced network settings.
- Click on Network Reset.
- Click on Reset next to the network reset.
- Restart Windows.

5. Run the internet troubleshooter
Time needed: 4 minutes
One of the most common reasons behind the error code Anteater is connection problems. Running the internet troubleshooter will fix this problem.
- In Windows Settings, go to System and click on Troubleshoot.
- Click on Other troubleshooters.
- Click on Run next to Internet Connections.
- Finish the troubleshooting process.
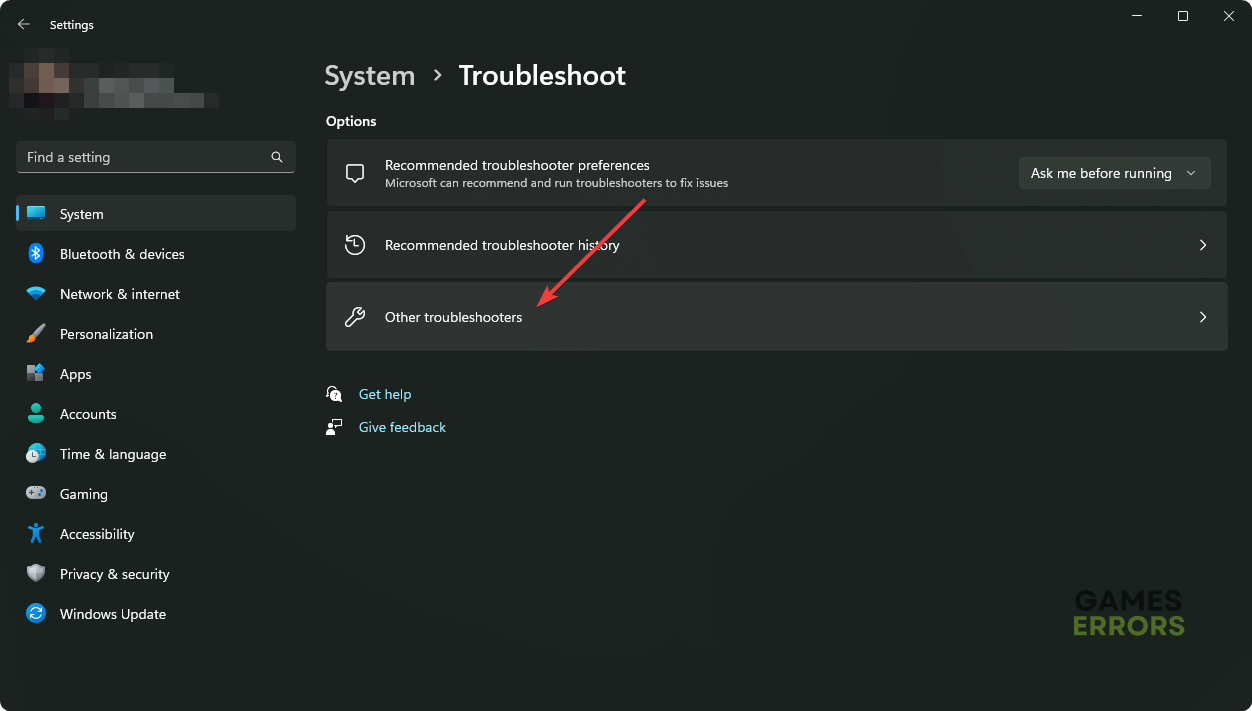
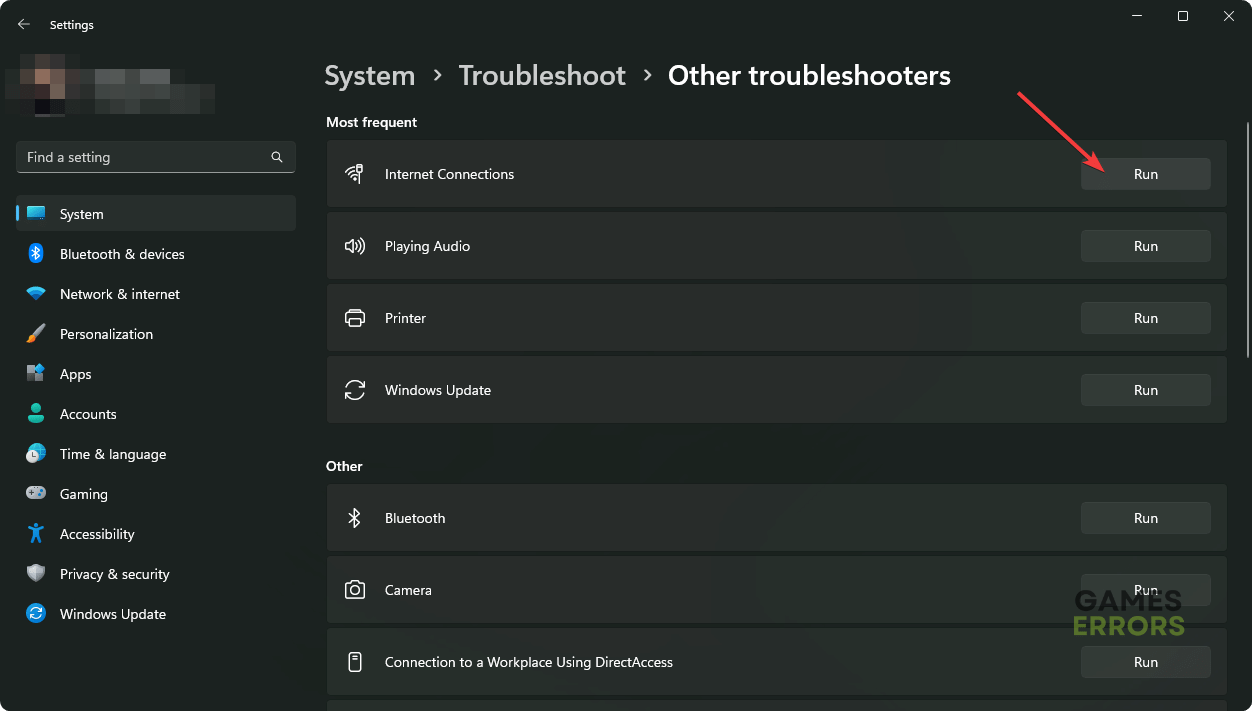
Now, try to play a multiplayer match in Destiny 2 and see if it has worked.
6. Clear cache
- Open the Steam app.
- Go to Steam Settings, as shown in the screenshot.

- Go to the Downloads tab and click on Clear Download Cache.
- Restart Steam.
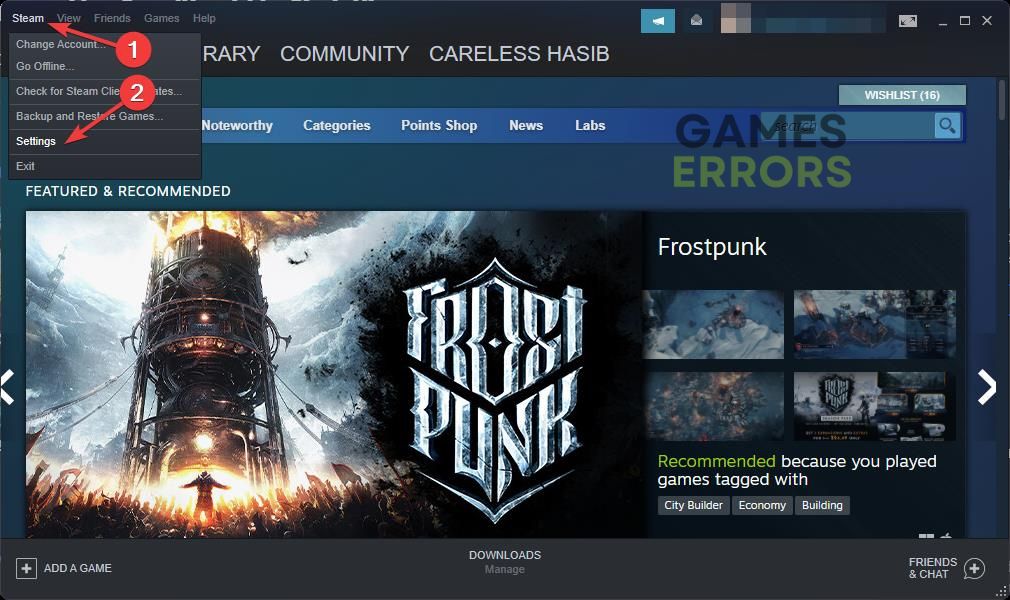

Now, try to play the Destiny 2 multiplayer again and see if it has fixed the error code Anteater.
If you use the Xbox app or Epic Games Launcher, you will have to clear the cache from there, too. If you don’t find the option, browse the local app data folder on Windows and locate the folder where temporary data are stored. Deleting that folder’s content will do the job.
Additional methods:
It’s possible that none of the above methods will work. In this case, you can consider trying these solutions:
- Disable or uninstall your Antivirus and firewall to see if it solves the problem.
- Update Windows to the latest version.
- Upgrade to a faster internet connection with low latency.
- You also can repair the game files or re-install Destiny 2 to see if it helps.
If you are interested, learn how to stop Destiny 2: Lightfall from crashing.
This article has explained how you can get rid of the Destiny 2 error code Anteater. If you have any questions, opinions, or suggestions, you can write them in the comment box.
If you encounter any issues or errors while playing your favorite games and require support, feel free to contact us here. Our team is always ready to assist you and ensure your gaming experience is seamless and enjoyable.

Hasibul Kabir is a Tech-Enthusiast Blogger, Web Developer & Hobbyist Game Developer. Writing about Technology, mainly Windows, Mac, iOS, etc., is his main focus, besides doing some computer science-related work.
He loves exploring new technology and presenting it with simple words to the audience. When not at work, Hasibul plays video games, explores nature, tastes delicious foods, or learns new things.

Чтобы исправить Destiny 2 Код ошибки Муравьед, вам нужно будет начать с выполнения ряда шагов по устранению неполадок. Первый шаг — перезапустить игру на консоли или ПК, а затем перезагрузить саму систему. Это простое исправление, которое иногда устраняет любые ошибки, с которыми вы сталкиваетесь, но не всегда работает.
Из-за этого вам нужно будет продолжить устранение неполадок, и следующим шагом будет попытка перезапуск вашего маршрутизатор. Перезагрузить маршрутизатор очень просто, просто отсоединив провод сзади.
Отсоединив провод, подождите несколько секунд, минуту или две и снова подключите его. После этого Error Code Anteater перестанет появляться в вашей игре. Но если это не так, вам нужно попробовать отключить любой VPN у тебя бег.
Короче говоря, VPN вызовет ошибку Anteater, поскольку она влияет на то, как ваша система подключается к игре, поэтому отключение VPN устранит ошибку. В
Код ошибки Destiny 2 Anteater — это общая ошибка сети, из-за которой игроки отключаются от игры. интернет-соединение является основной причиной, по которой игроки сталкиваются с ошибкой, но также могут возникнуть следующие проблемы:
- Управление кабелями
- Маршрутизаторы
- Нат
- Ограничения интернет-провайдера
- Wi-Fi соединение
- VPN
Дополнительные руководства по Destiny см. в разделе Кто такая Иммару в Destiny 2: Королева ведьм? и многое другое в Pro Game Guides.
Similar to most
errors that occur while playing Destiny 2 such as the error code weasel and
buffalo, the Destiny 2 error code anteater is also due to a faulty connection
between the server and the host.
According to Bungie, these errors are caused due to circumstances unassociated with the Bungie server such as the result of a problem with ISP, network hardware compliance issues, packet lost while playing the game, unstable connections, and Wi-Fi glitches.
Hence, the fault most likely is with your device and network. Making some small changes and configuration adjustments can get you back in the game.
Here is a list
of solutions to fix Destiny 2 error anteater.
1. Stop Using the Hotspot or Wi-Fi Connection
Any game that
requires you to transfer packets of data should be played over a wired connection.
If you are using a Wi-Fi or hotspot connection to play Destiny 2, we highly recommend
that you switch to a wired connection. A large number of errors that occur in
Destiny 2 are due to interruption in connection and the Wi-Fi is the primary
culprit. If you are serious about gaming and don’t want errors whether it’s for
Destiny 2, COD, or any other game, a wired connection is a must.
Many users who faced the error code were able to connect with the game and play it seamlessly once they shifted from Wi-Fi or hotspot connection to a wired internet connection. Try this as the first step for any error you encounter with the game.
2. Clear Cache
Another proved
method to resolve the Anteater error code is clearing the cache, this method
does not just fix this particular error but any other problem you might be facing
with the game. However, it’s only for Xbox users, so naturally, people playing
on PC or PlayStation can skip through this solution.
A word of
caution though, before you proceed with this method, ensure the game is synced
online and you have backed up the game as most of the data will be deleted from
your local system memory – the Xbox memory.
There are two ways to delete the cache from the Xbox and reset the memory.
Manual Reset
- Press the power button on the Xbox until the system powers down completely.
- Detach the power cord from the Xbox located at the back. Repeatedly press and hold the power button on the Xbox to drain the power. This clears the cache and formats the memory of the Xbox.
- Connect the power cord and wait for the Xbox to switch on, wait until the white light turns orange.
- At this point, turn the Xbox on as you would normally and open the game to see if you still face the Destiny 2 error code anteater.
Resetting Cache through Settings
- Navigate to the Xbox settings > Network > Advanced Settings.
- Go to Alternate Mac Address and select Clear option.
- Xbox will prompt the user if they want to continue. Give your command as affirmative and the Xbox will restart clearing the cache. Once done, open the game to check if you still encounter the Anteater error code.
3. Hard Reset PlayStation
Like Xbox, there
is no option to clear the cache in PlayStation; however, hard resetting the
PlayStation performs the same function. PlayStation users try this method to
fix the error code.
- Completely shut down the
PlayStation. - Remove the power cord from the
back and let the PlayStation sit for a few minutes until all processes are completely
shut down. - Put the power cord back to its
place and start the PlayStation normally. Check if the anteater error still
appears.
4. Contact Internet Service Provider
As Bungie recommend
that the error can be caused due to problem with the ISP, it’s always a good
idea to give them a call. Many times a particular game or website might be problematic
and the problem is with the Internet Service Provider. Request the ISP to run
tests to check you connection speed. Sometimes lowering the ping can also
eliminate this error. Make sure that everything is fine from the ISP end.
5. Replace Internet Cables and Equipment
More often than
not, the problem is with old internet cables or equipment. If you have not changed
the internet cable and other network equipment in years, it might be time you
do so. Even if you have a new cable installed, having a spare for test purposes
is recommended. Even a new cable can be faulty so check the cable and other
equipment for fault. A lot of users simply have a defective or leaking cable
that’s causing the Destiny 2 error code anteater as it disconnects just a
fraction of the second but enough to cause packet lapse and the error.
6. Check Firewall
For PC users, the
Firewall is a great antimalware software integrated in the OS to defend your
system against malicious software, but often it’s the cause of most problems. Sometimes,
the error can also be caused as the Windows Firewall is blocking Destiny 2. There
is two things you can try, one a little less risky than the other. Try adding
Destiny 2 to the Windows exception list. You can follow the same steps we have
highlighted in this blog to add
Chrome to the exception list of Windows Firewall.
The other method
is to simply turn off the Windows Defender and try playing the game. If it
works, the problem is with the Windows Defender.
If Windows
Defender is causing the Destiny 2 error code Anteater, then you must add the
game in the exception list of Windows Defender because turning off the Defender
is not a long-term fix as it may put your system under risk.
If the issue is
still not fixed, you might have some files missing from the game and a
reinstallation of the game can fix the problem. There are various software available
online that can scan your repository for corrupt and missing file, try one of
these software such as Reimage Repair Tool. We do not specifically recommend
this particular software, it’s just a suggestion! You can find a better
alternative.
Check out:
- FIX: Destiny 2 Error Code Buffalo
- Destiny 2 Error Code Weasel Fix