Looking for a solution to the DaVinci Resolve won’t open problem? No matter if your Resolve is not responding at all or gets stuck at the loading screen, you can try the following methods to fix the problem immediately.
Try these fixes
- End the Resolve process
- Unplug USB devices
- Launch DaVinci Resolve in Compatibility mode
- Update the graphics driver
- Increase the Virtual Memory
- Enable IGPU Multi-Monitor in BIOS
- Uninstall your antivirus software
- Allow TCP Network Port Access
- Reinstall DaVinci Resolve
Fix 1. End the Resolve process
The first thing you should try is to end the DaVinci Resolve process in the Task Manager. Here’s how:
1) Press Ctrl + Shift + Delete to open Task Manager.
2) Locate any process that is related to Revolve.
3) Right-click on it, and select End task.
Now you have forced shut down your Davinci Resolve. Launch the program again and you will be able to open it without any problems.
No luck? Don’t worry. We have a few more fixes for you.
Fix 2. Unplug USB devices
According to what many Resolve users have suggested, USB devices can cause your Resolve to not open so you can unplug these devices to check if your Resolve works again.
Resolve will act up especially if you’re using a USB headset as the audio output device. Once you have removed the USB device from your PC, launch your Revolve again.
Fix 3. Launch DaVinci Resolve in Compatibility mode
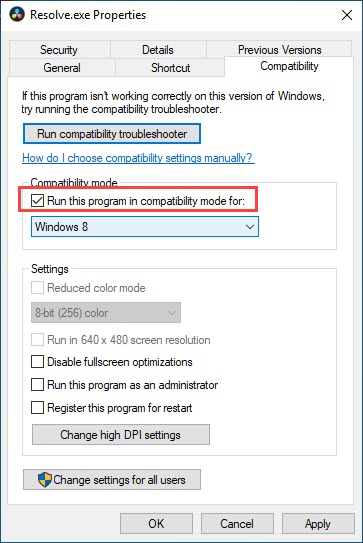
Still can’t launch your Resolve? It might be caused by some incompatibility issues, which can be solved by running Resolve in compatibility mode.
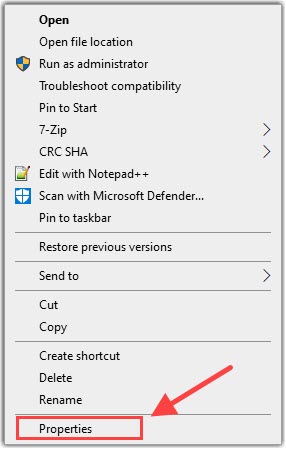
- Right-click on the Resolve shortcut or the executable file in the installation folder, and select Properties.
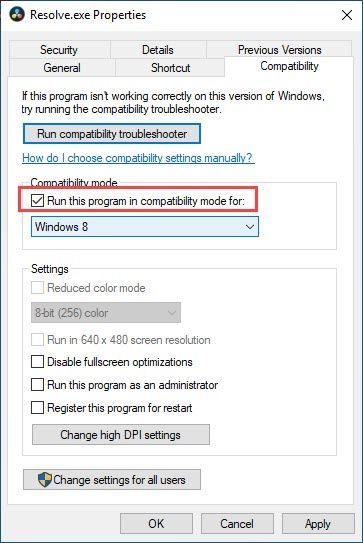
- Go to the Compatibility tab, and check the Run this program in compatibility for Windows 8 or Windows 7.
- Click Apply > OK to save the changes.
Now you can run Resolve to test the issue. If DaVinci Resolve is still not responding, you can head on to the next fix below.
Fix 4. Update the graphics driver
Editing videos with this DaVinci Resolve is very GPU-extensive, so it is mandatory to keep the GPU drivers updated (and sometimes your audio drivers, too).
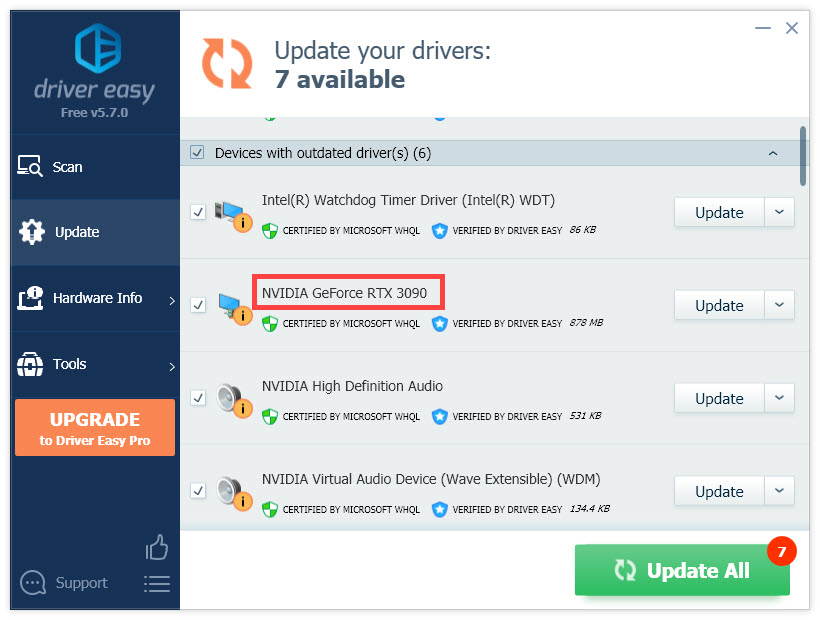
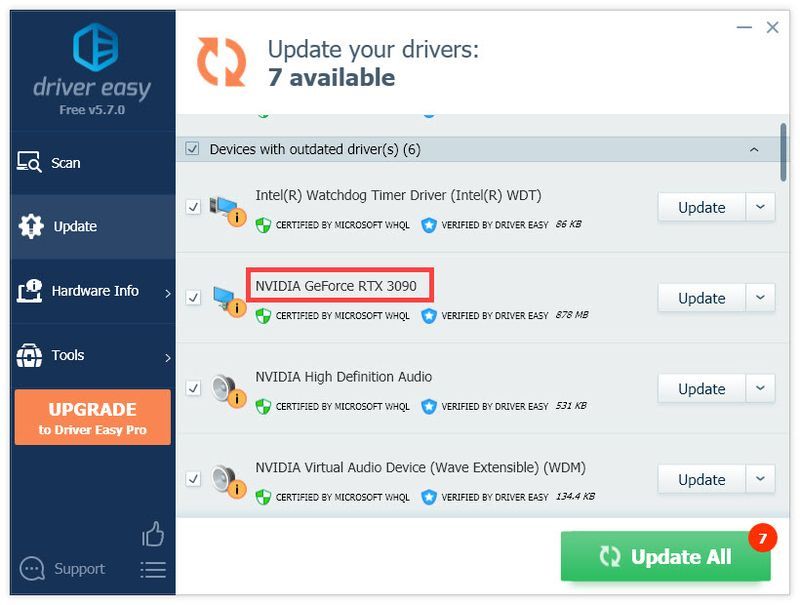
You can update your graphics driver manually, by visiting the manufacturer’s website (NVIDIA/AMD), finding the latest correct installer and installing step-by-step. But if you don’t have the time or patience to install manually, you can do that automatically with Driver Easy.
Driver Easy will automatically recognize your system and find the correct drivers for your exact graphics cards, and your Windows version, and it will download and install them correctly:
- Download and install Driver Easy.
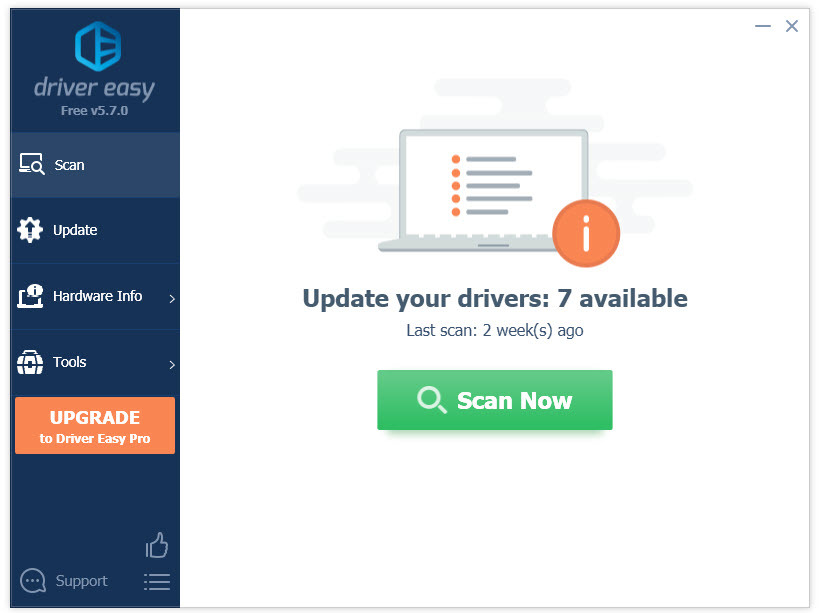
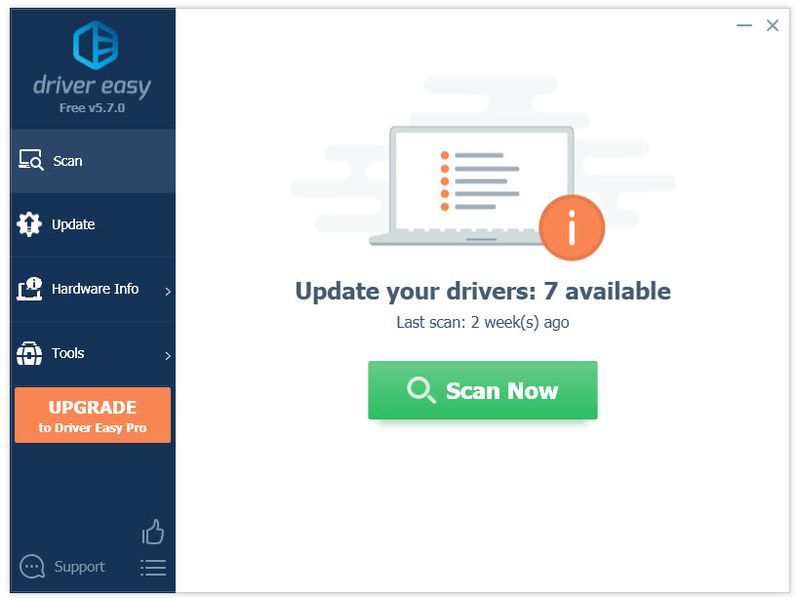
- Run Driver Easy and click Scan Now. Driver Easy will then scan your computer and detect any problem drivers.
- Click Update All to automatically download and install the correct version of all the drivers that are missing or out of date on your system. (This requires the Pro version – you’ll be prompted to upgrade when you click Update All. If you don’t want to pay for the Pro version, you can still download and install all the drivers you need with the free version; you just have to download them one at a time, and manually install them, the normal Windows way.)
The Pro version of Driver Easy comes with full technical support.
If you need assistance, please contact Driver Easy’s support team at support@drivereasy.com.
After updating your drivers, restart your PC and launch your Resolve to check if the issue has been resolved.
Fix 5. Increase the Virtual Memory
If your system is low on virtual memory, Windows increases the size of your virtual memory paging file. During this process, memory requests for some applications may be denied, e.g your DaVinci Resolve. To alleviate this, you can manually increase the size of your paging file.
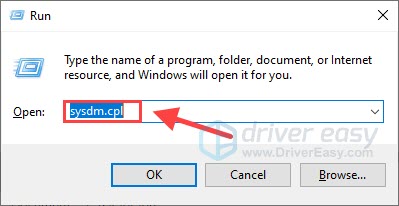
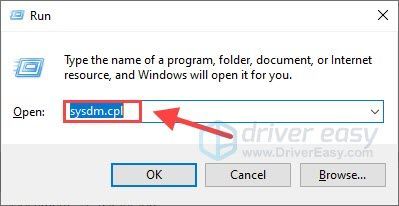
- On your keyboard, press the Windows logo key + R key at the same time, and enter sysdm.cpl to open system settings.
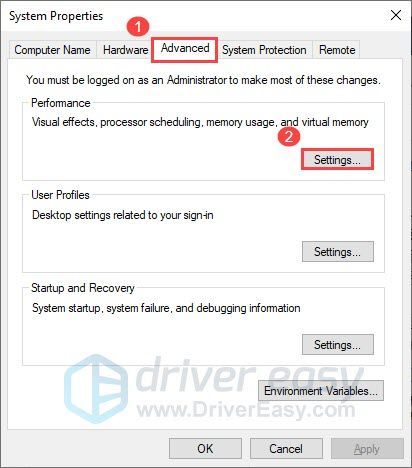
- Go to the Advanced tab and select Settings under Performance.
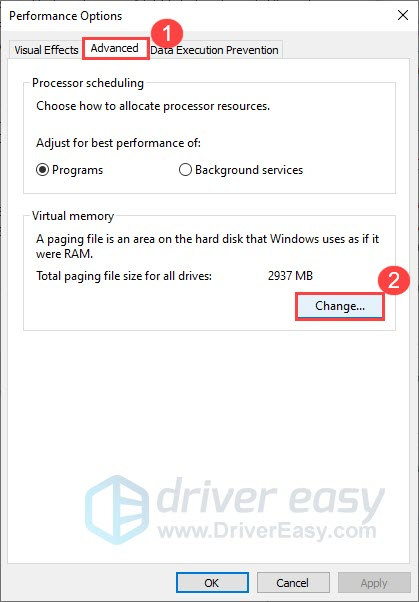
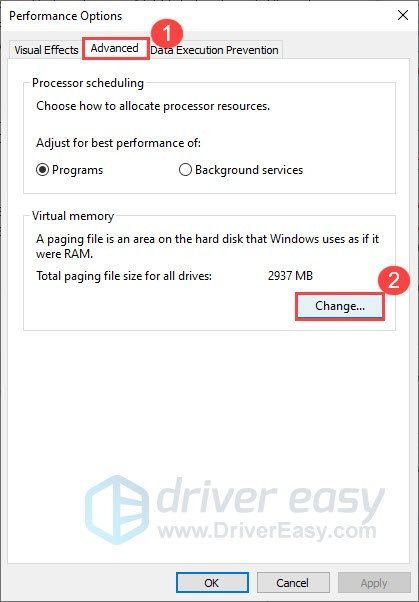
- Once the Performance Options window is open, go to the Advanced tab and select Change.
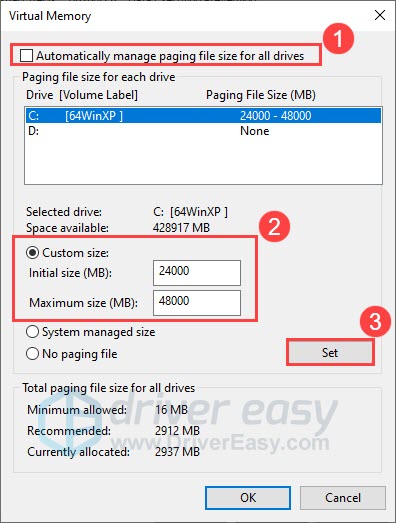
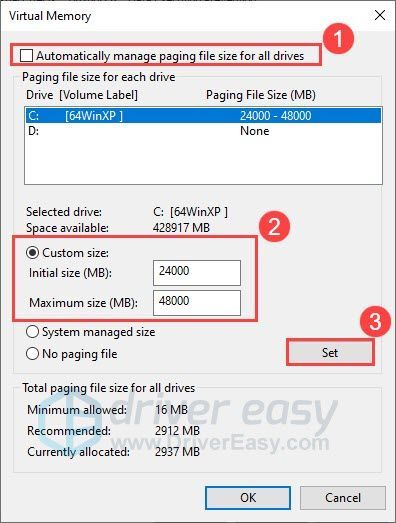
- Uncheck the Automatically manage paging file size for all drives. Then select Custom size, and enter the value accordingly.
Note: It’s recommended to use a number that’s one and a half times the total available memory for the “Initial size” and three times of available memory for the “Maximum size” when possible. (For example, my installed RAM is 16GB, so I set the initial size to 24,000, maximum size to 48,000). If you don’t know your installed RAM, you can press the Windows key + Pause to check your device specifications. - Click OK to confirm the change.
Restart your computer for the changes to take effect, and try opening your DaVinci Resolve to check if it launches successfully.
Fix 6. Enable IGPU Multi-Monitor in BIOS
It’s reported by many users that the IGPU Multi-Monitor feature can affect the use of DaVinci Resolve, thus causing Resolve to not open. To enable this feature, you should restart your PC and enter BIOS.
| Brand | BIOS Key |
|---|---|
| HP | F9 or Esc |
| Dell | F12 |
| Acer | F12 |
| Lenovo | F12 |
| Asus | Esc |
| Samsung | F12 |
| Sony | Esc |
| Microsoft Surface Pro | Volume Down Button |
- Restart your computer and keep pressing the setup key (shown above) as soon as you see the manufacturer’s logo on the screen to enter the BIOS settings.
- Under the Advanced Settings, you will see the IGPU Multi-Monitor Option.
- Switch this feature from Disabled to Enabled.
- Save and exit the BIOS.
Fix 7. Uninstall your antivirus software
Antivirus software is known to interfere with many programs, and if you’re experiencing issues with Resolve after installing third-party antivirus software, you might need to uninstall them because disabling them is not enough to prevent them from running in the background.
In the meantime, you should disable VPN services, such as NordVPN, ExpressVPN.
If DaVinci Resolve won’t launch after removing your antivirus software and disabling your VPN, you can try the next fix below.
Fix 8. Allow TCP Network Port Access
Another reason why your DaVinci Resolve is not responding is that it lacks access to your TCP ports, which is necessary for your DaVinci Resolve to launch successfully.
Here’s how to troubleshoot this issue quickly:
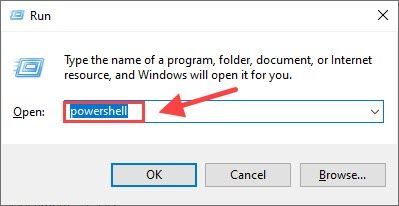
- On your keyboard, press the Windows + R key at the same time, and enter powershell.
- Enter the following command line:
Get-NetTCPConnection | Where-Object { $_.State -eq “Listen” -and $_.LocalPort -eq 1144 } | ForEach-Object { (get-process -id $_.OwningProcess).Description } - If nothing pops up in the next entry, there’s nothing wrong with your TCP network. But if it does, you might need to contact the Blackmagic Design support team with your log file.
- Navigate to C:\Program Files\Blackmagic Design\DaVinci Resolve.
- Double click on the CaptureLogs.bat file (or right-click and then run as administrator).
- It will generate a log file to your desktop – DaVinci-Resolve-logs-<current time>.zip.
Fix 9. Reinstall DaVinci Resolve
If none of the fixes above solved your Resolve not opening issue, you can clean reinstall your program and delete all files ( C:\Program Files\Blackmagic Design\DaVinci Resolve) left behind.
Did this post help you get rid of the problem? Feel free to drop us a line if you have any questions or suggestions.
9
9 people found this helpful
DaVinci Resolve won’t open due to the interference of: integrated graphics driver, installing DaVinci Resolve Control Panel without the hardware, incompatible graphics driver, USB devices, or corrupt Preferences folder.
To fix the Resolve not opening issue: disable the integrated graphics driver and make the GPU default, uninstall the Resolve Control Panel, update the graphics driver, remove corrupted folders, and do a clean re-install.
If nothing works, then there is a foolproof method that helps you solve – after debugging all the steps. (More on that later).
Beginners and especially, new users of Resolve, face Resolve not opening issue in Windows 11, 10, Mac, and Linux (laptop or desktop).
Let’s explore the fixes, that ACTUALLY work in 2023 for Resolve versions 18.5, 18, 17, etc., in detail = step-by-step with pictures.
- Fix 1: Disable the default Integrated Graphics Driver
- Fix 2: Uninstall DaVinci Control Panels
- Fix 3: Update Your Graphics Driver
- Fix 4: Rename the Corrupted Preferences Folder
- Fix 5: Uninstall Resolve and Do a Clean Install
- Uninstall Resolve
- Delete Left-Over Folders after Un-Installing Resolve
- Re-Install Resolve
- Where to Install DaVinci Resolve?
- Fix 6: Killing the Process in Task Manager
- Fix 7: Run Program Compatibility Troubleshooter
- Debug using Window’s “Reliability Monitor” tool
- Few Troubleshooting Steps to Make DaVinci Resolve Open
- #1. Remove USB Peripherals and Launch Resolve
- #2. Uninstall 3rd Party Software
- #3. Disable VPN and then Launch Resolve
- #4. Remove OFX Plugins
- #5. Temporarily Disable Firewall
- The Last Step – Getting Help from BlackMagic Design Support Staff
- How to Generate DaVinci Resolve Logs Zip file?
- How to Generate System Information .nfo file?
Fix 1: Disable the default Integrated Graphics Driver
Resolve requires a discrete GPU, which is one of the minimum system requirements.
For some reason, Resolve might find it difficult to recognize your discrete GPU. If this is the case then,
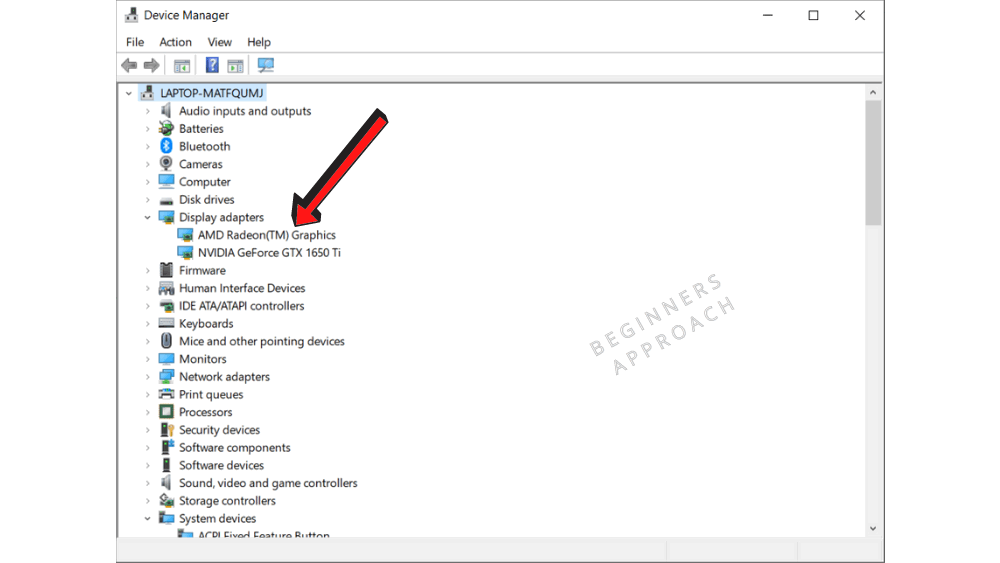
- Go to “Control Panel” > click on “Device Manager“.
- Click on “Display Adapters“.
- Right Click on your Integrated Graphics (in this case, AMD Radeon(TM) Graphics) and disable the driver.
- This will force Resolve to use your GPU (Nvidia GeForce GTX 1650 Ti).
Next time when you launch Resolve, it should use your GPU and successfully open.
Fix 2: Uninstall DaVinci Control Panels
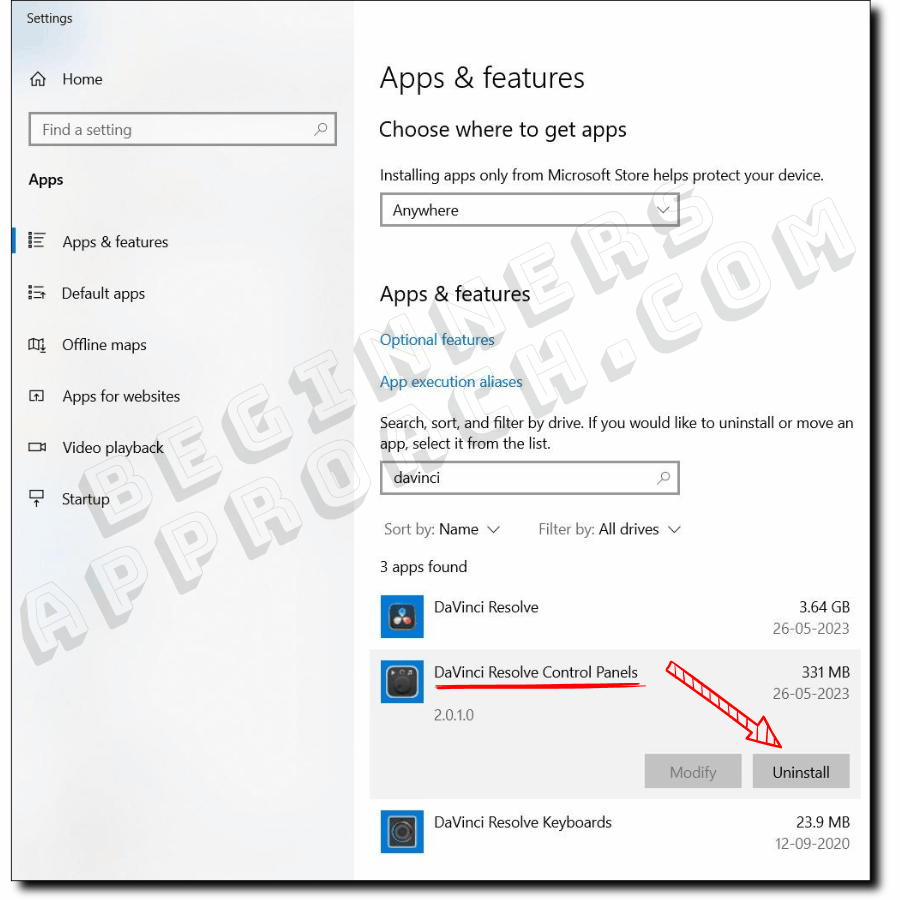
Sometimes, when you install Resolve, you might forget to uncheck the “Control Panels” option from the installer. A control panel is a hardware device. So naturally, when you launch Resolve, it will look for the control panel device which doesn’t exist – and because of this, Resolve won’t open.
- Click on the Windows start button.
- Type “Apps and Features” and click on it.
- Click “DaVinci Resolve Control Panel”.
- Click “Uninstall”.
- Now Resolve should open successfully.
Related Article:
(How to Troubleshoot): DaVinci Resolve Keeps Crashing
Fix 3: Update Your Graphics Driver
If you’ve Nvidia or AMD GPU, then update the required GPU driver to the latest version.
Especially Nvidia GPU users face this issue of Resolve not opening.
Update your video driver to the Nvidia Studio version (try to avoid the Gaming version).
Navigate to the Nvidia Official website and select your GPU from the list and download it.
While installing the driver, try to select “Custom Install” > “Clean Install”.
If you’re using the integrated Intel graphics and are not able to launch Resolve due to Intel Hardware acceleration issue, then I highly recommend the below detailed guide:
FIX DaVinci Resolve Intel Hardware Acceleration Issue
Fix 4: Rename the Corrupted Preferences Folder
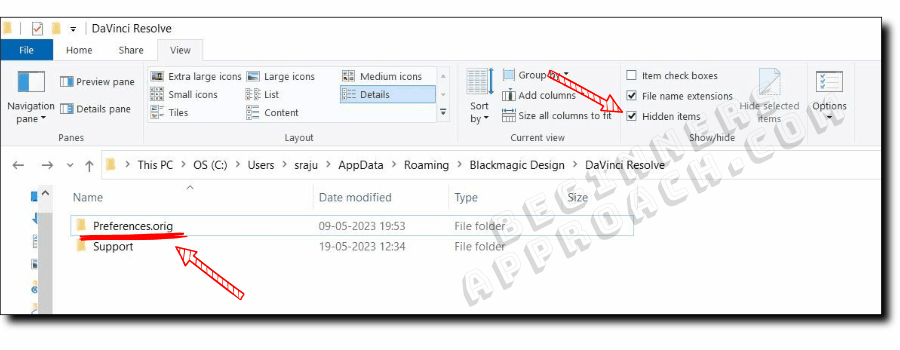
Sometimes your corrupted “Preferences” folder could stop Resolve from opening. Here’s how to fix it:
- Open Windows Explorer (press Windows key and “e”).
- Click on the “View” tab.
- Enable “Hidden Items” and “File Name Extensions”.
- Go to – “C:\Users\<your user name>/AppData\Roaming\Blackmagic Design\DaVinci Resolve”
- Rename the “Preferences” folder to “Preferences.orig” or “Preferences.bad”.
- Now launch Resolve and it should open.
- Update your preferences inside Resolve (because renaming the “Preferences” folder will remove your saved preferences).
Related Article:
Most Common DaVinci Resolve GPU Issues (& How to Fix Them)
Fix 5: Uninstall Resolve and Do a Clean Install
Sometimes, uninstalling and re-installing will launch Resolve with no issues.
Uninstall Resolve
- Go to “Control Panel” > “Programs and Features“.
- Right-click on “DaVinci Resolve” and click on “Uninstall“.
The above step should completely remove Resolve from your system. Problems might occur when the un-installation leaves back few folders and files.
The folders and files live in:
- Program Files
- ProgramData
- AppData
Delete Left-Over Folders after Un-Installing Resolve
- Navigate to “C:\Program Files\Blackmagic Design“. It should be empty. If not, delete the folders (usually the folder might be named “DaVinci Resolve” which you must delete).
- Navigate to “C:\ProgramData\Blackmagic Design” -> delete the folder named “DaVinci Resolve“
- Navigate to “C:\Users\<username>\AppData\Roaming\Blackmagic Design” and delete the “DaVinci Resolve” folder.
Now Resolve should be completely removed from your system.
Re-Install Resolve
- Double click on your required Resolve version (use run as admin if required).
- Uncheck other options like “DaVinci Control Panels” and check only “Davinci Resolve <version no.>
- Click Install and proceed till you finish the installation process.
- Now launch DaVinci Resolve.
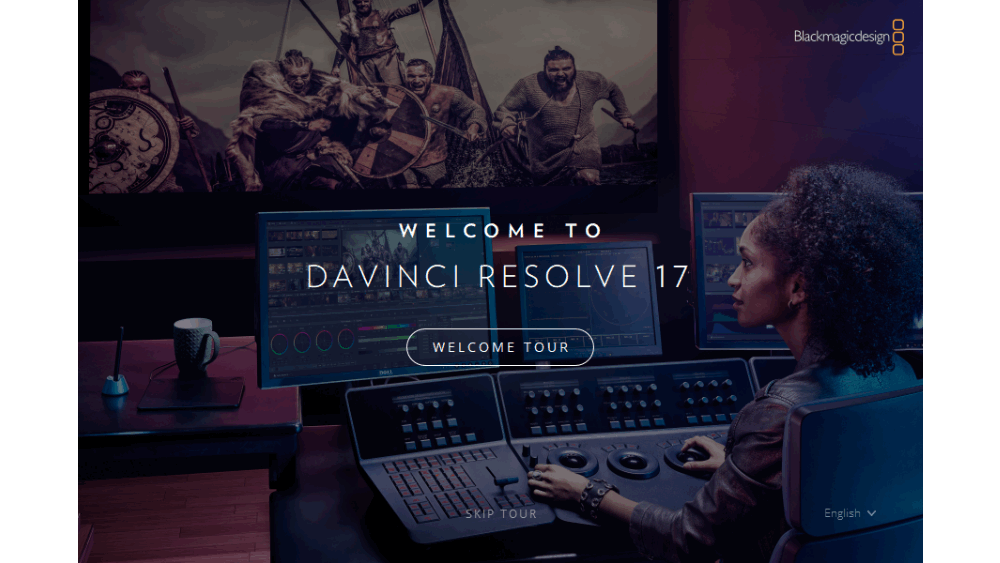
- The application will display “Welcome Tour” which means Resolve has been cleanly installed.
- You can click on “Skip Tour” and skip till you see the splash screen.
- Then Resolve should successfully open.
Where to Install DaVinci Resolve?
DaVinci Resolve should be installed in your system drive, which most probably should be “C:\“.
Do not install in a drive other than the system drive. If you have installed it in another drive, then uninstall it and do a clean install in your system drive.
Fix 6: Killing the Process in Task Manager
After launching Resolve, you see a tiny blue circle loading next to your cursor, which then disappears soon. Resolve never starts.
If this is your case, then:
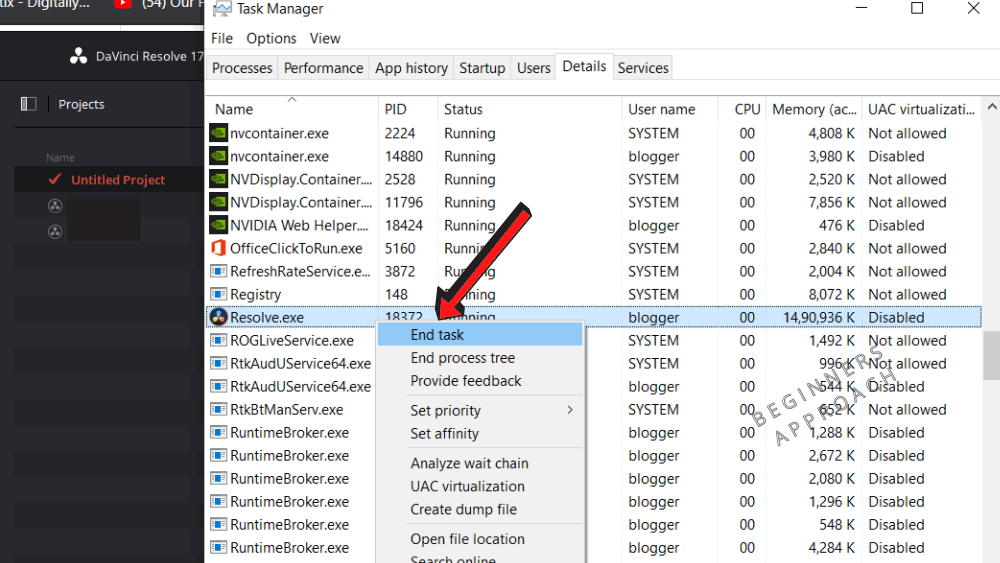
- Open Task Manager.
- Go to the “Details” tab.
- Locate “Resolve.exe”.
- Right-click and click on “End Task”.
- Launch Resolve now, and it should open.
Fix 7: Run Program Compatibility Troubleshooter
Sometimes, Resolve might have compatibility issues with Windows.
To resolve this:
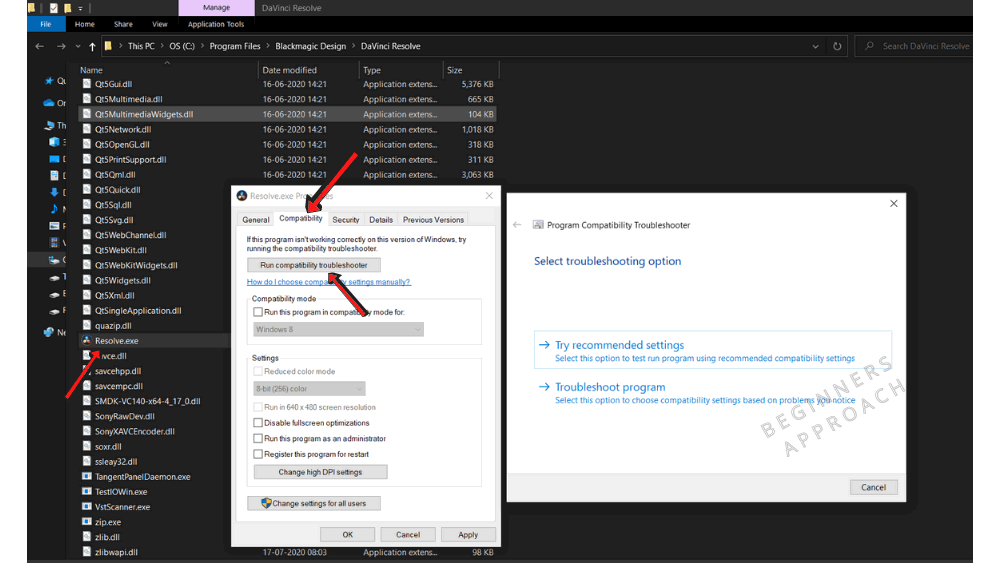
- Navigate to where Resolve is installed in your system = “C:\Program Files\Blackmagic Design\DaVinci Resolve“.
- Locate “Resolve.exe” and right-click on it. (Keep in mind – you should locate the original .exe and not the “DaVinci Resolve” shortcut)
- Click on the tab “Compatibility“.
- Click on “Run compatibility troubleshooter“.
- Under “Select troubleshooting option”, click on “Try recommended settings“.
- In the next window, click on “Test the program“.
- Windows will try to launch the application.
- If Resolve opens up successfully, then click on “Next”, then click on “Yes, save these settings for the program“.
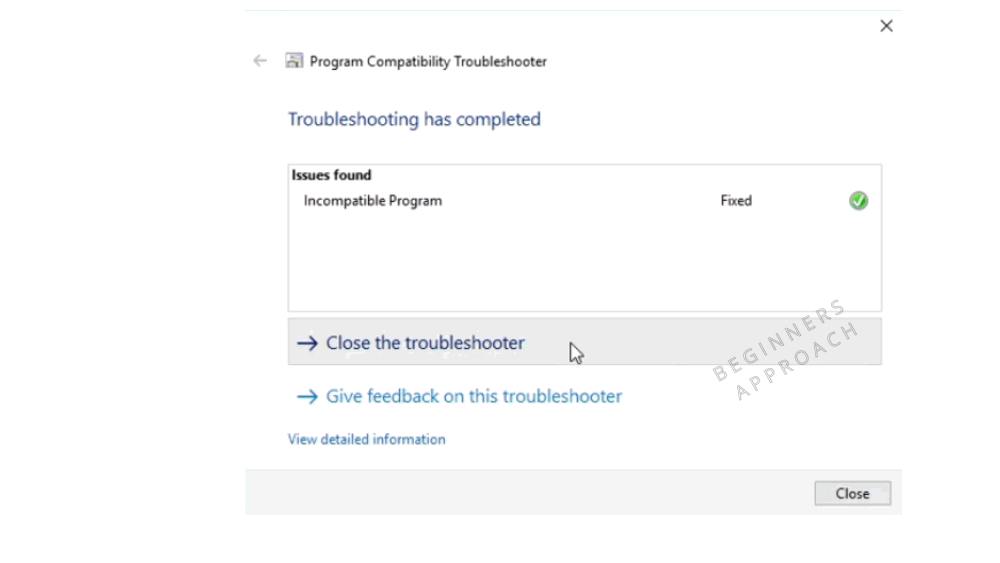
- The next window “Troubleshooting has completed” will be displayed. Then click on “Close the troubleshooter“.
- Next time when you launch Resolve, Windows will remember the settings and successfully start the program.
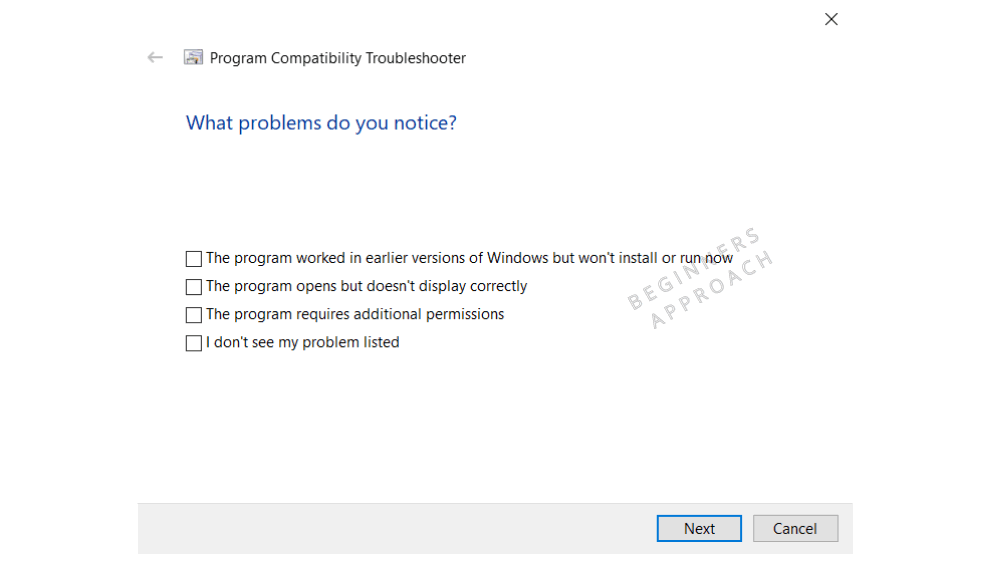
If “Try recommended settings” doesn’t work, then click on “Troubleshoot program“. You’ll get the below window.
Try the options one by one or whichever applies to you and then test the program.
If the above 2 options don’t work, then
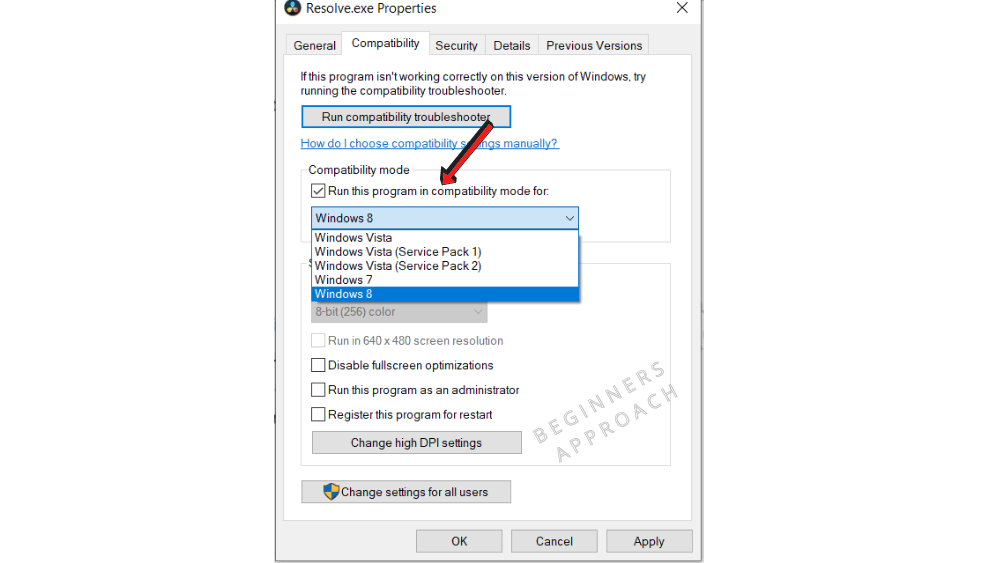
- Right-click on “Resolve.exe”, and click on the “Compatibility” tab.
- Under “Compatibility mode”, check “Run this program in compatibility mode for:“.
- Select the required OS. Give Ok and see if this solves the issue.
The above methods should resolve any compatibility issues.
Debug using Window’s “Reliability Monitor” tool
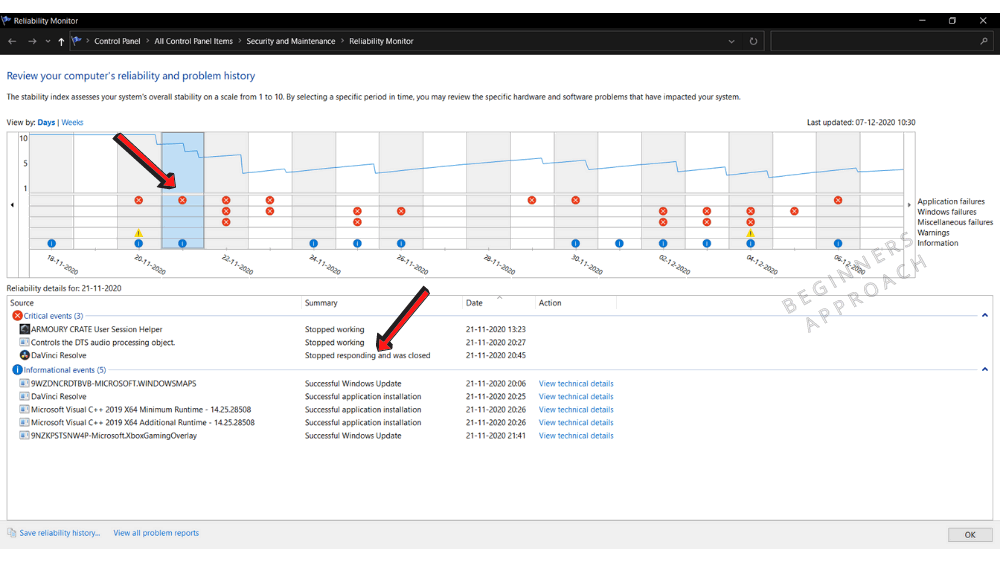
“Reliability Monitor” captures and tracks critical events like application failures, Windows failures, etc,.
In short, it displays a history of events that will tell you the “Source” and “Summary“, along with the date.
If your Resolve launched perfectly previously and then for some reason refuses to start now, then using “Reliability Monitor”, you could see what has happened to your computer at a particular period.
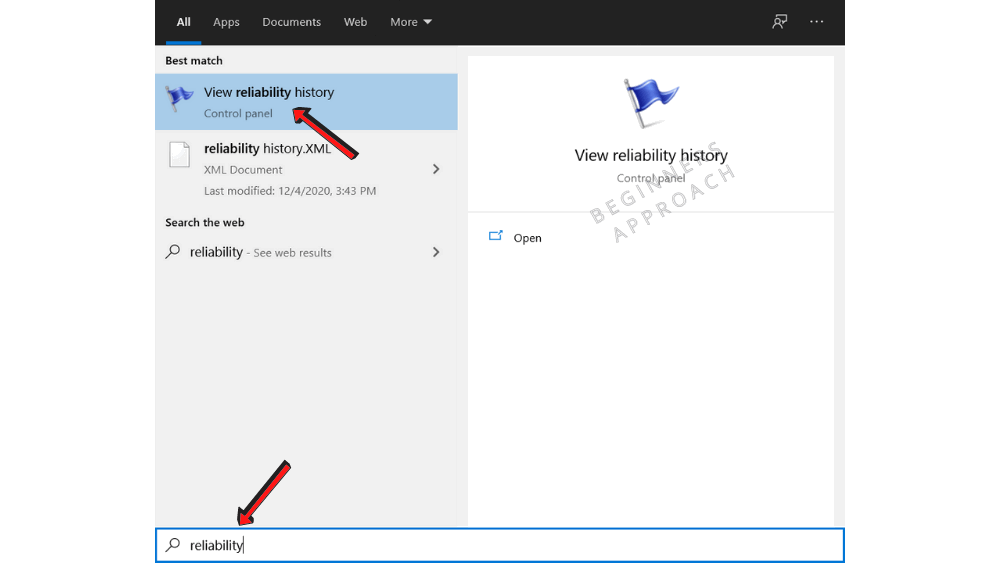
(To launch “Reliability Monitor“, click on Windows Start and Type “Reliability”. Click on “View Reliability History“.)
For example, consider the below image.
On Nov 21, my Resolve stopped responding and closed itself. I would go through other critical events on the same day and prior to see what could have caused Resolve to close itself.
For your case, if Resolve opened on a particular day and now refuses to start, then go through the critical events and informational events on those days to determine the root cause.
If you find any software that was installed recently, then uninstall the same and then try to launch Resolve.
Sometimes software like iCue could interfere with the launch of Resolve (but not for everyone).
If you’re still facing issues opening Resolve, then follow the below steps:
Few Troubleshooting Steps to Make DaVinci Resolve Open
#1. Remove USB Peripherals and Launch Resolve
Keeping the standard wired USB mouse and keyboard connected, remove other USB devices (like USB Webcam or wireless headphones USB) or BlueTooth peripheral devices, printers, etc, and then launch Resolve.
If Resolve opens (that’s good news) and then again close it.
Connect your other peripheral devices one by one and launch Resolve. You might zero in on the one device that might cause an issue.
Once you find the root cause, you will find a solution for yourself.
#2. Uninstall 3rd Party Software
If you’ve recently installed any anti-virus (or anti-malware), try to uninstall it and then launch Resolve.
Sometimes anti-virus software is known to interfere during Resolve start-up.
#3. Disable VPN and then Launch Resolve
Go to “Task Manager” and “End Task” your VPN like NordVPN, ExpressVPN, etc, (if you’ve any).
Then try to launch Resolve. Many of the users have benefitted from this step.
#4. Remove OFX Plugins
Many users install OFX plugins like FilmConvert, RedGiant, iZotope, etc,.
Sometimes they are known to interfere with Resolve start-up.
For example, if you have the FilmConvert Pro OFX plugin installed then,
- Navigate to “C:\Program Files\Common Files\OFX\Plugins\FilmConvertPro2.0.ofx.bundle” in Windows or “/Library/OFX/Plugins/FilmConvertPro2.0.ofx.bundle” in MacOS X.
- Delete the folder.
- Then launch Resolve.
- Do the same for other OFX plugins as well. (The idea is to remove all the plugins and put them back one by one to see which causes the issue).
#5. Temporarily Disable Firewall
- Turn off the internet.
- Temporarily disable the firewall by navigating to “Windows Start -> Settings -> Update and Security -> Windows Security -> Firewall and Network Connection”.
- Turn Off the networks.
- Now try to launch Resolve.
- If Resolve launches successfully, then you might have to add an exception.
(Note the above steps should be done at your own risk. Research thoroughly before adding rules or exceptions).
The Last Step – Getting Help from BlackMagic Design Support Staff
If none of the above steps work, then it’s time to generate the below files and share them with the support staff for debug:
- DaVinci-Resolve-logs-<current time>.zip
- System Information file with “.nfo” extension.
How to Generate DaVinci Resolve Logs Zip file?
- Navigate to “C:\Program Files\Blackmagic Design\DaVinci Resolve“.
- Double-click on the “CaptureLogs.bat” file (or right-click and then run as administrator).
- It will generate a log file to your desktop – “DaVinci-Resolve-logs-<current time>.zip”.
How to Generate System Information .nfo file?
- Click on Windows Start.
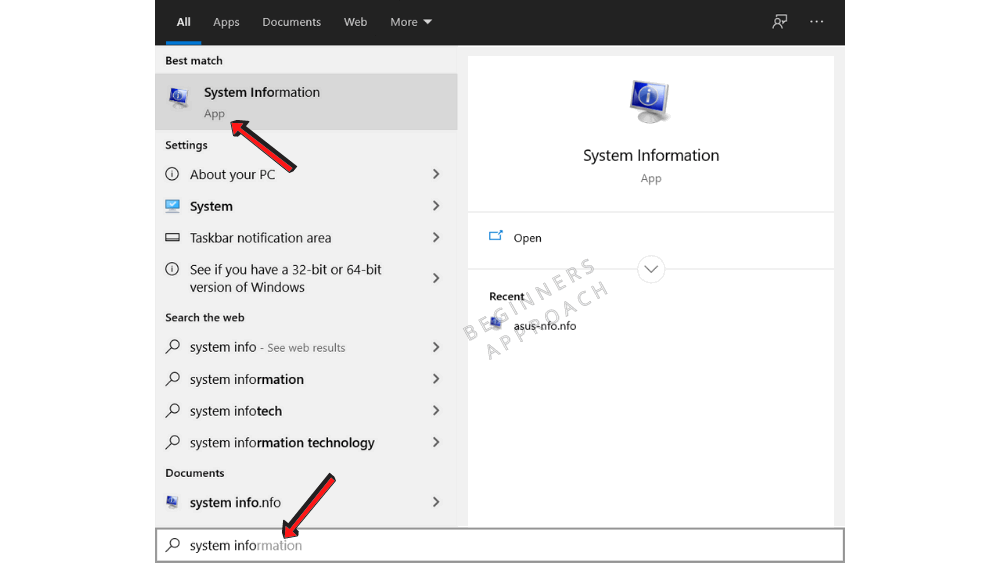
- Type “System Information” and click on the app “System Information“.
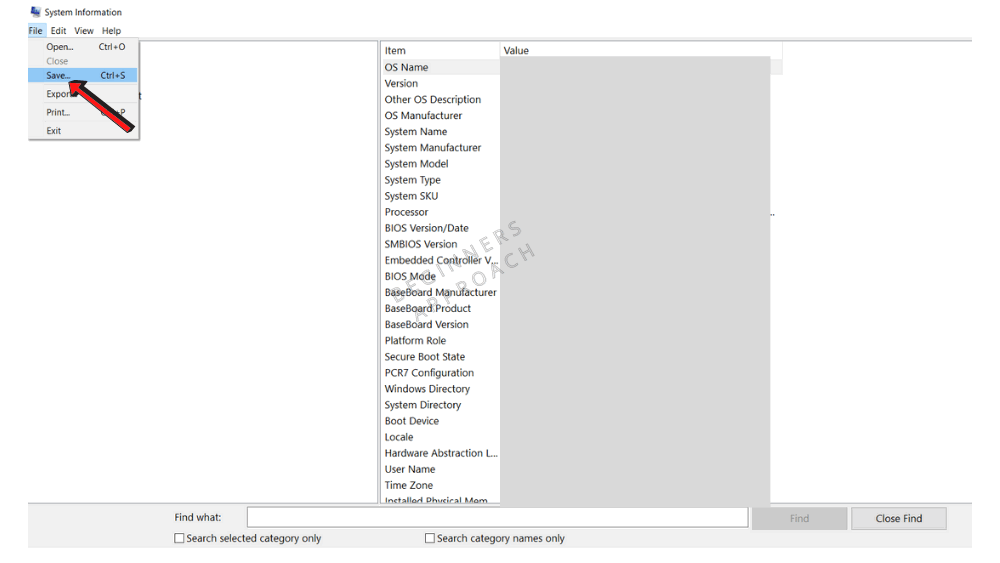
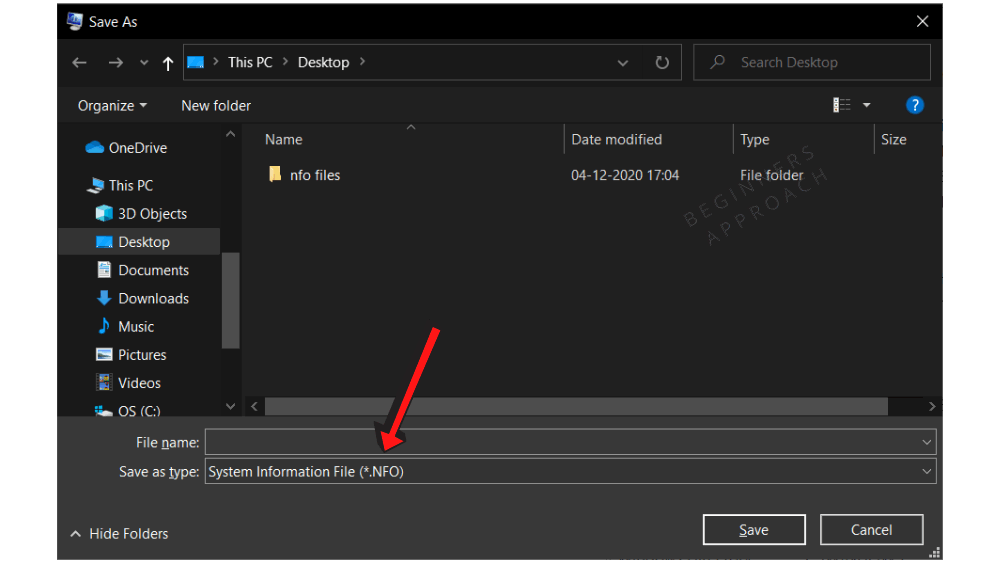
- Click on “File” > “Save”.
Enter filename and save it. It will be saved with extension “.NFO“.
Now head over to the BlackMagic Design forum, find the correct topic, and then post your question.
You may also find the below posts helpful:
- Tips to Save Your Precious Work in DaVinci Resolve (IMPORTANT!)
- How to Make DaVinci Resolve Use GPU (Helpful Tips!)
DaVinci Resolve — это программное обеспечение для цветокоррекции, видеомонтажа и звукозаписи, которое широко используется в кино- и телевизионной индустрии. Однако, иногда пользователи могут столкнуться с проблемой, когда DaVinci Resolve не запускается. В данной статье мы рассмотрим причины этой проблемы и предложим способы ее устранения.
Причины проблемы
-
Обновления системы
Если Вы обновили операционную систему, то возможно, что новые обновления несовместимы с устанавливаемым DaVinci Resolve. -
Несовместимость компонентов
Иногда возникают проблемы при установке DaVinci Resolve, когда несовместимы некоторые компоненты системы (например, видеокарта или драйверы). -
Ошибки при установке
Если при установке DaVinci Resolve произошли ошибки, то это может привести к неработоспособности программы. -
Недостаточная оперативная память
При работе с большими файлами необходимо иметь достаточное количество оперативной памяти. Если такой памяти недостаточно, то DaVinci Resolve может не запуститься.
Способы устранения проблемы
-
Проверьте наличие обновлений
Проверьте наличие обновлений операционной системы и установленного DaVinci Resolve. Если обновления доступны, то обновите систему и программу. -
Проверьте наличие необходимых компонентов
Убедитесь, что все компоненты Вашей системы (видеокарта, драйверы и т.д.) совместимы с DaVinci Resolve. Если необходимо, установите последние версии драйверов и обновите видеокарту. -
Переустановите DaVinci Resolve
Если при установке программы возникли ошибки, то попробуйте переустановить ее. Для этого необходимо удалить текущую версию DaVinci Resolve и установить новую. -
Добавьте оперативную память
Если у Вас недостаточно оперативной памяти, то добавьте ее. Это поможет Вашей системе более эффективно работать с большими файлами.
В заключение, стоит отметить, что проблема с неработоспособностью DaVinci Resolve может вызывать разный набор причин, поэтому необходимо тщательно проанализировать и исправить каждую из них. Если же Вас не устраивает производительность Вашей системы, рекомендуется обратиться к специалистам для дополнительной настройки и оптимизации работы.
Today we are going to solve the “Unable to Initialize GPU” error in DaVinci Resolve.
The “Unable to Initialize GPU” error in DaVinci Resolve, put in simple words, means; Resolve is unable to connect to your graphics card. To fix this you need to find a way of restoring the connection or removing the factor causing the disconnection.
Luckily for you, we have found the solutions that seem to fix the problem for most people!
Click the link to go directly to a specific solution:
- Change DaVinci Resolve’s Graphic Preferences
- Is the Monitor Connected to the Correct Port?
- Turn Off Battery Saving on Laptop
- Update Graphic Cards’ Drivers
- Install an Older Version of Resolve
I’ve also made a video explaining the solutions below:
1. Change DaVinci Resolve’s Graphic Preferences
- Right-click on the “Start” button in the taskbar, and search for “Settings.”

- Open “Settings” from the results. Select “Display” under the “System” sub-menu and then select “Graphics” after scrolling down a bit.
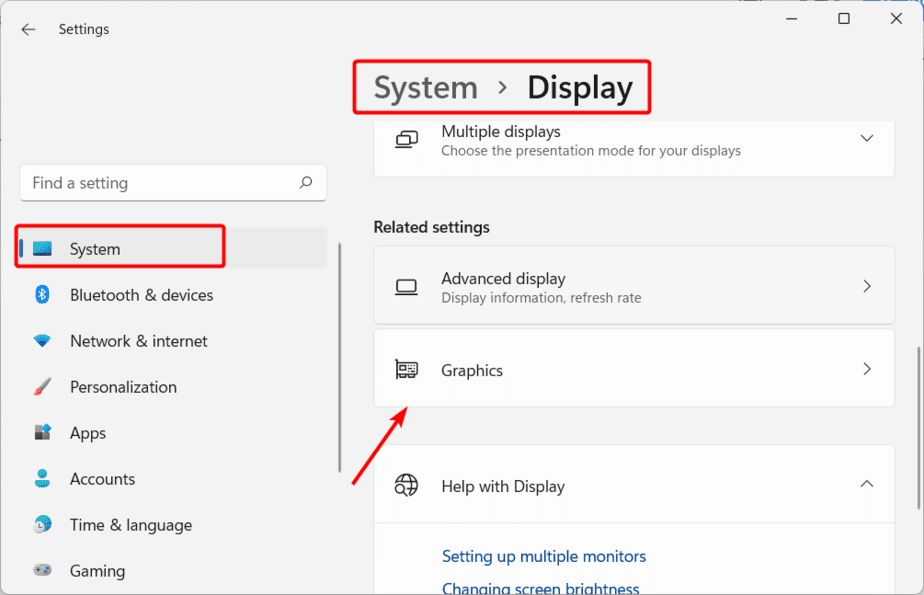
- Now on this page, you can decide what apps can use your graphics card or not and set how much power they can use on your graphics card.
- In the app list, check if DaVinci Resolve is already added. If not, select “Browse,” and then go to your OS drive (on most PCs, it is Local Disk (C:)).
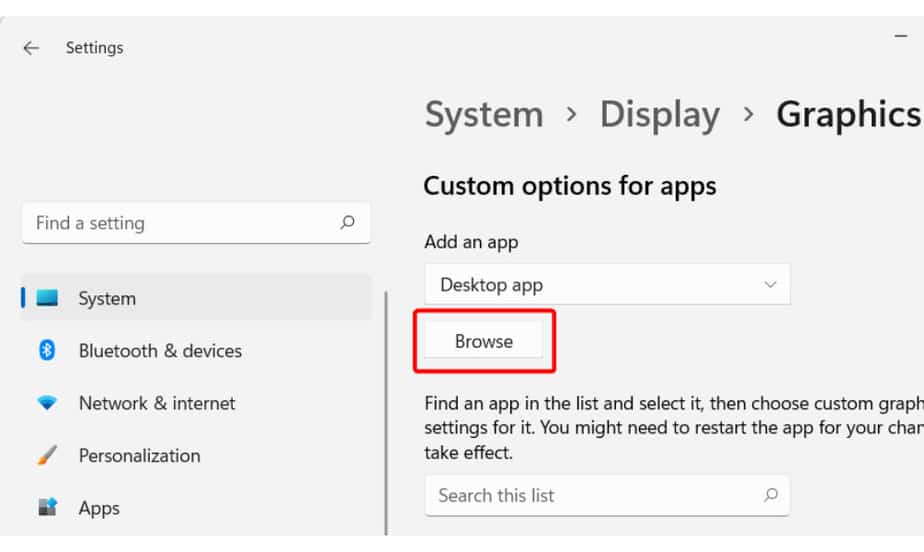
- After opening the Local Disk (C:), double-click on “Program Files” to open it, go to Blackmagic Design > DaVinci Resolve, select “Resolve,” and click on “Add”:

- Click on “Options,” then select “High Performance,” and click on “Save.”
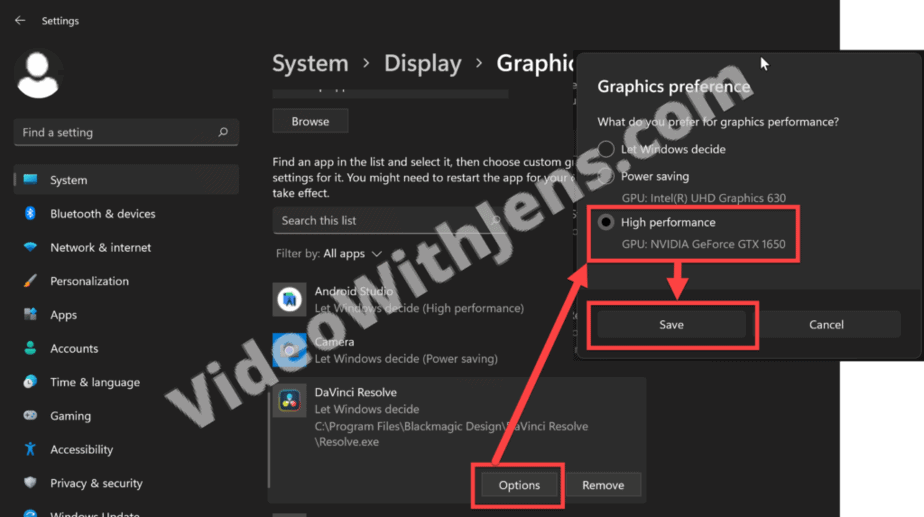
Next, try launching DaVinci Resolve, and hopefully, the “Unable to Initialize GPU” error doesn’t appear.
If this method didn’t help, no worries; we’ve got a few more that should resolve the issue for you in no time. Continue reading this article for the next solution.
1.1. Quick Way to Make Resolve Use Discrete GPU
This is one of the simplest tricks to make Resolve work if it shows the error “Unable to Initialize GPU.”
(Not everyone has this option, as it seems to have been removed in newer versions of Windows).
Here’s what you need to do:
- Right-click the DaVinci Resolve’s program icon on your desktop and hover your mouse over the option “Run with graphics processor.”
- In the sub-menu, select “High-performance NVIDIA processor (Default).” For AMD users, you will find a similar option to select. Make sure you select that and not “Integrated graphics.”
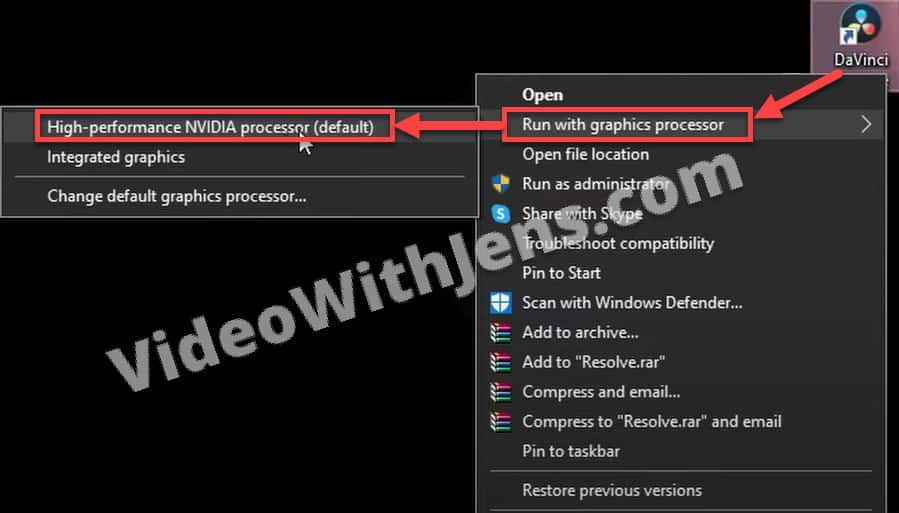
Continue reading for the next solution if this doesn’t help.
2. Is the Monitor Connected to the Correct Port?
Do you have your computer monitor connected to the motherboard or the GPU? Okay, now that you’ve checked which port your monitor is connected to, here’s what you need to do.
Assuming your monitor is plugged into the motherboard using an HDMI cable, unplug your monitor and connect it to the GPU’s HDMI port. If it is connected to the GPU’s HDMI port, disconnect and reconnect it to the motherboard port.
Now, check if the DaVinci Resolve is working properly. If it is still showing “Unable to Initialize GPU,” check our next step.
3. Turn Off Battery Saving on Laptop
Are you using a laptop? Have you enabled battery savings to keep your computer from running at full power and draining your battery? Or maybe you have a powerful computer that you turned on because you are using it to do basic tasks.
If that’s the case, you should turn off battery saving mode and select the option “Balanced” or “High Performance.”
Here’s how to do that:
- Open the “Start” menu, and search for the “Control Panel.”

- Now, open the “Control Panel” from the results, and then open “Hardware and sound.”

- Click on “Choose a power plan” and then select “Balanced” or “High performance.”

When you change your power settings from high-performance, your PC starts using fewer resources and also limits your PC’s performance.
By changing the power settings, your GPU and other components are likely working using limited resources. So, when you launch DaVinci Resolve with the battery settings in saver mode enabled, the program struggles to read GPU memory, resulting in the error.
4. Update Graphic Cards’ Drivers
Drivers are essential for making that component, in this case, the graphics card, communicate with the motherboard and the OS. Without the drivers, the graphics cards won’t function at all.
The drivers can get corrupted or removed automatically, or you may be using outdated drivers, and DaVinci Resolve cannot identify them.
Here’s how to update your graphics card drivers:
- Click on the magnifying glass icon in the taskbar and type in “Device manager.” Alternatively, you can right-click the “Start” button and open it by selecting “Device Manager.”

- Now, expand ”Display Drivers” and update every graphics card driver available inside. Right-click on the drivers and select “Update drivers.”

- Now, click “Search automatically for updated driver software,” and it should locate the latest drivers to install on your PC.

If you didn’t find any new drivers, awesome!
However, doing it this way will not grant you the latest update published by your GPU manufacturer but rather what’s perceived as the newest stable version by Windows.
So, if you don’t have a software set to automatically update your drivers, such as GeForce Experience, you are probably not running the newest version.
In that case, it’s worth trying to update it to solve the error!
How to Manually Update GPU Drivers
Go to google, and search for your GPUs name, followed by “driver download,” like in the image below:
Then the first result is probably your manufacturer’s official website; however, make sure of it before downloading anything!
(This is how you would do it with an Nvidia driver)
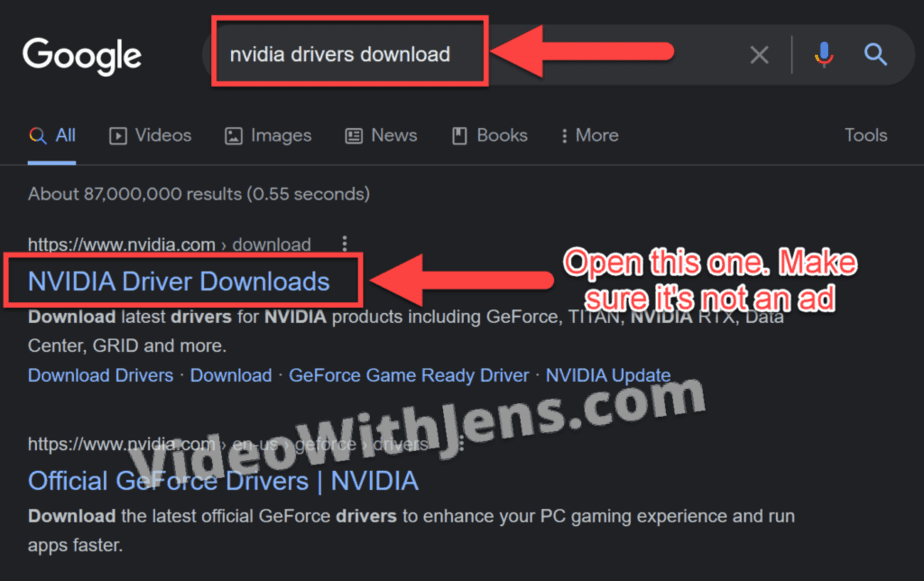
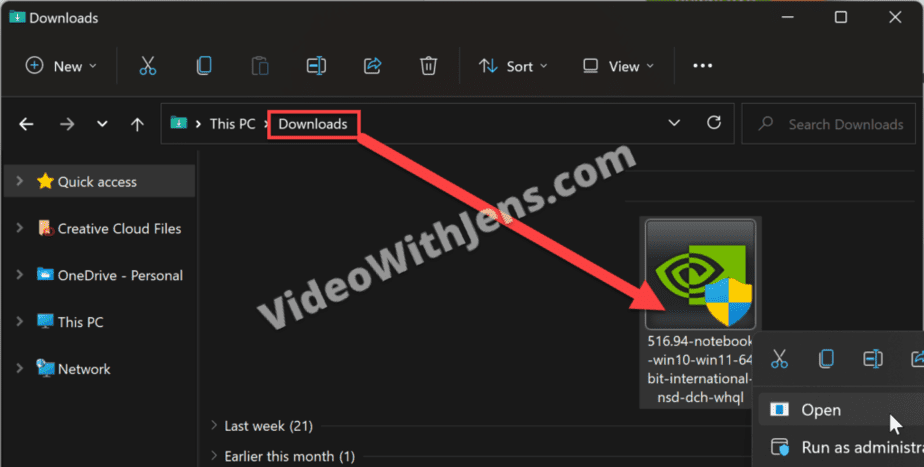
Once you’ve downloaded the driver, it’s by default located in the “Downloads” folder on your computer.
Double-click it and install the driver.
Once the installation process is complete, restart your computer and launch DaVinci Resolve.
If you’re still met with “Unable to Initialize GPU,” we have one more solution for you to try:
5. Install an Older Version of Resolve
In our research, we discovered that users experiencing this issue with DaVinci Resolve 18 and 17 were able to resolve it by downgrading and installing DaVinci Resolve 16.
If you started getting the error after updating Resolve, you could try downgrading it to the previously working version.
Here’s how to do it:
5.1 How to Uninstall DaVinci Resolve
Firstly, we need to uninstall the current version of Resolve. So, make sure to back up your projects if you need them in the future.
Then open “Start” on your computer, search for “Control Panel,” and open it:

Under “Programs,” click on “Uninstall a program”:
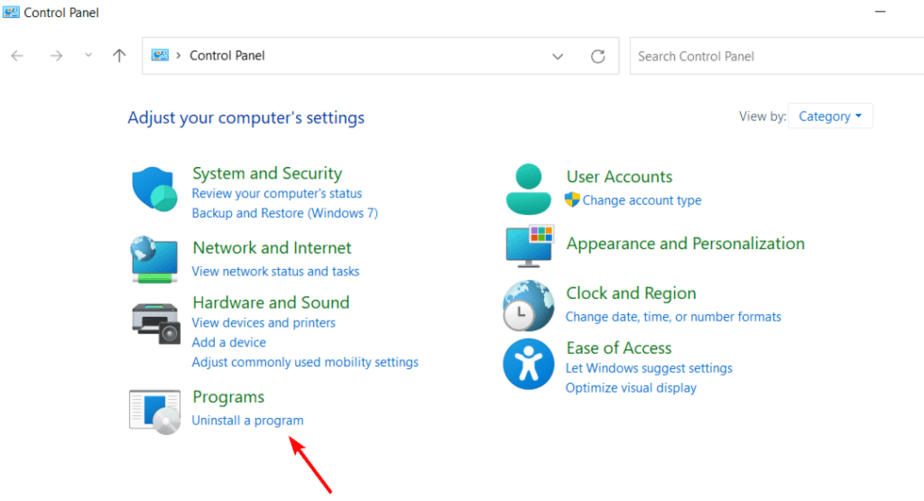
Locate DaVinci Resolve, right-click it, and select “Uninstall.”

Click on “Yes” if you are sure you want to do it:

Next:
5.2 How to Install Older Version of DaVinci Resolve
Visit Black Magic’s official website and head to the support section (or click the link).
Scroll down in the “Latest Downloads” and find the previous working version or DaVinci Resolve 16, which some people have found to be working. Download one of them.
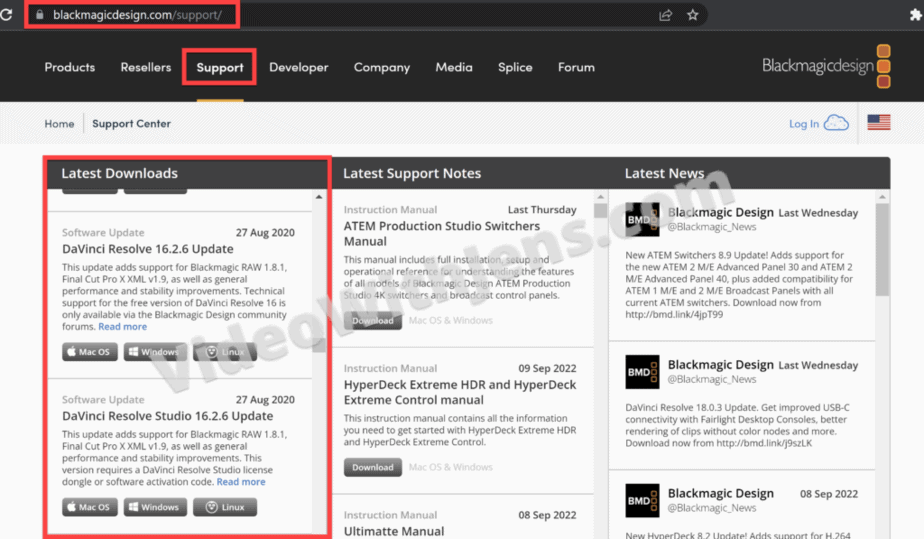
You’ll now find the file in your “Downloads” folder, by default
Open the setup file by double-clicking on it, and then click the “Next” button in the DaVinci Resolve’s installation window.
Accept the terms and license agreement, and proceed ahead by clicking on “Next” and pressing the “Install” button in the next window.
Now, allow a few minutes for the installation to complete. Once the installation is completed, click the “Finish” button to close the installation wizard.
Then, it’s time.
Try starting DaVinci Resolve again!
If you didn’t find your solution, here’s another GPU issue-related article, that might help you.
Попробуйте наш инструмент устранения неполадок
Выберите операционную систему
Выберите язык програмирования (опционально)
Ищем решение проблемы DaVinci Resolve не открывается проблема? Независимо от того, что ваш Resolve вообще не отвечает или зависает на экране загрузки, вы можете попробовать следующие методы, чтобы немедленно решить проблему.
Попробуйте эти исправления
- Завершите процесс решения Отключите USB-устройства Запустите DaVinci Resolve в режиме совместимости. Обновите графический драйвер Увеличьте виртуальную память Включить мультимонитор IGPU в BIOS Удалите антивирусное программное обеспечение Разрешить доступ к сетевому порту TCP Переустановите DaVinci Resolve
Исправить 1. Завершить процесс разрешения
Первое, что вы должны попробовать, это завершить процесс DaVinci Resolve в диспетчере задач. Вот как:
1) Нажмите Ctrl + Shift + Удалить чтобы открыть Диспетчер задач.
2) Найдите любой процесс, связанный с Revolve.
3) Щелкните правой кнопкой мыши и выберите Завершить задачу .
Теперь вы принудительно отключили Davinci Resolve. Запустите программу еще раз, и вы сможете открыть ее без проблем.
Не повезло? Не беспокойтесь. У нас есть еще несколько исправлений для вас.
Исправление 2. Отключите USB-устройства
Согласно тому, что предположили многие пользователи Resolve, USB-устройства могут привести к тому, что ваш Resolve не откроется, поэтому вы можете отключить эти устройства, чтобы проверить, работает ли ваш Resolve снова.
Resolve сработает, особенно если вы используете USB-гарнитуру в качестве устройства вывода звука. После того, как вы удалили USB-устройство с вашего ПК, снова запустите Revolve.
Исправление 3. Запустите DaVinci Resolve в режиме совместимости
Все еще не можете запустить Resolve? Это может быть вызвано некоторыми проблемами несовместимости, которые можно решить, запустив Resolve в режиме совместимости.
- Щелкните правой кнопкой мыши ярлык Resolve или исполняемый файл в папке установки и выберите Характеристики .
- Перейти к Совместимость вкладку и проверьте Запустите эту программу в совместимости с Windows 8 или Windows 7.
- Нажмите Применять > В ПОРЯДКЕ чтобы сохранить изменения.
Теперь вы можете запустить Resolve, чтобы проверить проблему. Если DaVinci Resolve по-прежнему не отвечает, вы можете перейти к следующему исправлению ниже.
Исправление 4. Обновите графический драйвер
Редактирование видео с помощью этого DaVinci Resolve требует больших ресурсов графического процессора, поэтому обязательно обновляйте драйверы графического процессора (а иногда и аудиодрайверы).
Вы можете обновить графический драйвер вручную, посетив веб-сайт производителя ( NVIDIA / AMD ), найти последнюю правильную программу установки и выполнить пошаговую установку. Но если у вас нет времени или терпения на установку вручную, вы можете сделать это автоматически с помощью Драйвер Легкий .
Driver Easy автоматически распознает вашу систему и найдет правильные драйверы для ваших видеокарт и версии Windows, а также загрузит и установит их правильно:
- Скачатьи установите драйвер Easy.
- Запустите Driver Easy и нажмите Сканировать сейчас . Затем Driver Easy просканирует ваш компьютер и обнаружит проблемные драйверы.
- Нажмите Обновить все для автоматической загрузки и установки правильной версии все драйверы, которые отсутствуют или устарели в вашей системе. (Для этого требуется Про версия — вам будет предложено обновиться, когда вы нажмете «Обновить все». Если вы не хотите платить за Pro-версию, вы все равно можете загрузить и установить все необходимые драйверы в бесплатной версии; вам просто нужно загрузить их по одному и установить вручную, как обычно в Windows.)
Pro-версия Driver Easy поставляется с полной технической поддержкой.
Если вам нужна помощь, обращайтесь Служба поддержки Driver Easy в support@drivereasy.com .
После обновления драйверов перезагрузите компьютер и запустите Resolve, чтобы проверить, решена ли проблема.
Исправление 5. Увеличьте виртуальную память
Если в вашей системе недостаточно виртуальной памяти, Windows увеличивает размер файла подкачки виртуальной памяти. Во время этого процесса запросы памяти для некоторых приложений могут быть отклонены, например, DaVinci Resolve. Чтобы облегчить это, вы можете вручную увеличить размер файла подкачки.
- На клавиатуре нажмите кнопку Окна ключ с логотипом + р клавишу одновременно и введите sysdm.cpl чтобы открыть системные настройки.
- Перейти к Передовой вкладку и выберите Настройки под Представление .
- Когда откроется окно «Параметры производительности», перейдите к Передовой вкладку и выберите Изменять .
- Снимите флажок Автоматически управлять размером файла подкачки для всех дисков . Затем выберите Обычный размер и введите соответствующее значение.
Примечание: Рекомендуется использовать номер, который полтора раза общая доступная память для Начальный размер и три раза доступной памяти для Максимальный размер когда возможно. (Например, моя установленная оперативная память составляет 16 ГБ, поэтому я установил начальный размер 24 000, максимальный размер — 48 000). Если вы не знаете свою установленную оперативную память, вы можете нажать кнопку Окна ключ + Пауза чтобы проверить характеристики вашего устройства. - Нажмите В ПОРЯДКЕ чтобы подтвердить изменение.
Перезагрузите компьютер, чтобы изменения вступили в силу, и попробуйте открыть DaVinci Resolve, чтобы проверить, успешно ли он запускается.
Исправление 6. Включить мультимонитор IGPU в BIOS
Многие пользователи сообщают, что функция IGPU Multi-Monitor может повлиять на использование DaVinci Resolve, из-за чего Resolve не открывается. Чтобы включить эту функцию, вы должны перезагрузить компьютер и войти в BIOS.
| Бренд | Ключ BIOS |
|---|---|
| мобильный телефон | F9 или Esc |
| Делл | F12 |
| Асер | F12 |
| Леново | F12 |
| Асус | выход |
| Samsung | F12 |
| Сони | выход |
| Microsoft Surface Pro | Кнопка уменьшения громкости |
- Перезагрузите компьютер и продолжайте нажимать клавишу настройки (показана выше), как только вы увидите логотип производителя на экране, чтобы войти в настройки BIOS.
- Под Передовой настройки, вы увидите Опция мультимонитора IGPU .
- Переключите эту функцию с Неполноценный к Включено .
- Сохраните и выйдите из BIOS.
Исправить 7. Удалите антивирусное программное обеспечение
Известно, что антивирусное программное обеспечение мешает работе многих программ, и если у вас возникли проблемы с Resolve после установки стороннего антивирусного программного обеспечения, вам может потребоваться их удалить, поскольку их отключения недостаточно для предотвращения их работы в фоновом режиме.
А пока вам следует отключить VPN-сервисы, такие как NordVPN, ExpressVPN.
Если DaVinci Resolve не запускается после удаления антивирусного программного обеспечения и отключения VPN, вы можете попробовать следующее исправление, указанное ниже.
Исправление 8. Разрешить доступ к сетевому порту TCP
Другая причина, по которой ваш DaVinci Resolve не отвечает, заключается в том, что у него нет доступа к вашим TCP-портам, что необходимо для успешного запуска вашего DaVinci Resolve.
Вот как быстро решить эту проблему:
- На клавиатуре одновременно нажмите клавиши Windows + R и введите пауэршелл .
- Введите следующую командную строку:
Get-NetTCPConnection | Where-Object { $_.State -eq Listen -and $_.LocalPort -eq 1144 } | ForEach-Object { (get-process -id $_.OwningProcess).Описание} - Если в следующей записи ничего не появляется, с вашей TCP-сетью все в порядке. Но если это так, вам, возможно, придется связаться с Блэкмагик Дизайн службу поддержки с файлом журнала.
- Перейдите к C:Program FilesBlackmagic DesignDaVinci Resolve .
- Дважды щелкните по CaptureLogs.bat файл (или щелкните правой кнопкой мыши, а затем запустите от имени администратора).
- Это создаст журнальный файл на рабочий стол – Журналы DaVinci-Resolve-.zip .
Исправление 9. Переустановите DaVinci Resolve
Если ни одно из приведенных выше исправлений не решило вашу проблему с открытием Resolve, вы можете полностью переустановить свою программу и удалить все файлы ( C:Program FilesBlackmagic DesignDaVinci Resolve ) осталось позади.
Этот пост помог вам избавиться от проблемы? Не стесняйтесь, напишите нам, если у вас есть какие-либо вопросы или предложения.
- крушение
- видео
- редактирование видео

