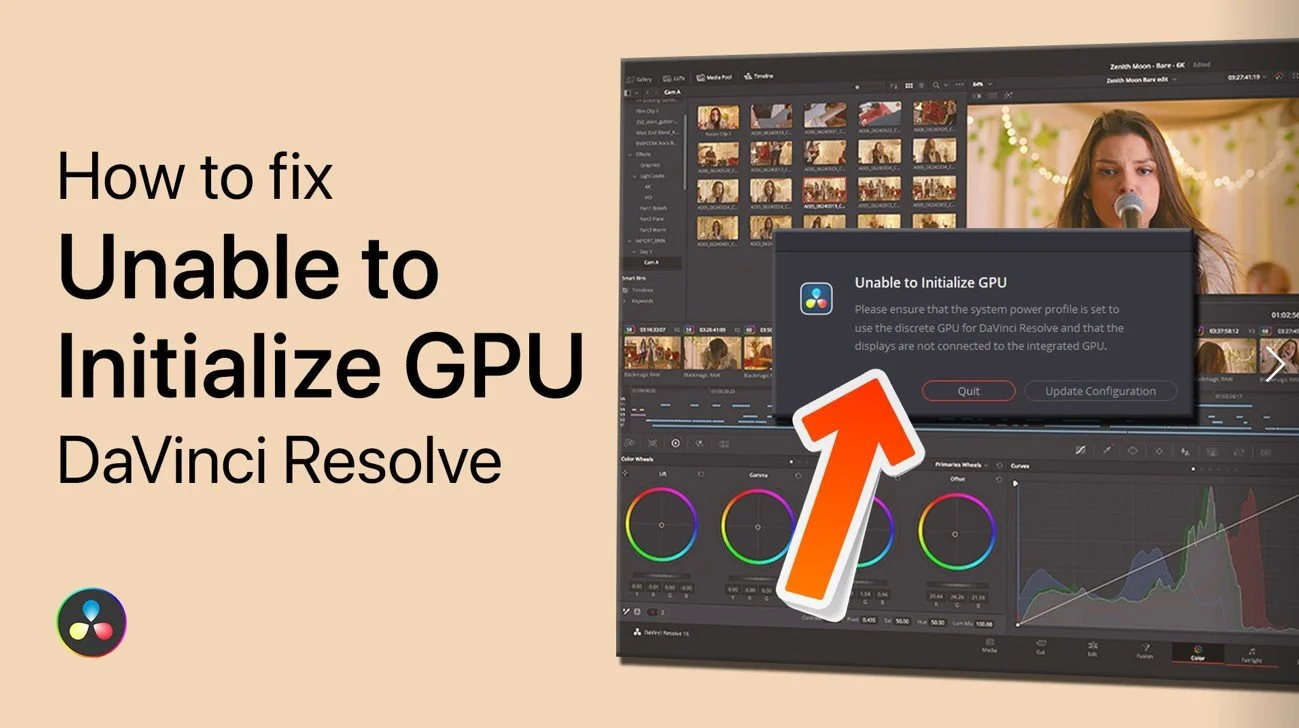
Today we are going to solve the “Unable to Initialize GPU” error in DaVinci Resolve.
The “Unable to Initialize GPU” error in DaVinci Resolve, put in simple words, means; Resolve is unable to connect to your graphics card. To fix this you need to find a way of restoring the connection or removing the factor causing the disconnection.
Luckily for you, we have found the solutions that seem to fix the problem for most people!
Click the link to go directly to a specific solution:
- Change DaVinci Resolve’s Graphic Preferences
- Is the Monitor Connected to the Correct Port?
- Turn Off Battery Saving on Laptop
- Update Graphic Cards’ Drivers
- Install an Older Version of Resolve
I’ve also made a video explaining the solutions below:
1. Change DaVinci Resolve’s Graphic Preferences
- Right-click on the “Start” button in the taskbar, and search for “Settings.”

- Open “Settings” from the results. Select “Display” under the “System” sub-menu and then select “Graphics” after scrolling down a bit.
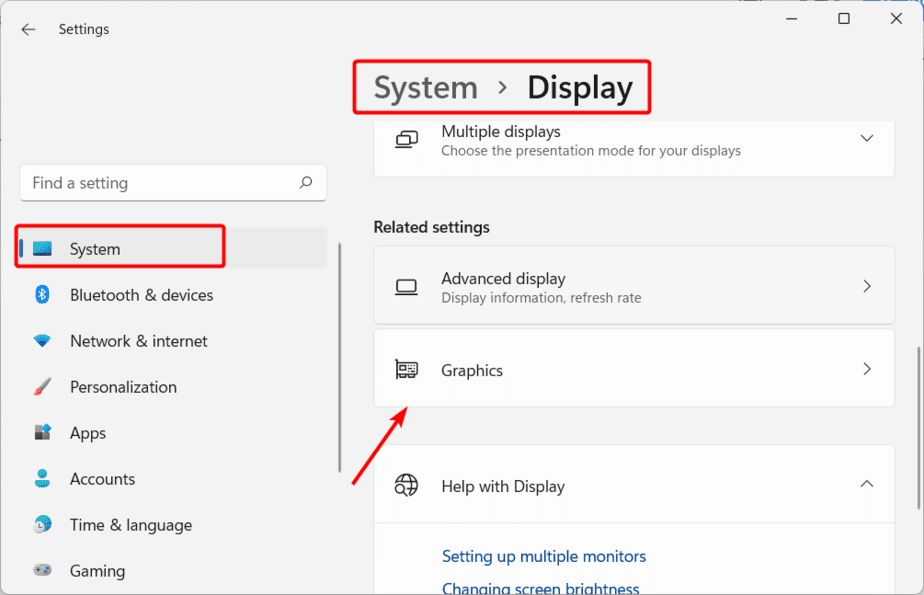
- Now on this page, you can decide what apps can use your graphics card or not and set how much power they can use on your graphics card.
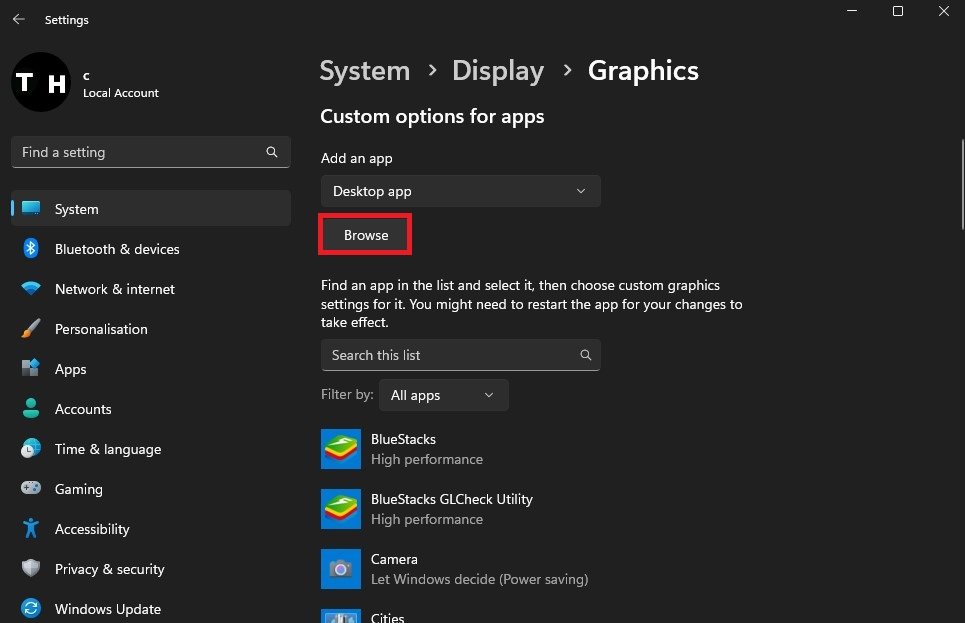
- In the app list, check if DaVinci Resolve is already added. If not, select “Browse,” and then go to your OS drive (on most PCs, it is Local Disk (C:)).
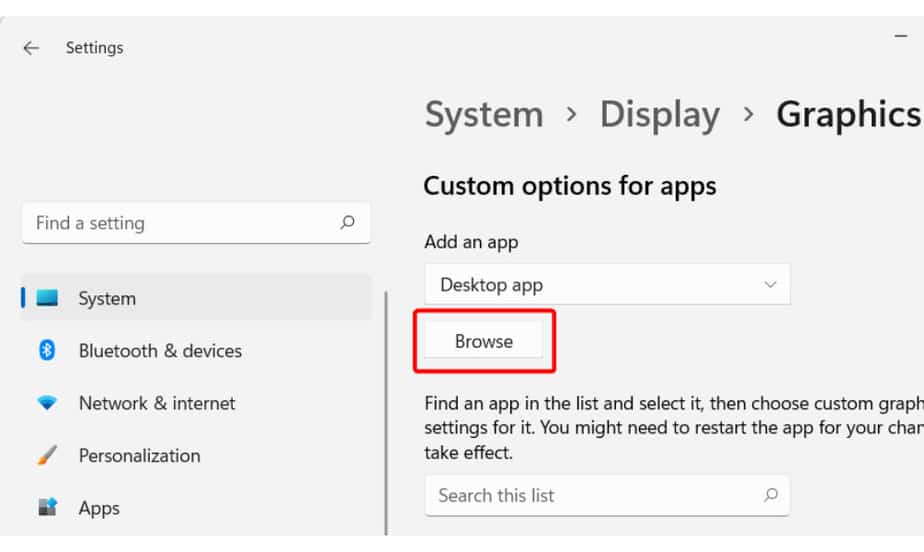
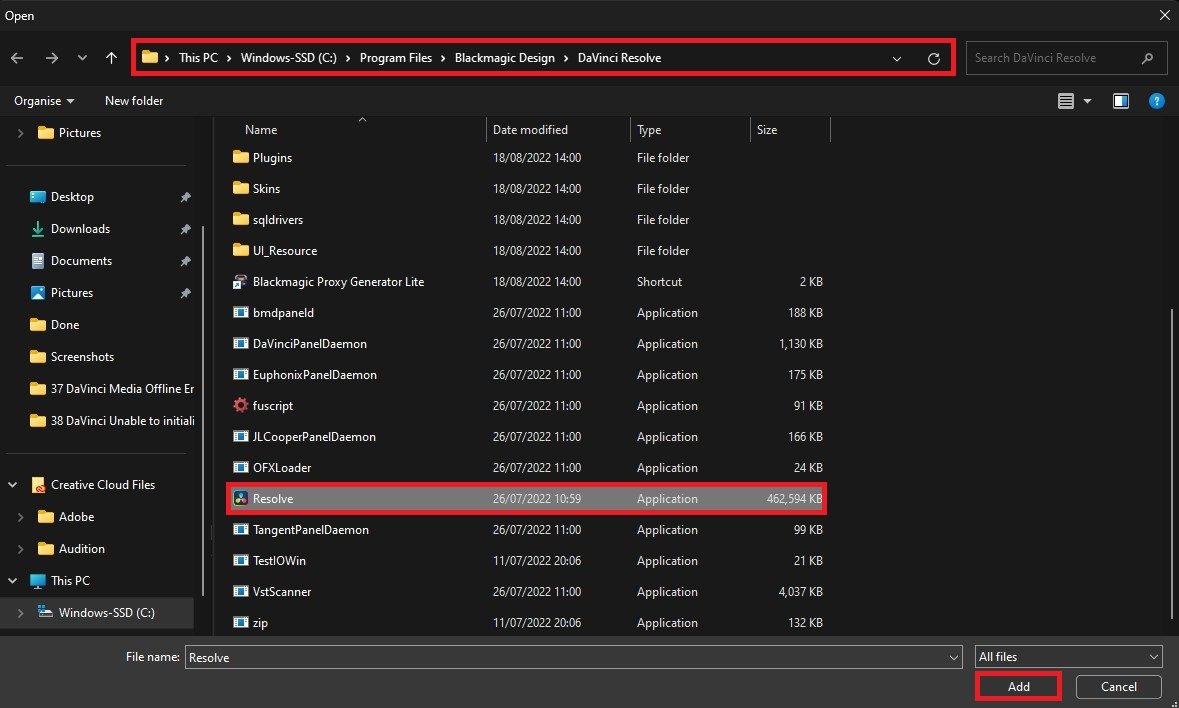
- After opening the Local Disk (C:), double-click on “Program Files” to open it, go to Blackmagic Design > DaVinci Resolve, select “Resolve,” and click on “Add”:

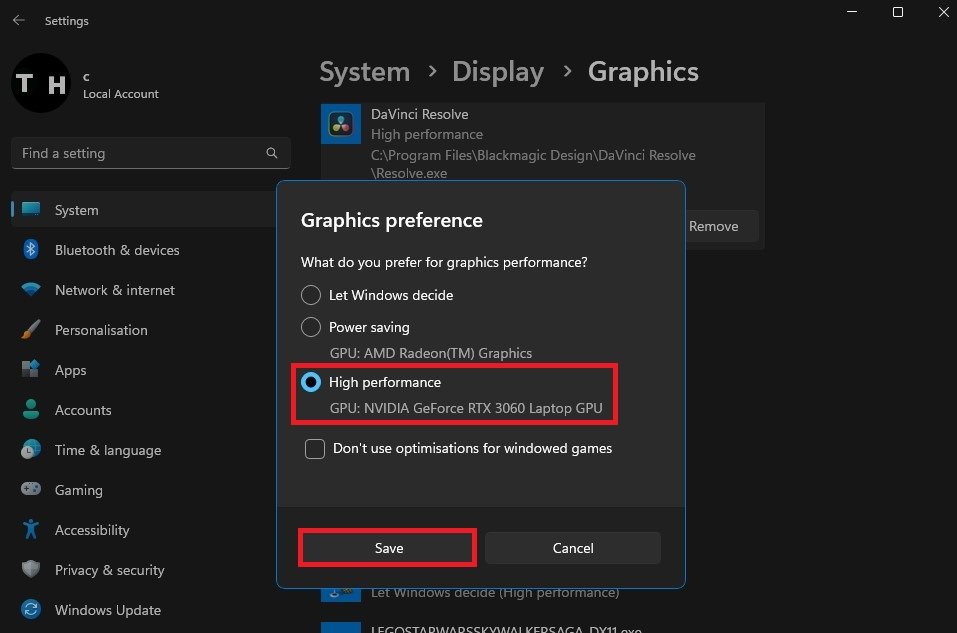
- Click on “Options,” then select “High Performance,” and click on “Save.”
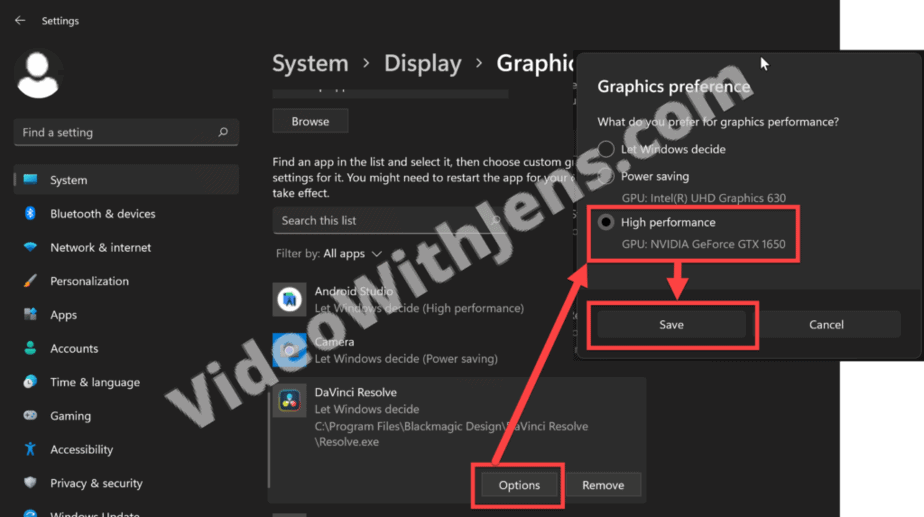
Next, try launching DaVinci Resolve, and hopefully, the “Unable to Initialize GPU” error doesn’t appear.
If this method didn’t help, no worries; we’ve got a few more that should resolve the issue for you in no time. Continue reading this article for the next solution.
1.1. Quick Way to Make Resolve Use Discrete GPU
This is one of the simplest tricks to make Resolve work if it shows the error “Unable to Initialize GPU.”
(Not everyone has this option, as it seems to have been removed in newer versions of Windows).
Here’s what you need to do:
- Right-click the DaVinci Resolve’s program icon on your desktop and hover your mouse over the option “Run with graphics processor.”
- In the sub-menu, select “High-performance NVIDIA processor (Default).” For AMD users, you will find a similar option to select. Make sure you select that and not “Integrated graphics.”
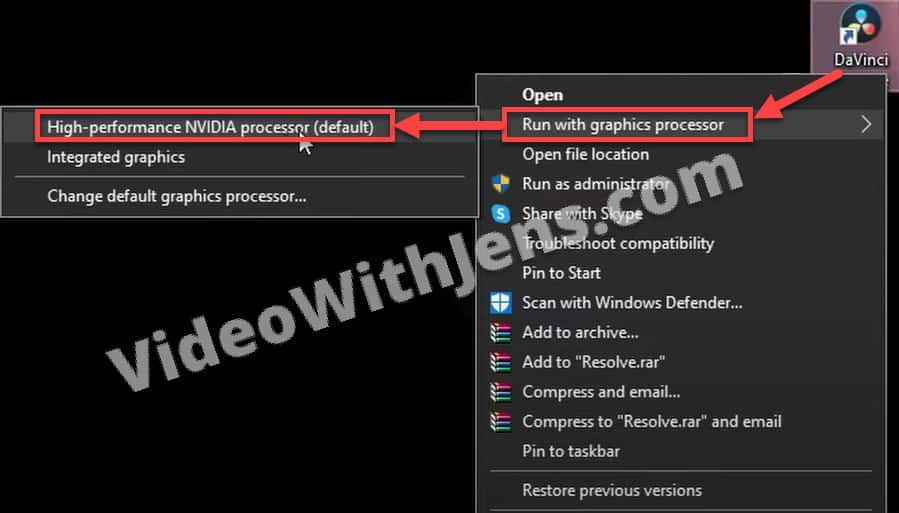
Continue reading for the next solution if this doesn’t help.
2. Is the Monitor Connected to the Correct Port?
Do you have your computer monitor connected to the motherboard or the GPU? Okay, now that you’ve checked which port your monitor is connected to, here’s what you need to do.
Assuming your monitor is plugged into the motherboard using an HDMI cable, unplug your monitor and connect it to the GPU’s HDMI port. If it is connected to the GPU’s HDMI port, disconnect and reconnect it to the motherboard port.
Now, check if the DaVinci Resolve is working properly. If it is still showing “Unable to Initialize GPU,” check our next step.
3. Turn Off Battery Saving on Laptop
Are you using a laptop? Have you enabled battery savings to keep your computer from running at full power and draining your battery? Or maybe you have a powerful computer that you turned on because you are using it to do basic tasks.
If that’s the case, you should turn off battery saving mode and select the option “Balanced” or “High Performance.”
Here’s how to do that:
- Open the “Start” menu, and search for the “Control Panel.”

- Now, open the “Control Panel” from the results, and then open “Hardware and sound.”

- Click on “Choose a power plan” and then select “Balanced” or “High performance.”

When you change your power settings from high-performance, your PC starts using fewer resources and also limits your PC’s performance.
By changing the power settings, your GPU and other components are likely working using limited resources. So, when you launch DaVinci Resolve with the battery settings in saver mode enabled, the program struggles to read GPU memory, resulting in the error.
4. Update Graphic Cards’ Drivers
Drivers are essential for making that component, in this case, the graphics card, communicate with the motherboard and the OS. Without the drivers, the graphics cards won’t function at all.
The drivers can get corrupted or removed automatically, or you may be using outdated drivers, and DaVinci Resolve cannot identify them.
Here’s how to update your graphics card drivers:
- Click on the magnifying glass icon in the taskbar and type in “Device manager.” Alternatively, you can right-click the “Start” button and open it by selecting “Device Manager.”

- Now, expand ”Display Drivers” and update every graphics card driver available inside. Right-click on the drivers and select “Update drivers.”

- Now, click “Search automatically for updated driver software,” and it should locate the latest drivers to install on your PC.

If you didn’t find any new drivers, awesome!
However, doing it this way will not grant you the latest update published by your GPU manufacturer but rather what’s perceived as the newest stable version by Windows.
So, if you don’t have a software set to automatically update your drivers, such as GeForce Experience, you are probably not running the newest version.
In that case, it’s worth trying to update it to solve the error!
How to Manually Update GPU Drivers
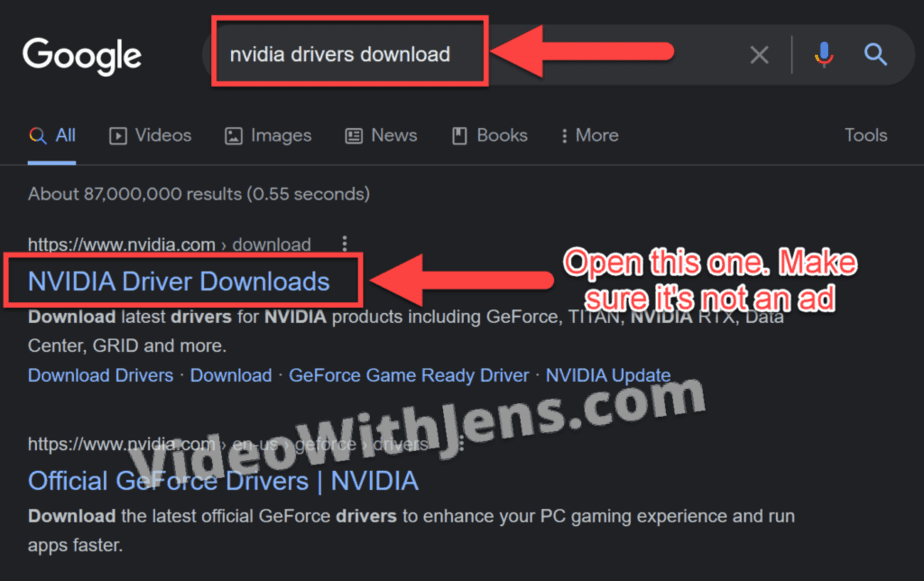
Go to google, and search for your GPUs name, followed by “driver download,” like in the image below:
Then the first result is probably your manufacturer’s official website; however, make sure of it before downloading anything!
(This is how you would do it with an Nvidia driver)
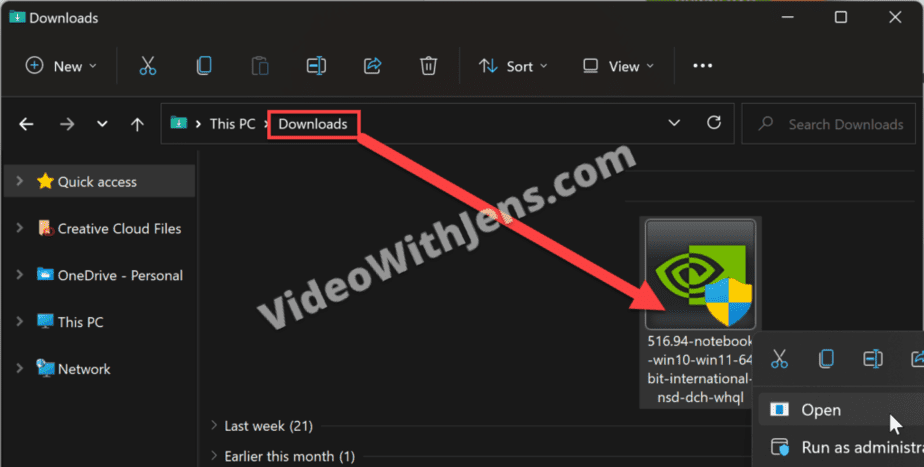
Once you’ve downloaded the driver, it’s by default located in the “Downloads” folder on your computer.
Double-click it and install the driver.
Once the installation process is complete, restart your computer and launch DaVinci Resolve.
If you’re still met with “Unable to Initialize GPU,” we have one more solution for you to try:
5. Install an Older Version of Resolve
In our research, we discovered that users experiencing this issue with DaVinci Resolve 18 and 17 were able to resolve it by downgrading and installing DaVinci Resolve 16.
If you started getting the error after updating Resolve, you could try downgrading it to the previously working version.
Here’s how to do it:
5.1 How to Uninstall DaVinci Resolve
Firstly, we need to uninstall the current version of Resolve. So, make sure to back up your projects if you need them in the future.
Then open “Start” on your computer, search for “Control Panel,” and open it:

Under “Programs,” click on “Uninstall a program”:
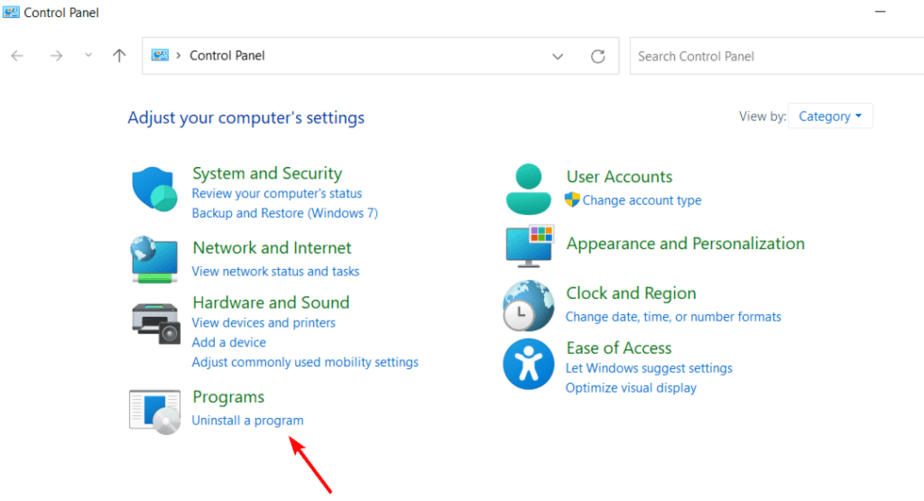
Locate DaVinci Resolve, right-click it, and select “Uninstall.”

Click on “Yes” if you are sure you want to do it:

Next:
5.2 How to Install Older Version of DaVinci Resolve
Visit Black Magic’s official website and head to the support section (or click the link).
Scroll down in the “Latest Downloads” and find the previous working version or DaVinci Resolve 16, which some people have found to be working. Download one of them.
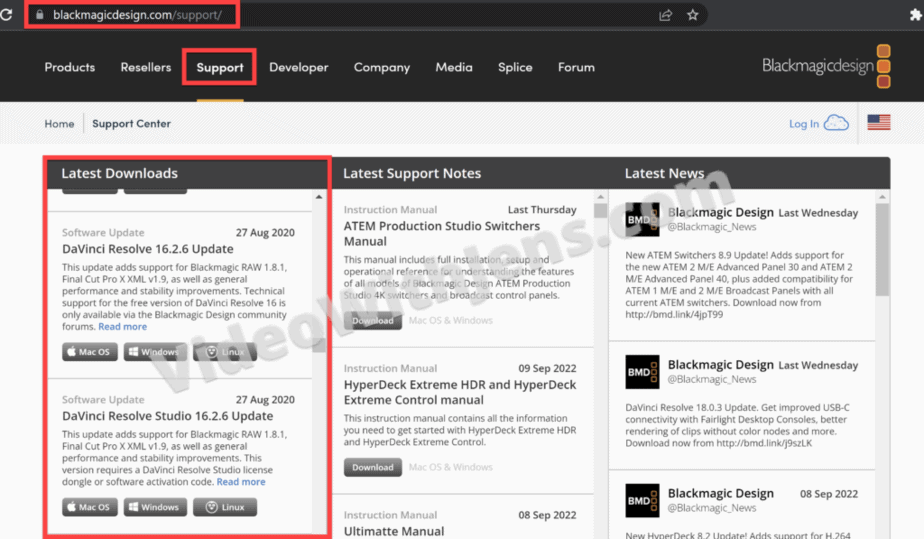
You’ll now find the file in your “Downloads” folder, by default
Open the setup file by double-clicking on it, and then click the “Next” button in the DaVinci Resolve’s installation window.
Accept the terms and license agreement, and proceed ahead by clicking on “Next” and pressing the “Install” button in the next window.
Now, allow a few minutes for the installation to complete. Once the installation is completed, click the “Finish” button to close the installation wizard.
Then, it’s time.
Try starting DaVinci Resolve again!
If you didn’t find your solution, here’s another GPU issue-related article, that might help you.
Most users get some sort of GPU issue or the other while working on DaVinci Resolve.
Sometimes you might face GPU (graphics card) related issues when…
You update Resolve to the latest version.
Or…
When you update the Nvidia drivers. Or it could be due to other reasons as well.
Today we’ll see how to fix these GPU related issues in DaVinci Resolve.
Without wasting time, let’s get started.
Is DaVinci Resolve GPU Intensive?
DaVinci Resolve is GPU intensive in the sense that the GPU does all the image processing heavy-lifting as per BlackMagic Design. Whereas other video editors rely heavily on CPU.
So DaVinci Resolve will naturally demand a good discrete GPU with a minimum of 2 GB onboard memory (4 GB and above is preferable).
Related Article:
How to Make DaVinci Resolve Use GPU (Helpful Tips!)
Most Commonly Used GPUs in DaVinci Resolve
Both Nvidia (CUDA) and AMD Radeon (OpenCL) are good. But the most commonly used GPUs come under Nvidia, for example:
- GeForce GTX Series like 970, 1080, 1650 Ti. etc, – for Consumers
- Quadro series – for Professionals
- Tesla series – Data Center
Because of a lot of graphics card variants in Nvidia and Radeon, there arises a need to properly update your computer with the right version of drivers (to run the hardware).
Why does DaVinci Resolve Throw GPU Errors?
DaVinci Resolve usually throws GPU errors whenever there are any compatibility issues with the graphics card, video driver and the version of DaVinci Resolve.
Hence it is very important for you to check whether your graphics card is supported, whether you have the latest or reliable version of video driver (like Nvidia Studio driver) and the latest or stable Resolve.
Though you don’t have control over the DaVinci Resolve software, you can make sure you have the right GPU with the correct video driver installed.
Some of the most common GPU issues faced in DaVinci Resolve are:
- GPU Configuration Warning
- Unsupported GPU processing mode
- GPU Error – like “Davinci resolve gpu failed to perform image processing error 702”
- GPU Memory Full
Related Article:
GPU & DaVinci Resolve (9 Things Most Beginners Don’t Know)
GPU Configuration Warning, Unsupported GPU Processing Mode & GPU Failed to Perform Image Processing Error
The GPU configuration warning will say “DaVinci Resolve is using OpenCL for image processing because the installed Nvidia driver does not support CUDA 11.0…“.
Starting from DaVinci Resolve version 16.2.7 and afterwards (including version 17), BlackMagic has come up with a minimum requirement for hardware GPU types and Nvidia drivers (Mac, Windows and Linux).
| OS | GPU Hardware Type | Minimum Nvidia Driver Version |
|---|---|---|
| MacOS 10.14.6 Mojave | Metal or OpenCL 1.2 | |
| Windows 10 Creators Update | CUDA 11.0 or OpenCL 1.2 | 451.82 |
| Linux CentOS 7.3 | CUDA 11.0 or OpenCL 1.2 | 450.51.06 |
The table clearly tells that for Windows, your Nvidia GPU (graphics card like GeForce GTX 1650) should support CUDA 11.0.
In other words…
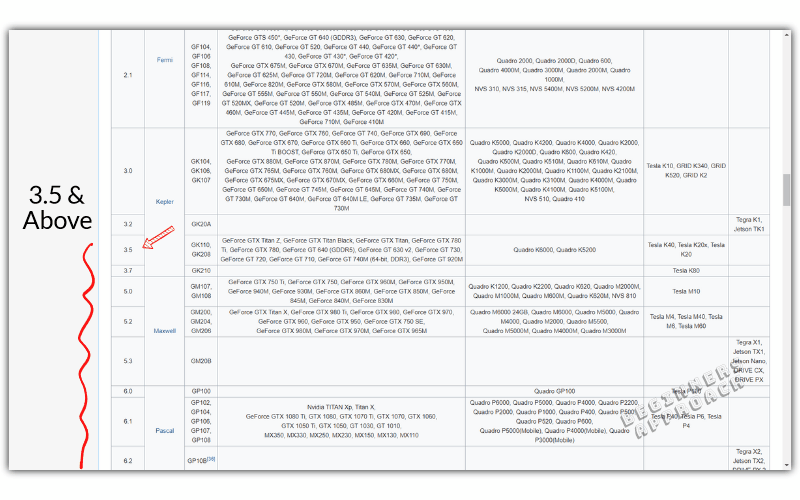
Your Nvidia GPU should have a minimum compute capability of 3.5 and a minimum Nvidia driver version of 451.82.
(If you think it is too technical, just hang on. Just have your GPU name ready for the next step).
How to Check your Nvidia GPU Card is Supported by DaVinci Resolve?
- Navigate to Wikipedia GPU CUDA Support List.
- Search for your GPU card by pressing “Ctrl + F”.
- After locating your card, check the first column “Compute Capability (version)“.
- The Compute capability version should be equal to or greater than 3.5.
- If it is less than 3.5, Resolve won’t support your GPU card for versions after 16.2.7 (including version 17).
You can also check the compute capability from Nvidia website as well.
If the “compute capability” for your card is greater than 3.5, there is nothing for you to do.
But if it is less than 3.5, then you won’t be able to use CUDA in Resolve.
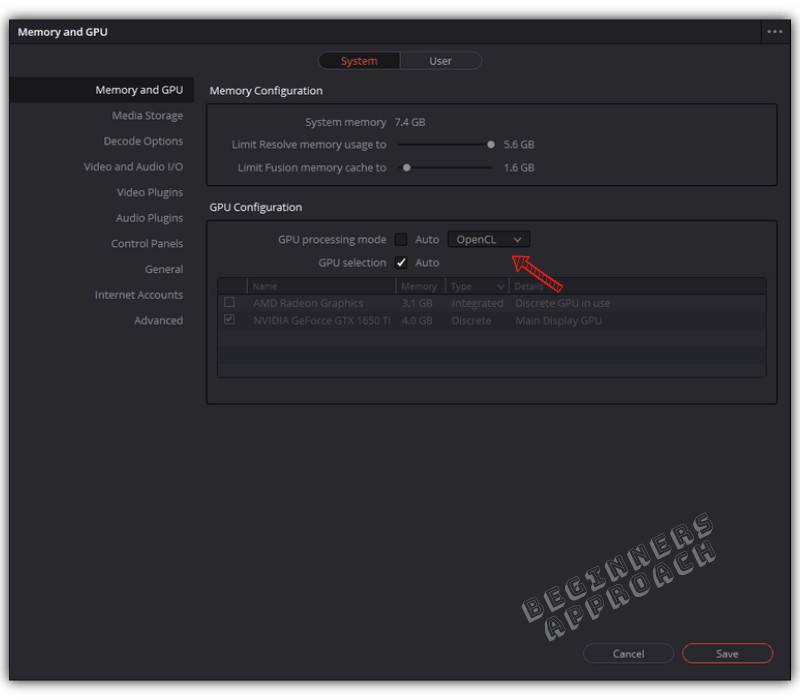
Instead you’ll have to go to the menu “DaVinci Resolve” -> “Preferences” -> “System” -> “Memory and GPU” -> “GPU Configuration” -> against “GPU Processing Mode” uncheck “Auto” and select “OpenCL” instead of CUDA.
If “OpenCL” doesn’t improve the performance, then keep the option as CUDA.
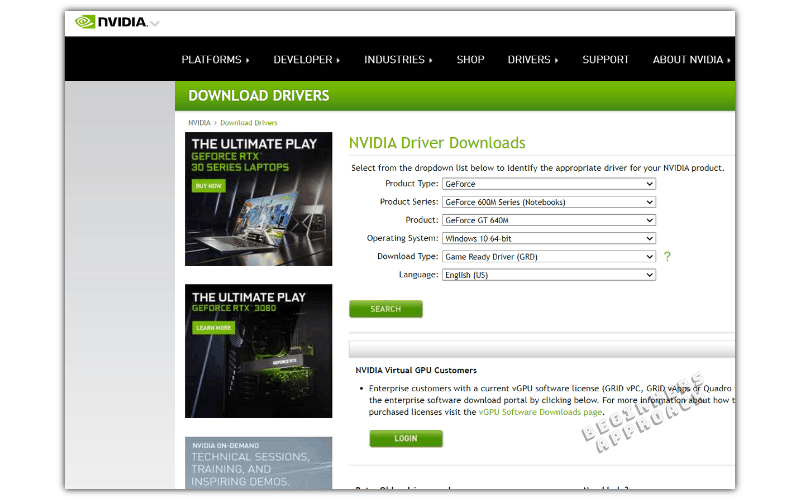
Go to Nvidia Driver Downloads, and select your graphics card from the list, search and download the appropriate driver and install it.
See if this improves your situation.
If you still have issues, then probably you might need to upgrade your graphics card (whose compute capability is more than 3.5).
Or roll back to previous versions of DaVinci Resolve (like 16.2.6) to check your existing card is getting supported in Resolve or not.
My GPU card is Eligible But Still Resolve Says It Is Un-Supported
If your graphics card has a compute capability of over 3.5, and Resolve says it’s unsupported, then you need to update your Nvidia driver version to a newer one.
For Windows, the minimum driver version is 451.82.
For Linux CentOS, the minimum driver version is 450.51.06.
Go to the Nvidia Driver Downloads, select your graphics card from the list, search and download the appropriate driver and install it.
DaVinci Resolve GPU Memory Full
When you work on high resolution footage like 4K UHD in a 4K timeline and do a lot of image processing like color grading, OFX plugins, Fusion effects, etc, Resolve might throw “GPU Memory is Full” error.
I get this error when I click on Fusion tab (after applying effects, transitions to the clips).
There is so much image processing happening that your Nvidia GPU might not have sufficient memory to handle them all.
Or…
When the GPU Processing Mode is set to “Auto” (which results in “OpenCL” being selected instead of “CUDA”).
Here’s how to fix the DaVinci Resolve GPU Memory Full issue in DaVinci Resolve 17:
- Go to the menu “DaVinci Resolve” -> “Preferences” -> “System” -> “Memory and GPU” -> “GPU Configuration” -> against “GPU Processing Mode” uncheck “Auto” and select “CUDA” instead of “OpenCL”.
- Against “GPU Selection”, uncheck “Auto” and manually select the available Nvidia card in your system.
- Restart DaVinci Resolve.
This should get rid of the error.
If the above fix doesn’t work, then try this work-around:
- Try to reduce the timeline resolution to 1920 x 1080p (if you were using 4K UHD = 3840 x 2160), by clicking on the “Project Settings” (bottom right hand corner cog wheel).
- Click on “Master Settings” -> “Timeline Resolution” -> “1920 x 1080 HD” or “1280 x 1080 HD”. (Before delivering, you have the option to render in 4K UHD).
If after doing all the above, if you still have issues with your GPU, then either update Resolve to the latest version or roll back to the previous version.
Most probably the latest version should have bug fixes and could support your GPU without any issues.
Still facing issues?
Then click on this link to generate log files and share it in the BlackMagic forum (scroll to this section “The Last Step – Getting Help from BlackMagic Design Support Staff”)
You may be also interested in the below posts:
- Set up DaVinci Resolve 18 the Right Way (& Fix Issues)
- (How to Troubleshoot): DaVinci Resolve Keeps Crashing!
- Tips to Save Your Precious Work in DaVinci Resolve (IMPORTANT!)
- 6 Ways to Fix DaVinci Resolve Media Offline Issue [NEW]
- 14 Ways to Fix DaVinci Resolve Not Opening Issue
Source:
BlackMagic Forum
DaVinci Resolve – это профессиональное программное обеспечение для монтажа видео, цветокоррекции и видеовизуализации. Однако, при использовании этого инструмента вы можете столкнуться с ошибкой «unsupported gpu processing mode». В этой статье мы расскажем вам, как ее решить.
Причины ошибки «unsupported gpu processing mode»
Обычно эта ошибка возникает по причине несоответствия поддерживаемого драйвера графической карты и версии DaVinci Resolve. Если вы используете устаревшие драйвера или версию программы, эта ошибка может появиться.
Как решить ошибку «unsupported gpu processing mode»
Обновите драйверы графической карты
Первым шагом для решения проблемы «unsupported gpu processing mode» является обновление драйверов графической карты. Лучше всего загрузить последнюю версию драйвера на официальном сайте производителя.
Обновите DaVinci Resolve
Если обновление драйверов не помогло, попробуйте обновить версию DaVinci Resolve до последней. Вы можете загрузить последнюю версию программы на официальном сайте Blackmagic Design.
Отключите GPU-обработку
Если вы не можете обновить драйверы или даунгрейднуть версию DaVinci Resolve, попробуйте отключить GPU-обработку. Чтобы это сделать, откройте меню «Preferences» (настройки) и выберите «System» (система). Затем установите флажок напротив «Use CPU (caching highly recommended)» (использовать процессор (рекомендуется кеширование))
Измените фреймворк CUDA
Если вы используете NVIDIA GPU, вам может потребоваться изменить фреймворк CUDA на версию, поддерживаемую текущей версией DaVinci Resolve. Чтобы это сделать, загрузите соответствующую версию CUDA на официальном сайте NVIDIA.
Заключение
Эти шаги должны помочь вам решить проблему «unsupported gpu processing mode» в DaVinci Resolve. Если ни один из методов не сработал, можно обратиться за поддержкой к производителю графической карты или Blackmagic Design.
DaVinci Resolve 18 is a powerful video editing software, loved by professionals and beginners alike. It is well known for its advanced features and tools that enable users to edit and color correct their videos with ease. However, sometimes users face issues like the «Unable to Initialize GPU» error, which can be quite frustrating. This article will explore some simple and effective solutions to fix this problem and get you back to creating stunning videos in no time.
Windows Graphics Settings
Close DaVinci Resolve and open up your Windows settings. In your system settings, click on Display. From here, scroll down and select Graphics. Alternatively, you can search for Graphics Settings to get here.
Windows Settings > System > Display > Graphics
Find DaVinci Resolve Install Location
Configure which apps you allow your graphics card to support while running. Click on Browse, which will open up your File Explorer.
Graphics Settings > Browse
The default install location for DaVinci Resolve is in your main drive under Program Files > Blackmagic Design > DaVinci Resolve. Scroll down until you can find the Resolve.exe application.
Program Files > Blackmagic Design > DaVinci Resolve
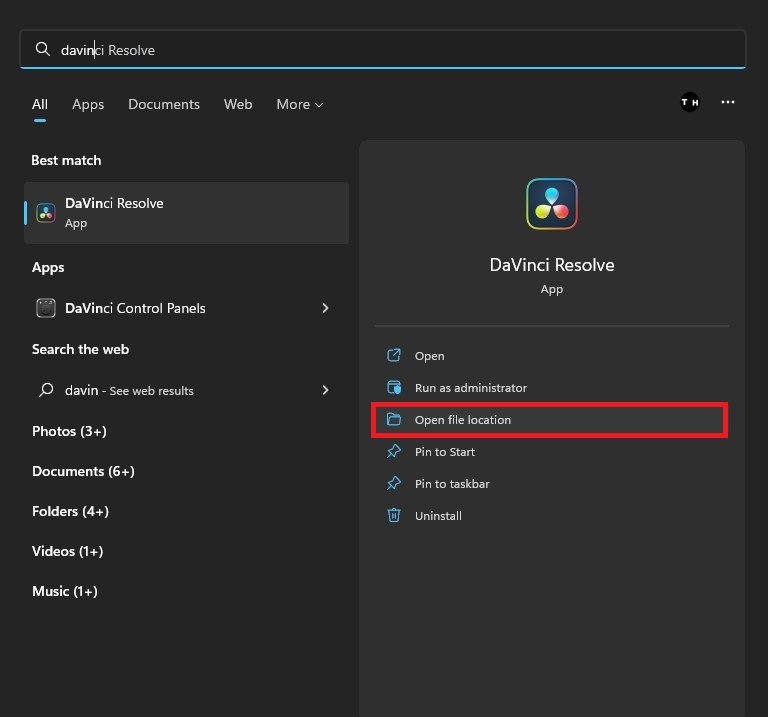
If DaVinci Resolve is not installed in this location, search for DaVinci and select Open File Location for the app. In most cases, this will be the location of the DaVinci Resolve shortcut. Right-click the shortcut and select Open File Location again to get to the final install location for this app.
DaVinci Resolve > Open File Location
Change DaVinci Resolve 18 Graphics Preference
After adding the application to this list, click Options to change its Graphics preference to High performance. This will allow DaVinci Resolve to utilize your graphics card and fix the “unable to initialize GPU” error you are getting.
High Performance Graphics Preference
-
This error is usually caused by outdated or incompatible GPU drivers, incorrect graphics card settings, or insufficient graphics card memory.
-
If none of the solutions work, you may need to upgrade your graphics card to a more powerful and compatible one. Additionally, you can seek help from the official DaVinci Resolve community forums or contact their customer support for further assistance.
Can you clarify what the system is doing now? Is it hanging before it gets to the Project Manager page? That’s my assumption.
The AMD driver you previously had loaded is identical to my Windows system with an RX580 card. And the Windows versions are identical. So that should have worked. Hopefully the AMD driver you installed since then still works.
EDIT: Forget all that stuff below, and first try this:
In an Explorer window, go to this folder:
C:\Users\cadla\AppData\Roaming\Blackmagic Design\DaVinci Resolve\Preferences
Make a copy of the config.dat file and call it config.dat.orig
Right click config.dat and select Edit. That should open the file in Notepad. Scroll about 3/4 of the way down the file, until you see this line:
Local.GPU.Mode = Unknown
EDIT 2: Sorry! Looking at your most recent log file, that line has gone away. If you don’t see a Local.GPU.Mode = line in your current config.dat file, then add this line at the end of the file:
Local.GPU.Mode = OpenCL
Then File — Save and File — Exit.
If the Local.GPU.Mode = Unknown IS back, for some reason, then:
Change Unknown to OpenCL
So it looks like this:
Local.GPU.Mode = OpenCL
Then do a File -Save then a File — Exit.
Launch Resolve. What happens?
If that didn’t help, THEN try all the stuff below.
You said unplugging all the USB stuff didn’t help. That’s step one of diagnosing a Resolve hang.
Step 2 is the firewall. Please remove the system from the Internet, and as a test turn off the firewall. Does that help. If not, try the following:
Step 3. Open a Powershell in Run as administrator mode. Then enter this:
netsh int ipv4 show dynamicportrange tcp
You should get what is shown in the image below:
- dynamic_port_range.PNG (10.83 KiB) Viewed 87465 times
If you see that, jump to step 4. If you don’t see that, enter this command:
netsh int ipv4 set dynamicportrange protocol=tcp startport=49152 numberofports=16384
then press enter, and then reboot the system. Now does Resolve launch?
Step 4. Enter this in the same Powershell window:
Get-NetTCPConnection | Where-Object { $_.State -eq «Listen» -and $_.LocalPort -eq 1144 } | ForEach-Object { (get-process -id $_.OwningProcess).Description }
and hit Enter. It should just return to a prompt. If not, it will report any apps using that port. Are there any? Fusion related would be OK.

