- Manuals
- Brands
- Dyson Manuals
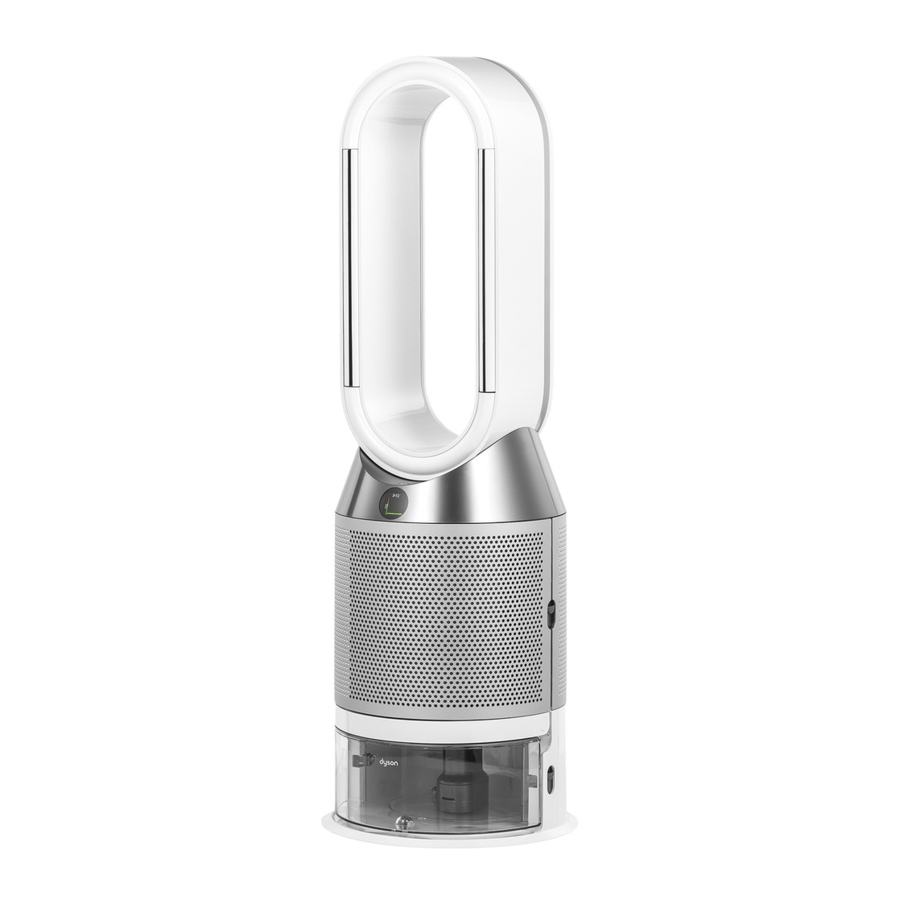
- Air Cleaner
- PH01
- Service instructions manual
-
Contents
-
Table of Contents
-
Bookmarks
Quick Links
Questo manuale d’istruzione è fornito da trovaprezzi.it. Scopri tutte le offerte per
Dyson Pure Humidify +
Cool
o cerca il tuo prodotto tra le
migliori offerte di Trattamento Aria
Issued December 19
Related Manuals for Dyson PH01
Summary of Contents for Dyson PH01
-
Page 1
Questo manuale d’istruzione è fornito da trovaprezzi.it. Scopri tutte le offerte per Dyson Pure Humidify + Cool o cerca il tuo prodotto tra le migliori offerte di Trattamento Aria Issued December 19… -
Page 2: Table Of Contents
This manual is written specifically for Dyson trained engineers and covers the full Circulates PH01 and PH02 range. The service instructions assume that the engineer has the approved Air Multiplier technology projects 350 litres of air per second, tools and test equipment with them.
-
Page 3: Product Overview Features And Benefits
HEPA filter to capture 99.95% of ultra fine particles. 4. Wrong Power Supply Unit (PSU) inserted/PSU fault PH01 machine comes with Combination filters. PH02 comes with permanent Cryptomic filters and Combination filters.
-
Page 4: Technical Information
Faults codes will be displayed as per the following format: 00X-0X-0X-X. As well as the UI error symbols, built into PH01 and PH02’s software is an engineers diagnostic In most cases it is only necessary to recognise the first three digits to determine the fault.
-
Page 5: Deep Cleaning The Machine
Deep cleaning the machine PH01 and PH02 have a ‘self cleaning’ cycle built in. This is to reduce limescale build up. In normal use the machine will show an alert when it needs to carry out a Deep clean cycle.
-
Page 6: Testing And Repair Process
General information Electrical safety testing The following tests must be performed prior to and upon completion of all repairs to Dyson products and before any functional checks. You must ensure that a full visual inspection of the product is completed prior to repair.
-
Page 7: Amp Service Assembly — Removal
Repair notes AMP Service Assembly — removal 01 Press the release catches on either side of the filter housings. Remove the filter Housing and Filter assemblies from the product. 04 Carefully lift off the Amp service Note: if the product is a Cryptomic assembly.
-
Page 8
For removal instructions of these parts continue to the next step. Note: not all PCBs are available as spare parts at launch. Always check Dyson Central for 08 To remove the Power button, lever out the two arms and push out the Button, spring and Foam. -
Page 9
09 Push the three grommets through the 12 Remove the Four T-15 screws. neck plate. 13 Release two of the three looms from 10 Remove the six T-8 screws. the large Grommet. 14 Carefully push the large single grommet through the hole in the 11 Remove the plate from the AMP neck assembly. -
Page 10: Amp Service Assembly — Fitting
Repair notes AMP Service Assembly — fitting If the Air Amp Neck Service assembly was previously removed, continue to the next step. If the reason for the repair is to replace the entire Amp Service assembly go to page 20 step 23 — 30. 15 Carefully feed the Grommets 16 Feed the three looms through the and looms through the AMP neck…
-
Page 11
21 Seat the three grommets into the 18 Fit the four T-15 screws. neck plate. 19 Feed the three looms through the neck plate. 22 Locate the foam ring and then the spring into the AMP neck assembly. Ensure the On/Off button is orientated the correct way up. Push the On/Off Button Service assembly 20 Fit the six T-8 screws. -
Page 12
24 Secure the Dust sensor to main controller loom into the retainers provided. 23 Carefully attach the Dust sensor to main controller loom. Locate the Dust Sensor and Dust sensor PCB Service assembly. 25 Reconnect the four Looms. Fit the two long T-8 screws. -
Page 13
26 Secure all Looms into the retainers provided. 27 Line up the LCD with the window on the Neck Service assembly. 28 Fit the eight T-15 screws. Lower the Air Amp Service assembly. -
Page 14: Lower Body Service Assembly — Removal
Repair notes Lower Body Service Assembly — removal Before continuing the following components will need to be removed as previously shown: Air amp service assembly (Pages 10 — 11, steps 01 — 05) 29 Refit the Evaporator assembly. 31 Remove the Water tank. 32 Remove the two T-8 screws in the top of the Filter release catch service assembly.
-
Page 15
37 If the Evaporator door needs replacing, remove the two screws in the top hinge cover and remove the 34 Disconnect the Power loom from the cover. Power controller PCB. 35 Remove the two T-15 screws on the right handside from behind the filter release catch holding at the base. -
Page 16
40 To refit the hinge covers, shut the door. Slide the cover from behind 41 Remove the two T-15 screws. the hinge so the lever folds back into the cover. 42 Remove the two T-8 screws from the Slide the cover forward until the screw underside of the Lower body service bosses line up. -
Page 17: Lower Body Service Assembly — Fitting
Repair notes Lower Body Service Assembly — fitting 44 Release the Power loom from the retainers in the side of the Main body. 45 Lift the Main body away from the 46 Place the Main body on top of the Lower Body Service assembly. Lower body service assembly.
-
Page 18
49 To refit the hinge covers, shut the door. Slide the cover from behind the hinge so the lever folds back into the cover. 48 Fit the two T-8 screws in the underside of the Lower body, and the four T-15 screws to secure the Main body to the Lower Body. -
Page 19
50 Feed the power loom through the hole in the top right hand side of the main body. 53 Ensure the power loom is positioned as shown to avoid trapping. 54 Slide the bottom of the Filter release catch into the details in the Main 51 Connect the Main power loom to the body. -
Page 20: Motor And Bucket Service Assembly — Removal
Repair notes Motor and Bucket Service Assembly — removal Before continuing the following components will need to be removed as previously shown: Air amp service assembly (Pages 10 — 11, steps 01 — 05) 59 Feed the Grommet and connector 56 Disconnect the Motor loom from the Main PCB assembly.
-
Page 21
62 With all three clips released the motor bucket can be removed. Carefully lift the motor bucket up and away from the Main body. 61 Using a blunt screwdriver carefully push the three tabs securing the Motor and Bucket assembly inside the Main body. -
Page 22: Motor And Bucket Service Assembly — Fitting
Repair notes Motor and Bucket Service Assembly — fitting Cross section view of Upper retention ring and spring positions Important: during shipping/transport the Upper, Lower retention rings and springs can detach. Before fitting the Motor and bucket assembly the Upper and Lower Spring retention rings have to be seated on their corresponding ledges on the motor bucket…
-
Page 23
66 Feed the motor loom connector through the hole in the Main body. 65 Push the Motor down until three clicks are heard. 67 Securely seat the motor loom grommet into the hole in the main body. 68 Connect the new motor to the Main PCB. -
Page 24: Connection Shuttle Service Assembly — Removal
Repair notes Connection Shuttle Service Assembly — removal Before continuing the following components will need to be removed as previously shown: Air amp service assembly (Pages 10 — 11, steps 01 — 05) Lower Body Service assembly (page 25 — 30, steps 31 — 35). 70 Remove the Tray Level Harness assembly.
-
Page 25: Connection Shuttle Service Assembly — Fitting
Repair notes Connection Shuttle Service Assembly — fitting 76 Slide the new Connection Shuttle Service assembly into place ensuring all the looms are free from trapping 73 Remove the six T-8 screws holding the tray to the Main body. and no seals have folded over. 74 Disconnect the Shuttle Loom from the Power controller PCB and release the loom from the retainers in the side of…
-
Page 26
79 Position the Connection Shuttle as shown and test it slides freely. 80 Locate the Shuttle Spring and Shuttle Spring Spigot into the hole in the rear of the Connection Shuttle. 78 Firmly locate the two rails on the base of the Water return tray onto the details on the Connection 81 Hold the Spigot firmly whilst carefully Shuttle. -
Page 27: Internal Power Harness Service Assembly — Removal
Repair notes Internal Power Harness Service Assembly — removal Before continuing the following components will need to be removed as previously shown: Air amp service assembly (Pages 10 — 11, steps 01 — 05) Lower Body Service assembly (page 25 — 30, steps 31 — 35). 82 Locate the tray level sensor into the 85 Remove the two T-8 screws holding water return tray.
-
Page 28
88 Unclip the retaing detail at the end of 91 Remove the two T-8 screws securing the skirt from the base. the Socket holder. 89 Remove the two countersunk T-8 92 Remove the Holder and Power screws holding the Base plate. harness. -
Page 29: Internal Power Harness Service Assembly — Fitting
Repair notes Internal Power Harness Service Assembly — fitting 97 Pull the Jack into the holder until it 94 Feed the new Power Harness locks and is flush with the edge as through the right handside of the shown. Lower Body Service assembly. 98 Seat the front of the holder into the 95 Locate the gasket into the hole in the Lower body.
-
Page 30
101 Place the Base plate onto the Lower body. Fit the two countersunk T-8 screws. 99 Press the holder down and fit the two T-8 screws. IMPORTANT: whilst tightening the screws check that the gasket does not become mishapen or the DC Jack misplaced. -
Page 31: Parts Diagram Main Body
Parts diagram Main body Motor Bucket Seal Tail Cone Motor & Bucket Service Assy Tray Level Sensor Assy Internal Input Harness Service Assy Clean Cycle PCB Assy 103 Run the left handside of the Base LCD Display Service Assy Skirt anti-clockwise aroun the base. Clip the securing tab in the base.
-
Page 32: Amp And Filter Assemblies
Parts diagram Amp and Filter assemblies Screw M3x15-P1 Remote Control Assy Air Amp Neck Service Assy Dust Sensor Assy Filter Housing Singular Glass Hepa & Inner Carbon Filter MO…
This manual is also suitable for:
Ph02
Technical infomation
Accessing the diagnostic menu
Diagnostic menu
As well as the UI error symbols, built into PH01 and PH02’s software is an engineers diagnostic
menu designed to enable the repair agent a quickly diagnosis of the machines failure.
The menu is accessed by pressing a sequence of buttons via a standard remote control.
2
1
AUTO
Switch
Press night mode
machine on.
button once.
4
5
AUTO
Engineering screen
will appear.
Immediately press
the oscillation
button once.
Once you have finished accssing the engineering menu, press any button on the remote except
the ‘i’ button to exit the diagnostic menu.
If the engineering screen does not appear press any button to reset and start again.
Repeat all steps ensuring the flow button is pressed between 11 and 13 seconds detailed in
step 3.
4
3
AUTO
AUTO
Hold down flow
mode direction
button for 11 to
13 seconds.
6
AUTO
Press i button six times to show
fault code screen
(the screen above is an
example).
04
Technical infomation
Diagnostic table
Faults codes will be displayed as per the following format: 00X-0X-0X-X.
In most cases it is only necessary to recognise the first three digits to determine the fault.
Fault code
Any codes starting with 002
Motor and Bucket assembly
except 002-02-01-2
002-02-01-2
AMP assembly
Any codes starting with 003
Main PCB assembly
Any codes starting with 004
LCD display service assembly or
Main PCB assembly
Any codes starting with 005
Main PCB assembly
Any codes starting with 006
Main PCB assembly
Any codes starting with 007
Power supply unit, DC inlet assembly or Main PCB assembly
Any codes starting with 008
Dust sensor service assembly or
Sensor input service assembly or
Sensor PCB service assembly
Any codes starting with 009
Wifi PCB*, Wifi harness assembly, Heater PCB, Heater har-
except 009-01-01-1 and
ness or Humidifier PCB
009-01-02-1
009-01-01-1
Motor and Bucket assembly
009-01-02-1
Any codes starting with 010
Main PCB assembly
Any codes starting with 011
Humidifier PCB, AMP assembly, Evaporator tray sensor, Water
tank harness or Pump column
*The Wifi PCB is a non-replaceable part.
Affected Part/s
05
(Ocr-Read Summary of Contents of some pages of the Dyson PH01 Document (Main Content), UPD: 01 September 2023)
-
9, 10 Remove the six T-8 screws. 14 11 Remove the plate from the AMP neck assembly. 09 Push the three grommets through the neck plate. 15 12 Remove the Four T-15 screws. 13 Release two of the three looms from the large Grommet. 14 Carefully push the large single grommet through the hole in the AMP neck assembly.
… -
6, Ensure that at all times during the repair and testing of products that customers, pets, children and you are not exposed to any Live electrical supply. Electrical safety testing Insulation test points: Test directly onto the eight T-10 screws in the Main body. Note: the filters will need to be removed to gain access to the screws. These tests are vital to avoid any possibility of personal injury to the end user. T…
-
25, Dyson PH01 73 Remove the six T-8 screws holding the tray to the Main body. 74 Disconnect the Shuttle Loom from the Power controller PCB and release the loom from the retainers in the side of the Main body. 75 Remove the Connection Shuttle Service assembly from the Main body. 46 76 Slide the new Connection Shuttle Service assembly into place ensuring all the looms are free from trapping and no seals have folded over. 77 …
-
3, 01 Product overview Features and benefits 02 03 Product overview Display error symbols Captures gases and ultra fine particles The sealed filtration system combines an activates carbon filter to remove gases and a sealed HEPA filter to capture 99.95% of ultra fine particles. PH01 machine comes with Combination filters. PH02 comes with permanent Cryptomic filters and Combination filters. Anti-bacterial evaporator Silver strands are woven int…
-
5, PH01 and PH02 have a ‘self cleaning’ cycle built in. This is to reduce limescale build up. In normal use the machine will show an alert when it needs to carry out a Deep clean cycle. If connected to the Dyson Link app, you will receive a notification message. If not using the Dyson Link App, the LCD screen on the machine will alert you and the Deep clean cycle button will light up. To cancel the Deep clean cycle at any point, press and hold the Deep clean cycle button for five…
-
22, Repair notes Motor and Bucket Service Assembly — fitting 63 Important: ensure both the Upper and Lower retention rings and all six tension springs are located correctly around the top and bottom of the motor bucket assembly. Failure to do so will result in a failed repair. Top view of motor Bottom view of motor Upper retention ring Cross section view of Upper retention ring and spring positions Important: during shipping/transport the Upper, Lower retention rings and sp…
-
28, 90 Remove the metal Base plate. 89 Remove the two countersunk T-8 screws holding the Base plate. 88 Unclip the retaing detail at the end of the skirt from the base. 52 91 Remove the two T-8 screws securing the Socket holder. 92 Remove the Holder and Power harness. 93 Carefully snip the Power harness and feed through the Lower body. 53
… -
26, Dyson PH01 78 Firmly locate the two rails on the base of the Water return tray onto the details on the Connection Shuttle. 48 79 Position the Connection Shuttle as shown and test it slides freely. 80 Locate the Shuttle Spring and Shuttle Spring Spigot into the hole in the rear of the Connection Shuttle. 81 Hold the Spigot firmly whilst carefully fitting the four T-8 screws. 49
… -
8, 06 At this point any of the PCB’s can be replaced Note: the Dust sensor and Dust sensors PCB are within the AMP Service assembly. For removal instructions of these parts continue to the next step. Note: not all PCBs are available as spare parts at launch. Always check Dyson Central for availability. 12 Main PCB LCD assembly Deep clean cycle PCB Humidifier PCB Wifi PCB 07 Remove the two T-8 screws holding the dust sensor and sensors PCB servic…
-
1, Dyson PH01 Issued December 19 Questo manuale d’istruzione è fornito da trovaprezzi.it. Scopri tutte le offerte per Dyson Pure Humidify + Cool o cerca il tuo prodotto tra le migliori offerte di Trattamento Aria
… -
30, 99 Press the holder down and fit the two T-8 screws. IMPORTANT: whilst tightening the screws check that the gasket does not become mishapen or the DC Jack misplaced. 100 Retain the Internal Power Harness into the details provided in the Lower body. 56 101 Place the Base plate onto the Lower body. Fit the two countersunk T-8 screws. 102 Locate the detail in the centre of the Base Skirt onto the centre of the Lower body Service assembly. Push down on the centre to secure the …
-
27, 82 Locate the tray level sensor into the water return tray. 83 Retain the Tray level sensor harness into all the details provided and feed through the top of the Main body. 84 Retain the Shuttle Harness into all details provided and feed through the top of the Main body. 50 After fitting the harness, continuing fitting the following components as previously shown: Lower boby assembly (pages 31 — 35, steps 46 — 55) Air AMP Service assembly (Pages 21 — 24, st…
-
20, 56 Disconnect the Motor loom from the Main PCB assembly. 57 Remove the Motor to amp seal. 58 Push the Grommet, loom and connector through the hole in the Main body. Open the Evaporator door. Repair notes Motor and Bucket Service Assembly — removal Before continuing the following components will need to be removed as previously shown: Air amp service assembly (Pages 10 — 11, steps 01 — 05) 36 59 Feed the Grommet and connector throu…
-
18, 48 Fit the two T-8 screws in the underside of the Lower body, and the four T-15 screws to secure the Main body to the Lower Body. 32 49 To refit the hinge covers, shut the door. Slide the cover from behind the hinge so the lever folds back into the cover. Fit the two T-8 screws into the Hinge cover. Slide the cover forward until the screw bosses line up. 33
… -
23, 65 Push the Motor down until three clicks are heard. Twist the Motor from right to left to test it has locked into the Main body securely. 42 66 Feed the motor loom connector through the hole in the Main body. 67 Securely seat the motor loom grommet into the hole in the main body. 68 Connect the new motor to the Main PCB. 43
… -
11, 18 18 Fit the four T-15 screws. 19 Feed the three looms through the neck plate. 20 Fit the six T-8 screws. 22 Locate the foam ring and then the spring into the AMP neck assembly. 19 21 Seat the three grommets into the neck plate. Ensure the On/Off button is orientated the correct way up. Push the On/Off Button Service assembly through the hole in the neck until it locks into place.
… -
29, Dyson PH01 Repair notes Internal Power Harness Service Assembly — fitting 94 Feed the new Power Harness through the right handside of the Lower Body Service assembly. 96 Locate the Harness through the opening in the top of the holder. 95 Locate the gasket into the hole in the Lower body. Ensure it is centered and there are no folds. 54 97 Pull the Jack into the holder until it locks and i…
-
21, 61 Using a blunt screwdriver carefully push the three tabs securing the Motor and Bucket assembly inside the Main body. Lift the Motor and Bucket out of the Main body as the last tab is released. 38 62 With all three clips released the motor bucket can be removed. Carefully lift the motor bucket up and away from the Main body. 39
…
Technical infomation
Accessing the diagnostic menu
Diagnostic menu
As well as the UI error symbols, built into PH01 and PH02’s software is an engineers diagnostic
menu designed to enable the repair agent a quickly diagnosis of the machines failure.
The menu is accessed by pressing a sequence of buttons via a standard remote control.
2
1
AUTO
Switch
Press night mode
machine on.
button once.
4
5
AUTO
Engineering screen
will appear.
Immediately press
the oscillation
button once.
Once you have finished accssing the engineering menu, press any button on the remote except
the ‘i’ button to exit the diagnostic menu.
If the engineering screen does not appear press any button to reset and start again.
Repeat all steps ensuring the flow button is pressed between 11 and 13 seconds detailed in
step 3.
4
3
AUTO
AUTO
Hold down flow
mode direction
button for 11 to
13 seconds.
6
AUTO
Press i button six times to show
fault code screen
(the screen above is an
example).
04
Technical infomation
Diagnostic table
Faults codes will be displayed as per the following format: 00X-0X-0X-X.
In most cases it is only necessary to recognise the first three digits to determine the fault.
Fault code
Any codes starting with 002
Motor and Bucket assembly
except 002-02-01-2
002-02-01-2
AMP assembly
Any codes starting with 003
Main PCB assembly
Any codes starting with 004
LCD display service assembly or
Main PCB assembly
Any codes starting with 005
Main PCB assembly
Any codes starting with 006
Main PCB assembly
Any codes starting with 007
Power supply unit, DC inlet assembly or Main PCB assembly
Any codes starting with 008
Dust sensor service assembly or
Sensor input service assembly or
Sensor PCB service assembly
Any codes starting with 009
Wifi PCB*, Wifi harness assembly, Heater PCB, Heater har-
except 009-01-01-1 and
ness or Humidifier PCB
009-01-02-1
009-01-01-1
Motor and Bucket assembly
009-01-02-1
Any codes starting with 010
Main PCB assembly
Any codes starting with 011
Humidifier PCB, AMP assembly, Evaporator tray sensor, Water
tank harness or Pump column
*The Wifi PCB is a non-replaceable part.
Affected Part/s
05
Чистое увлажнение + охлаждение 330PH01

Руководство пользователя
Благодарим вас за покупку очистительного и увлажняющего вентилятора Dyson.
Быстрая настройка машины с пошаговой поддержкой
- Персонализируйте свои настройки для максимального комфорта.
- Управляйте своей машиной и следите за ней, где бы вы ни находились.
- Автоматически обновляйте свою машину до последней версии программного обеспечения.
Загрузите приложение Dyson Link
Загрузите приложение Dyson Link из магазина приложений или Google Play.
Откройте приложение и следуйте инструкциям на экране, чтобы создать новую учетную запись.
Для получения дополнительной информации и поддержки: dyson.co.uk 0800 298 0298.

Apple и логотип Apple являются товарными знаками Apple Inc., зарегистрированными в США и других странах. App Store является знаком обслуживания Apple Inc., зарегистрированным в США и других странах.
Google Play и логотип Google Play являются товарными знаками Google Inc.
Активация гарантии
Мы не перестаем заботиться о наших машинах, когда они становятся вашими.
После активации вашей бесплатной двухлетней гарантии на ваш очистительный вентилятор-увлажнитель Dyson будет покрываться запасные части и работа (за исключением фильтров и испарителя) в течение двух лет с даты покупки в соответствии с условиями гарантии.
Даже после истечения срока гарантии мы будем рады помочь.
Бесплатные запчасти и работа Dyson
Беспроблемная замена
Совет эксперта. Семь дней в неделю.
Видео с инструкциями и полезные советы
Ваш серийный номер можно найти на табличке с паспортными данными, которая находится на основании вашей машины.
Запишите свой серийный номер для использования в будущем.
Эта иллюстрация предназначена для бывшегоampтолько для целей.

Сборка вашей машины
Используйте оба хонда, чтобы вытащить очищающий увлажняющий фонарь Dyson из коробки за его упор.
Не поднимайте его ampжизненная петля.
Нажмите кнопки освобождения кожуха с обеих сторон машины, чтобы освободить кожухи.
Когда кожухи будут сняты, внутренняя дверца, в которой находится испаритель, откроется пружиной. Закройте внутреннюю дверцу, убедившись, что она плотно закрывается со щелчком.

Ваш очищающий увлажняющий фонарь Dyson оснащен комбинированным фильтром.
Извлеките комбинированный фильтр из любой защитной упаковки.
Вставьте оба комбинированных фильтра в кожухи, пока защелки сверху и снизу не встанут на место.
Поместите кожухи на место на основном корпусе и осторожно надавите, пока они не встанут на место со щелчком.

Поместите пульт дистанционного управления на машину так, чтобы кнопки были направлены вниз.
Подключите и включите.
Наполнение резервуара для воды

- Перед тем, как снять резервуар для воды, убедитесь, что режимы увлажнения выключены, а резервуар для воды пустой.
- Нажмите кнопки освобождения резервуара для воды на боковых сторонах машины.
- Выдвиньте резервуар для воды из машины.
- Перенесите резервуар для воды за ручку вверх и отсоедините полицейский фиксатор.
- Заполните резервуар для воды до максимального уровня холодной водой.
- Установите на место полицейский и закрепите зажимы крышки на месте.
- Вставьте крышку резервуара для воды в машину до щелчка.
Использование вашей машины


Информация Ману

Нажмите эту кнопку, чтобы просмотреть информацию, отслеживаемую вашим очищающим и увлажняющим вентилятором Dyson.
Информация о качестве воздуха, температуре, влажности. Показаны уровни фильтра и испарителя.
Когда конкретный тип загрязнителя вызывает снижение качества воздуха, на ЖК-экране отображается значок загрязнителя.


Режим автоматической очистки

Установите очищающий увлажняющий фонарь Dyson в режим автоматической очистки, и встроенные датчики будут грамотно регулировать настройки вашей машины в соответствии с качеством воздуха.
Качество воздуха: ваша машина остановится, когда будет достигнуто целевое качество воздуха, и снова включится, когда уровень качества воздуха упадет.
Скорость воздушного потока: скорость воздушного потока будет увеличиваться до тех пор, пока не будут достигнуты заданные качество и температура воздуха.
Ночной режим: ваша машина будет работать только со скоростью воздушного потока от 1 до 4.
Режим автоматического увлажнения

Установите очищающий увлажняющий фонарь Dyson в режим автоматического увлажнения, и встроенные датчики будут грамотно регулировать настройки машины в соответствии с температурой и влажностью в вашей комнате.
Влажность в помещении: ваша машина
будет приостанавливаться при достижении заданной влажности в помещении и снова включаться, когда уровень влажности в помещении падает.
Скорость воздушного потока: скорость воздушного потока будет увеличиваться до тех пор, пока не будет достигнут целевой уровень влажности.
Чтобы выключить режим автоматического увлажнения или изменить уровень влажности вручную, нажмите кнопку управления влажностью.
осцилляция

Нажмите кнопку «Осцилляция» и выберите угол колебания 0 °, 45 °, 90 ° или режим «Ветерок».
Приостановите колебание в любой момент, нажав кнопку колебания.
Для возобновления снова нажмите кнопку «Осцилляция».
Чтобы сбросить направление осцилляции на центр, нажмите и удерживайте кнопку осцилляции в течение двух секунд.

Глубокая чистка вашей машины
Важно: не выключайте и не отключайте машину от сети, поскольку инструкции по очистке будут отображаться на ЖК-экране.
Чтобы ваш очищающий и увлажняющий вентилятор Dyson всегда работал с максимальной эффективностью, важно проводить регулярную глубокую очистку, чтобы удалить известковый налет.
До и после длительных периодов, когда увлажнение не используется, рекомендуется выполнить дополнительные циклы глубокой очистки.
В регионах с жесткой водой может потребоваться более частый запуск цикла глубокой очистки. Мы рекомендуем использовать фильтрованную воду, чтобы ваша машина всегда работала максимально эффективно.
Ваша машина предупредит вас, когда вам потребуется выполнить цикл глубокой очистки.
Если вы подключены к Dyson Link opp, вы получите уведомление.
Если вы не используете Dyson Link opp, ЖК-экран вашей машины предупредит вас, и загорится кнопка цикла глубокой очистки.
Чтобы отменить цикл глубокой очистки в любой момент, нажмите и удерживайте кнопку цикла глубокой очистки в течение пяти секунд.

Нажмите кнопку цикла глубокой очистки на передней панели машины, и ваши инструкции отобразятся на ЖК-экране.
Нажмите на кнопки освобождения кожуха, чтобы снять кожух. Внутренняя дверь откроется пружиной. Отложите кожухи в сторону во время выполнения цикла глубокой очистки.
Нажмите кнопки освобождения резервуара для воды на боковых сторонах машины.
Выдвиньте резервуар для воды из машины и снимите крышку.
Снимите испаритель с машины, поместите его в резервуар для воды и закройте крышку.


Смена фильтров
ЖК-экран вашей машины предупредит вас, когда вам нужно заменить фильтры.
Если вы подключены к приложению Dyson Link, вы получите уведомление.
Перейдите на сайт dyson.co.uk/support/filters, чтобы купить сменные фильтры.

Выключите и отключите машину.
Нажмите кнопки освобождения кожуха с обеих сторон машины, чтобы освободить кожухи.
Когда кожухи будут сняты, внутренняя дверца, в которой находится испаритель, откроется пружиной.
Закройте внутреннюю дверцу, убедившись, что она плотно закрывается со щелчком.
Нажмите на выступы в верхней и нижней части кожухов, чтобы освободить фильтры.
Выбрасывайте использованные фильтры в мусорное ведро.
Снимите защитную упаковку с новых фильтров.
Вставьте фильтры в кожухи, пока защелки сверху и снизу не встанут на место.
Установите кожухи на основание и сильно надавите, пока они не встанут на место со щелчком.
Подключите машину к электросети и нажмите кнопку режима ожидания на задней панели машины.

важно: Сбросить ваш фильтр
Нажмите и удерживайте кнопку ночного режима на пульте дистанционного управления.
На ЖК-экране вашего устройства начнется обратный отсчет от пяти до экрана по умолчанию.
Уровень фильтра будет сброшен, и ваша машина будет готова к использованию.
Непрерывный мониторинг
При включенном непрерывном мониторинге ваш очищающий и увлажняющий вентилятор Dyson будет собирать информацию о качестве воздуха, температуре и влажности, которая отображается на ЖК-экране и в приложении Dyson Link.
По умолчанию непрерывный мониторинг отключен. После включения он всегда будет активен, пока вы не выключите его снова.
Включение / выключение непрерывного мониторинга
Нажмите и удерживайте кнопку режима автоматической очистки на пульте дистанционного управления в течение пяти секунд, чтобы включить его. На ЖК-экране будет отображаться, когда непрерывный мониторинг включен или выключен.
Wi-Fi подключения
По умолчанию Wi-Fi включен. Чтобы включить или выключить Wi-Fi, нажмите и удерживайте кнопку режима ожидания на устройстве в течение пяти секунд.
Уход за вашей машиной
Чтобы ваш вентилятор-увлажнитель Dyson всегда работал с максимальной эффективностью, важно регулярно чистить его и проверять на наличие засоров.

Уборка
Если пыль скапливается на поверхности машины, вытрите пыль с ampподъемную петлю, кожухи и другие детали чистой сухой тканью.
Ищите засоры в отверстиях для впуска воздуха на кожухе и небольшом отверстии внутри кожуха. ampжизненная петля.
Используйте мягкую щетку для удаления пыли и мусора.
Не используйте моющие средства или полироли для чистки машины.
Оповещения
Значок предупреждения может появиться на вашем ЖК-экране, чтобы показать, что ваша машина требует вашего внимания.
Непрерывный предупреждающий треугольник
Выключите и отключите машину.
Подождите 10 секунд, а затем снова подключите машину и включите ее.
Если значок предупреждения продолжает отображаться на ЖК-экране, обратитесь в Dyson.
Временный предупреждающий треугольник
Если предупреждение появляется на ЖК-экране, а затем исчезает, продолжайте использовать машину.
Если на ЖК-экране отображаются какие-либо другие значки предупреждений, обратитесь в Dyson за дальнейшими советами.
Документы / Ресурсы
Specifications:1834/1834454-ph01.pdf file (20 Apr 2023) |
Accompanying Data:
Dyson PH01 Air Cleaner PDF Service Instructions Manual (Updated: Thursday 20th of April 2023 01:39:48 PM)
Rating: 4.1 (rated by 50 users)
Compatible devices: Pure Hot + Cool Link HP02, Pure Hot+Cool HP04, purifier cool, pure hot+cool, PureCool TP05, pure hot + cool link, Pure Hot + Cool, Pure Cool DP04.
Recommended Documentation:
Text Version of Dyson PH01 Service Instructions Manual
(Ocr-Read Summary of Contents, UPD: 20 April 2023)
-
23, 65 Push the Motor down until three clicks are heard. Twist the Motor from right to left to test it has locked into the Main body securely. 42 66 Feed the motor loom connector through the hole in the Main body. 67 Securely seat the motor loom grommet into the hole in the main body.…
-
14, 29 Refit the Evaporator assembly. 30 Refit the Filter assemblies and filter Housings. 24 31 Remove the Water tank. 32 Remove the two T-8 screws in the top of the Filter release catch service assembly. 33 Remove the Filter release catch service assembly from the Mai…
-
17, Dyson PH01 45 Lift the Main body away from the Lower body service assembly. 44 Release the Power loom from the retainers in the side of the Main body. 30 Repair notes Lower Body Service Assembly — fitting 46 Place the Main body on top of the Lower Body Service assembly. Ensure it is positioned as shown, with the Main…
-
18, Dyson PH01 48 Fit the two T-8 screws in the underside of the Lower body, and the four T-15 screws to secure the Main body to the Lower Body. 32 49 To refit the hinge covers, shut the door. Slide the cover from behind the hinge so the lever folds back into the cover. Fit the two T-8 screw…
-
20, Dyson PH01 56 Disconnect the Motor loom from the Main PCB assembly. 57 Remove the Motor to amp seal. 58 Push the Grommet, loom and connector through the hole in the Main body. Open the Evaporator door. Repair notes Motor and Bucket Service Assembly — removal Before continuing the following components will need to be remo…
-
9, 10 Remove the six T-8 screws. 14 11 Remove the plate from the AMP neck assembly. 09 Push the three grommets through the neck plate. 15 12 Remove the Four T-15 screws. 13 Release two of the three looms from the large Grommet. 14 Carefully push the large single grommet through the hole in the AMP neck assem…
-
19, Dyson PH01 51 Connect the Main power loom to the Main PCB assembly. 52 Retain the Main power loom with Ferrite core into the details provided. 50 Feed the power loom through the hole in the top right hand side of the main body. 34 54 Slide the bottom of the Filter release catch into …
-
2, Technical information Accessing the Diagnostic menu………………………………………………………………………..04 Diagnostic table …………………………………………………………………………………………..05 Deep cleaning the machine ……………………….…
-
16, 40 To refit the hinge covers, shut the door. Slide the cover from behind the hinge so the lever folds back into the cover. Fit the two T-8 screws into the Hinge cover. Slide the cover forward until the screw bosses line up. 28 41 Remove the two T-15 screws. 42 Remove the t…
-
6, Ensure that at all times during the repair and testing of products that customers, pets, children and you are not exposed to any Live electrical supply. Electrical safety testing Insulation test points: Test directly onto the eight T-10 screws in the Main body.…
-
28, 90 Remove the metal Base plate. 89 Remove the two countersunk T-8 screws holding the Base plate. 88 Unclip the retaing detail at the end of the skirt from the base. 52 91 Remove the two T-8 screws securing the Socket holder. 92 Remove the Holder and Power harness. 93 Carefully snip the Power harness…
-
Dyson PH01 User Manual
-
Dyson PH01 User Guide
-
Dyson PH01 PDF Manual
-
Dyson PH01 Owner’s Manuals
Recommended Instructions: EC-F400, APE1 SERIES, Digital Wave Player VN-120PC


-
Minuteman C43000-00
Your Air Mover Provider®®C43000-00 USER MANUALMODEL: C43000-00Minuteman International specializes in innovative design and manufacturing of reliable air movers, while providing exible and efcient real-world solutions to meet our customer’s changing needs. Our movers are small and lightweight yet powerful enough to meet your restoration, drying, and ventilation needs. Ou …
C43000-00 12
-
Sharp IG-A20EK-W
IG-A20EK-WHIGH-DENSITY PLAMACLUSTER TECHNOLOGYWIDE LOUVER FOR HIGH OUTPUTEFFECTIVE AGAINST AIRBORNE VIRUSES &MOULD3 AIRSTREAM SETTINGSLOW POWER CONSUMPTIONQUIET OPERATIONAUTO RESTART SWITCHREDUCING CIGARETTE SMOKE ODOUR FROMCLOTHThis product is designed for making the business environment healthier and more comfortable. The Plamacluster Ion Generatorcreates th …
IG-A20EK-W 2
-
Fellowes AeraMax Pro AM II
AeraMax® Pro AM II1789 Norwood Avenue, Itasca, Illinois 60143 • 1-800-955-0959 • www.fellowes.comBrands© 2016 Fellowes, Inc. | Part #409896CUSTOMER SERVICE & SUPPORTwww.fellowes.comEurope Freephone: 00800-1810-1810Benelux: +31-(0)-13-458-0580Canada: 1-800-665-4339Deutschland: +49 (0)511 545489-0France: +33 (0) 1 78 64 91 00Italia: +39-071-730041Mexico: 001-800-514 …
AeraMax Pro AM II 28
Popular Right Now:
Operating Impressions, Questions and Answers:
sigh so this is #2…I bought this machine because I heard dyson made great, if not expensive products and living in an apartment, 8 really wanted clean air in winter. Well the first unit wouldn’t humidify past 15% no matter what and so I contacted dyson and they were actually very good about everything. New unit, just over a month now, stopped humidifying well two weeks ago and then suddenly yesterday was giving me no water errors, while I’m starting at a full tank. I’ve cleaned the contacts, dried out the lid etc, but nothing.
I’ll contact them again tomorrow…But this is honestly killing the brand in my mind. $1200 Canadian should not buy this level of performance. I was going to buy a honeywell purifier and a separate humidifier for like $700 total, but dyson offered great design, features and support. I feel like I made a mistake, and that’s the reason why although I wanted to buy one for my parents for Christmas, I didn’t. Anyway.