Last updated on 27 April 2023
Opening DaVinci Resolve and continuing your current project to find that your timeline is filled with “Media Offline” everywhere instead of your clips that should be there instead. Learn how to fix media offline in DaVinci Resolve below.
Don’t worry! The clips are still there, DaVinci Resolve just can’t locate the files. We’ll show you how you can help DaVinci Resolve locate the files so you can continue your work.
Quick guide
On DaVinci Resolve:
- Navigate to the “Media Pool” panel in the “Edit” or “Media” tab – this is where all your imported media is located.
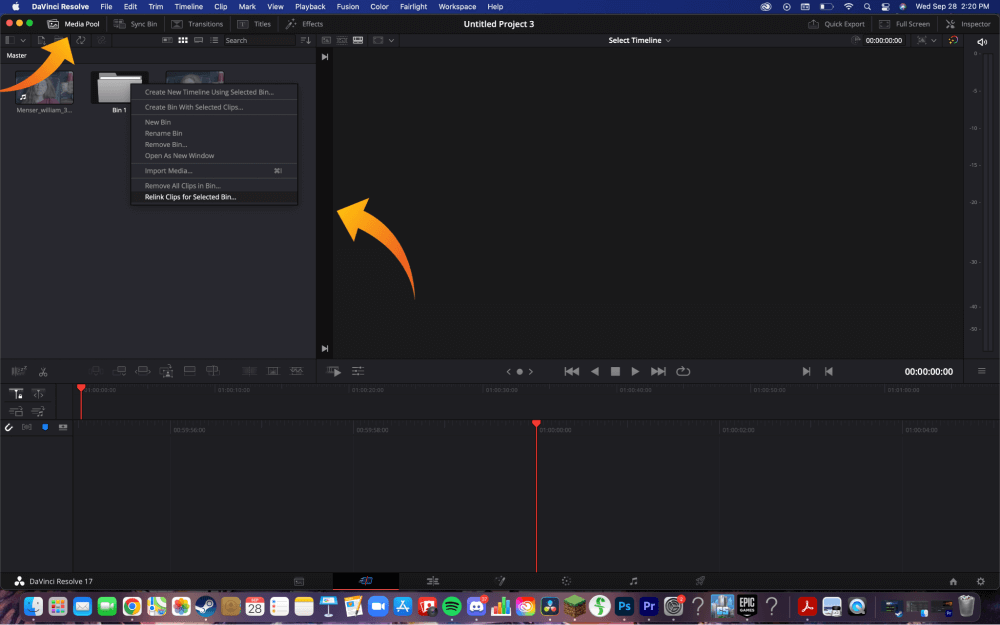
- Right-click on the background of the Media Pool and select “Relink Clips for Bins“
- Now all you have to do from here is locate where your files are and hit “Select folder“
Pro tip: If you aren’t sure where your files are located, you can broaden your search with DaVinci by doing a wider search on your computer such as searching through “Videos“, rather than a specific folder located in the videos folder. DaVinci will search for the files fairly quickly, a window should pop up that looks something like the image below.

800+ DaVinci Resolve Animated Elements
Over 800 unique drag & drop animations that work directly in DaVinci Resolve. Improve your video editing with professional video editing tools. No need to hire animators at a high cost & look more professional.
Provided in Apple ProRes 4444 + Alpha channel, MP4 H264 & PNG Photos.

Get 30% off – $84 $49
How to fix Media Offline – step by step
Here’s our step-by-step process which will go into more detail regarding the steps you need to follow to fix media offline in DaVinci Resolve.
Step 1 – In the “Edit” tab, locate the “Media Pool” panel
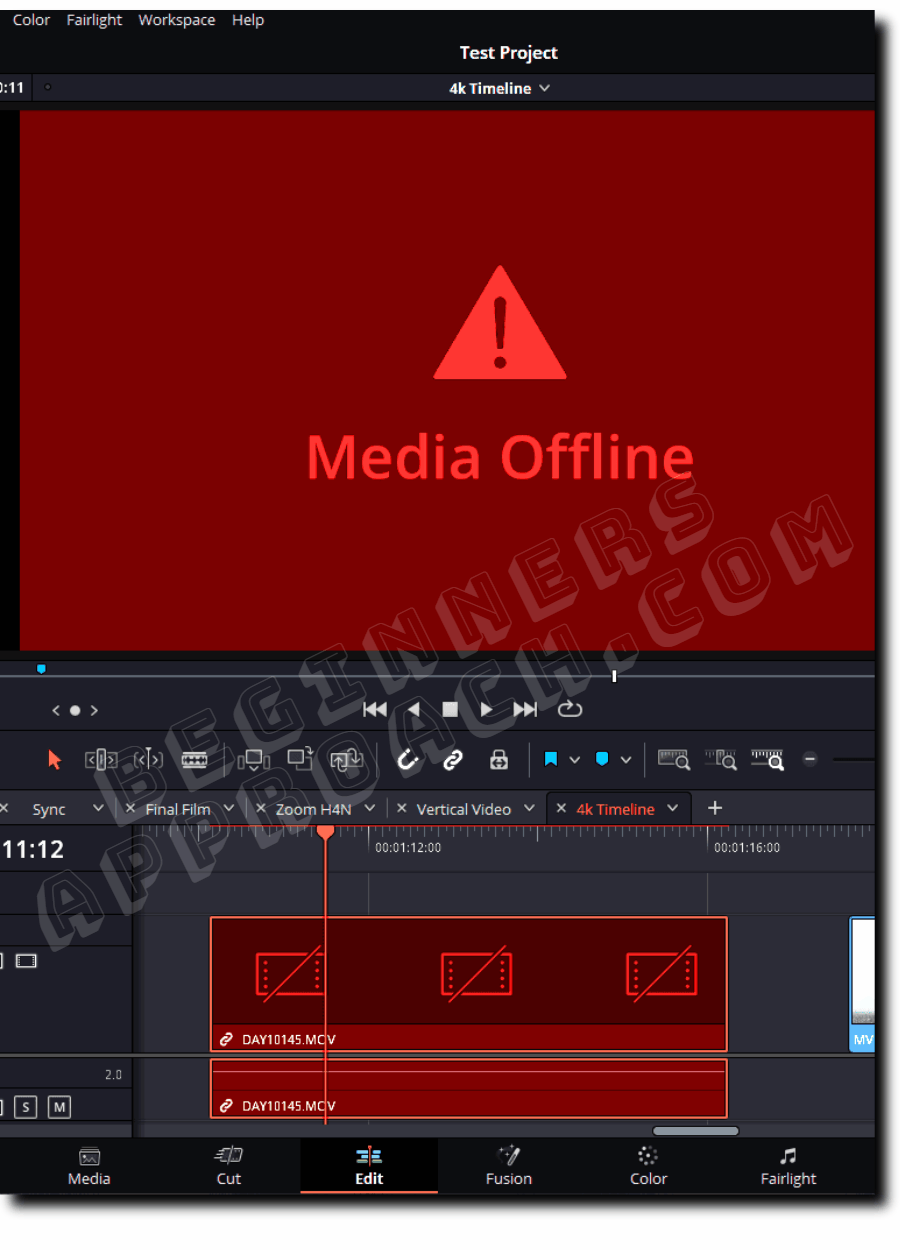
So you’ve opened up your project to find something that looks like the image below. The first task you need to complete is to find the “Master” panel. This is the panel where your imported media is located.
- Go to the “Edit” tab

- Go to “Media Pool” in the top-left. This is where you will find all of your media.

You can also find all of your media by going to the “Media” panel at the bottom of the screen. But either way will work the same.

Step 2 – Relink clips for bin
Right-click on the background of the master panel and select “Relink Clips for Bin“. This is so you can help DaVinci Resolve find the lost footage and fix media offline from showing up.

Step 3 – Locate your footage
A window will pop up looking similar to the below image. All you need to do now is locate your offline media.
If you’re struggling to find your offline media, then you can broaden your search in the OS by performing a wider search. (Searching through “Videos” instead of a specific folder located in Videos).
DaVinci Resolve will filter through thousands of files in a short amount of time to find your footage.

Go back to DaVinci Resolve. Your project should now look something like the below image. Your timeline should now be displayed as normal, and you should be able to continue working on your project.

Extra advice
If you only located a part of your offline media
If only a part of your footage was re-located, then it’s likely that the rest of the remaining footage is in another location. You can repeat the above steps and perform an even wider search than you performed before or you can search in a completely different location for the remaining footage.
If the above steps haven’t helped you fix offline media
It’s likely that your project is located on a hard drive or media server that your PC isn’t currently connected to. It’s worth double-checking that you’re connected to any servers that you need to be connected to and ensuring that you have any hard drives that could potentially contain the footage connected to your PC.
Video tutorial to fix “Media Offline”
Summary
You should now know how to quickly fix media offline within the DaVinci Resolve software. The process is similar to most video editing software, so it’s fairly easy to take the skills you’ve learnt today to other video editing platforms too.
Related
- Why Is DaVinci Resolve Free? + Free vs. Studio Differences
- How to Update DaVinci Resolve & Safely Backup Data
- Changing the Timeline Frame Rate in DaVinci Resolve
- How To Create Subtitles In DaVinci Resolve
- How to Add LUTs in DaVinci Resolve + Free Downloads
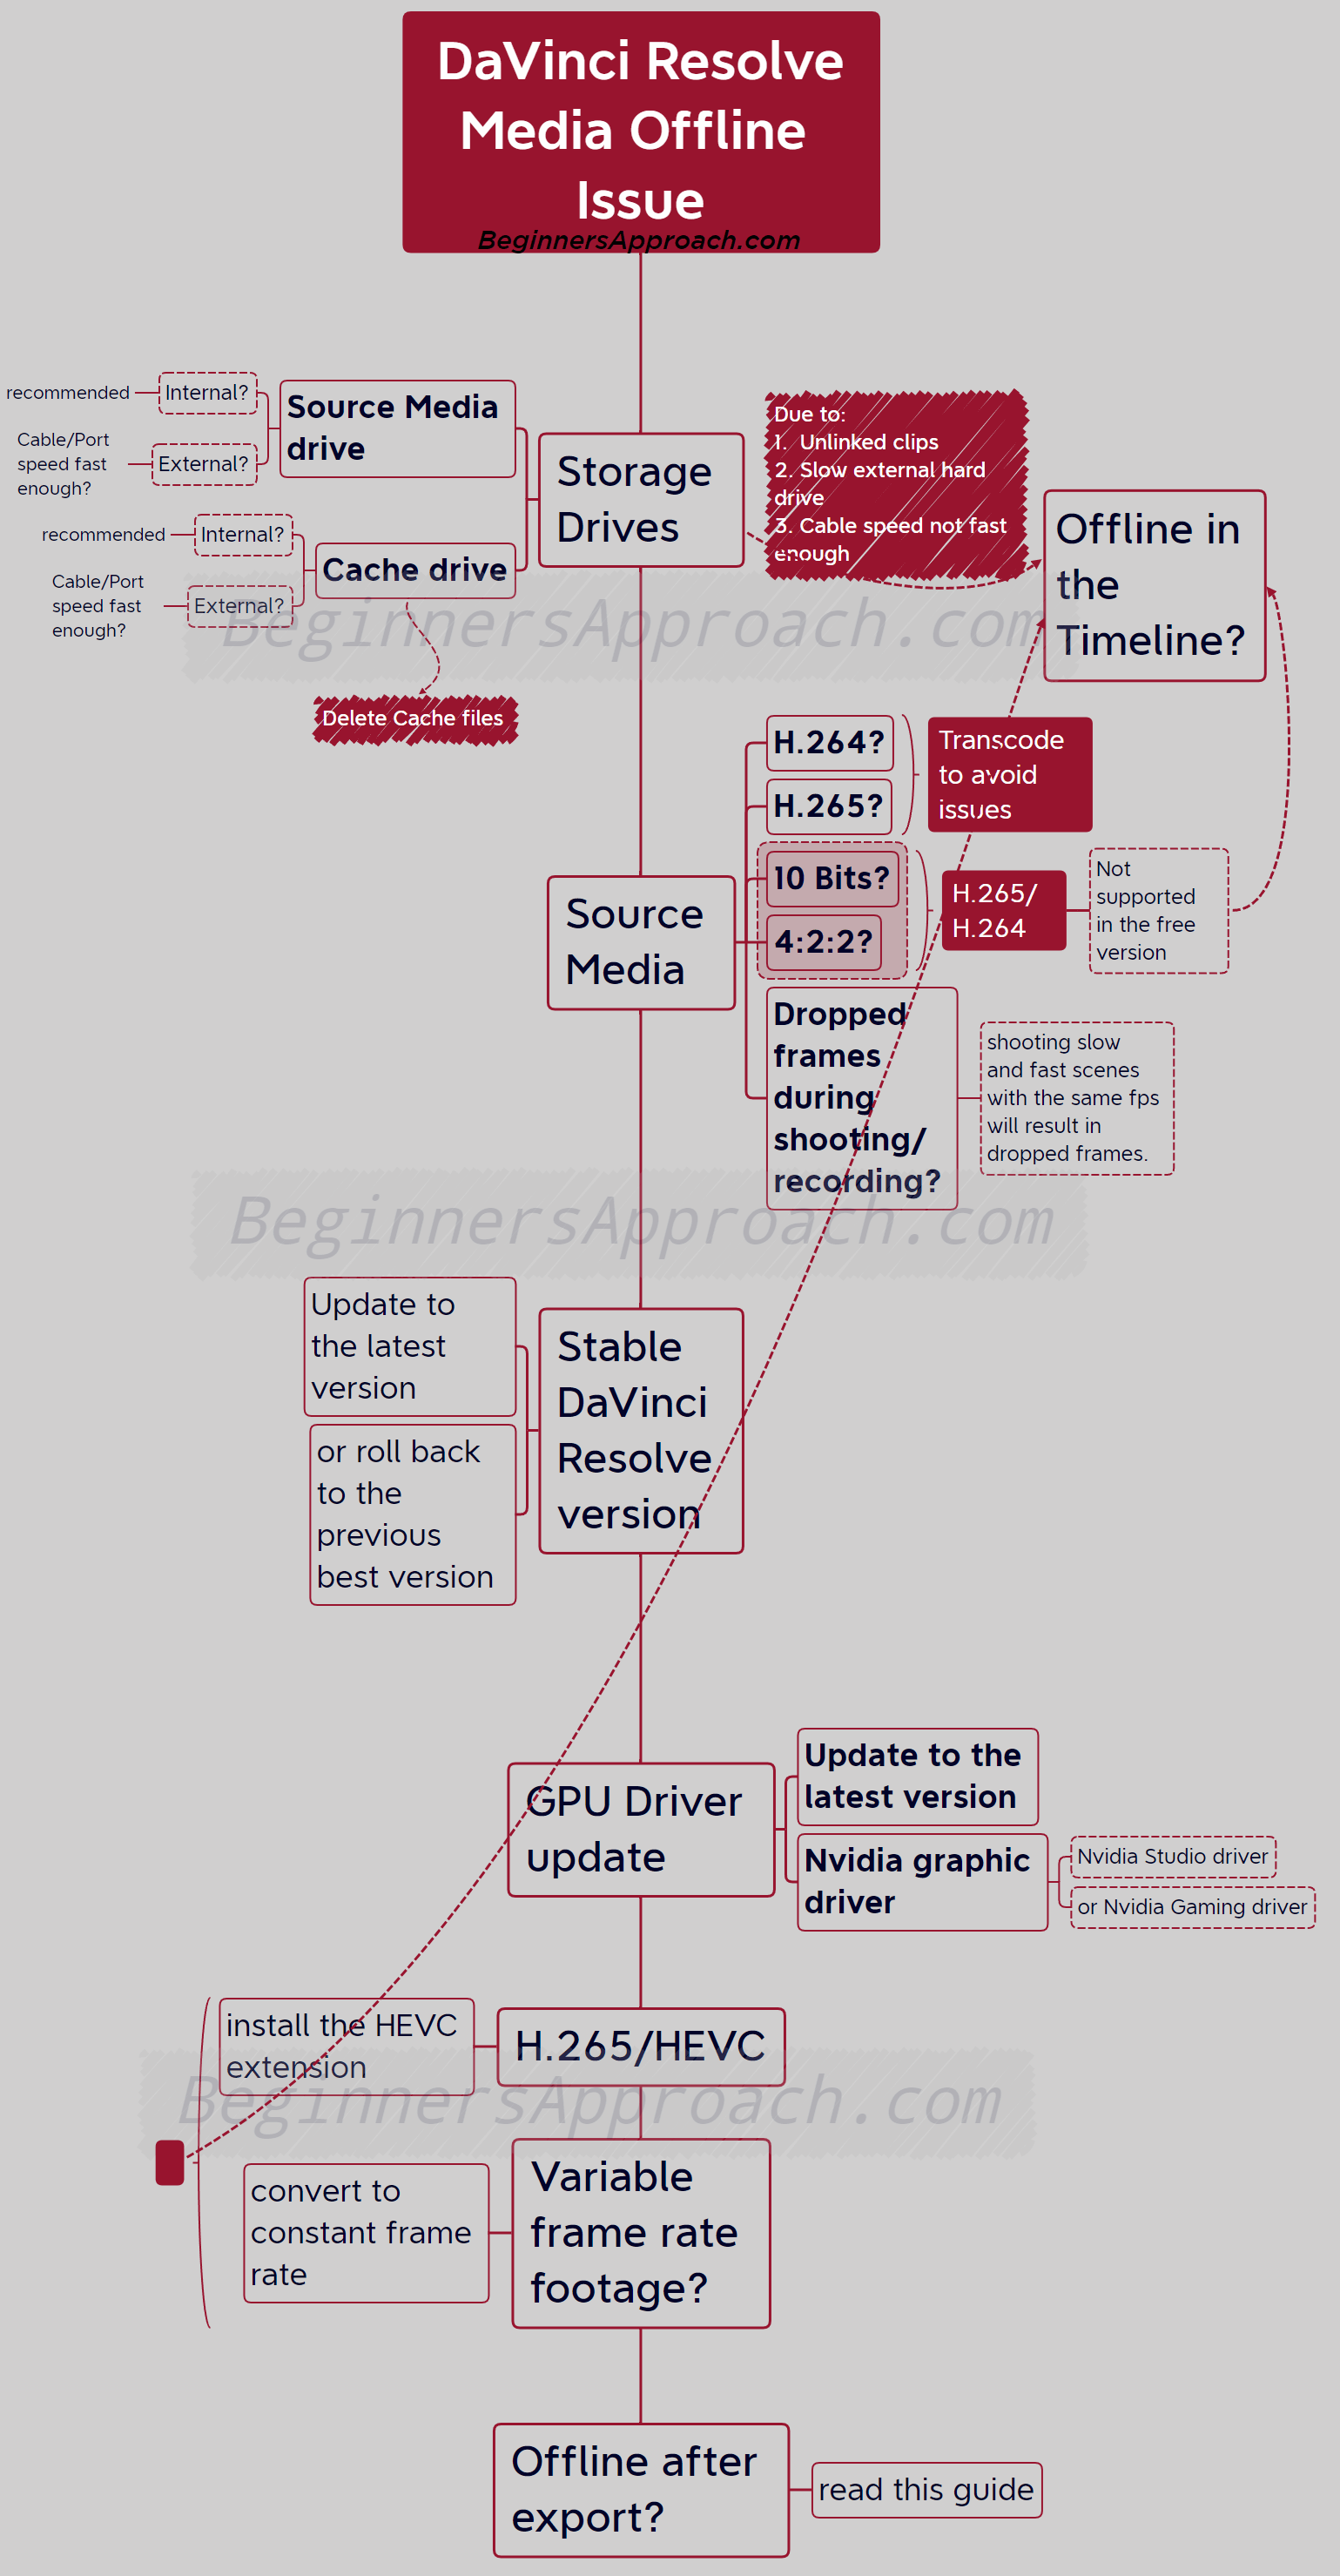
This is a Step-by-Step guide to fix the media offline issues in DaVinci Resolve (version 18.5, 18, 17, etc.) – updated for 2023!
DaVinci Resolve shows media offline error whenever it is unable to read the source footage, most often due to external slow storage drives, H.265/HEVC encoded videos, variable frame rate, unlinked clips, 10-bit 4:2:2 files, etc.
To fix the media offline issue in DaVinci Resolve, use high speed internal (or fast cable/usb external) drives for media and cache files. Transcode footage that are shot in 10 bits, 4:2:2, since they aren’t supported in the free version. Update the GPU driver.
The below infographics will help you identify the root cause. (Very helpful for beginners and newcomers to Resolve.)
Once you identify the root cause, the fix is easy – covered in detail below.
Let’s get started.
#1) DaVinci Resolve Media Offline – Unlinked Issue
Unlinked clips issue can result in media offline when your imported clips inside Resolve lose their link with the source footage placed in the hard disk. This happens when you unknowingly move your source footage to a different folder or drive...
… especially during exporting and importing your projects to another system (laptop or desktop).
Or, this could happen when you rename your source footage.
Fix for Media Offline Due to Unlinked Clips:
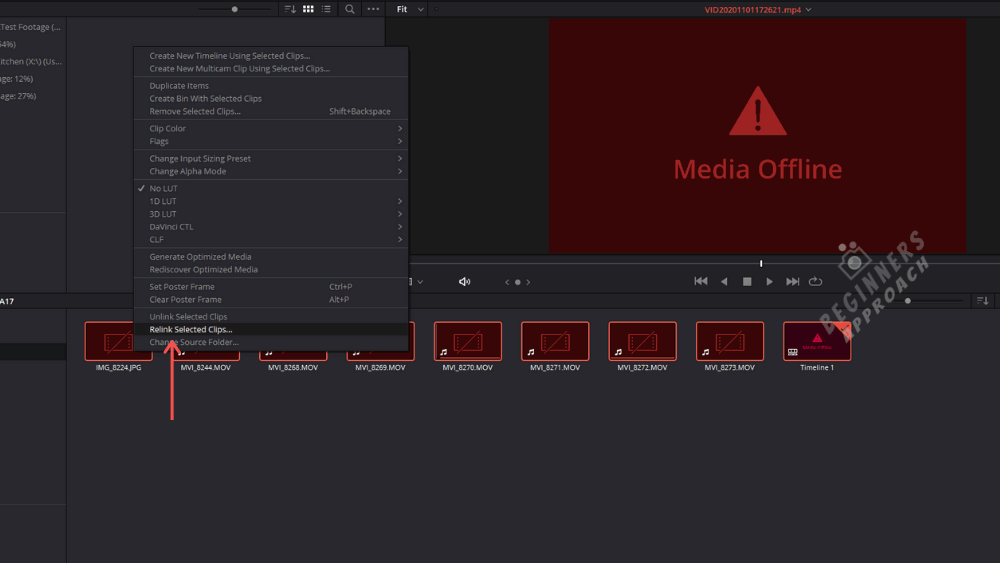
- Go to the Media Pool under the “Edit” or “Media” page.
- Select all of your offline clips
- Then right-click one of the selected clips
- Choose “Relink Selected Clips”
- From the dialog box, locate your folder, which contains the source footage.
- Click Ok.
If for some reason, there are clips that couldn’t be found, then DaVinci Resolve would ask for “Comprehensive Search” in a dialog box.
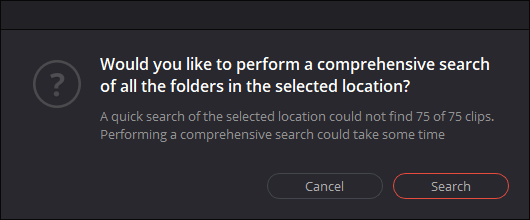
Clicking Search will let Resolve to search the source files inside the sub-folders of the selected folder.
If (for some reason) a few clips are offline, then change the parent folder and start the search again.
If unlinked clips are not your issue, then proceed to the next one.
#2 – DaVinci Resolve Media Offline on Import
When you import clips inside DaVinci Resolve, they turn offline. This could be due to the below reasons:
- Unable to successfully play back H.265 or HEVC codec footage.
- DaVinci Resolve free version doesn’t support 10 bits H.264 or H.265 footage.
- DaVinci Resolve free version doesn’t support 4:2:2 chroma sampling.
Now let’s fix the above issues one by one.
DaVinci Resolve Media Offline due to H.265 or HEVC codec
If you import and drag the H.265 clips into the timeline and try to play, either Resolve shows media offline, or you hear the audio with no video.
Smartphones like iPhone and the GoPros/DJI drones encode high resolution & faster footage (like 4K 60 FPS) into highly compressed H.265. (or HEVC), which could result in media offline issues in Resolve.
Even mirrorless cameras like Fujifilm XT4 and Sony A7S3 use H.265 codec:
- Sony A7S3 = XAVC HS (H.265) -> 4K 120 FPS, 4K 60 FPS, etc, in 10 bit 4:2:2 and 4:2:0 sub-sampling.
- Fuji XT3/XT4 = H.265 -> 4K 60 FPS, 4K 30 FPS, etc, in 10 bit 4:2:0 sub-sampling.
The root cause is the inability to decode HEVC or H.265.
Actually, this is more of a Windows 10 problem. This means it needs HEVC extensions to successfully decode H.265 footage (in DaVinci Resolve).
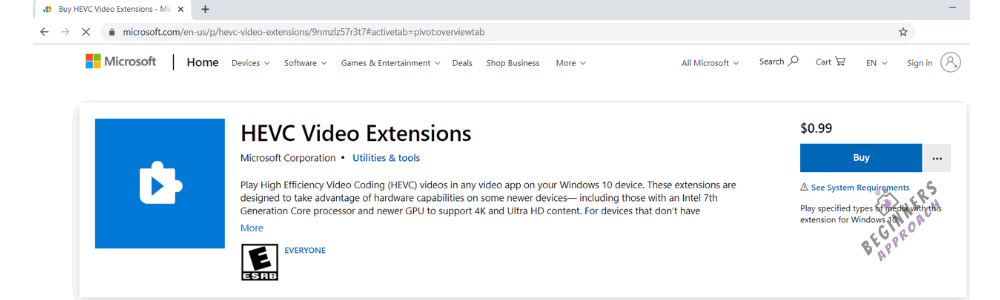
Fix for Media Offline due to H.265 (HEVC) in DaVinci Resolve
- Go to the Microsoft store or type “microsoft hevc video extensions” in Google and click on the relevant result.
- Click on the “Buy” button. (You’ll have to purchase it for $0.99.)
- Download and install the extension.
- Restart your PC.
- Resolve should now be able to decode the h.265 videos.
DaVinci Resolve Studio Supports 10 bits and 4:2:2 Chroma subsampling
Upgrade to the Studio version (or if you can’t, there is a workaround discussed below) to work with the 10-bit footage along with 4:2:2 chroma subsampling, as most modern cameras like mirrorless and drones shoot in high resolution.
Keep in mind that both the DaVinci Resolve free and Studio version support H.265 decoding, but only the Studio version supports GPU acceleration for Windows. For MacOS users, the free version supports GPU acceleration for both encoding and decoding.
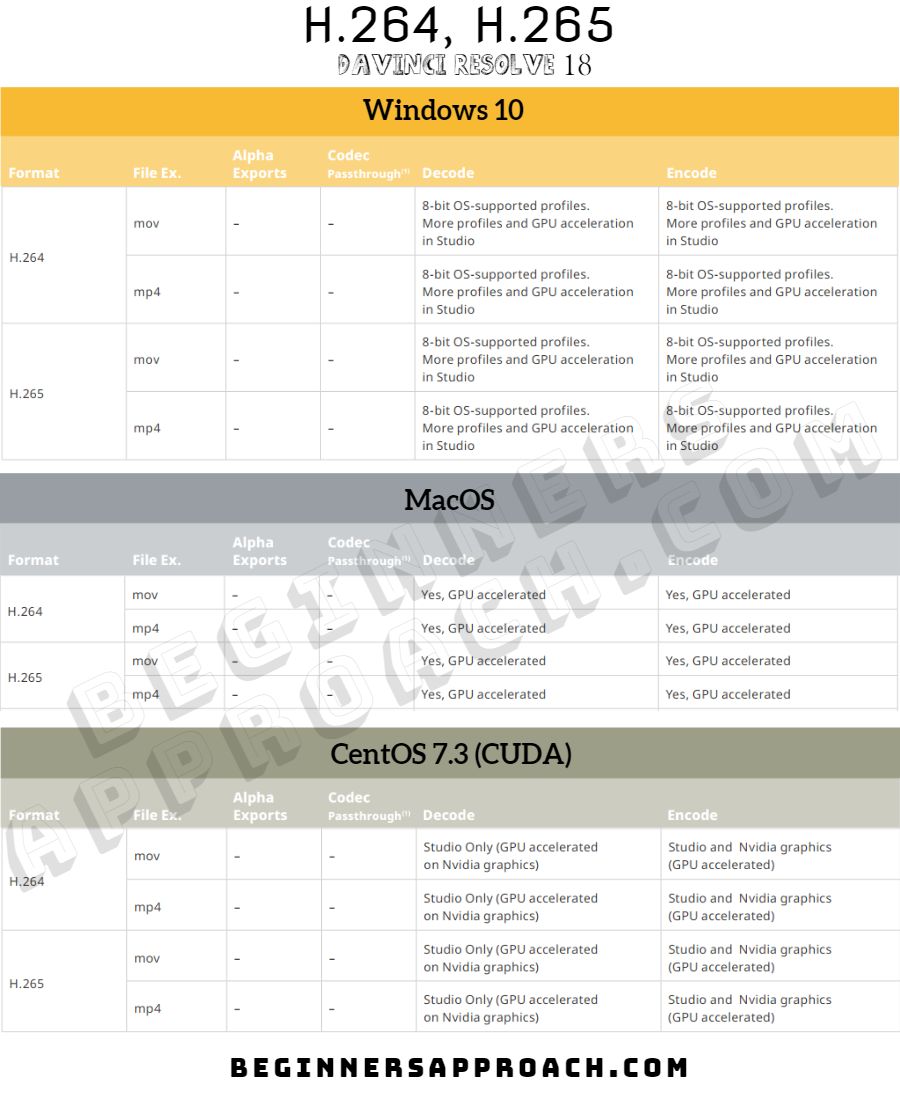
So, if you plan to upgrade to the Studio version being a Windows user, working with H.265 footage should no longer be an issue.
Related Article:
GPU & DaVinci Resolve (9 Things Most Beginners Don’t Know)
#3 – DaVinci Resolve Media Offline Frames / Flickering Issue
The most common issue is the media offline frames you get while playing back the clip in the timeline. This results in a flickering media offline error.
The media offline frames (flickering) issue is mostly due to the slow external storage drives or the cable (port) speed not being fast enough for the read-write operation. If you have your source footage (especially H.265/H.264) or cache files located in an external drive or usb, make sure the cable is fast enough for Resolve to decode the footage.
Huge ones like red camera files take a lot of bandwidth for read-write operation. Hence, external storage is not suggested.
Another reason could be – dropped frames during recording. Shooting slow and fast scenes with the same fps will result in dropped frames. Resolve will show the dropped frames as offline.
Fix for Media Offline Frame Issue in Resolve
- Transcode your source files to editor-friendly codecs like DNxHR or ProRes (described below).
- Move your source files to high-speed internal drives.
- Delete cache files (Playback > Delete Render Cache > All or Selected Clips) and regenerate them.
- Make sure the drive with cache isn’t full.
- Regarding your external drive, make sure you assign a drive letter high in the alphabet so that the drive letter won’t change whenever your computer automatically assigns it during loading.
- Make sure the cached folder path has not changed (is the same as the actual path.)
- If none of the above works, then simply copy all of your source media to a new storage device and relink all the files (as mentioned in the above section).
#4 – DaVinci Resolve Media Offline due to Missing Clips
Missing clips are denoted by a question mark in the timeline.
When you accidentally delete a file from the Media Pool, then you get a missing clip in the timeline.
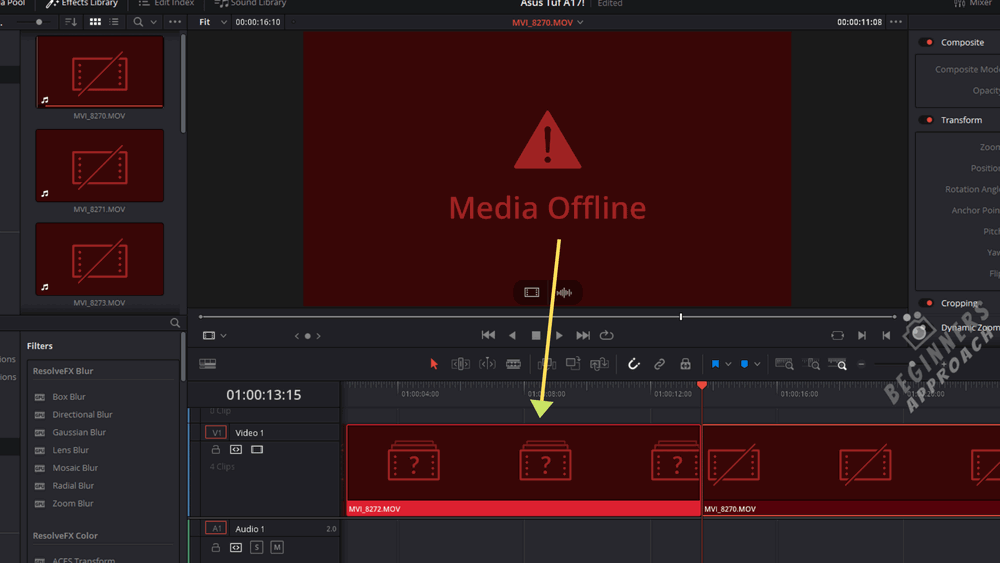
Fix For Media Offline due to Missing Clips:
Re-import the deleted files into the media pool from your source folder.
#5 – Either Audio Sync Issues or Media Offline during Playback
After you import all the clips inside DaVinci Resolve, they turn offline, but the audio seems to be fine. Or, sometimes, the video plays with out-of-sync audio. This is a common issue with Variable Frame Rate (VFR) footage.
Smartphones, OBS(Open Broadcaster Software), game-play recording software like NVIDIA ShadowPlay, etc, record videos in VFR format.
(To the contrary, a DSLR or mirrorless shoots constant frame rate videos.)
Please keep in mind that any editing software (NLE) like DaVinci Resolve or Premiere Pro will expect constant frame-rate videos.
(Learn more about – Frame Rates in DaVinci Resolve (Things You Should Know))
Hence it’s a good practice to convert variable framerate footage into constant framerate ones.
Click on the below article for a step-by-step guide on checking and converting your media to a constant frame rate file.
DaVinci Resolve: Convert Variable to Constant Frame Rate File
#6 – Foolproof Method for Media Offline Issue – Transcode Your Media to DaVinci Resolve Reccognizable Codec
Even after following the above steps, if you are still unable to fix the media offline issue, then the best possible solution is to…
Transcode your footage.
It is nothing but re-encoding your footage to other DaVinci Resolve recognizable codecs like:
#1. H.264, Mpeg-4, VP9, etc. These are highly compressed codecs which can demand a lot of horsepower from your laptop/desktop. (Can use Handbrake)
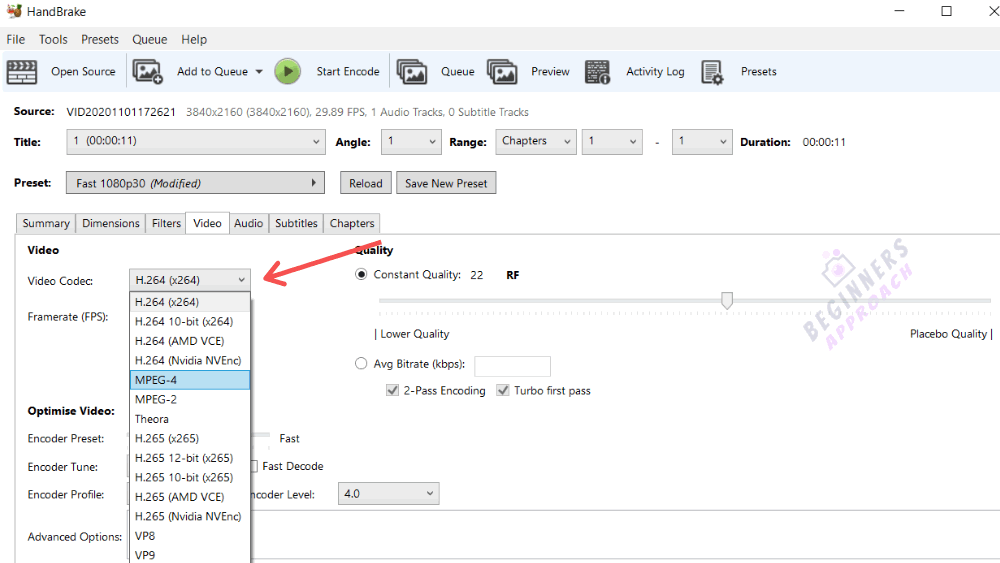
#2. Post-production friendly codecs like DNxHR (Windows) or ProRes (Mac). These take up huge disk space but are easy to edit and color-correct. (Can use FFMPEG – a command line interface utility).
If you need editing-friendly codecs like DNxHR, PRORES, etc but are facing difficulty working with FFMPEG, then try either of the below steps using Handbrake:
1. Batch transcode your footage into the codec that DaVinci can decode, like H.264.
Then import the footage inside DaVinci Resolve and then go to the delivery tab and export the footage into your required format and post-production-friendly codec.
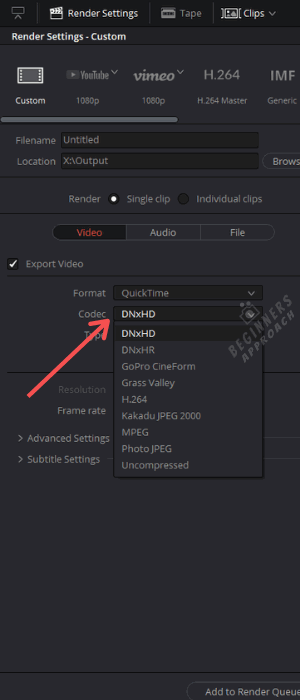
This will export videos that are huge in size but are easy to edit (less stress on your computer’s resources).
Go ahead and import these videos into DaVinci Resolve and start editing.
Or…
2. After importing the footage that DaVinci can decode:
- Go to “Project Settings” > “Master Settings” > “Optimized Media and Render Cache”
- Select your required editing-friendly codec like DNxHR HQX or Uncompressed 10-bit (can result in huge file sizes)
- Click “Save”.
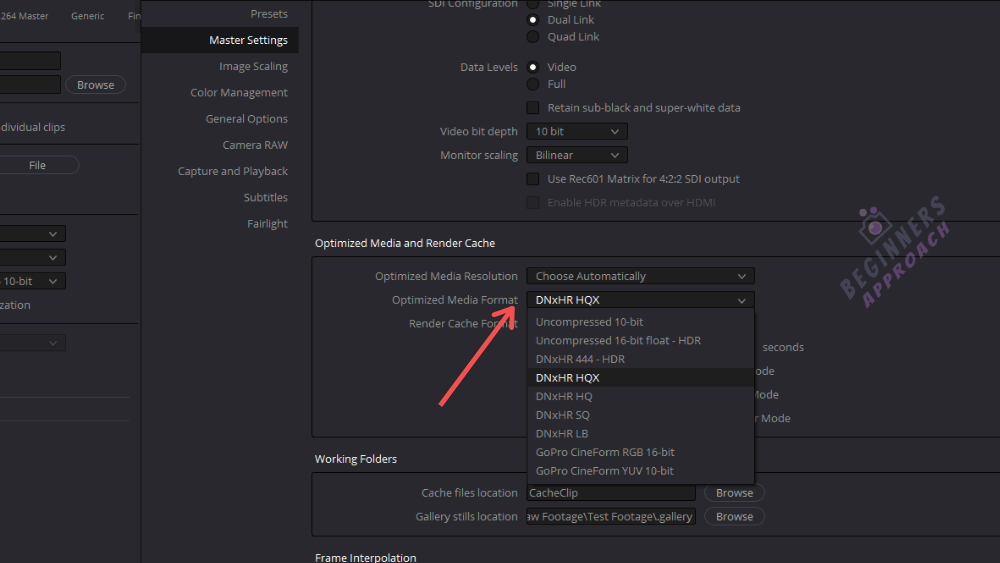
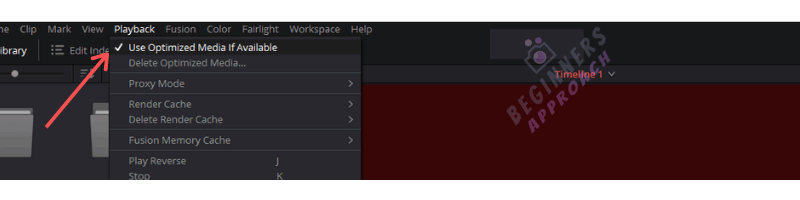
- Go to “Playback” > Check the “Use Optimized Media If Available” option.
- That’s it.
If you want to learn more about render cache, optimized media, and proxy media, refer to the below helpful guides:
DaVinci Resolve Render Cache (3 Settings for Smooth Playback)
DaVinci Resolve Optimized Media (3 Important Things to Know)
DaVinci Resolve Proxy (Here’s What You Should Know)
Important Points to Keep in Mind
Whenever you face any problem related to media offline issues, keep a check on the following items:
- DaVinci Resolve updated to the latest version (this can solve some codec support-related issues)
- The latest GPU drivers (preferably Studio versions) are installed and compatible with DaVinci Resolve.
- The codec of your footage like H.265, H.264, etc.
- 8 or 10 bit footage.
- 4:2:0, or 4:2:2 chroma sub-sampling.
- The container or format like .mp4, .mkv, etc.
- Mirrorless/DSLR cameras, GoPros, and Drones like DJI Mavic – can pack the video into highly compressed h.265 codec (in 4K 60fps).
- Videos shot using Smartphone, Screen Capture software – which can result in variable frame rate videos.
- Does the footage play in media players like VLC, etc.
The above knowledge can help you zero in on the root cause…
This can further help you in coming up with a solution using the various methods we discussed in this post.
Don’t freak out. This has happened to most of us. We sit down after filming our project, stretch our fingers, and begin importing all of our footage. While we wait, we do a few extra things to our footage, grab a sandwich, start doing a light edit, and then realize we didn’t want a clip after all and delete it. Before you know it, you are met with a red screen of terror to tell you that your beloved footage is not currently present. But don’t worry. I’m here to tell you how to fix the DaVinci Resolve media offline issue.
Why Does DaVinci Resolve say Media offline?
There are multiple reasons why this is happening. The most common is that a file you imported into your media pool is no longer linked to its source file outside. i.e.: you moved your files to a different drive or folder. I had also had this happen when I simply renamed files.
A few other reasons are as follows:
- Missing clips. This happens when you delete a file from your media pool, but the clip still exists in your timeline.
- H.265 or HEVC camera codecs.
- A very rare instance with using Sony cameras and XAVC camera codecs and renaming files on your drive as opposed to within DaVinci.
Unlinked Clips
Let’s first address unlinked clips. If you have moved your files to a new drive, new computer, or a new folder, then you will automatically need to relink it.
Next Step: Relink Clips
To relink your clips:
- Go into your media pool and select your missing clips.
- Right-click on one of the missing clips and click “relink selected clips.”
- Navigate to the folder that has your footage in it.

If different clips are in other folders, let’s say, scene 1 or scene 2, etc., then DaVinci will ask you to perform a comprehensive search which allows it to look in subfolders of bigger folders. This is helpful when you have a bunch of files missing, and the source files are in multiple folders. However, if you only have a few, I would recommend linking them one at a time and navigating to the exact folder it’s in so DaVinci can find them quickly. This shouldn’t be an issue if all of your files are in one folder.

Missing Clips From Media Pool
If your problem is a missing clip from your media pool, then you can reimport your media into the media pool from your source folder.
Next Step: Reimport Media Into Media Pool
To reimport your media into the Media Pool, go to File -> Import -> Media. Or simply drag and drop your clips into the Media Pool.

H.265 and HEVC Camera Codec
As our tech advances, we will need to do a little bit extra to be able to decode particular codecs so that DaVinci can work with them. Cameras like GoPros and certain drones use this codec because it allows them to film large file formats like 4k60fps at half the file size.
Next Step: Windows HEVC Extension
If you are on Windows, you can get a free extension by going to Free-codecs.com, clicking Download at the bottom of the screen, and then downloading whichever one pertains to your operating system. Microsoft also has an extension for $0.99 if the free codecs don’t work. Once you have downloaded and installed the extension, restart your PC.

While it is excellent that both DaVinci Resolve Free and Studio both support H.265 decoding, understanding all that goes into CPU and GPU decoding can be kind of a headache. Therefore, if you want to work with these files, the easiest way to get them compatible is to use the Optimize Media feature within DaVinci. This will give you smoother playback with less stress on your CPU or GPU.
Next Step: Optimize Media
To optimize your media, you must first decide what kind of media you want. You can do this by heading over to your project settings (shift 9 for both Mac and PC). Once you have chosen your preferred media type, which will change depending on your needs, change the storage location so your optimized media won’t be in the same folder as your source files.

You can then right-click on your files and click Generate Optimized Media. Depending on the original file size and the codec you are changing, this may take a few minutes. So now is the time to grab that sandwich. Once DaVinci has created the media, you can then go to “Playback” and check on “Use Optimized Media if Available.” This feature is nice because when you need to watch performance playback in real-time, the optimized media will be a better choice for smoothness. But then, if you are color grading, you might want to use the raw footage.

Sony Cameras and XAVC Codec
Let me preface this by saying it is a rare issue but is an issue nonetheless, and I would like you all to keep your hair because I certainly lost a lot of my own. If you are like me and have a specific way of labeling your footage, then listen up. Over the years, I have heard filmmakers talk about importing their footage into their editing software and then doing all of the sorting and labeling.
In my experience of working on a lot of 48 hour to 72 hour film festivals or just working in short turnarounds, that is an insane waste of time. Before I even open the editing program, I label my files, separate them into folders, mark the ones I plan to use, and then import those into the editing software.
Speaking of 72 hour film festivals, here is 5ive, a short we did for the Adrenaline Film Project.
Now back to our topic!
If this is also your process, your files are missing, and you are using Sony or the XAVC codec, this could be the reason why.

I say this with all of the enthusiasm in the world. Don’t touch, rename, move, or even look at those source folders. The minute one of those folders is renamed, or you have renamed a clip, there is no going back because that codec is labeled and placed in those folders the way it is for a reason.
Your media will forever be offline, and you will have to do another media dump of all of your cards. All while praying to the film gods that you haven’t reformatted the card with your files on it. Right now, your only step is to offload all of your footage again, reimport it into DaVinci, and then do all your renaming and sorting.
The best way to attack this issue is to be ahead of it in the first place. Think of my unfortunate experience as a cautionary tale.
After almost a year of not finding anything online about this issue, I was able to attend NAB, where I spoke to a Black Magic rep, bless this human, and they said this was something specific to that codec and Sony cameras. Now don’t worry. This isn’t all completely hopeless because I also spoke to a Sony rep at Cinegear this year, and they have said that is something they plan to address to make sorting their footage a little bit easier. We will all soon rejoice.
Finally, Verify The Files
You always want to make sure that you have relinked the correct clips. If for some reason, you have linked the wrong one, you can always right-click the clip in your Media Pool and relink it again.
Additional DaVinci Resolve Resources
If you are looking for more tutorials, walkthroughs and troubleshooting on DaVinci Resolve, here are some additional posts about DaVinci:
Conclusion
Whether it’s a misplaced clip, moved file, or different camera codec, I hope you found this article helpful on how to fix DaVinci Resolve media offline. Always make sure you are keeping track of your clip locations to help prevent media from disappearing from your timeline.
I would love to hear your thoughts or tips and tricks regarding DaVinci Resolve Media Offline. Leave us a comment below, and happy filmmaking!

Возможно, при работе с DaVinci Resolve, вы сталкивались с проблемой, когда импортированный с вашей новой камеры или телефона, с алгоритмом сжатия h.265, видеофайл — вместо видеосигнала отображает плашку Media Offline.

Точно такая же плашка может появиться, когда вы утратили исходный видеофайл, например, импортировав видео с флешки, которую в последствии извлекли, и в тому подобных случаях.
Однако в отличие от случаев с действительно отсутствующим файлом, при данной проблеме вы точно имеете доступ к файлу, и более того, если начать воспроизводить его через ДаВинчи, аудиодорожка будет прекрасно работать.
Все что нужно сделать, для того чтобы избавиться от таблички «Media Offline», и научить Resolve работать с файлами HEVC, это установить соответствующий кодек в систему.
Для пользователей Windows 10 и 11
Самое простое решение — это установить из магазина приложений Windows HEVC Video Extensions, и сразу же, даже без перезапуска ДаВинчи, ваши медиафайлы начнут правильно работать.
Увы, по ссылке выше, кодек платный. Однако существует и бесплатная версия данного приложения, которая автоматически привязывалась к вашему аккаунту, если вы покупали новый ноутбук или видеокарту. Вернее, стоимость данного кодека уже была включена в стоимость вашего устройства. Раньше его спокойно можно было установить прямиком из Microsoft Store, однако уже к концу 2020 года, для его установки требовалось ввести некий код, если это приложение не было привязано к вашему аккаунту. А с зимы 2022 года и вовсе — было скрыто из магазина приложений, автоматически устанавливаясь владельцам соответствующих устройств.
Поэтому вам придется получить приложение из другого источника — я разместила установочный пакет на своем сервере.
Обязательно проверьте SHA256 хэш перед установкой! Для размещенной мною версии 2.0.53348.0_x64 он будет:
3ea5551a0cfc342fe5b0904ca2b4c21027c78ef304244b6901ee58d7a4e003e2Пользователям других операционных систем
Стоит обратить внимание на x265, либо на OpenHEVC, однако эти решения не столь тривиальны и потребуют от вас понимания того как работает операционная система, и хотя бы умения собирать исполняемые файлы из исходного кода.
Постскриптум
HEVC видео абсолютно непригодно для видеомонтажа. Настоятельно рекомендую, прежде чем приступать к монтажу, транскодировать медиафайлы в монтажный кодек, что значительно увеличит производительность программы.
Нет ничего более разочаровывающего, чем загрузить проект, на который вы потратили часы, и увидеть, что ничего не воспроизводится, потому что написано «медиа не в сети». Однако у меня для вас отличная новость: решить эту проблему так же просто, как переподключение средств массовой информации.
Меня зовут Натан Менсер. Я писатель, режиссер и актер. Видеомонтаж был моей страстью более 6 лет, и три из этих лет я работал на DaVinci Resolve. Поэтому после многих лет, когда мои медиафайлы уходили в автономный режим, я уверен, что эту проблему легко исправить.
В этой статье я помогу вам определить проблему, объясню, почему это происходит, и покажу, как исправить эту проблему.
Определение проблемы отключения носителя
В DaVinci Resolve легко определить, когда медиафайл находится в автономном режиме: окно видеоплеера станет красным и появится сообщение: » Медиа оффлайн .» Вы не сможете воспроизводить видеоклипы. Кроме того, ваша временная шкала станет красной.
Обычно это происходит, когда редактор перемещает свои файлы в другую папку или на внешний жесткий диск.
К счастью, есть два разных способа решить эту проблему.
Метод 1
Шаг 1: Выберите «медиапул» в левой верхней части экрана. Вы увидите в левой верхней части экрана рядом с названием видео маленький красный символ. Этот символ означает, что между видеофайлами и редактором нарушены связи.
Появится окно с количеством недостающих клипов. На этом этапе у редактора есть два варианта.
- Если вы знаете, где находятся все ваши файлы, нажмите найти Это позволит вам перейти непосредственно к нужным файлам.
- Для тех из нас, кто не так организован, выберите поиск дисков. DaVinci Resolve выполнит поиск на всем диске.

Метод 2
Шаг 1: Щелкните правой кнопкой мыши все корзины в левой части экрана.
Шаг 2: Выберите » пересоедините зажимы для выбранных бункеров. » Это позволит вам найти все недостающие файлы сразу.
Шаг 3: Нажмите на диск и проверьте, все ли файлы сохранены. Некоторые люди любят заходить по отдельности и выбирать каждый файл, но в этом нет необходимости. Просто выберите диск, на котором сохранен каждый клип.
DaVinci Resolve будет искать нужные файлы в каждой папке на жестком диске. Это сэкономит пользователю много времени. Усаживайтесь поудобнее и дайте ему загрузиться.
Заключительные слова
Вот и все! Проблема «Media Offline» устраняется просто путем повторной привязки носителя.
Ошибка «Media Offline» может быть пугающей и иногда означает, что файлы были повреждены или безвозвратно утеряны.
Чтобы избежать этой проблемы, перепроверьте и убедитесь, что все ваши медиафайлы сохранены на внешнем жестком диске и что у вас есть резервные копии при редактировании.