As Linux users continue to skillfully nurture and grow their user experience, they soon realize that they become more performant and productive while in the Linux command-line environment.
The Linux OS environment exposes its users to terminal-based tools like Curl for a non-interactive download and upload of targeted network/internet-based files, which is similar to the Wget utility and both share some similarities in their implementation and functionalities.
The primary role of the Curl utility as highlighted on its manual page is to transfer a targeted URL.
$ man curl
It supports numerous protocols with the common ones being FTP, FTPS, HTTP, HTTPS, SCP, SFTP, SMTP, and SMTP.
The Curl command syntax is as follows:
$ curl [options / URLs]
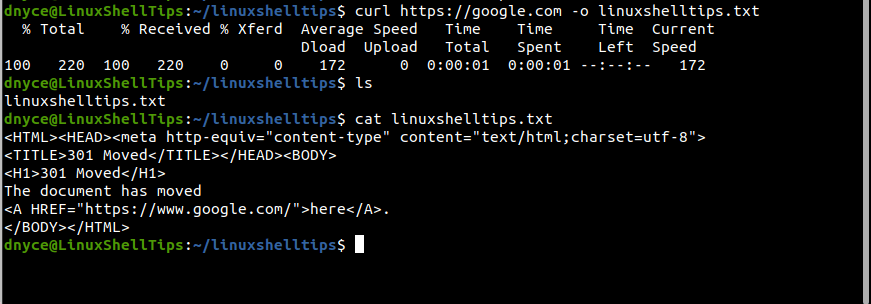
We can show its implementation by using it with a random URL.
$ curl https://google.com -o linuxshelltips.txt
In the above command, Curl’s findings from accessing the highlighted URL are saved in the succeeding text file.
curl: (6) could not resolve host Error
Mostly, such an error occurs when there is an issue with a Linux server’s DNS resolver. A Linux administrator will categorize/define this challenge as a server management service issue.
This error is likely to take several forms when the curl command is executed from the Linux terminal and the most popular ones include:
- curl: (6) could not resolve host: domain_name.extension; Name or service not known
- curl: (6) could not resolve host: domain_name.extension e.g. ubuntumint.com
- curl: (6) could not resolve host: application
Now that we have highlighted the primary reason that might be behind the stated curl command error during its execution on a Linux terminal, it’s time to fix the problem.
Solution 1: Missing Working DNS Nameserver
A nameserver is basically a bridge between a working/purchased domain name and the IP address of a server. When you purchase or subscribe to a domain name, and before you use/link this domain name to your remote Linux server, you need to configure a DNS nameserver. A DNS nameserver enables a user to use a domain name to access a remote server instead of using its IP address.
On your Linux server/machine, the file /etc/resolv.conf is responsible for the DNS nameserver entries auto-generated by NetworkManager.
$ sudo nano /etc/resolv.conf
This file can hold more than one DNS nameserver entry. As you might have noted, the syntax for adding a DNS nameserver entry in this file should resemble the following:
nameserver IP.ADDRESS
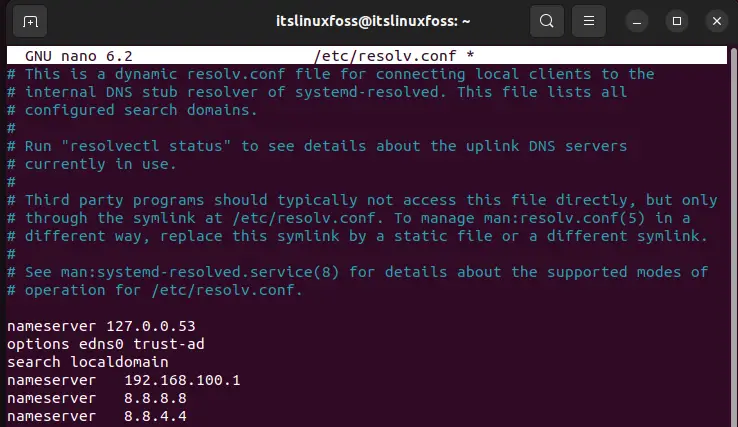
For instance, if you were to add Google public nameservers to this file, it would look like the following:
nameserver   192.168.100.1
nameserver   8.8.8.8
nameserver   8.8.4.4
If you are using a private DNS nameserver, add it to the /etc/resolv.conf file. Update or reboot the system if possible and the host should start resolving.
Solution 2: Curl Syntax Errors
Make sure the curl command execution adheres to its correct syntax usage. A syntax error can arise from something as simple as the misuse of an escape sequence (/) or an illegal spacing on the URL.
The curl: (6) could not resolve host error in Linux primarily relates to wrongful/missing DNS nameserver setup or a random syntax error that can be scanned and fixed.
Are you curious to know why does the error ‘curl (6) could not resolve host ubuntu’ appear?
Usually, such curl errors happen when there are problems with DNS resolvers on the server.
At Bobcares, we often get requests from our customers to fix curl (6) could not resolve host Ubuntu as part of our Server Management Services.
Today, let’s discuss why this error occurs and see how our Support Engineers fix it.
What is curl (6) could not resolve host?
Many of our customers have experienced this error ‘curl (6) could not resolve host’ while trying to connect to a webpage from the terminal.
This error mainly occurs due to a wrong DNS set up or bad settings on the server.
Also, we’ve seen this error appearing in different ways which include.
- curl: (6) Could not resolve host: application
- curl: (6) Could not resolve host: domain.com
- curl: (6) Could not resolve host: google.com; Name or service not known
This essentially means the server was not able to connect to the remote host.
How we fixed the error curl (6) could not resolve host in ubuntu
At Bobcares, where we have more than a decade of expertise in managing servers, we see many customers face problems while managing a server.
Now, let’s see the major reasons for curl errors and how our Support Engineers fix this error.
1. Missing working DNS nameserver
Sometimes, users may receive a problem when trying to install packages like wget, apt-get not being able to resolve hosts.
For example, when executing a command apt-get install wget.
Users may get an error as curl#6 - "Could not resolve host: repo.xxx.com; Unknown error"
This mainly occurs when we don’t have nameservers in the /etc/resolv.conf
So, we added the following line in the file.
nameserver 8.8.8.8Then, this fixed the error and the host started resolving.
2. Syntax error
Recently, one of our customers had a problem while executing the command curl on his terminal. He used the command as below,
curl -X 'GET https://www.mywebsite.com/Web2/PDF.aspx?page=1' \Also, the error said Mozilla/5.0 (Windows NT 6.1; WOW64) AppleWebKit/537.36 (KHTML, like Gecko) Chrome/64.0.3282.119 Safari/537.36 OPR/51.0.2830.26' \
curl: (6) Could not resolve host:
On checking, our Support Engineers found that the error was due to the incorrect syntax used to access the website.
So, we corrected the syntax as below. This happened as he had included space after one of the / escape sequences.
curl -X GET https://www.mywebsite.com/Web2/PDF.aspx?page=1/Similarly, an error happened when running the following command
curl -i -H 'Content-Type: application/json' -d '{"Code":"FR","Name":"France"}' http://127.0.0.1:8080/countriesThe error said Curl: (6) Could not resolve host: application.
This error was also due to the syntax error in the command. Thus, we resolved this problem editing like this in windows:
"{/"Code/":/"FR/"}"In another case, we corrected it by deleting an extra space from the command.
curl -H Content-Type:application/json ~Finally, this fixed the error.
[Need more help to solve curl error?- We’ll fix it for you.]
Conclusion
In short, an error curl (6) could not resolve host on ubuntu happens due to syntax error or due to the wrong DNS set up. Today, we saw how our Support Engineers assisted our customers to solve this error.
PREVENT YOUR SERVER FROM CRASHING!
Never again lose customers to poor server speed! Let us help you.
Our server experts will monitor & maintain your server 24/7 so that it remains lightning fast and secure.
GET STARTED
var google_conversion_label = «owonCMyG5nEQ0aD71QM»;
Linux is an Operating System whose core functionality revolves around the use of the command line terminal. Almost all of the tasks can be performed through the Linux terminal. Downloading from the web is one of these features. This is often accomplished using the curl command in the terminal. When utilizing this feature, an error can be encountered that has the statement “curl:(6) Could not resolve host”.
This article will shed some light on what is prompting these errors as well as what can be done to fix these issues.
There may be numerous reasons which will invoke this error. This section will not only elaborate on what these reasons are but also explain the necessary steps you can take to fix this problem.
Reason 1: Syntax Problem
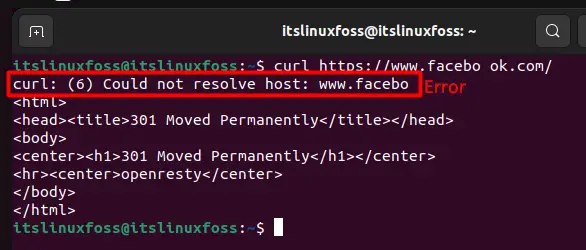
The first and most obvious reason for a problem like this is that there is some issue with the curl command’s syntax. Usually, the syntax to curl is very simple to follow but even the slightest mistake can invoke the error as is shown in the snippet below:
It is very clearly seen that the syntax for the command above is incorrect. It is a very simple mistake that there is an unnecessary space in the link provided after curl.
Solution: Use the Correct Syntax
The only way to fix this issue is to follow the correct syntax of any curl command. The standard syntax for any curl command is as follows:
curl [options] [URL]Now, let’s implement this syntax for the link shown above:
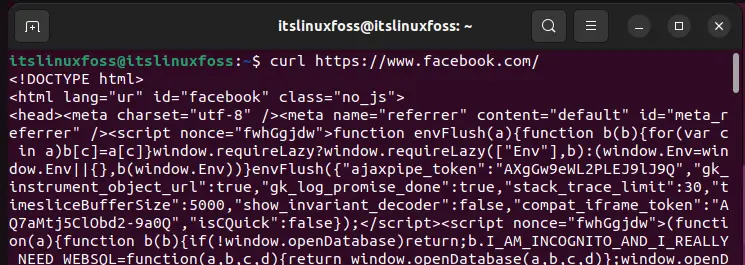
Now that the syntax problem has been avoided, we can see that the curl command works without any errors.
Reason 2: No DNS Nameserver
Nameservers act as a link between the domain name and the remote server of any web page. Instead of using the IP addresses, nameservers are utilized. But if the Nameserver is missing from your /etc/resolv.conf file then this error will be prompted.
Solution: Add DNS Nameserver
The simple solution to this issue is to add the nameserver of the URL to the file and save it. To add the nameserver, first, open the file using this command in the terminal:
$ sudo nano /etc/resolv.confThis should open the file and we need to add the nameserver to the file using the following format:
nameserver ip.addressCheck out the sample below to verify:
Once the nameserver is added, you can run the curl command with the link and the error will be resolved.
Conclusion
The “curl:(6) Could not resolve host” error occurs when the curl command is used with incorrect syntax or the DNS nameserver is missing. To fix it, you need to verify and check the syntax of the command or add a nameserver for the URL into your /etc/resolv.conf file. This article has provided a detailed guide on why the error “curl:(6) Could not resolve host” occurs and also the possible solutions to fix it.
I’m trying to fetch the contents of a page using CURL. The page that is doing the fetching is https and the page it is trying to fetch is also https. I’m getting an error «Couldn’t resolve host» with all of the settings I try.
$c=curl_init();
curl_setopt($c, CURLOPT_URL,$url);
//curl_setopt($c, CURLOPT_USERAGENT, "Mozilla/5.0 (Windows; U; Windows NT 5.1; en-US; rv:x.x.x) Gecko/20041107 Firefox/x.x");
curl_setopt ($c, CURLOPT_RETURNTRANSFER, TRUE);
//curl_setopt($c, CURLOPT_SSL_VERIFYPEER, TRUE);
//curl_setopt($c, CURLOPT_SSL_VERIFYHOST, TRUE);
curl_setopt($c, CURLOPT_HEADER, FALSE);

$html=curl_exec($c);

if($html === false) {
    echo curl_error($c);
}
else {
    echo 'Operation completed without any errors';
}


curl_close($c);
Any ideas?
asked Aug 27, 2009 at 14:57
2
I found that curl can decide to use IPv6, in which case it tries to resolve but doesn’t get an IPv6 answer (or something to that effect) and times out.
You can try the curl command line switch -4 to test this out:
curl -4 http://x.com
In PHP, you can configure this line by setting this:
curl_setopt($c, CURLOPT_IPRESOLVE, CURL_IPRESOLVE_V4);
Official manual page for this option: https://curl.se/libcurl/c/CURLOPT_IPRESOLVE.html
answered Apr 25, 2013 at 20:58
Jacob BruinsmaJacob Bruinsma
1,0971 gold badge10 silver badges23 bronze badges
13
Maybe a DNS issue?
Try your URL against this code:
$_h = curl_init();
curl_setopt($_h, CURLOPT_HEADER, 1);
curl_setopt($_h, CURLOPT_RETURNTRANSFER, 1);
curl_setopt($_h, CURLOPT_HTTPGET, 1);
curl_setopt($_h, CURLOPT_URL, 'YOUR_URL' );
curl_setopt($_h, CURLOPT_DNS_USE_GLOBAL_CACHE, false );
curl_setopt($_h, CURLOPT_DNS_CACHE_TIMEOUT, 2 );

var_dump(curl_exec($_h));
var_dump(curl_getinfo($_h));
var_dump(curl_error($_h));
answered Aug 27, 2009 at 15:05
KB22KB22
6,9099 gold badges43 silver badges52 bronze badges
6
I had the same problem. Coudn’t resolve google.com. There was a bug somewhere in php fpm, which i am using. Restarting php-fpm solved it for me.
answered Aug 12, 2015 at 15:52
TecBeastTecBeast
9408 silver badges16 bronze badges
5
Just a note which may be helpful- I was having this trouble with Apache on my laptop (which connects by wifi AFTER startup), and restarting the server (after connect) fixed the issue. I guess in my case this may be to do with apache starting offline and perhaps there noting that DNS lookups fail?
answered Nov 24, 2010 at 10:08
RickRick
931 silver badge5 bronze badges
1
There is a current bug in glibc on Ubuntu which can have this effect:
https://bugs.launchpad.net/ubuntu/+source/glibc/+bug/1674733
To resolve it, update libc and all related (Packages that will be upgraded: libc-bin libc-dev-bin libc6 libc6-dev libfreetype6 libfreetype6-dev locales multiarch-support) and restart the server.
answered Mar 22, 2017 at 14:41
After tried all above, still can’t resolved my issue yet.
But got new solution for my problem.
At server where you are going to make a request, there should be a entry of your virtual host.
sudo vim /etc/hosts
and insert
192.xxx.x.xx www.domain.com
The reason if you are making request from server to itself then, to resolve your virtual host or to identify it, server would need above stuff, otherwise server won’t understand your requesting(origin) host.
answered Jun 13, 2019 at 12:40
Jigar7521Jigar7521
1,54914 silver badges27 bronze badges
We need to add host security certificate to php.ini file. For local developement enviroment we can add cacert.pem in your local php.ini.
do phpinfo(); and file your php.ini path open and add uncomment ;curl.capath
curl.capath=path_of_your_cacert.pem
answered Aug 30, 2016 at 9:12
PrincePrince
312 silver badges6 bronze badges
1
If you do it on Windows XAMPP/WAMP it probaly won’t work as in my case.
I solved the problem setting up Laravel’s Homestead/Vagrant solution to create my (Ubuntu) development environment — it has built-in: Nginx, PHP 5.6, PHP 7.3, PHP 7.2, PHP 7.1, MySQL, PostgreSQL, Redis, Memcached, Node… to name just a few.
See here for info how to set up the environment — it’s really worth the effort!
Laravel Homestead is an official, pre-packaged Vagrant box that provides you a wonderful development environment without requiring you to install PHP, a web server, and any other server software on your local machine. No more worrying about messing up your operating system! Vagrant boxes are completely disposable. If something goes wrong, you can destroy and re-create the box in minutes!
Then you can easily switch PHP versions or set up more virtual hosts, new databases just in seconds.
answered Jan 18, 2019 at 11:01
PicardPicard
3,7453 gold badges42 silver badges50 bronze badges
This error is a dns issue and if you using docker you can solve it with this help.
we must change our docker daemon’s DNS settings point to a public DNS like Google DNS.
Open the docker configuration file daemon.json (Location of file in official docker site) and add “dns”: “8.8.8.8” to it.
so it could be like this:
{ …
«experimental»: false,
«dns»: «8.8.8.8»
}
answered Sep 18 at 6:39
New contributor
Reza Dehghani is a new contributor to this site. Take care in asking for clarification, commenting, and answering.
Check out our Code of Conduct.
1
Your getting the error because you’re probably doing it on your Local server environment. You need to skip the certificates check when the cURL call is made. For that just add the following options
curl_setopt($c, CURLOPT_SSL_VERIFYPEER, false);
curl_setopt($c, CURLOPT_SSL_VERIFYHOST,  0);
answered Jan 6, 2016 at 12:10
You may have to enable the HTTPS part:
curl_setopt($c, CURLOPT_SSL_VERIFYPEER, FALSE);
curl_setopt($c, CURLOPT_SSL_VERIFYHOST,  2);
And if you need to verify (authenticate yourself) you may need this too:
curl_setopt($c, CURLOPT_USERPWD, 'username:password');
answered Aug 27, 2009 at 15:04
Mr. SmithMr. Smith
5,49911 gold badges44 silver badges60 bronze badges
0
add yourlocalhost
ex. 127.0.0.1 cards.localhost
in the /etc/hosts directory.
Now restart apache server
answered Nov 22, 2017 at 8:44
sunilsunil
11 bronze badge
2
Let’s face it: errors and disruptions in our digital workflow can be frustrating. But with the right guidance, we can turn these obstacles into learning experiences. One such hitch is the infamous ‘Curl: Could Not Resolve Host’ error in Linux systems. This guide will provide a clear pathway to navigate this issue, meticulously guiding you through each step in a straightforward, easy-to-understand fashion. Let’s get started!
Table of Contents
Understanding ‘Curl: Could Not Resolve Host’ Error
The first step in our problem-solving approach is to comprehend the nature of the error we’re tackling. This will equip us with the right mindset and help us understand the impact of the steps we take to resolve it.
The ‘Curl 6: Could Not Resolve Host’ error is essentially a cry for help from your Linux system, signaling it’s having trouble connecting to the network. Specifically, it’s unable to resolve the hostname into an IP address, meaning it can’t send or receive data from the desired server. Now that we understand the issue, we can dive into the resolution methods.
 Pin
PinVerifying Network Connectivity
Preparatory Step: Checking Internet Connection
Your first instinct when faced with the ‘Curl 6’ error should be to check the stability of your internet connection. Linux has a straightforward command for this:
ping -c 4 google.comThis command will attempt to reach Google’s servers, pinging them four times. If you receive responses, your internet connection is working fine. If the pings fail, the problem could be with your network connection.
Analyzing Ping Output
When the ping is successful, you’ll see an output with the time taken for each packet to reach the server and return. Any significant deviation or irregularities in these times may indicate unstable network conditions, potentially causing the Curl 6 error. If this is the case, check with your network provider or troubleshoot your network settings.
Evaluating Your DNS Resolver
Initial DNS Check
Once you’re certain your internet connection is stable, the next step is to inspect your DNS resolver. This is the service that translates hostnames into IP addresses. You can check its functionality with the ‘dig’ command:
dig google.comThis command queries the DNS associated with google.com. If you receive a response, your DNS resolver is functioning well.
Interpreting ‘dig’ Command Response
A successful response from the ‘dig’ command provides several pieces of information, such as the IP address associated with the hostname and the response’s speed. A slow response or the absence of an IP address can indicate issues with your DNS resolver. If you encounter problems at this stage, consider updating your DNS settings or reaching out to your ISP for assistance.
Inspecting Your /etc/hosts File
Accessing the /etc/hosts File
If your network connection and DNS resolver are functioning properly, the next port of call is your /etc/hosts file. This vital file maps hostnames to IP addresses directly, circumventing the need for a DNS lookup. However, misconfigurations in this file can lead to the ‘Curl 6: Could Not Resolve Host’ error.
To view and edit this file, utilize the ‘nano’ command:
sudo nano /etc/hostsAnalyzing and Correcting the /etc/hosts Entries
Once inside the /etc/hosts file, assess it carefully for any incorrect entries. This file generally contains lines mapping IP addresses to hostnames. Each entry should be on its own line, starting with the IP address, followed by a space or tab, then the hostname. Any deviation from this format could cause network-related errors.
If you discover incorrect or obsolete entries, rectify them, and ensure you save the changes before you exit. However, be prudent while editing as inaccurate changes can lead to further network issues.
Setting Up DNS Resolvers: Google and Cloudflare
Why Use External DNS Resolvers?
While your ISP typically provides a default DNS resolver, it may not always be the most reliable or fastest option. External DNS resolvers, like Google DNS and Cloudflare, can often provide better performance and enhanced security.
Configuring Google DNS
Google Public DNS is a popular choice, known for its speed and security. To configure your Linux system to use Google DNS, you’ll need to edit the resolv.conf file:
sudo nano /etc/resolv.confOnce inside the file, you can add Google’s DNS servers. Remove the existing ‘nameserver’ entries, then add the following lines:
nameserver 8.8.8.8
nameserver 8.8.4.4
Save and exit the file. You’ve now set up Google DNS on your system.
Configuring Cloudflare DNS
Another excellent choice for an external DNS resolver is Cloudflare. It’s particularly recognized for respecting user privacy. To use Cloudflare’s DNS, you’ll need to go through a similar process:
sudo nano /etc/resolv.confOnce in the resolv.conf file, remove the existing ‘nameserver’ entries and replace them with:
nameserver 1.1.1.1
nameserver 1.0.0.1
Remember to save and exit the file. Your system is now using Cloudflare DNS.
Ensuring Changes Persist
Note that in some Linux systems, the DHCP client may overwrite the resolv.conf file on reboot. To prevent this and ensure your DNS settings persist, you might need to make these changes in the DHCP client’s configuration file. Consult your specific Linux distribution’s documentation for precise instructions.
This completes our in-depth look at resolving the ‘Curl 6: Could Not Resolve Host’ error in Linux. By following these carefully crafted steps and understanding the underlying processes, you can efficiently troubleshoot this issue and optimize your Linux system’s networking capabilities.
Conclusion: Your Go-To Guide for Resolving the ‘Curl’ Error
In this comprehensive guide, we’ve thoroughly examined the methods to address and rectify the ‘Curl 6: Could Not Resolve Host’ error, a common networking issue encountered in Linux systems. We began by establishing a basic understanding of the problem, highlighting the importance of identifying whether it’s a network connectivity issue, a DNS resolver problem, or a misconfiguration in the /etc/hosts file.
For every possible scenario, we’ve demonstrated methodical, step-by-step solutions that are both effective and easily understandable. In particular, we delved into how to leverage external DNS resolvers such as Google DNS and Cloudflare to enhance network performance and security.
Our final recommendation is to remain proactive in understanding the networking components of your Linux system. Regular checks of your network connectivity, DNS resolver, and /etc/hosts file can prevent such errors from occurring. Remember, in the digital world, prevention is often more efficient than troubleshooting. As you continue navigating the intricacies of Linux, let this guide serve as a testament to the system’s robustness and your ability to master it.


