Решаем проблемы за Гейба.
Valve и баги. Баги и Valve. Компания Гейба Ньюэлла регулярно выпускает обновления для CS:GO, Dota 2 и даже TF2, но ошибок в играх от этого меньше не становится.
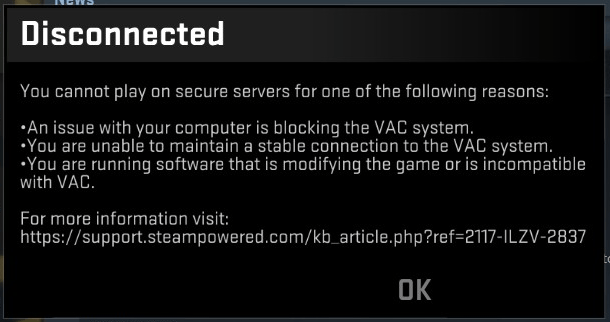
Одна из частых ошибок, с которой сталкиваются игроки в Кс Го – «Система VAC не смогла проверить вашу игровую сессию». Рассказываем что делать для исправления.

Как исправить ошибку
Есть сразу несколько способов решения с ошибкой VAC в Кс Го. Если первый способ не сработает, переходите к следующим.
- Очистка кэша загрузки
- Проверка целостности кэша
- Перезагрузка ПК и другие способы
Как очистить кэш загрузки
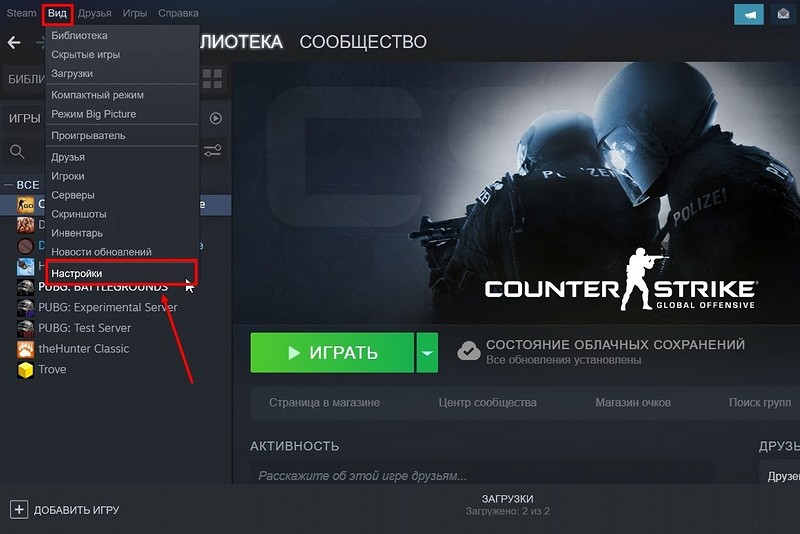
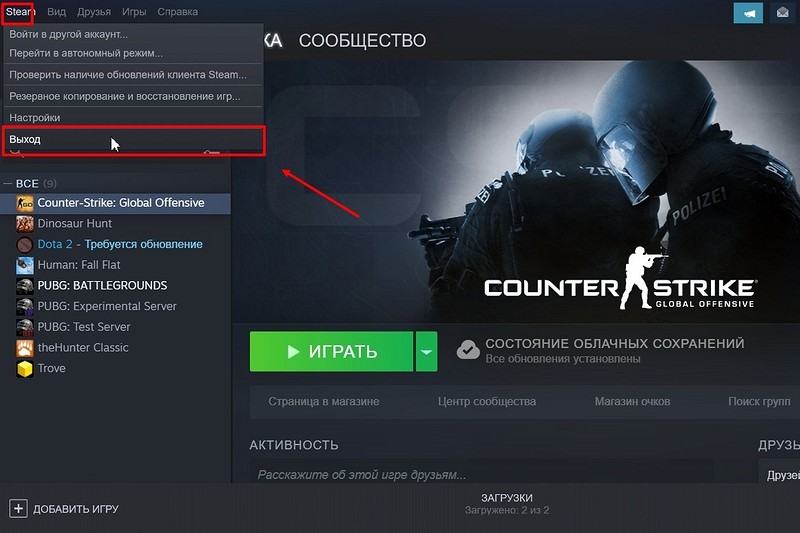
- Перейдите в настройки Steam. Для этого в левом верхнем углу Стима кликните на пункт меню «Steam» и перейдите в Настройки
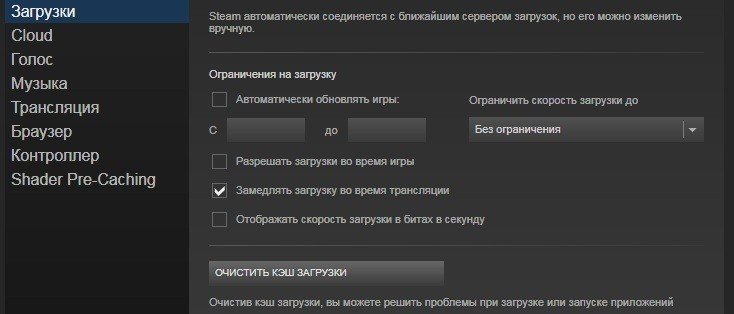
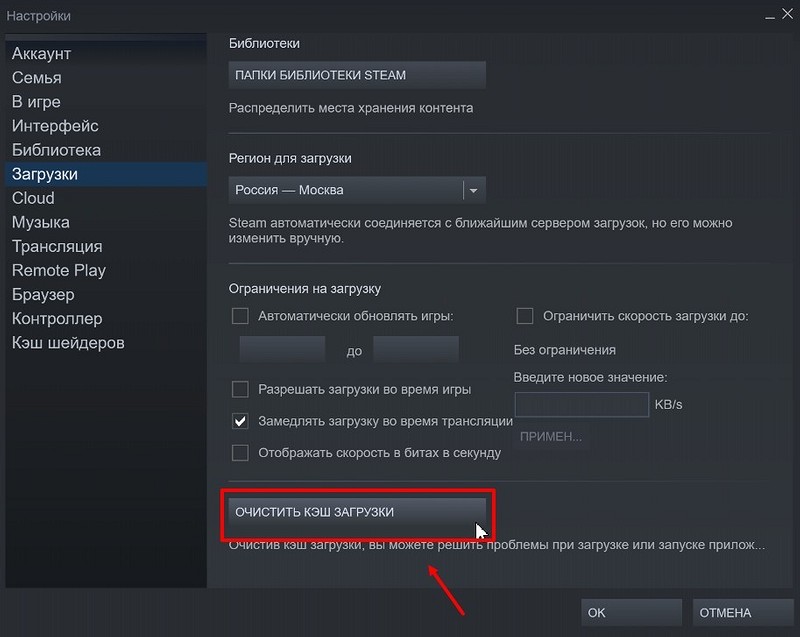
- Откройте вкладку «Загрузки»
- Выберите пункт «Очистить кэш загрузки»
- Готово, в большинстве случаев очистка кэша загрузки помогает с ошибкой Вак в Кс Го
Все консольные команды Кс Го – смена рук, настройки графики, сервера и другие полезности
Как проверить целостность кэша
Если предыдущий способ не помог, то стоит попробовать проверить целостность кэша Кс Го. Вот как это делается:
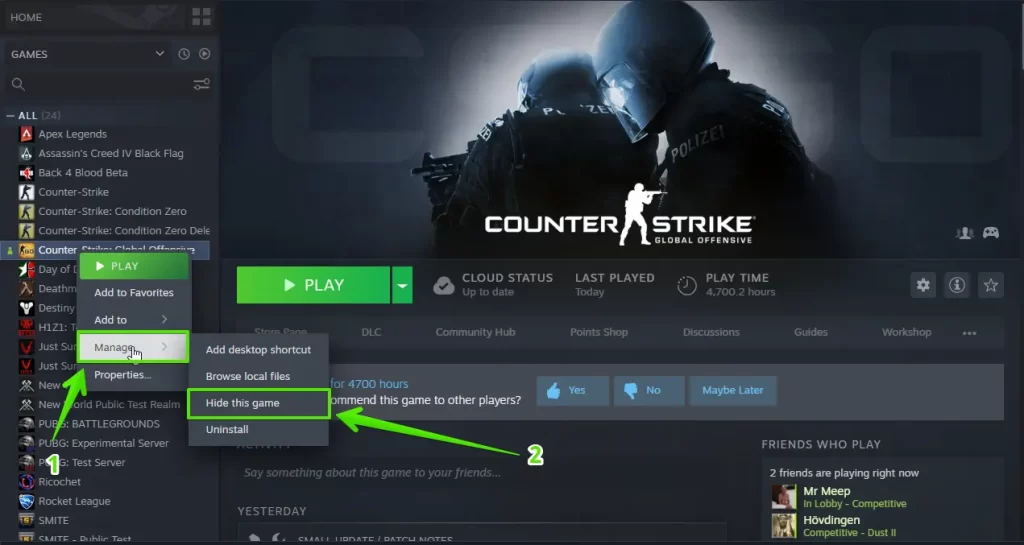
- В библиотеке в Steam найдите CS:GO
- Зайдите в «Свойства» игры – нажмите ПКМ по Кс Го в списке
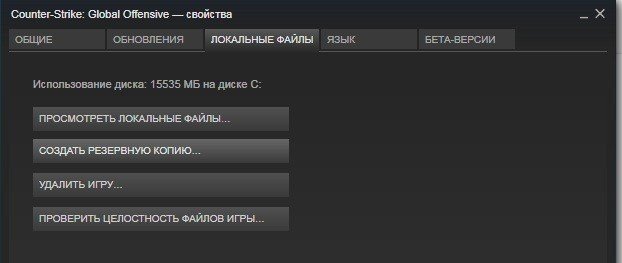
- Нам нужна вкладка меню под названием «Локальные файлы»
- Кликните на кнопку «Проверить целостность файлов игры…»
- Самое время проверить наличие ошибки в Кс Го
Перезагрузка ПК и другие способы
Если два предыдущих способа не помогли решить проблему с VAC-ошибкой, попробуйте следующие решения
- Перезагрузите ПК
- Выйдите из аккаунта Steam и войдите обратно
- Добавьте CS:GO или весь Steam в исключения своего антивируса
Помогли ли способы исправить ошибку «Система VAC не смогла проверить вашу игровую сессию»? Делитесь результатами (и если знаете – другими советами) в комментариях.
Как выдать себе оружие в Кс Го
Все виды оружия в Кс Го. Актуальный список с фото и названиями
Valve Anti-Cheat (VAC) is there to make sure games are as fair as possible in CS:GO. However, sometimes players get hit with false positives and get locked out of official servers. Here’s how you can fix those authentication errors.
Getting hit by a VAC authentication error in the middle of a competitive game can be infuriating at the best of times. It always seems to strike at the worst possible time, and can lead to you getting a competitive ban for hours, days, or even weeks.
Article continues after ad
Once you get one as well, it’s like being stuck in an endless loop. It happens time and again, to the point where players stop loading CS:GO to avoid the issue.
 Valve
Valve
You cannot play on official CS:GO servers without VAC.
[ad name=”article1″]
There’s a good reason for these VAC authentication errors though. They are there to make sure the servers stay clean, and keep games fair. The issues are commonly caused by “third party software interfering with your game or Steam,” but sometimes a quick re-log doesn’t do the trick.
Article continues after ad
- Read more: CSGO pro play records
However, there are a few fixes recommended by Valve themselves as to how you can solve the errors. So, if you’re struggling to load into CS:GO, follow these steps, and hopefully you’ll be back on the right track.
Restart your computer
It seems pretty straight forward, but we have to list it anyway, just in case. Giving your computer a quick restart can help, as a fresh boot might be all you need to fix the error.
Related:
11 most expensive CSGO skins in 2023: Knives, AK-47, AWP & more
Article continues after ad
[ad name=”article2″]
Reinstall Steam and CS:GO
Sometimes, a quick uninstall and reinstall of both Steam and CS:GO can solve all the issues as well.
If you don’t want to go through the massive download, you can just verify the integrity of your game files through the Steam client.
- Read more: CSGO March 31 update adds new maps, Prisma 2 case, more
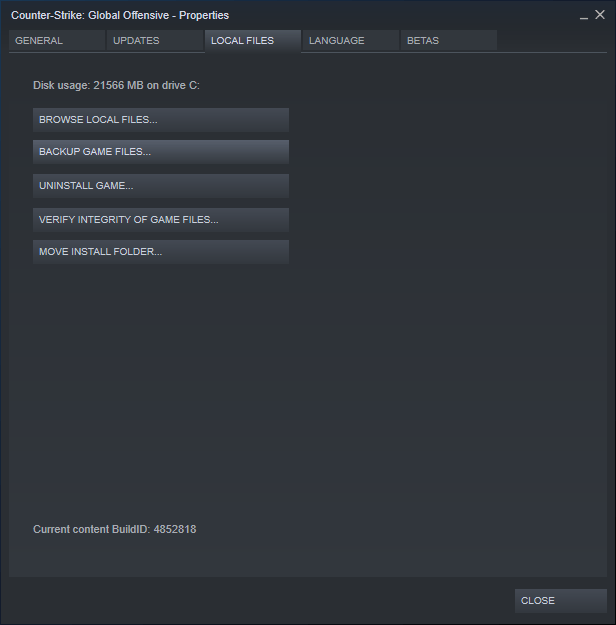
Right-clicking on CS:GO in your library, looking through Properties > Local Files, and running a verification check could also fix the authentication error.
 Valve
Valve
You should verify your game files before uninstalling to save you from having to re-download the game.
[ad name=”article3″]
Repair the Steam Service
If that doesn’t work, you can repair the Steam client itself. A corrupt file in the Steam Service can be all it takes to close your account off from VAC-protected servers.
Sign up to Dexerto for free and receive
Fewer Ads|Dark Mode|Deals in Gaming, TV and Movies, and Tech
Article continues after ad
By booting up a repair command and re-starting Steam, the issues might sort themselves out. It’ll take a few minutes to do, but can save you hours of hurt.
If you are on Windows, here’s how you can run a repair of the Steam Service:
- Exit Steam.
- Click Start > Run (Windows Key + R).
- Type the following command: “C:\Program Files (x86)\Steam\bin\SteamService.exe” /repair
- Launch Steam and test the issue again.
[ad name=”article4″]
Restore boot settings to default
So restarting your computer hasn’t worked, and neither has repairing the game files. The issues may lay deeper in your computer’s boot settings, which can affect all programs.
Article continues after ad
- Read more: CSGO bug sees prices for all skins skyrocket on market
Restoring your boot settings to default may remove any settings that might be incompatible with VAC. Here’s a step-by-step guide to doing that yourself:
- Exit Steam.
- Click the Start button, then All Programs, and Accessories.
- Right-click on Command Prompt and click Run as administrator.
- In the command prompt, type the following commands and press Enter after each command: bcdedit /deletevalue nointegritychecks, bcdedit /deletevalue loadoptions, bcdedit /debug off, bcdedit /deletevalue nx
- Restart your computer.
- Launch Steam and test the issue again.
If you receive an error along the lines of “The value is protected by Secure Boot policy and cannot be modified or deleted,” your boot settings are already default.
 Valve
Valve
If fixing Steam or CS:GO doesn’t work, it might be a bigger problem with your computer itself.
Repair system files
Finally, the most drastic measure you can take is a complete repair of your operating system. There might be some corrupt files floating around that VAC detects, shutting you off from the servers.
Article continues after ad
To run a repair, follow these steps:
- Exit Steam.
- Click the Start button, All Programs, and Accessories.
- Right-click on Command Prompt and click Run as administrator.
- In the command prompt, type the following command and press Enter: sfc /scannow
- Once the operation has completed please restart your computer, then launch Steam and test the issue again.
Send Valve an email
If all else fails, Valve always checks their emails. CS:GO developer John McDonald told players they can send the team an email to give them a chance to not only fix it for you, but for other users.
- Read more: How to watch ESL Pro League Season 11
“If this is affecting you, please send an email to CSGOTeamFeedback@valvesoftware.com with the subject line ‘VAC Authentication Error,’” he wrote on Reddit.
“Make sure to include a link to your Steam profile, how long this has been affecting you, and any steps you might’ve attempted to remedy the situation.”
Article continues after ad
Recently CS: GO players are complaining that when they try to open the game they encounter VAC Authentication Error.
Some of the players are very frustrated with this error and share their experiences on social forums.
Don’t worry about it!
The CPU Guide brings you the best working solution to solve CS:GO VAC Authentication Error.
Solution 1: Restart the Game to Fix CS:GO VAC Authentication Error
Whenever you encounter CS:GO VAC Authentication Error or any game bug, you should restart the game before trying any further solutions.
Restarting the game will eliminate any temporary error which is occurring due to the old cookies and cache or the system’s other software is clashing with your gaming software.
All of these errors will be eradicated after a simple restart of the PC or any other platform you use.
If the restarting is not helping to solve CS:GO VAC Authentication Error PC then try performing a Clean boot.
Solution 2: Performing a Clean Boot to Initialize the CSGO
Clean boot will help you to eliminate the unnecessary applications which are running on the backend.
And shut down any applications which are conflicting with each other.
How to perform a clean boot on Windows 11?
Here is how to perform a Clean Boot on Windows 11:
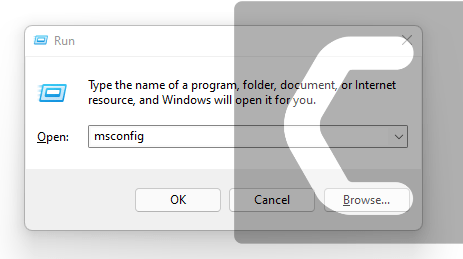
- Press Windows Button + R Key

- The Run Dialogue Box will appear
- Type “MSConfig“
- Press Enter
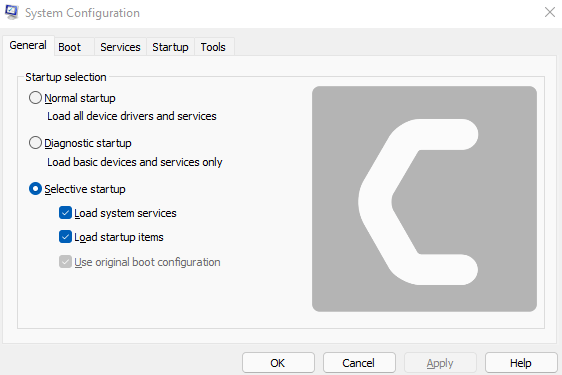
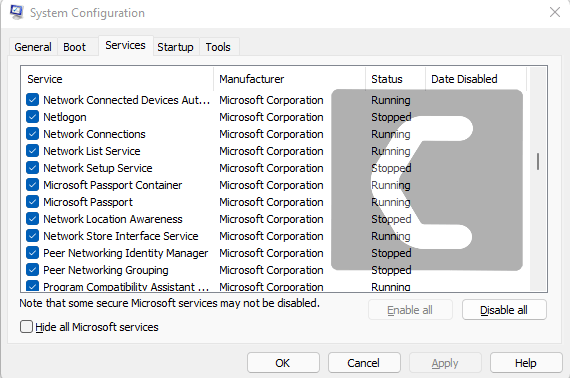
- The System Configuration window will open

- Select Services tab

- Uncheck all the unnecessary service
- Only check those you need now
- Now click OK
Now, your clean boot is done and the unnecessary services are eliminated which will enable you to play CSGO without crashing on the startup
If the error still persists, then proceed to the next solution to solve CSGO Keeps Crashing PC.
Read More: CSGO Crashing/Not Launching [Best Guide]
Solution 3: Keep your PC Updated to Fix CS:GO VAC Authentication Error
Sometimes your outdated PC is the main cause of the Outdated Graphics Card Driver on Windows.
Outdated drivers in your PC or your current Window Version cannot support the CSGO and gaming software, as you update your Windows all running drivers are updated too.
So, here is how you can update your PC:
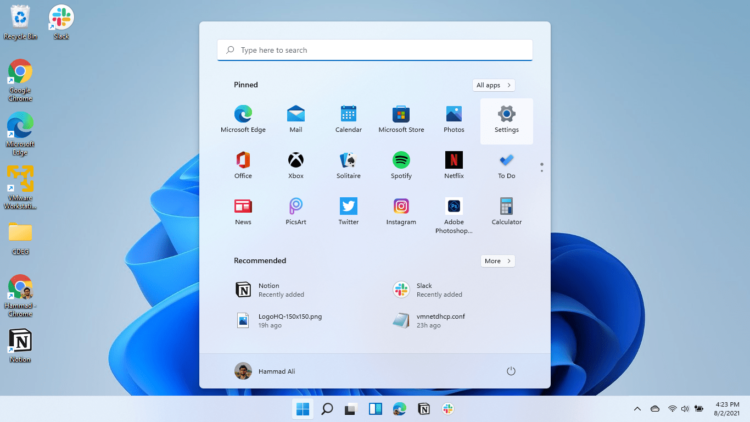
- Click on the Windows icon

- Click on the Settings icon
- A new window will pop up
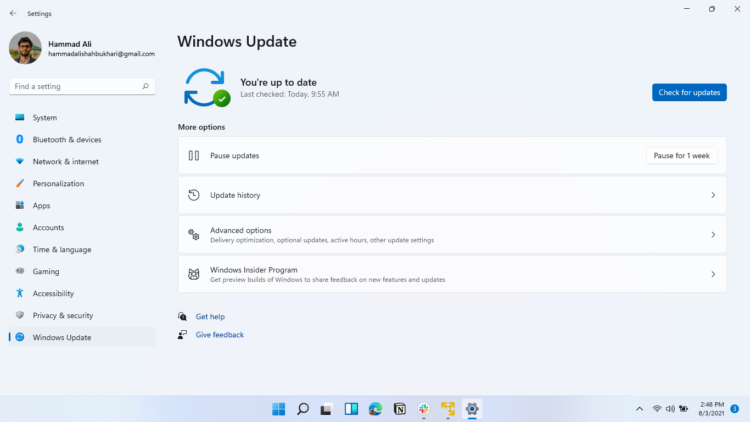
- Select Windows Update from the left menu
- The new Window will pop up
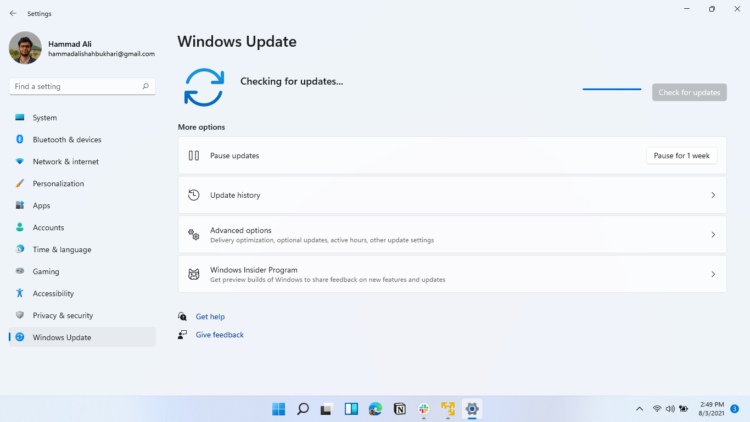
- Then click on Check for updates.
- If there is any update it will start updating the PC.
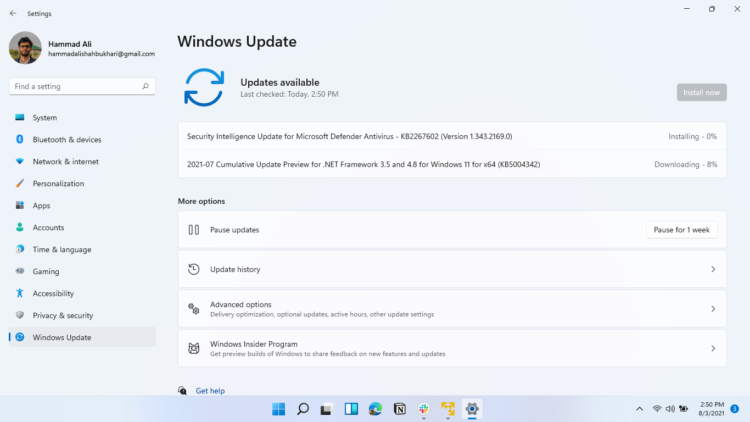
You can also update your graphic drivers through Windows Update too and solve CSGO Won’t Launch errors.
Read More: Elden Ring Won’t Launch: Not Starting on PC?
Solution 4: Update Graphics Card Driver with Windows Update
Updating the graphic drivers will help you have a better and more stable graphical experience.
This will fix the CS:GO VAC Authentication Error PC and you will be able to play CSGO without Keeps freezing.
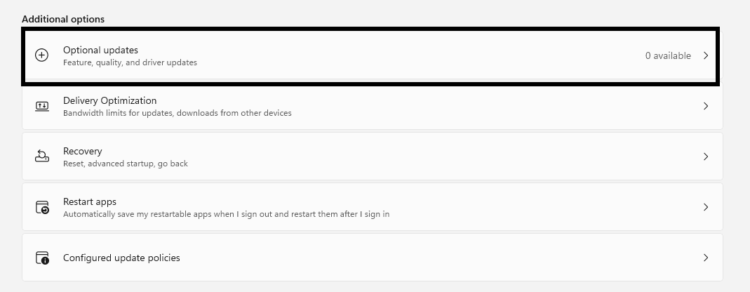
Here is how you can update drivers via optional update:
- Click on the Windows icon
- Click on the Settings icon
- A new window will pop up
- Select Windows Update from the left menu
- The new window will pop up
- Now select Advanced options
- Click on Optional updates

- A new window will open
- Click on the drop-down button for Driver updates
- Now, select your desired drivers
- Now press the Download & install button
If you cannot update your drivers through Windows Update, you can try updating the Graphics Drivers through Device Manager to fix CSGO Stuck on the Loading Screen.
Solution 5: Update Graphics Card Driver via Device manager to FIX CSGO Keeps Crashing
Outdated graphic drivers can be updated in multiple ways.
If you are unable to update your graphic drivers by updating Windows, you can try updating through the Device Manager too which in return will fix CSGO Crashing PC.
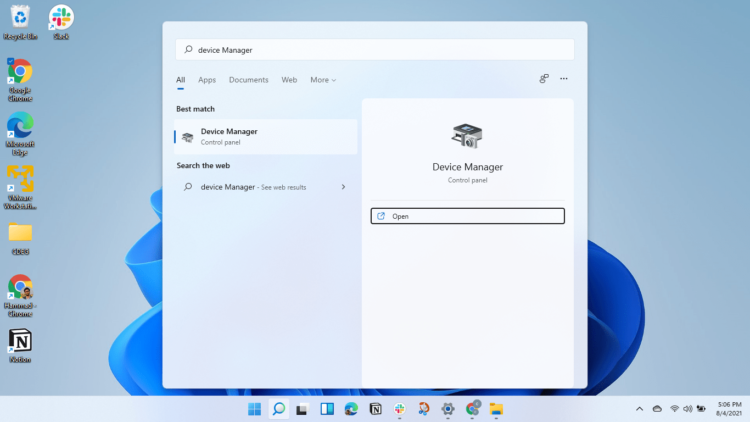
Here is how you can update drivers through Device Manager:
- Click on the Search icon
- Type Device Manager
- Click to open Device Manager
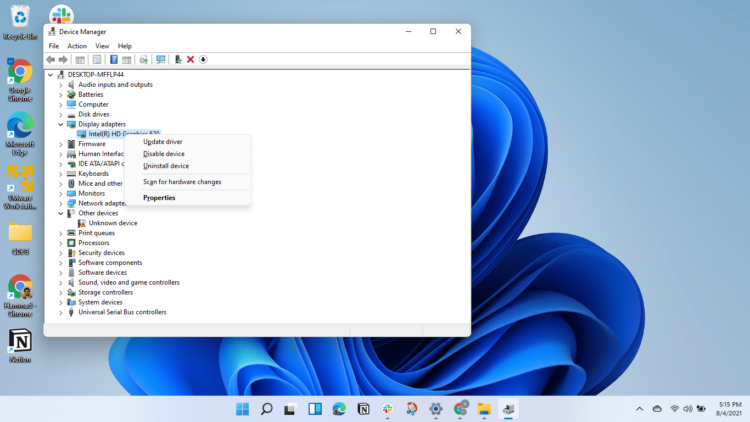
- Then select the Display adapters
- A further menu will open
- Right-click on the graphic card name
- Click on the Update driver
Rolling Back the Driver to Fix CS:GO VAC Authentication Error :
If you experiencing the CSGO PC Crash issue after updating your graphic drivers then you can roll back the driver’s recent update to avoid Frozen CSGO.
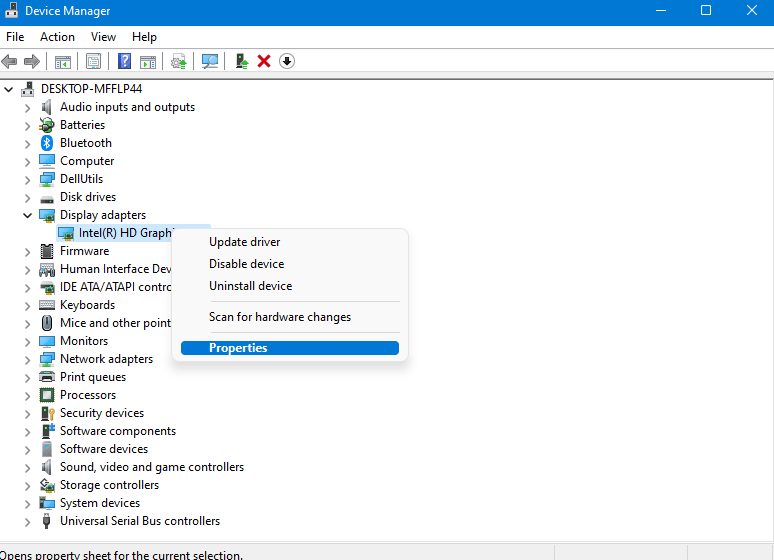
Here is how you can roll back drivers:
- Click on the Search icon
- Type Device Manager
- Click to open Device Manager
- Then select the Display adapters
- A further menu will open
- Right-click on the graphic card name
- Click on the Properties

- A graphic card properties Window will open
- Navigate to the Driver Tab
- There is an option of “Roll Back Drivers” click on it
- If the option of “Roll Back Drivers” is grey out this means that the driver did not update recently.
If this solution didn’t fix CS:GO VAC Authentication Error then proceed to update the external GPU driver.
Solution 6: Check for Driver’s Updates of GPU/Video Card of different company
One of the highlighted issues is outdated GPU drivers leading to Frozen CSGO PC.
When our video card has outdated drivers, it’s unable for GPU to align with the modern gaming experience and starts causing CS:GO VAC Authentication Error.
So, we recommend updating the video card drivers.
Here are the direct links to the main GPU Making Companies:
- AMD
- Nvidia
- Intel
After updating the GPU drivers and check the CS:GO VAC Authentication Error is fixed or not.
If the above solution didn’t work out for you then try the next solution to fix the CSGO Freezing PC.
Solution 7: Verify the Game Files to Fix CS:GO VAC Authentication Error
Sometimes the game file will get corrupted or get deleted which eventually causes CSGO Crash on Startup and the CSGO won’t launch properly.
Verify Game File in Steam to fix CSGO Crashing PC
Follow the steps to verify the game file on steam software:
- Launch the Steam Software
- Now login in the steam
- Navigate to the library
- Select the game and right-click on the game
- Now select properties
- Now click on the “Local file” Option
- A further menu will open
- Click on the “Verify Integrity of the Game Cache“
- Now the software is starting to verify the files and this will take some time.
Sometimes the game file will get corrupted or get deleted that eventually causes CS:GO VAC Authentication Error.
What is Steam software used for?
Steam software is an Online platform that is used to play games and also host more than 10,000 games.
This software allows the user to make community and play games on the same platform.
Is Steam a virus? Can steam harm your computer?
Steam is a client gaming software that allows the user to enjoy gaming with building the best community around them.
In current times Steam has more than 120 Million active players around the world.
When you play games on Steam your PC might get occupied but it will not harm your computer.
Now move on to the Power Setting to solve CS:GO VAC Authentication Error.
Solution 8: Change Power Settings to Fix CS:GO VAC Authentication Error
When your PC power plan is set on the Balanced option plan, your PC will provide less power to the game, this will eventually cause game lag or CSGO 2 Crashing.
To avoid Frozen CSGO follow the below steps to change Power settings:
How do I change power settings in Windows 11?
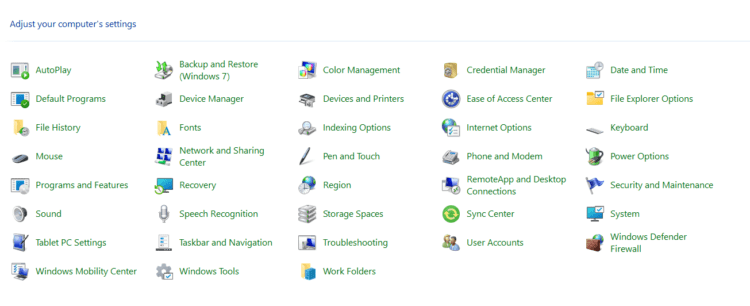
- Go to the Control Panel
- Select View option “Large Icon“

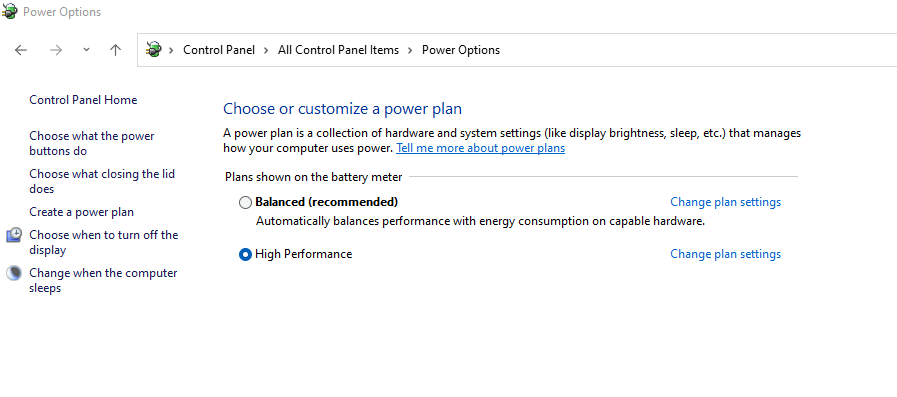
- Now find “Power Options” click on it
- Choose your Power Plan “High Performance“

- If there is no other option expect a “Balanced“
- Then navigate the left menu
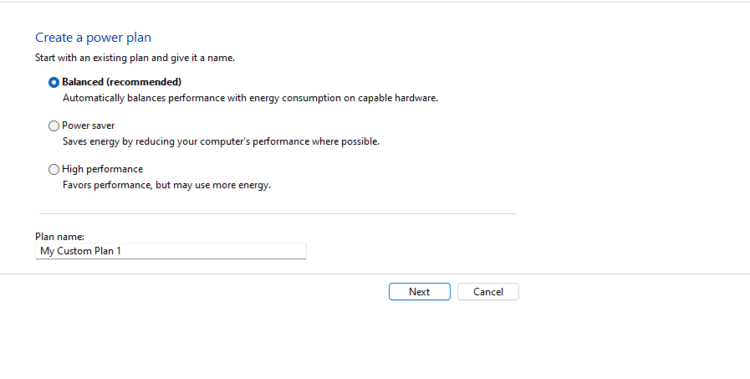
- Select “Create a power plan“
- A new window will open
- Select the power plan to “High Performance“

- And click on Next
- The new power plan is available.
If still the error pops up, then you turn overclocking off. And if you haven’t enabled it, then you need to learn this application as an administrator.
Solution 9: Turn off Overclocking To Fix CSGO Keeps Crashing
Sometimes some players increased the CPU speed in order to achieve more smooth gaming. But sometimes some games stop playing or keeps crashing. To rectify overclocking you have to set CPU speed to default.
Here are the steps to put CPU speed in default settings to solve CS:GO VAC Authentication Error:
- Restart your PC
- When you see the company logo press “F2“(the Key might differ depending on the Manufacturer)
- Now you will enter in BIOS
- Now go to Advanced Tab
- Locate Performance and
- Find Overclocking option
- Disable overclocking
- Save changes
- Exist BIOS
IF CS:GO VAC Authentication Error persists then follow the next solution.
Solution 10: Run the Application as Administrator to Fix CSGO Won’t Launch
Running the program as an administrator will definitely help you to eradicate the “CSGO Crashing PC & CSGO Freezing PC” as it might be lacking the privileges required to run the Application.
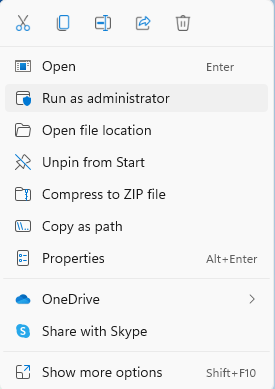
Here is how you can run the application as an administrator:
- Go to the file/ folder.
- Then go to the Game Launcher.
- Right-click on the Launcher icon

- A menu will open
- Select “Run as administrator“
Now the program will start running smoothly without giving you the error “CS:GO VAC Authentication Error“
Hope all of the above solutions help you to eliminate the VAC Authentication Error.
If you have any queries or suggestions feel free to share your experience with us in the comments section down below or you can reach us on our social handles.
If you happen to be an avid player of Counter-Strike 2 (CS2), chances are you’ve encountered the frustrating “VAC Was Unable to Verify Your Game Session” error.
This issue can seriously disrupt your gaming experience, leaving you unable to enjoy your favorite game. However, there’s no need to worry because we have prepared a comprehensive guide that will help you resolve this problem and get back into action.
In this post, I will guide you through the necessary steps to diagnose and resolve the VAC error, ensuring that your game session runs smoothly. From checking for VAC bans to reinstalling CS2, rest assured that we have all your concerns covered.
So let us delve into it and restore your game back on track!
Understanding the “VAC Was Unable to Verify Your Game Session” Error
The Valve Anti-Cheat (VAC) system aims to safeguard players against cheaters and uphold a fair gaming environment. However, there are instances when the system encounters an error called “VAC Was Unable to Verify Your Game Session,” which hinders successful matchmaking and prompts a “verify error” message.
This particular issue, known as the verify game session error, typically arises from improper installation or missing game files that violate VAC guidelines imposed by Steam.
Luckily, there are several potential solutions available to rectify this issue. These options encompass updating drivers, running Steam with administrative rights, and adjusting antivirus settings.
However, before delving into these remedies, let us first discuss some fundamental preliminary steps.
Essential Preliminary Steps
Before delving into more advanced solutions, it is essential to conduct preliminary checks. These initial steps are crucial and involve:
- Ensuring that there are no VAC bans on your account
- Verifying that no cheat software is running on your computer
- Inspecting any missing game files
- Updating Windows to address vulnerabilities, update drivers, and rectify issues that may be causing the error, including problems with program files.
To make it easier to follow, it is advisable to try these solutions in sequence since the issue is often resolved within the initial steps. These can include checking the local files tab in Steam.
Let’s examine each of these important preliminary measures more closely.
Check for VAC Bans
To ensure uninterrupted access to your Steam games, it is essential to check if your steam account has been VAC-banned.
Follow these steps: Open Steam and go to your profile page. If a VAC ban exists on your profile, it will be clearly indicated.
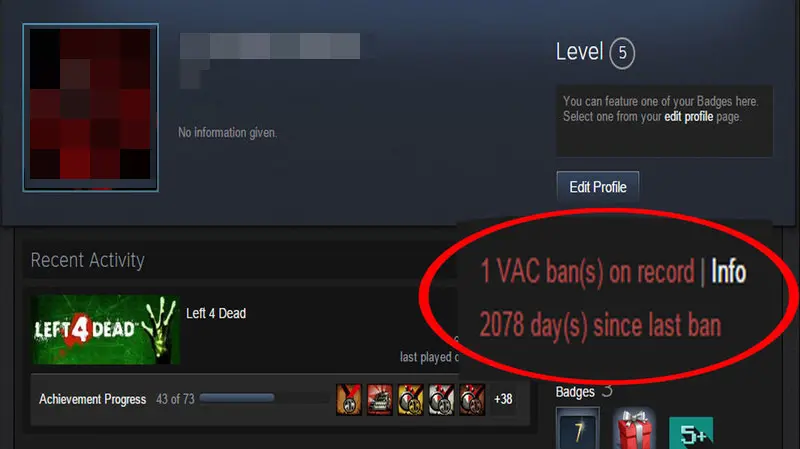
Unfortunately, this ban will restrict your access to the games on Steam. In such circumstances, creating a new account might be the only solution for reclaiming your beloved games.
If you have not received a VAC ban, you are ready to move on to the next step.
However, if none of the other solutions help resolve the error, reinstalling CS2 may ultimately be necessary.
Also view: How to remove Steam Trade holds.
Update Device Drivers
Outdated device drivers may potentially cause the “VAC was unable to verify your game session” error. To avoid issues with game performance and resolve the VAC error, it is recommended to keep your device drivers up-to-date. You have a couple of options: you can utilize a third-party tool or go directly to Nvidia or AMD driver update section.
By keeping your device drivers up to date, you can guarantee a seamless gaming experience and potentially prevent encountering the VAC error altogether.
Close Cheat Software
Running cheat software on your computer while playing online games can result in VAC errors. If you’re using Windows and encounter cheat software, follow these steps to close the software:
- Press Ctrl + Alt + + +. Delete the file.
- Select Task Manager.
- Choose the cheat software from the list of running processes.
- Click ”End task”.
Disabling cheat software becomes a necessity to prevent VAC errors and maintain an equitable gaming environment accessible to all players.
If non of the above solutions worked, don’t worry. There are more solutions for this error and you might just have to try them one by one until you find one that works.
1. Restarting Steam and Your Computer
Sometimes, the simplest solutions prove to be the most effective ones. If you encounter a VAC error while using your Steam client, try restarting both the client and your computer.
This straightforward action often resolves the issue. To restart the Steam client, just right click the icon in your activity bar and press ”Exit Steam”.
After restarting the Steam client (providing it didn’t solve the issue), proceed to restart your computer. Once your computer has restarted, launch Steam and test out CS2 to see if the VAC error has been resolved.
If the error persists, move on to the next fix.
2. Verifying Integrity of Game Files
In CS2, Steam provides a built-in feature that enables users to effortlessly check and repair game files. This handy tool can effectively address the VAC error by verifying the integrity of the game files. To perform this task, simply follow these steps:
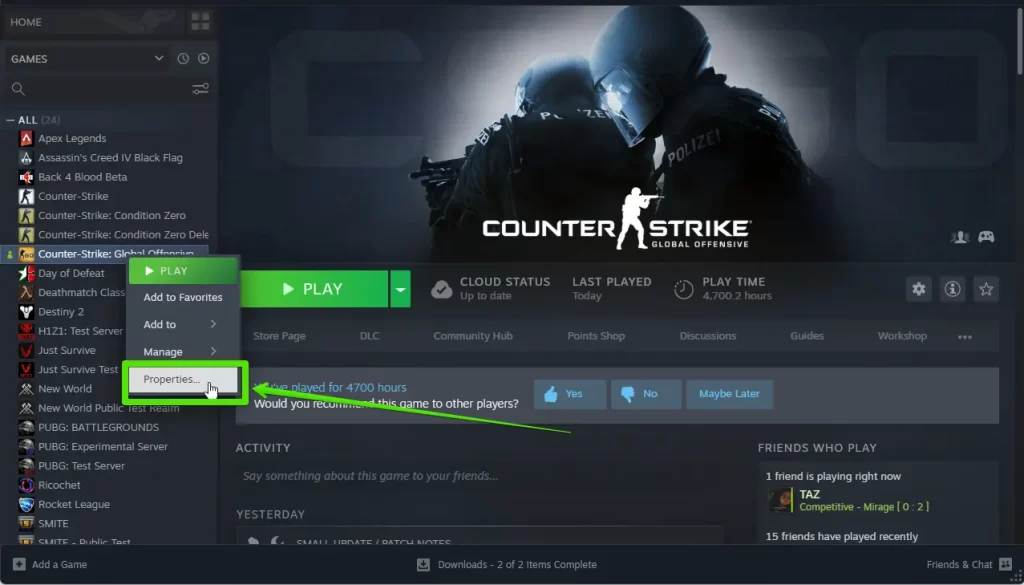
1. Right click CS2 and press ”Properties”.
2. Go to ”Installed Files”
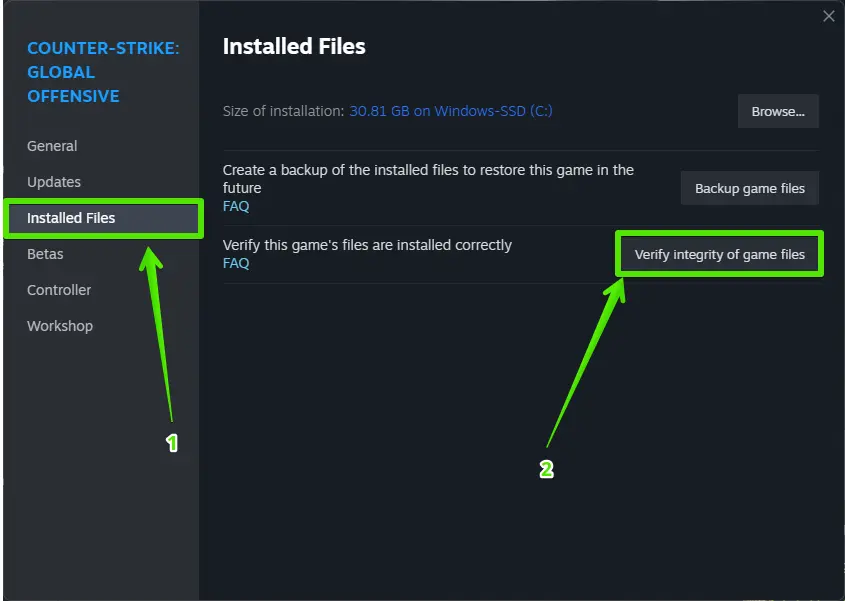
3. Press ”Verify Integrity of Game Files”.
If verifying the files didn’t work, move on to the next fix.
3. Running Steam and CS2 as Administrator
Running into the VAC error while using Steam and CS2? Granting administrator privileges might just help you out.
To do so, simply right-click on the Steam or CS2 icon and select “Run as administrator.”
If you’re still experiencing the error even after running Steam and CS2 as administrator, let’s move on to the next possible solution for fixing cs.
4. Repairing the Steam Client and Library Folder
Repair the Steam client and library folder to fix the VAC error.
Once the repair is finished, launch Steam. Test CS2 afterwards to check if the VAC error has been resolved. If it hasn’t, proceed with the next solution.
5. Antivirus and Firewall Considerations
When dealing with Steam and CS2, it is important to adjust your antivirus and firewall settings in order to avoid any potential interference. Doing so can help resolve the VAC error.
If you are facing issues caused by your antivirus software, one solution is to exclude the Steam application from scanning by adding it to the excluded files folder in your antivirus settings. Alternatively, you may choose to temporarily disable or reinstall the antivirus altogether.
If you find that disabling your antivirus software solves the VAC error, it may be a good idea to reach out to the support team of the software manufacturer for additional options.
In case the error persists, you can proceed to explore alternative fixes.
6. Addressing Background Tasks and Services
To avoid encountering the VAC error in Steam and CS2, it is advisable to identify and close any background tasks and services that may cause conflicts.
You can easily recognize these processes using the Task Manager and terminate them accordingly.
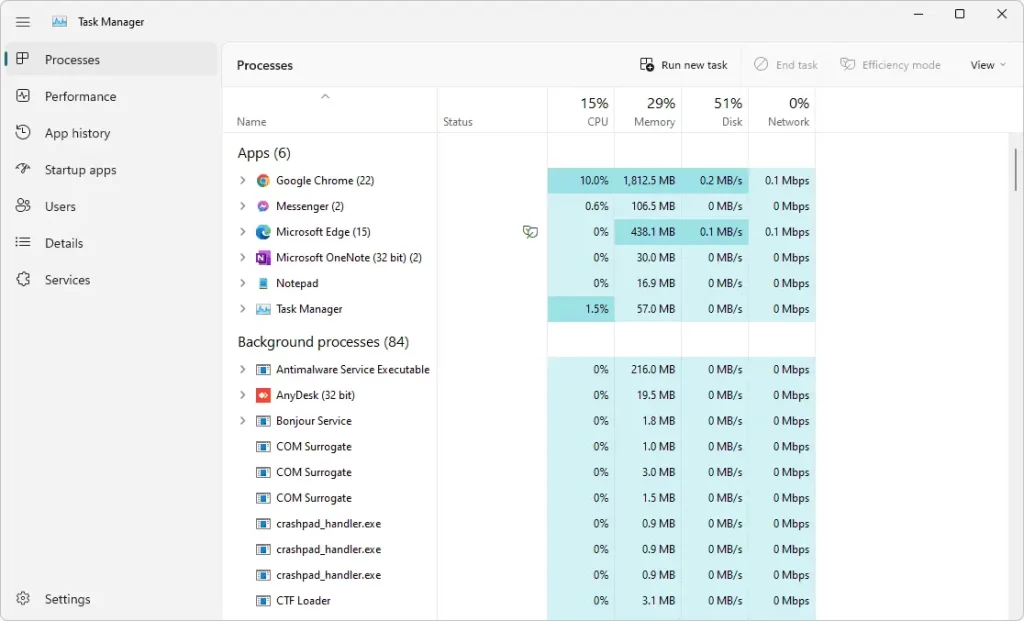
To access the Run window, one can simply press Windows+R. Afterwards, enter “taskmgr” and then click “OK” or press Enter. This action will open up Task Manager.
First, address the background tasks and services. Then, test CS2 to check if the VAC error has been resolved. If it hasn’t, proceed to the next solution.
7. Opting Out of Steam Beta Participation
To resolve the VAC error in certain cases, you may find it helpful to leave the Steam Beta program. Here are the steps to opt out of Steam Beta participation:
- Navigate to Steam settings.
- Select the Account tab.
- Under Beta Participation, click the “Change” button.
- Select “NONE – Opt out of all beta programs”.
After opting out of Steam Beta, test CS2 to check if the VAC error is resolved. If the error persists, proceed to the final solution.
8. Reinstalling CS2
If all else fails, you can try resolving the VAC error in CS2 by reinstalling the game. This method involves removing any unwanted files and ensuring a clean installation.
- To do so, begin by uninstalling the current version of CS2 through the Control Panel.
- Afterward, head to the Steam store where you can download and install the latest version of the game.
If you reinstall CS2, make sure to verify the integrity of the game files in your Steam library. Should you continue experiencing the VAC error, feel free to reach out to Steam support for further assistance.
Related: How to check someone’s Steam Trade history.
Summary
We hope this comprehensive guide has successfully resolved the “VAC Was Unable to Verify Your Game Session” error in CS2. By following these steps, you will be able to regain uninterrupted enjoyment of your favorite game.
Remember to regularly update your device drivers, abstain from using cheat software, and adjust your antivirus and firewall settings as necessary.
Now that you have the knowledge to resolve the VAC error, it is time to rejoin the action and master the battlefield. Enjoy your gaming experience!
Frequently Asked Questions
How do I fix my Steam VAC ban?
Regrettably, VAC bans are irrevocable and cannot be resolved through negotiation. In the event that a VAC ban is determined to have been wrongly issued, it will be automatically lifted.
How do you verify game files in CS2?
To verify game files in CS2, follow these steps:
1. Open your game library on Steam.
2. Right-click on the game.
3. Go to its Properties.
4. Select Installed Files.
5. Click on Verify Integrity of Game Files.
Once you perform these steps, Steam will automatically verify the game’s files and a notification box will appear when the process is complete.
What does VAC stand for CS2?
Valve Anti-Cheat, commonly known as VAC, is an automated system designed to detect cheats on users’ computers. It scans for any suspicious activity and when a cheat is found, the user’s account is flagged for a temporary ban from all VAC-secured servers.
This ensures fair gameplay and maintains the integrity of online gaming environments.
How do I get rid of VAC authentication error?
To resolve the VAC Authentication Error, you should restart your computer and attempt some classic Steam solutions. These include turning it off and on again, launching Steam as an administrator, and verifying game files.
Moreover, you should consider disabling any potentially harmful hacks, removing unnecessary software and malware. Additionally, verify if XD/NX is enabled in your BIOS and DEP is enabled in your Windows operating system.
VAC’s inability to verify the game session suggests that tampering has been detected in the game files or a third-party program/script has attempted to manipulate game processing. Consequently, VAC will compare and either modify or repair any files that differ from those on the Steam servers.
Вы наверняка знаете, что все современные игровые площадки оснащены встроенным античитом. У Valve это — VAC, у Riot Games — Vanguard, у Epic Games — Easy Anti-Cheat. Год назад на платформу Battle.net (Blizzard) добавили античит RICOCHET, который сфокусирован на контроле честности игроков в Overwatch. Самостоятельно обойти ни одну из этих систем нельзя (кроме случаев, если вы пользуетесь читами). Чтобы игровая сессия состоялась, античит должен обязательно проверить ваш компьютер на соответствие требованиям. Но иногда этого не получается сделать, что и приводит к возникновению ошибки «Система VAC не смогла проверить вашу игровую сессию». Почему?

Содержание:
- Принцип работы VAC, и почему возникает ошибка «Система VAC не смогла проверить игровую сессию»?
- Как исправить ошибку «Система VAC не смогла проверить вашу игровую сессию»?
Принцип работы VAC, и почему возникает ошибка «Система VAC не смогла проверить игровую сессию»?
Работа любого античита направлена на предотвращение вмешательства сторонних программ в игровой процесс:
- Античит загружается на жесткий диск.
- Программа запускается параллельно с игрой.
- Система проверяет наличие цифровой подписи любых процессов, которые пытаются вмешаться в игру.
- Если какая-то программа пытается повлиять на игровой процесс, но не соответствует требованиям античита, то в любом случае будет расценена как чит.
- На центральный сервер отправляется информация о нарушении, и аккаунт нечестного игрока блокируется.

Ошибка «Система VAC не смогла проверить вашу игровую сессию» возникает вовсе не потому, что вы читер. Античит не смог проверить ваши локальные файлы. И случается это по следующим причинам:
- Система не смогла найти файлы по причине неправильных настроек местоположения.
- Антивирус или Firewall заблокировал античит VAC.
- Слетели настройки роутера, и появились проблемы с доступом в сеть.
Как исправить ошибку «Система VAC не смогла проверить вашу игровую сессию»?
Есть 5 рабочих способов. Если вы не пользуетесь сторонним софтом и это предупреждение появилось внезапно и беспричинно, то мы обязательно решим проблему. Для начала пробуем перезагрузить компьютер и зайти заново в клиент Steam. Иногда эти подготовительные действия помогают справиться с этой ошибкой.
1. Проверяем целостность кэша
Этот способ, как правило, исправляет ошибку в 9 из 10 случаев. Мы проверим наличие всех необходимых для игры файлов.
- Открываем Steam и заходим в Библиотеку.
- Кликаем правой кнопкой мыши по игре, с запуском которой возникли проблемы. В нашем примере рассмотрим CS:GO. И нажимаем «Свойства».
- Переходим в раздел «Локальные файлы» и нажимаем «Проверить целостность игровых файлов».
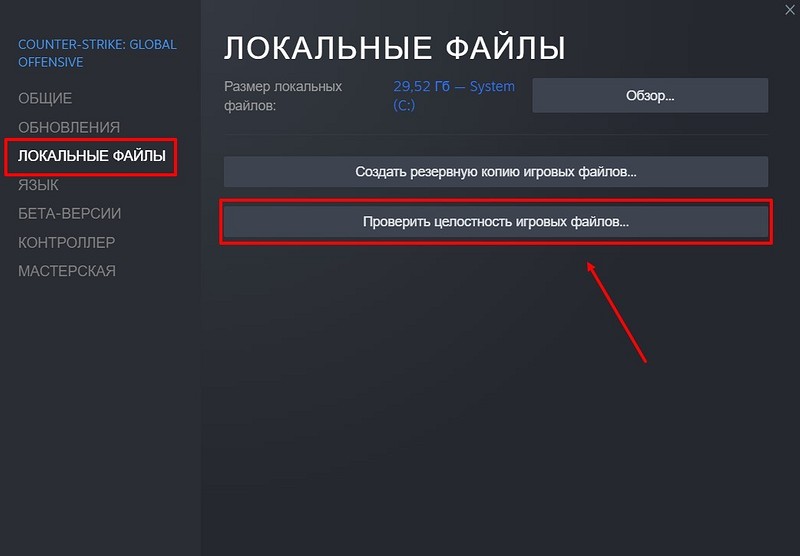
- Ожидаем окончания проверки, и, если действительно некоторых файлов не хватает, то система автоматически их загрузит при следующем запуске приложения.
Если же проверка показала, что все файлы на месте, то идем дальше…
2. Очищаем загрузочный кэш Steam
- Второй действенный способ — это удаление временных файлов загрузки. Открываем Стим, переходим в раздел «Вид» → «Настройки».
- Кликаем по строчке «Загрузки» и нажимаем «Очистить кэш загрузки».
Далее — подтвердите свое действие. Система попросит вас залогиниться заново. Если не помогло, то пробуем следующий способ устранения ошибки «Система VAC не смогла проверить вашу игровую сессию».
3. Обновляем Steam.dll и SteamUI.dll
- Что мы будем делать? Удалять файлы из папки Steam. Но для начала полностью выходим из клиента.
- Ищем папку, где установлен Стим и удаляем оттуда эти два объекта.
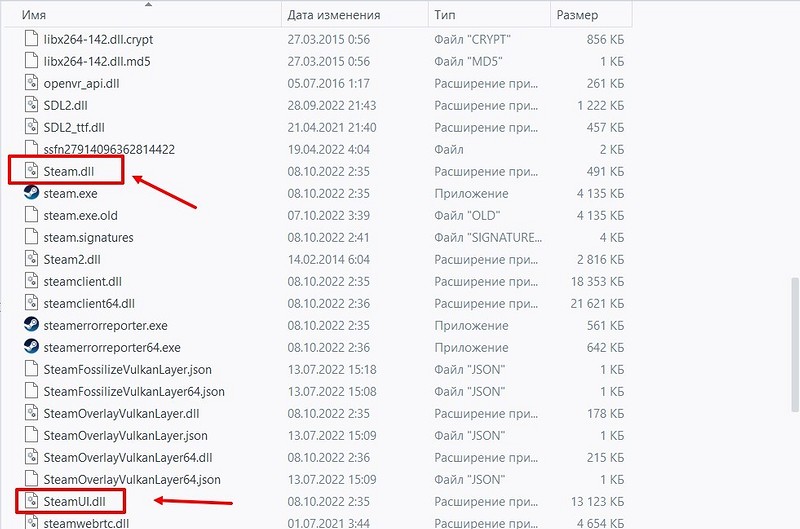
Когда мы в следующий раз запустим клиент Steam, то он автоматически скачает эти удаленные файлы. И, возможно, проблема с запуском игры решится. Если нет, то пробуем еще варианты.

4. Отключаем Брандмауэр
Многие игроки пишут, что отключение этой стандартной службы Windows помогает устранить ошибку VAC. Попытаемся и мы (на примере Windows 10).
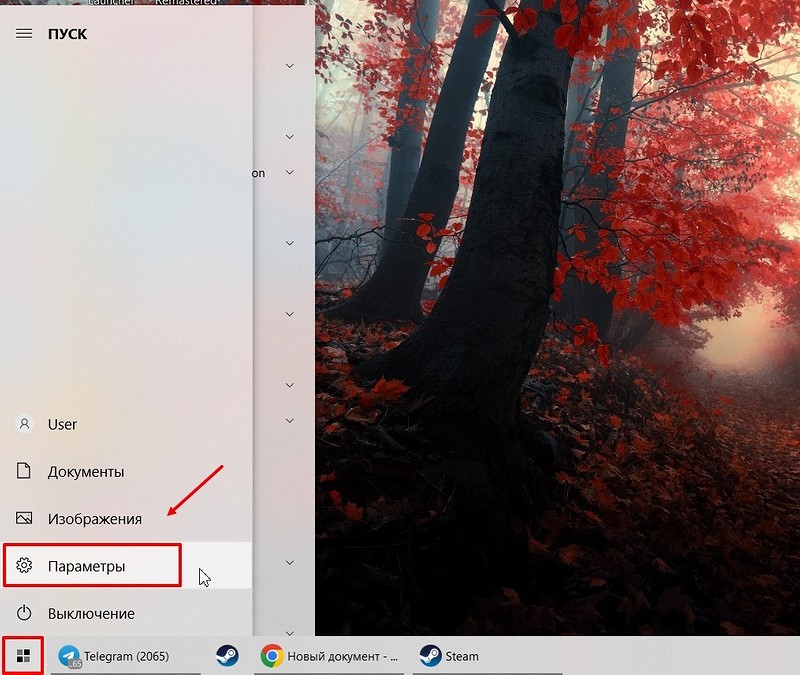
- Открываем меню «Пуск» и заходим в «Параметры».
- Заходим в «Обновление и безопасность».

- Кликаем по «Защитнику Windows».

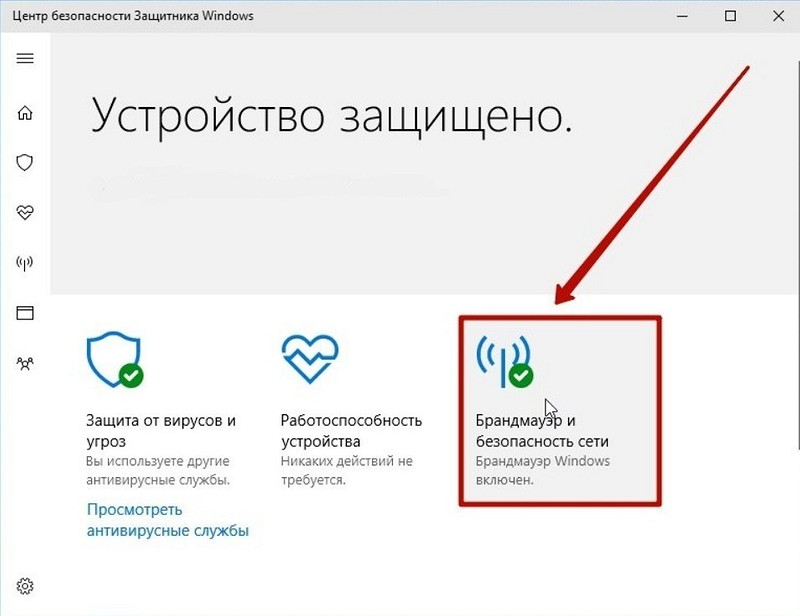
- Переходим в раздел «Открыть Центр безопасности Защитника Windows».

- Заходим в «Брандмауэр и безопасность сети».
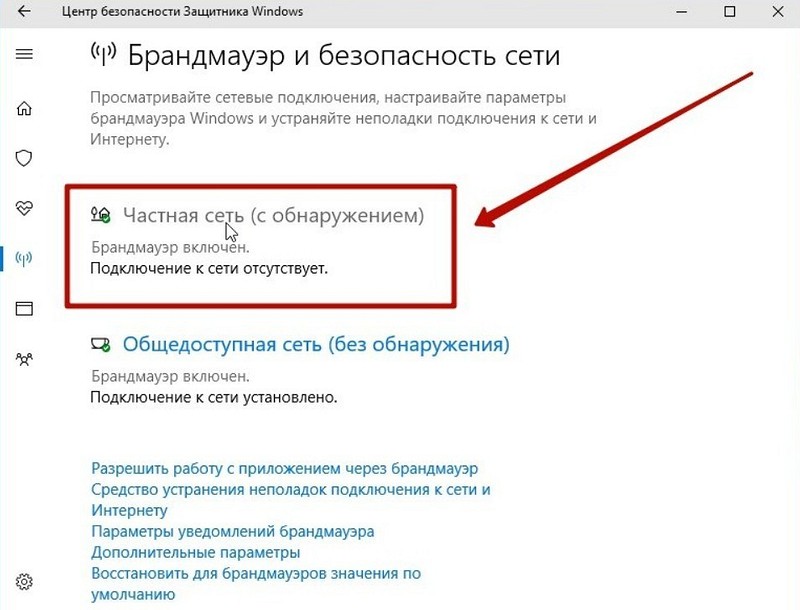
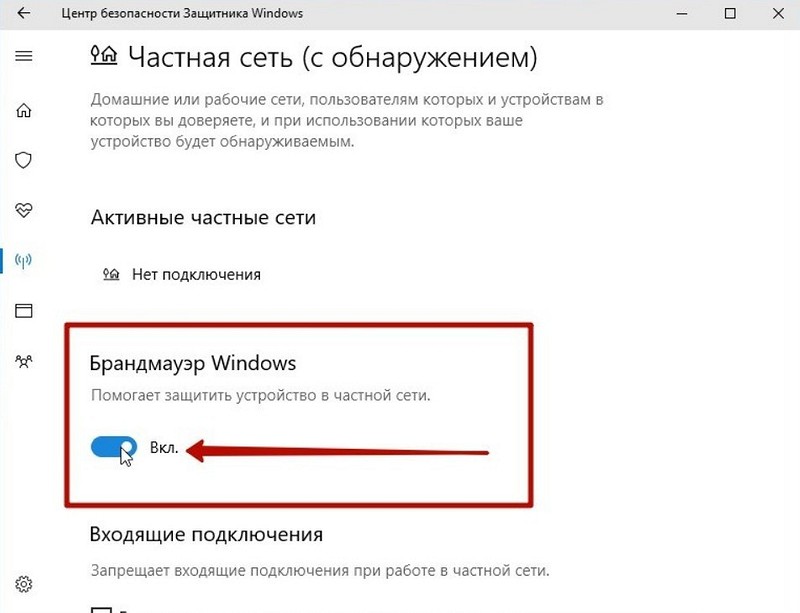
- Видим два типа сети. Нам предстоит отключить Защитник для обоих. Кликаем по «Частной сети».
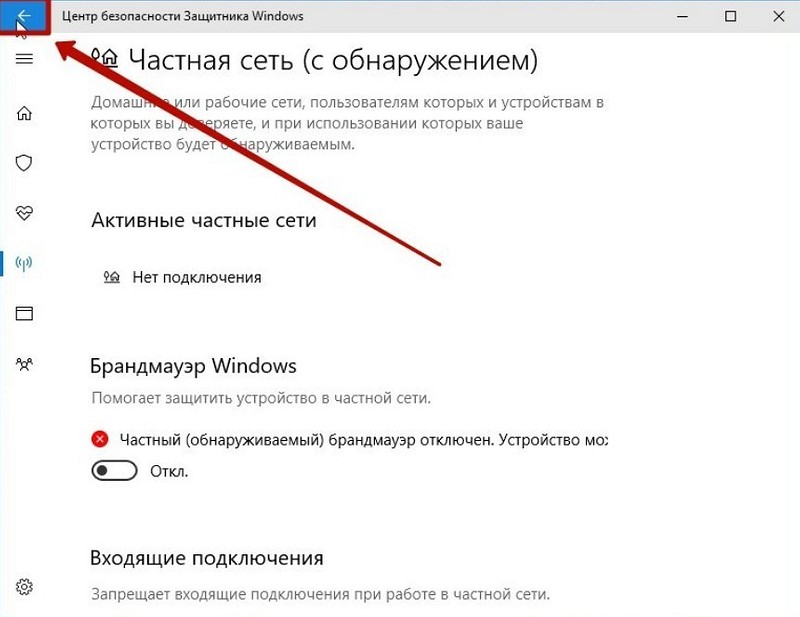
- Убираем бегунок в положение «Выкл».
- Выходим назад и повторяем то же самое для пункта «Общедоступная сеть».
Теперь пробуем запустить игру, которая выдавала ошибку «Система VAC не смогла проверить вашу игровую сессию». Если и этот способ не помог, то попробуем еще один.
5. Проверяем дату и время на ПК, перезапускаем роутер
Корректная работа античита VAC напрямую зависит от даты и времени, установленных на компьютере. Система проверяет, соответствуют ли эти данные вашему географическому положению. Если дата/время сбились, то настройте вручную. Далее выключаем роутер на 10 секунд. Потом включаем и пробуем запустить игру.
Все 5 способов на сегодня считаются самыми действенными. Столкнувшись с ошибкой «Система VAC не смогла проверить вашу игровую сессию», вы легко решите ее с помощью наших советов. Вряд ли кто-то дойдет до последнего способа. Также рекомендуем закрыть такие приложения, как CCleaner, Hypervisors, PowerShell и Sandboxie. По словам представителей Valve, эти приложения могут конфликтовать с программой VAC.
Что еще почитать?
- Window SmartScreen: как отключить мешающий работе фильтр
- Охлаждающие подставки для ноутбука: есть ли от них толк?
- Как повысить фпс в «Фортнайте»: только рабочие и безопасные методы
- Как повысить FPS в Counter Strike: Global Offensive? Рассмотрим основные рекомендации